1
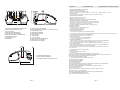
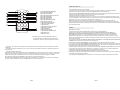
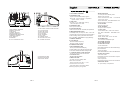
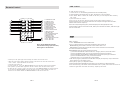
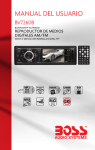
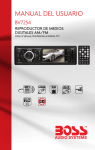
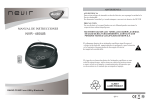
SY-990
MANUAL DE INSTRUCCIONES
CD/C
PLL SYN
THE
D-R/
MP3
U SB
FU NC
SIZ ER
P L AY
BAC
K
.
RE P.
TIM
E/
PR OG
.
PR
PR
SY-990
SY-9 90
Before connection operating or adjusting this product
Please read these instructions completely
Please keep this manual.
Before connection operating or adjusting this product
RADIO
PLL
P l e a s eFM
r e aESTÉREO
d t h e s e i n s tCON
r u c t i oSINTONIZACIÓN
ns completely
P l eREPRODUCTOR
a s e k e e p t h i s m a n uDE
a l . CD/MP3/AUX/USB
E-
DN
E-
UP
Conozca estos símbolos de seguridad
Desempaquetado y configuración
PRECAUCIÓN
Para el usuario
Introduzca a continuación el nº de serie, que está
en la parte inferior de la carcasa. Guarde esta
información para futuras consultas.
Modelo nº
Nº de Serie
RIESGO DE ELECTROSHOCK NO ABRIR
PRECAUCIÓN: PARA REDUCIR EL RIESGO DE ELECTROSHOCK, NO
QUITE LA CUBIERTA (O PARTE TRASERA). NO HAY PARTES QUE
USTED PUEDA
ARREGLAR EN SU INTERIOR. LLEVE EL APARATO A UN CENTRO
DE REPARACIONES CON PERSONAL CUALIFICADO.
Este rayo indica que hay material no
aislado en su unidad que puede provocar
electroshocks. Para su seguridad y la
de su hogar, no quite la carcasa del
producto.
El “signo de admiración” llama la
atención sobrecaracterísticas para
las que debe leer toda la documentación
para evitar problemas de uso y mantenimiento.
Advertencia sobre goteos:Este producto no se
debe exponer a goteos o salpicaduras y no se
deben colocar objetos llenos de líquido encima
del producto.
ADVERTENCIA: PARA EVITAR INCENDIOS O
CORTOCIRCUITOS,NO EXPONGA ESTE
EQUIPO A LA LLUVIA O A LA HUMEDAD.
PRECAUCIÓN: PARA EVITAR ELECTROSHOCK,
HAGA COINCIDIR LAS CLAVIJAS DEL ENCHUFE
CON LA TOMA DE CORRIENTE E INTRODUZCA
EL ENCHUFE TOTALMENTE.
Advertencia sobre ventilación:
No se debe impedir la ventilación
normal del aparato.
Saque cuidadosamente la unidad de la caja de cartón y quite
todo el material de empaquetado de la unidad.
Quite cualquier etiqueta descriptiva que pueda encontrar tanto delante como
en la parte superior de la unidad. No quite las etiquetas situadas en la parte
trasera o inferior de la unidad.
Presione el botón OPEN de la puerta para CD para abrir la tapa del compartimento de CD.
Encontrará una tarjeta blanca en el compartimento de CD colocada para evitar que el
compartimento se abra durante el envío del producto. Saque esta tarjeta del compartimento
para CD antes de su u
Fuente de energía
Utiliza corriente AC
1. Compruebe si el voltaje, mostrado en la placa situada en la parte inferior del
equipo corresponde con su suministro de corriente AC local. Si no es así, consulte
a su distribuidor o centro de reparaciones
2. Conecta el cable de alimentación al adaptador AC y a la toma de pared.
El suministroeléctrico ya está conectado y listo para su uso.
3. Para apagar la unidad completamente, desconecte el cable de alimentación de
la toma de pared.
Desconecte el cable de alimentación de la toma de pared para proteger su equipo
durante las tormentas eléctricas.
Pilas (no incluidas)
Abra el compartimento para pilas e introduzca seis pilas de tipo LR14, UM-2 o C,
(preferiblemente alcalinas) respetando la polaridad tal como se indica mediante los
símbolos "+" y "-" del interior del compartimento.
Las pilas contienen elementos químicos, por lo que se deben eliminar de forma responsable.
El uso incorrecto de las pilas puede causar fuga de electrolitos y corroer el interior del
compartimento o provocar que se quemen, por lo tanto:
No mezcle distintos tipos de pilas: p. ej. Alcalinas con zinc de carbono, utilice pilas del mismo
tipo para el equipo.
Cuando introduzca pilas nuevas, no mezcle pilas nuevas con las viejas.
Quite las pilas si no va a utilizar el equipo durante mucho tiempo.
ES-1
ES-2
Español
1
2
3
4
6
5
7
8
9
10
11 12 13
1
16 17 18
15
19 20
14
1 .ALTAVOZ IZQUIERDO Y DERECHO
2.BOTÓN REPETIR (REPEAT)
3.CLAVIJA USB
4.BOTÓN DE ENCENDIDO
5.SELECCIÓN DE FUNCIÓN
6.BOTÓN DE TIEMPO/PROGRAMA
7.SENSOR REMOTO
8.PANTALLA LCD
9.STANDBY
21 22
10.BOTÓN DE PLAY/PAUSA
11.BOTÓN OPEN/CLOSE DE LA PUERTA DE CD
12.BOTÓN DE STOP
13.BOTÓN SIGUIENTE
14.BOTÓN ANTERIOR
15.CLAVIJA AC
16.ANTENA FM
17.CLAVIJA AUX
18.CLAVIJA DE AURICULARES
19.BOTÓN DE VOLUMEN +
20.BOTÓN DE VOLUMEN -
23
21 .BOTÓN PRE-ABAJO
22.BOTÓN PRE-ARRIBA
23.COMPARTIMENTO PARA PILAS
ES-3
CONTROLES
SUMINISTRO ELÉCTRICO
1.ALTAVOZ IZQUIERDO Y DERECHO
2.BOTÓN REPETIR (REPEAT)
-Repite un programa de CD/MP3/USB
-Modo de reproducción: normal – repetir 1 – repetir todo – repetir 1 carpeta - normal
3.CLAVIJA USB
-Para escuchar su dispositivo USB con archivos musicales en MP3.
4.BOTÓN DE ENCENDIDO
-Presione para encender o apagar
5.SELECCIÓN DE FUNCIÓN
-Selecciona la fuente de sonido CD/USB/AUX/RADIO.
6.BOTÓN DE TIEMPO / PROGRAMA
-En el modo standby, para establecer el tiempo de la unidad.
-Programa y revisa los números de las pistas programadas.
-Durante la reproducción, presione este botón
en el modo CD/MP3/USB/RADIO para programar pistas.
7.SENSOR REMOTO
8.PANTALLA LCD
-Muestra la frecuencia del dial de FM.
-Muestra el número de pistas.
9. INDICADOR DE STANDBY
10. BOTÓN PLAY/PAUSA
-Inicia o pausa la reproducción de MP3/CD/USB.
-En el modo de radio, presione el botón play/pausa para entrar en el modo de cambio de canal.
11. BOTÓN OPEN/CLOSE DE LA PUERTA DE CD
-Presione para abrir/cerrar la puerta de CD.
12. BOTÓN DE STOP
- Detiene la reproducción de CD/MP3/USB.
- Cancela el programa preseleccionado.
13. BOTÓN SIGUIENTE
- Para establecer el tiempo, el modo standby y seleccionar la pista SIGUIENTE
- Mantenga presionado para avanzar rápidamente en una pista.
En el modo de radio, presione el botón SIGUIENTE para cambiar la frecuencia.
14. BOTÓN ANTERIOR
-Para establecer el tiempo, el modo standby y seleccionar la pista ANTERIOR
-Mantenga presionado para retroceder en una pista.
En el modo de radio, presione el botón ANTERIOR para cambiar la frecuencia.
15. CLAVIJA AC
-entrada para el cable de alimentación
16. ANTENA FM
- Para mejorar la recepción de FM.
17. CLAVIJA AUX
- Presione el botón FUNC para seleccionar la función AUX.
Reproduce dispositivos de MP3, DISCMAN, WALKMAN a través de la clavija AUX
Nota: Saque el disco antes de utilizar la función AUX
18. CLAVIJA PARA AURICULARES
- Clavija para auriculares en estéreo de 3,5 mm.
19. BOTÓN DE VOLUMEN +
20. BOTÓN DE VOLUMEN 21 BOTÓN PRE-ABAJO
- En el modo de radio
(Presione el botón PRE-ABAJO para seleccionar hacia atrás, principalmente,
los canales seleccionados).En el modo mp3
Presione el botón PRE-ABAJO para entrar en la carpeta anterior
22. BOTÓN PRE-ARRIBA
En el modo de radio
Presione el botón PRE-ARRIBA para seleccionar el siguiente canal
preseleccionado.-En el modo mp3
Presione el botón PRE-ARRIBA para entrar en la carpeta siguiente
23. COMPARTIMENTO PARA PILAS
- Para abrir el compartimento para pilas
ES-4
USO DEL RELOJ
1
4
2
3
5
8
9
12
7
6
11
10
13
16
14
15
17
19
18
1 .BOTÓN DE ENCENDIDO
2.BOTÓN DE TIEMPO
3.BOTÓN DE INTRO
4.BOTÓN DE SILENCIO (MUTE)
5.BOTÓN RANDOM
6.BOTÓN P-ARRIBA
7.BOTÓN REPETIR
8.BOTÓN DE PROGRAMA
9.BOTÓN ANTERIOR
10.BOTÓN DE FUNCIÓN
11.BOTÓN SIGUIENTE
12.BOTÓN EQ
13.BOTÓN DE PLAY/PAUSA
14.BOTÓN P-ABAJO
15.BOTÓN BBS
16.BOTÓN DE STOP
17.BOTONES NUMÉRICOS
18.BOTÓN VOL19.BOTÓN VOL+
NOTA (presione el BOTÓN INTRO durante
10 segundosEn el estado de navegación de
repertorio, vuelva a presionar para cancelar).
- Por favor, quite el trozo de plástico del compartimiento para pilas antes de utilizar el mando a
distancia.
- Cuando el mando a distancia no funcione o se acorte la distancia de uso, cambie las pilas por
unas nuevas.
- Uso del mando a distancia
Para utilizar el mando a distancia, diríjalo al SENSOR y presione los botones suave y firmemente.
El mando a distancia se puede utilizar en una distancia de unos 6 metros. Sin embargo, como la
distancia del mando a distancia es menor cuando la unidad se utiliza en ángulo, utilícelo
directamente delante del SENSOR, para obtener la máxima distancia.
No exponga el SENSOR a una luz intensa (luz solar directa o iluminación artificial) y asegúrese
de que no hay obstáculos entre el SENSOR y el mando a distancia.
ES-5
Para establecer la hora de la unidad
1.Conecte la corriente (la siguiente operación se debe realizar en el modo standby).
2.Presione el botón de tiempo, el tiempo parpadeará en la pantalla LCD.
3.Presione ANTERIOR-SIGUIENTE para seleccionar la hora/minuto/segundos del tiempo.
Puede configurar el tiempo tanto en modo de 12h como de 24h.
4.Presione el botón de tiempo para confirmar.
5.Después puede configurar la hora y los minutos con el mismo método de los pasos 3 y 4.
6. Para establecer la hora de la alarma, presione de forma prolongada el botón de tiempo para
establecer la hora, con el mismo método de los pasos 3 y 4.
Nota: Tras configurar el tiempo de comienzo, la pantalla LCD mostrará el modo de
radio/cd/usb/aux, presione el botón ANTERIOR o SIGUIENTE para seleccionar el modo,
después presione el botón de tiempo para confirmar. Por defecto, la unidad mostrará primero
el modo USB o AUX.
RADIO
Recepción de radio
1.Presione el botón de FUNCIÓN para seleccionar el modo RADIO.
2.Sintonice la emisora requerida presionando ATRÁS/SINTONIZACIÓN ABAJO o
SIGUIENTE/SINTONIZACIÓN ARRIBASintonización manual: Presione ANTERIOR o
SIGUIENTE y suéltelo en 1 segundo.Sintonización automática: Presione el botón de
play/pausa para entrar en el modo de búsqueda automática de canales y sintonizar las
emisoras automáticamente.Canales preseleccionados: Este equipo puede memorizar hasta
30 emisoras de FM.
(1) Presione el botón ANTERIOR/SINTONIZACIÓN ABAJO o SIGUIENTE/SINTONIZACIÓN
ARRIBA para sintonizar las emisoras manualmente.
(2)Presione el botón PROGRAMA y se mostrarán las emisoras preseleccionadas.
(3) Presione el botón PRE-ARRIBA o PRE-ABAJO para seleccionar la emisora preseleccionada.
(4) Presione el botón PROGRAMA para guardar la emisora de radio en la posición seleccionada.
(5) Repita el procedimiento para el resto de emisoras.
3.Tras finalizar la programación, presione el botón PRE-ARRIBA o PRE-ABAJO para comenzar
a reproducir la frecuencia que seleccionó o presione el número en el mando a distancia.
4.Presione los botones [VOL-] y [VOL+] para ajustar el volumen
5.Extienda la ANTENA TELESCÓPICA si está escuchando la radio FM
6.Apague la radio presionando el botón FUNC y seleccione otro modo o presione el botón de
encendido para apagar la unidad.
7.La frecuencia se guardará en la memoria una vez que se vuelva a encender la unidad.
ES-6
MÉTODO DE PROGRAMACIÓN
Reproducir un CD/MP3
(1) Presione el botón [PROGRAMA] en el modo STOP, el sistema entrará en el modo PROGRAMA.
- El icono PRG y P01 parpadearán en 2Hz. Esto indica al usuario que está entrando en la
primera canción de la lista de reproducción programada.
(2) El usuario puede seleccionar las pistas deseadas utilizando los botones [SIGUIENTE] y
[ANTERIOR].Una vez que se presionen estos botones, la pantalla mostrará la pista seleccionada.
(3) Tras seleccionar la pista deseada, vuelva a presionar el botón [PROGRAMA] y se guardará
en la memoria – se pueden programar un máximo de 99 pistas de MP3 y de 20 pistas de CD
repitiendo los pasos (2) y (3).
(4) Si presiona el botón [stop] durante el modo de programación, se guardarán las PISTAS
seleccionadas en la memoria y se volverá al modo de reproducción normal.
(5) Si presiona el botón [play] durante el modo de programación, comenzará el modo de
reproducción.
La reproducción comenzará desde la pista P01.
BORRAR UN PROGRAMA
Puede borrar el contenido de la memoria
- Durante la reproducción, presione el botón STOP dos veces.
- Por abrir la puerta del compartimiento de CD
- Seleccionando otro modo de reproducción.
USO DE AUX
Para escuchar la música con un mp3, Discman o Walkman.
1. Conecte la unidad con un cable a la salida AUX.
2. Cambie el modo de reproducción a AUX para reproducir
la música a través de la unidad.
- Presione el control de volumen para ajustarlo.
- La unidad no puede controlar el reproductor.
Este reproductor de CD puede reproducir Discos de audio, CD-R de MP3, no intente reproducir
CD-ROM, CDi, VCD, DVD o CD de datos.
1.Cambie la función al modo CD.
2.Para abrir la puerta de CD, presione el botón OPEN.
3.Introduzca un MP3/CD o CD-R con la cara impresa hacia arriba y presione el botón de CD
suavemente para cerrar.
4.Presione el botón PLAY/PAUSA para detener la reproducción.
5.Presione el botón de PLAY/PAUSA para pausar, vuelva a presionar el botón PLAY/PAUSA
para reproducir.
6.Presione el botón STOP para detener la reproducción del CD.
Nota: La reproducción de CD/MP3 también se puede detener cuando:
- Abre el compartimento de CD:
- Selecciona la fuente de sonido de radio;
- El CD/MP3 llega a su final.
Seleccionar una pista diferente
Durante la reproducción puede utilizar los botones anterior y siguiente para seleccionar una
pista en particular.Si ha seleccionado un número de pista en la posición de stop o de pausa,
presione play para comenzar a reproducir.
Presione el botón siguiente una vez brevemente para la siguiente pista, o presiónelo
repetidamente hasta que aparezca el número de la pista deseada en la pantalla.
Presione el botón anterior brevemente para volver al comienzo de la pista actual.
Presione el botón anterior más de una vez para ir a una pista anterior.
Mantenga presionado el botón anterior o siguiente para rebobinar o avanzar
rápidamente una pista.
2. Cuando desea parar, suelte el botón anterior o siguiente y la pista reproducirá
desde el lugar donde ha parado.
Diferentes modos de reproducción:
Repetir – reproduce la pista actual continuamente.
Repetir todo – reproduce el CD completo continuamente.
Presione el botón de aleatorio para reproducir las pistas aleatoriamente.
Reproducir un USB
Funciones de audio USB
1) Cambie la función al modo USB.
2 PLAY/PAUSA
3) SIGUIENTE, ANTERIOR para saltar de pista
4) Pista programada (99 pistas para MP3 y 20 pistas para CD)
5) MODO DE REPRODUCCIÓN: normal – repetir 1 – repetir todo – repetir 1 carpeta - normal
6) Máximo de carpetas: 99 carpetas
7) Máximo de archivos: 999 archivos
Nota:
- Cuando la unidad no tenga ningún disco insertado, el reproductor leerá automáticamente de
la clavija USB.
- La unidad no admite discos duros externos.
Nota: Cuando este en el modo CD/MP3/USB, la pantalla LCD mostrará el número de
canciones o el tiempo de reproducción de la canción.
Cuando este en el modo AUX, la pantalla LCD mostrará el símbolo AUX o la hora.
ES-7
ES-8
RESOLUCIÓN DE PROBLEMAS
MANTENIMIENTO Y SEGURIDAD
Precauciones y mantenimiento general
Coloque el aparato sobre una superficie dura y plana para que se vuelque.
No exponga el aparato, las pilas o los CD a humedad, lluvia, arena o calor excesivo causado
por equipos de calor o luz solar directa.
No cubra el aparato Es necesaria una adecuada ventilación con un espacio mínimo de 6
pulgadas entre las ranuras de ventilación y las superficies circundantes para evitar el sobrecalen
tamiento.Las partes mecánicas de este aparato contienen engranajes auto-lubricantes y no
necesitan ser lubricados.Para limpiar el aparato, utilice un paño suave seco. No utilice agentes
limpiadores que contengan alcohol, amoniaco, benceno o abrasivos, ya que
pueden dañar la carcasa.
Resolución de problemas
Si se produce un fallo, compruebe primero los puntos enumerados a continuación antes de
llevar el aparato a reparar.No abra el aparato ya que existe riesgo de electroshock.
Si no es capaz de solucionar un problema siguiendo estos consejos, consulte a su distribuidor
o centro de reparaciones.
ADVERTENCIA: En ninguna circunstancia debe intentar reparar el aparato usted mismo,
ya que esto anularía la garantía.
- -Problema
·Solución
Sin sonido / energía
- - Volumen no ajustado
· Ajuste el VOLUMEN
--El cable de alimentación no está bien conectado
·Conecte el cable de alimentación AC adecuadamente
--Pilas agotadas/mal colocadas
·Inserte pilas (nuevas) correctamente
La pantalla no funciona adecuadamente/No
reacciona ante la operación de cualquiera de los controles
-- Descarga electroestática
·Apague y desconecte el aparato. Vuelva a conectar tras
unos segundos
Indicación “no disc”
- No se ha introducido un CD/MP3
Introduzca un CD, MP3, CD-R
Reproductor de CD y manejo de CD
¡No se debe tocar nunca la lente del reproductor de CD!
Los cambios bruscos de temperatura pueden provocar condensación y se puede nublar la lente
de su reproductor de CD. En ese momento no se pueden leer CD. No intente limpiar la lente,
deje el aparato en un lugar templado hasta que se evapore la humedad.
Cierre siempre la puerta de CD para mantener el compartimento libre de polvo. Para limpiarlo,
utilice un paño suave y seco.
Para limpiar el CD, realice movimientos rectos desde el centro hacia el borde utilizando un
paño suave y sin pelusas. No utilice agentes limpiadores ya que pueden dañar el disco.
Nunca escriba sobre un CD o le ponga pegatinas.
- CD rayado o sucio
Reemplace/limpie el CD, consulte Mantenimiento
- El CD-R está en blanco o no está terminado
Utilice un CD-R terminado
La reproducción de CD/MP3/USB no funciona
-CD/MP3/USB rayado o sucio
·Reemplace p limpie el CD/MP3/USB
(consulte Mantenimiento)
- Lente con vapor
·Espere a que la lente se haya ajustado a la temperatura ambiente
El CD/MP3 se salta pistas
- - CD/MP3 rayado o sucio
·Reemplace o limpie el CD/MP3
- -El programa está activo
·Salga del modo de programa
Información medioambiental
Hemos empleado todos nuestros esfuerzos en reducir el empaquetado y facilitar su separación
en 3 materiales: Cartón, pulpa de papel y polietileno expansible.
Su aparato está formado por materiales que se pueden reciclar si es desmontado por una
empresa especializada.
Siga las normativas locales referentes a la eliminación del empaquetado, las pilas agotadas y
los equipos viejos.
ES-9
ES-10
ESPECIFICACIONES TÉCNICAS
GENERAL
Requisito energético
AC:110/220V~50/60Hz
Consumo energético
AC:13.5 vatios
Dimensiones
Aprox:215mm(L)x208mm(W)x113mm(H)
Temperatura de uso
+5℃- + 35℃
SECCIÓN RECEPTORA
Bandas receptoras
FM ST.
Rango de sintonización
FM:88-108MHz
SECCIÓN DE DISCO COMPACTO
Lectura óptica
Láser de 3 haces
Frecuencia de respuesta
100Hz-16KHz
SECCIÓN DE AUDIO
Salida energética
Máximo 1 vatio x 2
Impedancia del auricular
4 ~ 32 Ohmios
ACCESORIOS
Folleto de instrucciones
1
Mando a distancia
1
Cable de alimentación AC
1
DECLARACION DE CONFORMIDAD
Importador: Satyatrade S. L.
Dirección: Pol. Ind. La Raya. C/ Guadalquivir, 2.
Camarma de Esteruelas, 28816 Madrid
Tel: 902 430 967
Fax: 91 8864285
NIF: B83254763
País de origen: China
Sytech® SY-990
Declaramos bajo nuestra propia responsabilidad que el producto cumple las siguientes directivas:
Directiva 1999/5/EC del Parlamento Europeo y del Consejo de 9 de marzo de 1999
EMC Estándar: Directiva 2004/108EC
Firmado: Ajeet Nebhwani Utamchandani
Administrador único
ES-11
ES-12
SY-990
INSTRUCTION MANUAL
CD/C
PLL SYN
THE
D-R/
MP3
U SB
FU NC
SIZ ER
P L AY
BAC
K
.
RE P.
TIM
E/
PR OG
.
PR
PR
SY-990
SY-9 90
Before connection operating or adjusting this product
Please read these instructions completely
Please keep this manual.
Before connection operating or adjusting this product
completely
Please keep this manual.
FM STEREO RADIO WITH PLL TUNING
P l e a s e r e a d t hPLAYER
ese instructions
CD/MP3/AUX/USB
E-
DN
E-
UP
PREPARATION FOR USE
For Customer Use
Enter below the Serial No. which is located
On the bottom of the cabinet. Retain this
Information for future reference.
Unpacking and Setup
Mode No.
Serial No.
* Carefully remove the unit from the display carton and remove all packing material from the unit itself.
* Remove any descriptive labels that may be found on either the front or top cabinet of the unit. Do not
remove any labels located on either the back or button cabinet of the unit.
* Press the CD door OPEN Button to open the CD compartment door. There is a white card in the CD
compartment which is intended to prevent the CD pickup from moving during shipment of the product,
Remove this card from the CD compartment before use.
Using AC power
1.Check if the power voltage, as shown on the type plate located on the bottom of the set,
corresponds to your local AC power supply. If it does not , consult your dealer or service centre.
2.Connect the power cord to the AC socket inlet and the wall outlet. the power supply is now
connected and ready for use.
3.To switch off completely, unplug the power cord from the wall outlet.
Unplug the power cord from the wall outlet to protect your set during heavy thunderstorms.
Batteries (not included)
Open the battery compartment and insert six batteries, type LR14, UM-2 or C-cells,
,,
,,
(preferably Alkaline) with the correct polarity as indicated by the + and - symbols
,,
,,
inside the compartment
Batteries contains chemical substances, so they should be disposed of properly.
Incorrect use of batteries can cause electrolyt leakage and will corrode the compartment or
cause the batteries to burst. Therefore:
Do not mix battery types: e.g. alkaline with carbon Zinc. Only use batteries of the same
type for the set.
When inserting new batteries, do not try to mix old batteries with new ones.
Remove the batteries if the set is not be used for a long time.
EN-2
1
1
2
3
4
6
5
7
8
9
10
11 12 13
1
15
16 17 18
19 20
14
11. CD DOOR OPEN/CLOSE BUTTON
12. STOP BUTTON
13. NEXT BUTTON
14. BACK BUTTON
15. AC SOCKET
16. FM ANTENNA
17. AUX JACK
18.PHONES JACK
19. VOLUME+ BUTTON
20. VOLUME- BUTTON
1.LEFT& RIGHT SPEAKER
2.REPEAT BUTTON
3. USB JACK
4. POWER BUTTON
5.FUNCTION SELECT
6.TIME/PROGRAM BUTTON
7. REMOTE SENSOR
8. LCD DISPLAY
9. STANDBY
10.PLAY/ PAUSE BUTTON
21 22
23
21.PRE-DN BUTTON
22.PRE- UP BUTTON
23.BATTERY DOOR
EN-3
14.BACK BUTTON
-To setup the time standby state
BACK track selection.
- Press and hold more than 1.5 sec BACK
search intra track.
1. LEFT&RIGHT SPEAKER
2. REPEAT BUTTON
- repeat a track/CD/MP3/USB program.
- play mode : normal->repeat 1->repeat all->
repeat 1 folder ->normal
3. USB JACK
-To listen to your USB flash memory
stick with Mp3 music files.
4. POWER BUTTON
-Press power button on.
5. FUNCTION SELECT
-select source of sound CD/USB /(AUX)/RADIO.
6.TIME/PROGRAM BUTTON
-In the radio mode , Press BACK button will
-In standby mode, to setup the time of the unit.
-program and review programmed track numbers.
-In the working status, push down this button
can on CD/MP3 / USB/RADIO for programming.
7.REMOTE SENSOR
8. LCD DISPLAY
- show the FM dial frequency.
- show the number of tracks.
9. STANDBY INDICATOR
10.PLAY/PAUSE BUTTON
- start or pause MP3/CD/USB play
tuning frequency to low-end.
15.AC SOCKET
- inlet for power cord.
16.FM ANTENNA
-to improve FM reception.
17.AUX JACK
-Push FUNC button , select AUX station.
play MP3、DISCMAN、 WALKMAN AUX
insert.
insert when no disc.
NOTE:Please take out the CD disc.
18.PHONES JACK
- 3.5 mm stereo headphone jack.
19.VOLUME+ BUTTON
20.VOLUME- BUTTON
21.PRE-DN BUTTON
- In the radio mode
(Press PRE-DN button to select backward, primary
-In radio mode, press the play/pause button
pre-set channel.
enter the automatic channel surfing mode.
11.CD DOOR OPEN/ CLOSE BUTTON
- press here to open/close the CD door.
12. STOP BUTTON
- cancel preset program
13.NEXT BUTTON
-To setup the time standby state
NEXT track selection.
- Press and hold more than 1. 5 sec
forward search intra track.
- In the radio mode, Press NEXT button
will tuning frequency to high-end
-In the mp3 mode
Press PRE-DN button to enter the backward folder
22.PRE-UP BUTTON
-In the radio mode
Press PRE-UP button to select the next primary
pre-set channel.
-In the mp3 mode
Press PRE-DN button to enter the forward folder
23.BATTERY DOOR
-to open battery compartment
EN-4
USE CLOCK
Remote Control
to setup the time of the unit
1.connect the ac on( The following operation must be in standby mode) .
1
4
2
3
5
8
9
12
7
6
11
10
13
16
14
15
17
19
18
1.POWER BUTTON
2. TIME BUTTON
3.INTRO BUTTON
4.MUTE BUTTON
5.RANDOM BUTTON
6.P-UP BUTTON
7.REPEAT BUTTON
8.PROGRAM BUTTON
9.BACK BUTTON
10.FUNCTION BUTTON
11.NEXT BUTTON
12.EQ BUTTON
13.PLAY/PAUSE BUTTON
14.P-DOWN BUTTON
15.BBS BUTTON
16.STOP BUTTON
17.NUMBER KEY BUTTON
18.VOL- BUTTON
19.VOL+BUTTON
2. short according to the time button, the time will flashing on the lcd display.
3. Press BACK、NEXT to select the number of the time. you can setup the time format by
12h or 24h.
4. press time button to confirm.
5. then you can set the hour and the minute with the same method of steps 3-4.
6.(setup the alarm time, long press the time button can setup the unit begin alarm time mode,
with the same method of steps 3-4).
Note: after setup the beginning time, the lcd will display the radio/cd/usb/aux mode,
Press the BACK or NEXT to choose the mode, then it press time button to affirm, otherwise it play
usb or aux mode first.
Radio reception
Note: (Press INTRO BUTTON into
10 seconds browsing repertoire state,
Press again to cancel browse
* Please pull out the plastic paper from the battery door before use the remote contro
* When the remote control operation becomes unstable or the distance from which the remote control
works is shorter. replace the batteries with new ones.
* Using the remote control unit
To use the remote unit, point at the REMOTE SENSOR and press the buttons gently and firmly. Remote
control operation is possible within approximate 18ft(6m).However, since the remote control range is
less when the unit is used at an angle, use directly in front of the REMOTE SENSOR, for maximum distance.
Do not expose the REMOTE SENSOR to strong light(direct sunlight or artificial lighting) and make sure
that there are no obstacles between the REMOTE SENSOR and the remote control unit.
EN-5
1. Press FUNCTION button select RADIO mode .
2.Tune to required station by press BACK/TUNE DN or NEXT/ TUNE UP
Manual Tuning: Press BACK or NEXT and then release within 1 sec.
Auto Tuning: Press the play/pause button enters into the automatic scan channel and
to be enter the station automatically.
Preset Channel:(FM only Preset 30 station memories)
(1) Press BACK/TUNE-DN or NEXT/TUNE-UP to tuning by manual , select radio station
(2) Press PROGRAM button, The pre-set program begins steady in the display).
(3) Press PRESET-UP OR PRESET- DOWN buttons to select the primary pre-set station
(4) Press PROGRAM button to save you select that stations
(5) Repeat steps (1) to (2) procedures for other stations.
3.After end of program. press PRE-UP or PRE-DN to start play the frequency that you selected or
Press number key on the remote control
4. Press [VOL-]or [VOL +] to adjust the volume.
5.Extend TELESCOPIC ANTENNA to its full length if you are listening to FM broadcasting.
6.Turn off the radio by press FUNC button select other mode or press power button to off the unit.
7.Switch on again after shut down,the memory frequency still exists.
EN-6
PROGRAM METHOD
CD/MP3 PLAYER
(1)Press the [PROGRAM] key at STOP mode, system will go to PROGRAM mode.
-The PRG icon and P01 will blink at 2Hz. This prompts the user to enter the first songs in the
program PLAY list.
(2)The user can select the desire tracks by using [NEXT], [BACK] keys.
Once these keys are pressed, the Display will show the selected track.
(3)After select the desired track, press [PROGRAM] key again and it will be stored in the memory.
Mp3 Maximum 99 and CD Maximum 20 tracks can be programmed when Repeat
steps (2) to (3) procedures.
(4)If press the [STOP] key during the program mode, then the selected TRACKs will be stored
in the memory and return to STOP mode (Continuous Play mode)
(5)If press the [PLAY] key during the program mode, it will start the program PLAY mode.
PLAY start from P01 Track
Erasing a program
You can erase the content of the memory by:
- While playing, press STOP button twice.
- Opening the CD door
- Select the other mode.
USE AUX
To listen music with a mp3、discman、walkman .
1.Connect to the AUX .
2.press function selector to AUX, with connector cable plug-in the AUX
jack the sound source of the mp3 Or Discman or walkman will output from the unit
- Press the volume control to adjust the volume.
-The unit can' t control the player.
EN-7
CD/MP3 Player
Playing a CD/MP3
This CD-player can play Audio Discs,MP3 CD-R.
Do not try to play CD-ROM,CDi,VCD,DVD or
computer CD.
1. Press function button to CD state.
2.to open the cd door, press cd open button.
3.insert a mp3/cd or cd-r、with the printed side
facing up and press cd door gently to close.
4.press play/pause on the set to start playback.
5.Press the pause button to pause , press the
play button play again.
6.to stop cd playback , press stop.
note: cd/mp3 play will also stop when:
-you open the cd compartment;
-you select radio sound source;
-the cd/mp3 has reached to the end.
selecting a different track.
during playback you can use back or next to
select a particular track.
if you have selected a track number in the
stop or pause position, press play to start
playback.
Press next once briefly for the next track,
or press repeatedly until the desired track
number appears in the display.
Press back once briefly to return to the
beginning of a current track.
Press back more than once briefly for a
previous track.
Press & hold down back or next, The cd is
played at high speed play
finding a passage within a track
1.Press and hold down back or next.
the cd is played at high speed play.
2.when you recognize the passage you want
release back or next.
normal playback resumes.
different play modes:repeat
repeat-play the current track continuously.
repeat all-plays the entire cd continuously.
playing tracks in random order after press
the random button, the tracks will be played
in random order.
Playing a USB
USB Audio functions
1)press function button or stop usb button to
choose the usb state.
2) PLAY/PAUSE
3) NEXT, BACK Skip search
4) Program Track(MP3 99 Track CD 20 Track )
5) PLAYMODE : normal->repeat 1->repeat all->
repeat 1 folder ->normal
6) Maximum Folder : 99 Folders
7) Maximum File : 999 Files
*Notice :
-When the unit has not the disc, inserting the
usb card will automatically real usb card,
it read the USB first while having the USB.
-The unit don' t support the HDD all and the
portion usb with mp3 player.
Note: at the mode of CD/MP3 / USB ,the lcd will
display the number of song or the song playing time.
if at the mode of aux, the lcd will display the
symbol of aux or the unit time.
EN-8
CD/MP3/ USB playback does not work
CD/MP3/ USB badly scratched/dirty
Replace/clean CD/MP3/ USB
(see maintenance)
The CD/MP3 skips tracks
CD/MP3 damaged or dirty
Replace or clean CD/MP3
No CD/MP3 inserted
Insert a CD,MP3, CD-R.
- CD-R、is blank or the disc is
not finalized
Use a finalized CD-R.
EN-9
EN-10
TECHNICAL SPECIFICATIONS
GENERAL
Power Requirement
AC:110/220V~50/60Hz
Power consumption
AC:13.5 Watts
Dimensions
approx:215mm(L)x208mm(W)x113mm(H)
Operation temperature
+5℃-+ 35℃
RECEIVER SECTION
Receiving Bands
FM ST.
Tuning Range
FM:88-108MHz
COMPACT DISC SECTION
Optical Pickup
3-Beam laser
Frequency Response
100Hz-16KHz
AUDIO SECTION
Power output
Maximum 1 Wattx2
Headphone Impedance
4~32 Ohms
ACCESSORIES
Instruction Booklet
1
Remote control
1
Ac line cord
1
EN-11