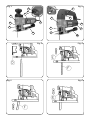
1
MANUAL DE INSTRUCCIONES
OPERATING INSTRUCTIONS
MODE D’ EMPLOI
GEBRAUCHSANWEISUNG
MANUALE D’ISTRUZIONI
MANUAL DE INSTRUÇÕES
ИНСТРУКЦИЯ ПО ЭКСПЛУАТАЦИИ
SC134L / SC234L
Sierra de Calar
Jig Saw
Scie sauteuse
Stichsäge
Seghetto alternativo
Serra tico tico
Электролобзик
MANUAL DE INSTRUCCIONES
OPERATING INSTRUCTIONS
MODE D'EMPLOI
GEBRAUCHSANWEISUNG
MANUALE D'ISTRUZIONI
MANUAL DE INSTRUÇÕES
ИНСТРУКЦИЯ ПО ЭКСПЛУАТАЦИИ
página/page
Seite/pagina
страница
ESPAÑOL
Sierras de calar SC134L • SC234L
2
ENGLISH
SC134L • SC234L Jig saw
5
FRANÇAIS
Scie sauteuse SC134L • SC234L
7
DEUTSCH
Stichsäge SC134L • SC234L
10
ITALIANO
Seghetto alternativo SC134L • SC234L
13
PORTUGUÉS
Serra tico tico SC134L • SC234L
16
РУССКИЙ
Электролобзик SC134L • SC234L
19
ESPAÑOL
SIERRA DE CALAR SC134L-SC234L
(Ver imágenes pag. 23, 24, 25)
Importante
Antes de utilizar la máquina lea atentamente éste MANUAL DE INSTRUCCIONES
y el FOLLETO DE INSTRUCCIONES GENERALES DE SEGURIDAD que se adjunta.
Asegúrese de haberlos comprendido antes
de empezar a operar con la máquina.
Conserve los dos manuales de instrucciones para posibles
consultas posteriores.
1. INSTRUCCIONES DE SEGURIDAD PARA
EL MANEJO DE LA SIERRA
Lea atentamente el FOLLETO DE INSTRUCCIONES GENERALES DE SEGURIDAD
que se adjunta con la documentación de
la máquina.
1. Asegúrese antes de conectar la máquina, que la tensión
de alimentación corresponde con la indicada en la chapa
de características.
2. Antes de comenzar a serrar elimine de la madera
2
cualquier clavo u objeto metálico.
3. No utilice hojas de sierra deformadas o rotas. Asegúrese
de se encuentran bien afiladas y que tengan los dientes
en perfecto estado.
4. No utilizar hojas de sierra que no se correspondan con
las características indicadas en éste manual.
5. Desconecte la máquina de la red eléctrica antes de
cambiar la hoja o realizar cualquier reglaje o manipulación en la misma.
2. CARACTERÍSTICAS TÉCNICAS
MODELO SC134L (sin empuñadura de agarre)
Potencia...............................................................550W
Carreras por minuto................................300-3200/min
Espesor de corte máximo en madera.....................80 mm
Capacidad de inclinación de la base...........................0º-45º
Velocidad regulable....................................................Si
Sistema de fijación rápido.....................................................Si
Movimiento pendular...................................3 posiciones
Peso.............................................................................2,1Kg
Nivel de Presión acústica Ponderado A.................84 dBA
Nivel de Potencia acústica Ponderada A..............95 dBA
Incertidumbre de la medición.............................K = 3 dBA
¡Usar protectores auditivos!
Nivel total de emisión de vibraciones.........ah: 6,9 m/s2
Incertidumbre de la medición............................K: 1,5 m/s2
MODELO SC234L (con empuñadura de agarre)
Potencia..........................................................................550W
Carreras por minuto...............................300-3200/min
Espesor de corte máximo en madera.................80 mm
Capacidad de inclinación de la base............................0º-45º
Velocidad regulable...................................................Si
Sistema de fijación rápido..................................................Si
Movimiento pendular.............................................3 posiciones
Peso............................................................................2,.2 Kg
Nivel de Presión acústica Ponderado A.................84 dBA
Nivel de Potencia acústica Ponderada A..............95 dBA
Incertidumbre de la medición.............................K = 3 dBA
¡Usar protectores auditivos!
inferior con lo que la hoja quedará fijada y bloqueada
(Fig. 6)
Antes de iniciar el trabajo volver a montar la posición
transparente D (Fig. 7).
Para desmontar la hoja de sierra, primeramente debe
quitarse la protección transparente D (Fig. 8).
A continuación colocar el botón de bloqueo E en su
posición más elevada y tirar de la hoja de sierra F hacia
abajo (Fig. 9). El botón de bloqueo E volverá automáticamente a su posición inicial.
Por último colocar el protector transparente D (Fig.
10)
La sierra caladora va equipada con dos
pantallas de protección, como se muestra
en las figuras 14 y 15.
Nivel total de emisión de vibraciones.........ah: 6,9 m/s2
Incertidumbre de la medición............................K: 1,6 m/s2
3. EQUIPO STANDARD
1. Juego de 3 hojas de calar variadas (madera y metal)
2. Guía de corte antiastillas
3. Tobera para conexión a un aspirador
4. Protector contra el vuelo de virutas
5. Llave hexagonal de servicio.
6. Patín anti-rayaduras.
La pantalla protección mostrada S (Fig. 14) esta diseñada para un trabajo sin polvo y debe ser utilizada
solamente con la máquina conectada a un aspirador
de polvo externo.
Para cortes inclinados deberá utilizarse solamente la
pantalla protección mostrada T (Fig. 15), nunca la pantalla
protección S (Fig. 14).
4. CONEXIÓN ELECTRICA Y PUESTA EN MARCHA
La tensión de alimentación debe corresponder con la
indicada en la etiqueta de características
MODELO SC134L
Para la puesta en marcha de la máquina mantener
accionado el pulsador A (Fig. 1). Si se desea realizar un
trabajo continuo, accionar y bloquear el pulsador en
su posición final.
Para parar la máquina soltar el pulsador A (Fig. 1).
MODELO SC234L
Para la puesta en marcha de la máquina mantener
accionado el pulsador B (Fig. 2). Si se desea realizar
un trabajo continuo, bloquear el pulsador mediante el
botón C (Fig. 2). Para parar la máquina desbloquear el
pulsador B mediante el botón C.
5. MONTAJE Y CAMBIO DE LA HOJA
DE SIERRA (Figs. 3 a 10)
Para montar la hoja de sierra, en primer lugar debe
quitarse la protección transparente D (Fig. 3).
Una vez quitada la protección transparente, colocar el
mecanismo de fijación rápida E en su posición más elevada
y poner la hoja de sierra F en la ranura del mecanismo
de fijación (Fig. 4).
A continuación introducir la hoja de sierra F hasta que
el diente quede sujeto por el mecanismo de fijación
(Fig. 5).
Por ultimo colocar el botón de bloqueo E en su posición
6. AJUSTE DEL MOVIMIENTO PENDULAR
El uso del movimiento pendular permite obtener el
máximo de eficacia en el corte. La selección y puesta en
marcha del sistema de pendulación se hace por medio
de la palanca G (Figs. 1-2). Las posiciones recomendadas para cada tipo de material se indican en la placa
H (Figs. 1-2).
Las Sierras Caladoras SC134L-SC234L permiten realizar
la selección de cada una de las posiciones de pendulación
incluso con la máquina en marcha.
7. AJUSTE DE LA VELOCIDAD DE CORTE
La velocidad de corte puede ser regulada con precisión
mediante la rueda I desde la posición A hasta la posición G (Fig. 1 para SC134L y Fig. 2 para SC234L). Esta
opción le permite trabajar con la opción ideal según el
material a serrar.
La posición recomendada para cada tipo de material
es:
MATERIAL
MADERA
ACERO
ALUMINIO
GOMA
CERAMICA
POSICION DEL REGULADOR
G
D-E
E
B-C
A-C
Estas posiciones vienen también indicadas en la placa
H (Figs. 1-2)
3
8. ENTRADA DEL CORTE SIN TALADRO (Fig. 11)
Poner la máquina, con el canto delantero de la base sobre
la pieza, y presionar suavemente hacia abajo.
Colocar la palanca G (Fig. 11) de la posición oscilante
en el punto "O".
9. REGULACION DE LA BASE (Fig. 12)
Aflojar el tornillo K (Fig. 12) mediante la llave hexagonal
incluida en el equipo estándar. Tirar de la base J hacia
atrás y ajustarla al ángulo deseado (0º, 15º, 30º o 45º),
volver la base a su posición inicial y fijarla nuevamente
con el tornillo K. Para fijar ángulos intermedios es
necesario hacerlo con la base hacia atrás.
10. GUIA DE CORTE ANTIASTILLAS (Fig. 12)
La guía de corte antiastillas L (Fig. 12) puede ser empleada
únicamente con la base a 0º.
11. PRECAUCIONES PARA EL SERRADO
Para el serrado de metales, aplicar sobre la hoja de sierra
algún producto para su lubrificación y refrigeración.
En caso de cortar chapas finas de metal es conveniente
fijar la chapa en un soporte de madera para que el
corte sea más fino.
Antes de penetrar la hoja de sierra en una pared o techo,
asegúrese que no haya empotrados cables eléctricos.
Sostenga siempre la máquina por las partes de sujeción
que estén aisladas.
12. CONEXIÓN A UN ASPIRADOR
La máquina puede ser conectada fácilmente a nuestros
aspiradores VIRUTEX AS182K y AS282K, a través de la
tobera M (Figs. 1-2), mediante el kit refs. 6446073 o
1746245.
Para desmontar la tobera, presionar la pestaña de fijación
N y tirar de la tobera hacia atrás. (Fig. 13)
13. MANTENIMIENTO CAMBIO DE ESCOBILLAS
Cambie las escobillas cuándo la longitud del carbón sea
inferior a 5 mm. En el modelo SC134L afloje los tornillos
O y extraiga la parte trasera de la carcasa P (Fig. 1). Las
escobillas serán fácilmente visibles. Soltar el muelle de
sujeción, desconectar la conexión y extraer el carbón.
Reemplazar las escobillas en sentido inverso.
Para el modelo SC234L, afloje los tornillos Q y extraiga
las tapas laterales R (Fig. 2) y proceda de la misma forma
que la explicada para el modelo anterior.
14. ENGRASE
(a realizar por el servicio técnico oficial)
No se deben aflojar los tornillos del cabezal de engranaje
durante el periodo de garantía, de lo contrario se perdería
el derecho de la misma.
4
La grasa debe renovarse una vez transcurridas 1.500
horas de funcionamiento.
15. ACCESORIOS OPCIONALES
3445406 Escuadra guía lateral / compás.
8200010/200- Aspiradores AS182K/AS282K
6446073 Acoplamiento aspiración
1746245 Acoplamiento aspiración estándar 5 m.
16. HOJAS DE SIERRA OPCIONALES
(juego de 5 unidades)
3440163 Paquete sierras de calar (acero al carbono) (Para
madera blanda y dura, contrachapado y aglomerado
hasta 80 mm)
3440164 Paquete sierras de calar (acero al carbono) (Para
madera blanda y dura, contrachapado y aglomerado hasta
80 mm, Fibras aislantes y plásticos flexibles)
3440165 Paquete sierras de calar (acero rápido) (Para
hierro y acero dulce hasta 5 mm, Melamina y fibras sintéticas hasta 8 mm, metales no férreos hasta 20 mm)
3440166 Paquete sierras de calar (acero rápido) (Para
hierro y acero dulce hasta 5 mm, metales no férreos hasta
20 mm, melamina y fibras sintéticas hasta 10 mm)
3440167 Paquete sierras de calar (acero al carbono) (Para
madera blanda y dura, aglomerado hasta 80 mm).
3440169 Blister de 3 hojas sierra de calar variadas
(madera y metal).
17. NIVEL DE RUIDO Y VIBRACIONES
Los niveles de ruido y vibraciones de esta herramienta
eléctrica han sido medidos de acuerdo con la Norma
Europea EN60745-2-11 y EN 60745-1 y sirven como
base de comparación con máquinas de semejante
aplicación.
El nivel de vibraciones indicado ha sido determinado
para las aplicaciones principales de la herramienta,
y puede ser utilizado como valor de partida para la
evaluación de la exposición al riesgo de las vibraciones.
Sin embargo, el nivel de vibraciones puede llegar a ser
muy diferente al valor declarado en otras condiciones
de aplicación, con otros útiles de trabajo o con un
mantenimiento insuficiente de la herramienta eléctrica
y sus útiles, pudiendo llegar a resultar un valor mucho
más elevado debido a su ciclo de trabajo y modo de uso
de la herramienta eléctrica.
Por tanto, es necesario fijar medidas de seguridad de
protección al usuario contra el efecto de las vibraciones,
como pueden ser mantener la herramienta y útiles de trabajo en perfecto estado y la organización de los tiempos
de los ciclos de trabajo (tales como tiempos de marcha
con la herramienta bajo carga, y tiempos de marcha de
la herramienta en vacío y sin ser utilizada realmente ya
que la reducción de estos últimos puede disminuir de
forma sustancial el valor total de exposición).
18. GARANTÍA
Todas las máquinas electroportátiles VIRUTEX tienen
una garantía válida de 12 meses, a partir del día de su
suministro, quedando excluidas todas las manipulaciones o daños ocasionados por manejo inadecuado o por
desgaste natural de la máquina.
Para cualquier reparación, dirigirse al Servicio Oficial
de Asistencia Técnica VIRUTEX.
VIRUTEX, se reserva el derecho de modificar sus productos
sin previo aviso.
Strokes per minute………..............................…300-3200/min
Maximum cutting depth for wood.……….....................80 mm
Angle capacity of base……………...…….........................…0°-45°
Variable speed.................................................................Yes
Quick fixing system....................................................Yes
Pendular movement...................................................3 positions
Weight...........................................................2.1 Kg
Weighted equivalent continuous acoustic pressure level
A.........................................................................................84 dBA
Acoustic power level A.................................95 dBA
Uncertainty......................................................................K = 3 dBA
Wear ear protection!
ENGLISH
JIG SAW SC134L-SC234L
(See pictures on pages 23, 24 and 25)
Important
Read these OPERATING INSTRUCTIONS
and the attached GENERAL SAFETY
INSTRUCTIONS LEAFLET carefully before
using the machine. Make sure you have
understood them before operating the
machine for the first time.
Keep both sets of instructions for any future queries.
1. SAFETY INSTRUCTIONS FOR
HANDLING THE SAW
Read the GENERAL SAFETY INSTRUCTIONS LEAFLET carefully (included with
the documentation for the machine).
1. Before connecting the machine, ensure that the
supply voltage matches that indicated on the characteristics plate.
2. Remove all nails or other metal objects from the wood
before starting to use the saw.
3. Do not use broken or deformed saw blades. Ensure
that the blades are sufficiently sharp and that the teeth
are in perfect condition.
4. Do not use any saw blades other than those indicated
in this manual.
5. Disconnect the machine from the power supply before
changing the blade or handling it.
2. TECHNICAL CHARACTERISTICS
MODEL SC134L (Without handle)
Power......................................................................550W
Vibration total values..............................................ah: 6.9 m/s2
Uncertainty....................................................................K: 1.5 m/s2
MODEL SC234L (WITH HANDLE)
Power........................................................................550W
Strokes per minute.......................................300-3200/min
Maximum cutting depth for wood........................80 mm
Angle capacity of base...........................................0°-45°
Variable speed..........................................................Yes
Quick fixing system.....................................................Yes
Pendular movement...................................3 positions
Weight......................................................................2.2 Kg
Weighted equivalent continuous acoustic pressure level
A.........................................................................................84 dBA
Acoustic power level A.................................95 dBA
Uncertainty......................................................................K = 3 dBA
Wear ear protection!
Vibration total values..............................................ah: 6.9 m/s2
Uncertainty....................................................................K: 1.6 m/s2
3. STANDARD ACCESSORIES
1. Set of 3 different jig saw blades (for wood and
metal)
2. Anti-splinter cutting guide
3. Nozzle for connection to a dust collector
4. Flying chips protector
5. Hexagonal service key
6. Plastic slide.
4. CONNECTING TO THE ELECTRICAL
SUPPLY AND TURNING ON THE MACHINE
The voltage of the power supply must correspond to
that indicated on the characteristics label.
MODEL SC134L
To turn the machine on, keep button A pressed down
(Fig. 1). For continuous action, press the button and
lock into position.
5
To turn the machine off, release button A (Fig. 1).
MODEL SC234L
To turn the machine on, keep button B pressed down (Fig.
2). For continuous action, lock button B into position
by means of button C (Fig. 2). To turn the machine off,
use button C to unlock button B.
5. INSERTING AND CHANGING THE
SAW BLADE (Fig. 3 to 10)
To insert the saw blade, transparent shield D must first
be removed (Fig. 3).
When the transparent shield has been removed, put fastfix mechanism E into the highest position and place saw
blade F into the slot of the fixing mechanism (Fig. 4).
Push the blade in until the teeth are held in place by
the fixing mechanism (Fig. 5).
Finally, put locking button E into its lowest position, so
that the blade is fixed and locked into place (Fig. 6).
Before beginning work, replace transparent shield D.
To remove the blade, transparent shield D must first be
removed (Fig. 8).
Put locking button E into its highest position and pull
down on saw blade F -(Fig. 9).
Locking button E will automatically return to its original
position.
Finally, replace transparent shield D -(Fig. 10).
The jig saw comes equipped with two
protective guards, as shown in (Figures
14 and 15).
The protective guard shown S (Fig. 14) is designed for
dust-free operation and should only be used when the
machine is hooked up to an external dust collector.
For cuts on an angle, use only the protective guard shown
T (Fig. 15), never the protective guard S (Fig. 14).
6. ADJUSTING THE PENDULAR MOVEMENT
7. ADJUSTING THE CUTTING SPEED
The cutting speed can be precision-controlled using
wheel I, from position A through to position G (Fig. 1
for SC134L and Fig. 2 for SC234L). This option means
that you can choose the best option for the material
you are cutting.
6
MATERIAL
WOOD
STEEL
ALUMINIUM
RUBBER
CERAMICS
WHEEL POSITION
G
D-E
E
B-C
A-C
These positions are also shown on plate H (Fig. 1-2).
8. CUTTING WITHOUT PRIOR DRILLING (Fig. 11)
Place the front edge of the base of the machine onto
the piece to be cut and press down gently.
Move lever G (Fig. 11) from the variable position into
point O.
9. ADJUSTING THE BASE (Fig. 12)
Loosen screw K (Fig. 12) using the hexagonal key supplied
with the standard equipment. Pull back base J and adjust
it to the desired angle (0°, 15°, 30° or 45°), then return
the base to its original position and fix it in place once
again with screw K. Intermediate angles must be fixed
with the base pulled back.
10. ANTI-SPLINTER CUTTING GUIDE (Fig. 12)
Anti-splinter cutting guide L - (Fig. 12) may only be
used when the base is at 0°.
11. PRECAUTIONS TO BE TAKEN WHEN SAWING
When sawing metal, apply a lubricating and cooling
product to the jig saw blade. When cutting thin sheets
of metal, these should be fixed to a wooden support in
order to achieve a finer cut.
Before penetrating a wall or ceiling with the jig saw blade,
ensure that there are no electrical wires behind it.
Always hold the machine by the insulated parts.
12. CONNECTING TO A DUST COLLECTOR
The nozzle of machine M (Fig. 1-2) may be easily connected to one of our dust collectors (VIRUTEX AS182K
and AS282K) by using the kit (References no. 6448073
our 1746245).
To release the nozzle, press down on fixing bolt N and
pull back the nozzle (Fig. 13).
13. MAINTAINING AND CHANGING THE
BRUSHES
Change the brushes before then reach a length of
5 mm. For model SC134L, loosen screws O and pull
out the back of housing P (Fig. 1). The brushes will be
clearly visible. Release the retaining spring, undo the
ITALIANO
Using the pendular movement enables you to achieve
maximum cutting efficiency. To select and start up the
pendular system, use lever G (Fig. 1-2). The recommended positions for each type of material are shown on
plate H (Fig. 1-2).
SC134L-SC234L jig saws allow you to select the different
pendular positions even when the machine is running.
The recommended position for each type of material
is as follows:
connection and remove the brush. Replace the brushes
the other way around.
For model SC234L, loosen screws Q and remove lateral
covers R (Fig. 2). Proceed in the same way as for the
previous model.
14. GREASING
(to be performed by an official technician)
The screws on the gear head must not be loosened
during the warranty period. Otherwise the warranty
will be invalid.
The grease should be renewed after 1,500 hours of
use.
15. OPTIONAL ACCESSORIES
3445400 Lateral fence / compass
8200010/200 Dust collectors AS182K/AS282K
6446073 Dust collector attachment
1746245 Standard dust collector attachment 5 m
16. OPTIONAL JIG SAW BLADES
accessories, reaching a much higher value as a result
of the work cycle or the manner in which the electrical
device is used.
Therefore, it is necessary to establish safety measures
to protect the user from the effects of vibrations, such
as maintaining both the device and its tools in perfect
condition and organising the duration of work cycles
(such as operating times when the machine is subjected
to loads, and operating times when working with no-load,
in effect, not in use, as reducing the latter may have a
considerable effect upon the overall exposure value).
18. WARRANTY
All VIRUTEX power tools are guaranteed for 12 months
from the date of purchase, excluding any damage which
is a result of incorrect use or of natural wear and tear
on the machine. All repairs should be carried out by the
official VIRUTEX technical assistance service.
VIRUTEX reserves the right to modify its products without prior notice.
(Set of 5)
3440163 Pack of jig saw blades (carbon steel). For soft and
hard wood, veneer and chipboard of up to 80 mm.
3440164 Pack of jig saw blades (carbon steel). For soft
and hard wood, veneer and chipboard of up to 80 mm,
insulating fibres and flexible plastics.
3440165 Pack of jig saw blades (high speed steel).
For soft steel and iron of up to 5 mm, melamine and
synthetic fibres up to 8 mm and non-ferrous metals
up to 20 mm.
3440166 Pack of jig saw blades (high speed steel). For
soft steel and iron of up to 5 mm, non-ferrous metals
up to 20 mm and melamine and synthetic fibres up
to 10 mm.
3440167 Pack of jig saw blades (carbon steel). For soft
and hard wood and chipboard of up to 80 mm.
3440169 Blister pack of 3 assorted jig saw blades for
wood and metal.
17. NOISE AND VIBRATION LEVELS
The noise and vibration levels of this device have
been measured in accordance with European standard EN60745-2-11 and EN 60745-1 and serve as a
basis for comparison with other machines with similar
applications.
The indicated vibration level has been determined for
the device’s main applications and may be used as an
initial value for evaluating the risk presented by exposure to vibrations. However, vibrations may reach levels
that are quite different from the declared value under
other application conditions, with other tools or with
insufficient maintenance of the electrical device or its
FRANÇAIS
SCIE SAUTEUSE SC134L/SC234L
(Voir images pages 23, 24, 25)
Important
Avant d'utiliser la machine, lisez attentivement ce MANUEL D'INSTRUCTIONS et la
BROCHURE D'INSTRUCTIONS GÉNÉRALES
DE SÉCURITÉ qui vous sont fournis avec
cette machine. Assurez-vous de bien
avoir tout compris avant de commencer
à travailler sur la machine.
Gardez toujours ces deux manuels d'instructions à
portée de la main pour pouvoir les consulter, en cas
de besoin.
1. INSTRUCTIONS DE SÉCURITÉ
POUR LE MANIEMENT DE LA SCIE
Lire avec soin le prospectus concernant
LES INSTRUCTIONS GÉNÉRALES DE SÉCURITÉ, fourni avec la documentation
de la machine.
1. Avant de brancher la machine, vérifiez que la tension
de l'alimentation correspondant à celle indiquée sur la
7
plaque où sont inscrites les caractéristiques.
2. Avant de commencer à scier, ayez soin d'enlever
tous les clous ou objets en métal qui se trouveraient
sur le bois.
3. Ne pas utiliser de lames de scie déformées ou cassées.
Vérifiez qu'elles sont bien affilées et qu'elles ont leurs
dents en parfait état.
4. Ne pas utiliser de lames de scie qui ne correspondraient
pas aux caractéristiques indiquées dans ce manuel.
5. Déconnecter la machine du réseau électrique avant
de changer la lame et avant d'effectuer un réglage ou
une manipulation quelconque sur la machine.
2. CARACTÉRISTIQUES TECHNIQUES
MODÈLE SC134L (sans poignée)
Puissance..............................................................550 W
Courses par minute...............................300-3200/min
Épaisseur de coupe maximum pour le bois.................80 mm
Capacité d'inclination de la base......................................0º-45º
Vitesse réglable...............................................................SI
Système de fixation rapide...............................................SI
Mouvement pendulaire.............................................3 positions
Poids.........................................................................2.1 Kg
Niveau de pression acoustique continu équivalent pondéré A...............................................................................84 dBA
Niveau de puissance acoustique A.................................95 dBA
Incertitude......................................................................K = 3 dBA
Porter une protection acoustique!
Valeurs totales des vibrations.................................ah: 6,9 m/s2
Incertitude.....................................................................K: 1,5 m/s2
MODÈLE SC234L (sans poignée)
Puissance.............................................................550 W
Courses par minute.............................................300-3200/min
Épaisseur de coupe maximum pour le bois.................80 mm
Capacité d'inclination de la base.................................0º-45º
Vitesse réglable.......................................................................SI
Système de fixation rapide......................................................SI
Mouvement pendulaire............................................3 positions
Poids............................................................................2.2 Kg
Niveau de pression acoustique continu équivalent pondéré A...............................................................................84 dBA
Niveau de puissance acoustique A.................................95 dBA
Incertitude......................................................................K = 3 dBA
Porter une protection acoustique!
Valeurs totales des vibrations.................................ah: 6,9 m/s2
Incertitude.....................................................................K: 1,6 m/s2
3. ÉQUIPEMENT STANDARD
1. Jeu de 3 lames à chantourner variées (bois et mé8
tal).
2. Guide de coupe contre les éclats de bois.
3. Tuyère pour connecter un aspirateur.
4. Protecteur contre les copeaux.
5. Clé hexagonale de service.
6. Patin PVC.
4. CONNEXION ÉLECTRIQUE ET MISE EN MARCHE
La tension d'alimentation doit être celle qui est indiquée
sur l'étiquette des caractéristiques.
MODÈLE SC134L
Pour la mise en marche de la machine appuyer de manière continue sur le bouton-poussoir A (Fig. 1). Pour
réaliser un travail ininterrompu, pousser et bloquer le
bouton-poussoir en position final.
Pour arrêter la machine lâcher le bouton-poussoir A
(Fig. 1).
MODÈLE SC234L
Pour la mise en marche de la machine appuyer de manière
continue sur le bouton-poussoir B (Fig. 2). Pour réaliser
un travail ininterrompu, bloquer le bouton-poussoir à
l'aide du bouton C (Fig. 2).
Pour arrêter la machine débloquer le bouton-poussoir
B à l'aide du bouton C.
5. INSTALLATION ET CHANGEMENT
DE LA LAME DE LA SCIE (Fig. 3 à 10)
Pour installer la lame de la scie, enlevez tout d'abord la
protection transparente D (Fig. 3).
Après avoir enlevé la protection transparente posez le
mécanisme de fixation rapide E dans la position la plus
haute et mettez la lame de la scie F dans la rainure du
mécanisme de fixation (Fig. 4).
Introduire ensuite la lame de la scie F jusqu'à ce que la dent
reste accrochée au mécanisme de fixation (Fig. 5).
Pour finir, placer le bouton de blocage E dans la position
inférieure; la lame sera ainsi fixée et bloquée (Fig. 6).
Avant de commencer le travail réinstallez la protection
transparente D (Fig. 7).
Pour démonter la lame de la scie, démonter tout d'abord
la protection transparente D (Fig. 8).
Placer ensuite le bouton de blocage E dans la position
la plus élevée et tirez sur la lame de la scie F vers le
bas (Fig. 9).
Le bouton de blocage E reviendra automatiquement à
sa position d'origine.
Pour finir, réinstallez la protection transparente D
(Fig. 10).
La scie sauteuse est dotée de deux écrans
de protection comme le montrent les
figures 14 et 15.
L'écran de protection S (Fig. 14) a été conçu pour un
travail sans poussière, ne devant être utilisé que si la
machine est connectée à un aspirateur de poussière
externe.
Pour des découpes inclinées, il ne faudra utiliser que
l'écran de protection T (Fig. 15), jamais l'écran de protection S (Fig. 14).
6. RÉGLAGE DU MOUVEMENT PENDULAIRE
L'utilisation du mouvement pendulaire permet d'obtenir
une efficacité maximale de la coupe.
Pour sélectionner et mettre en marche le système pendulaire on utilise le levier G (Fig. 1-2).
Les positions recommandées pour chaque type de matériel sont indiquées sur la plaque H (Fig. 1-2).
Les scies sauteuse SC134L-SC234L permettent de réaliser
la sélection de chacune des positions pendulaires, même
si la machine est en marche.
7. RÉGLAGE DE LA VITESSE DE COUPE
La vitesse de coupe peut être réglée avec précision à
l'aide de la roue et à partir de la position A jusqu'à la
position G (Fig. 1 pour SC134L et Fig. 2 pour SC234L).
Cette option lui permet de travailler avec l'option idéale
suivant le matériel à scier.
La position recommandée pour chaque type de matériel
est la suivante:
MATÉRIEL
BOIS
ACIER
ALUMINIUM
CAOUTCHOUC
CÉRAMIQUE
POSITION DU RÉGULATEUR
G
D-E
E
D-C
A-C
Ces positions sont également indiquées sur la plaque
H (Fig. 1-2)
8. ENTRÉE DE LA COUPE SANS TROU (Fig. 11)
Positionner le bord antérieur de la base de la machine
sur la pièce et appuyer légèrement vers le bas.
Placer le levier G (Fig. 11) de la position oscillant au
point "O".
9. RÉGLAGE DE LA BASE (Fig. 12)
Desserrez la vise K (Fig. 12) en utilisant la clé hexagonale
fournie dans l'équipement standard.
Tirez sur la base vers l'arrière et réglez-la selon l'angle
voulu (0º, 15º, 30º ou 45º). Remettre la base dans sa
position d'origine et fixez-la de nouveau avec la vis K.
En ce qui concerne les angles intermédiaires, ceux-ci
doivent être fixés avec la base en arrière.
10. GUIDAGE DE COUPE CONTRE
LES ÉCLATS DE BOIS (Fig. 12)
Le guidage de coupe contre les éclats de bois L, (Fig. 12)
peut être utilisé uniquement avec la base à 0º.
11. PRÉCAUTIONS POUR LE SCIAGE
Pour le sciage de métaux, appliquer sur la lame de la scie
un produit pour la lubrifier et la refroidir. Pour couper
des plaques fines de métal, il faut fixer la plaque sur un
support en bois pour que la coupe soit plus fine.
Avant de faire pénétrer la lame de la scie dans un mur
ou un toit, vérifier qu'il n'y a pas de câbles électriques
encastrés.
Pour tenir la machine utilisez toujours les parties isolées
prévues à cet usage.
12. CONNEXION À UN ASPIRATEUR
La machine peut être connectée facilement à nos aspirateurs VIRUTEX AS182K et AS282K, par l'intermédiaire
de la tuyère M (Fig. 1-2), au moyen de du kit réfs.
6448073 - 1746245. Pour démonter la tuyère appuyer
sur la languette de fixation N et tirez en arrière sur la
tuyère. (Fig. 13)
13. MAINTENANCE ET
CHANGEMENT DES BALAIS
Changez les balais lorsque leur longueur sera inférieure
à 5 mm. Dans les modèles SC134L desserrez les vis O
et retirez la partie arrière de la carcasse P (Fig. 1). Les
balais seront facilement visibles. Décrochez le ressort de
fixation, débranchez la connexion et retirez le balais.
Remplacer les balais en sens inverse.
Pour le modèle SC234L, desserrez les vis Q, retirez les
couvercles latéraux R (Fig. 2) et continuez en suivant les
instructions fournies pour le modèle antérieur.
14. GRAISSAGE
(Doit être effectué par le service technique officiel)
On ne doit pas desserrer les vis de la carcasse à engrenages
pendant la période de garantie. Dans le cas contraire
celle-ci serait sans effet.
La graisse doit être changée au bout de 1.500 heures
de fonctionnement.
15. ACCESSOIRES EN OPTION
3445406 Équerre guide latérale/compas.
8200010/200- Aspirateurs AS182K/AS282K.
6446073 Accordement aspiration.
1746245 Kit d'aspiration standard 5 m
16. LAMES DE SCIE EN OPTION
9
(Jeux de 5 unités)
3440163 Paquets scies à chantourner (acier au carbone)
(pour le bois mou et dur, contre-plaqué et aggloméré
jusqu'à 80 mm).
3440164 Paquets scies à chantourner (acier au carbone)
(pour le bois mou et dur, contre-plaqué et aggloméré
jusqu'à 80 mm, Fibres isolantes et plastiques flexibles).
3440165 Paquets scies à chantourner (acier rapide)
(pour fer et acier doux jusqu'à 5 mm, mélamine et
fibres synthétiques jusqu'à 6 mm, métaux non ferriques
jusqu'à 20 mm).
3440166 Paquets scies à chantourner (acier rapide)
(pour fer et acier doux jusqu'à 5 mm, métaux non ferriques jusqu'à 20 mm, mélamine et fibres synthétiques
jusqu'à 10 mm).
3440167 Paquets scies à chantourner (acier au carbone) (pour le bois mou et dur, et aggloméré jusqu'à
80 mm).
3440169 Blister de 3 lames scie à chantourner variées
(bois et métal).
17. NIVEAU DE BRUIT ET VIBRATIONS
Les niveaux de bruit et de vibrations de cet appareil
électrique ont été mesurés conformément à la norme
européenne EN60745-2-11 et EN 60745-1 et font
office de base de comparaison avec des machines aux
applications semblables.
Le niveau de vibrations indiqué a été déterminé pour
les principales applications de l’appareil, et il peut être
pris comme valeur de base pour l’évaluation du risque
lié à l’exposition aux vibrations. Toutefois, dans d’autres
conditions d’application, avec d’autres outils de travail
ou lorsque l’entretien de l’appareil électrique et de ses
outils est insuffisant, il peut arriver que le niveau de
vibrations soit très différent de la valeur déclarée, voire
même beaucoup plus élevé en raison du cycle de travail
et du mode d'utilisation de l'appareil électrique.
Il est donc nécessaire de fixer des mesures de sécurité
pour protéger l'utilisateur contre les effets des vibrations, notamment garder l’appareil et les outils de
travail en parfait état et organiser les temps des cycles
de travail (temps de fonctionnement avec l’appareil
en service, temps de fonctionnement avec l’appareil
à vide, sans être utilisé réellement), car la diminution
de ces temps peut réduire substantiellement la valeur
totale d’exposition.
18. GARANTIE
Tous les machines électro-portatives VIRUTEX ont une
garantie valable 12 mois à partir de la date d'achat, en
étant exclus toutes manipulations ou dommages causés
par des maniements inadéquats ou par l'usure naturelle
de la machine. Pour toute réparation, s'adresser au service
officiel d'assistance technique VIRUTEX.
10
VIRUTEX se réserve le droit de modifier ses produits
sans avis préalable.
DEUTSCH
STICHSÄGE SC134L-SC234L
(siehe Abbildungen auf den Seiten 23, 24, 25)
Achtung!
Lesen Sie bitte vor Benutzung der Maschine die beiliegende GEBRAUCHSANWEISUNG und die ALLGEMEINEN SICHERHEITSHINWEISE sorgfältig durch.
Stellen Sie sicher, dass Sie sowohl die Gebrauchsanweisung als auch die allegemeinen Sicherheitshinweise
verstanden haben, bevor Sie die Maschine bedienen.
Bewahren Sie beide Gebrauchsanweisungen zum späteren Nachschlagen auf.
1. SICHERHEITSVORSCHRIFTEN
FÜR DIE BEDIENUNG DER SÄGE
Beachten Sie die der Maschinendokumentation beigefügte BROSCHÜRE: ALLGEMEINE SICHERHEITSVORSCHRIFTEN!
1. Vor dem Einschalten der Maschine ist sicherzustellen,
dass die Netzspannung mit der auf dem Typenschild
angegebenen Spannung übereinstimmt.
2. Vor dem Sägen sind Nägel und metallene Gegenstände
aus dem Holz zu entfernen.
3. Verwenden Sie keine verbogenen oder gebrochenen
Sägeblätter. Vergewissern Sie sich, dass die Sägeblätter
gut geschärft sind, und überprüfen Sie den einwandfreien
Zustand der Sägezähne.
4. Verwenden Sie keine Sägeblätter, deren Merkmale
nicht mit denen in diesem Handbuch beschriebenen
übereinstimmen.
5. Vor dem Austauschen der Sägeblätter sowie vor jeder
Justierung oder Manipulation an der Maschine muss
diese vom Stromnetz getrennt werden.
2. TECHNISCHE DATEN
MODELL SC134L (ohne Haltegriff)
Leistung................................................550 W
Hubzahl pro Minute...........................300-3200/min
Max. Schnitttiefe (Holz)..............................................80 mm
Auflagewinkel regulierbar.....................................0°-45°
Regelbare Drehzahl..................................................Ja
Schnellbefestigungssystem......................................Ja
Pendelbewegung.........................................3 Positionen
Gewicht..............................................................2,1 Kg
Gewichteter akustischer Dauerdruckpegel A...............84 dBA
Akustischer Druckpegel A..............................................95 dBA
Unsicherheit..................................................................K = 3 dBA
Gehörschutz tragen!
Schwingungsgesamtwerte...................................ah: 6,9 m/s2
Unsicherheit................................................................K = 1,5 m/s2
MODELL SC234L (mit Haltegriff)
Leistung................................................................550 W
Hubzahl pro Minute...................................300-3200/min
Max. Schnitttiefe (Holz)..........................................80 mm
Auflagewinkel regulierbar........................................0°-45°
Regelbare Drehzahl....................................................Ja
Schnellbefestigungssystem.......................................Ja
Pendelbewegung....................................3 Positionen
Gewicht.................................................................2,1 kg
Gewichteter akustischer Dauerdruckpegel A...............84 dBA
Akustischer Druckpegel A..............................................95 dBA
Unsicherheit..................................................................K = 3 dBA
Gehörschutz tragen!
Schwingungsgesamtwerte...................................ah: 6,9 m/s2
Unsicherheit................................................................K = 1,6 m/s2
3. STANDARDAUSRÜSTUNG
1. Set mit 3 verschiedenen Sägeblättern (für Holz und
Metall)
2. Antisplitter-Sägeführung
3. Düse für Absaugungsanschluss
4. Antisplitterschutz
5. Inbusschraubenschlüssel
6. Plastikschieber.
4. ELEKTRISCHER ANSCHLUSS
UND INBETRIEBNAHME
Die Netzspannung muss mit der auf dem Typenschild
angegebenen übereinstimmen.
MODELL SC134L
Um die Maschine in Betrieb zu nehmen, Drucktaste A
(Abb. 1) gedrückt halten. Für die Durchführung fortlaufender Arbeiten, Drucktaste betätigen und in der
Endstellung arretieren.
Um die Maschine außer Betrieb zu setzen, Drucktaste
A (Abb. 1) lösen.
MODELL SC234L
Um die Maschine in Betrieb zu nehmen, Drucktaste B
(Abb. 1) gedrückt halten. Für die Durchführung fort-
laufender Arbeiten, Drucktaste mittels Feststellknopf
C (Abb. 2) arretieren.
Um die Maschine außer Betrieb zu setzen, Drucktaste B
mittels Feststellknopf C lösen.
5. MONTAGE UND WECHSEL
DES SÄGEBLATTS (Abb. 3 bis 10)
Für den Einbau des Sägeblattes muss zunächst die
durchsichtige Schutzvorrichtung D abgenommen
werden (Abb. 3).
Nach Abnahme der durchsichtigen Schutzvorrichtung
wird die Schnellspannvorrichtung E in die oberste
Position gebracht und das Sägeblatt F in die Nut der
Spannvorrichtung eingelegt (Abb. 4).
Danach das Sägeblatt F einführen bis der Sägezahn
von der Spannvorrichtung festgehalten wird (Abb.
5). Abschließend den Feststellknopf E auf die untere
Position stellen, um das Sägeblatt zu fixieren und zu
arretieren (Abb. 6). Vor Beginn der Sägearbeiten muss die
durchsichtige Schutzvorrichtung D wieder angebracht
werden (Abb. 7).
Um das Sägeblatt auszubauen, muss zunächst die durchsichtige Schutzvorrichtung D abgenommen werden (Abb.
8). Danach den Feststellknopf E auf die oberste Position
stellen und das Sägeblatt F nach unten wegziehen (Abb.
9). Der Feststellknopf E springt automatisch zurück in die
Ausgangsstellung. Abschließend wird die durchsichtige
Schutzvorrichtung D erneut angebracht (Abb. 10).
Die Stichsäge ist mit zwei Schutzblenden
ausgestattet, wie in Fig. 14 und 15 zu
sehen ist.
Die gezeigte Schutzblende S (Fig. 14) ist für ein Arbeiten
ohne Staub entworfen und darf nur verwendet werden,
wenn die Maschine an eine externe Staubabsaugung
angeschlossen ist.
Für Schrägschnitte darf nur die gezeigte Schutzblende T
(Fig. 15), niemals die Schutzblende S (Fig. 14) verwendet
werden.
6. EINSTELLUNG DER PENDELBEWEGUNG
Durch den Einsatz der Pendelbewegung wird eine
optimale Schnittleistung erzielt. Die Auswahl und die
Betätigung des Pendelsystems erfolgt mit dem Hebel G
(Abb. 1-2). Auf dem Datenschild H sind die empfohlenen
Arbeitspositionen für die unterschiedlichen Materialtypen angegeben (Abb. 1-2).
Bei den Stichsägen SC134L und SC234L können die einzelnen Pendelpositionen sogar mit laufender Maschine
ausgewählt werden.
7. EINSTELLUNG DER
SCHNITTGESCHWINDIGKEIT
11
Mit dem Einstellrad I kann die Schnittgeschwindigkeit
exakt reguliert werden, von Position A bis Position
G (Abb. 1 für SC134L und Abb. 2 für SC234L). Diese
Option bietet optimale, dem Sägematerial angepasste
Arbeitsbedingungen.
Je nach Materialtyp werden folgende Positionen
empfohlen:
MATERIAL POSITION DES REGLERS
HOLZ
STAHL
ALUMINIUM
GUMMI
KERAMIK
G
D-E
E
B-C
A-C
Diese Positionen sind ebenfalls auf dem Datenschild H
(Abb. 1-2) angegeben.
8. EINTAUCHANSCHNITT OHNE
VORBOHREN (Abb. 11)
Die laufende Maschine mit der Vorderkante der Auflagefläche auf das Werkstück aufsetzen und leicht nach
unten drücken.
Hebel G (Abb. 11) von der Pendelstellung auf Punkt
O stellen.
9. REGULIERUNG DES
AUFLAGEWINKELS (Abb. 12)
Schraube K (Abb. 12) mit dem in der Standardausrüstung
mitgelieferten Inbusschraubenschlüssel lösen. Auflagefläche J nach hinten ziehen und auf den gewünschten
Winkel (0°, 15°, 30° oder 45°) ausrichten. Auflagefläche
wieder in die Ausgangsstellung bringen und erneut mit
der Schraube K befestigen. Für die Fixierung der dazwischenliegenden Winkelwerte muss die Auflagefläche nach
hinten verstellt sein.
10. ANTISPLITTER-SÄGEFÜHRUNG (Abb. 12)
Die Antisplitter-Sägeführung L (Abb. 12) kann nur bei
einer auf 0° ausgerichteten Auflagefläche verwendet
werden.
11. VORSICHTSMASSNAHMEN
WÄHREND DES SÄGEVORGANGS
Für das Sägen von Metallen sollte ein Schmier- und
Kühlungsmittel auf das Sägeblatt aufgetragen werden.
Beim Sägen feiner Metallplatten sollten diese auf einer
Unterlage aus Holz fixiert werden, um so einen feinen
Schnitt zu gewährleisten. Bei Arbeiten an Wänden und
Decken sollte vor Arbeitsbeginn überprüft werden, ob
eingemauerte elektrische Kabel vorhanden sind. Die
Maschine sollte stets an den isolierten Haltegriffen
gehalten werden.
12
12. ANSCHLUSS AN ABSAUGUNG
Mit Hilfe des Zubehörteils, Bestellnummer 6446073 1746245, kann die Maschine problemlos über die Düse
M (Abb. 1-2) an die Absaugungen VIRUTEX AS182K und
AS282K angeschlossen werden. Um die Düse auszubauen,
auf die Befestigungsleiste N drücken und die Düse nach
hinten wegziehen (Abb. 13).
13. WARTUNG UND WECHSEL DER BÜRSTEN
Wenn bei den Bürsten die Kohle kürzer als 5 mm ist,
müssen sie ausgetauscht werden. Vorgehensweise für
Modell SC134L: Schrauben O abschrauben und die
Rückseite des Gehäuses P (Abb. 1) abnehmen. Die Bürsten
sind dann gut sichtbar. Haltefeder lösen, Bürstenkabel
abklemmen und Bürsten herausnehmen. Bürsten in
umgekehrter Reihenfolge einsetzen.
Vorgehensweise für Modell SC234L: Schrauben Q abschrauben und Seitendeckel R (Abb. 2) abnehmen, danach
gleiche Vorgehensweise wie bei Modell SC134L.
14. SCHMIERUNG
(nur vom offiziellen Kundendienst auszuführen)
Während der Garantiezeit dürfen die Schrauben am
Getriebekopf nicht gelöst werden, andernfalls verlieren
die Garantieansprüche ihre Gültigkeit.
Das Fett muss nach 1.500 Betriebstunden erneuert
werden.
15. OPTIONALES ZUBEHÖR
3445406 Seitliche Winkelschiene/Zirkel.
8200010/200 Absaugung AS182K/AS282K
6446073 Saugkupplung
1746245 Standard-Absauganschluss 5 m
16. OPTIONALE SÄGEBLÄTTER
(Set zu 5 Stück)
3440163 Packung Sägeblätter (Kohlenstoffstahl, für
weiches und hartes Holz, Sperrholz und Spanfaserplatten bis 80 mm)
3440164 Packung Sägeblätter (Kohlenstoffstahl, für
weiches und hartes Holz, Sperrholz und Spanfaserplatten
bis 80 mm, Isolierfasern und flexible Kunststoffe)
3440165 Packung Sägeblätter (Schnellstahl, für Eisen
und Weichstahl bis 5 mm, Melamin und Kunstfasern bis
8 mm, nicht eisenhaltige Metalle bis 20 mm)
3440166 Packung Sägeblätter (Schnellstahl, für Eisen
und Weichstahl bis 5 mm, nicht eisenhaltige Metalle bis
20 mm, Melamin und Kunstfasern bis 10 mm)
3440167 Packung Sägeblätter (Kohlenstoffstahl, für
weiches und hartes Holz, Spanfaserplatten bis 80 mm)
3440169 Blisterverpackung mit 3 verschiedenen Sägeblättern (für Holz und Metall)
17. GERÄUSCHPEGEL UND VIBRATIONEN
Die Lärm- und Vibrationswerte dieses Elektrowerkzeugs
wurden in Übereinstimmung mit der europäischen Norm
EN60745-2-11 und EN 60745-1 gemessen und dienen
als Vergleichsgrundlage bei Maschinen für ähnliche
Anwendungen.
Der angegebene Vibrationspegel wurde für die wesentlichen Einsatzzwecke des Werkzeugs ermittelt und kann
bei der Beurteilung der Gefahren durch die Aussetzung
unter Vibrationen als Ausgangswert benutzt werden. Die
Vibrationswerte können sich jedoch unter anderen Einsatzbedingungen, mit anderen Arbeitswerkzeugen oder
bei einer ungenügenden Wartung des Elektrowerkzeugs
oder seiner Werkzeuge stark vom angegebenen Wert
unterscheiden und aufgrund des Arbeitszyklus und der
Einsatzweise des Elektrowerkzeugs einen bedeutend
höheren Wert aufweisen.
Es ist daher erforderlich, Sicherheitsmaßnahmen zum
Schutz des Anwenders vor den Vibrationen festzulegen.
Dazu können die Aufrechterhaltung des einwandfreien
Zustands des Werkzeugs und der Arbeitsutensilien sowie
die Festlegung der Zeiten der Arbeitszyklen gehören (wie
Laufzeiten des Werkzeugs unter Last und im Leerlauf,
ohne tatsächlich eingesetzt zu werden, wodurch die
Gesamtzeit der Vibrationsauswirkungen bedeutend
verringert werden kann).
ITALIANO
SEGHETTO ALTERNATIVO SC134L /
SC234L
(Vedere illustrazioni a pagina 23, 24 e 25)
Importante
Prima di utilizzare la macchina, leggere
attentamente questo MANUALE DI ISTRUZIONI e il PROSPETTO DELLE NORME
GENERALI DI SICUREZZA allegato. Non
cominciate a lavorare con la macchina
se non siete sicuri di avere compreso
integralmente il loro contenuto.
Conservare tutti e due i manuali per eventuali
consultazioni successive.
1. NORME DI SICUREZZA PER
L'USO DEL SEGHETTO
Leggere attentamente le NORME GENERALI DI SICUREZZA unite alla documentazione dell'apparecchio.
18. GARANTIE
Alle Elektrowekzeuge von VIRUTEX habe eine garantie
von 12 Montaen ab dem Lieferdatum. Hiervon augeschlossen sind alle Eingriffe oder Schäden aufgrund von
unsachgemässen Gebrauch oder natürlicher Abnutzung
des Geräts.
Wenden Sie sich im Falle einer Reparatur immer an den
zugelassenen Kundendiest von VIRUTEX.
VIRUTEX behält sich das Recht vor, die Produkte ohne
vorherige Ankündigung zu verändern.
1. Prima d'inserire la spina dell'apparecchio nella presa
di corrente, accertarsi che la tensione della linea elettrica corrisponda a quella indicata sulla piastrina delle
caratteristiche dell'apparecchio.
2. Prima d'iniziare a segare, rimuovere dal legno chiodi
o altri oggetti metallici eventualmente presenti.
3. Non utilizzare lame deformate o rotte. Accertarsi
che siano ben affilate e che abbiano i denti in perfetto
stato.
4. Non utilizzare lame le cui caratteristiche non corrispondano a quelle indicate in questo manuale.
5. Staccare la spina della macchina dalla presa di corrente prima di sostituire le lame o di realizzare qualsiasi
regolazione o intervento sulla stessa.
2. CARATTERISTICHE TECNICHE
MODELLO SC134L
(senza impugnatura supplementare)
Potenza...........................................................550 W
Corse al minuto...................................................300-3200
Profondità massima di taglio nel legno............80 mm
Possibilità d'inclinazione della base.................0º-45º
Velocità regolabile.....................................................Sì
Sistema di fissaggio rapido.................................................Sì
Movimento oscillante.........................................3 posizioni
Peso..................................................................2,1 Kg
13
Livello di pressione acustica continuo equivalente
ponderato A.......................................................................84 dBA
Livello di potenza acustica A...........................................95 dBA
Incertezza della misura...................................................K = 3 dBA
Usare la protezione acustica!
Valori totali delle oscillazioni.................................ah: 6,9 m/s2
Incertezza della misura................................................K: 1,5 m/s2
MODELLO SC234L
(con impugnatura supplementare)
Potenza.......................................................................550 W
Corse al minuto.....................................................300-3200
Profondità massima di taglio nel legno...........80 mm
Possibilità d'inclinazione della base.........................0º-45º
Velocità regolabile......................................................Sì
Sistema di fissaggio rapido.........................................Sì
Movimento oscillante.................................3 posizioni
Peso...................................................................2,2 Kg
Livello di pressione acustica continuo equivalente
ponderato A.......................................................................84 dBA
Livello di potenza acustica A...........................................95 dBA
Incertezza della misura...................................................K = 3 dBA
Usare la protezione acustica!
Valori totali delle oscillazioni.................................ah: 6,9 m/s2
Incertezza della misura................................................K: 1,6 m/s2
3. KIT STANDARD
1. Set di 3 lame assortite (legno e metallo)
2. Guida di taglio antischegge
3. Attacco per aspiratore
4. Protettore contro l'espulsione dei trucioli
5. Chiave per brugole per la manutenzione.
6. Base in plastica.
4. COLLEGAMENTO ELETTRICO E AVVIAMENTO
La tensione della rete d'alimentazione deve corrispondere
a quella indicata sulla piastrina delle caratteristiche.
MODELLO SC134L
Per avviare la macchina, tenere premuto il pulsante A (Fig.
1). Se si desidera realizzare un lavoro continuo, azionare
il pulsante e bloccarlo nella posizione finale.
Per fermare la macchina, rilasciare il pulsante A (Fig.
1).
MODELLO SC234L
Per avviare la macchina, tenere premuto il pulsante B (Fig.
2). Se si desidera realizzare un lavoro continuo, azionare
il pulsante e bloccarlo mediante il perno C (Fig. 2).
Per fermare la macchina, sbloccare il pulsante B estraendo il perno C.
14
5. COLLOCAZIONE E SOSTITUZIONE
DELLA LAMA (Figg. da 3 a 10)
Per collocare la lama, si deve innanzi tutto togliere la
protezione trasparente D (Fig. 3).
Una volta tolta la protezione trasparente, collocare il
meccanismo di fissaggio rapido E nella posizione più
alta e inserire la lama F nella fessura del meccanismo
di fissaggio (Fig. 4).
Introdurre quindi la lama F finché il dente non rimane
bloccato dal meccanismo di fissaggio (Fig. 5).
Collocare infine il meccanismo di bloccaggio E nella posizione più bassa, così la lama rimarrà fissata e bloccata (Fig.
6). Prima d'iniziare a lavorare, ricollocare la protezione
trasparente D nella posizione originaria (Fig. 7).
Per togliere la lama, si deve innanzi tutto togliere la
protezione trasparente D (Fig. 8).
Quindi, collocare il meccanismo di fissaggio rapido E
nella posizione più alta e tirare verso il basso la lama
(Fig. 9).
Il meccanismo di fissaggio E tornerà automaticamente
nella posizione iniziale.
Collocare infine il protettore trasparente D (Fig. 10).
Il seghetto alternativo è dotato di due
schermi di protezione, come indicato
nelle Figg. 14 e 15.
Lo schermo di protezione indicato con S (Fig. 14) è
adatto per i lavori senza produzione di polvere, e deve
essere utilizzato soltanto con la macchina collegata a
un aspiratore esterno.
Per i tagli inclinati, utilizzare solo lo schermo di protezione
indicato con T (Fig. 15) e mai lo schermo S (Fig. 14).
6. REGOLAZIONE DEL
MOVIMENTO OSCILLANTE
L'uso del movimento oscillante permette di ottenere la
massima efficacia di taglio. La selezione e l'attivazione
del sistema di oscillazione si realizza mediante la leva
G (Figg. 1 e 2). Le posizioni raccomandate per i diversi
materiali sono indicate nella piastrina H (Figg. 1 e 2).
I seghetti alternativi SC134L e SC234L permettono di
scegliere le posizioni di oscillazione anche con la macchina in funzionamento
7. REGOLAZIONE DELLA VELOCITÀ DI TAGLIO
La velocità di taglio può essere regolata con precisione
mediante la ruota I, dalla posizione A alla posizione G
(Fig. 1 per SC134L e Fig. 2 per SC234L). Questa opzione
permette di lavorare sempre con la velocità più adeguata
al materiale da segare.
Le posizioni consigliate per i diversi tipi di materiale
sono:
MATERIALE
LEGNO
ACCIAIO
ALLUMINIO
GOMMA
CERAMICA
POSIZIONE DEL REGOLATORE
G
D-E
E
B-C
A-C
Queste posizioni vengono anche indicate sulla piastrina
H (Figg. 1 e 2).
8. INIZIO DEL TAGLIO SENZA FORO (Fig. 11)
Collocare la macchina con l'angolo anteriore della base
sul pezzo e premere delicatamente in basso.
Collocare la leva G (Fig. 11) della posizione oscillante
nel punto "0".
9. REGOLAZIONE DELLA BASE (Fig. 12)
Svitare la vite K (Fig. 12) mediante la chiave per brugole in
dotazione. Tirare indietro la base J e regolarla sull'angolo
desiderato (0º, 15º, 30º o 45º), quindi riportare la base
nella posizione iniziale e fissarla di nuovo con la vite K.
È possibile selezionare anche angoli intermedi: per farlo
bisogna tenere la base tirata indietro.
10. GUIDA DI TAGLIO ANTISCHEGGE (Fig. 12)
La guida di taglio antischegge L (Fig. 12) può essere
utilizzata solamente con la base a 0º.
11. PRECAUZIONI DURANTE IL TAGLIO
Per segare metalli, collocare sulla lama un prodotto
lubrificante e refrigerante. Se si vogliono tagliare lamiere
metalliche sottili è conveniente fissare la lamiera su un
supporto di legno perché il taglio sia più netto.
Prima di far penetrare la lama in una parete o sul soffitto,
accertarsi che non ci siano cavi elettrici sotto traccia.
Tenere sempre la macchina per le apposite impugnature,
dato che queste sono isolate.
12. COLLEGAMENTO A UN ASPIRATORE
La macchina può essere facilmente collegata ai nostri
aspiratori VIRUTEX AS182K e AS282K attraverso la
bocchetta M (Figg. 1 e 2), mediante il kit 6446073 1746245.
Per togliere la bocchetta, premere la linguetta di fissaggio
N e tirare la bocchetta indietro (Fig. 13).
13. SOSTITUZIONE DELLE SPAZZOLE
Sostituire le spazzole quando la lunghezza del carboncino
diventa inferiore a 5 mm. Nel modello SC134L, allentare
le viti O ed estrarre la parte posteriore del rivestimento
P (Fig. 1). Le spazzole sono facilmente visibili. Liberare
la molla di fissaggio, staccare il collegamento ed estrarre il carboncino. Sostituire la spazzola e rimontare il
tutto, realizzando all'inversa le operazioni descritte per
lo smontaggio.
Per il modello SC234L, svitare le viti Q ed estrarre i
rivestimenti laterali R (Fig. 2), quindi procedere come
indicato per il modello precedente.
14. INGRASSAGGIO
(deve essere realizzato da un Servizio di Assistenza
Tecnica Ufficiale)
Non svitare le viti della testa d'ingrassaggio durante il
periodo di garanzia, altrimenti si perderebbe il diritto
alla stessa.
Il grasso deve essere sostituito dopo circa 1.500 ore di
funzionamento
15. ACCESSORI OPTIONAL
3445406 Squadra guida laterale / compasso
8200010/200 Aspiratore AS182K / AS282K
6446073 Kit aspiratore
1746245 Raccordo di aspirazione standard 5 m.
16. LAME OPTIONAL
(set di 5 unità)
3440163 Pacchetto di lame per seghetti alternativi (acciaio al carbonio) per legno morbido e duro, compensato
e truciolato sino a 80 mm.
3440161 Pacchetto di lame per seghetti alternativi
(acciaio al carbonio) per legno morbido e duro, compensato e truciolato sino a 80 mm, fibre isolanti e materie
plastiche flessibili.
3440165 Pacchetto di lame per seghetti alternativi
(acciaio rapido) per ferro e acciaio dolce sino a 5 mm,
resina melamminica e fibre sintetiche sino a 8 mm,
metalli non ferrosi sino a 20 mm
3440166 Pacchetto di lame per seghetti alternativi
(acciaio rapido) per ferro e acciaio dolce sino a 5 mm,
metalli non ferrosi sino a 20 mm, resina melamminica
e fibre sintetiche sino a 10 mm.
3440167 Pacchetto di lame per seghetti alternativi (acciaio al carbonio) per legno morbido e duro, truciolato
sino a 80 mm.
3440169 Blister di 3 lame assortite per seghetti alternativi
(legno e metallo).
17. LIVELLO DI RUMOROSITÀ E VIBRAZIONI
I livelli di rumore e vibrazioni di questo apparato elettrico
sono stati misurati in conformità con la Norma Europea
EN60745-2-11 è EN 60745-1 e fungono da base di
confronto con macchine per applicazioni simili.
Il livello di vibrazioni indicato è stato determinato per
le principali applicazioni dell’apparato e può essere
utilizzato come punto di partenza per la valutazione
dell’esposizione al rischio delle vibrazioni. Ciononos15
tante, il livello di vibrazioni può variare notevolmente
rispetto al valore dichiarato in altre condizioni di
applicazione, con altri strumenti di lavoro o in caso
di manutenzione insufficiente dell’apparato elettrico
e dei suoi strumenti, e può aumentare notevolmente
come conseguenza del ciclo di lavoro e del modo d’uso
dell’apparato elettrico.
Pertanto è necessario stabilire misure di sicurezza per
la protezione dell’utente dall’effetto delle vibrazioni,
ad esempio mantenendo l’apparato e gli strumenti
di lavoro in perfetto stato e pianificando i tempi dei
cicli lavorativi (ad esempio i tempi di funzionamento
dell’apparato sotto carico e i tempi di funzionamento a
vuoto quando l'apparato non viene realmente utilizzato,
dato che la riduzione di questi ultimi può ridurre in modo
sostanziale il valore totale dell’esposizione).
18. GARANZIA
Tutte le machine elettroportatili VIRUTEX hanno una
garanzia di 12 mesi valida a partire della data di consegna, con l'esclusione di tutte le manipolazioni o danni
derivanti da un uso inadeguato o dall'usura normale
della macchina.
Per qualunque riparazione rivolgersi al servizio autorizzato di assistenza tecnica VIRUTEX.
La VIRUTEX si riserva il diritto di modificare i propi
prodotti senza preaviso.
PORTUGUÉS
1. Antes de ligar a máquina, certifique-se de que a tensão
de alimentação eléctrica seja a correspondente à indicada
na placa de características do aparelho.
2. Antes de começar a serrar, elimine da madeira qualquer
prego ou objecto metálico.
3. Não utilize folhas de serra que estejam deformadas ou
quebradas. Certifique-se de que estejam bem afiladas e
de que possuam os dentes em perfeito estado.
4. Não use folhas de serra que não correspondam às
características indicadas neste manual.
5. Desligue a máquina da rede de corrente eléctrica, antes
de substituir a folha ou de realizar qualquer regulação
ou manipulação na mesma
2. CARACTERÍSTICAS TÉCNICAS
MODELO SC134L
(sem empunhadura de agarramento)
Potência.........................................................................550W
Percursos por minuto.................................300-3200/min
Espessura máxima de corte em madeira............80 mm
Capacidade de inclinação da base.................................0°-45°
Velocidade regulável.............................................................Sim
Sistema de fixação rápido.....................................................Sim
Movimento pendular.................................................3 posições
Peso.......................................................................................2,1 Kg
Nível de pressão acústica contínuo equivalente ponderado A...........................................................................84 dBA
Nível de potência acústica A.................................95 dBA
Incerteza...........................................................................K = 3 dBA
Usar protecção auricular!
SERRA TICO TICO SC134L-SC234L
(Ver imagens nas págs. 23, 24 e 25)
Valores totais de vibração......................................ah: 6,9 m/s2
Incerteza.........................................................................K: 1,5 m/s2
Importante
MODELO SC234L
(com empunhadura de agarramento)
Potência................................................................................550W
Percursos por minuto....................................300-3200/min
Espessura máxima de corte em madeira........................80 mm
Capacidade de inclinação da base............................0°-45°
Velocidade regulável..........................................................Sim
Sistema de fixação rápido.....................................................Sim
Movimento pendular.............................................3 posições
Peso......................................................................................2,1 Kg
Antes de utilizar a máquina leia atentamente este MANUAL DE INSTRUÇÕES
e o FOLHETO DE INSTRUÇÕES GERAIS
DE SEGURANÇA anexo. Assegure-se de
os ter compreendido antes de começar
a trabalhar com a máquina.
Conserve os dois manuais de instruções para possíveis
consultas posteriores.
1. INSTRUÇÕES DE SEGURANÇA
PARA A UTILIZAÇÃO DA SERRA
Leia atentamente o FOLHETO DE INSTRUÇÕES GERAIS DE SEGURANÇA que se
anexa à documentação da máquina.
16
Nível de pressão acústica contínuo equivalente ponderado A...........................................................................84 dBA
Nível de potência acústica A.................................95 dBA
Incerteza...........................................................................K = 3 dBA
Usar protecção auricular!
Valores totais de vibração......................................ah: 6,9 m/s2
Incerteza.........................................................................K: 1,6 m/s2
3. EQUIPAMENTO STANDARD
1. Jogo de 3 folhas de serra tico tico variadas (madeira
e metal)
2. Guia de corte anti-estilhas
3. Tubagem para a ligação a um aspirador
4. Protector contra o voo de aparas
5. Chave hexagonal de serviço
6. Base plastico.
4. LIGAÇÃO ELÉCTRICA E ENTRADA
EM FUNCIONAMENTO
A tensão de alimentação eléctrica deve ser correspondente à indicada na placa de características da máquina.
MODELO SC134L
Para a entrada em funcionamento da máquina há que
manter accionado o botão A (Fig. 1). Se se desejar realizar
um trabalho contínuo, há que accionar e bloquear o
botão na sua posição final.
Para parar a máquina, só há que soltar o botão A
(Fig.1).
MODELO SC234L
Para a entrada em funcionamento da máquina há que
manter accionado o botão B (Fig. 2). Se se desejar realizar
um trabalho contínuo, há que bloquear o dito botão por
meio do botão C (Fig. 2).
Para parar a máquina, só há que desbloquear o botão
B por meio do botão C.
5. MONTAGEM E SUBSTITUIÇÃO DA
FOLHA DE SERRA (Figs. 3 a 10)
A fim de montar a folha de serra, em primeiro lugar
deve-se retirar a protecção transparente D (Fig. 3).
Depois de retirada a protecção transparente, há que
colocar o mecanismo de fixação rápida E na sua posição
mais elevada e colocar a folha de serra F na ranhura do
mecanismo de fixação (Fig. 4).
A seguir, há que introduzir a folha de serra F até que
o dente fique agarrado pelo mecanismo de fixação
(Fig. 5).
Por último, há que colocar o botão de bloqueio E na
sua posição inferior, com o qual a folha ficará fixada e
bloqueada (Fig. 6).
Antes de dar início ao trabalho, há que voltar a montar
a protecção transparente D (Fig. 7).
A fim de poder desmontar a folha de serra, primeiramente
deve-se retirar a protecção transparente D (Fig. 8).
A seguir, há que colocar o botão de bloqueio E na sua
posição mais elevada e puxar para baixo pela folha de
serra F (Fig. 9).
O botão de bloqueio E voltará automaticamente para
a sua posição inicial.
Por último, há que colocar o protector transparente
D (Fig. 10).
A serra de recortes está equipada com
dois ecrãs de protecção, tal como se indica
nas figuras 14 e 15.
O ecrã de protecção S (Fig. 14) está concebido para os
trabalhos sem pó e deverá ser utilizado apenas com a
máquina acoplada a um aspirador de pó externo.
Para os cortes inclinados deverá utilizar-se apenas o ecrã
de protecção T (Fig. 15) e nunca o ecrã de protecção
S (Fig. 14).
6. REGULAÇÃO DO MOVIMENTO PENDULAR
O uso do movimento pendular permite poder obter o
máximo de eficácia no corte. A selecção e a entrada
em funcionamento do sistema de pendulação é executada por meio da alavanca G (Figs. 1-2). As posições
recomendadas para cada um dos tipos de material são
indicadas na placa H (Figs. 1-2).
As Serras Tico Tico SC134L-SC234L permitem poder efectuar a selecção de cada uma das posições de pendulação,
até mesmo estando a máquina em funcionamento.
7. REGULAÇÃO DA VELOCIDADE DE CORTE
A velocidade de corte pode ser regulada com precisão
por meio da roda I desde a posição A até à posição G
(Fig. 1 para a SC134L e Fig. 2 para a SC234L). Esta opção
permite-lhe poder trabalhar com a opção ideal, de acordo
com a natureza do material a serrar.
A posição recomendada para cada tipo de material, é
a seguinte:
MATERIAL
POSIÇÃO DO REGULADOR
MADEIRA
AÇO
ALUMÍNIO
BORRACHA
CERÂMICA
G
D-E
E
B-C
A-C
Estas posições encontram-se também indicadas na
placa H (Figs. 1-2).
8. ENTRADA DO CORTE SEM
PERFURAÇÃO (Fig. 11)
Posicionar a máquina, tendo o canto dianteiro da base sobre a peça, e fazer pressão para baixo com suavidade.
Colocar a alavanca G (Fig. 11) da posição oscilante no
ponto "O".
9. REGULAÇÃO DA BASE (Fig. 12)
Afrouxar o parafuso K (Fig. 12) por meio da chave
hexagonal fornecida junto com o equipamento standard.
17
Empurrar a base J para atrás e regulá-la ao ângulo
desejado (0º, 15º, 30º ou 45º); voltar a pôr a base na sua
posição inicial e fixá-la de novo por meio do parafuso K.
A fim de poder fixar ângulos intermédios, é necessário
fazê-lo tendo a base para atrás.
10. GUIA DE CORTE ANTI-ESTILHAS (Fig. 12)
A guia de corte anti-estilhas L (Fig. 12) unicamente pode
ser empregue tendo a base em 0º.
11. PRECAUÇÕES PARA A SERRAGEM
Na serragem de metais, há que aplicar na folha de serra
algum produto para a sua lubrificação e refrigeração.
No caso de se cortarem chapas metálicas finas torna-se
conveniente fixar a chapa num suporte de madeira, a
fim de que o corte seja mais fino.
Antes de penetrar a folha de serra numa parede ou num
tecto, certifique-se que que não existem fios eléctricos
embutidos.
Agarre sempre a máquina pelas partes de sujeição que
estiverem isoladas.
12. LIGAÇÃO A UM ASPIRADOR
A máquina pode ser ligada facilmente aos nossos
aspiradores VIRUTEX AS182K e AS282K, através da
tubagem M (Figs. 1-2), por meio do kit de refª 6446073
- 1746245.
A fim de poder desmontar a tubagem, há que fazer
pressão na pestana de fixação N e puxar da tubagem
para a atrás. (Fig. 13).
13. MANUTENÇÃO: SUBSTITUIÇÃO DE ESCOVAS
Quando o comprimento do carvão for inferior a 5 mm,
há que substituir as escovas. No modelo SC134L há
que afrouxar os parafusos O e extrair a parte traseira
da carcaça P (Fig. 1).
De esta forma, as escovas tornam-se facilmente visíveis.
Depois, soltar a mola de sujeição, desconectar a ligação
e extrair o carvão. A substituição das escovas realiza-se
em sentido inverso.
Para o modelo SC234L há que afrouxar os parafusos Q,
extrair as tampas laterais R (Fig. 2) e proceder da mesma
forma como a que se explicou para o modelo anterior.
14. LUBRIFICAÇÃO
(a ser realizada pelo Serviço Técnico Oficial)
Durante o período de garantia, não se devem afrouxar os
parafusos da cabeça de engrenagem; em caso contrário
perder-se-ia o direito à dita garantia.
15. ACESSÓRIOS OPCIONAIS
3445406 Esquadra guia lateral/compasso
8200010/200 Aspiradores AS182K/AS282K
18
6446073 Acoplamento aspiração
1746245 Acoplamento de aspiração standard 5 m.
16. FOLHAS DE SERRA OPCIONAIS
(jogo de 5 unidades)
3440163 Pacote de serras tico tico (aço-carbono). (Para
madeira mole e dura, e contrachapado e aglomerados
de até 80 mm)
3440164 Pacote de serras tico tico (aço-carbono). (Para
madeira mole e dura, contrachapado e aglomerados de
até 80 mm, e Fibras isolantes e plásticos flexíveis)
3440165 Pacote de serras tico tico (aço rápido). (Para
ferro e aço doce de até 5 mm, Melamina e fibras sintéticas
de até 8 mm e metais não férreos de até 20 mm)
3440166 Pacote de serras tico tico (aço rápido). (Para
ferro e aço doce de até 5 mm, metais não férreos de até
20 mm, e Melamina e fibras sintéticas de até 10 mm)
3440167 Pacote de serras tico tico (aço-carbono). (Para
madeira mole e dura, e aglomerados de até 80 mm)
3440169 Blister de 3 folhas de serras tico tico variadas
(madeira e metal).
17. NÍVEL DE RUÍDO E VIBRAÇÕES
Os níveis de ruído e vibrações desta ferramenta eléctrica foram medidos de acordo com a Norma Europeia
EN60745-2-11 e EN 60745-1 e servem como base de
comparação com uma máquina de aplicação semelhante.
O nível de vibrações indicado foi determinado para as
principais aplicações da ferramenta e pode ser utilizado
como valor de partida para a avaliação da exposição ao
risco das vibrações. Contudo, o nível de vibrações pode
alcançar valores muito diferentes do valor indicado
noutras condições de aplicação, com outros dispositivos
de trabalho ou com uma manutenção deficiente da
ferramenta eléctrica e respectivos dispositivos, podendo
resultar num valor muito mais elevado devido ao seu
ciclo de trabalho e modo de utilização.
Por conseguinte, é necessário estabelecer medidas de
segurança para protecção do utilizador contra o efeito
das vibrações, tais como a manutenção da ferramenta,
conservação dos respectivos dispositivos em perfeito
estado e organização dos períodos de trabalho (tais
como os períodos de trabalho com a ferramenta em
carga e períodos de trabalho com a ferramenta em vazio
e sem ser realmente utilizada, uma vez que a redução
da carga pode diminuir de forma substancial o valor
total da exposição).
18. GARANTIA
Todas as máquinas electro-portáteis VIRUTEX possuem
uma garantia válida por 12 meses contados a partir
do dia do seu fornecimiento, ficando dela excluídas
todas aquelas manipulações ou danos ocasionados por
utilizações não adequadas ou pelo desgaste natural da
máquina. Para qualquer reparação, há que se dirigir ao
Serviço Oficial de Assistência Técnica VIRUTEX.
A VIRUTEX reserva para si o direito de poder modificar os
seus productos, sin a necesidade de aviso prévio.
РУССКИЙ
ЭЛЕКТРОЛОБЗИК SC134L - SC234L
(23, 24, 25)
ОЧЕНЬ ВАЖНО
Прежде, чем начать
пользоваться станком
прочтите внимательно это
РУКОВОДСТВО и прилагаемую
БРОШЮРУ С ИНСТРУКЦИЯМИ
ПО БЕЗОПАСНОСТИ. До того, как
приступить к работе на станке
удостоверьтесь, что Вы хорошо
освоили их содержание.
Сохраните руководство и брошюру для
возможных последующих консультаций.
1. ИНСТРУКЦИЯ ПО БЕЗОПАСНОСТИ
Прочитайте внимательно общую
инструкцию по ТБ, включенную
в комплект Документации
электролобзика.
1. Перед подключением электричества
убедитесь, что напряжение в сети
соответствует характеристикам, указанным
на электролобзике.
2. Перед работой осмотрите поверхность, на
которой собираетесь работать, удалите все
металлические и другие частицы.
3. Никогда не используйте поврежденные
или сильно изношенные пилки. Убедитесь,
что пила достаточно острая и ее зубцы в
хорошем состоянии.
4. Не используйте никакие другие пилки,
кроме тех, которые указаны в этой
инструкции.
5. Обязательно отключите машину от сети
прежде, чем менять пилку или переносить
лобзик
2. ТЕХНИЧЕСКИЕ ХАРАКТЕРИСТИКИ
МОДЕЛЬ SC134L (без ручки)
Мощность.................................................550 Вт
Количество рабочих
ходов в минуту............................300-3200/мин
Максимальная глубина реза по дереву....80 мм
Угол наклона..............................................0°-45°
Электронная регулировка скорости............Есть
Система быстрого зажима...........................Есть
Регулировка маятникового хода..........3 позиции
Вес...............................................................2.1 кг
Эквивалентный уровень
акустического давления A........84 дБ(A)
Уровень акустического давления A........95 дБ(A)
Диапазон колебания.....................K = 3 дБ(A)
Используйте индивидуальные
средства защиты слуха!
Уровень вибрации общий...............ah: 6,9 м/с2
Диапазон колебания...........................K: 1,5 м/с2
МОДЕЛЬ SC234L (с ручкой)
Мощность..................................................550 Вт
Количество рабочих
ходов в минуту..............................300-3200/мин
Максимальная глубина реза по дереву....80 мм
Угол наклона..............................................0°-45°
Электронная регулировка скорости............Есть
Система быстрого зажима...........................Есть
Регулировка маятникового хода..........3 позиции
Вес...............................................................2.2 кг
Эквивалентный уровень
акустического давления A........84 дБ(A)
Уровень акустического давления A......95 дБ(A)
Диапазон колебания.....................K = 3 дБ(A)
Используйте индивидуальные
средства защиты слуха!
Уровень вибрации общий................ah: 6,9 м/с2
Диапазон колебания...................K: 1,6 м/с 2
3. СТАНДАРТНАЯ КОМПЛЕКТАЦИЯ
1. Набор трех различных пилок (для дерева и
металла).
2. Противоскольный вкладыш.
3. Адаптор для подключения пылесборника.
4. Прозрачный защитный кожух.
5. Ключ шестигранный.
4. ПОДСОЕДИНЕНИЕ К СЕТИ И ВКЛЮЧЕНИЕ
МАШИНЫ
Напряжение питания должно соответствовать
19
указанному на табличке лобзика.
МОДЕЛЬ SC134L
Для включения машины необходимо
удерживать кнопку А нажатием (рис. 1). Для
продолжительного действия нужно нажать
кнопку и зафиксировать в таком положении.
Для выключения машины отожмите кнопку А
(рис. 1).
МОДЕЛЬ SC234L
Для включения машины необходимо
удерживать кнопку В нажатием (рис. 2). Для
продолжительного действия нужно нажать
кнопку В и зафиксировать в таком положении
с одновременным нажатием кнопки С (рис. 2).
Для выключения машины отожмите кнопку С
для разблокирования кнопки В.
5. УСТАНОВКА И ЗАМЕНА ПИЛОК
Для установки пилки необходимо сначала
удалить защитный кожух D (рис. 3). Когда
защитный кожух будет удален, переведите
быстро зажимной механизм Е в его
наивысшую позицию и установите пилку F в
разъем фиксирующего механизма (рис. 4).
Нажимайте на полотно до тех пор, пока оно
не займет свое место в фиксаторе (рис. 5).
В конце опустите фиксирующую кнопку Е
в нижнюю позицию, таким образом пилка
будет зафиксирована в своем посадочном
месте (рис. 6). Перед началом работы
установите защитный кожух D на место.
Чтобы снять пилку, удалите защитный кожух,
зафиксируйте кнопку Е в наивысшей позиции
и потяните вниз за пилку F (рис. 9).
Блокирующая кнопка Е автоматически примет
исходную позицию.
Наконец, закройте крышку защитного кожуха
D (рис. 10).
Лобзик оснащен двумя
защитными системами,
изображенными на (рис. 14 и 15).
Защитная система S (рис. 14) разработана
специально и должна применяться
только в случае подключения к внешнему
пылеудаляющему устройству. Для
выполнения пропила под углом используйте
защитную систему Т (рис. 15). Никогда не
применяйте защитную систему S (рис. 14)
при выполнении пропила под углом.
6. РЕГУЛИРОВКА МАЯТНИКОВОГО ХОДА
Использование маятникового хода позволит
Вам достичь максимально эффективного
резания. Для начала и выбора маятникового
хода используйте рычаг G (рис. 1-2).
Рекомендуемые позиции для каждого вида
материалов указаны на полотне Н (рис. 1-2).
Лобзики SC134L - SC234L позволяют
выбирать различные маятниковые позиции
даже в тот момент, когда машина уже
запущена.
7. РЕГУЛИРОВКА СКОРОСТИ РЕЗАНИЯ
Скорость резания можно регулировать при
помощи поворота вариатора с позиции А
до позиции G (рис. 1 для модели SC134L
и рис. 2 для модели SC234L). Эта опция
позволяет выбрать наилучшую скорость для
обрабатываемого материала.
Рекомендуемые позиции для каждого вида
материала следующие:
МАТЕРИАЛ
ПОЗИЦИЯ ВАРИАТОРА
ДЕРЕВО
СТАЛЬ
АЛЮМИНИЙ
РЕЗИНА
КЕРАМИКА
G
D-E
E
В-С
А-С
Эти позиции также указаны на полотне Н
(рис. 1-2).
8. РЕЗАНИЕ БЕЗ ПРЕДВАРИТЕЛЬНОГО
СВЕРЛЕНИЯ
Установите переднюю поверхность корпуса
машины (как показано на рисунке 11) в место,
где будет производиться разрез и сильно
надавите на корпус.
Переместите рычаг G (рис. 11) из выбранной
позиции в пункт О.
9. РЕГУЛИРОВАНИЕ КОРПУСА (рис. 12)
Ослабьте винт К (рис. 12), используя ключ
шестигранник, прилагаемый к стандартному
комплекту оборудования. Потяните назад
базу J и настройте на желаемый угол (0°,
15°, 30° или 45°), затем верните базу в
исходное положение и снова зафиксируйте
стягивающим винтом К. Промежуточные углы
должны быть зафиксированы поворотом
корпуса назад.
10. ПРОТИВОСКОЛЬНЫЙ ВКЛАДЫШ
20
Противоскольный вкладыш L (рис. 12) может
использоваться только в том случае, если
корпус отрегулирован на 0°.
11. РЕКОМЕНДАЦИИ ПО РАСПИЛИВАНИЮ
Во время распиливания металла наносите
смазочные и охлаждающие средства на
лезвие пилки. Распиливая тонкие листы
железа, их необходимо зафиксировать в
деревянные подложки для наилучшего
результата.
Прежде чем использовать электролобзик для
распиливания стены или потолка, убедитесь,
что там отсутствует электропроводка.
Всегда храните машину в разобранном виде
(без режущего элемента).
12. ПОДСОЕДИНЕНИЕ К ПЫЛЕСБОРНИКУ
Сопло машины М (рис. 1-2) легко может быть
подсоединено к пылесборникам (VIRUTEX AS182K и AS282K), используя набор
инструментов 6448073 - 1746245.
13. ЭКСПЛУАТАЦИЯ И ЗАМЕНА ЩЕТОК
Замена щеток производится, если их толщина
достигла 5мм. Для модели SC134L: ослабить
стягивающий винт О и потянуть назад крышку
Р (рис. 1). Щетки должны быть отчетливо
видны. Выведите фиксирующую пружину из
зацепления и удалите щетки.
Для модели SC234L: ослабить стягивающий
винт Q и открыть боковую крышку R (рис.
2). Проделайте все то же самое, что и в
предыдущем описании.
14. СМАЗКА
(производится изготовителем)
Винты на головном механизме не должны
быть сняты до конца гарантийного
срока, иначе гарантия будет считаться
недействительной.
Смазка должна быть произведена через
1.500 часов использования лобзика.
15. ДОПОЛНИТЕЛЬНЫЕ ПРИСПОСОБЛЕНИЯ
3445400 Боковой упор/циркуль
8200010/200 Пылесборники AS182K/AS282K
6446073 дополнительное приспособление
для подключения машины к внешнему
пылесборнику.
1746245 Стандартный шланг для
подключения к пылеудаляющему аппарату
5м
16. ДОПОЛНИТЕЛЬНЫЕ ПИЛКИ ДЛЯ ЛОБЗИКА
3440163 Упаковка лобзиковых пилок
(углеродистая сталь) для мягких и твердых
пород дерева, шпона и ДСП толщиной до 80
мм.
3440164 Упаковка лобзиковых пилок
(углеродистая сталь) для мягких и твердых
пород дерева, шпона и ДСП толщиной до 80
мм, исключая волокна и гибкие пластики.
3440165 Упаковка лобзиковых пилок
(быстрорез) для мягких сталей и железа
толщиной до 5 мм, меламина и синтетических
волокон толщиной до 8 мм и цветных
металлов толщиной до 20 мм.
3440166 Упаковка лобзиковых пилок
(быстрорез) для мягких металлов толщиной
до 20 мм, меламина и синтетических волокон
до 10 мм.
3440167 Упаковка лобзиковых пилок
(углеродистая сталь) для мягких и твердых
сортов дерева и ДСП толщиной до 80 мм.
3440169 Блистерная упаковка 3Х различных
видов пил для дерева и металла.
17. УРОВЕНЬ ШУМА И ВИБРАЦИИ
Уровень шума и вибрации этого устройства
были измерены в соответствии с
европейским стандартом 60745-2-11 и
EN 60745-1 и служат основанием для
сравнения с другими машинами с подобными
характеристиками.
Обозначенный уровень вибрации был
определен для основных операций и может
использоваться как начальное значение для
того, чтобы оценить риски, возникающие
вследствие вибрации. Однако, колебания
могут достигнуть уровней, которые
отличаются от объявленного значения при
других условиях эксплуатации, с другими
инструментами или с недостаточным
техническим обслуживанием устройства
или его приспособлений, достигая намного
более высокой величины в результате цикла
работы или способа, которым используется
устройство.
Необходимо принять меры по обеспечению
безопасности пользователя от повышенной
вибрации, например, поддержание
устройства в чистоте и своевременное
техническое обслуживание устройства,
приспособлений и инструмента, а также
организация продолжительности циклов
работы (например, операционное время под
нагрузкой и время простоя, т.к. сокращение
последнего может существенно влиять на
21
уровень вибрации).
18. ГАРАНТИЯ
Все изделия фирмы VIRUTEX имеют
гарантию 12 месяцев с момента поставки.
Гарантия не распространяется на ущерб
или повреждения, возникшие в результате
некорректного использования или
естественного износа изделия. Любой ремонт
должен выполняться на уполномоченных
станциях техобслуживания VIRUTEX.
Фирма VIRUTEX оставляет за собой право
на внесение изменений в свои изделия без
предварительного уведомления.
22
Fig. 1
H
O
A
C
P
Fig. 2
I
H
B
I
D
G
Q
D
R
G
M
M
Fig. 3
Fig. 5
Fig. 4
Fig. 6
23
Fig. 7
Fig. 8
Fig. 9
Fig. 10
Fig. 12
G
L
Fig. 11
24
K
Fig. 13
Fig. 14
S
Fig. 15
T
25
3496309
102010
Virutex, S.A.
Antoni Capmany, 1
08028 Barcelona (Spain)
www.virutex.es