1
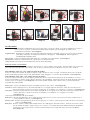
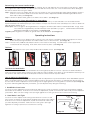
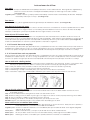
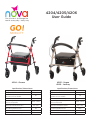
4204/4205/4206
User Guide
Our mission is to change the
world - every day - every way
4205 - Vogue
4206 - Journey
4204 - Groove
Specifications/Dimensiones
Specifications/Dimensiones
Weight Capacity/Peso Max. Usuario
275 lbs.
Weight Capacity/Peso Max. Usuario
Weight/Peso
16.5 lbs.
Weight/Peso
275 lbs.
15 lbs.
Width Between Handles/
Anchura entre las manillas
18”
Width Between Handles/
Anchura entre las manillas
19”
Wheel Size/Medida de reudas
8”
Wheel Size/Medida de reudas
6”
Handle Height Adjustment/
Altura total ajustada
Approximate User Height/
Altura aproximada del usuario
Overall Height/Altura total
31.75” - 35.25”
5’3” - 6’0”
42”
Handle Height Adjustment/
Altura total ajustada
Approximate User Height/
Altura aproximada del usuario
27.75” - 33.75”
4’9” - 6’0”
Overall Height/Altura total
39.5”
23.75”
Overall Width/Anchura total
24.5”
Overall Width/Anchura total
Overall Depth/Anchura Plegada
27.5”
Overall Depth/Anchura Plegada
22”
Safety Warning Instructions
• Read walker guidebook before operation or using any Nova rollator.
• DO NOT exceed 275 lb. weight capacity.
• Periodically check leg and handle height adjustment screws to make sure they are secure.
• Periodically check push buttons on legs and backrest to make sure they are engaged.
• Always contact your physician or therapist before using to determine proper adjustment and usage.
• DO NOT use as a wheelchair or to transport someone.
• DO NOT self propel or scoot around while seated.
• Brakes must be in locked position before using the seat. Do not attempt to push yourself or ambulate in any way.
• Backrest must always be attached when using and is not designed to support the entire weight of the user.
• DO NOT use on stairs, escalators, moving sidewalks, or any uneven surfaces.
• DO NOT attempt to reach for items while seated on the walker. This motion may cause a change in weight distribution and cause the rollator to tip or become unstable.
• The rollator bag has a weight capacity of 10 lbs. Items should not hang over the top or front of the bag.
• Care should be taken to ensure that all height adjustment knobs, castors, or any other moving objects are in good working order before operation.
• Make sure walker frame is fully opened before use.
• DO NOT sit on the walker on an incline.
• DO NOT remove warning sticker.
FAILURE TO FOLLOW THESE INSTRUCTIONS CAN LEAD TO SERIOUS INJURY OR RESULT IN DEATH.
MISUSE OF THE WALKER MAY VOID WARRANTY.
Read Walker Guidebook before operating or using any Nova rollator.
Instrucciones de seguridad
• Lea el manual de instrucciones antes de usar o operar cualquier Andadera de Nova.
• No pase el máximo de 275 lbs.
• Periódicamente revise que los botones para ajustar colocados en las patas y las manillas estén asegurados.
• Periódicamente presione los botones para ajustar colocados en las patas y el respaldo para asegurar que funcionan.
• Para saber si debe usar una andadera, pregúntele a su médico o terapeuta.
• No use la andadera como silla de ruedas.
• No se pasee o gire mientras esté sentado.
• Los frenos deben estar activados y asegurados antes de sentarse. No trate de moverse o empujarse al hacer esto.
• El respaldo siempre debe estar puesto durante uso, y no está diseñado para aguantar el peso entero del usuario.
• No use la andadera en escaleras, ni escaleras o banquetas mecánicas, ni en algún piso a desnivel.
• No trate de agarrar cosas alrededor de la andadera mientras esté sentado. Este movimiento puede causar un cambio de equilibrio y causar que se ladee.
• La bolsa de andadera carga un máximo de 10 lbs. Las cosas dentro de la bolsa no deben salir o colgarse fuera de la bolsa.
• Cuidadosamente asegure que todos los ajustes de altura, las manillas, las ruedas, y cualquier otro objeto
que se mueva esté funcionando correctamente antes de utilizar.
• Revise que la andadera esté completamente abierta antes de utiliza.
• No se siente en la andadera cuando esté inclinada.
• No quite la etiqueta de precaución.
EL NO SEGUIR ESTAS INSTRUCCIONES, PUEDE RESULTAR EN HERIDAS, DAÑO, O MUERTE.
EL MAL USO DE LA ANDADERA PUEDE CAUSAR ANULACIÓN DE GARANTÍA
Lea las Instrucciones de la Andadera antes de utilizar o operar cualquier
producto de Nova.
Assembly Instructions
To Remove
1
2
Step 1: Carefully remove the walker frame and components from
the shipping box.
Step 2: Examine all parts for damage from shipping. If any parts are missing or damaged, please call 1-800-557-6682 and prompt Customer Service. DO NOT use walker until all parts are received.
Components
Walker Frame with Bag and Seat, Backrest (see image 1)
(2) Front Wheels (see image 2)
(2) Rear Wheels with Cable Handle and Hand Brake (see image 3)
(6) Leg and Handle Adjustment Screws (see image 4)
3
4
Lea el Manual de Instrucciones antes de utilizar cualquier andadera de Nova.
Instrucciones de ensamblaje
Para Sacar
Primer paso: Cuidadosamente saque el marco de la andadera y todas sus partes de la caja.
Segundo paso: Revise que las partes no estén dañadas por causa de ser enviadas. Si falta o está dañada alguna parte, por favor llame al 1-800-557-6682 para el Servicio de reclamaciones. No utilice la andadera hasta que reciba todas las partes.
Partes
Marco de andadera con la bolsa, un asiento, y un respaldo (vea imagen 1)
(2) Ruedas delanteras (vea imagen 2)
(2) Ruedas traseras con cable para el freno de mano (vea imagen 3)
(6) Tornillos para ajustar las piernas y las agarraderas (vea imagen 4)
To Unfold
Step 1: Unfold the walker by pulling the front and rear frame apart and place on a flat surface. Lift the seat and push downward on the folding support piece so the side folding hinges are fully extended. (see image 5)
Step 2: Insert the backrest into the plastic backrest hinges. Press down on the push buttons and slide the backrest completely into the hinge until the buttons engage into the hinge holes. (see image 6) Pull on the backrest to make sure it is secure.
Step 3: Turn the walker so that it rests on the rear of the frame. (see image 7)
Step 4: Insert the front wheels into the frame for your desired seat height.
(See recommended seat height below)
Recommended Seat Height
The user’s feet should be flat on the ground when they are properly seated on the walker. We recommend the lower seat height to fit most individuals from 4’-10” – 5’5” and the higher seat height for individuals from 5’5”- 6’1”.
For Heights 5’5” - 6’1” (upper push button)
Push down on the top button and slide the stem into the frame. You will need to press down on the second button to allow the top button to insert into the hole on the frame. (see image 8)
For Heights 4’10” - 5’5” (lower push button)
Align the button just off center from the hole in the frame and slide the stem into the frame. Press down again on the lower button and continue to slide the stem into the frame while aligning the lower button with the hole on the frame
until the lower button is inserted into the hole. (see image 9) Be sure that both wheels are set at the same height and pull on the legs to make sure they are secure.
Step 5: Turn walker over so that it rests on the front of the frame. (see image 10)
Step 6: Insert the wheel leg marked (L) into the left rear frame so that the wheel is on the outside of the frame and the push buttons are lined up with the hold in the frame. (see image 11)
Step 7: Insert the wheel leg marked (R) into the right rear frame so that the wheel is on the outside of the frame and the push buttons are lined up with the hole in the frame. (see image 12)
(See recommended seat height above)
Step 8: Turn the walker over so that it is resting on the wheels. Be sure that all the four wheels are flat and that the seat is level. (see image 13)
Step 9: Insert the handles into the frame being sure that the cables are on the outside of the frame. (see image 14)
Step 10: Insert the four leg attachment screws into the holes located on the outside of the frame. Hand tighten until
the screw is secure and the plastic knob is flush with the frame. Adjustment handle should be tight and not move from side to side. Be sure all four screw legs screws are secure before using the walker. (see image 15)
image 5
image 10
image 6
image 11
image 7
image 12
image 8
image 13
image 9
image 14
image 15
Para Desdoblar
Primer paso: Para desdoble la andadera, jale el frente del marco y luego por atrás. Coloque la andadera en un piso a nivel. Levante el asiento y oprima hacia abajo para asegurar que las bisagras de al lado estén completamente abiertas. (vea imagen 5)
Segundo paso: Ensamble el respaldo dentro de las bisagras de plástico indicadas. Presione los botones del respaldo
hacia abajo hasta que el respaldo quede dentro del agujero. (vea imagen 6) Para asegurar la estabilidad del respaldo, jálelo.
Tercer paso: Voltee la andadera para abajo para que el respaldo esté hacia arriba. (vea imagen 7)
Cuarto paso: Meta las ruedas delanteras, y ajuste las a su altura preferida.
(Abajo puede usar nuestras recomendaciones para la altura adecuada)
Altura de asiento recomendada
Los pies del usuario de la andadera deben mantenerse en el piso cuando esté sentado. Recomendamos que el asiento
esté más bajo para individuos entre 4’10’’ y 5’5’’ de altos y más alto para los individuos entre 5’5’’ y 6’1’’ de altos.
Para individuos entre 5’5’’ y 6’1’’ (utilice el botón de arriba)
Presione el botón de la parte de arriba y empuje el tubo del asiento entre en lugar. Tendrá que presionar el segundo
botón hacia abajo para que el botón de arriba pueda entrar al agujero en el marco de la andadera. (vea imagen 8)
Para individuos entre 4’10’’ y 5’5’’ (utilice el botón de abajo)
Presione el botón hacia al centro del agujero para poder mover el tubo dentro del marco de la andadera. De nuevo presione hacia abajo y empuje el tubo dentro del marco de la andadera. Mantenga el botón de abajo alineado hasta que
el botón entre en el agujero. (vea imagen 9) Revise que ambas ruedas estén al mismo nivel, y jale las patas para asegurar que estén estable.
Cinco paso: Voltee la andadera para que el respaldo quede contra el piso. (vea imagen 10)
Seis Paso: Meta la pata trasera con la rueda marcada (L) en el lugar izquierdo del marco, para que la rueda esté al exterior del marco y presione los botones para que se ensamblen con el agujero en el marco. (vea imagen 11)
Siete paso: Meta la otra pata trasera con la rueda marcada (R) en el lugar derecho del marco, para que la rueda esté al exterior del marco y presione los botones para que se ensamblen con el agujero en el marco. (vea imagen 12)
(Lea las recomendaciones de altura arriba)
Ocho paso: Mueva la andadera de nuevo, para que las ruedas estén en el piso. Revise que las cuatro ruedas estén a nivel y también el asiento. (vea imagen 13)
Noveno paso: Coloque las agarraderas dentro de los agujeros en el marco, y mantenga los cables de freno por fuera del marco. (vea imagen 14)
Diez paso: Meta los cuatro tornillos para la patas dentro de cada agujero afuera del marco. Atornille los a mano hasta que la manilla de plástico haga contacto con el marco. La manilla del tornillo debe permanecer apretada si movimiento. Esté seguro que los tornillos para las patas estén asegurados antes de usar la andadera.
(vea imagen 15)
Determining the Correct Handle Height
Stand upright behind the walker with your arms hanging at your side and both feet in line with the rear wheels. Adjust
the height of the walker handles so that they are even with the wrist of the user. This should create a 20 to 30 degree
bend in the elbow when using the walker.
Step 1: Align the hole in the handle with the hole in the frame to your selected handle height and hand tighten until the screw is secure and the plastic knob is flush with the frame. Adjustment handle should be tight and not move from side to side.) (see image 16)
Step 2: Attach the plastic cable guide to the frame of the walker. (see image 17)
Como Determinar la Altura adecuada de las agarraderas
Por detrás de la andadera, póngase de pie con sus manos por un lado y sus pies alineados con las ruedas traseras. Ajuste la altura de las manillas para que estén al mismo nivel que sus muñecas. Esto causará que los codos se doblen de
20 a 30 grados durante el uso.
Primer paso: Alinee el agujero de la agarradera con el agujero del marco para obtener la altura preferida. Luego, meta los tornillos de la agarradera y atornille hasta que estén apretados y seguros. La manilla del tornillo debe permanecer apretada sin movimiento. (vea imagen 16)
Segundo paso: Enganche los cables de guía al marco de la andadera. (vea imagen 17)
Operating Instructions
To Open
Step 1: Place the walker in the upright position resting on the rear wheels. Hold both handles and squeeze the hand brakes while pushing forward on the walker until it rests on all four wheels. (see image 18)
Step 2: Lift up on the padded seat and press down on the bottom of the bag. You will feel the center support bar located under the carry bag. Push down until it locks into place. (see image 19)
To Close
Lift up the seat and pull on the nylon carry handle until the walker closes. (see image 20)
image 16
image 17
image 18
image 19
image 20
To Check the Hand Brakes
You should check to make sure the hand brakes are working properly before each use. Squeeze the brake handles to
make sure that the brake pad contacts the wheel and can stop the walker. Push down on the hand brakes until they lock
into position and make sure that the brake pad contacts the wheel and can stop the walker.
How to Adjust the Hand Brakes
The following information is designed to assist you with the adjustment of your Nova Feather Touch Hand Brake System.
Note: The braking system on your new Nova walker has been preset from the factory. To maintain this preset position,
be sure that the tension adjustment screw locking nuts are tight against the housing and the rear wheels (see image 24).
If you are still having difficulty with your brakes, you can adjust them by doing the following:
1. Hand Brake is too Loose
Loosen the tension adjustment screw locking nut and turn the screw one full turn clockwise (as viewed from standing
at the back of the walker). If this does not correct the adjustment, repeat one full turn at a time until you have adjusted
your brakes. Make sure the locking nut is spun tight against the housing to prevent the screw from loosening.
2. Hand Brake is too Tight
Loosen the tension adjust screw locking nut and turn the screw one full
turn counter clockwise (as viewed from standing at the back of the walker).
If this does not correct the adjustment, repeat one full turn at a time until
you have adjusted your brakes. Make sure the locking nut is pun tight
against the housing to prevent the screw from loosening.
Mounting
Screw
Cable End
Cap
Tension
Adjustment
Screw
Handle
image 24
Brake
Housing
Tension
Adjustment
Screw Locking
Nut
Instrucciones de utilizar
Para Abrir
Primer paso: Coloque la andadera derecha para que descanse en las ruedas traseras. Detenga las dos agarraderas y presione los frenos de mano al empujar la andadera para que se mantenga en la cuatro ruedas. (vea imagen 18)
Segundo paso: Levante el asiento y empuje la bolsa hacia abajo. Sentirá el tubo central debajo de la bolsa. Empújalo hacia abajo hasta que se encaje. (vea imagen 19)
Para Cerrar
Levante el asiento y jale la agarradera para cargar hasta que la andadera se doble. (vea imagen 20)
Para Revisar los frenos de mano
Antes de cada uso, debe asegurar que los frenos de mano funcionen correctamente. Presione la palanca de frenos para
ver que la pastilla de freno haga contacto con la rueda y pare la andadera. Presione los frenos de mano hacia abajo
hasta que se atranquen y revise que la pastilla de freno haga contacto con la rueda.
Como Ajustar El Freno de Mano
La información siguiente es para ayudarle con el ajustamiento del Sistema de Frenos de Mano de Nova. Anote: El
sistema de frenos de su nueva andadera de Nova ha sido programado. Para mantener la programación, asegure que la
tuerca del tornillo que ajusta la presión este apretada contra la caja de frenos y las ruedas traseras (vea imagen 24).
Si aún tiene dificultades con sus frenos, puede ajustar los haciendo lo siguiente:
1. Si el Freno de Mano esta muy flojo
Afloje la tuerca que del tornillo que ajusta la presión y completamente voltee el tornillo a la derecha (se está viendo la
andadera por la parte trasera). Si esto no corrige el ajustamiento, de nuevo completamente voltee el tornillo hasta que
los frenos se ajusten. Asegure que la tuerca esté apretada contra la caja de freno para que el tornillo no se afloje.
2. Si el Freno de Mano está muy apretado
Afloje la tuerca que del tornillo que ajusta la presión y completamente voltee el tornillo a la izquierda (se está viendo la
andadera por la parte trasera). Si esto no corrige el ajustamiento, de nuevo completamente voltee el tornillo hasta que
los frenos se ajusten. Asegure que la tuerca esté apretada contra la caja de freno para que el tornillo no se afloje.
How to Walk with a Rolling Walker
Step 1: Hold the handles with your fingers resting around the hand brake in the squeezing position. This position will allow you to quickly stop the walker or control your speed if necessary by squeezing the hand brake.
Step 2: Roll your walker slowly forward so that the rear wheels are a few inches ahead of your body.
Step 3: Step forward and place one foot in line with the rear wheels.
Step 4: Maintaining a steady roll forward, place your other foot in line with the rear wheels.
Step 5: Determine a pace that is comfortable and allows you to place each step in line with the rear wheels.
How to Sit with a Rolling Walker
Step 1: Lock the brakes by pushing down on the knob located at the rear of the brake handle until it locks in the
downward position.
Step 2: Test the walker before sitting down to make sure that it will not roll.
Step 3: Before sitting, touch the back of your legs to the edge of the seat to ensure proper positioning of the walker.
Step 4: Use the handles to stabilize your body as you turn around.
Step 5: Holding your hands on the handles, slowly lower your body onto the seat.
DO NOT support your full body weight on the handles when attempting to sit down.
Como caminar con la Andadera para adultos
Primer paso: Detenga las agarraderas con sus dedos descansando en el freno de mano. Esta posición lo permite a frenar rápidamente y controlar la velocidad de la andadera.
Segundo paso: Comience a pasear lentamente con la andadera para que la ruedas de atrás estén algunas pulgadas enfrente de su cuerpo.
Tercer paso: Camine hacia al frente y coloque un pie al lado de una de las ruedas traseras.
Cuarto paso: El otro pie debe estar en línea con la otra rueda trasera, y mantenga una velocidad constante.
Quinto paso: Mantenga un ritmo confortable que lo permita caminar en marcha con la andadera.
Como sentarse en la andadera para adultos
Primer paso: Segundo paso:
Tercer paso: Cuarto paso: Quinto paso: NO apoye todo
Presione la palanca de los frenos hasta que se atranquen.
Esté seguro que la andadera no se mueva antes de sentarse.
Antes de sentarse, ponga sus piernas enfrente de la andadera para que la parte de atrás de sus piernas toquen el bordo del asiento.
Use las agarraderas para estabilizar su cuerpo.
Siéntese lentamente y cuidadosamente, deteniendo las agarraderas.
su peso en las agarraderas cuando trate de sentarse.
Warning
Walker must be in a stationary position, on a level surface with the brakes locked when sitting or attempting to sit.
DO NOT scoot around or navigate the walker when in the seated position. Risk of serious damage to the walker and
serious injury may result if brakes are not in the locked position.
Maintenance
Check your walker periodically to make sure that the brakes are working correctly and that all of the nuts and bolts are
secure. Do not use the walker if the brakes are not working correctly.
Warranty Information
Nova stands firm on our commitment to providing the highest quality products, as well as exceptional service. This
product was built to precise standards and thoroughly inspected prior to shipment. This warranty
represents our confidence in the materials and workmanship of our product. Nova extends this warranty only to the
original purchaser of this product. The warranty does not extend to any subsequent purchaser or owner. The warranty
is void upon any sale or transfer of ownership or use by other person. Nova warrants its products are free from defects
in material and workmanship under NORMAL use for the period commencing upon the date of purchase and continuing
for the following specified period of time after that date:
Metal frame: Brakes: Non-Metal/Metal parts: Limited Lifetime Warranty
5 Years
1 Year Limited Warranty
(Wheels, Hand Grips, Padding, Cables, Upholstery, Bag, Screws, Plastic Parts)
This warranty does not cover problems due to user negligence, misuse of the product, failure to adhere to product instructions, or normal wear and tear. Items that have been subject to negligent abuse, modified without prior written
authorization are not covered within this warranty. For warranty service, please contact the dealer from whom you purchased your Nova product. In the event that you do not receive satisfactory service, please call us directly at the
number below. Be prepared to indicate, the nature of the defect, the product serial number, and the name and location
of where you purchased the product. You will also be required to provide a receipt of your purchase. DO NOT return
any products to our office without prior consent. Repair or replacement is the only remedy under this limited warranty.
This warranty does not include any labor or shipping charges incurred in replacement part installation or repair of product.
THIS WARRANTY IS EXCLUSIVE AND IN LIEU OF ALL OTHER EXPRESS WARRANTIES, IMPLIED WARRANTIES, IF ANY,
INCLUDING THE IMPLIED WARRANTIES OF MERCHANTABILITY AND FITNESS FOR A PARTICULAR PURPOSE. NOVA
SHALL NOT BE LIABLE FOR ANY SEQUENTIAL OR INCIDENTAL DAMAGES WHATSOEVER.
***Remember to keep the product’s serial number and the date of purchase***
Customer Help Line: 1-800-557-6682