1
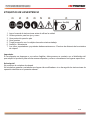
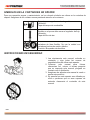
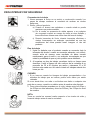
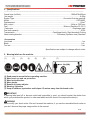
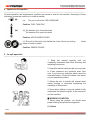
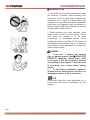
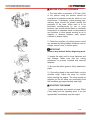
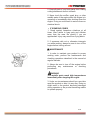
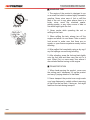
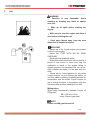
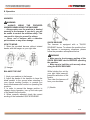
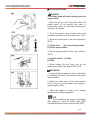
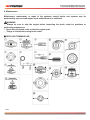
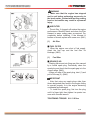
MANUAL DE INSTRUCCIONES
CORTADORA DE CÉSPED
CGR-4603
ESTIMADO CLIENTE
Con el fin de que obtenga el mayor desempeño de su producto, por favor lea este manual de
instrucciones cuidadosamente antes de comenzar a utilizarlo, y guárdelo para su futura referencia.
Si necesita soporte adicional, no dude en escribir a: [email protected]
PRECAUCIÓN
RIESGO DE CHOQUE
ELÉCTRICO , NO ABRA
Precaución: Para reducir el riesgo de choque eléctrico, no
retire la cubierta, no hay partes manipulables por el usuario al
interior de la unidad.
Refiera todo mantenimiento o
intervención técnica a personal técnico calificado.
Este símbolo indica la existencia de voltaje peligroso al
interior de esta unidad, que constituye un riesgo de choque
eléctrico.
Este símbolo indica que hay importantes instrucciones de
operación y mantenimiento en la literatura que acompaña a
esta unidad.
LÍNEAS DE SERVICIO AL CLIENTE PREMIER
Venezuela:
Panamá:
Sitio Web:
E-mail:
0800 – ELECTRIC (353-2874)
300-5185
www.premiermundo.com
[email protected]
NOTA
Nos reservamos el derecho de modificar las especificaciones, características y/u operación de este
producto sin previo aviso, con el fin de continuar las mejoras y desarrollo del mismo.
P-1
ÍNDICE
PARTES DE LA UNIDAD ........................................................................................................................... 3!
ESPECIFICACIONES ................................................................................................................................ 4!
ETIQUETAS DE ADVERTENCIA .............................................................................................................. 5!
SIMBOLOS EN LA CORTADORA DE CÉSPED ....................................................................................... 6!
INSTRUCCIONES DE SEGURIDAD ......................................................................................................... 6!
CONDICIONES PARA TRABAJAR CON LA UNIDAD ........................................................................... 7!
PARA OPERAR CON SEGURIDAD .......................................................................................................... 8!
ANTES DE ARRANCAR EL MOTOR ..................................................................................................... 9!
USO DE LA UNIDAD ............................................................................................................................... 10!
MANTENIMIENTO ................................................................................................................................... 11!
RECARGA DE COMBUSTIBLE ........................................................................................................... 11!
TRASLADANDO LA UNIDAD .................................................................................................................. 11!
INSTALACIÓN DE LAS AGARRADERAS ........................................................................................... 12!
INSTALACIÓN DEL PROTECTOR DE DESECHOS ........................................................................... 12!
INSTALACIÓN DEL CABEZAL DE CORTE ......................................................................................... 12!
COMBUSTIBLE........................................................................................................................................ 13!
PRECAUCIÓN ...................................................................................................................................... 13!
IMPORTANTE ...................................................................................................................................... 13!
OPERACIÓN ............................................................................................................................................ 13!
INICIAR EL MOTOR ............................................................................................................................. 14!
DETENER EL MOTOR ......................................................................................................................... 15!
AJUSTAR LA VELOCIDAD “NEUTRAL” .................................................................................................. 15!
USO DEL CABEZAL DE CORTE............................................................................................................. 16!
CORTAR PASTO Y MALEZA............................................................................................................... 16!
AJUSTAR LA LONGITUD DE LA LÍNEA DE CORTE .......................................................................... 16!
MANTENIMIENTO ................................................................................................................................... 16!
RELLENAR LA LÍNEA DE CORTE ...................................................................................................... 17!
FILTRO DE AIRE.................................................................................................................................. 18!
FILTRO DE COMBUSTIBLE ................................................................................................................ 18!
BUJÍA.................................................................................................................................................... 18!
SILENCIADOR ..................................................................................................................................... 18!
PARACHISPAS .................................................................................................................................... 18!
ENTRADA DE VENTILACIÓN DEL ENFRIAMIENTO DE AIRE .......................................................... 18!
PROCEDIMIENTOS QUE DEBE REALIZAR CADA 10 HORAS DE USO .......................................... 19!
ALMACENAR LA UNIDAD ....................................................................................................................... 19!
SOLUCIÓN DE PROBLEMAS ................................................................................................................. 20!
P-2
PARTES DE LA UNIDAD
1. Manija
2. Correa de hombro
3. Interruptor de encendido
4. Cable del acelerador
5. Palanca del acelerador
6. Botón de ajuste del acelerador
7. Tubo
8. Bloqueador de desechos
9. Cuchilla
10. Cubierta del engranaje
11. Perilla de arranque
12. Tanque de combustible
13. Palanca del regulador de flujo
14. Cubierta del limpiador de aire
15. Bomba de cebado
P-1
ESPECIFICACIONES
Tipo de motor
Enfriado por aire, de 2 tiempos a gasolina
Desplazamiento
52cm3
Salida Máxima
2.4Hp en 7500 rpm
Combustible
Mezcla (Gasolina 25: Aceite 1)
Carburador
Tipo diafragma
Capacidad del tanque de 0.65litros
combustible
Transmisión
Embrague centrifugo, Cortador del eje de transmisión rígido
Rotación del cortador
En el sentido de las manecillas del reloj desde el punto de vista del
usuario
Dimensiones
L
1900mm
An
260mm
Al
670mm
Peso Neto
9.40kg
Accesorios
Cuchilla
Cabezal de corte
Kit de herramienta
P-4
ETIQUETAS DE ADVERTENCIA
1.
2.
3.
4.
5.
6.
7.
Leer el manual de instrucciones antes de utilizar la unidad
Utilizar protector para los ojos y casco.
Usar protección para los pies
Usar guantes
Tenga precaución con los objetos lanzados mientras trabaja.
Atención / Advertencia
Los niños, espectadores y ayudantes deben mantenerse a 15 metros de distancia de la cortadora
de césped.
Importante
Si las etiquetas se despegan o se vuelven ilegibles, debe ponerse en contacto con el distribuidor del
que adquirió el producto para solicitar nuevas etiquetas y volver a colocarlas en los lugares específicos.
Advertencia!
No modifique la cortadora de césped.
No brindamos garantía a cortadoras que hayan sido modificadas o si no ha seguido las instrucciones de
operación descritas en el presente manual.
P-1
SÍMBOLOS EN LA CORTADORA DE CÉSPED
Para una operación segura y mantenimiento, se ha colocado símbolos en relieve en la cortadora de
césped. Asegúrese de no cometer errores prestando atención a los mismos.
Boquete para cargar la mezcla de gasolina.
Ubicación:
Tapa del tanque de combustible
Sentido en el que se debe cerrar el regulador de flujo.
Ubicación:
Tapa del filtro de aire
Esta unidad esta diseñada para ser usada con
cortadora de línea flexible. No use la unidad con
cortadoras hechas de metal o plástico.
Posición: Bloqueador de desechos
INSTRUCCIONES DE SEGURIDAD
1. Lea atentamente este manual, entienda su
contenido y siga todas las normas de
seguridad antes de utilizar este aparato.
2. Conserve
este
manual
para
futuras
referencias. Así mismo, si tuviese pregunta
que no responde este manual, póngase en
contacto con el distribuidor.
3. Asegúrese de adjuntar este manual si vende o
presta este producto.
4. No permita que este aparato sea utilizado por
niños o personas que no sean capaces de
entender claramente el contenido de este
manual.
P-6
CONDICIONES PARA TRABAJAR CON LA UNIDAD
1. Cuando use esta unidad debe vestir
indumentaria de seguridad y equipo de
protección.
(1) Casco
(2) Orejeras
(3) Lentes o protector de rostro
(4) Guantes gruesos de trabajo
(5) Botas con suelas antideslizantes
2. Ud. debería portar
(1) Las herramientas y archivos adjuntos
(2) Combustible de reserva adecuadamente
almacenado
(3) Hoja de repuesto
(4) Elementos para demarcar su área de
trabajo (soga, señales de precaución)
(5) Silbato (para pedir ayuda en caso de
emergencia)
(6) Hacha o sierra (para retirar obstáculos)
3. No utilice ropa suelta, joyas, pantalones cortos,
sandalias, no vaya descalzo. No use nada que
pueda ser atrapado por una parte móvil de la
unidad. Asegure bien el cabello, de forma que
esté por encima de la altura de los hombros.
P-1
PARA OPERAR CON SEGURIDAD
Circunstancia de trabajo
1. Nunca arranque el motor en un recinto o construcción cerrada. Los
gases de escape contienen el monóxido de carbono en niveles
peligrosos.
2. Nunca utilice el producto,
a) Cuando el terreno sea resbaloso o cuando usted no pueda
mantener una postura estable.
b) Por la noche, en presencia de niebla espesa, o en cualquier
otro momento cuando su campo de visión se viera limitado y
fuese dificultoso obtener una visión clara del área de trabajo.
c) Durante tormentas de lluvia, durante tormentas eléctricas o
vientos huracanados en cualquier oportunidad en que las
condiciones del clima puedan hacer inseguro el uso del
producto.
Plan de trabajo
1. Usted no debería usar el producto cuando se encuentre bajo la
influencia del alcohol, cuando se encuentre exhausto o sin dormir,
cuando sufra de mareos como resultado de haber tomado
medicamento para el resfrío o en cualquier circunstancia en que
exista la posibilidad de que su juicio pudiese verse debilitado.
2. Al organizar su plan de trabajo, permítase incluir un tiempo para
descanso. Limite el tiempo de uso continuo de la cortadora a un
promedio de 30 a 40 minutos por sesión y descanse 10 a 20
minutos entre cada una. Así mismo intente no trabajas más de dos
horas por día.
CUIDADO
1. Si no toma en cuenta los tiempos de trabajo recomendados o los
métodos de trabajo que se indican, podría sufrir daños por estrés
reiterado.
Si no se siente bien, con rubor o se hinchan sus dedos o cualquier otra
parte de su cuerpo, consulte un médico antes de sentirse más afectado.
2. Para evitar molestias causadas por el ruido, trabaje entre la 8.00am y
las 5.00pm en días laborales y entre las 9.00am y las 5.00pm los fines
de semana.
NOTA:
Tome en cuenta las normas locales respecto a los niveles de ruido y
horas de trabajo antes de usar la cortadora.
P-8
ANTES DE ARRANCAR EL MOTOR
1. El área que comprende los 15 metros a la redonda de la
persona que está realizando el trabajo es considerada
riesgosa, por lo que nadie deberá asomarse. De ser
necesario, extienda una franja de seguridad amarilla en el
perímetro.
Cuando el trabajo vaya a ser realizado simultáneamente por dos
o más personas, observe constantemente alrededor para
asegurarse de que las demás personas no se encuentren cerca y
mantenga una distancia suficientemente segura.
2. Revise las condiciones del área de trabajo para asegurarse de
que no existan obstáculos como piedras, hoyos, palos o ramas.
IMPORTANTE
Retire cualquier obstáculo antes de empezar el trabajo.
3. Revise completamente la cortadora de césped en búsqueda de
tornillos sueltos o fugas de combustible. Asegúrese de que las
cuchillas estén correctamente colocadas y bien sujetas.
4. Asegúrese de que el protector de desechos esté en su lugar y
firmemente sujeto.
5. Use siempre la abrazadera. Ajústela antes de arrancar el motor.
La correa puede ser cómodamente ajustada en su mano
izquierda para alcanzar una altura cómoda.
ARRANCANDO EL MOTOR
1. Los animales y transeúntes deben mantenerse al menos a
15 metros de distancia del punto de operación. Si alguien se
acerca, detenga el motor de inmediato.
2. El producto está equipado con un mecanismo de embrague
centrífugo, por lo que las cortadoras comienzan a girar en
cuanto el motor es arrancado colocando el acelerador en la
posición de ignición. Cuando arranque el motor coloque el
aparato en el suelo un área plana y expedita, sosténgalo
firmemente en su lugar de tal manera que las partes
cortantes no entren en contacto con nada.
CUIDADO
Nunca coloque el acelerador a velocidad máxima al arrancar el
motor.
3. Una vez encendido el motor, asegúrese de que las
cortadoras dejan de girar cuando regrese el acelerador a su
posición original. Si las mismas continúan girando, apague el
motor y lleve el aparato a su distribuidor para que este sea
revisado.
P-1
USO DE LA UNIDAD
IMPORTANTE
Corte únicamente los materiales indicados para este
producto
y
realice
únicamente
las
tareas
especificadas en este manual.
1. Sostenga firmemente las agarraderas con ambas
manos. Pise firmemente manteniendo sus pies
separados (aproximadamente un poco más que la
distancia de sus hombros) de tal modo que el peso
de su cuerpo quede bien distribuido en sus dos
piernas y asegúrese de mantenerse firme en una
posición adecuada para el trabajo.
2. Mantenga la cortadora debajo de la altura de su
cintura.
3. Mantenga la velocidad del motor en el nivel
adecuado y no aumente la velocidad más allá del
lo necesario.
4. Si el aparato comienza a vibrar, apague el motor y
revise toda la cortadora de césped. No vuelva a
usarla hasta que el problema haya sido resuelto.
5. Mantenga su cuerpo lejos de las cuchillas y de las
superficies calientes.
6. No toque el silenciador, la bujía u otras partes
metálicas del motor mientras este esté en
funcionamiento o inmediatamente después de
apagarlo. Caso contrario podría quemarse o recibir
descargas eléctricas.
SI ALGUIEN SE ACERCA
1. Evite siempre cualquier situación de riesgo.
Recomiende a los adultos mantener a las
mascotas y los niños lejos del área. Tenga cuidado
si se encuentra cerca, pues puede resultar
lastimado por los restos que se cortan.
2. Si alguien lo llama o lo interrumpe mientras esté
trabajando, asegúrese de apagar el motor antes
de voltearse.
P-10
MANTENIMIENTO
1. Con el fin de mantener el producto funcionando en buenas
condiciones, realice el mantenimiento y las revisiones periódicas
que se describen en el presente manual.
2. Asegúrese de apagar el motor antes de realizar cualquier
mantenimiento y revisión.
ATENCIÓN
Las partes metálicas alcanzan altas temperaturas incluso después de
haber apagado el motor.
3. Cuando remplace las cuchillas u otras partes o bien el combustible o lubricante, asegúrese de que el
motor esté apagado.
4. En el caso de que cualquier parte deba ser remplazada o reparada póngase en contacto con su
distribuidor o con un centro de servicio técnico autorizado.
5. No utilice ningún accesorio o complemento que no esté recomendado específicamente para este
aparato.
6. Bajo ninguna circunstancia deberá desarmar o modificar el producto. Esto podría resultar en daños
durante la operación o en fallas de funcionamiento.
RECARGA DE COMBUSTIBLE
1. El motor está diseñado para funcionar con una mezcla que
contiene gasolina altamente inflamable. No almacene
recipientes de combustible o llene el tanque en lugares donde
hayan hogueras, estufas, cocinas, chispas eléctricas, o
cualquier otra fuente de calor o fuego ya que podría encender el
combustible.
2. No fume mientras utilice el aparato o esté llenando el tanque de
combustible.
3. Apague el motor antes de llenar el tanque de combustible y
espere
a que este se enfríe. Observe alrededor para
asegurarse de que no existan chispas o llamas cerca.
4. Limpie cualquier salpicadura de combustible que haya quedado después de cargar el tanque,
usando un paño seco.
5. Después de llenar el tanque vuelva a ajustar la tapa del mismo y lleve el aparato a unos 10 metros
de distancia del lugar donde fue cargado el tanque antes de encender el aparato.
TRASLADANDO LA UNIDAD
1. Cuando termine de cortar el césped en un sitio y desee continuar en otro, apague el motor, levante
el aparato y cárguelo cuidando la cortadora.
2. No transporte el aparato en caminos sinuosos en vehículos sin antes retirar el combustible del
tanque, caso contrario el mismo podría derramarse.
P-1
INSTALACIÓN DEL TUBO
Monte el tubo al motor y apriete los tornillos. Asegúrese que los tornillos insertados en el centro este
colocados de manera correcta.
INSTALACIÓN DE LAS AGARRADERAS
•
Monte las agarraderas, el eje y la abrazadera en una posición cómoda para usted.
INSTALACIÓN DEL PROTECTOR DE DESECHOS
•
Coloque el protector en la cubierta de rodamiento, ajústelo con el tornillo, la arandela, tuerca y la
placa de soporte.
INSTALACIÓN DEL CABEZAL DE CORTE
•
•
Mientras bloquea el engranaje del eje insertando la barra hexagonal en el soporte superior y la
cubierta.
Rote el cabezal de corte para enganchar las roscas. Ajústelo de manera segura
P-12
COMBUSTIBLE
PRECAUCIÓN
•
•
•
•
Evite fumar o que fuego o chispas estén cerca del combustible.
Limpie cualquier derrame de combustible antes de encender el motor.
Apague el motor de la unidad y espere hasta que se enfríe antes de echar el combustible.
Evite usar o almacenar la unidad cerca de llamas o chispas.
IMPORTANTE
•
•
•
•
•
•
Evite usar aceite para motor de 4 tiempos, use o agua fría o
aceite para motor de dos tiempos.
No use combustible sin aceite (Gasolina cruda)
No use combustible mezclado con agua
Combustible mezclados que no han sido utilizados por un
mes o mas, pueden obstruir el carburador y ocasionar que el
motor no funcione de una manera apropiada. Ponga el
combustible restante en un contenedor hermético y
manténgalo en un lugar oscuro y fresco.
Mezcle gasolina en grado regular (Con plomo o sin plomo,
libre de alcohol) y un aceite de motor de dos tiempos
calificado.
Recomendación en la mezcla de gasolina 25: Aceite 1. El aceite debe ser especial para motor de
dos tiempos. (160ml de aceite por cada 4 litro de gasolina)
OPERACIÓN
ARNÉS
•
•
•
Advertencia!
Use siempre el arnés suministrado cuando use la unidad.
Asegúrese siempre que la unidad este bien conectada con el arnés. De lo contrario, usted no podrá
manejar la unidad de forma segura, y esto puede provocar accidentes.
No use nunca un arnés con un mecanismo de liberación rápida dañado ó cualquier otra pieza.
COMO USARLO
Colóquese el arnés suministrado sin las bandas cruzadas, con el colgador en su lado derecho.
(1) Colgador
P-1
BALANCEAR LA UNIDAD
•
•
•
•
Conecte la unidad con el cargador
Ajuste el alto de las bandas del arnés, de tal forma que la cuchilla de
corte de la unidad quede paralela al suelo.
Con el fin de prevenir cambiar la posición del colgador durante la
operación de la unidad, gire la parte extra de la banda desde la hebilla.
Cuando este correctamente ajustado, verifique que el sistema de
liberación rápida funcione correctamente.
MECANISMO DE LIBERACIÓN RÁPIDA
El arnés esta equipado con un mecanismo de liberación rápido.
Para liberar la unidad del arnés en caso de emergencia, siga el siguiente procedimiento.
Advertencia!
• Asegúrese de revisar que el mecanismo de liberación rápida funciona
correctamente antes de usar la unidad.
• Asegúrese de sostener la unidad de manera segura cuando use el
mecanismo de liberación rápida.
Cuando sostenga la unidad con su mano derecha de manera segura, presione
botón rojo de la hebilla.
Luego, retire el arnés de sus hombros.
(1) Hebilla
INICIAR EL MOTOR
Advertencia!
El cabezal de corte empieza a girar inmediatamente después
de encender la unidad
•
•
•
Ubique la unidad en un lugar plano y asegúrese que la
cabeza de la cuchilla esta totalmente libre de objetos a su
alrededor.
Empuje la bomba cebadora algunas veces hasta que el
combustible fluya en el tubo de retorno.
Mueva la palanca reguladora de flujo a la posición Cerrado
(OP2).
(1). Palanca reguladora de flujo
A. Posición “Cerrado”
B. Posición “Abierto”
P-14
el
•
Ajuste el interruptor de ignición en la posición de
arranque (OP3).
(1). Interruptor de ignición
(2). Detener
(3). arranque
•
Mientras sostiene la unidad firmemente hale la cuerda
de arranque rápidamente hasta que el motor encienda.
(OP4)
IMPORTANTE:
Evite halar la cuerda de arranque hasta su fin, o devolverla
al liberar la perilla, ya que esto puede dañar la cuerda de
arranque.
•
Mueva la palanca reguladora de flujo a la posición
“Abrir” y hale la cuerda de arranque para encender el motor.
•
Permita que el motor se caliente algunos minutos antes de iniciar la operación.
NOTA:
• Si va a volver a arrancar el motor de la unidad inmediatamente después de haberlo parado, mueva
la palanca reguladora de flujo a la posición “Abrir” y presione la bomba de cebado algunas veces.
• Un motor inundado puede ser difícil de arrancar debido al exceso de combustible. Cuando el motor
no encienda después de varios intentos, abra la palanca reguladora de flujo y hale la cuerda de
arranque ó remueva la bujía y séquela.
DETENER EL MOTOR
•
•
Libere la palanca de aceleración y permita que el motor funcione durante medio minuto.
Cambie el interruptor de ignición a la posición “Detenido”.
NOTA: Excepto en casos de emergencias, evite detener el motor mientras presione la palanca de
aceleración.
AJUSTAR LA VELOCIDAD “NEUTRAL”
Cuando necesite detener frecuentemente el motor en
velocidad Neutral, gire el tornillo de ajuste.
• Cuando el cabezal de corte continúe girando después de
liberar la palanca de aceleración, gire el tornillo.
NOTA: Caliente el motor antes de ajustar la velocidad
neutral.
•
P-1
USO DEL CABEZAL DE CORTE
Advertencia!
• Use siempre gafas y guantes protectores, ya que los desechos ó rocas pueden golpearlo y causar
serias lesiones.
• Mantenga siempre el protector de desechos en su lugar mientras este operando la unidad.
CORTAR PASTO Y MALEZA
•
Recuerde siempre cortar con la punta de la
línea de corte. Obtendrá mejores resultados si
no introduce toda la línea de corte en el área.
Permita que la unidad trabaje a su propio ritmo.
1. Sostenga la unidad cuidando que el cabezal de
corte no este cerca del suelo
2. Puede evitar golpes por desechos si mueve la
unidad de derecha a izquierda.
3. Use una velocidad baja para corta vegetación
pesada. La velocidad del corte dependerá del
material que esta siendo cortado. Vegetación
pesada necesita una menor velocidad de corte.
4. No mueva la unidad muy rápido, ya que puede perder el balance ó el control de la misma.
5. Trate de controlar la unidad con la cadera y no con sus manos y brazos.
6. Tenga precaución y evite que cables, hierva muerta y seca se enrolle alrededor del eje del cabezal,
ya que tales materiales pueden detener el cabezal y causar que el embrague se deslice. Esto podría
dañar el sistema de embrague si se repite con mucha frecuencia.
AJUSTAR LA LONGITUD DE LA LÍNEA DE CORTE
•
•
Esta unidad esta equipada con una línea de nylon tipo semi-automática, lo cual permite que el
operador avance la línea sin detener el motor. Cuando la línea esta muy corta, golpee suavemente
el cabezal en la tierra con el motor completamente acelerado
Cada vez que el cabezal es golpeado, la línea avanza 1” (25.4mm). para mejores resultados golpee
suavemente el cabezal sobre tierra dura. Evite golpearlo en tierra gruesa, ya que el motor puede
detenerse por sobrecarga.
MANTENIMIENTO
Remita todo mantenimiento ó reparación a personal de servicio técnico calificado.
Advertencia!
• Asegúrese siempre de detener el motor y que la unidad se encuentre completamente fría antes de
revisarla o de realizarle mantenimiento
• No altere la unidad ni retire su motor
• Verifique que todo este en su lugar antes de usar la unidad.
P-16
RELLENAR LA LÍNEA DE CORTE
P-1
FILTRO DE AIRE
Si el filtro de aire se encuentra obstruido, puede disminuir el
rendimiento del motor. Revise y limpie mensualmente el elemento
del filtro con agua tibia y jabonosa. Séquelo por completo antes de
colocarlo nuevamente. Si el elemento se encuentra roto o reducido
reemplácelo por uno nuevo. (MA1)
FILTRO DE COMBUSTIBLE
Cuando el motor se queda sin suministro de combustible, revise la
tapa de combustible y el filtro para evitar bloqueos. (MA2)
BUJÍA
Fallas en el arranque y mal funcionamiento es a menudo causado
por una falla en la bujía. Limpie la bujía periódicamente y verifique
que esta se encuentre en el rango correcto. (MA3)
Importante:
• El uso de una bujía que no corresponda con la proporcionada,
puede provocar fallas en el funcionamiento del motor o
sobrecalentamiento y daños.
• Para instalar la bujía, primero gire el enchufe hasta que quede
apretado, luego apriételo un cuarto mas con una llave de tubo.
Torsión de presión: 9.8~11.8N.m
SILENCIADOR
Advertencia!
• Revise el silenciador periódicamente en busca de piezas flojas
o perdidas, dañadas ó corroídas. Si encuentra alguna anomalía
o daño, no use la unidad y remítala de inmediato a un centro de servicio autorizado
PARACHISPAS
El silenciador esta equipado con un parachispas, el cual previene que el carbón caliente salga por la
salida de escape. Revíselo periódicamente y límpielo de ser necesario con un cepillo de alambre. (MA5)
ENTRADA DE VENTILACIÓN DEL ENFRIAMIENTO DE AIRE
•
•
Advertencia!
No toque le cilindro, silenciador ó la bujía inmediatamente después de haber apagado la unidad, ya
que puede sufrir serias lesiones.
Verifique siempre que la unidad esta libre de desechos y astillas de madera antes de su uso.
P-18
Revise la entrada de ventilación del enfriamiento de aire y el área alrededor de las aletas de
enfriamiento del cilindro cada 25 horas de uso, con el fin de evitar bloqueos. Retire la protección del
enchufe si es necesario con lo indica la figura (MA4), con el fin de tener una mejor visibilidad de la
parte superior del cilindro.
Importante:
Si los desechos están obstruyendo la entrada de ventilación del enfriamiento de aire o alrededor de las
aletas del cilindro, puede sobrecalentarse el motor, y causar fallas mecánicas en la unidad.
•
PROCEDIMIENTOS QUE DEBE REALIZAR CADA 10 HORAS DE USO
1. Remueva el silenciador, inserte un destornillador en la ventilación y
limpie la acumulación de carbón. Limpie además la acumulación de
carbón el la ventilación de escape del silenciador.
2. Ajuste los tornillos, pernos y piezas.
3. Revise si hay aceite o grasa en medio del recubrimiento del embrague
o el tambor, y límpielo de ser necesario usando gasolina libre de
plomo.
ALMACENAR LA UNIDAD
•
•
Almacenar combustible por mucho tiempo puede causar problemas al arrancar la unidad. Antes de
almacenar la unidad, vacíe el tanque de combustible y encienda el motor hasta que se consuma
toda la reserva de combustible del tanque.
Guarde la unidad en un lugar seco y limpio.
P-1
SOLUCIÓN DE PROBLEMAS
Caso 1: Fallas al encender la unidad
Revisar
Posibles causas
Tanque de combustible
Combustible incorrecto
Posible solución
Llénelo con el combustible correcto y la
mezcla recomendada
Filtro de combustible
El filtro de combustible esta Límpielo
bloqueado
Tornillo de ajuste del Esta fuera del rango normal Ajústelo al rango norman
carburador
Chispas
(No
hay La bujía esta mojada ó Límpiela ó séquela
chispas)
sucia
La brecha debe ser de: 0.6~0.7mm
La brecha de la bujía no es
la correcta
Bujía
Desconectada
Vuelva a apretarla
Caso 2: el motor enciende pero no tiene un funcionamiento continuo / es difícil re-iniciarlo
Revisar
Posibles causas
Posible solución
Tanque de combustible
Combustible incorrecto
Llénelo con el combustible correcto y la
mezcla recomendada
Silenciador,
cilindro, El carbón esta acumulado
Retírelo
(puerto de escape)
Tornillo de ajuste del Esta fuera del rango normal Ajústelo al rango norman
carburador
Limpiador de aire
Obstruido
Lávelo
Aletas del cilindro
Obstruidas
Límpielas
P-20
INSTRUCTION MANUAL
BRUSH CUTTER
CGR-4603
DEAR CUSTOMER
In order to achieve the best performance of your product, please read this instruction manual carefully
before using, and keep it for future reference.
If you need extra support, please write to [email protected]
PREMIER CUSTOMER SERVICE
Venezuela:
Panama:
Website
E-mail:
0800 – ELECTRIC (353-2874)
300-5185
www.premiermundo.com
[email protected]
NOTE
This unit may be submitted to changes in specifications, characteristics and/or operation without prior
notice to the user, in order to continue improving and developing its technology.
P-1
SAFETY FIRST
Instructions contained in warnings within
this manual marked with a
symbol
concern critical points which must be taken
into consideration to prevent possible
serious bodily injury, and for this reason you
are requested to read all such instructions
carefully and follow them without fail.
! WARNINGS IN THE MANUAL
WARNING
This mark indicates instructions which must be
followed in order to prevent accidents which
could lead to serious bodily injury or death.
IMPORTANT
This mark indicates instructions which must be
followed, or it leads to mechanical failure,
breakdown, or damage.
NOTE
This mark indicates hints or directions useful in
the use of the product.
CONTENTS
1. Parts location !!!!!!!!!!!!!!!!!!!!!!!!!!!!!!!!!!!!!!3
2. Specifications !!!!!!!!!!!!!!!!!!!!!!!!!!!!!!!!!!!!!!4
3. Warning labels on the machine !!!!!!!!!!!!!!!!!!!!!!!!!!!!!!4
4. Symbols on the machine !!!!!!!!!!!!!!!!!!!!!!!!!!!!!!!!!5
5. For safe operation !!!!!!!!!!!!!!!!!!!!!!!!!!!!!!!!!!!!5
6. Set up!!!!!!!!!!!!!!!!!!!!!!!!!!!!!!!!!!!!!!!!!12
7. Fuel!!!!!!!!!!!!!!!!!!!!!!!!!!!!!!!!!!!!!!!!!!13
8. Operation !!!!!!!!!!!!!!!!!!!!!!!!!!!!!!!!!!!!!!!14
9. Maintenance !!!!!!!!!!!!!!!!!!!!!!!!!!!!!!!!!!!!!!18
10. Storage !!!!!!!!!!!!!!!!!!!!!!!!!!!!!!!!!!!!!!!21
11. Troubleshooting guide!!!!!!!!!!!!!!!!!!!!!!!!!!!!!!!!!21
P-2
!" #$%&'()*+$&,*-((
-----------------------------------------------------------------------------------------------------------------------------------------
1. Handle
9. Blade
2. Shoulder strap hanger
10. Gear case
3. Ignition switch
11. Starter knob
4. Throttle cable
12. Fuel tank
5. Throttle lever
13. Choke lever
6. Throttle set button
14. Air cleaner cover
7. Pipe
15. Primer pump
8. Debris Guard
P-1
!" #$%&'('&)*'+,-..
--------------------------------------------------------------------------------------------------------------------------------------Overall size (LxWxH).......................................................................................................1900x670x260mm
Net weight ........................................................................................................................................9.40kg
Engine Type.................................................................................................... Air-cooled 2-stroke gasoline
Model..........................................................................................................................................CGR-4603
Displacement......................................................................................................................................52cm3
Max. output.................................................................................................................... 2.4Hp at 7500 rpm
Fuel ................................................................................................................. Mixture (Gasoline 25: Oil 1)
Carburetor .........................................................................................................................Diaphragm type
Fuel tank capacity................................................................................................................................0.65L
Transmission..............................................................................Centrifugal clutch, Rigid driveshaft Cutting
Head rotating direction....................................................................... Clockwise (Operator view) Standard
Accessories
Line Head .............................................................................................................................................1 pc
Blade ................................................................................................................................................. 1 pc
Tool set................................................................................................................................................1 set
Specifications are subject to change without notice.
." /$%-,-0()$12)'(*-(&32(4$+3,-2((
----------------------------------------------------------------------------------------------------------------------------------------(1)
(2)
(3)
(4)
(5)
(6)
(7)
(1) Read owner's manual before operating machine.
(2) Wear head, eye and ear protection.
(3) Wear foot protection.
(4) Wear gloves.
(5) Beware of thrown objects.
(6) Warning / Attention
(7) Keep all children, bystanders and helpers 15 meters away from the brush cutter
IMPORTANT
If warning label peel off or become soiled and impossible to read, you should contact the dealer from
which you purchased the product to order new labels and affix them in the required location(s).
WARNING
Never modify your brush cutter. We won't warrant the machine, if you use the remodeled brush cutter or
you don't observe the proper usage written in the manual.
P-1
5" 6741*)'(*-(&32(4$+3,-2((
----------------------------------------------------------------------------------------------------------------------------------------For safe operation and maintenance, symbols are carved in relief on the machine. According to these
indications, please be careful not to make a mistake.
(a)
The port to refuel the "MIX GASOLINE"
Position: FUEL TANK CAP
(b) The direction A to close the choke
The direction B to open the choke
Position: AIR CLEANER COVER
(c) This unit is fitted with only flexible line cutter. Never use cutting
made of metal or plastic.
blade
Position: DEBRIS GUARD
8" 9*%('$:2(*;2%$&,*-((
----------------------------------------------------------------------------------------------------------------------------------------1. Read this manual carefully until you
completely understand and follow all safety and
operating instructions.
2. Keep this manual handy so that you may refer
to it later whenever any questions arise. Also
note, if you have any questions which cannot be
answered herein, contact the dealer from whom
you purchased the product.
3. Always be sure to include this manual when
selling, lending, or otherwise transferring the
ownership of this product.
4. Never allow children or anyone unable to fully
understand the directions given in the manual to
use the machine.
WORKING CONDITION
1. When using the product, you should wear
proper clothing and protective equipment.
(1) Helmet
P-2
(2) Ear protectors
(3) Protection goggles or face protector
(4) Thick work gloves
(5) Non-slip-sole work boots
2. And you should carry with you.
(1) Attached tools and files
(2) Properly reserved fuel
(3) Spare blade
(4) Things to notify your working area (rope,
warning signs)
(5) whistle (for collaboration or emergency)
(6) Hatchet or saw (for removal of obstacles)
3. Do not wear loose clothing, jewelry, short
trousers, sandals, or go barefoot. Do not wear
anything which might be caught by a moving
part of the unit. Secure hair so it is above
shoulder length.
WORKING CIRCUMSTANCE
1. Never start the engine inside a closed room or
building. Exhaust gases contain dangerous
carbon monoxide.
2. Never use the product,
a. when the ground is slippery or when you can’t
maintain a steady posture.
b. At night, at times of heavy fog, or at any other
times when your field of vision might be limited
and it would be difficult to gain a clear view of
the working area.
c. During rain storms, during lightning storms, at
times of strong or gale-force winds, or at any
other times when weather conditions might
make it unsafe to use the product.
P-1
WORKING PLAN
1. You should never use the product when under
the influence of alcohol, when suffering from
exhaustion or lack of sleep, when suffering from
drowsiness as a result of having taken cold
medicine or at any other time when a possibility
exists that your judgment might be impaired or
that you might not be able to operate the product
properly and in a safe manner.
2. When planning your work schedule, allow
plenty of time to rest. Limit the amount of time
over which the product is to be used
continuously to somewhere around 30~40
minutes per session, and take 10~20 minutes of
rest between work sessions. Also try to keep the
total amount of work performed in a single day
under 2 hours or less.
WARNING
1.
If you don t observe the working
time, or working manner (See USING THE
PRODUCT), Repetitive Stress Injury (RSI)
could occur. If you feel discomfort, redness
and swelling of your fingers or any other part
of your body, see a doctor before getting
worse.
2.
To avoid noise complaints, in general,
operate product between 8a.m. and 5p.m. on
weekdays and 9a.m. to 5p.m. weekends.
NOTE
Check and follow the local regulations as to
sound level and hours of operations for the
product.
P-2
BEFORE STARTING THE ENGINE
1. The area within a perimeter of 50 feet (15m)
of the person using the product should be
considered a hazardous area into which no one
should enter. If necessary, yellow warning rope,
warning signs should be placed around the
perimeter of the area. When work is to be
performed simultaneously by two or more
persons, care should also be taken to constantly
look around or otherwise check for the presence
and locations of other people working so as to
maintain a distance between each person
sufficient to ensure safety.
2. Check the condition of working area to avoid
any accident by hitting hidden obstacles such as
stumps, stones, cans, or broken grass.
IMPORTANT
Remove any obstacle before beginning work.
3. Inspect the entire unit for loose fasteners and
fuel leakage. Make sure that the cutting
attachment is properly installed and securely
fastened.
4. Be sure the debris guard is firmly attached in
place.
5. If the cutting head is the metal blade, use the
shoulder strap. Adjust the strap for comfort
before starting the engine. The strap should be
adjusted so the left hand can comfortably hold
the handlebar grip approximately waist high.
STARTING THE ENGINE
1. Keep bystanders and animals at least 50feet
(15m) away from the operating point. If you are
approached, immediately stop the engine.
P-1
2. The product is equipped with a centrifugal
clutch mechanism, so the cutting attachment
begins to rotate as soon as the engine is started
by putting the throttle into the start position.
When starting the engine, place the product onto
the ground in a flat clear area and hold it firmly in
place so as to ensure that neither the cutting
part nor the throttle come into contact with any
obstacle when the engine starts.
WARNING
Never place the throttle into the high speed
position when starting the engine.
3. After starting the engine, check to make sure
that the cutting attachment stops rotating when
the throttle is moved fully back to its original
position. If it continues to rotate even after the
throttle has been moved fully back, turn off the
engine and take the unit to your authorized
servicing dealer for repair.
USING THE PRODUCT
IMPORTANT
Cut only materials recommended by the
manufacturer. And use only for tasks
explained in the manual.
1. Grip the handles firmly with both hands using
your whole hand. Place your feet slightly apart
(slightly further apart than the width of your
shoulders) so that your weight is distributed
evenly across both legs, and always be sure to
maintain a steady, even posture while working.
2. Keep cutting attachment below waist level.
3. Maintain the speed of the engine at the level
required to perform cutting work, and never raise
the speed of the engine above the level
necessary.
4. If the unit start to shake or vibrate, turn off the
engine and check the whole unit. Do not use it
until the trouble has been properly corrected.
P-4
5. Keep all parts of your body away from rotating
cutting attachment and hot surfaces.
6. Never touch the muffler, spark plug, or other
metallic parts of the engine while the engine is in
operation or immediately after shutting down the
engine. Doing so could result in serious burns or
electrical shock.
IF SOMEONE COMES
1. Guard against hazardous situations at all
times. Warn adults to keep pets and children
away from the area. Be careful if you are
approached. Injury may result from flying debris.
2. If someone calls out or otherwise interrupts
you while working, always be sure to turn off the
engine before turning around.
MAINTENANCE
1. In order to maintain your product in proper
working order, perform the maintenance and
checking operations described in the manual at
regular intervals.
2. Always be sure to turn off the engine before
performing any maintenance or checking
procedures.
WARNING
The metallic parts reach high temperatures
immediately after stopping the engine.
3. Under no circumstances should you ever take
apart the product or alter it in any way. Doing so
might result in the product becoming damaged
during operation or the product becoming unable
to operate properly.
P-1
HANDLING FUEL
1. The engine of the product is designed to run
on a mixed fuel which contains highly flammable
gasoline. Never store cans of fuel or refill the
tank of the unit in any place where there is a
boiler, stove, wood fire, electrical sparks,
welding sparks, or any other source of heat or
fire which might ignite the fuel.
2. Never smoke while operating the unit or
refilling its fuel tank.
3. When refilling the tank, always turn off the
engine and allow it to cool down. Take a careful
look around to make sure that there are no
sparks or open flames anywhere nearby before
refueling.
4. Wipe spilled fuel completely using a dry rag if
any fuel spillage occurs during refueling.
5. After refueling, screw the fuel cap back tightly
onto the fuel tank and then carry the unit to a
spot 10feet (3m) or more away from where it
was refueled before turning on the engine.
TRANSPORTATION
1. When hand-carrying the product, cover over
the cutting part if necessary, lift up the product
and carry it paying attention to the blade.
2. Never transport the product over rough roads
over long distances by vehicle without removing
all fuel from the fuel tank. If doing so, fuel might
leak from the tank during transport.
P-6
<"(62&(=;((
---------------------------------------------------------------------------------------------------------------------------------------- INSTALLING PIPE
!
Mount the pipe to the engine and tighten the
screws. Be sure that the screw in the middle
inserts rightly in the hole on pipe.
INSTALLING HANDLE HOLDER
!
Mount the handle holder to the pipe,
approximately 5 to 7 cm from the hanger.
INSTALLING HANDLE
Mount the handle to the shaft tube and
clamp it at your best operating position.
INSTALLING DEBRIS GUARD
Put the debris guard on the bearing case,
attach it with the screw, washer, nut and support
plate provided.
(1)
Support plate
INSTALLING CUTTING HEAD
1. While locking the gear shaft by inserting the
attached hexagon bar into the upper holder and
the housing.
2.
Rotate the cutting head to engage
threads. Hand tightens it securely.
P-1
>"(
9=2)((
-----------------------------------------------------------------------------------------------------------------------------------------WARNING
Gasoline is very flammable. Avoid
smoking or bringing any flame or sparks
near fuel.
Wipe up all spills before starting the
engine.
Make sure to stop the engine and allow it
cool before refueling the unit.
Keep open flames away from the area
where fuel is handled or stored.
IMPORTANT
Never use oil for 4 cycle engine use or water
cooled 2-cycle engine.
Never use "FUEL WITH NO OIL (RAW
GASOLINE)".
Never use fuel laced with water.
Mixed fuels which have been left unused for a
period of one month or more may clog the
carburetor or result in the engine failing to
operate properly. Put remained fuel into an airtight container and keep it in the dark and cool
room.
Please ask for “mixed gasoline for air-cooled
2-cycle engines” at your nearest gas station, or
use fuel made by putting unleaded gasoline for
automobiles and air-cooled 2-cycle engine oil
into a mixing container in accordance with the
following ratios and then shaking to mix well.
Mixing ratios:
When using commercially available 2-cycle oil
(FB grade):
25:1 (160 ml of oil for
every 4 liters of gasoline)
NOTE
Please use 90# gasoline and oil.
P-1
?"(@;2%$&,*-((
----------------------------------------------------------------------------------------------------------------------------------------HARNESS
WARNING
ALWAYS
WEAR
THE
PROVIDED
HARNESS WHEN USING THE MACHINE!
Always make sure the machine is hooked
securely to the harness. If you don't, you will
be unable to control the machine safely. This
can result in injury to yourself or others.
Never use a harness with a defective
quick release or any other damage.
HOW TO WEAR
1. Wear the provided harness without twisted
bands, with the hanger on your right side.
(1) Hanger
BALANCE THE UNIT
1. Hook your machine to the hanger.
2. Adjust the bands of the harness to have the
blade parallel to the ground when standing in
your normal working position to provide you
most effectiveness and comfort on operating the
machine.
3. In order to prevent the hanger position to
change during operation, turn up the extra part
of the band from the buckle.
4. When correctly adjusted, check the correct
working of the harnesses' QUICK RELEASE.
QUICK RELEASE
The harness is equipped with a "QUICK
RELEASE" devise. To release the machine from
the harness in emergency situations, please
follow the procedure as explained below.
WARNING
Make sure to check proper working of the
QUICK RELEASE device BEFORE operating
the machine.
Make sure to hold the unit securely when
using the QUICK RELEASE.
While holding the unit by
your right hand securely,
press the red button of the
buckle.
Then take the harness off
from your shoulders.
(1) Buckle
P-1
STARTING ENGINE
WARNING
The cutting head will start rotating upon the
engine starts.
1. Rest the unit on a flat, firm place. Keep the
cutting head off the ground and clear of
surrounding objects as it will start rotating upon
starting of the engine.
OP2
2. Push the primer pump several times until
overflown fuel flows out in the return tube. (OP1)
3. Move the choke lever to the closed position.
(OP2)
(1) Choke lever
(2) A: the closed position
(3) B: the open position
4. Set the ignition switch to the “start” position.
(OP3)
(1) Ignition switch
(3) Start
(2) Stop
5. While holding the unit firmly, pull out the
starter rope quickly until engine fires. (OP4)
IMPORTANT
Avoid pulling the rope to its end or returning it
by releasing the knob. Such actions can cause
starter failures.
6. Move the choke lever to the open position
(OP2). And pull out the starter rope quickly to
restart engine. (OP4)
7. Allow the engine to warm up for several
minutes before starting operation.
NOTE
1.
When restarting the engine immediately
after stopping it, leave the choke open (OP2)
and push the primer pump several times (OP4).
P-1
2. Overchoking can make the engine hard to
start due to excess fuel. When the engine failed
to start after several attempts, open the choke
and repeat pulling the rope, or remove the spark
plug and dry it.
STOPPING ENGINE
1. Release the throttle lever and run the engine
for a half minute.
2. Shift the ignition switch to the STOP position.
NOTE
Except for an emergency, avoid stopping the
engine while pulling the throttle lever.
ADJUSTING IDLING SPEED (OP5)
1. When the engine tends stop frequently at
idling mode, turn the adjusting screw clockwise.
2. When the cutting head keeps rotating after
releasing the trigger, turn the adjusting screw
NOTE
Warm up the engine before adjusting the
idling speed.
LINE HEAD USAGE
WARNING
1. Always wear eye protection such as safety
goggles. Never lean over the rotating cutting
head. Rocks or other debris could be thrown
into eyes and face and cause serious
personal injury.
2. Keep the debris guard attached in place at
all times when the unit is operated.
TRIMMING GRASS AND WEEDS
Always remember that the TIP of the line
does cutting. You will achieve better results by
not crowding the line into the cutting area. Allow
the unit to trim at its own pace.
1. Hold the unit so the head is off the ground and
is tilted about 20 degrees toward the sweep
direction. (OP6)
P-2
2. You can avoid thrown debris by sweeping
from your right to the left.
3. Use a slow, deliberate action to cut heavy
growth. The rate of cutting motion will depend on
the material being cut. Heavy growth will require
slower action than will light growth.
4. Never swing the unit so hard as you are in
danger of losing your balance or control of the
unit.
5. Try to control the cutting motion with the hip
rather than placing the full workload on the arm
and hands.
6. Take precautions to avoid wire, grass and
dead, dry, long-stem weeds from wrapping
around the head shaft. Such materials can stall
the head and cause the clutch to slip, resulting in
damage to the clutch system if repeated
frequently.
ADJUSTING THE LINE LENGTH
Your brush cutters is equipped with a semiauto type nylon line head that allows the
operator to advance the line without stopping the
engine. When the line becomes short, lightly tap
the head on the ground while running the engine
at full throttle.
Each time the head is bumped, the line
advance about 1 inch(25.4 mm). For better
effect, tap the head on bear ground or hard soil.
Avoid bumping in thick, tall grass as the engine
may stall by overload.
P-1
A"(B$,-&2-$-+2((
-----------------------------------------------------------------------------------------------------------------------------------------Maintenance, replacement, or repair of the emission control device and systems may be
performed by any non-road engine repair establishment or individual.
WARNING
Always be sure to stop the engine before inspecting the brush cutter for problems or
performing maintenance.
Never alter the brush cutter or take the engine apart.
Things to check before using brush cutter.
REFILLING TRIMMING LINE
P-2
WARNING
Make sure that the engine has stopped
and is cool before performing any service to
the brush cutter. Contact with moving cutting
head or hot muffler may result in a personal
injury.
AIR FILTER
The air filter, if clogged, will reduce the engine
performance. Monthly check and clean the filter
element in warm, soapy water as required. Dry
completely before installing. If the element is
broken or shrunk, replace with a new one. (MA1)
(1)
Air filter
FUEL FILTER
When the engine runs short of fuel supply,
check the fuel cap and the fuel filter for
blockage. (MA2)
(1)
Fuel filter
SPARK PLUG
Starting failure and mis-firing are often caused
by a fouled spark plug. Periodically clean the
spark plug and check that the spark gap is in the
correct range. (MA3)
When you take off the spark plug, twist (1) and
pull off the cap (2). (MA4)
IMPORTANT
Note that using any spark plugs other than
those designated may result in the engine failing
to operate properly or in the engine becoming
overheated and damaged.
To install the spark plug, first turn the plug
until it is finger tight, then tighten it a quarter turn
more with a socket wrench.
TIGHTENING TORQUE: 9.8~11.8 N.m
P-1
MUFFLER
WARNING
Inspect periodically, the muffler for loose
fasteners, any damage or corrosion. If any
sign of exhaust leakage is found, do not use
the brush cutter and have it repaired
immediately.
Note that failing to do so may result in the
engine catching on fire.
INTAKE AIR COOLING VENT
WARNING
Never touch the cylinder, muffler, or spark
plugs with your bare hands immediately after
stopping the engine. The engine can become
very hot when in operation, and doing so
could result in severe burns.
When checking the brush cutter to make
sure that it is okay before using it, check the
area around the muffler and remove any
wood chips or leaves which have attached
themselves to the brush cutter. Note that
failing to do so could cause the muffler to
become overheated, and that this in turn
could cause the brush cutter to catch on fire.
Always make sure that the muffler is clean
and free of wood chips, leaves, and other
waste before use.
Check the intake air cooling vent and the
area around the cylinder cooling fins after
every 25 hours of use for blockage, and
remove any waste which has attached itself
to the brush cutter. Note that it is necessary
to remove the plug guard shown in Figure
(MA4) in order to be able to view the upper
part of the cylinder.
IMPORTANT
If waste gets stuck and causes blockage
around the intake air cooling vent or between the
cylinder fins, it may cause the engine to
overheat, and that in turn may cause mechanical
failure on the part of the brush cutter. (MA6)
(1) Cylinder fin
(2) Intake air cooling vent (back)
PROCEDURES TO BE PERFORMED
AFTER EVERY 10 HOURS OF USE
1. Remove the muffler, insert a screwdriver into
the vent, and wipe away any carbon buildup.
Wipe away any carbon buildup on the muffler
exhaust vent at the same time. (MA7)
(1) Screwdriver
(2) Muffler
2. Tighten all screws, bolts, and fittings.
3. Check to see if any oil or grease has worked
its way in between the clutch lining and drum,
and if it has wiped it away using oil-free, leadfree gasoline.
P-1
!C"(6&*%$02((
---------------------------------------------------------------------------------------------------------------------------------------- Aged fuel is one of major causes of engine starting failure. Before storing the unit, empty the fuel
tank and run the engine until it uses all the fuel left in the fuel line and the carburetor. Store the unit
indoor taking necessary measures for rust prevention.
!!"(D%*=1)2'3**&,-0(0=,E2((
----------------------------------------------------------------------------------------------------------------------------------------Case 1. Starting failure
----------------------------------------------------------------------------------------------------------------------------------------CHECK
PROBABLE CAUSES
ACTION
----------------------------------------------------------------------------------------------------------------------------------------fuel tank
incorrect fuel
drain it and with correct fuel
fuel filter
fuel filter is clogged
clean
carburetor adjustment screw out of normal range
adjust to normal range
sparking (no spark)
spark plug is fouled/wet
clean/dry
plug gap is incorrect
correct (GAP: 0.6~0.7mm)
spark plug
disconnected
retighten
----------------------------------------------------------------------------------------------------------------------------------------Case 2. Engine starts but does not keep running/Hard re-starting.
----------------------------------------------------------------------------------------------------------------------------------------CHECK
PROBABLE CAUSES
ACTION
-----------------------------------------------------------------------------------------------------------------------------------------fuel tank
incorrect fuel or staled fuel
drain it and with correct fuel
carburetor adjustment screw out of normal range
adjust to normal range
muffler, cylinder (exhaust port) carbon is built-up
wipe away
air cleaner
clogged with dust
wash
cylinder fin, fan cover
clogged with dust
clean
----------------------------------------------------------------------------------------------------------------------------------------When your unit seems to need further service, please consult with service shop in your area.
P-2