1
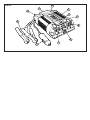
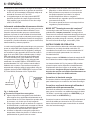
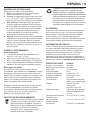
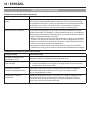
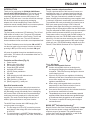
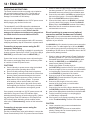
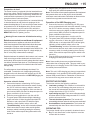
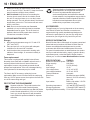
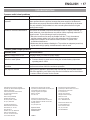
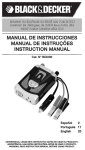
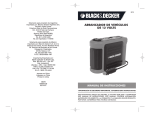
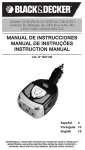
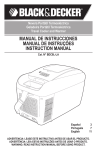
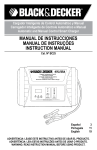
Conversor Eléctrico
Power Inverter
MANUAL DE INSTRUCCIONES
INSTRUCTION MANUAL
Cat. N° PI400LA
Español3
English11
ADVERTENCIA: LEASE ESTE INSTRUCTIVO ANTES DE USAR EL PRODUCTO.
WARNING: READ INSTRUCTION MANUAL BEFORE USING PRODUCT.
FIG. A
9
11
10
1
4
5
2
6
8
3
7
ESPAÑOL • 3
NO DEVUELVA ESTE PRODUCTO A LA TIENDA,
comuníquese antes a las oficinas locales o con el Centro
de Servicio Black & Decker más cercano a usted.
CONSERVE ESTAS INSTRUCCIONES
¡Advertencia! Lea todas las instrucciones antes de
operar el producto. El incumplimiento de todas y cada
una de las instrucciones enumeradas a continuación puede
provocar una descarga eléctrica, un incendio o lesiones graves.
NORMAS GENERALES DE SEGURIDAD
INSTRUCCIONES DE SEGURIDAD
Advertencias de seguridad generales para herramientas eléctricas.
¡Atención! Lea todas las advertencias e instrucciones de
seguridad. En caso de no respetarse las advertencias e
instrucciones indicadas a continuación, podría producirse
una descarga eléctrica, incendio y/o lesión grave.
Conserve todas las advertencias e instrucciones
para su posterior consulta. El término empleado en
las advertencias indicadas a continuación se refiere a la
herramienta eléctrica con alimentación de red (con cable) o
alimentada por pila (sin cable).
ff Evite las condiciones ambientales peligrosas. No utilice artefactos en zonas húmedas o mojadas. No utilice artefactos bajo la lluvia.
ff Mantenga a los niños alejados. Los visitantes deben mantenerse a distancia del área de trabajo.
ff Guarde los artefactos que no utilice en el interior. Cuando no los utilice, los artefactos deben guardarse en el interior en un lugar seco, alto o bajo llave, lejos del alcance de los niños.
ff No fuerce el aparato. Trabajará mejor y con menos probabilidad de riesgo de daños si se opera a la velocidad para la que fue diseñado.
ff Utilice el aparato adecuado. Nunca utilice el aparato
para otra tarea que no sea aquella para la que fue creada.
ff Use la vestimenta adecuada. No use ropas holgadas o joyas. Pueden atascarse en las piezas en movimiento. Se recomienda utilizar guantes de goma y calzado antideslizante considerable al trabajar al aire libre. Recójase y cubra el cabello largo.
ff Use anteojos de seguridad y cualquier otro equipo de seguridad. Use anteojos protectores o lentes de seguridad con protección lateral que cumplan con las normas de seguridad aplicables y, de ser necesario, un protector facial. Utilice también máscaras faciales o para polvo si la operación produce polvillo. Esto se aplica a todas las personas que se encuentren en el área de trabajo. Utilice también un casco, protección auditiva, guantes, ff
ff
ff
ff
ff
ff
ff
ff
ff
ff
calzado de seguridad y sistemas de recolección de polvo cuando así se especifique o requiera.
No tire del cable. Nunca transporte el aparato por el cable ni lo jale para desconectarlo del tomacorriente. Mantenga el cable alejado del calor, el aceite y los bordes afilados.
No se estire. Conserve el equilibrio y párese adecuadamente en todo momento.
Desconecte los aparatos. Desconecte el aparato de la fuente de energía cuando no lo utiliza, antes de realizar un mantenimiento y al cambiar accesorios como hojas y elementos semejantes.
Evite el encendido por accidente. No transporte el aparato enchufado con el dedo en el interruptor. Asegúrese de que el interruptor esté apagado cuando lo enchufe.
El enfriamiento correcto es fundamental al operar el conversor. No coloque la unidad cerca de los orificios de ventilación del vehículo ni la exponga a la luz solar directa.
La protección del interruptor del circuito de la avería eléctrica se debe proporcionar en los circuitos o los enchufes que se utilizarán. Los receptáculos están disponibles que construyen en la protección del interruptor del circuito de la avería eléctrica y se pueden utilizar para esta medida de seguridad.
Uso de suplementos y accesorios. El uso de accesorios o dispositivos no recomendados para este aparato puede resultar peligroso. Nota: Consulte la sección “Accesorios” de este manual para obtener detalles adicionales.
Manténgase alerta. Fíjese en lo que está haciendo. Use el sentido común. No opere la herramienta si está cansado.
Verifique que no haya piezas dañadas. Antes de volver a utilizar la herramienta, se debe controlar cualquier protección u otra pieza que esté averiada para determinar si funcionará correctamente y realizará la función para la que fue diseñada. Verifique la alineación y la sujeción de las piezas móviles, la rotura de piezas, el montaje y cualquier otra condición que pueda afectar su operación. Cualquier protección u otra pieza que esté dañada debe ser reparada correctamente o reemplazada por un centro de mantenimiento autorizado, a menos que este manual de instrucciones indique otra cosa. Reemplace los interruptores defectuosos en un centro de mantenimiento autorizado. No utilice la herramienta si no puede encenderla o apagarla con el interruptor.
No opere herramientas eléctricas portátiles cerca de líquidos inflamables o en atmósferas gaseosas o explosivas. Los motores de estas herramientas normalmente chispean, y las chispas pueden encender los vapores.
4 • ESPAÑOL
ff
ff
En espacios abiertos, use cables prolongadores. Cuando utiliza la herramienta al aire libre, utilice solamente cables prolongadores diseñados para su uso al aire libre o marcados como tales.
Cables prolongadores. Asegúrese de que el cable prolongador esté en buenas condiciones. Cuando utilice un cable prolongador, cerciórese de que tenga la capacidad para conducir la corriente que su producto exige. Un cable de menor capacidad provocará una disminución en el voltaje de la línea, lo cual producirá una pérdida de potencia y sobrecalentamiento.
NORMAS DE SEGURIDAD: DEFINICIONES
¡Peligro! Indica una situación de peligro inminente que,
si no se evita, provocará la muerte o lesiones graves.
¡Advertencia! Indica una situación de peligro potencial
que, si no se evita, podría provocar la muerte o lesiones graves.
¡Precaución! Indica una situación de peligro potencial
que, si no se evita, provocará lesiones leves o moderadas.
¡Precaución! Cuando se utiliza sin el símbolo de alerta
de seguridad indica una situación de peligro potencial que,
si no se evita, puede provocar daños a la propiedad.
Riesgo de operación insegura. Cuando se utilizan
herramientas o equipos, siempre se deben respetar las
precauciones de seguridad para reducir el riesgo de lesiones
personales. La operación, el mantenimiento o la modificación
incorrectos de herramientas o equipos pueden provocar
lesiones graves y daños a la propiedad. Las herramientas y
los equipos están diseñados para determinados usos. Black
& Decker recomienda enfáticamente que NO se modifique
este producto y que NO se utilice para ningún otro uso que
aquél para el que fue diseñado. Lea y comprenda todas las
instrucciones operativas y las advertencias antes de utilizar
cualquier herramienta o equipo.
¡Advertencia! ¡Manténgase lejos del AGUA, FUEGO,
HUMO!
Para reducir el riesgo de lesiones, el usuario debe leer y
entender el manual de instrucciones. Este manual contiene
información importante con relación a la operación y garantía
de este producto. Por favor consérvelo para referencia futura.
El conversor tiene funciones de protección como apagado
de sobrevoltaje de entrada, apagado de voltaje bajo
de entrada, reanudación de apagado de bajo voltaje,
auto seguro de sobre calentamiento, auto seguro de
sobrecarga y protección de corto circuito, el indicador
LED desplegará directamente la entrada de energía y
los errores. La unidad no está diseñada para que sea a
prueba de agua.
INSTRUCCIONES IMPORTANTES
SOBRE SEGURIDAD
¡Advertencia! Para reducir el riesgo de descarga
eléctrica:
ff No conecte al cableado de distribución de CA.
ff No realice conexiones o desconexiones eléctricas en áreas designadas como protegidas contra ignición. Esto incluye el adaptador para aviones o el enchufe tipo encendedor de cigarrillos de CC. Esta unidad No está aprobada para áreas protegidas contra ignición.
ff Nunca sumerja la unidad en el agua ni en ningún otro líquido, ni la utilice cuando esté húmeda.
ff No introduzca objetos extraños en el tomacorriente de CA ni en el puerto USB.
¡Advertencia! Para reducir el riesgo de incendio:
ff No opere cerca de materiales, vapores o gases inflamables.
ff El enfriamiento correcto es fundamental al operar el conversor. No coloque la unidad cerca de los orificios de ventilación del vehículo ni la exponga a la luz solar directa.
ff No lo exponga al calor extremo o a las llamas.
¡Precaución! Para reducir el riesgo de lesiones o daño a la propiedad:
ff No opere cerca de materiales, vapores o gases inflamables.
ff El enfriamiento correcto es fundamental al operar el conversor. No coloque la unidad cerca de los orificios de ventilación del vehículo ni la exponga a la luz solar directa.
ff No lo exponga al calor extremo o a las llamas.
¡Precaución! Para reducir el riesgo de lesiones
o daño a la propiedad:
ff Desenchufe el aparato de la tira del tomacorriente o apague el conversor antes de trabajar en el aparato. Varias cintas de la potencia de salida con interruptores e interruptores automáticos sólo interrumpen la potencia en los terminales del tomacorriente “caliente”. Los terminales “neutros” siguen alimentándose en relación con los terminales “a tierra”.
ff No intente conectar o configurar la unidad o sus componentes mientras maneja su vehículo. El hecho de no prestar atención a la carretera puede tener como consecuencia un accidente grave.
ff Siempre utilice el conversor en lugares adecuadamente ventilados. No bloquee las ranuras de ventilación.
ff Siempre apague el conversor desenchufándolo del tomacorriente para accesorios de CC cuando no lo utilice.
ff Asegúrese de que el voltaje nominal de encendido sea CC de 12V, conexión central POSITIVO (+).
ESPAÑOL • 5
ff
ff
ff
ff
ff
ff
ff
ff
ff
ff
ff
ff
ff
Al utilizar esta unidad en un vehículo, revise el manual del usuario del vehículo para ver el máximo rango de potencia y la salida recomendada. Tal vez sea necesario cambiar el fusible en línea del tomacorriente del vehículo a un rango mayor. No lo instale en el compartimiento del motor. Instálelo en un área bien ventilada.
No lo utilice con sistemas eléctricos con positivo a tierra*. La conexión de polaridad inversa hará que un fusible se queme y puede causar un daño permanente al conversor y anulará la garantía.
* La mayoría de los automóviles, vehículos recreativos y camiones modernos posee un negativo a tierra.
Tenga en cuenta que este conversor no funcionará con aparatos o equipos de alta potencia en Watts que produzcan calor, como secadores de cabello, hornos de microondas y tostadores.
No abra el conversor: no hay piezas que el usuario pueda reparar en su interior.
No utilice este conversor con dispositivos médicos. No se ha comprobado su funcionamiento en aplicaciones médicas.
Mantenga fuera del alcance de los niños. ¡Esto no es un juguete!
Instale y opere la unidad solamente como se describe en este manual de instrucciones.
No utilice este conversor en un bote. No se califica para los usos marinos.
Controle el desgaste de la unidad periódicamente. Lleve la unidad a un técnico calificado para reemplazar las piezas desgastadas o defectuosas de inmediato.
No conecte la unidad a cualesquier sistemas de distribución de energía de una empresa de servicios públicos o circuitos de derivación.
No utilice el conversor en temperaturas superiores a 104° F (40° C) o inferiores a 32° F (0° C).
El no seguir estos lineamientos de seguridad resultará en lesiones personales y/o daños a la unidad. También puede anular la garantía.
Lea y entienda este manual de instrucción antes de usar esta unidad.
CONSERVE ESTAS INSTRUCCIONES
Este manual contiene instrucciones importantes de
seguridad y de operación para el conversor de 400W
con puerto de carga USB (PI400LA).
¡Advertencia! Para reducir el riesgo de lesiones:
ff Siga estas instrucciones y las publicadas por el fabricante de la batería y de cualquier equipo que tenga la intención de utilizar con esta unidad. Revise las indicaciones sobre precauciones en estos productos y en el motor.
INTRODUCCIÓN
Gracias por comprar el Sistema de Energía del Vehículo
Conversor Eléctrico de 400W con Puerto de Carga
USB (PI400LA). Este conversor puede utilizarse para
operar productos electrónicos personales, como:
Computadoras portátiles, cámaras digitales o filmadoras,
reproductores de MP3, teléfonos celulares, agendas
electrónicas y más. También puede utilizarse para
recargar dispositivos de CA que tengan un adaptador
de recarga apropiado con un enchufe de dos o tres patas
estadounidense estándar. Lea este manual de instrucciones
detenidamente antes de utilizar la unidad para garantizar su
óptimo rendimiento y evitar dañar el producto.
CARACTERÍSTICAS
El panel frontal presenta dos indicadores LED. El
indicador LED verde indica la potencia y la operación
adecuada del conversor. Los enchufes de la CA y del
USB son listos utilizar. El indicador LED rojo indica que el
conversor se apagó debido a una sobrecarga o condición
de temperatura excesiva.
El botón de la energía da vuelta al conversor por
intervalos. Puede también ser utilizado para forzar el
reajuste de los circuitos del conversor presionándolo
APAGADO (no se enciende ningunos LED), entonces
detrás ENCENDIDO otra vez.
El PI400LA posee dos tomacorrientes. El tomacorriente
pueden adaptarse a enchufes de CA de dos o tres
patas. La potencia también puede suministrarse a través
del tomacorriente de CC de 12V.
Controles y funciones (Fig. A)
1. Conversor eléctrico
2. Clips para la batería (con los cables)
3. Enchufe para adaptador de vehículo de 12V de CC
4. Indicador LED de falla en la salida de corriente
5. Indicador LED de falla en la entrada de corriente
6. Botón de Conectado/Desconectado de la energía
7. Tomacorriente de tres patas de CA con cubierta
8. Puerto de carga USB
9. Ventilador de enfriamiento de alta velocidad
10. Conexión eléctrica de CC del positivo (+) (Rojo)
11. Conexión eléctrica de CC del negativo (–) (Negro)
Funcionamiento del conversor
El conversor es un dispositivo electrónico que convierte
electricidad de CC (corriente continua) de bajo voltaje de
una batería a energía para uso doméstico de CA (corriente
alterna). Durante el diseño de este conversor, Black & Decker
incorporó técnicas de diseño utilizadas anteriormente en
fuentes de energía para computadoras. El resultado de estas
innovaciones en el diseño es un conversor eléctrico más
pequeño, más liviano y más fácil de utilizar.
6 • ESPAÑOL
El conversor de 400W convierte la energía en dos etapas:
ff La primera etapa consiste en un proceso de conversión de CC a CC que incrementa la CC de bajo voltaje en la entrada del conversor a CC de 145V.
ff La segunda etapa es una etapa puente MOSFET (transistor de efecto de campo semiconductor de óxido metálico) que convierte la CC de alto voltaje a 220V, 50-60HZ AC.
La forma de onda de salida del conversor eléctrico
ff
ff
ff
Si produce calor en exceso, esto indica que el dispositivo no debe utilizarse con este conversor.
Este problema no se presenta con la mayoría de los equipos operados con batería. La mayoría de estos dispositivos utiliza un cargador o transformador por separado que está enchufado en un tomacorriente de CA.
El conversor puede funcionar con la mayoría de los cargadores y transformadores.
La forma de onda de la salida de CA de este conversor se
conoce como una onda senoidal modificada. Es una
forma de onda escalonada que posee características
similares a la forma de onda senoidal de la electricidad.
Este tipo de forma de onda es adecuado para la mayoría
de las cargas de CA, incluidas las fuentes de energía por
conmutación y lineales utilizadas en equipos electrónicos,
transformadores y motores pequeños.
MAXX SST® Tecnología suave del comienzo®
La onda senoidal modificada producida por este conversor
posee un voltaje RMS (raíz cuadrada media) de 220V. La
mayoría de los voltímetros de CA (digitales y análogos)
son sensibles al valor promedio de la forma de onda en
lugar de al valor RMS. Están calibrados para el voltaje
RMS suponiendo que la forma de onda medida será
una onda senoidal pura. Estos medidores no leerán
correctamente el voltaje RMS de una onda senoidal
modificada. Un medidor RMS no VERDADERO leerá
aproximadamente 20V a 30V mínimo cuando mida la
salida de este conversor. Para realizar una medición
adecuada del voltaje de salida de esta unidad, utilice un
voltímetro de lectura RMS VERDADERO como un Fluke
87, Fluke 8060A, Beckman 4410 o Triplett 4200.
El Conversor eléctrico debe estar conectado solamente
a baterías con un voltaje de salida nominal de 12V.
La unidad no funcionará si se coloca una batería de 6V
y ocasionará un daño permanente si se conecta a
una batería de 24V.
CA modificada
de la onda
220V del seno
CA de la onda
220V del seno
Fig. 1: Salida de CA
¡Precaución! Dispositivos recargables
ff Algunos dispositivos recargables están diseñados
Modified sine wave
para cargarse al ser enchufados directamente
en un 220V AC
tomacorriente de CA. Estos dispositivos pueden dañar wave
Sine
el conversor
o el circuito que se está cargando.
220V AC
ff Si
hay algún indicio de que su artefacto se comporta de forma distinta a cuando está conectado a la fuente de energía normal, entonces desenchúfelo y busque el asesoramiento del fabricante de su aparato.
ff Al utilizar un dispositivo recargable, supervise la temperatura durante los primeros 10 minutos de uso para determinar si genera calor en exceso.
La tecnología suave del comienzo de Black & Decker
gradualmente “rampas para arriba” la energía de los
conversores de comenzar lentamente las aplicaciones que
requieren una oleada conseguir comenzada. Esta rampa
gradual para arriba protege el conversor y la aplicación,
así como la fuente de energía, contra daño y falta.
INSTRUCCIONES DE OPERACIÓN
Siempre conecte el el PI400LA a la fuente de energía de CC
de 12V antes de conectar cualquier dispositivo al conversor.
Los tomacorrientes de CA y los puertos USB permiten
al usuario operar varios dispositivos simultáneamente.
Simplemente enchufe el equipo en la unidad y opere
normalmente. Asegúrese de que la potencia en Watts
de todos los equipos enchufados simultáneamente en
el PI400LA no supere los 400W continuos.
Conexión a la fuente de energía
El conversor eléctrico viene equipado con cables para pinzas
para la batería para su conexión a una fuente de energía.
Conexión a una fuente de energía utilizando el
enchufe de salida para accesorios
El enchufe de salida para accesorios de CC es adecuado
para operar el conversor con salidas de energía de hasta
100 Watts. La punta del enchufe es el POSITIVO (+) y el
contacto lateral es el NEGATIVO (–).
Conecte el conversor a la fuente de energía insertando el
enchufe de salida para accesorios de CC con firmeza
dentro del tomacorriente para accesorios de un vehículo
o de otra fuente de energía.
ESPAÑOL • 7
PRECAUCIONES
ff Conecte directamente a una fuente de energía al operar a más de 100W.
ff No utilice con sistemas eléctricos con positivo a tierra.
ff La conexión de polaridad inversa hará que un fusible se queme y puede causar un daño permanente al conversor.
Notas: La mayoría de los circuitos de salida para accesorios del vehículo poseen fusibles clasificados en 15A a 20A o más. Para operar a la potencia en Watts máxima, utilice el cable de la pinza de la batería (suministrado) o conecte directamente a la fuente de energía con el cable y el fusible suministrado por el usuario. La mayoría de los automóviles modernos, vehículos recreativos y camiones posee un negativo a tierra.
Una vez conectado adecuadamente a una fuente de
energía de CC de 12V y encendido, el indicador LED
de potencia enciende una luz verde que indica que
el conversor está funcionando correctamente. Si el
indicador LED de fallas de entrada enciende una luz
amarilla o el indicador LED de fallas de salida enciende
una luz roja, esto indica que existe una falla. Consulte la
sección “Detección de problemas” de este Manual de
instrucciones.
Conexión a una fuente de energía utilizando
los clips de la batería
Utilice los clips de la batería con cables y conecte el
conversor eléctrico directamente a la fuente de energía
de 12V de la siguiente manera:
1. Compruebe para cerciorarse de que se haya extraído el botón de la energía del conversor (no se enciende
ningunos LED) y de que no haya vapores inflamables en el área de instalación.
2. Conecte el cable ROJO al borne ROJO marcado como (+) en la parte posterior del conversor. Conecte la pinza de la batería al terminal POSITIVO de la batería.
3. Conecte el cable NEGRO al borne NEGRO marcado como (–) en la parte posterior del conversor. Conecte la pinza de la batería al terminal NEGATIVO de la batería.
4. Asegúrese de que todas las conexiones entre las pinzas de la batería y los terminales sean firmes.
Cableado directo a la fuente de energía (método
opcional de la conexión; hardware no incluido)
¡Advertencia! Para evitar que el conversor funcione en
forma defectuosa, se recomienda no instalarlo con
cables de una extensión superior a 3m (10 pies).
Utilice el alambre del AWG #6 si el conversor a la
conexión de la fuente de energía es 6 pies o menos. Para
longitudes de cable más largas utilice el alambre del AWG
#4. En cualquier caso, proteja (+) el alambre positivo
contra cortocircuitos instalando un fusible o el interruptor
de 35 ANL cerca del terminal de la fuente de la potencia
CC (batería).
1. Compruebe para cerciorarse de que se haya extraído el botón de la energía del conversor (no se enciende
ningunos LED) y de que no haya vapores inflamables en el área de instalación.
2. Identifique los terminales POSITIVO (+) y NEGATIVO (–) (batería) de la fuente de energía de CD.
3. Instale un soporte para fusibles o interruptor cerca del terminal POSITIVO (+) de la fuente de energía (batería) de CD.
4. Conecte una prolongación de cable en un lado del soporte del fusible o del interruptor automático. Conecte el otro extremo del cable al terminal POSITIVO (+) del conversor.
5. Conecte una prolongación del cable entre el terminal NEGATIVO (–) del conversor y el terminal NEGATIVO (–) de la fuente de energía de CD.
6. Conecte una prolongación corta del cable al otro terminal del soporte del fusible o al interruptor automático. Márquelo como “POSITIVO” o “+”.
7. Conecte el extremo libre del fusible o del cable del interruptor al terminal POSITIVO (+) de la fuente de energía (batería) de CD.
8. Inserte un fusible adecuado al conversor en el soporte del fusible.
9. Pruebe el conversor encendiéndolo y enchufándolo en una lámpara o equipo de 100W.
10. Si el conversor no funciona correctamente, consulte la sección “Detección de problemas” de este manual.
PRECAUCIONES GENERALES
ff
ff
Los conectores sueltos pueden hacer que los cables se sobrecalienten y que el aislamiento se derrita.
Compruebe para asegurarse de que no ha invertido la polaridad. Los daños ocasionados por polaridad inversa no están cubiertos por nuestra garantía.
Conexión a la carga
El conversor eléctrico viene con tomacorrientes estándar
dobles de potencia de CA. Enchufe el cable al equipo que
desee operar en el tomacorriente de CA. Asegúrese de
que el requisito de carga combinada no exceda la potencia
continua máxima.
El conversor eléctrico está diseñado para conectarse
directamente a equipos eléctricos y electrónicos estándar
de la forma en que se describió anteriormente. No conecte
el conversor eléctrico a cableados de distribución de CA
de vehículos recreativos o para uso doméstico. No conecte
el conversor eléctrico a cualquier circuito de carga de CA
en el que el conductor neutro esté conectado a tierra o al
NEGATIVO de la fuente (batería) de energía de CC.
¡Advertencia! No conecte al cableado de distribución
de CA.
8 • ESPAÑOL
Consumo de corriente real versus calificado
del equipo
La mayoría de las herramientas eléctricas, los aparatos y
los equipos de audio/vídeo posee etiquetas que indican el
consumo de potencia en Amperes o Watts. Asegúrese de
que el consumo de potencia del artículo que desee operar
posea la misma calificación o una menor a la calificación
de salida del conversor. Si el consumo de energía se
clasifica en CA de Amperes, simplemente multiplique por
los Volts de CA para determinar la potencia en Watts (220).
El conversor eléctrico puede transportar las cargas resistivas
con más facilidad. No obstante, las cargas resistivas
más grandes, como estufas o calentadores eléctricos,
generalmente requieren más potencia en Watts de la que
puede suministrar el conversor eléctrico en forma continua.
Las cargas inductivas, como televisores y estéreos, requieren
más corriente para funcionar que las cargas resistivas de la
misma clasificación de potencia en Watts.
La unidad se apagará si se sobrecarga. Para recomenzar
la unidad, desenchufe simplemente todos los dispositivos
tapados en la unidad; desconecte la unidad de cualquier
fuente de la potencia CC de 12V; entonces vuelva a conectar
la unidad ANTES de tapar la aplicación detrás adentro.
Funcionamiento del tomacorriente de CA
1. Conecte el conversor con una fuente de funcionamiento de la potencia CC de 12V según lo descrito en este manual de instruccionne. Si usa el adaptador accesorio del vehículo de la CC de 12V, rote el enchufe accesorio del vehículo levemente para cerciorarse de que hay buen contacto. Cerciórese de que haya espacio adecuado para la ventilación apropiada del conversor.
2. Presione el botón de la energía para girar la unidad.
3. El indicador verde de la energía LED se encenderá, indicando una conexión apropiada. Si existe el indicador amarillo de la avería LED de la entrada o las luces de indicador rojas de la avería LED de la salida, indicando una condición de avería, refiera a la sección de “localización de averías” de este manual de instruccionne.
4. Si el conversor no funciona, asegúrese de que el interruptor de accesorios/ignición esté suministrando
realmente energía al tomacorriente para accesorios. Algunos vehículos exigen que el interruptor de ignición esté en la posición de encendido.
5. Enchufe el aparato (CA de 220V) en uno de los tomacorrientes de CA de tres patas del conversor y opere normalmente.
Nota: El conversor no servirá para aparatos y equipos que generen calor, como secadores de cabello, mantas
térmicas, hornos de microondas y tostadores. Recuerde
desconectar la unidad de cualquier fuente de energía
cuando no es adentro uso.
Funcionamiento del puerto de carga USB
1. 2. 3. 4. 5. Conecte el conversor con una fuente de funcionamiento de la potencia CC de 12V según lo descrito en este manual de instruccionne. Si usa el adaptador accesorio del vehículo de la CC de 12V, rote el enchufe accesorio del vehículo levemente para cerciorarse de que hay buen contacto. Cerciórese de que haya espacio adecuado para la ventilación apropiada del conversor.
Presione el botón de la energía para girar la unidad.
El indicador verde de la energía LED se encenderá, indicando una conexión apropiada. Si existe el indicador amarillo de la avería LED de la entrada o las luces de indicador rojas de la avería LED de la salida, indicando una condición de avería, refiera a la sección de “localización de averías” de este manual de instruccionne.
Si el conversor no funciona, asegúrese de que el interruptor de accesorios/ignición esté suministrando
realmente energía al tomacorriente para accesorios. Algunos vehículos exigen que el interruptor de ignición esté en la posición de encendido.
Enchufe el dispositivo eléctrico USB en el puerto de carga USB del conversor y opere normalmente.
Nota: Algunos teléfonos móviles vienen provistos de un cable
de datos en lugar de un cable de carga. Esto puede
provocar que su teléfono móvil no se cargue a través del
puerto USB. Consúltelo con el fabricante del teléfono móvil.
Nota: El Puerto de carga USB del conversor no admite
comunicación de datos. Sólo proporciona energía de CC
de 5V/500 mA a un dispositivo eléctrico USB externo.
Recuerde desconectar la unidad de cualquier fuente de
energía cuando no es adentro uso.
CARACTERÍSTICAS DE PROTECCIÓN
El conversor supervisa las siguientes condiciones:
a. Voltaje bajo de la batería: este estado no es perjudicial para el conversor, pero puede dañar la fuente de energía, de modo que el conversor se apagará automáticamente cuando el voltaje de entrada disminuya a una CD de 10,5V ± 0,3V. Al corregir esta condición, la unidad se reiniciará automáticamente.
b. Protección contra voltaje en exceso: el conversor se apagará automáticamente cuando el voltaje de entrada sea mayor a una CD de 15,5V ± 0,5V.
c. Protección de apagado térmico: El conversor se apagará automáticamente cuando la unidad se sobrecaliente.
d. Protección contra cortocircuitos: el conversor se apagará automáticamente en presencia de un cortocircuito. El conversor se reiniciará automáticamente después de quitar el cortocircuito.
ESPAÑOL • 9
SUGERENCIAS DE OPERACIÓN
El conversor sólo debe operarse en lugares:
a.Secos: No permita que el agua u otros líquidos entren en contacto con el conversor.
b.Frescos: La temperatura ambiente debe estar entre 10°C y 20°C (50°F y 68°F). Mantenga el conversor lejos de la luz solar directa siempre que sea posible.
c. Bien ventilados: Mantenga el área que rodea el conversor limpia para garantizar la libre circulación de aire alrededor de la unidad. No coloque artículos en o sobre el conversor durante su funcionamiento.
La unidad se apagará si la temperatura interna se eleva demasiado. El conversor se reiniciará automáticamente después de enfriarse.
d.Seguros: No utilice el conversor cerca de materiales inflamables o en lugares donde se puedan acumular
vapores o gases inflamables. Éste es un aparato eléctrico que puede generar chispas durante breves períodos si se establecen conexiones eléctricas o éstas se rompen.
CUIDADO Y MANTENIMIENTO
Almacenamiento
1. 2. 3. La temperatura ideal de almacenamiento varía entre 0°C y 40°C (32°F y 104°F).
Almacene y use el conversor en un lugar fresco y seco y con ventilación adecuada en los alrededores.
Evite los lugares expuestos a unidades de calefacción, radiadores, luz solar directa o humedad en exceso.
Reemplazo del fusible
Este conversor viene con varios fusibles internos.
Normalmente, estos fusibles no se “quemarán” a menos
que exista un problema grave dentro de la unidad. Los
fusibles internos pueden reemplazarse, no obstante, sólo
debe hacerlo el personal capacitado para reemplazar
fusibles. Si la unidad se daña durante el reemplazo del
fusible, la garantía puede quedar anulada.
El fusible en el enchufe accesorio del enchufe de la CC es usuario-reemplazable. Cerciórese de a primero
desconectan el enchufe del enchufe de cualquier fuente
de la potencia CC de 12V; entonces substituya el
fusible por uno del mismo grado y tipo.
PROTECCIÓN DEL MEDIO AMBIENTE
Separación de desechos. Este producto no debe desecharse con la basura doméstica normal. Si llega el momento de reemplazar su producto Black & Decker o éste ha dejado de tener utilidad
para usted, no lo deseche con la basura
doméstica normal. Asegúrese de que este
producto se deseche por separado.
La separación de desechos de productos usados y
embalajes permite que los materiales puedan
reciclarse y reutilizarse. La reutilización de materiales
reciclados ayuda a evitar la contaminación medioambiental
y reduce la demanda de materias primas. La normativa
local puede ofrecer la separación de desechos de
productos eléctricos de uso doméstico en centros
municipales de recogida de desechos o a ravés del
distribuidor cuando adquiere un nuevo producto.
ACCESORIOS
El adecuado funcionamiento de la herramienta depende
de los accesorios que utilice. Los accesorios Piranha y
Black & Decker se han fabricado siguiendo estándares
de alta calidad y se han diseñado para mejorar el
funcionamiento de la herramienta. Al utilizar estos accesorios,
conseguirá el máximo rendimiento de la herramienta.
INFORMACIÓN DE SERVICIO
Todos los Centros de Servicio de Black & Decker cuentan
con personal altamente capacitado dispuesto a brindar
a todos los clientes un servicio eficiente y confiable en
la reparación de herramientas eléctricas. Para mayor
informacion acerca de nuestros centros de servicio
autorizados y si necesita consejo técnico, reparaciones o
piezas de repuesto originales de fábrica, comuniquese a su
oficina local o visitenos en www.BlackandDecker-la.com
ESPECIFICACIONESPI400LA
Energía continua máxima: 400 Watts
Capacidad de sobretensión: 800 Watts
Puerto USB: 5V CC (500mA)
Voltaje de entrada: 12,8V
Alarma por voltaje bajo: CC de 11V ± 0,3V
Parada por voltaje bajo: CC de 10,5V ± 0,3V
Apagado térmico: Automático
Forma de onda: Onda senoidal modificada (MSW, por su sigla en inglés)
Fusibles: Internos / Enchufe
del accesorio
de la CC de 12V: 10A
Cables de entrada: Cables del clip de la batería /cable del adaptador de la CC 12V
Temperatura de operación: 10°C y 20°C (50°F y 68°F)
Temperatura de almacenamiento: 0°C a 40°C (32°F a 104°F)
Humedad relativa
de operación: 5% a 95% no condensada
10 • ESPAÑOL
DETECCIÓN DE PROBLEMAS
Problemas visuales/de audio frecuentes
Problema
Explicación / recomendación
Zumbidos en los sistemas de
audio
Algunos sistemas estéreos y estéreos económicos generan zumbidos cuando
se los pone en funcionamiento desde el conversor ya que la fuente de energía
en el dispositivo electrónico no filtra correctamente la onda senoidal modificada
producida por el conversor. La única solución a este problema es utilizar un
sistema de sonido que posea una fuente de energía de calidad superior.
Interferencia con el televisor
El Conversor está protegido a fin de reducir al mínimo la interferencia con las
señales de televisión. Sin embargo, en determinadas situaciones, es posible que
aún haya alguna interferencia, particularmente con señales de televisión débiles.
Intente las siguientes medidas correctivas:
1. Mueva el conversor lo más lejos posible del televisor, la antena y los cables de
la antena. En caso de ser necesario, utilice un cable prolongador de CA corto.
2. Ajuste la orientación de los cables de la antena y el cable de alimentación del
televisor para reducir al mínimo la interferencia.
3. Asegúrese de que la antena conectada al televisor proporcione una señal
adecuada (sin nieve) y que se utilice un cable de antena blindado de alta calidad.
Problemas frecuentes de potencia de salida
Causas posibles
Recomendaciónes
El voltaje de la batería está
por debajo de 10,5V
Recargue la batería o verifique la fuente de energía de CC.
El equipo que se opera genera
mucha energía
ff Reduzca la carga a un máximo de 400W.
ff Conecte directamente con la fuente de energía usando los clips de batería
incluidos al funcionar sobre 100W.
El conversor está en la
condición de apagado térmico
Espere que el conversor se enfríe. Asegúrese de que haya una ventilación
adecuada alrededor de la unidad y que la carga no sea mayor a 400W
para un funcionamiento continuo.
La salida de CA está en
cortocircuito
Desenchufe la aplicación de la CA. Desconecte la unidad de cualquier fuente
de la potencia CC de 12V. Compruebe la cuerda de la aplicación. Refiera
a la sección de la información de servicio que sigue para entrar en contacto
con un centro de servicio de Black & Decker.
ENGLISH • 11
DO NOT RETURN THIS PRODUCT TO THE STORE,
first contact your local Black & Decker office
or nearest authorized service center.
GENERAL SAFETY RULES
Warning! Read and understand all instructions.
Failure to follow all instructions listed below, may result in
electric shock, fire and/or serious personal injury.
SAVE THESE INSTRUCTIONS
SAFETY INSTRUCTIONS
General power tool safety warnings.
Warning! Read all safety warnings and
all instructions. Failure to follow the warnings and
instructions listed below may result in electric shock, fire
and/or serious injury.
Save all warnings and instructions for future reference.
The term “power tool” in all of the warnings listed below
refers to your mains operated (corded) power tool or battery
operated (cordless) power tool.
ff
ff
ff
ff
ff
ff
ff
ff
Avoid dangerous environments. Don’t use appliances in damp or wet locations. Don’t use appliances in the rain.
Keep children away. All visitors should be kept at a distance from work area.
Store idle appliances indoors. When not in use, appliances should be stored indoors in dry, and high or locked-up place – out of reach of children.
Don’t force appliance. It will do the job better and with less likelihood of a risk of injury at the rate for which it was designed.
Use right appliance. Do not use the appliance for any job except that for which it is intended.
Dress properly. Do not wear loose clothing or jewelry. They can be caught in moving parts. Rubber gloves and substantial, non-skid footwear are recommended when working outdoors. Wear protective hair covering to contain long hair.
Use safety glasses and other safety equipment. Use safety goggles or safety glasses with side shields, complying with applicable safety standards and, when needed, a face shield. Also use face or dust mask if operation is dusty. This applies to all persons in the work area. Also use a hard hat, hearing protection, gloves, safety shoes and dust collection systems when specified or required. Safety glasses or the like are available at extra cost at your local dealer or Black & Decker Service Center.
Don’t abuse cord. Never carry appliance by cord or yank it to disconnect from receptacle. Keep cord from heat, oil, and sharp edges.
ff Don’t overreach. Keep proper footing and balance at all times.
ff Disconnect appliances. Disconnect the appliance from the power supply when not in use, before servicing, and when changing accessories such as blades and the like.
ff Avoid unintentional starting. Don’t carry plugged-in appliance with finger on switch. Be sure switch is off when plugging in.
ff Proper cooling is essential when operating the inverter. Do not place the unit near the vehicle’s heat vent or in direct sunlight.
ff Electrical fault circuit interruptor protection should be provided on the circuits or outlets to be used. Receptacles are available having built in electrical fault circuit interruptor protection and may be used for this measure of safety.
ff Use of accessories and attachments. The use of any accessory or attachment not recommended for use with this appliance could be hazardous. Note: Refer to the accessory section of this manual for further details.
ff Stay alert. Watch what you are doing. Use common sense. Do not operate tool when you are tired.
ff Check damaged parts. Before further use of the tool, a guard or other part that is damaged should be carefully checked to determine that it will operate properly and perform its intended function. Check for alignment of moving parts, binding of moving parts, breakage of parts, mounting, and any other conditions that may affect its operation. A guard or other part that is damaged should be properly repaired or replaced by an authorized service center unless otherwise indicated elsewhere in this instruction manual. Have defective switches replaced by authorized service center. Do not use tool if switch does not turn it on and off.
ff Do not operate portable electric tools near flammable liquids or in gaseous or explosive atmospheres. Motors in these tools normally spark, and the sparks might ignite fumes.
ff Outdoor use extension cords. When tool is used outdoors, use only extension cords intended for use outdoors and so marked.
ff Extension cords. Make sure your extension cord is in good condition. When using an extension cord, be sure to use one heavy enough to carry the current your product will draw. An undersized cord will cause a drop in line voltage resulting in loss of power and overheating.
SAFETY GUIDELINES: DEFINITIONS
Danger! Indicates an imminently hazardous situation
which, if not avoided, will result in death or serious injury.
Warning! Indicates a potentially hazardous situation which,
if not avoided, could result in death or serious injury.
12 • ENGLISH
Caution! Indicates a potentially hazardous situation
which, if not avoided, may result in minor or moderate injury.
Caution! Used without the safety alert symbol indicates
potentially hazardous situation which, if not avoided, may
result in property damage.
Risk of unsafe operation. When using tools or equipment,
basic safety precautions should always be followed to
reduce the risk of personal injury. Improper operation,
maintenance or modification of tools or equipment could
result in serious injury and property damage. There are
certain applications for which tools and equipment are
designed. Black & Decker strongly recommends that this
product NOT be modified and/or used for any application
other than for which it was designed. Read and understand
all warnings and operating instructions before using any
tool or equipment.
Warning! Keep away from WATER, FIRE, SMOKE!
To reduce the risk of injury, user must read and understand
this instructional manual. This manual contains important
information regarding the operation and warranty of this
product. Please retain for future reference.
The inverter has the protection functions such as over
input voltage shut off, low input voltage shut off, Undervoltage turn-off resume, over heating self-lock, overload
self-lock, short circuit protection, the LED indicator will
directly display input power and errors.
IMPORTANT SAFETY INSTRUCTIONS
Warning! To reduce the risk of electric shock:
ff Do not connect to AC distribution wiring.
ff Do not make any electrical connections or disconnections in areas designated as ignition protected. This includes DC cigarette lighter type plug connection. This unit is Not approved for ignition protected areas.
ff Never immerse the unit in water or any other liquid, or use when wet.
ff Do not insert foreign objects into the AC outlet or the USB outlet.
Warning! To reduce the risk of fire
ff Do not operate near flammable materials, fumes or gases.
ff Do not expose to extreme heat or flames.
Caution! To reduce the risk of injury or property
damage:
ff Remove appliance plug from outlet before working on the appliance.
ff Do not attempt to connect or set up the unit or its components while operating your vehicle. Not paying attention to the road may result in a serious accident.
ff
ff
ff
ff
ff
ff
ff
ff
ff
ff
ff
ff
ff
ff
ff
ff
Always use the inverter where there is adequate ventilation. Do not block ventilation slots.
Always turn the inverter OFF by disconnecting it from the DC accessory outlet when not in use.
Make sure the nominal powering voltage is 12V DC, center connection POSITIVE (+).
When using this unit in a vehicle, check the vehicle owner’s manual for maximum power rating and recommended output. It may be necessary to change the vehicle accessory outlet’s in-line fuse to a higher rating. Do not install in engine compartment install in a well ventilated area.
Do not use with positive ground electrical systems*. Reverse polarity connection will result in a blown fuse and may cause permanent damage to the inverter and will void warranty. * The majority of modern automobiles, RVs and trucks are negative ground.
Keep in mind that this inverter will not operate high wattage appliances or equipment that produce heat, such as hair dryers, microwave ovens and toasters.
Do not open the inverter: there are no user-serviceable parts inside.
Do not use this inverter with medical devices. It is not tested for medical applications.
Keep away from children. This is not a toy!
Install and operate unit only as described in this Instruction Manual.
Do not use this inverter on a watercraft. It is not qualified for marine applications.
Check unit periodically for wear and tear. Take to a qualified technician for replacement of worn or defective parts immediately.
Do not connect the unit to any utility power distribution systems or branch circuits.
Do not use the inverter in temperatures over 104ºF (40ºC) or under 32ºF (0ºC).
Failure to follow these safety guidelines will result in personal injury and/or the damage to the unit. It may also be void of the warranty.
Read and understand this instruction manual before using this unit.
SAVE THESE INSTRUCTIONS
This manual contains important safety and operating
instructions for the 400W Power inverter (PI400LA).
Warning! To reduce the risk of injury:
ff Follow these instructions and those published by battery manfacturer and the manufacturer of any equipment you intend to use with this unit. Review cautionary markings on these products and on engine.
ENGLISH • 13
INTRODUCTION
Thank you for purchasing the PI400LA 400W Power
Inverter with USB Charging Port. This inverter can be
used to operate personal electronics such as: laptop
computers, digital/video cameras, MP3 players, cell
phones, PDAs, and more. It can also be used to recharge
AC devices that have an appropriate recharging
adapter with a local standard plug. Please read this
Instruction manual carefully before use to ensure optimum
performance and to avoid damage to this product.
FEATURES
The front panel provides two LED indicators. The AC and
USB outlets are ready to use. The green LED indicates
power and proper operation of the inverter. The AC and
USB outlets are ready to use. The red LED indicates
inverter shutdown from an over-load or over-temperature fault.
The Power Pushbutton turns the inverter ON and OFF. It
can also be used to force reset of inverter circuits by
pressing it OFF (no LEDs are lit), then back ON again.
AC power is supplied through two standard three-prong
type outlets. The outlets can accommodate either two- or
three-pin AC plugs.
Power inverter output waveform
The AC output waveform of this inverter is known as a
modified sine wave. It is a stepped waveform that has
characteristics similar to the sine wave shape of utility
power. This type of waveform is suitable for most AC
loads, including linear and switching power supplies used
in electronic equipment, transformers, and small motors.
The modified sine wave produced by this inverter has an
RMS (root mean square) voltage of 220V. Most AC
voltmeters (both digital and analog) are sensitive to the
average value of the waveform rather than the RMS value.
They are calibrated for RMS voltage under the assumption
CA modificada
that the waveform measured will be a pure sine
wave.
de la onda
These meters will not correctly read the RMS220V
voltage
of a
del seno
modified sine wave. Non-TRUE RMS meters will read
CA de la onda
about
30 volts low when measuring the output of this
220V20
delto
seno
inverter. For accurate measurement of the output voltage
of this unit, use a TRUE RMS reading voltmeter such as a
Fluke 87, Fluke 8080A, Beckman 4410 or Triplett 4200.
Modified
sine wave
220V AC
Sine wave
220V AC
Controls and functions (Fig. A)
1. Power inverter
2. Battery clips (with cables)
3. DC accessory outlet plug
4. Output fault LED indicator
5. Input fault LED indicator
6. (On/Off) Power pushbutton
7. AC outlet
8. USB charging port with tethered cover
9. High-Speed cooling fan
10. (Red) positive (+) cable post
11. (Black) negative (–) cable post
How this inverter works
This inverter is an electronic device that converts low
voltage DC (direct current) electricity from a battery to
AC (alternating current) household power. In designing
this inverter, Black & Decker has incorporated design
techniques previously employed in computer power
supplies. The result of these design innovations is a
smaller, lighter and easier-to-use power inverter.
The 400W Power Inverter with USB Charging Port
converts power in two stages:
ff The first stage is a DC-to-DC conversion process that raises the low voltage DC at the inverter input to 145V DC.
ff The second stage is a MOSFET bridge stage that converts the high voltage DC into 220V, 50-60HZ AC.
Fig. 1: AC Output
Caution! Rechargeable Devices
ff Certain rechargeable devices are designed to be charged by plugging them directly into an AC receptacle. These devices may damage the inverter or the charging circuit.
ff If there is any sign that your appliance is behaving differently to that when connected to the normal power source then unplug and seek advice from your appliance manufacturer.
ff When using a rechargeable device, monitor its temperature for the initial ten minutes of use to determine if it produces excessive heat.
ff If excessive heat is produced, this indicates the device should not be used with this inverter.
ff This problem does not occur with most battery-operated equipment. Most of these devices use a separate charger or transformer that is plugged into an AC receptacle.
ff The inverter is capable of running most chargers and transformers.
MAXX SST® Soft start technology®
Black & Decker’s Soft Start Technology gradually “ramps
up” the inverters power to slowly start appliances that
require a surge to get started. This gradual ramp up
protects the inverter and the appliance, as well as the
power source, from damage and failure.
14 • ENGLISH
OPERATING INSTRUCTIONS
The Power Inverter must be connected only to batteries
with a nominal output voltage of 12V. The unit will not
operate from a 6V battery and will sustain permanent
damage if connected to a 24V battery.
Always connect the PI400LA to the 12V DC power source
before plugging any devices into the unit.
The standard AC and USB outlets allow simultaneous
operation of multiple devices. Simply plug the equipment
into the unit and operate normally. Ensure that the
wattage of all equipment simultaneously plugged into
the PI400LA does not exceed 400W continuous.
Connection to power source
The power inverter comes equipped with a DC accessory
outlet plug and battery clips for connection to a power source.
Connecting to a power source using the DC
accessory outlet plug
The DC Accessory outlet plug is suitable for operating the
inverter at power outputs up to 100W. The tip of the plug is
POSITIVE (+) and the side contact is NEGATIVE (–).
Connect the inverter to the power source by inserting the
DC accessory outlet plug firmly into the accessory outlet
of a vehicle or other DC power source.
CAUTIONS
ff
ff
ff
Connect directly to power source using the included battery clips when operating above 100W.
Do not use with positive ground electrical systems.
Reverse polarity connection will result in a blown fuse and may cause permanent damage to the inverter.
Notes: Most vehicle accessory outlet circuits have fuses rated at 15A to 20A or greater. To operate at full wattage, either use the battery clip cable (supplied) or directly wire to the power source with user-supplied wire and fuse. The majority of modern automobiles, RVs and trucks are negative ground.
Once properly connected to a 12V DC power source and
switched on, the green Power LED Indicator lights
indicating that the Inverter is functioning properly. If either
the yellow Input Fault LED Indicator or red Output Fault
LED Indicator lights, indicating a fault condition exists,
refer to the “Troubleshooting” section of this Instruction
manual.
Connecting to a power source using the
provided battery clips
Use the provided battery clips (with cables) to connect the
Power Inverter directly to the 12V power source as follows:
1. 2. 3. 4. Check to make sure the inverter’s Power Pushbutton has been pressed OFF (no LEDs are lit) and that no
flammable fumes are present in the installation area.
Connect the red cable to the RED post marked (+) on the back of the inverter . Connect the RED Battery Clip to the POSITIVE terminal of the battery.
Connect the black cable to the BLACK post marked (–) on the back of the inverter. Connect the BLACK Battery Clip to the NEGATIVE terminal of the battery.
Make sure that all connections between cables and terminals are secure.
Direct hardwiring to power source (optional
connection method; hardware not included)
Warning! It is not recommended to install with cables
longer than 10 feet (3m) as this can adversely effect the
operation of your inverter.
Use #6 AWG wire if the inverter to power source connection
is 6 feet or less. For cable lengths up to 10ft use #4 AWG
wire. In either case, protect the positive (+) wire from shorts
by installing a 35 ANL fuse or circuit breaker close to the DC
power source (battery) terminal.
1. Check to make sure the inverter’s Power Pushbutton has been pressed OFF (no LEDs are lit) and that no
flammable fumes are present in the installation area.
2. Identify the POSITIVE (+) and NEGATIVE (–) DC power source (battery) terminals.
3. Install a fuse holder or breaker close to the POSITIVE (+) terminal of the DC source (battery).
4. Connect a length of wire on one side of the fuse holder or circuit breaker. Connect the other end of the wire
to the POSITIVE (+) terminal of the inverter.
5. Connect a length of wire between the inverter’s NEGATIVE (–) terminal and the DC power source NEGATIVE (–) terminal.
6. Connect a short length of wire to the other terminal of the fuse holder or circuit breaker. Mark it “POSITIVE” or “+”.
7. Connect the free end of the fuse or breaker wire to the POSITIVE (+) terminal of the DC power source (battery).
8. Insert a fuse appropriate to the inverter in the fuse holder.
9. Test the inverter by turning it on and plugging in a 100W lamp or equipment.
10. If the inverter is not properly operating, then refer to the “Troubleshooting” section of this manual.
CAUTION
ff
ff
Loose connectors may cause overheated wires and melted insulation.
Check to make sure you have not reversed the polarity. Damage due to reversed polarity is not covered by our warranty.
ENGLISH • 15
Connection to load
The Power Inverter is equipped with dual standard threeprong type outlets. Plug the cord from the equipment you
wish to operate into the AC receptacle(s). Make sure the
combined load requirement of your equipment does not
exceed maximum continuous power.
The Power Inverter is engineered to be connected directly
to standard electrical and electronic equipment in the
manner described above. Do not connect the Power Inverter
to household or RV AC distribution wiring. Do not connect
the Power Inverter to any AC load circuit in which the
neutral conductor is connected to ground (earth) or to the
NEGATIVE of the DC (battery) source.
Warning! Do not connect to AC distribution wiring.
Rated versus actual current draw of equipment
Most electrical tools, appliances, electronic devices and
audio/visual equipment have labels that indicate the power
consumption in amps or watts. Be sure that the power
consumption of the item to be operated is below 400W. If the
power consumption is rated in amps AC, simply multiply by
the AC volts (220) to determine the wattage.
Resistive loads are the easiest for the inverter to run; however,
it will not run larger resistive loads (such as electric stoves
and heaters), which require far more wattage than the inverter
can deliver. Inductive loads (such as TVs and stereos) require
more current to operate than do resistive loads of the same
wattage rating.
For safety reasons, the unit will simply shut down if it is
overloaded. To restart the unit, simply unplug all devices
plugged into the unit; disconnect the unit from any 12V DC
power source; then reconnect the unit BEFORE plugging the
appliance back in.
Operation of the AC Outlets
1. Connect the inverter to a functioning 12V DC power source as described in this Instruction manual. If using
the 12V DC vehicle accessory adapter, rotate the vehicle accessory plug slightly to make sure there is
good contact. Make sure there is adequate space for proper ventilation of the inverter.
2. Press the power pushbutton to turn the unit ON.
3. The green power LED Indicator will light, indicating a proper connection. If either the yellow input fault LED
Indicator or red output fault LED Indicator lights, indicating a fault condition exists, refer to the
“Troubleshooting” section of this Instruction Manual.
4. If the Inverter does not work, make sure the ignition/
accessory switch is actually powering the accessory
outlet. Some vehicles require the ignition switch to be turned on.
5. Plug the (220V AC) appliance into one of the inverter’s three-prong AC outlet and operate normally.
Note: The Inverter will not operate appliances and equipment
that generate heat, such as hair dryers, electric blankets,
microwave ovens and toasters. Remember to disconnect the
inverter from any power source when not in use.
Operation of the USB Charging port
1. 2. 3. 4. 5. Connect the inverter to a functioning 12V DC power source as described in this Instruction manual. If using
the 12V DC vehicle accessory adapter, rotate the vehicle accessory plug slightly to make sure there is
good contact. Make sure there is adequate space for proper ventilation of the inverter.
Press the power pushbutton to turn the unit ON.
The green power LED Indicator will light, indicating a proper connection. If either the yellow input fault LED Indicator or red output fault LED Indicator lights, indicating a fault condition exists, refer to the
“Troubleshooting” section of this Instruction manual.
If the Inverter does not work, make sure the ignition/
accessory switch is actually powering the accessory
outlet. Some vehicles require the ignition switch to be turned on.
Plug the USB-powered device into the inverter’s USB charging port and operate normally.
Note: Some mobile phones are provided with a data
cable rather than a charging cable. This may result in your
mobile phone not charging via the USB. Please check with
the mobile phone manufacturer.
Note: This unit’s USB charging port does not support data
communication. It only provides 5V/500mA DC power to an
external USB-powered device. Remember to disconnect
the inverter from any power source when not in use.
PROTECTIVE FEATURES
The inverter monitors the following conditions:
a. Low battery voltage: This condition is not harmful to the inverter, but could damage the power source, so the inverter will automatically shut down when input voltage drops below 10.5V ± 0.3V DC.
b.Input voltage too high: The inverter will automatically shut down when DC input voltage exceeds 15.5V ± 0.5V, as this can harm the unit.
c. Thermal shutdown protection: The inverter will automatically shut down when the unit becomes overheated.
d. Overload/Short circuit protection: The inverter will automatically shut down when a short circuit occurs.
OPERATING TIPS
The inverter should only be operated in locations that are:
a.Dry: Do not allow water or other liquids to come into contact with the inverter.
16 • ENGLISH
b.Cool: Surrounding air temperature should ideally be 10°C and 20°C (50°F and 68°F). Keep the inverter away from direct sunlight, when possible.
c.Well-Ventilated: Keep the area surrounding the inverter clear to ensure free air circulation around the unit. Do not place items on or over the inverter during operation. The unit will shut down if the internal temperature gets too hot. The inverter will auto-reset after it cools down.
d. Safe: Do not use the inverter near flammable materials or in any locations that may accumulate flammable fumes or gases. This is an electrical appliance that can briefly spark when electrical connections are made or broken.
CARE AND MAINTENANCE
Storage
1. Ideal storage temperature range is 0°C and 40°C (32°F and 104°F).
2. Store and use in a cool, dry place with adequate ventilation for all-around air circulation.
3. Avoid locations that are exposed to heating units, radiators, direct sunlight, or excessive humidity or dampness.
Fuse replacement
This inverter is equipped with multiple internal fuses.
Normally, these fuses will not “blow” unless there is a
serious problem inside the unit. Internal fuses are
replaceable; however, only trained personnel should
attempt fuse replacement. If the unit is damaged during
fuse replacement, the warranty may be voided.
The fuse in the DC accessory outlet plug is userreplaceable. Make sure to first disconnect the outlet plug
from any 12V DC power source; then replace the fuse with
one of the same rating and type.
PROTECTING THE ENVIRONMENT
Separate collection. This product must not be
disposed of with normal household waste.
Should you find one day that your Black & Decker
product needs replacement, or if it is of no further
use to you, do not dispose of it with household
waste. Make this product available for separate
collection.
Separate collection of used products and packaging
allows materials to be recycled and used again.
Re-use of recycled materials helps prevent
environmental pollution and reduces the demand
for raw materials. Local regulations may provide for
separate collection of electrical products from the
household, at municipal waste sites or by the
retailer when you purchase a new product.
ACCESSORIES
The performance of your tool depends on the accessory
used. Black & Decker and Piranha accessories are
engineered to high quality standards and designed to
enhance the performance of your tool. By using these
accessories you will get the very best from your tool.
SERVICE INFORMATION
Black & Decker offers a full network of company-owned and
authorized service locations. All Black & Decker Service
Centers are staffed with trained personnel to provide
customers with efficient and reliable power tool service.
For more information about our authorized service centers
and if you need technical advice, repair, or genuine factory
replacement parts, contact the Black & Decker location
nearest you, or visit us at www.BlackandDecker-la.com
SPECIFICATIONS PI400LA
Maximum continuous power: 400 Watts
Surge capacity: 800 Watts
USB port: 5V DC (500mA)
Input voltage: 12.8V
Low voltage alarm: 11.0V ± 0.3V DC
Low voltage shutdown: 10.5V ± 0.3V DC
Thermal shutdown: Automatic
Wave form: Modified sine wave (MSW)
Fuses: Internal / 12V DC accessory plug: 10A
Input cables: Battery clip cables / 12V DC accessory plug
Operating temperature: 10°C and 20°C (50°F and 68°F)
Storage temperature: 0°C and 40°C (32°F and 104°F)
Operating/Relative humidity: 5% to 95% non-condensing
ENGLISH • 17
TROUBLESHOOTING
Common audio/visual problems
Problem
Explanation/Recommendation
Buzzing sound in audio
systems
Some inexpensive stereo systems and boom boxes make a buzzing sound
when operated from the inverter, because the power supply in the electronic
device does not properly filter the modified sine wave produced by the inverter.
The only solution to this problem is to use a sound system that has a higher
quality power supply.
Problem: Television interference
The inverter is shielded to minimize interference with TV signals. However, in
some instances, some interference may still be visible, especially when the TV
signal is weak. Try the following to improve the picture:
1. Move the Inverter as far away as possible from the TV set, the antenna,
and the antenna cables. Use a short AC extension cord, if necessary.
2. Adjust the orientation of the antenna cables, and the TV power cord
to minimize interference.
3. Make sure that the antenna feeding the TV provides an adequate (snow-free)
signal and that high quality, shielded antenna cable is used.
Common power output problems
Possible cause
Recommendation
Battery voltage below 10.5V
Recharge battery or check DC power supply.
Equipment being operated
draws too much power
ff Reduce load to maximum 400W.
ff Connect directly to power source using the included battery clips when
operating above 100W.
Inverter in thermal shutdown
condition
Allow inverter to cool down. Ensure there is adequate ventilation around the
load is no more than 400W for continuous operation.
AC output is shorted
Unplug the AC appliance. Disconnect the unit from any 12V DC power source.
Check the appliance cord. Refer to the Service Information section that follows
to contact a Black & Decker Service Center.
Solamente para propósito de Argentina:
Importado por: Black & Decker Argentina S.A.
Pacheco Trade Center
Colectora Este de Ruta Panamericana
Km. 32.0 El Talar de Pacheco
Partido de Tigre
Buenos Aires (B1618FBQ)
República de Argentina
No. de Importador: 1146/66
Tel.: (011) 4726-4400
Imported by/Importado por:
Black & Decker do Brasil Ltda.
Rod. BR 050, s/n°- Km 167
Dist. Industrial II
Uberaba ˆ MG ˆ Cep: 38064-750
CNPJ: 53.296.273/0001-91
Insc. Est.: 701.948.711.00-98
S.A.C.: 0800-703-4644
Solamente para propósitos de Colombia
Importado por: Black & Decker de Colombia, S.A.
Carrera 85D # 51-65, Bodega 23
Complejo Logístico San Cayetano
Bogotá - Colombia
Tel.: 744-7100
Solamente para propósito de Chile:
Importado por: Black & Decker de Chile, S.A.
Av. Pdte. Eduardo Frei M. 6001-67 Conchalí
Santiago de Chile
Tel.: (56-2) 687 1700
Impreso en China
Impresso em China
Printed in China
11/06/13
Solamente para propósito de México:
Importado por: Black & Decker S.A. de C.V.
Avenida Antonio Dovali Jaime
# 70 Torre B Piso 9
Colonia La Fe, Santa Fé
Delegación Alvaro Obregón,
México D.F. 01210
Tel. (52) 555-326-7100
R.F.C.: BDE810626-1W7
Black & Decker del Perú S.A.
Av. Enrique Meiggs 227.
Pque. Industrial - Callao
Tel.: (511) 614-4242
RUC 20266596805