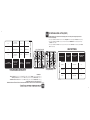
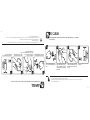
1
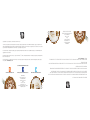
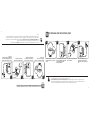
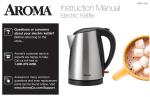
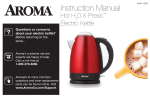
Answers to many common
questions and even
replacement parts can be
found online. Visit
www.AromaCo.com/Support.
Aroma’s customer service
experts are happy to help.
Call us toll-free at
1-800-276-6286.
Questions or concerns
about your milk frother?
Before returning to the
store...
Hot Froth X-Press™
Milk Frother
Instruction Manual
¿Preguntas o
dudas acerca de su
emulsionador de leche?
Antes de regresar a la
tienda...
AFR-180
Manual de instrucciones
Hot Froth X-Press™
Emulsionador de leche
Nos expertos de servicio al
cliente estará encantado de
ayudarle. Llámenos al número
gratuito a 1-800-276-6286.
Las respuestas a muchas
preguntas comunes e incluso
piezas de repuesto se pueden
encontrar en línea. Visita:
www.AromaCo.com/Support.
AFR-180
Congratulations on your purchase of the Aroma® Hot Froth X-Press™!
In no time at all, you’ll be able to make all your favorite coffeehouse beverages right at home. Your new milk frother includes a cappuccino attachment for
thick, rich frothed milk and a latte attachment for a delicious frothy milk. So whether you’re in the mood for a cappuccino, latte, café mocha, hot chocolate or
any other favorite milk-based drink, the Hot Froth X-Press™ is your quick and easy answer.
Publicada Por:
Aroma Housewares Co.
6469 Flanders Drive
San Diego, CA 92121
U.S.A.
1-800-276-6286
www.AromaCo.com
©2012 Aroma Housewares Company
Todos los derechos reservados.
Hot Froth X-Press ™
The Hot Froth X-Press™ includes three heating options: “High Heat,” “Medium Heat” and “No Heat” for cold drinks. Each press of the POWER button will
toggle between these functions.
This manual contains instructions on the use of your Hot Froth X-Press™ as well as its included attachments. A few delicious recipe ideas are included in the
back of the manual as well.
Para más información sobre su Aroma Hot Froth X-Press™, recetas, consultas sobre servicio técnico, piezas de repuesto y otros electrodomésticos,
visítenos en www.AromaCo.com.
For more information on your Aroma® Hot Froth X-Press™, or for recipes, replacement parts, product service and other home appliance solutions, please
visit us online at www.AromaCo.com.
Este manual contiene instrucciones sobre el uso de su Hot Froth X-Press™ así como los accesorios incluidos. En el dorso del manual podrá encontrar
varias recetas deliciosas.
See what’s brewing with Aroma online!
Hot Froth X-Press™ tiene tres niveles de temperatura: “Calor fuerte”, “Calor mediano” y “Frío” para preparar bebidas frías. Para cambiar el nivel de
temperatura solo presione el botón de poder.
Hot Froth X-Press ™
Published By:
Aroma Housewares Co.
6469 Flanders Drive
San Diego, CA 92121
U.S.A.
1-800-276-6286
www.AromaCo.com
©2012 Aroma Housewares Company
All rights reserved.
www.twitter.com/AromaHousewares
¡Felicitaciones por comprar Aroma® Hot Froth X-Press™!
www.facebook.com/AromaHousewares
En solo segundos podrá preparar sus bebidas favoritas como las de cafeterías en su propia casa. Su nuevo emulsionador de leche incluye un accesorio
Cappuccino para obtener una espuma espesa, y un accesorio Latte para obtener leche algo espumosa. Por lo tanto, cuando tenga deseos de un
cappuccino, café latte, café mocha, chocolate caliente o cualquier otra bebida con leche Hot Froth X-Press™ será una solución rápida y fácil.
www.AromaTestKitchen.com
S AV E T H E S E I N S T R U C T I O N S
11. Do not touch hot surfaces. Use the handles or knobs.
10. Close supervision is necessary when the appliance is used by or near
children.
16. This appliance is intended only for use with milk products. Do not use
the appliance for other than its intended use.
7. Use only on a level, dry and heat-resistant surface.
17. Always operate the appliance with the lid securely in place.
8. Keep hands and utensils out of container while the frother is in use to
reduce the risk of severe injury to persons or damage to the product.
18. Children should be supervised to ensure that they do not play with the
appliance.
9. To protect against fire, electric shock or personal injury, do not immerse
cord, electric plug or frother body in water or other liquids.
19. Do not use outdoors.
Important: Read all instructions carefully before first use.
1
22. Use extreme caution when opening the lid during or after cooking. Hot
steam will escape and may cause burns.
21. Always unplug from the base of the wall outlet. Never pull on the cord.
20. To disconnect, press the POWER button to the “OFF” mode and
remove the plug from the wall outlet.
6. Do not place on or near a hot gas or electric burner or in a heated oven.
5. Do not let the cord hang over the edge of a table or counter or touch a
hot surface.
4. Unplug from the outlet when not in use and before cleaning. Allow
to cool before installing or removing parts, and before cleaning the
appliance.
3. Do not operate the milk frother without liquid to avoid damaging the
heating element.
2. Use only with a 120V AC power outlet.
1.
15. Do not operate any appliance with a damaged cord or plug or
after the appliance malfunctions, or is dropped or damaged in any
manner. Contact Aroma® customer service for examination, repair or
adjustment.
14. The use of accessory attachments not recommended or sold by
Aroma® Housewares may result in fire, electric shock or injury.
13. Avoid contact with moving parts.
12. Extreme caution must be used when moving an appliance containing
hot milk or other liquids.
Basic safety precautions should always be followed when using electrical appliances, including the following:
IMPORTANT SAFEGUARDS
1.
INSTRUCCIONES IMPORTANTES DE SEGURIDAD
Cuando se usen aparatos electricos, siempre deberán observarse las precauciones básicas de seguridad, incluyendo las siguientes:
Importante: lea cuidadosamente las instrucciones antes de usarlo. 12. Los artefactos que contienen leche u otros líquidos calientes se deben
mover con extrema precaución.
2. Utilice solo CA de 120 V.
3. No use el emulsionador de leche sin líquidos ya que podría dañar el
artefacto.
4. Desenchufe el artefacto cuando no esté en uso o para limpiarlo. Espere a
que se enfríe antes de poner o quitar piezas, o antes de limpiarlo.
5. Evite que el cable de alimentación cuelgue del borde de la mesa o
mesada, o que toque superficies calientes.
6. No lo coloque sobre o cerca de una hornalla eléctrica o a gas, o dentro
del horno caliente.
7. Úselo únicamente en una superficie nivelada, seca y resistente al calor.
8. Mantenga las manos y utensilios alejados del recipiente mientras el
emulsionador esté en funcionamiento para reducir el riesgo de heridas y
evitar dañar el artefacto.
13. Evite el contacto con las partes movibles.
14. El uso de accesorios no recomendados o vendidos por Aroma®
Housewares puede dañar el artefacto.
15. No utilice artefactos con cables o enchufes en mal estado, si funciona
mal o si está dañado de cualquier forma. Consulte al Servicio al cliente
de Aroma® para examinar, reparar o ajustar el artefacto.
16. Este artefacto está diseñado para usar solo con leche. No lo utilice para
otro propósito distinto a aquél para el que está diseñado.
17. Antes de usar, compruebe que la tapa esté bien trabada.
18. Los niños no deben jugar con este artefacto.
19. No lo utilice al aire libre.
20. Para desconectarlo, ponga el interruptor en “OFF” y desenchúfelo.
22. Tenga mucho cuidado al abrir la tapa con el artefacto en funcionamiento
o inmediatamente después. El vapor puede causar quemaduras graves.
10. No lo deje al alcance de los niños. Evite que los niños utilicen el artefacto
sin la supervisión de un adulto.
21. Desenchúfelo desde la base en el enchufe de la pared. Nunca tire del
cable.
9. No sumerja el cable, enchufe o cuerpo del emulsionador de leche
en agua, u otros líquidos, para evitar riesgos de incendio, descargas
eléctricas o daños personales.
11. No toque las superficies calientes. Use las manijas o los botones. Los
artefactos que contienen leche u otros líquidos calientes se deben mover
con extrema precaución.
GUARDE ESTAS INSTRUCCIONES
1
INSTRUCCIONES IMPORTANTES DE SEGURIDAD
Instrucciones de cable corto
3.
Hay cables de extensión más largos disponibles y deben ser usados con sumo cuidado.
2.
Se proporciona un cable eléctrico corto con el propósito de reducir el riesgo de tropezarse o
enredarse con un cable más largo.
1.
¡NO DEJE QUE EL
CABLE CUELGUE!
Hot Froth X-Press ™
¡MANTÉNGALO
LEJOS DE LOS
NIÑOS!
Ploya Polarizada
If a longer extension cord is used:
a.
The marked electrical rating of the extension cord should be at least as great as the
electrical rating of the appliance.
b.
The longer cord should be arranged so that it will not drape over the counter top or
tabletop where it can be pulled by children or tripped over unintentionally.
Si este aparato tiene ploya polarizada:
3.
Hot Froth X-Press ™
Para reducir el riesgo de descarga eléctrica, este ploya intencionalmente solo debe de enchufar un lado en enchufes de luz de ploya polarisada. Si la clavija no
entra completamente, da vuelta a la clavija. Si aun la clavija no puede entrar, llame a un electricista calificada. No intente de modificar la clavija, es muy peligroso.
Longer extension cords are available and may be used if care is exercised in their use.
Si esté estropeado el cordón eléctrico, hay que ser reemplazado por el fabricante o su agencia de servicio u otra persona calificada para hacer que se evita
cualquier peligro.
2.
Si se usa un cable de extensión más largo:
a.
La clasificación eléctrica marcada en el cable de extensión debe ser por lo menos
igual que la clasificación eléctrica del aparato.
b.
El cable más largo debe ser colocado de manera que no cuelguepor el borde del
mostrador o mesa en donde pudiera ser jalado por un niño o alguien pudiera
tropezarse con el cable sin querer.
THIS APPLIANCE IS FOR HOUSEHOLD USE ONLY.
A short power-supply cord is provided to reduce the risks resulting from becoming entangled
in or tripping over a longer cord.
DO NOT DRAPE CORD!
ESTE APARATO ES PARA USO DOMÉSTICO.
2
2
If the supply cord is damaged, it must be replaced by the manufacturer, its service agent or a similarly qualified person in order to avoid a hazard.
To reduce the risk of electric shock, this plug is intended to fit into a polarized outlet only one way. If the plug does not fit fully into the outlet, reverse the plug.
If it still does not fit, contact a qualified electrician. Do not attempt to modify the plug in any way.
This appliance has a polarized plug (one blade is wider than the other); follow the instructions below:
Polarized Plug
KEEP AWAY
FROM CHILDREN!
1.
Short Cord Instructions
IMPORTANT SAFEGUARDS
3
Hot Froth X-Press ™
IDENTIFICACIÓN DE PARTES
Cappuccino Attachment
Latte Attachment
Tapa transparente
Power Button
Línea
Latte Max
Línea
Cappuccino Max
Indicator Lights
Hot Froth X-Press ™
Hot Froth
X-Press™ Body
Manija fría
Mixing Shaft
Cool-Touch Handle
Nonstick
Inner
Canister
LATTE
MAX
CAPP
MAX
Hot Froth X-Press ™
Cuerpo del Hot
Froth X-Press™
LATTE
MAX
CAPP
MAX
Recipiente
antiadherente
Eje
mezclador
Las luces
indicadoras
Botón de poder
Transparent Lid
Latte
Max Line
Cappuccino
Max Line
Accesorio cappuccino
Accesorio latte
Hot Froth X-Press ™
PARTS IDENTIFICATION
3
ANTES DE USAR POR PRIMERA VEZ
4
NOTE
• Do not use abrasive cleaners or scouring pads.
• Do not immerse the milk frother body, cord or plug in water at any time.
Lea todas las instrucciones y precauciones.
It is recommended to run your milk frother through one cycle at the “High Heat” setting before using it to consume beverages. Follow the
instructions in “To Froth Milk for Lattes” on page 8, using water instead of milk. When finished, pour out the water and wipe the inside of the milk
frother dry with a soft cloth. The milk frother is now ready for use.
1.
7.
Retire todo el material de empaque y compruebe que el producto haya llegado en buenas condiciones.
Wipe Hot Froth X-Press™ body clean with a damp cloth.
2.
6.
Rompa las bolsas de plástico ya que son peligrosas para los niños.
Wash the nonstick inner canister clean with a soft, wet cloth.
3.
5.
Lave la tapa transparente, y los accesorios para cappuccino y latte en agua tibia y jabonosa. Enjuague y seque a fondo.
Wash transparent lid, cappuccino attachment and latte attachment in warm, soapy water. Rinse and dry thoroughly.
4.
4.
Lave el recipiente antiadherente con un trapo mojado suave.
Tear up all plastic bags as they can pose a risk to children.
5.
3.
Limpie el cuerpo del Hot Froth X-Press™ con un trapo húmedo.
Remove all packaging materials and check that all items have been received in good condition.
6.
2.
7.
Read all instructions and important safeguards.
Se recomienda ejecutar emulsionador de leche a través de un ciclo antes de usarlo para consumir bebidas. Siga las instrucciones de “Leche
Espumosa Para Lattes” en la página 8, utilizando agua en vez de leche. Al terminar, vierta el agua y limpie el interior de emulsionador de leche
seca con un paño suave. El emulsionador de leche está ahora listo para su uso.
1.
• No utilice limpiadores abrasivos, o esponjas de plástico o metal.
• No sumerja el artefacto, cable o enchufe en agua.
NOTA
BEFORE FIRST USE
4
CAUTION
• Do not fill past the “CAPP MAX” line with the
cappuccino attachment in place. Milk frother will
overflow!
HELPFUL
HINTS
5
• Once frothing begins, operation may be canceled by
pressing the POWER button once.
• Using skim milk will produce a greater volume of froth.
1
LECHA ESPUMOSA PARA CAPPUCCINOS
El accesorio para cappuccino producirá una espuma espesa, perfecta para cappuccinos y otras bebidas.
Al completar el proceso, obtendrá una espesa capa de espuma con poca cantidad de leche.
2
Insert the cappuccino attachment
onto the mixing shaft.
Fill with the desired amount of milk.
Do not exceed the “CAPP MAX” line.
Close the transparent lid securely
atop the Hot Froth X-Press™.
LATTE
MAX
CAPP
MAX
3
LATTE
MAX
CAPP
MAX
Inserte el accesorio cappuccino en
el eje mezclador.
Agregue la cantidad de leche
deseada. No sobrepase la línea
“CAPP MAX”.
4
Hot Froth X-Press ™
Hot Froth X-Press ™
Cierre y trabe la tapa superior del
Hot Froth X-Press™.
Enchufe el cable de alimentación.
1
2
Plug the power cord into an available
wall outlet.
Hot Froth X-Press ™
Hot Froth X-Press ™
3
4
The cappuccino attachment will create a thick froth perfect for cappuccinos and a variety of other
drinks. When complete, there will be a thick layer of froth and a small amount of milk.
PRECAUCIÓN
• No llene arriba de la línea “CAPP MAX” cuando
use el accesorio cappuccino. La espuma podría
derramarse.
SUGERENCIAS
• Cuando el emulsionador esté en funcionamiento,
puede pararlo en cualquier momento presionando el
botón de poder una sola vez.
• Use leche descremada para obtener más espuma.
TO FROTH MILK FOR CAPPUCCINOS
5
High Heat
1
Flashing Red
2:10
Medium Heat
2
Solid Red
1:30
No Heat
3
Flashing Blue
1:15
LECHA ESPUMOSA PARA CAPPUCCINOS (CONT.)
APPROXIMATE TIME
(MINUTES)
Hot Froth X-Press™ tiene tres niveles de temperatura diferentes, ideales para una gran variedad de bebidas
y preferencias. Para seleccionar la temperatura:
• Para el “Calor máximo” presione el botón de poder una vez. Se encenderá las luces rojas intermitente.
• Para el “Calor mediano” presione el botón de poder dos veces. Se encenderá las luces rojas fija.
• Para emulsionar la leche “En frío”, presione el botón de poder tres veces. Se encenderá las luces azules
intermitente.
INDICATOR LIGHTS
COLOR
AJUSTES DE TEMPERATURA
6
Choose your heat setting.
# OF BUTTON
PRESSES
5
AJUSTES DE
TEMPERATURA
Hot Froth X-Press ™
Hot Froth X-Press ™
PRESIONAR EL
BOTÓN
COLOR DE
LAS LUCES
INDICADORAS
TIEMPO APROXIMADO
(MINUTOS)
Hot Froth X-Press ™
Elija la temperatura que desea.
2 veces
Calor mediano
1 vez
Calor máximo
1:30
Las luces rojas fija
2:10
Las luces rojas
intermitente
Hot Froth X-Press ™
3 veces
Hot Froth X-Press ™
Frío
Hot Froth X-Press ™
HEAT SETTING
5
Las luces azules
intermitente
1:15
HEAT SETTINGS
The Hot Froth X-Press™ features three heat settings perfect for a variety of beverages and preferences.
To select a heat setting:
• Pressing the POWER button once will set the frother to “High Heat.” The indicator lights will flash red for this setting.
• Pressing the POWER button twice in succession will set the frother to “Medium Heat.” The indicator lights wil be a
solid red for this setting.
• Pressing the POWER button three times in succession will set the frother to “No Heat.” The indicator lights will flash
blue for this setting.
TO FROTH MILK FOR CAPPUCCINOS (CONT.)
6
LECHA ESPUMOSA PARA CAPPUCCINOS (CONT.)
NOTE
7
6
7
8
9
Ho
t Fro
th X-P
res
s™
• Thoroughly clean the milk frother after every use. See “To Clean” on page 11 for details.
• It is recommended to allow three minutes cool-down time between uses.
• If the Hot Froth X-Press™ is used for five continuous cycles, it will automatically enter a five minute cool-down state. During
this time the indicator lights will flash in alternating blue and red colors and will not respond to presses of the POWER button. After
five minutes, the indicator lights will turn off and the Hot Froth X-Press™ will be ready for use again.
Hot Froth X-Press ™
Hot Froth X-Press ™
The Hot Froth X-Press™ will now
begin frothing at the selected heat
setting.
Once the milk has finished frothing,
the mixing shaft will stop spinning
and the indicator lights will
illuminate solid blue.
Remove the transparent lid to serve
the frothed milk.
Press the POWER button once to
turn off the Hot Froth X-Press™.
Unplug the power cord when not in
use.
El Hot Froth X-Press™ comenzará
a funcionar en la posición
seleccionada.
Una vez que la leche esté lista, el
eje mezclador se detendrá y se
encenderá las luces azules.
Retire la tapa transparente para
servir la leche espumosa.
Presione el botón de poder una vez
para apagar el Hot Froth X-Press™.
Desenchufe el artefacto cuando no
está en uso.
Hot Froth X-Press ™
Hot Froth X-Press ™
s™
th X-P
res
t Fro
Ho
6
7
8
9
NOTA
TO FROTH MILK FOR CAPPUCCINOS (CONT.)
• Limpie a fondo el emulsionador después de usarlo. Consulte “Limpieza” en la página 11 para más información.
• Se recomienda esperar tres minutos para que se enfríe antes de comenzar otro ciclo.
• Si se utiliza el Hot Froth X-Press™ cinco ciclos seguidos, dejará de funcionar automáticamente durante cinco minutos para
enfriarse. Durante este tiempo los indicadores se encenderán en rojo y azul en forma alternada, y no responderán al presionar el
botón de poder. Pasado este tiempo, los indicadores luminosos se apagarán y el Hot Froth X-Press™ estará listo para volver a
usarse.
7
8
TO FROTH MILK FOR LATTES
• Cuando el emulsionador esté en funcionamiento,
puede pararlo en cualquier momento presionando el
botón de poder una sola vez.
• Use leche descremada para obtener más espuma.
4
Enchufe el cable de alimentación.
Hot Froth X-Press ™
Hot Froth X-Press ™
Plug the power cord into an available
wall outlet.
4
El accesorio latte producirá una leche espumosa ideal para café latte y otras bebidas. Al completar el
proceso, obtendrá partes iguales de leche y espuma en el Hot Froth X-Press™.
LECHE ESPUMOSA PARA LATTES
8
HELPFUL
HINTS
3
CAUTION
• Once frothing begins, operation may be canceled by
pressing the POWER button once.
• Using skim milk will produce a greater volume of froth.
2
• Do not fill past the “LATTE MAX” line with the
latte attachment in place. Milk frother will overflow!
1
Close the transparent lid securely
atop the Hot Froth X-Press™.
Hot Froth X-Press ™
Fill with the desired amount of milk.
Do not exceed the “LATTE MAX” line.
Cierre y trabe la tapa superior del
Hot Froth X-Press™.
Insert the latte attachment onto the
mixing shaft.
Agregue la cantidad de leche
deseada. No sobrepase la línea
“LATTE MAX”.
Hot Froth X-Press ™
Inserte el accesorio latte en el eje
mezclador.
3
SUGERENCIAS
2
• No llene arriba de la línea “LATTE MAX”
cuando use el accesorio latte. La espuma podría
derramarse.
1
PRECAUCIÓN
The latte attachment will create frothy milk perfect for lattes and a variety of other drinks. When
complete, there will be roughly equal parts froth and milk in the Hot Froth X-Press™.
Choose your heat setting.
# OF BUTTON
PRESSES
INDICATOR LIGHTS
COLOR
APPROXIMATE TIME
(MINUTES)
High Heat
1
Flashing Red
2:10
Medium Heat
2
Solid Red
1:30
No Heat
3
Flashing Blue
1:15
9
LECHE ESPUMOSA PARA LATTES (CONT.)
Hot Froth X-Press™ tiene tres niveles de temperatura diferentes, ideales para una gran variedad de bebidas
y preferencias. Para seleccionar la temperatura:
• Para el “Calor máximo” presione el botón de poder una vez. Se encenderá las luces rojas intermitente.
• Para el “Calor mediano” presione el botón de poder dos veces. Se encenderá las luces rojas fija.
• Para emulsionar la leche “En frío”, presione el botón de poder tres veces. Se encenderá las luces azules
intermitente.
AJUSTES DE TEMPERATURA
5
AJUSTES DE
TEMPERATURA
Hot Froth X-Press ™
Hot Froth X-Press ™
Hot Froth X-Press ™
Hot Froth X-Press ™
Hot Froth X-Press ™
PRESIONAR EL
BOTÓN
COLOR DE
LAS LUCES
INDICADORAS
TIEMPO APROXIMADO
(MINUTOS)
Hot Froth X-Press ™
HEAT SETTING
Calor máximo
1 vez
5
HEAT SETTINGS
Elija la temperatura que desea.
The Hot Froth X-Press™ features three heat settings perfect for a variety of beverages and preferences.
To select a heat setting:
• Pressing the POWER button once will set the frother to “High Heat.” The indicator lights will flash red for this setting.
• Pressing the POWER button twice in succession will set the frother to “Medium Heat.” The indicator lights wil be a
solid red for this setting.
• Pressing the POWER button three times in succession will set the frother to “No Heat.” The indicator lights will flash
blue for this setting.
Calor mediano
Frío
2 veces
3 veces
Las luces rojas
intermitente
2:10
Las luces rojas fija
1:30
Las luces azules
intermitente
1:15
TO FROTH MILK FOR LATTES (CONT.)
9
LECHE ESPUMOSA PARA LATTES (CONT.)
7
8
9
Ho
t Fro
th X-P
res
s™
6
10
NOTE
• Thoroughly clean the milk frother after every use. See “To Clean” on page 11 for details.
• It is recommended to allow three minutes cool-down time between uses.
• If the Hot Froth X-Press™ is used for five continuous cycles, it will automatically enter a five minute cool-down state. During
this time the indicator lights will flash in alternating blue and red colors and will not respond to presses of the POWER button. After
five minutes, the indicator lights will turn off and the Hot Froth X-Press™ will be ready for use again.
Hot Froth X-Press ™
Hot Froth X-Press ™
Retire la tapa transparente para
servir la leche espumosa.
Press the POWER button once to
turn off the Hot Froth X-Press™.
Unplug the power cord when not in
use.
Presione el botón de poder una vez
para apagar el Hot Froth X-Press™.
Desenchufe el artefacto cuando no
está en uso.
Remove the transparent lid to serve
the frothed milk.
Una vez que la leche esté lista, el
eje mezclador se detendrá y se
encenderá las luces azules.
Once the milk has finished frothing,
the mixing shaft will stop spinning
and the indicator lights will
illuminate solid blue.
El Hot Froth X-Press™ comenzará
a funcionar en la posición
seleccionada.
The Hot Froth X-Press™ will now
begin frothing at the selected heat
setting.
Hot Froth X-Press ™
Hot Froth X-Press ™
s™
th X-P
res
t Fro
Ho
8
9
NOTA
7
• Limpie a fondo el emulsionador después de usarlo. Consulte “Limpieza” en la página 11 para más información.
• Se recomienda esperar tres minutos para que se enfríe antes de comenzar otro ciclo.
• Si se utiliza el Hot Froth X-Press™ cinco ciclos seguidos, dejará de funcionar automáticamente durante cinco minutos para
enfriarse. Durante este tiempo los indicadores se encenderán en rojo y azul en forma alternada, y no responderán al presionar el
botón de poder. Pasado este tiempo, los indicadores luminosos se apagarán y el Hot Froth X-Press™ estará listo para volver a
usarse.
6
TO FROTH MILK FOR LATTES (CONT.)
10
11
TO CLEAN
Hot Froth X-Press ™
Always unplug the Hot Froth X-Press™ from the power outlet and allow it to cool completely
before cleaning.
NOTA
• No utilice limpiadores abrasivos, esponjas de plástico o metal, o productos que no se consideren seguros para usar sobre
superficies antiadherentes.
• La reparación del artefacto debe hacerla solamente Aroma® Housewares.
• Para consultas sobre piezas de repuesto y servicios, contáctese con Servicio al cliente de Aroma® llamando al 1-800-276-6286 o
en [email protected].
1
2
3
4
Lave la tapa transparente y demás
accesorios con agua tibia jabonosa.
Tratando de no mojar los
componentes eléctricos, lave el
recipiente con interior antiadherente
con un trapo mojado suave.
Limpie el cuerpo del Hot Froth
X-Press™ con un trapo mojado
suave.
Seque bien. Ármelo para que esté
listo para volver a usar.
Hot Froth X-Press ™
Hot Froth X-Press ™
Hot Froth X-Press ™
Hot Froth X-Press ™
Wash the transparent lid and all
accessories used with warm, soapy
water.
Fill the nonstick inner canister with
water and wash with a soft cloth.
Scrub the bottom of the nonstick
canister to remove any remaining
milk residue.
Taking care not to get the electrical
components wet, wipe the body of
the Hot Froth X-Press™ with a soft,
wet cloth.
Dry all parts thoroughly. Reassemble
for next use.
1
2
NOTE
• Do not use harsh abrasive cleaners, scouring pads or products that are not considered safe to use on nonstick coatings.
• Any other servicing should be performed by Aroma® Housewares.
• For replacement parts and service questions, please contact Aroma® customer service at 1-800-276-6286 or via e-mail at
[email protected].
3
Antes de limpiar, desenchufe el Hot Froth X-Press™ y espere a que se enfríe por completo.
Hot Froth X-Press ™
11
LIMPIEZA
4
RECETAS
Chocolate Macchiato
Ingredientes
1/3 taza de café
1 ración completa
1 cucharadita
una pizca
de café exprés
de leche latte caliente
de jarabe de chocolate
de cacao en polvo
Coloque el accesorio latte, llene el recipiente con leche hasta la línea “LATTE
MAX”. Ajuste la temperatura a “Calor máximo” (presione el botón de poder una
sola vez). Revuelva el jarabe de chocolate en la taza de café con el café exprés.
Vierta la leche caliente en la taza; deje la espuma en el emulsionador. Agregue el
resto de espuma de leche para que el café exprés, la leche caliente y la espuma
formen tres capas. Espolvoree cacao en polvo sobre la espuma. ¡Disfrútelo!
Chocolate caliente
Ingredientes
de jarabe de chocolate
de leche latte caliente
crema batida (opcional)
With the latte attachment in place, pour milk into the milk frother to the “LATTE
MAX” line. Froth at “High Heat” (one press of the POWER button). When latte milk
has finished frothing, pour latte milk into a heat-safe mug. Stir in chocolate syrup.
Top with whipped cream and enjoy!
With the latte attachment in place, pour milk into the milk frother to the “LATTE
MAX” line. Froth at “High Heat” (one press of the POWER button). Stir the vanilla
and sugar into a heat-safe mug filled 1/2 of the way with brewed single serve
coffee. Once latte milk has finished frothing, slowly pour the milk into the mug until
nearly full, so that the hot milk pours and the froth stays behind. Then spoon or
pour the froth into the mug so that the drink forms layers of coffee, milk and froth.
Enjoy!
3 cucharaditas
1 ración completa
-
For additional recipes, or even to submit your own, visit our website at www.AromaCo.com!
hot latte milk
chocolate syrup
whipped cream (optional)
brewed bold single serve coffee
hot latte milk
vanilla
sugar
Coloque el accesorio latte, llene el recipiente con leche hasta la línea “LATTE MAX”.
Ajuste la temperatura a calor máximo (presione el botón de poder una sola vez).
Vierta la leche caliente y la espuma en una taza. Agregue el jarabe de chocolate y
revuelva. Coloque crema batida por arriba y, ¡disfrútelo!
¡Para recibir recetas adicionales, o también para someter las suyas, visite nuestro sitio web en: www.AromaCo.com!
12
12
1 full serving
3 teaspoons
-
Ingredients
Hot Chocolate
1/2 mug
1 full serving
1/2 teaspoon
1 teaspoon
Ingredients
Aroma’s Favorite
Vanilla Latte
RECIPES
¡Para recibir recetas adicionales, o también para someter las suyas, visite nuestro sitio web en: www.AromaCo.com!
RECIPES (CONT.)
Chocolate Macchiato
Ingredients
1/3 mug
1 full serving
1 teaspoon
pinch
brewed espresso
hot latte milk
chocolate syrup
cocoa powder
With the latte attachment in place, pour milk into the milk frother to the “LATTE
MAX” line. Froth at “High Heat” (one press of the POWER button). Stir the
chocolate syrup into a heat-safe mug filled 1/3 of the way with brewed espresso.
Once latte milk has finished frothing, slowly pour the milk into the mug, so that the
hot milk pours and the froth stays behind. Then pour the froth into the mug so that
the drink forms layers of espresso, milk and froth. Sprinkle cocoa powder on top
of the froth. Enjoy!
Single Serve Iced Latte
Ingredients
1/3 mug
1 full serving
1 teaspoon
-
bold single serve coffee
latte milk, cold
sugar
ice, as needed
With the cappuccino attachment in place, pour milk into the milk froth to the
“CAPP MAX” line. Froth at “No Heat” (three presses of the POWER button). With
your single serve coffee maker, brew 1/3 of a heat-safe mug of bold coffee. Once
the mug is 1/3 of the way full, cancel brewing. Remove the mug. Pour coffee into
the tall glass, add sugar and stir. When latte milk has finished frothing, slowly pour
the latte milk into the tall glass leaving behind the froth. Add ice, as needed, to the
tall glass to cool the drink. Pour remaining milk froth into the glass. Allow to cool
and enjoy!
For additional recipes, or even to submit your own, visit our website at www.AromaCo.com!
13
1/3 taza de café
2/3 taza de café
1 cucharaditas
-
de café fuerte, frío
leche latte fría
azúcar (opcional)
hielo a gusto
Coloque el accesorio latte, llene el recipiente con leche hasta la línea “LATTE MAX”.
Emulsione en frío (presione el botón de poder tres veces). Vierta la leche espumosa
en un vaso de trago largo con hielo. Agregue el azúcar. Vierta café fuerte helado
por el borde del vaso tratando de no desarmar la capa de espuma. ¡Disfrútelo!
Ingredientes
Café latte helado para uno
1/3 taza de café
1/3 taza de café
1/3 taza de café
de café fuerte
de leche caliente
de leche espumosa
Ingredientes
Cappuccino para uno
RECETAS (CONT.)
Coloque el accesorio cappuccino, llene el recipiente con leche hasta la línea
“CAPP MAX”. Ajuste la temperatura a calor máximo (presione el botón de poder
una sola vez). Llene la taza de café con el café fuerte. Con cuidado, llene la taza
con leche caliente del emulsionador. Llene el resto de la taza con el resto de la
espuma del emulsionador con ayuda de una cuchara. ¡Disfrútelo!
13
GARANTÍA
GARANTÍA LIMITADA
SERVICIO Y SOPORTE
1-800-276-6286
L-V, 8:30AM – 4:30PM, Tiempo del Pacifico
Dentro de este período de garantía, Aroma Housewares Company reparará o
reemplazará, a su opción, las partes defectuosas sin ningún costo, siempre y
cuando el producto sea devuelto, con el fl ete prepagado, con comprobación de
compra y $12.00 dólares para cargos de envío y manejo a favor de Aroma
Housewares Company. Antes de devolver un producto, sírvase llamar al número
telefónico gratuito que está más abajo para obtener un número de autorización
de devolución. Espere entre 2-4 semanas para recibir el aparato nuevamente.
En la eventualidad de un reclamo de garantía, o si el servicio se requiere para
este producto, póngase en contacto con Aroma® de servicio al cliente al
número gratuito:
Aroma Housewares Company garantiza que este producto no tenga defectos
en sus materiales y fabricación durante un período de un año a partir de la fecha
comprobada de compra dentro de los Estados Unidos.
Esta garantía no cubre la instalación incorrecta, el uso indebido, maltrato o
negligencia por parte del usuario. La garantía también es inválida en caso
de que el aparato sea desarmado o se le dé mantenimiento en un centro de
servicio no autorizado.
Esta garantía le da derechos legales específi cos los cuales podrán variar de un
estado a otro y no cubre áreas fuera de los Estados Unidos.
O podemos ser alcanzados en línea en [email protected].
Para su registro, le recomendamos grapar su recibo a esta página, junto con un
registro escrito de lo siguiente:
Fecha de compra:
Date of Purchase:
For your records, we recommend stapling your sales receipt to this page along with
a written record of the following:
Or we can be reached online at [email protected].
Lugar de compra:
1-800-276-6286
M-F, 8:30AM-4:30PM, Pacific Time
In the event of a warranty claim, or if service is required for this product, please
contact Aroma® customer service toll-free at:
SERVICE & SUPPORT
AROMA HOUSEWARES COMPANY
6469 Flanders Drive
San Diego, California 92121
1-800-276-6286
L-V, 8:30 AM - 4:30 PM, Tiempo del Pacífico
Sitio Web: www.AromaCo.com
14
NOTE
• Proof of purchase is required for all warranty claims.
AROMA HOUSEWARES COMPANY
6469 Flanders Drive
San Diego, California 92121
1-800-276-6286
M-F, 8:30 AM - 4:30 PM, Pacific Time
Website: www.AromaCo.com
Place of Purchase:
This warranty gives you specific legal rights, which may vary from state to
state, and does not cover areas outside the United States.
This warranty does not cover improper installation, misuse, abuse or
neglect on the part of the owner. Warranty is also invalid in any case that
the product is taken apart or serviced by an unauthorized service station.
Within this warranty period, Aroma Housewares Company will repair or
replace, at its option, defective parts at no charge, provided the product
is returned, freight prepaid with proof of purchase and U.S. $12.00 for
shipping and handling charges payable to Aroma Housewares Company.
Before returning an item, please call the toll free number below for a return
authorization number. Allow 2-4 weeks for return shipping.
Aroma Housewares Company warrants this product free from defects in
material and workmanship for one year from provable date of purchase in
the United States.
LIMITED WARRANTY
• La prueba de compra es necesaria para todos los reclamos.
LIMITED WARRANTY
NOTA
14