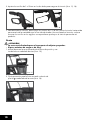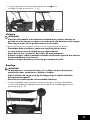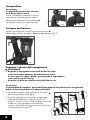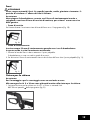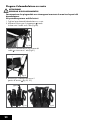
1
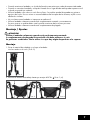
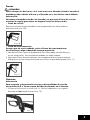
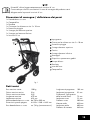
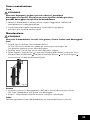
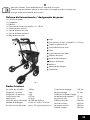
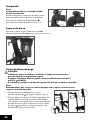
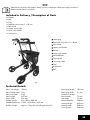
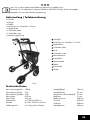
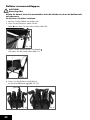
volito
Andador “VOLITO“ – RF-1301
5 – 14
Deambulatore VOLITO – RF-1301
15 – 24
Andarilho “VOLITO“ com Rodas – RF-1301
25 – 34
“VOLITO“ Rollator – RF-1301
35 – 44
Rollator VOLITO – RF-1301
45 – 54
Este producto es conforme a la directiva 93/42/EWG de productos médicos.
Questo prodotto è conforme alla norma 93/42EWG sui prodotti medicinali.
Este produto está em conformidade com a Directiva 93/42/CEE sobre produtos de medicina.
This product conforms to the Medicinal Product guideline 93/42/EWG.
Dieses Produkt ist konform mit der Richtlinie 93/42/EWG über Medizinprodukte.
Instrucciones de uso
Istruzioni d‘uso
Manual De Instrucciones
Volumen de entrega / Nombre de las piezas. . . . . . . . . . . . . . . . . . . . . . . . . . . . . . . . . . . . . . . . . . . . . . . 5
Datos técnicos. . . . . . . . . . . . . . . . . . . . . . . . . . . . . . . . . . . . . . . . . . . . . . . . . . . . . . . . . . . . . . . . . . . . . . . . 5
Símbolos utilizados. . . . . . . . . . . . . . . . . . . . . . . . . . . . . . . . . . . . . . . . . . . . . . . . . . . . . . . . . . . . . . . . . . . . 6
Uso adecuado . . . . . . . . . . . . . . . . . . . . . . . . . . . . . . . . . . . . . . . . . . . . . . . . . . . . . . . . . . . . . . . . . . . . . . . 6
Consejos de seguridad. . . . . . . . . . . . . . . . . . . . . . . . . . . . . . . . . . . . . . . . . . . . . . . . . . . . . . . . . . . . . 6 – 7
Montaje / Ajustes. . . . . . . . . . . . . . . . . . . . . . . . . . . . . . . . . . . . . . . . . . . . . . . . . . . . . . . . . . . . . . . . . . . . . 7
Montaje. . . . . . . . . . . . . . . . . . . . . . . . . . . . . . . . . . . . . . . . . . . . . . . . . . . . . . . . . . . . . . . . . . . . . . . . . . 7
Timbre . . . . . . . . . . . . . . . . . . . . . . . . . . . . . . . . . . . . . . . . . . . . . . . . . . . . . . . . . . . . . . . . . . . . . . . . . . . 8
Soporte para bastón. . . . . . . . . . . . . . . . . . . . . . . . . . . . . . . . . . . . . . . . . . . . . . . . . . . . . . . . . . . . . . . . 8
Regular la altura de las asas. . . . . . . . . . . . . . . . . . . . . . . . . . . . . . . . . . . . . . . . . . . . . . . . . . . . . . . . . . 8
Frenos. . . . . . . . . . . . . . . . . . . . . . . . . . . . . . . . . . . . . . . . . . . . . . . . . . . . . . . . . . . . . . . . . . . . . . . . . . . . 9
Cinturón . . . . . . . . . . . . . . . . . . . . . . . . . . . . . . . . . . . . . . . . . . . . . . . . . . . . . . . . . . . . . . . . . . . . . 9 – 10
Cesta. . . . . . . . . . . . . . . . . . . . . . . . . . . . . . . . . . . . . . . . . . . . . . . . . . . . . . . . . . . . . . . . . . . . . . 10 – 11
Asiento. . . . . . . . . . . . . . . . . . . . . . . . . . . . . . . . . . . . . . . . . . . . . . . . . . . . . . . . . . . . . . . . . . . . . . . . . . 11
Bandeja . . . . . . . . . . . . . . . . . . . . . . . . . . . . . . . . . . . . . . . . . . . . . . . . . . . . . . . . . . . . . . . . . . . . . . . . . 11
Plegar el andador. . . . . . . . . . . . . . . . . . . . . . . . . . . . . . . . . . . . . . . . . . . . . . . . . . . . . . . . . . . . . . . . . . . . 12
Cuidado y mantenimiento. . . . . . . . . . . . . . . . . . . . . . . . . . . . . . . . . . . . . . . . . . . . . . . . . . . . . . . . . . . . . . 13
Cuidado. . . . . . . . . . . . . . . . . . . . . . . . . . . . . . . . . . . . . . . . . . . . . . . . . . . . . . . . . . . . . . . . . . . . . . . . . 13
Mantenimiento. . . . . . . . . . . . . . . . . . . . . . . . . . . . . . . . . . . . . . . . . . . . . . . . . . . . . . . . . . . . . . . . . . . . 13
Reparaciones . . . . . . . . . . . . . . . . . . . . . . . . . . . . . . . . . . . . . . . . . . . . . . . . . . . . . . . . . . . . . . . . . . . . . . . 14
Indicaciones para la eliminación. . . . . . . . . . . . . . . . . . . . . . . . . . . . . . . . . . . . . . . . . . . . . . . . . . . . . . . . 14
3 Años de garantía. . . . . . . . . . . . . . . . . . . . . . . . . . . . . . . . . . . . . . . . . . . . . . . . . . . . . . . . . . . . . . . . . . . 14
Indice
Dimensioni di consegna / definizione dei pezzi. . . . . . . . . . . . . . . . . . . . . . . . . . . . . . . . . . . . . . . . . . . . 15
Dati tecnici. . . . . . . . . . . . . . . . . . . . . . . . . . . . . . . . . . . . . . . . . . . . . . . . . . . . . . . . . . . . . . . . . . . . . . . . . . 15
Simboli utilizzati . . . . . . . . . . . . . . . . . . . . . . . . . . . . . . . . . . . . . . . . . . . . . . . . . . . . . . . . . . . . . . . . . . . . . 16
Uso previsto. . . . . . . . . . . . . . . . . . . . . . . . . . . . . . . . . . . . . . . . . . . . . . . . . . . . . . . . . . . . . . . . . . . . . . . . . 16
Avvertenze di sicurezza. . . . . . . . . . . . . . . . . . . . . . . . . . . . . . . . . . . . . . . . . . . . . . . . . . . . . . . . . . 16 – 17
Montaggio / Impostazioni. . . . . . . . . . . . . . . . . . . . . . . . . . . . . . . . . . . . . . . . . . . . . . . . . . . . . . . . . . . . . 17
Montaggio. . . . . . . . . . . . . . . . . . . . . . . . . . . . . . . . . . . . . . . . . . . . . . . . . . . . . . . . . . . . . . . . . . . . . . . 17
Campanellino . . . . . . . . . . . . . . . . . . . . . . . . . . . . . . . . . . . . . . . . . . . . . . . . . . . . . . . . . . . . . . . . . . . . 18
Sostegno per il bastone. . . . . . . . . . . . . . . . . . . . . . . . . . . . . . . . . . . . . . . . . . . . . . . . . . . . . . . . . . . . . 18
Regolare l´altezza dell´impugnatura. . . . . . . . . . . . . . . . . . . . . . . . . . . . . . . . . . . . . . . . . . . . . . . . . . 18
Freni. . . . . . . . . . . . . . . . . . . . . . . . . . . . . . . . . . . . . . . . . . . . . . . . . . . . . . . . . . . . . . . . . . . . . . . . . . . . 19
Cintura per la schiena. . . . . . . . . . . . . . . . . . . . . . . . . . . . . . . . . . . . . . . . . . . . . . . . . . . . . . . . . 19 – 20
Cestino. . . . . . . . . . . . . . . . . . . . . . . . . . . . . . . . . . . . . . . . . . . . . . . . . . . . . . . . . . . . . . . . . . . . . 20 – 21
Sedile. . . . . . . . . . . . . . . . . . . . . . . . . . . . . . . . . . . . . . . . . . . . . . . . . . . . . . . . . . . . . . . . . . . . . . . . . . . 21
Tavoletta. . . . . . . . . . . . . . . . . . . . . . . . . . . . . . . . . . . . . . . . . . . . . . . . . . . . . . . . . . . . . . . . . . . . . . . . . 21
Deambulatore pieghevole su ruote . . . . . . . . . . . . . . . . . . . . . . . . . . . . . . . . . . . . . . . . . . . . . . . . . . . . . . 22
Cura e manutenzione. . . . . . . . . . . . . . . . . . . . . . . . . . . . . . . . . . . . . . . . . . . . . . . . . . . . . . . . . . . . . . . . . 23
Cura. . . . . . . . . . . . . . . . . . . . . . . . . . . . . . . . . . . . . . . . . . . . . . . . . . . . . . . . . . . . . . . . . . . . . . . . . . . . 23
Manutenzione. . . . . . . . . . . . . . . . . . . . . . . . . . . . . . . . . . . . . . . . . . . . . . . . . . . . . . . . . . . . . . . . . . . . 23
Riparazione. . . . . . . . . . . . . . . . . . . . . . . . . . . . . . . . . . . . . . . . . . . . . . . . . . . . . . . . . . . . . . . . . . . . . . . . . 24
Smaltimento. . . . . . . . . . . . . . . . . . . . . . . . . . . . . . . . . . . . . . . . . . . . . . . . . . . . . . . . . . . . . . . . . . . . . . . . . 24
3 Anni di garanzia. . . . . . . . . . . . . . . . . . . . . . . . . . . . . . . . . . . . . . . . . . . . . . . . . . . . . . . . . . . . . . . . . . . 24
2
Índice
Volume de fornecimento / designação de peças. . . . . . . . . . . . . . . . . . . . . . . . . . . . . . . . . . . . . . . . . . . 25
Dados técnicos. . . . . . . . . . . . . . . . . . . . . . . . . . . . . . . . . . . . . . . . . . . . . . . . . . . . . . . . . . . . . . . . . . . . . . 25
Símbolos utilizados. . . . . . . . . . . . . . . . . . . . . . . . . . . . . . . . . . . . . . . . . . . . . . . . . . . . . . . . . . . . . . . . . . . 26
Utilização correcta. . . . . . . . . . . . . . . . . . . . . . . . . . . . . . . . . . . . . . . . . . . . . . . . . . . . . . . . . . . . . . . . . . . 26
Indicações de segurança. . . . . . . . . . . . . . . . . . . . . . . . . . . . . . . . . . . . . . . . . . . . . . . . . . . . . . . . . 26 – 27
Montagem / ajustes. . . . . . . . . . . . . . . . . . . . . . . . . . . . . . . . . . . . . . . . . . . . . . . . . . . . . . . . . . . . . . . . . . 27
Estrutura. . . . . . . . . . . . . . . . . . . . . . . . . . . . . . . . . . . . . . . . . . . . . . . . . . . . . . . . . . . . . . . . . . . . . . . . . 27
Campainha . . . . . . . . . . . . . . . . . . . . . . . . . . . . . . . . . . . . . . . . . . . . . . . . . . . . . . . . . . . . . . . . . . . . . . 28
Suporte de barra. . . . . . . . . . . . . . . . . . . . . . . . . . . . . . . . . . . . . . . . . . . . . . . . . . . . . . . . . . . . . . . . . . 28
Ajuste da altura da pega. . . . . . . . . . . . . . . . . . . . . . . . . . . . . . . . . . . . . . . . . . . . . . . . . . . . . . . . . . . 28
Travões. . . . . . . . . . . . . . . . . . . . . . . . . . . . . . . . . . . . . . . . . . . . . . . . . . . . . . . . . . . . . . . . . . . . . . . . . . 29
Cinto para as costas. . . . . . . . . . . . . . . . . . . . . . . . . . . . . . . . . . . . . . . . . . . . . . . . . . . . . . . . . . 29 – 30
Cesto. . . . . . . . . . . . . . . . . . . . . . . . . . . . . . . . . . . . . . . . . . . . . . . . . . . . . . . . . . . . . . . . . . . . . . 30 – 31
Assento. . . . . . . . . . . . . . . . . . . . . . . . . . . . . . . . . . . . . . . . . . . . . . . . . . . . . . . . . . . . . . . . . . . . . . . . . . 31
Tabuleiro . . . . . . . . . . . . . . . . . . . . . . . . . . . . . . . . . . . . . . . . . . . . . . . . . . . . . . . . . . . . . . . . . . . . . . . . 31
Fechar o carrinho de andar. . . . . . . . . . . . . . . . . . . . . . . . . . . . . . . . . . . . . . . . . . . . . . . . . . . . . . . . . . . . 32
Conservação e manutenção. . . . . . . . . . . . . . . . . . . . . . . . . . . . . . . . . . . . . . . . . . . . . . . . . . . . . . . . . . . 33
Conservação. . . . . . . . . . . . . . . . . . . . . . . . . . . . . . . . . . . . . . . . . . . . . . . . . . . . . . . . . . . . . . . . . . . . . 33
Manutenção . . . . . . . . . . . . . . . . . . . . . . . . . . . . . . . . . . . . . . . . . . . . . . . . . . . . . . . . . . . . . . . . . . . . . 33
Reparação. . . . . . . . . . . . . . . . . . . . . . . . . . . . . . . . . . . . . . . . . . . . . . . . . . . . . . . . . . . . . . . . . . . . . . . . . 34
Instruções para a eliminação. . . . . . . . . . . . . . . . . . . . . . . . . . . . . . . . . . . . . . . . . . . . . . . . . . . . . . . . . . . 34
3 anos de Garantia . . . . . . . . . . . . . . . . . . . . . . . . . . . . . . . . . . . . . . . . . . . . . . . . . . . . . . . . . . . . . . . . . . 34
Contents
Included in Delivery / Description of Parts. . . . . . . . . . . . . . . . . . . . . . . . . . . . . . . . . . . . . . . . . . . . . . . . . 35
Technical Details. . . . . . . . . . . . . . . . . . . . . . . . . . . . . . . . . . . . . . . . . . . . . . . . . . . . . . . . . . . . . . . . . . . . . 35
Symbols used . . . . . . . . . . . . . . . . . . . . . . . . . . . . . . . . . . . . . . . . . . . . . . . . . . . . . . . . . . . . . . . . . . . . . . . 36
Intended use. . . . . . . . . . . . . . . . . . . . . . . . . . . . . . . . . . . . . . . . . . . . . . . . . . . . . . . . . . . . . . . . . . . . . . . . 36
Safety notes. . . . . . . . . . . . . . . . . . . . . . . . . . . . . . . . . . . . . . . . . . . . . . . . . . . . . . . . . . . . . . . . . . . . 36 – 37
Assembly / Settings. . . . . . . . . . . . . . . . . . . . . . . . . . . . . . . . . . . . . . . . . . . . . . . . . . . . . . . . . . . . . . . . . . 37
Design . . . . . . . . . . . . . . . . . . . . . . . . . . . . . . . . . . . . . . . . . . . . . . . . . . . . . . . . . . . . . . . . . . . . . . . . . . 37
Bell . . . . . . . . . . . . . . . . . . . . . . . . . . . . . . . . . . . . . . . . . . . . . . . . . . . . . . . . . . . . . . . . . . . . . . . . . . . . 38
Stick holder . . . . . . . . . . . . . . . . . . . . . . . . . . . . . . . . . . . . . . . . . . . . . . . . . . . . . . . . . . . . . . . . . . . . . . 38
Setting the hand grip height . . . . . . . . . . . . . . . . . . . . . . . . . . . . . . . . . . . . . . . . . . . . . . . . . . . . . . . . . 38
Brakes. . . . . . . . . . . . . . . . . . . . . . . . . . . . . . . . . . . . . . . . . . . . . . . . . . . . . . . . . . . . . . . . . . . . . . . . . . 39
Back belt . . . . . . . . . . . . . . . . . . . . . . . . . . . . . . . . . . . . . . . . . . . . . . . . . . . . . . . . . . . . . . . . . . . 39 – 40
Basket. . . . . . . . . . . . . . . . . . . . . . . . . . . . . . . . . . . . . . . . . . . . . . . . . . . . . . . . . . . . . . . . . . . . . . 40 – 41
Seat. . . . . . . . . . . . . . . . . . . . . . . . . . . . . . . . . . . . . . . . . . . . . . . . . . . . . . . . . . . . . . . . . . . . . . . . . . . . 41
Tray . . . . . . . . . . . . . . . . . . . . . . . . . . . . . . . . . . . . . . . . . . . . . . . . . . . . . . . . . . . . . . . . . . . . . . . . . . . . 41
Folding the Rollator. . . . . . . . . . . . . . . . . . . . . . . . . . . . . . . . . . . . . . . . . . . . . . . . . . . . . . . . . . . . . . . . . . . 42
Care and Maintenance . . . . . . . . . . . . . . . . . . . . . . . . . . . . . . . . . . . . . . . . . . . . . . . . . . . . . . . . . . . . . . . 43
Care. . . . . . . . . . . . . . . . . . . . . . . . . . . . . . . . . . . . . . . . . . . . . . . . . . . . . . . . . . . . . . . . . . . . . . . . . . . . 43
Maintenance. . . . . . . . . . . . . . . . . . . . . . . . . . . . . . . . . . . . . . . . . . . . . . . . . . . . . . . . . . . . . . . . . . . . . 43
Repairs. . . . . . . . . . . . . . . . . . . . . . . . . . . . . . . . . . . . . . . . . . . . . . . . . . . . . . . . . . . . . . . . . . . . . . . . . . . . 44
Disposal. . . . . . . . . . . . . . . . . . . . . . . . . . . . . . . . . . . . . . . . . . . . . . . . . . . . . . . . . . . . . . . . . . . . . . . . . . . . 44
3 Year guarantee . . . . . . . . . . . . . . . . . . . . . . . . . . . . . . . . . . . . . . . . . . . . . . . . . . . . . . . . . . . . . . . . . . . . 44
3
Inhaltsverzeichnis
Lieferumfang / Teilebezeichnung. . . . . . . . . . . . . . . . . . . . . . . . . . . . . . . . . . . . . . . . . . . . . . . . . . . . . . . . 45
Technische Daten . . . . . . . . . . . . . . . . . . . . . . . . . . . . . . . . . . . . . . . . . . . . . . . . . . . . . . . . . . . . . . . . . . . . 45
Verwendete Symbole. . . . . . . . . . . . . . . . . . . . . . . . . . . . . . . . . . . . . . . . . . . . . . . . . . . . . . . . . . . . . . . . . 46
Bestimmungsgemäße Verwendung. . . . . . . . . . . . . . . . . . . . . . . . . . . . . . . . . . . . . . . . . . . . . . . . . . . . . . . 46
Sicherheitshinweise. . . . . . . . . . . . . . . . . . . . . . . . . . . . . . . . . . . . . . . . . . . . . . . . . . . . . . . . . . . . . . 46 – 47
Montage / Einstellungen . . . . . . . . . . . . . . . . . . . . . . . . . . . . . . . . . . . . . . . . . . . . . . . . . . . . . . . . . . . . . . 47
Aufbau. . . . . . . . . . . . . . . . . . . . . . . . . . . . . . . . . . . . . . . . . . . . . . . . . . . . . . . . . . . . . . . . . . . . . . . . . . 47
Klingel . . . . . . . . . . . . . . . . . . . . . . . . . . . . . . . . . . . . . . . . . . . . . . . . . . . . . . . . . . . . . . . . . . . . . . . . . . 48
Stockhalter. . . . . . . . . . . . . . . . . . . . . . . . . . . . . . . . . . . . . . . . . . . . . . . . . . . . . . . . . . . . . . . . . . . . . . . 48
Einstellen der Griffhöhe. . . . . . . . . . . . . . . . . . . . . . . . . . . . . . . . . . . . . . . . . . . . . . . . . . . . . . . . . . . . . 48
Bremsen. . . . . . . . . . . . . . . . . . . . . . . . . . . . . . . . . . . . . . . . . . . . . . . . . . . . . . . . . . . . . . . . . . . . . . . . . 49
Rückengurt. . . . . . . . . . . . . . . . . . . . . . . . . . . . . . . . . . . . . . . . . . . . . . . . . . . . . . . . . . . . . . . . . . 49 – 50
Korb. . . . . . . . . . . . . . . . . . . . . . . . . . . . . . . . . . . . . . . . . . . . . . . . . . . . . . . . . . . . . . . . . . . . . . . 50 – 51
Sitz. . . . . . . . . . . . . . . . . . . . . . . . . . . . . . . . . . . . . . . . . . . . . . . . . . . . . . . . . . . . . . . . . . . . . . . . . . . . . 51
Tablett. . . . . . . . . . . . . . . . . . . . . . . . . . . . . . . . . . . . . . . . . . . . . . . . . . . . . . . . . . . . . . . . . . . . . . . . . . . 51
Rollator zusammenklappen. . . . . . . . . . . . . . . . . . . . . . . . . . . . . . . . . . . . . . . . . . . . . . . . . . . . . . . . . . . . . 52
Pflege und Wartung. . . . . . . . . . . . . . . . . . . . . . . . . . . . . . . . . . . . . . . . . . . . . . . . . . . . . . . . . . . . . . . . . . 53
Pflege. . . . . . . . . . . . . . . . . . . . . . . . . . . . . . . . . . . . . . . . . . . . . . . . . . . . . . . . . . . . . . . . . . . . . . . . . . . 53
Wartung. . . . . . . . . . . . . . . . . . . . . . . . . . . . . . . . . . . . . . . . . . . . . . . . . . . . . . . . . . . . . . . . . . . . . . . . . 53
Reparatur. . . . . . . . . . . . . . . . . . . . . . . . . . . . . . . . . . . . . . . . . . . . . . . . . . . . . . . . . . . . . . . . . . . . . . . . . . . 54
Hinweise zur Entsorgung. . . . . . . . . . . . . . . . . . . . . . . . . . . . . . . . . . . . . . . . . . . . . . . . . . . . . . . . . . . . . . . 54
3 Jahre Garantie. . . . . . . . . . . . . . . . . . . . . . . . . . . . . . . . . . . . . . . . . . . . . . . . . . . . . . . . . . . . . . . . . . . . . 54
4
Antes de utilizar el andador lea detenidamente las instrucciones uso.
Consérvelas para leerlas en un futuro. Si le da este artículo a otra persona, entréguele también
estas instrucciones.
Volumen de entrega / Nombre de las piezas
1x Andador
1x Timbre
1x Bandeja
1x Cinturón con tornillo 3 x 10 mm
1x Protector contra la lluvia
1x Soporte superior para el bastón
1x Soporte inferior para el bastón
1x Instrucciones de uso
Manillar
Cinturón con tornillo 3 x 10 mm
Protector contra la lluvia
Soporte superior para el bastón
Cesta
Soporte inferior para el bastón
Protector del canto
Ayuda anti-caídas
Maneta de bloqueo
Bandeja
Maneta para el freno
Timbre
ilustr. 1
Datos técnicos
Peso máx. del usuario: 150 kg
Peso máx. en la cesta: 5 kg
Peso máx. en la bandeja: 5 kg
Longitud máx.: 675 mm
Ancho máx.: 635 mm
Altura del andador: de 790 a 990 mm
Medidas plegado: Alto 825 x Ancho 280 x Largo 655 mm
Peso del andador: aprox. 7,8 kg (sin complementos)
Longitud del asa: 105 mm
Ancho del asa: 53 mm
Distancia hasta la
maneta de freno:
72 mm
Ancho de las ruedas: 33 mm
Diámetro de las ruedas: 200 mm
Altura del asiento: 650 mm
Ancho del asiento:
400 mm
Diámetro de giro: 860 mm
5
Símbolos utilizados
Lea las instrucciones de uso
Peso máx. en la bandeja
Fecha de fabricación
Peso máx. en la cesta
Lote número
Ancho máx.
Fabricante
Altura de las asas regulable
Peso máx. del usuario
Para uso al aire libre y
en interiores.
Uso adecuado
El andador está diseñado como ayuda para caminar, para proporcionar más libertad de movimientos
a personas de movilidad reducida. Se puede usar tanto dentro como fuera de casa. Está concebido
para el uso privado y no es adecuado para el uso comercial.
Coloque el andador bien cerca de su cuerpo, mantenga una posición derecha y mantenga su mirada
hacia delante.
Mantenga el andador siempre cerca de su cuerpo al andar para evitar caídas debidas a una mala
distribución del peso.
Consejos de seguridad
Riesgo de lesiones
¡Advertencia!
¡Riesgo de asfixia para los niños!
No deje que los niños jueguen con el material de embalaje o el artículo sin la supervisión de un adulto.
• Mantenga el artículo alejado del alcance de los niños. Podrían intentar subirse o usarlo
como ayuda para levantarse y se podrían caer.
• Utilice el artículo solamente para el fin para que ha sido diseñado.
• Sólo pueden utilizar este artículo personas que estén familiarizadas con los consejos de seguridad.
• El peso máximo de los usuarios no debe sobrepasar los 150 kg.
• Compruebe cada vez antes de utilizar el andador que no esté dañado o haya partes gastadas.
• Antes de utilizarlo, compruebe cada vez que no haya tornillos flojos.
• Este artículo sólo debe utilizarse si está en perfectas condiciones.
No lo utilice si ve que hay algún desperfecto o lo supone.
• Utilice el andador solamente cuando la temperatura de su superficie sea adecuada.
La superficie del artículo puede llegar a temperaturas peligrosas para la salud en
contacto con agua caliente, los rayos del sol, en una sauna, cuando el frío sea extremo, etc.
6
• Cuando estacione el andador, no olvide de frenarlo para evitar que ruede de manera indeseada.
• Cuando no necesite el andador, colóquelo frenado en un lugar donde nadie pueda tropezar con él
o donde no pueda irse rodando.
• Utilice el andador sólo sobre un suelo firme y llano. Se podrían quedar bloqueadas en grietas o
agujeros del suelo. Por eso mismo es recomendable evitar las tapas de las cloacas, rejillas u otros
obstáculos similares.
• No se suba nunca al andador ni transporte a nadie en él.
• Utilice el andador solamente cuando esté completamente montado y correctamente.
En caso opuesto se podría dañar usted o podría ocasionar daños a otras personas.
• Utilice el andador solamente cuando esté completamente desplegado.
Montaje / Ajustes
¡ATENCIÓN!
¡Utilice el andador solamente cuando esté perfectamente montado
y completamente desplegado! Este artículo sólo debe utilizarse si está
en perfectas condiciones. No lo utilice si ve que hay algún desperfecto o lo supone.
Montaje
1. Quite el material de embalaje y coloque el andador
con las ruedas en el suelo. (ilustr. 2).
ilustr. 2
2.Presione el asiento hacia abajo hasta que encaje <KLICK>
ilustr. 3
(ilustr. 3, 4).
ilustr. 4
7
Timbre
Advertencia:
Puede montar el timbre tanto al lado
derecho como al izquierdo.
Fije el timbre introduciendo la cinta por la apertura
prevista para ello. Quite el timbre apretando la
maneta de bloqueo y estirando de la cinta
(ilustr. 5, 6).
ilustr. 5
ilustr. 6
Soporte para bastón
Introduzca los soporte, el de arriba y el de abajo
en los espacios diseñados para ese fin (ilustr. 7)
ilustr. 7
Regular la altura de las asas
¡ATENCIÓN!
•Coloque las asas a la misma altura a los dos lados para garantizar
un desplazamiento seguro.
• Las asas deben estar siempre encajadas en una de las siete cavidades
destinadas a ese uso. <KLICK>.
• Gire los tornillos de soporte hasta la marca roja.
Advertencia:
Le recomendamos que coloque las asas a la altura de la muñeca cuando esté
de pie y con los brazos colgando.
1. Para colocarlas a la altura deseada, afloje los tornillos
de soporte de las asas (ilustr. 8).
2.Mueva las asas hasta la altura deseada y enrosque los
tornillos de soporte. Si una vez atornillados, éstos no se
encuentran paralelos al tubo de la armadura del
andador, presione el botón de freno y colóquelos en
la buena posición (ilustr. 9)
ilustr. 8
8
ilustr. 9
Frenos
¡ATENCIÓN!
Utilice siempre los dos frenos. Si el suelo está sucio, húmedo, helado o nevado el
andador puede resbalar al frenar y el frenado no es tan efectivo como debería.
Advertencia:
No mueva el andador cuando esté frenado y no presione el freno de servicio
mientras lo empuja para evitar un desgaste excesivo de las ruedas.
• Freno de servicio
Para frenar mientras empuja el andador estire la palanca de freno hacia arriba en
dirección al asa (ilustr. 10).
ilustr. 10
• Freno de estacionamiento
Siempre que no use el andador, active el freno de estacionamiento.
Así evitará que salga rodando de manera imprevista.
1. Para activar el freno, presione la palanca de freno hacia abajo más allá del punto
en que sienta presión. De esta manera el andador no saldrá rodando.
2.Para soltar el freno de estacionamiento estire la palanca de freno hacia arriba más
allá del punto en que sienta presión hasta que el freno se haya desbloqueado (ilustr. 11).
ilustr. 11
Cinturón
Advertencia
Para montarlo y desmontarlo necesita un destornillador de estrella.
Los tornillos de 3 x 10 mm vienen de fábrica colocados en el cinturón.
1. Coloque el cinturón con los tornillos de 3 x 10 mm a cada lado, en los espacios
destinado a él cerca de las asas (ilustr. 12).
ilustr. 12
9
2.Apriete los tornillos de 3 x 10 mm en los dos lados para asegurar el cinturón (ilustr. 13, 14).
ilustr. 13
ilustr. 14
3.Para desmontar el cinturón, desenrosque los tornillos de 3 x 10 mm y estire el cinturón hacia arriba
para sacarlo de las cavidades que le han sido destinadas. Una vez sacado el cinturón, vuelva a
enroscar los tornillos en los agujeros correspondientes que hay en el cinturón para evitar así
perderlos.
Cesta
¡ATENCIÓN!
• La cesta está diseñada para el transporte de objetos pequeños.
•El peso máximo de carga es de 5 kg.
1. Monte/desmonte la cesta cerrando dos botones de presión y una
tira de velcro a cada lado de ésta (ilustr. 15).
ilustr. 15
2.Fije la protección para la lluvia cerrando un botón de
presión a cada lado de la cesta (ilustr. 16).
ilustr. 16
10
3. Coloque la protección contra la lluvia cuando sea necesaria con
la solapa (2) sobre la cesta (ilustr. 17, 18).
ilustr. 17
ilustr. 18
Asiento
¡ATENCIÓN!
•El asiento del andador está solamente diseñado para sentarse durante un
período corto de tiempo y no para ser usado como silla durante mucho tiempo.
•Sólo una persona a la vez puede sentarse en el asiento.
Si quiere utilizar el asiento, tenga en cuenta los puntos siguientes antes de sentarse:
•El andador debe encontrarse sobre una superficie plana y firme,
en caso opuesto corre el peligro de que salga rodando.
• Antes de sentarse, accione los dos frenos de estacionamiento.
•Siéntese siempre sobre al andador mirando a la dirección opuesta a la marcha.
Puede respaldarse en el cinturón.
•Siéntese siempre derecho y con los dos pies tocando al suelo.
Bandeja
¡ATENCIÓN!
• La bandeja no es resistente al calor y no se debe usar para transportar
artículos pesados, voluminosos, afilados o frágiles.
•El peso máximo de carga son 5 kg. Distribuya el peso sobre la bandeja
de manera homogénea.
•No utilice el asiento cuando está montada la bandeja.
1. Coloque la bandeja, que es parte del volumen de entrega, en el asiento del andador.
Los puntos de debajo de la bandeja tienen que encajar en las cavidades de la zona
para sentarse (ilustr. 19).
ilustr. 19
11
Plegar el andador
¡ATENCIÓN!
¡Peligro de pellizcarse!
Cuando pliegue el andador vaya con cuidado a no pellizcarse
las manos entre las diversas partes del andador.
Se podría hacer daño.
1. Quite la bandeja del andador.
2.Afloje el bloqueo para plegar levantando la palanca
que hay debajo del asiento (ilustr. 20).
ilustr. 20
3.Coja el andador por el lazo del asiento
y estire de él hacia arriba (ilustr. 21).
ilustr. 21
4.Fije el andador con la abrazadera
ilustr. 22
12
(ilustr. 22, 23).
ilustr. 23
Cuidado y mantenimiento
Cuidado
¡ATENCIÓN!
No utilice productos de limpieza corrosivos o que rasquen, tampoco estropajos.
Podrían atacar la superficie del andador. Tampoco utilice limpiadores a presión
porque podrían estropear la superficie del andador.
1. Limpie el andador regularmente con un trapo húmedo, de vez en cuando puede
utilizar un producto de limpieza suave.
2.Séquelo bien antes de usarlo o guardarlo, sobretodo las asas.
Mantenimiento
¡ATENCIÓN!
No utilice el andador cuando las ruedas, los frenos o el bastidor
tengan algún fallo o desperfecto.
Frenos
1. Compruebe siempre antes de usar el andador que los frenos funcionen correctamente.
Si no funcionasen bien, no los arregle usted mismo, póngase en contacto con el
vendedor o con el centro de atención al cliente.
2.Compruebe que los cables del freno no estén deformados o tengan grietas.
3.Ajustar: Coloque las zapatas de freno de manera que la distancia a la rueda sea de
aprox. 2 mm. Afloje la contratuerca y ajuste el cable de freno con el tornillo de ajuste
vuelva a apretar la contratuerca (ilustr. 24).
y
ilustr. 24
Ruedas
1. Cambie las ruedas cuando estén muy gastadas o deterioradas (por ej. grietas).
No utilice el andador si ve que las ruedas tienen algún fallo.
2.Compruebe, como mínimo una vez por semana, que las ruedas giran sin problemas.
Bastidor
Compruebe a menudo que el bastidor no esté deformado o tenga alguna grieta.
13
Reparaciones
No haga cambios en el producto ni intente arreglarlo usted mismo.
Sólo compre las piezas de recambio al fabricante.
Por culpa de una reparación inadecuada se pueden producir daños inesperados.
Indicaciones para la eliminación
¡Desechar embalaje y artículo de acuerdo con el medio ambiente y por separado! Desechar este artículo a través de una planta de eliminación autorizada o mediante la administración municipal. Cumpla
con las prescripciones en vigor.
3 Años de garantía
Este producto ha sido fabricado sujeto a un control permanente de la calidad. Garantizamos la
ausencia de defectos de fabricación y de material. La garantía no es aplicable al desgaste normal,
quedando invalidada en caso de uso indebido.
No obstante, si tiene algún motivo de reclamación, póngase en contacto con nuestra línea directa de
servicio gratuita o nuestra dirección en Internet, o simplemente envíenos un correo electrónico.
En todos los casos le asesoraremos personalmente. Durante la vigencia de la garantía, Ud. puede
enviar, tras consultarlo con nuestro personal de servicio, las piezas defectuosas sin franqueo a la
dirección de servicio señalada abajo, recibiendo gratuitamente y sin demora una pieza nueva o
reparada.
Conserve la factura de compra. Describa la causa de su reclamación. Procuraremos ofrecer una
solución satisfactoria lo más rápidamente posible.
IAN: 46438
Dirección del servicio técnico
Línea directa de producto 00800-88080808 (gratuita de lunes a viernes 10 - 16 horas)
LARA • Gran Via 20-26 • E-07182 El Toro
[email protected]
www.nws-service.com
14
Prima dell´utilizzo leggere attentamente le istruzioni d´uso.
Conservarle per ulteriori consultazioni! In caso di consegna del prodotto a terzi
allegare anche le presenti istruzioni d´uso.
Dimensioni di consegna / definizione dei pezzi
1x Deambulatore su ruote
1x Campanellino
1x Tavoletta
1x Cintura per la schiena con vite 3 x 10 mm
1x Protezione pioggia
1x Sostegno per bastone superiore
1x Sostegno per bastone inferiore
1x Istruzioni d´uso
Impugnatura
Cintura per la schiena con vite 3 x 10 mm
Protezione pioggia
Sostegno bastone superiore
Cestino
Sostegno bastone inferiore
Paraspigoli
Dispositivo superamento gradini
Vite per blocco
Tavoletta
Leva del freno
Campanellino
fig. 1
Dati tecnici
Peso massimo utente:
150 kg
Carico massimo cestino: 5 kg
Carico massimo tavoletta: 5 kg
Lunghezza massima: 675 mm
Larghezza massima: 635 mm
Altezza deambulatore su ruote: da 790 a 990 mm
Dimensioni quando piegato: A 825 x L 280 x L 655 mm
Peso deambulatore su ruote: ca. 7,8 kg (senza accessori)
Lunghezza impugnatura: Larghezza impugnatura: Distanza all´impugnatura
della leva del freno:
Larghezza ruota: Diametro ruota: Altezza sedia: Larghezza sedia:
Diametro di sterzata: 105 mm
53 mm
72 mm
33 mm
200 mm
650 mm
400 mm
860 mm
15
Simboli utilizzati
Osservare le istruzioni d´uso
Carico massimo tavoletta
Data di produzione
Carico massimo cestino
Numero di batch
Larghezza massima
Produttore
Regolazione in altezza
dell´impugnatura scorrevole
Peso massimo utente
Per uso esterno ed interno
Uso previsto
Il deambulatore su ruote deve essere utilizzato solamente per aiutare a camminare e per favorire i
movimenti di persone limitate fisicamente. È adatto per l´uso esterno ed interno. Questo prodotto è stato
studiato per uso privato e non è adatto per un utilizzo commerciale.
Tenere il deambulatore su ruote vicino al corpo, mantenere una postura dritta e sguardo in avanti.
Camminare sempre all´interno del deambulatore su ruote, non tenerlo lontano dal proprio corpo per
evitare cadute dovute a sforzi errati.
Avvertenze di sicurezza
Pericolo di lesioni!
AVVERTENZA!
Pericolo di soffocamento bambini!
Non lasciare giocare i bambini con il materiale di imballaggio o con il
prodotto senza alcuna supervisione.
• Tenere i bambini lontano dal prodotto. Montandoci sopra o tenendosi ad esso
potrebbero ribaltarsi insieme all’oggetto.
• Usare il prodotto solamente per l´uso previsto.
• Il prodotto deve essere usato solamente da persone che sono a conoscenza
delle avvertenze di sicurezza.
• Il peso massimo dell´utente di 150 kg non deve essere superato.
• Prima di ogni utilizzo verificare che il prodotto non sia nè usurato né danneggiato.
• Prima di ogni utilizzo verificare che tutte le viti siano serrate bene!
• Il prodotto deve essere utilizzato solamente in perfette condizioni!
Non utilizzare il prodotto con danni visibili o danni presunti!
• Usare questo prodotto solamente se le temperature delle superfici lo consentono.
Per acqua calda, insolazione, condizioni di sauna, freddo estremo ect.
la superficie del prodotto può assumere temperature che nuocciono alla salute.
16
• Quando si mette da parte il deambulatore inserire il freno di
stazionamento per evitare che si possa muovere.
• Se il deambulatore su ruote non viene utilizzato, posizionarlo con il freno
inserito in modo che nessuno possa inciamparci o il deambulatore si possa muovere.
• Usare il deambulatore su ruote solamente su superfici stabili piatte. Le ruote possono impigliarsi
in solchi o in fessure di terra. Perciò evitare tombini, griglie oppure ostacoli simili.
• Mai posizionarsi sopra il deambulatore su ruote e mai trasportarci delle persone.
• Usare il deambulatore solamente se montato interamente e correttamente!
Se montato in maniera errata c´è il pericolo che si ferisca Lei o qualche altra persona.
• Usare il deambulatore solamente se aperto.
Montaggio / Impostazioni
ATTENZIONE!
Usare il deambulatore solamente se completamente montato e aperto!
Il prodotto deve essere utilizzato solamente se in perfette condizioni!
Non utilizzare il prodotto con danni visibili o danni presunti!
Montaggio
1. Eliminare il materiale di imballaggio e posizionare
il deambulatore con le ruote per terra (fig.2).
fig. 2
2.Spingere il sedile in basso fino al klick
fig. 3
(fig. 3,4).
fig. 4
17
Campanellino
Avvertenza:
Il campanellino può essere montato
sia a destra che a sinistra.
Fissare il campanellino passando il nastro di
cricchetto per l´apertura prevista. Levare il
campanellino premendo la leva di sblocco
e estraendo il nastro di cricchetto (fig. 5,6).
fig. 5
fig. 6
Sostegno per bastone
Spingere gli elementi del sostegno superiore per bastone
e del sostegno inferiore per bastone nelle guide predisposte (fig.7).
fig. 7
Regolare l´altezza dell´impugnatura
ATTENZIONE!
•Regolare le impugnature scorrevoli dei due lati sulla
stessa altezza per garantire un avanzamento sicuro.
•Si deve sentire lo scatto „KLICK“ posizionando le impugnature
scorrevoli in uno dei 7 fori .
• Girare le viti di fermo solamente fino alla linea rossa.
Avvertenza:
Si raccomanda di regolare l´altezza dell’impugnatura in modo da avere una postura
dritta e le braccia pendenti sull´altezza del polso.
1. Per regolare l’altezza corretta allentare le viti di fermo
delle impugnature scorrevoli (fig.8).
2.Estrarre le impugnature scorrevoli fino a raggiungere
l´altezza desiderata e poi serrare di nuovo le viti
di fermo. Nel caso in cui le viti di fermo dopo essere state
serrate non risultino parallele al tubo del telaio,
premere il pulsante di arresto e portare le viti di fermo
nella giusta posizione (fig.9).
fig. 8
18
fig. 9
Freni
ATTENZIONE!
Usare sempre entrambi i freni. Su superfici sporche, umide, giacciate o innevate c´è
pericolo di scivolare e l´effetto dei freni è limitato.
Avvertenza:
Non spingere il deambulatore su ruote con il freno di stazionamento inserito e
spingendo, non tirare il freno di servizio di continuo, per evitare l´usura eccessivo
delle gomme.
• Freno di servizio
Per frenare durante il movimento tirare la leva del freno verso l´impugnatura (fig. 10).
fig. 10
• Freno di stazionamento
Inserire sempre il freno di stazionamento quando non si usa il deambulatore.
In questo modo si evita il movimento accidentale.
1. Premere la leva del freno in basso attraverso il punto palpabile.
Il deambulatore su ruote non sarà in grado di muoversi.
2.Per disinserire il freno di stazionamento tirare in alto la leva del freno oltre il punto palpabile (fig. 11).
fig. 11
Cintura per la schiena
Avvertenza
Per il montaggio e per lo smontaggio usare un cacciavite a croce.
Alla consegna le viti 3 x 10 mm sono già metà inserite nella cintura per la schiena.
1. Spingere la cintura per la schiena con le viti 3 x 10 mm su entrambi i lati
dall´alto nei passanti delle impugnature (fig.12).
fig. 12
19
2.Per bloccare la cintura per la schiena serrare le viti 3 x 10 mm su ogni lato (fig. 13, 14).
fig. 13
fig. 14
3.Per lo smontaggio della cintura estrarre, ruotando,
le viti 3 x 10 mm dai fori e tirare la cintura dai passanti verso l´alto.
Cestino
ATTENZIONE!
• Il cestino è adatto solamente per il trasporto di oggetti piccoli.
• Il carico massimo è 5 kg.
1. Montare/smontare il cestino attraverso 2 rispettivi bottoni automatici ed
una chiusura a velcro su ogni lato del cestino (fig. 15).
fig. 15
2.Montare la protezione pioggia fissandola su ogni lato del
cesto attraverso un bottone automatico (fig.16).
fig. 16
20
3. Secondo necessità tirare la protezione pioggia attraverso i passanti
sopra il cestino (fig. 17,18).
fig. 18
fig. 17
Sedile
ATTENZIONE!
• Il sedile del deambulatore su ruote è stato studiato per l´appoggio per un breve
periodo di tempo e non può essere utilizzato come sedia per un periodo di tempo
prolungato.
• Può essere usato solamente da una persona.
Se si desidera usare il sedile bisogna comunque osservare ciò che segue:
• Il deambulatore su ruote deve stare su una superficie pina e stabile,
altrimenti c´è il pericolo che si muova.
• Innanzitutto, prima di sedersi, inserire ambedue i freni di stazionamento.
• Appoggiarsi al deambulatore su ruote sempre in modo da guardare
contro il senso del movimento. Può appoggiarsi alla cintura per la schiena.
•Sedersi sul sedile sempre con un comportamento dritto.
I piedi devono sempre toccare a terra.
Tavoletta
ATTENZIONE!
• La tavoletta non è resistente al calore e non deve essere usata per trasportare
oggetti pesanti, ingombranti, taglienti o fragili.
• Il carico massimo è 5 kg. Distribuire il carico sulla tavoletta in modo uniforme.
•Non sedersi sul sedile quando è montata la tavoletta!
1. Prendere la tavoletta e metterla sul sedile del deambulatore.
Si deve sentire come si inseriscono i piedini nelle sedi del sedile (fig.19).
fig. 19
21
Piegare il deambulatore su ruote
ATTENZIONE!
PERICOLO DI SCHIACCIAMENTO!
Far attenzione che piegandolo non rimangano incastrate le mani tra le parti del
deambulatore.
Ciò potrebbe portare a delle lesioni.
1. Togliere la tavoletta dal deambulatore su ruote.
2.Allentare il blocco per il piegamento tirando
la leva sotto il sedile verso l’alto (fig.20).
fig. 20
3.Afferrare il deambulatore al passante del
sedile e tirare verso l´alto (fig.21).
fig. 21
4.Bloccare poi il deambulatore con il
gancio di arresto (fig.22, 23).
fig. 22
22
fig. 23
Cura e manutenzione
Cura
ATTENZIONE!
Non usare detergenti, spugne corrosive o abrasivi, potrebbero
danneggiare le superfici. Per pulire non usare il pulitore ad alta pressione,
potrebbe danneggiare la superficie del deambulatore.
1. Passare sul deambulatore in maniera uniforme un panno leggermente umidificato ed
eventualmente con un detergente delicato.
2.Successivamente asciugarlo completamente, in particolare le impugnature,
prima di riusarlo o prima di metterlo a posto.
Manutenzione
ATTENZIONE!
Non usare il deambulatore su ruote se le gomme, i freni o il telaio sono danneggiati!
Freni
1. Prima di ogni uso verificare il funzionamento dei freni.
Se i freni non sono funzionanti non ripararli per conto proprio ma rivolgersi ad
uno specialista oppure al servizio clienti del prodotto.
2.Verificare anche i cavi dei freni che non siano deformati o strappati.
3.Tarare: Regolare i ceppi dei freni in modo che la distanza alla superficie ruota sia ca. 2 mm.
Allentare il dado autobloccante e regolare la cordicella del freno con la vite di registro
e serrare di nuovo il dado autobloccante (fig.24).
fig. 24
Gomme
1. Le gomme usurate o con danneggiamenti visibili (ad es. fessure) devono essere sostituite.
Non usare il deambulatore se le gomme sono danneggiate.
2.Almeno 1 volta/settimana verificare che tutte le ruote girino senza intoppi.
Telaio
Verificare regolarmente il telaio del deambulatore per eventuali deformazioni o fessure.
23
Riparazioni
Non modificare il prodotto, né ripararlo per conto proprio!
Usare solamente pezzi di ricambio del produttore.
Riparazioni improprie possono portare a danneggiamenti inaspettati!
Smaltimento
Smaltire l’imballaggio e l’articolo stesso rispettando l’ambiente e le regole della raccolta differenziata!
Per lo smaltimento rivolgersi ad un’azienda autorizzata o alle autorità competenti.
Rispettare la normativa vigente.
3 Anni di garanzia
Questo prodotto è stato realizzato sotto il controllo continuo della qualità. Pertanto garantiamo
l’assenza di difetti di produzione e di materiale. Il diritto della garanzia non vale in caso di un’usura
normale come pure in caso di un uso improprio.
Vi preghiamo di rivolgersi al nostro call center gratuito per l’assistenza clienti, all’indirizzo web oppure
scriveteci un’e-mail se nonostante tutto dovesse sussistere il motivo per un reclamo. Riceverà in ogni caso
una consulenza personale. Durante il periodo di garanzia potrà inviare in porto assegnato all’indirizzo
indicato, previo accordo con i nostri collaboratori, responsabili per l’assistenza dei nostri clienti,
il prodotto difettoso e riceverete immediatamente e gratuitamente un prodotto nuovo oppure riparato.
Vi preghiamo di conservare lo scontrino. Descrivete il motivo della contestazione, sarà nostra premura
trovare al più presto possibile una soluzione soddisfacente.
IAN: 46438
Indirizzo assistenza
Numero verde 00800-88080808 (Lu-Ve dalle 10 alle 16, gratuito)
C.K - Service • Via Cà Solaro 7 • I - 30030 Favaro Veneto/Venzia
[email protected]
www.nws-service.com
24
Antes da utilização, leia cuidadosamente o manual de instruções.
Guarde-o impreterivelmente para o ler mais tarde! Se entregar o artigo a outra pessoa,
entregue também este manual de instruções.
Volume de fornecimento / designação de peças
1x Carrinho de andar
1x Campainha
1x Tabuleiro
1x Cinto para as costas com parafuso 3 x 10 mm
1x Cobertura para a chuva
1x Suporte de barra em cima
1x Suporte de barra em baixo
1x Manual de instruções
Pega
Cinto para as costas com parafuso 3 x 10 mm
Cobertura para a chuva
Suporte de barra em cima
Cesto
Suporte de barra em baixo
Deflector de cantos
Ajuda de basculamento
Parafuso de fixação
Tabuleiro
Alavanca de travagem
Campainha
Fig. 1
Dados técnicos
Peso máx. do utilizador:
150 kg
Carga máx. do cesto: 5 kg
Carga máx. do tabuleiro: 5 kg
Comprimento máx.: 675 mm
Largura máx.: 635 mm
Altura do carrinho de andar: de 790 até 990 mm
Medida de dobragem: A 825 x L 280 x C 655 mm
Peso do carrinho de andar: aprox. 7,8 kg (sem acessórios)
Comprimento da pega: Largura da pega: Distância em relação à pega
da alavanca de travagem:
Largura da roda: Diâmetro da roda: Altura do assento: Largura do assento:
Área de viragem: 105 mm
53 mm
72 mm
33 mm
200 mm
650 mm
400 mm
860 mm
25
Símbolos utilizados
Observar o manual de instruções
Carga máx. do tabuleiro
Data de fabrico
Carga máx. do cesto
Designação de lote
Largura máx.
Fabricante
Ajuste em altura das pegas corrediças
Peso máx. do utilizador
Para utilização ao ar livre e
em compartimentos fechados
Utilização correcta
O carrinho de andar deve ser utilizado exclusivamente como auxílio para andar, para fomentar a
liberdade de movimentos de pessoas limitadas corporalmente. É adequado para a utilização ao ar
livre e em compartimentos fechados. Este artigo foi concebido para uso privado e não é adequado
para utilização comercial.
Conduzir o carrinho para andar justo ao corpo, manter uma posição vertical e olhar para a frente.
Andar sempre no carrinho de andar e não deslocar o artigo demasiado afastado da pessoa para
evitar perigo de queda devido à carga errada.
Indicações de segurança
Perigo de ferimentos!
AVISO!
Perigo de asfixia para crianças!
Não deixe as crianças brincar sem vigilância com o material de embalagem ou com o artigo.
• Mantenha as crianças afastadas do artigo. Elas podem tentar colocar-se em cima
ou puxar-se para cima, virando o artigo.
• Utilize o artigo apenas de acordo com a utilização correcta.
• O artigo só deve ser utilizado por pessoas familiarizadas com as indicações de segurança.
• O peso máx. do utilizador não deve exceder os 150 kg.
• Antes de cada utilização, verifique o artigo quanto a danos ou desgastes.
• Antes de cada utilização, verifique a fixação segura de todas as ligações aparafusadas!
• O artigo só deve ser utilizado nas perfeitas condições!
Não utilize o artigo se apresentar danos visíveis e presumidos!
• Utilize apenas o artigo se a temperatura das superfícies não apresentar problemas.
Devido a água quente, incidência solar, condições de sauna, frio extremo, etc.,
a superfície do artigo pode ficar com temperaturas nocivas à saúde.
26
• Quando parar o seu carrinho de andar, accione o travão de estacionamento para
este não de deslocar indesejadamente.
• Se não necessitar do carrinho de andar, coloque-o com o travão fixado de modo a
que ninguém possa cair sobre ele ou o carrinho para andar se possa deslocar.
• Utilizar o carrinho de andar apenas sobre uma base fixa e plana. As rodas podem ficar
presas nas ranhuras ou partes fundas do chão. Por isso, evite tampas de esgotos,
grelhas ou obstáculos semelhantes.
• Nunca se coloque em cima do carrinho de andar e não transporte pessoas com ele.
• Utilize o carrinho de andar apenas se estiver correctamente montado e de forma completa!
Devido a um carrinho de andar mal montado pode sofrer ferimentos ou terceiros podem
sofrer ferimentos.
• Utilizar o carrinho de andar apenas num estado desdobrado.
Montagem / ajustes
ATENÇÃO!
Utilize o carrinho de andar apenas se estiver completamente montado e desdobrado!
O artigo só deve ser utilizado nas perfeitas condições!
Não utilize o artigo se apresentar danos visíveis e presumidos!
Estrutura
1. Retire o material da embalagem e coloque o carrinho
de andar com as rodas no chão (Fig. 2).
Fig. 2
2.Pressione o assento para baixo, até engatar <CLIQUE>
Fig. 3
(Fig. 3, 4).
Fig. 4
27
Campainha
Nota:
A campainha pode ser montada no lado
direito ou esquerdo.
Prenda a campainha, conduzindo a cinta de prisão
através da abertura prevista. Retire a campainha,
pressionando a alavanca de desbloqueio e
puxando a cinta de prisão para fora (Fig. 5, 6).
Fig. 5
Fig. 6
Suporte de barra
Desloque as peças suporte de barra em cima e
suporte de barra em baixo para as guias previstas (Fig. 7).
Fig. 7
Ajuste da altura da pega
ATENÇÃO!
•Coloque as pegas corrediças em ambos os lados na mesma altura
para assegurar um movimento seguro.
• As pegas corrediças devem engatar sempre audivelmente num dos 7
orifícios <CLIQUE>.
•Desaperte os parafusos de fixação apenas até à linha assinada a vermelho.
Nota:
Recomendamos que se ajuste a altura da pega com o apoio vertical e braço
suspenso à altura do punho.
1. Para ajustar a altura adaptada a si, solte os
parafusos de fixação das pegas corrediças (Fig. 8).
2.Retire as pegas corrediças, até à altura desejada e, em
seguida, aperte novamente os parafusos de fixação.
Se os parafusos de fixação não estiverem paralelamente
ao tubo da estrutura após o apertar, pressione o botão
de engate para dentro e coloque os parafusos de
fixação na posição correcta (Fig. 9).
Fig. 8
28
Fig. 9
Travões
ATENÇÃO!
Accionar sempre ambos os travões uniformemente. Em pisos sujos, húmidos,
com gelo ou neve existe perigo de escorregamento e a eficácia de travagem
está limitada.
Nota:
Não desloque o carrinho para andar com o travão de estacionamento activado e
não puxe o travão de funcionamento permanentemente ao deslocar para evitar o
desgaste em demasia.
•Travão de funcionamento
Para travar durante a marcha, puxe a alavanca de travagem para cima, no sentido da pega (Fig. 10).
Fig. 10
•Travão de estacionamento
Active os travões de estacionamento sempre que não utilizar o carrinho para andar.
Deste modo, evita o deslocamento não voluntário.
1. Para isso, pressione as alavancas de travagem para além do ponto de pressão
perceptível para baixo. O carrinho para andar está agora protegido contra o deslocamento.
2.Para soltar os travões de estacionamento, puxe as alavancas de travagem para além do ponto
de pressão perceptível para cima, até o travão estar novamente desbloqueado (Fig. 11).
Fig. 11
Cinto para as costas
Nota
Para a montagem e desmontagem necessita de uma chave de fenda Phillips.
No estado de entrega, os parafusos 3 x 10 mm já estão um pouco enroscados no
cinto para as costas.
1. Desloque o cinto para as costas com os parafusos 3 x 10 mm de ambos
os lados de cima nas guias das pegas (Fig. 12).
Fig. 12
29
2.Aperte bem os parafusos 3 x 10 mm de ambos os lados
para proteger o cinto para as costas (Fig. 13, 14).
Fig. 13
Fig. 14
3.Para a desmontagem do cinto para as costas desaperte os parafusos 3 x 10 mm dos pré-orifícios e
puxe o cinto para as costas para cima, para fora das guias. Para protecção contra a perda,
em seguida enrosque novamente os parafusos nos respectivos pré-orifícios do cinto para as costas.
Cesto
ATENÇÃO!
•O cesto só é adequado para transportar objectos mais pequenos.
• A capacidade de carga máxima é de 5 kg.
1. Monte/desmonte o cesto através de respectivamente 2 botões de pressão
e um fecho de velcro por cada lado do cesto (Fig. 15).
Fig. 15
2.Monte a cobertura para a chuva, fixando-a de ambos os lados
do cesto com um botão de pressão (Fig. 16).
Fig. 16
30
3. Se necessário, puxe a cobertura para a chuva com as patilhas
Fig. 17
por cima do cesto (Fig. 17, 18).
Fig. 18
Assento
ATENÇÃO!
•O assento do carrinho para andar foi concebido apenas como apoio durante pouco
tempo e não foi concebido para ser utilizado como cadeira durante muito tempo.
• A área do assento só deve ser utilizada por uma pessoa em simultâneo.
Se desejar utilizar o assento, observe impreterivelmente os seguintes pontos antes de se sentar:
•O carrinho para andar deve encontrar-se sobre um piso plano e fixo;
caso contrário existe o perigo de ele se deslocar.
• Accione em primeiro lugar sempre ambos os travões de estacionamento
antes de se sentar.
•Sente-se sempre no carrinho para andar de modo a olhar no sentido
contrário ao do andamento.
Pode encostar as suas costas ao cinto para as costas.
•Sente-se sempre na vertical no assento. Os pés devem permanecer
sempre no chão.
Tabuleiro
ATENÇÃO!
•O tabuleiro não é resistente ao calor e não deve ser utilizado para
o transporte de objectos volumosos, afiados ou que quebrem facilmente.
• A capacidade de carga máxima é de 5 kg. Distribua a carga uniformemente
no tabuleiro.
•Não se sente na área do assento quando o tabuleiro estiver montado!
1. Pegue no tabuleiro fornecido juntamente e coloque-o em cima da área de assento do carrinho
para andar. Os pins na parte de baixo do tabuleiro devem deslizar perceptivelmente para dentro
das aberturas da área do assento (Fig. 19).
Fig. 19
31
Fechar o carrinho para andar
ATENÇÃO!
Perigo de entalamento!
Assegure-se de que não entala as mãos entre as peças do carrinho para andar ao
fechar.
Pode sofrer ferimentos.
1. Retire o tabuleiro do carrinho para andar.
2.Solte o bloqueio de fecho , puxando a alavanca
por baixo do assento para cima (Fig. 20).
Fig. 20
3.Agarre o carrinho para andar pelo laço do assento
e puxe-o para cima (Fig. 21).
Fig. 21
4.Em seguida, proteja o carrinho para andar com o
grampo de fixação (Fig. 22, 23).
Fig. 22
32
Fig. 23
Conservação e manutenção
Conservação
CUIDADO!
Não utilizar produtos de limpeza cáusticos ou esponjas que friccionem.
Podem atacar a superfície. Para a limpeza não utilizar aparelhos de limpeza por alta
pressão! Podem danificar a superfície do carrinho para andar.
1. Limpe o carrinho para andar regularmente com um pano ligeiramente humedecido e eventualmente
com um pouco de produto de limpeza suave.
2.Depois seque-o por completo, especialmente as pegas antes de o utilizar de novo ou o guardar.
Manutenção
ATENÇÃO!
Não utilize o carrinho para andar se os pneus, os travões ou a estrutura, etc. apresentarem danos!
Travões
1. Antes de cada utilização, verifique se os travões ainda funcionam bem.
Se não for o caso, não os repare por si próprio mas dirija-se ao seu comerciante especializado
ou ao serviço de assistência ao produto.
2.Verifique também os cabos do travão quanto a deformações e rupturas.
3.Ajustar: Ajuste os cubos do travão de modo a que a distância em relação à superfície
da roda seja de aprox. 2 mm. Solte a contraporca e ajuste o cabo do travão com o
parafuso de ajuste e aperte novamente a contraporca (Fig. 24).
Fig. 24
Pneus
1. Os pneus com um forte desgaste ou os pneus com danos visíveis (p.ex., rupturas) devem ser
substituídos. Não utilize o carrinho para andar se os pneus tiverem danos.
2.Verifique pelo menos 1x por semana se todas as rodas rodam livremente.
Estrutura
Verifique a estrutura do carrinho para andar regularmente quanto a deformações e rupturas.
33
Reparação
Não efectue alterações no produto e não repare o artigo por si próprio!
Adquira as peças de substituição apenas no fabricante.
Podem surgir danos imprevisíveis se se efectuarem reparações inadequadas!
Instruções para a eliminação
Por favor elimine a embalagem e o artigo de forma amiga do ambiente e genuína!
Elimine o artigo através de uma central de eliminação de resíduos certificada ou através da
administração do seu município. Tome em atenção os protocolos em vigor.
3 anos de Garantia
Este produto foi fabricado sob um permanente controlo de qualidade. Garantimos a ausência de falhas
de material e de fabrico no produto. O direito à garantia não se aplica ao desgaste do produto e é
extinto em caso de um uso inadequado.
Caso tenha ainda algum motivo para reclamar, dirija-se ao nosso serviço gratuito de HOTLINE,
ao nosso endereço na Internet ou escreva-nos um email. Será sempre atendido pessoalmente.
Durante o período de garantia, as peças defeituosas poderão ser enviadas livre de franquia para o
endereço de serviço indicado, após se ter acordado o respectivo envio. Receberá então gratuitamente
de volta, uma peça nova ou reparada. Mantenha guardado o seu talão de compra.
Descreva o motivo da sua reclamação. Nós tentaremos encontrar uma solução satisfatória o mais
rapidamente possível.
IAN: 46438
Endereço de Serviço
Linha de apoio ao cliente 00800-88080808
(2ª. a 6ª. 10:00-16:00 horas, chamada gratuita)
TRANSPORTES LURDES AMADO • RUA DA BREGIEIRA 7 MONTE REDONDO
PT-2425 MONTE REAL
[email protected]
34
www.nws-service.com
Read these instructions thoroughly. Retain for future reference! When passing this article on,
please include these instructions.
Included in Delivery / Description of Parts
1x Rollator
1x Bell
1x Tray
1x Back belt with screw 3 x 10 mm
1x Rain hood
1x Upper stick holder
1x Lower stick holder
1x Instructions
Hand grip
Back belt with screw 3 x 10 mm
Rain hood
Upper stick holder
Basket
Lower stick holder
Kerb deflector
Tipping aid
Securing screws
Tray
Brake lever
Bell
fig. 1
Technical Details
Max. user weight: 150 kg
Max. basket load: 5 kg
Max. tray load: 5 kg
Max. length: 675 mm
Max. width: 635 mm
Rollator height: from 790 to 990 mm
Folded dimensions: H 825 x W 280 x L 655 mm
Rollator weight: approx. 7.8 kg (not including accessories)
Hand grip length: Hand grip width: Distance to brake
lever handle:
Tyre width: Wheel diameter: Seating height: Seating width:
Turning circle: 105 mm
53 mm
72 mm
33 mm
200 mm
650 mm
400 mm
860 mm
35
Symbols used
Observe the instructions
Max. tray load
Date of manufacture
Max. basket load
Batch designation
Max. width
Manufacturer
Push handles height adjustment
Max. user weight
For use outdoors and in
enclosed rooms
Intended Use
The Rollator is to be used exclusively as a walking aid to promote the freedom of movement of physically affected people. It is suitable for outdoor use as well as in enclosed rooms. This article is conceived
for private use and is unsuitable for commercial application.
Keep the Rollator close in to the body, whilst maintaining an upright position, making sure to always look
forwards.
Never run with the Rollator and do not push the article too far ahead in order to avoid falling over or
other dangers due to adverse weight.
Safety notes
Danger of injury!
WARNING!
Danger of strangulation for children!
Never allow children to play unsupervised with this article or its packaging.
• Keep children away from this article. They could attempt to clamber onto it
or pull themselves up on it, thereby causing injury.
• Use the article only for its stated use.
• The article should only be used by persons aware of these safety instructions.
• This article should not be used by persons exceeding the maximum user weight of 150 kg.
• Check the article before every use for damage or signs of wear and tear.
• Check that all of the screws are tight before every use!
• This article should only be used in whilst in good order and condition!
Do not use the article if you can see that it has been damaged or if you think it may be damaged!
• Use this article only when surface temperatures are suitable for its use.
Hot water, direct sunlight, sauna conditions, extreme cold, etc. can cause the surface of the
article to assume temperatures which could endanger health.
36
• When parking the Rollator, make sure to use the brake so that it does not unintentionally roll away.
• If you are not using the Rollator, make sure that the brake is on so that no-one can fall over it, or that it
does not unintentionally roll away.
• Only use the Rollator on a solid, flat surface. The tyres can catch in grooves and uneven recesses in
the ground. Avoid drains, manhole covers and similar obstacles.
• Never stand on the Rollator and never attempt to carry passengers.
• Only use the Rollator when it has been completely and correctly assembled! Failure to observe this
can cause injury to the user, and to others.
• The Rollator should only be used when in a completely unfolded condition.
Assembly / Settings
WARNING!
Only use the Rollator when it has been completely and correctly assembled! It should
only be used in whilst in good order and condition! Do not use the article if you can
see that it has been damaged or if you think it may be damaged!
Assembly
1. Remove the packaging materials and place the Rollator
on the ground on its wheels. (fig. 2).
fig. 2
2.Press the seat down until it slots in with a click <CLICK>
fig. 3
(fig.3, 4).
fig. 4
37
Bell
Note:
The bell can be mounted on either the right
or left side.
Fasten the bell so that the ratchet ring passes through
the intended opening. Remove the bell by pressing
the release lever and pulling the ratchet ring
out (fig.5, 6).
fig. 5
fig. 6
Stick holder
Push the stick holder up and down
in the manner intended(fig.7).
fig. 7
Setting the hand grip height
Warning!
• Make sure that the push handles are set at the same height in
order to maintain safe transport and use.
•The push handles must click audibly into the 7 holes <CLICK>.
•Turn the retaining screws only up to the red line.
Note:
We recommend the hand grip height to be set at the same height as that of the wrists
when hanging down at arm’s length when standing.
1. In order to set these at the correct height, release the push
handle retaining screws ,(fig.8).
2.Pull the push handles out to the required height and then
tighten the retaining screws. If the retaining screws are
not exactly parallel with the frame tubing after tightening,
press the locking button in and arrange the retaing
screws in the correct position (Fig.9).
fig. 8
38
fig. 9
Brakes
WARNING!
Always use both brakes simultaneously. Braking effect can be hindered by dirty,
wet, icy, slippery or snowy surfaces.
Note:
Do not attempt to push the Rollator whilst the brakes are activated and do not pull
the brakes over a lengthy period of time when pushing so as to avoid excessive wear
and tear on the tyres.
• Braking operation
To brake when on the move, pull the brake lever upwards, towards the handle (fig.10).
fig. 10
• Locking brake
Apply the locking brake when the Rollator is not in use. This will ensure that it does
not roll away unintentionally.
1. Press the brake lever downwards, over the point at which pressure can be felt.
The Rollator is now protected from rolling away.
2.To release the locking brake, pull the brake lever upwards, over the point
at which pressure can be felt, until the brake has been released (fig.11).
fig. 11
Back belt
Note
For assembly and disassembly you will require a cross-head screwdriver.
The 3 x 10mm screws are slightly turned into their respective holes in delivered
default condition.
1. Push the back belt with the 3 x 10mm screws from both sides and from above into
the slots in the hand grips (fig.12).
fig. 12
39
2.Tighten the 3 x 10mm screws on both sides in order to secure the back belt
(figs. 13, 14).
fig. 13
fig. 14
3.To dismantle the back belt, loosen the 3 x 10mm screws from their holes and pull the back belt out of
the slots in an upward direction. Re-tighten the screws into their holes in the back belt so that they do
not get lost.
Basket
WARNING!
•The basket is suitable only for transporting small objects.
•The maximum load should not exceed 5kg.
1. Assembling/Dismantling the basket is achieved with the use of 2 push-buttons
and hook and loop fasteners on both sides of the basket (fig.15).
fig. 15
2.Assemble the rain hood by attaching it to the push-buttons
on both sides of the basket (Fig.16).
fig. 16
40
3. If necessary, pull the rain hood over the basket using the straps
fig. 17
(fig.17, 18).
fig. 18
Seat
WARNING!
•The Rollator seat is not intended to support weight over a lengthy period of time
and is not intended for use as a chair.
•The seat is currently not intended for more than one person.
If you intend to use the seat, please observe the following before you sit down:
•The Rollator must be standing on a solid, flat surface; otherwise there is a risk of it
rolling away.
• Always activate both locking brakes before you sit down.
•Sit down in the Rollator so that you face away from the direction of travel.
You can lie back against against the back belt.
• Always sit upright in the seat. Your feet should always remain in contact
with the ground.
Tray
WARNING!
•The tray is not heat-resistant and should not be used to carry heavy,
sharp or fragile objects.
•The maximum load the tray can carry is 5kg. Spread the load evenly over the tray.
•Do not sit on the seat when the tray is mounted!
1. Use the tray supplied and place it on the seat of the Rollator.
The pins on the underside of the tray must glide noticeably into the recesses
seating area (fig.19).
of the
fig. 19
41
Folding the Rollator
WARNING!
Danger of crushing!
When folding the Rollator, make sure your hands do not get caught in the moving
parts. This can cause injury.
1. Remove the tray from the Rollator.
2.Unlock the fold lock by pulling the lever
under the seat upwards. (fig.20).
fig. 20
3.Hold on to the Rollator’s seat loop
pull it upwards (fig.21).
and
fig. 21
4.Then secure the Rollator with the locking clamp
fig. 22
42
(fig.22, 23).
fig. 23
Care and Maintenance
Care
CAUTION!
Do not use any abrasive or corrosive cleaning agents or sponges. These can damage
the surface. Never use a high-pressure cleaner! This can also damage the surface of
the Rollator.
1. Wipe over the Rollator at regular intervals with a damp cloth and perhaps a mild
detergent when necessary.
2.Make sure that you dry it thoroughly, especially the handles before use or storage.
Maintenance
WARNING!
Do not use the Rollator when the tyres, brakes or frame appear to be damaged!
Brakes
1. Check the brakes before each use to make sure they still work. If they are not working,
do not attempt to repair them yourself. Contact your dealer or service centre.
2.Check the brake cables for tears or kinks.
3.Calibrate: Set the distance between the brake pads and the wheel to approximately 2mm.
Release the counter nut and adjust the brake cable with the adjuster screw and
then re-tighten the counter nut (fig.24).
fig. 24
Tyres
1. Heavily worn tyres, or tyres with visible damage (e.g., cracks), must be exchanged.
Do not use the Rollator if this damage is apparent.
2.Check if all of the wheels are turning freely at least once a week.
Frame
Check the frame of the Rollator for cracks and damage on a regular basis.
43
Repairs
Never attempt to change any of the product characteristics and do not attempt
to repair this article yourself! Obtain spare parts only from the manufacturer.
Unforeseeable damage can occur from improper repair work!
Disposal
Please dispose of the product and packaging in an environmentally friendly manner, separating different
materials for recycling as required! Dispose of this item through an authorised disposal company or
through your local waste disposal facilities - ask your local authority for information if further guidance
is required. Ensure that you comply with all regulations currently in force.
3 Year guarantee
This product was manufactured under constant quality controls. We guarantee that it is free from
manufacturing and material defects. The guarantee claim is not valid for normal wear and tear and is
invalid in case of misuse.
Should you however have cause for complaint, please contact the free phone service hotline, visit our
website, or send us an e-mail. You will receive personal advice in all cases. During the guarantee
period, you can arrange with our service staff that you send the faulty component(s) to the stated
service address. We will immediately replace or repair the component, and send it back to you.
Please retain the till receipt. Describe the nature of your complaint, and we will do our best to find a
satisfactory solution as soon as possible.
IAN: 46438
Service address
Product hotline 00800-88080808 (Mon.-Fri. 10am – 4pm, free phone)
PSB LOGISTICS MANAGEMENT LTD • UNIT B3 SITE B
THE BOWMAN CENTRE ARNCOTT, OX25 1NZ OXON
[email protected]
C.K - Service • Via Cà Solaro 7 • I - 30030 Favaro Veneto/ Venzia
[email protected]
www.nws-service.com
44
Lesen Sie vor dem Gebrauch die Bedienungsanleitung sorgfältig durch.
Bewahren Sie sie unbedingt für späteres Nachlesen auf! Wenn Sie den Artikel weitergeben,
übergeben Sie auch diese Bedienungsanleitung.
Lieferumfang / Teilebezeichnung
1x Rollator
1x Klingel
1x Tablett
1x Rückengurt mit Schraube 3 x 10 mm
1x Regenhaube
1x Stockhalter oben
1x Stockhalter unten
1x Bedienungsanleitung
Handgriff
Rückengurt mit Schraube 3 x 10 mm
Regenhaube
Stockhalter oben
Korb
Stockhalter unten
Kantenabweiser
Ankipphilfe
Halteschraube
Tablett
Bremshebel
Klingel
Abb. 1
Technische Daten
Max. Benutzergewicht: 150 kg
Max. Belastung Korb: 5 kg
Max. Belastung Tablett: 5 kg
Max. Länge: 675 mm
Max. Breite: 635 mm
Rollatorhöhe: von 790 bis 990 mm
Faltmaß: H 825 x B 280 x L 655 mm
Rollatorgewicht: ca. 7,8 kg (ohne Zubehör)
Handgrifflänge: Handgriffbreite: Abstand zum Bremshebelgriff:
Radbreite: Raddurchmesser: Sitzhöhe: Sitzbreite:
Wendebereich: 105 mm
53 mm
72 mm
33 mm
200 mm
650 mm
400 mm
860 mm
45
Verwendete Symbole
Bedienungsanleitung beachten
Max. Belastung Tablett
Herstellungsdatum
Max .Belastung Korb
Chargenbezeichnung
Max. Breite
Hersteller
Höhenverstellung der Schiebegriffe
Max. Benutzergewicht
Zum Einsatz im Freien und in
geschlossenen Räumen
Bestimmungsgemäße Verwendung
Der Rollator ist ausschließlich als Gehhilfe zu verwenden, um die Bewegungsfreiheit körperlich beeinträchtigter Menschen zu fördern. Er ist für den Gebrauch im Freien und in geschlossenen Räumen
geeignet. Dieser Artikel ist für den privaten Gebrauch konzipiert und für den gewerblichen Einsatz
ungeeignet.
Den Rollator dicht am Körper führen, eine aufrechte Haltung einnehmen und den Blick nach vorn richten.
Stets im Rollator laufen und den Artikel nicht zu weit vor sich her schieben, um Sturzgefahr durch falsche
Belastung zu vermeiden.
Sicherheitshinweise
Verletzungsgefahr!
WARNUNG !
Erstickungsgefahr für Kinder!
Lassen Sie Kinder nicht unbeaufsichtigt mit dem Verpackungsmaterial oder dem Artikel spielen.
• Halten Sie Kinder von dem Artikel fern. Sie könnten versuchen, sich darauf zu stellen oder daran
hochzuziehen und dabei mit dem Artikel umkippen.
• Verwenden Sie den Artikel nur entsprechend der bestimmungsgemäßen Verwendung.
• Der Artikel darf nur von Personen verwendet werden, die mit den Sicherheitshinweisen vertraut sind.
• Das max. Benutzergewicht darf 150 kg nicht überschreiten.
• Prüfen Sie den Artikel vor jedem Gebrauch auf Beschädigungen oder Abnutzungen.
• Kontrollieren Sie vor jedem Gebrauch den festen Sitz aller Schraubverbindungen!
• Der Artikel darf nur in einwandfreiem Zustand verwendet werden!
Verwenden Sie den Artikel nicht bei sichtbaren und vermuteten Beschädigungen!
• Verwenden Sie den Artikel nur, wenn die Temperatur der Oberflächen unbedenklich ist.
Durch heißes Wasser, Sonneneinstrahlung, Saunabedingungen, extreme Kälte etc. kann die
Oberfläche des Artikels gesundheitsschädliche Temperaturen annehmen.
46
• Wenn Sie Ihren Rollator abstellen, betätigen Sie die Feststellbremse gegen unerwünschtes Rollen.
• Wenn Sie den Rollator nicht benötigen, stellen Sie ihn mit festgestellter Bremse so ab, dass niemand
darüber fallen kann oder der Rollator wegrollen kann.
• Den Rollator nur auf festem und ebenem Untergrund benutzen. Die Reifen können sich in Rillen oder
Bodenvertiefungen verhaken. Meiden Sie deshalb Gullydeckel, Gitterroste oder ähnliche
Hindernisse.
• Stellen Sie sich niemals auf den Rollator und befördern Sie keine Personen mit ihm.
• Verwenden Sie den Rollator nur, wenn er vollständig und korrekt aufgebaut ist! Durch einen unsach gemäß zusammengebauten Rollator könnten Sie oder andere Personen sich verletzen.
• Den Rollator nur im auseinandergefalteten Zustand verwenden.
Montage / Einstellungen
ACHTUNG!
Verwenden Sie den Rollator nur, wenn er komplett zusammengebaut
und auseinandergeklappt ist!
Der Artikel darf nur in einwandfreiem Zustand verwendet werden!
Verwenden Sie den Artikel nicht bei sichtbaren und vermuteten Beschädigungen!
Aufbau
1. Entfernen Sie das Verpackungsmaterial und stellen Sie
den Rollator mit den Rädern auf den Boden (Abb. 2).
Abb. 2
2. Drücken Sie den Sitz nach unten bis er einrastet <KLICK>
Abb. 3
(Abb. 3, 4).
Abb. 4
47
Klingel
Hinweis:
Die Klingel kann auf der rechten oder
linken Seite montiert werden.
Befestigen Sie die Klingel, indem Sie das Ratschenband durch die vorgesehene Öffnung führen.
Entfernen Sie die Klingel, indem Sie den Entsperrhebel drücken und das Ratschenband
herausziehen (Abb. 5, 6).
Abb. 5
Abb. 6
Stockhalter
Schieben Sie die Teile Stockhalter oben und
Stockhalter unten in die vorgesehenen Führungen (Abb. 7).
Abb. 7
Einstellen der Griffhöhe
ACHTUNG!
•Stellen Sie die Schiebegriffe auf beiden Seiten auf die gleiche Höhe ein,
um eine sichere Fortbewegung zu gewährleisten.
•Die Schiebegriffe müssen immer hörbar in eine der 7 Bohrungen
einrasten <KLICK>.
•Drehen Sie die Halteschrauben nur bis zur rot markierten Linie hinaus.
Hinweis:
Wir empfehlen die Griffhöhe bei aufrechtem Stand und hängendem Arm auf
Handgelenkshöhe einzustellen.
1. Um die für Sie passende Höhe einzustellen, lösen Sie
die Halteschrauben der Schiebegriffe (Abb. 8).
2.Ziehen Sie die Schiebegriffe bis auf die gewünschte
Höhe heraus und drehen Sie die Halteschrauben
anschließend wieder fest. Stehen die Halteschrauben
nach dem Festziehen nicht parallel zum Rahmenrohr,
drücken Sie den Arretierknopf hinein und bringen
Sie die Halteschrauben in die richtige Position
(Abb. 9).
Abb. 8
48
Abb. 9
Bremsen
ACHTUNG!
Stets beide Bremsen gleichmäßig betätigen. Auf verschmutztem, feuchtem, vereistem
oder verschneitem Untergrund besteht Rutschgefahr und die Bremswirkung ist
eingeschränkt.
Hinweis:
Schieben Sie den Rollator nicht bei aktivierter Feststellbremse und ziehen Sie die
Betriebsbremse nicht dauerhaft beim Schieben, um übermäßigen Verschleiß der
Reifen zu vermeiden.
• Betriebsbremse
Zum Bremsen während der Fahrt ziehen Sie die Bremshebel nach oben in Richtung Griff (Abb. 10).
Abb. 10
• Feststellbremse
Aktivieren Sie die Feststellbremsen stets, wenn Sie den Rollator nicht verwenden.
Sie verhindern dadurch ein unbeabsichtigtes Wegrollen.
1. Drücken Sie dazu die Bremshebel über den spürbaren Druckpunkt hinaus nach unten.
Der Rollator ist nun vor Wegrollen geschützt.
2.Zum Lösen der Feststellbremsen ziehen Sie die Bremshebel über den spürbaren Druckpunkt hinaus
nach oben, bis die Bremse wieder entriegelt ist (Abb. 11).
Abb. 11
Rückengurt
Hinweis
Für die Montage und Demontage benötigen Sie einen Kreuzschlitzschraubendreher.
Die Schrauben 3 x 10 mm sind im Auslieferungszustand bereits ein Stück in den
Rückengurt eingedreht.
1. Schieben Sie den Rückengurt mit den Schrauben 3 x 10 mm auf beiden Seiten von oben
in die Führungen der Handgriffe (Abb. 12).
Abb. 12
49
2.Ziehen Sie die Schrauben 3 x 10 mm auf beiden Seiten fest an, um den Rückengurt zu sichern
(Abb. 13, 14).
Abb. 13
Abb. 14
3.Zur Demontage des Rückengurtes drehen Sie die Schrauben 3 x 10 mm aus den Vorbohrungen
und ziehen Sie den Rückengurt nach oben aus den Führungen. Drehen Sie die Schrauben zum
Schutz vor Verlust anschließend wieder in die entsprechenden Vorbohrungen des Rückengurtes.
Korb
ACHTUNG!
•Der Korb ist nur zum Transport von kleineren Gegenständen geeignet.
•Die maximale Belastbarkeit beträgt 5 kg.
1. Montieren/Demontieren Sie den Korb durch jeweils 2 Druckknöpfe
und einen Klettverschluss pro Korbseite (Abb. 15).
Abb. 15
2.Montieren Sie die Regenhaube, indem Sie sie auf beiden Seiten
des Korbes mit einem Druckknopf befestigen (Abb. 16).
Abb. 16
50
3. Ziehen Sie die Regenhaube bei Bedarf mit den Laschen
Abb. 17
über den Korb (Abb. 17, 18).
Abb. 18
Sitz
ACHTUNG!
•Der Sitz des Rollators ist lediglich als Unterstützung für eine kurze Zeit bestimmt
und ist nicht dafür konzipiert, für längere Zeit als Stuhl verwendet zu werden.
•Die Sitzfläche darf nur von einer Person zurzeit verwendet werden.
Wenn Sie den Sitz verwenden möchten, beachten Sie unbedingt die folgenden Punkte,
bevor Sie sich hinsetzen:
•Der Rollator muss dabei auf einem ebenen und festen Untergrund stehen,
ansonsten besteht Wegroll-Gefahr.
• Betätigen Sie zuerst stets beide Feststellbremsen, bevor Sie sich hinsetzen.
•Setzen Sie sich immer so auf den Rollator, dass Sie entgegen die Gehrichtung
blicken. Sie können Ihren Rücken an dem Rückengurt anlehnen.
•Setzen Sie sich immer aufrecht auf den Sitz. Die Füße müssen stets am Boden
bleiben.
Tablett
ACHTUNG!
•Das Tablett ist nicht hitzebeständig und darf nicht zum Transport von schweren,
sperrigen, scharfen oder leicht zerbrechlichen Gegenständen verwendet werden.
•Die maximale Belastbarkeit beträgt 5 kg. Verteilen Sie die Last gleichmäßig auf
dem Tablett.
•Setzen Sie sich nicht auf die Sitzfläche, wenn das Tablett montiert ist!
1. Nehmen Sie das mitgelieferte Tablett und setzen Sie es auf die Sitzfläche des Rollators.
Die Pins an der Unterseite des Tabletts müssen spürbar in die Aussparungen der Sitzfläche
hineingleiten (Abb. 19).
Abb. 19
51
Rollator zusammenklappen
ACHTUNG!
Quetschgefahr!
Achten Sie darauf, beim Zusammenfalten nicht die Hände zwischen die Rollatorteile
zu bekommen.
Sie könnten sich dabei verletzen.
1. Nehmen Sie das Tablett vom Rollator ab.
2.Lösen Sie die Faltsperre, indem Sie den
Hebel unter dem Sitz nach oben ziehen (Abb. 20).
Abb. 20
3.Fassen Sie den Rollator an der Sitzschlaufe
und ziehen Sie diese nach oben (Abb. 21).
Abb. 21
4.Sichern Sie den Rollator anschließend
mit der Feststellklammer (Abb. 22, 23).
Abb. 22
52
Abb. 23
Pflege und Wartung
Pflege
VORSICHT!
Keine ätzenden oder scheuernden Reinigungsmittel oder -schwämme verwenden.
Diese können die Oberfläche angreifen. Zum Reinigen keinen Hochdruckreiniger
verwenden! Dies kann die Oberfläche des Rollators beschädigen.
1. Wischen Sie den Rollator in regelmäßigen Abständen mit einem leicht angefeuchtetem Tuch und
gegebenenfalls etwas mildem Reinigungsmittel ab.
2.Trocknen Sie ihn danach vollständig ab, besonders die Griffe, bevor Sie ihn erneut verwenden
oder verstauen.
Wartung
ACHTUNG!
Verwenden Sie den Rollator nicht, wenn die Reifen, Bremsen oder der Rahmen etc.
Schäden aufweisen!
Bremsen
1. Überprüfen Sie vor jedem Gebrauch, ob die Bremsen noch funktionstüchtig sind.
Sollte dies nicht der Fall sein, reparieren Sie sie nicht selbst, sondern wenden Sie sich an Ihren
Fachhändler oder an den Produkt-Service.
2.Prüfen Sie auch die Bremskabel auf Verformungen oder Risse.
3.Justieren: Stellen Sie die Bremsklötze so ein, dass der Abstand zur Radoberfläche ca. 2 mm beträgt.
Lösen Sie die Kontermutter und justieren Sie das Bremsseil mit der Justierschraube und
ziehen Sie die Kontermutter wieder an (Abb. 24).
Abb. 24
Reifen
1. Stark abgenutzte Reifen oder Reifen mit sichtbaren Beschädigungen (z.B. Rissen) müssen
ausgetauscht werden. Verwenden Sie den Rollator nicht, wenn die Reifen Schäden aufweisen.
2.Prüfen Sie mindestens 1x pro Woche, ob alle Räder frei drehbar sind.
Rahmen
Überprüfen Sie den Rahmen des Rollators regelmäßig auf Verformungen und Risse.
53
Reparatur
Nehmen Sie keine Veränderungen am Produkt vor und reparieren Sie den Artikel nicht selbst!
Beziehen Sie Ersatzteile nur durch den Hersteller.
Durch unsachgemäße Reparaturen können unvorhersehbare Schäden entstehen!
Hinweise zur Entsorgung
Verpackung und Artikel bitte umweltgerecht und sortenrein entsorgen!
Entsorgen Sie den Artikel über einen zugelassenen Entsorgungsbetrieb oder über
Ihre kommunale Gemeindeverwaltung. Beachten Sie die aktuell geltenden Vorschriften.
3 Jahre Garantie
Dieses Produkt wurde unter permanenter Qualitätskontrolle hergestellt.
Wir garantieren, dass es frei von Herstellungs- und Materialfehlern ist.
Der Garantieanspruch gilt nicht bei normaler Abnutzung und entfällt bei unsachgemäßer Behandlung.
Sollten Sie dennoch Grund zu einer Reklamation haben, wenden Sie sich an die kostenlose
Service-Hotline, an die Web-Adresse oder schreiben Sie eine E-Mail.
Sie werden in jedem Fall persönlich beraten. Während der Garantiezeit können nach Absprache mit
unserem Servicemitarbeiter defekte Teile unfrei an die aufgeführte Service-Adresse geschickt werden.
Sie erhalten dann unverzüglich ein neues oder repariertes Teil kostenlos zurück.
Bitte bewahren Sie den Kassenbon auf. Beschreiben Sie den Grund Ihrer Reklamation.
Wir werden versuchen, so schnell wie möglich eine zufriedenstellende Lösung zu finden.
IAN: 46438
Service-Adresse
Produkt-Hotline 00800-88080808 (Mo.- Fr., 10:00 - 16:00 Uhr, gebührenfrei)
NWS-Service • Wragekamp 6 • D-22397 Hamburg
[email protected]
A.Hofer • Loebersdorfer Str. 42 • AT-2560 Berndorf
[email protected]
Atlantic Forwarding Ltd. • Mühlemattstr. 22, C.P. No. 131
4104 Oberwil BL, Switzerland
[email protected]
www.nws-service.com
54
55
Delta-Sport Handelskontor GmbH
Wragekamp 6 • D-22397 Hamburg
Versión para imprimir / Versione stampata / Impresso / Printable Version / Druckversion: 12/2010