1
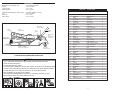
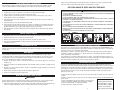
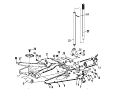
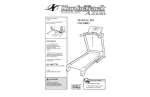
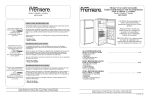
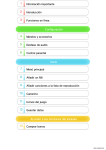
Model / Modelo / Modèle
#640818
2
TON
TONELADAS
LOW PROFILE
GARAGE JACK
OPERATING AND MAINTENANCE
INSTRUCTION MANUAL
GATO PARA GARAJE
DE PERFIL BAJO
MANUAL DE INSTRUCCIONES PARA EL
FUNCIONAMIENTO Y MANTENIMIENTO
Meets ANSI/ASME PALD-2003 Safety Standard
Please retain these instructions for future reference.
If you encounter any problems or difficulties please do not return this jack to the store.
Please contact our toll free customer service department at:
1-800-423-3598
1-310-522-9008 (California only)
1-310-522-9066 Fax
FOR CUSTOMER SERVICE
PARA EL SERVICIOPARA EL CONSUMIDOR
1-800-423-3598
1431 Via Plata
Long Beach, CA 90810-1462
©Copyright 2006 POWERBUILT. Rev.1
Cumple con las Normas de Seguridad ANSI/ASME PALD-2003
Por favor, guarde estas instrucciones para que le sirvan de referencia en el futuro.
Si usted se encuentra con algún problema o dificultad, por favor, no dude en devolver este gato al negocio.
Por favor, comuníquese con nuestro departamento de servicios para el consumidor, de forma gratuita llamando al:
1-800-423-3598
1-310-522-9008 (solamente para California)
1-310-522-9066 - Fax
SPECIFICATIONS
Rated Capacity (Safe Working Load)
Weight
Lowered Height
Maximum Height
2 Ton (4000 LB) (1814 KG)
75.9 LB (34.4 KG)
3-1/2" (9 cm)
21-1/4" (54 cm)
Capacidad Calificada (Carga de trabajo segura)
Peso
Altura baja
Altura máxima
2 Toneladas (4000 LB) (1814 KG)
75.9 LB (34.4 KG)
3-1/2" (9 cm)
21-1/4" (54 cm)
PARTS LIST • LISTA DE PIEZAS
No.
Handle Socket
Dado de la Manija
Saddle
Asiento
Lift Arm
Brazo Elevador
Yoke
Balancín
Handle Socket
Screw
Tornillo del Dado
de la Manija
Lift Arm Linkage
Unión del Brazo
Elevador
Front Wheel
Rueda Delantera
Handle
Manija
Ram (Not Shown)
Embolo (No se Demuestra)
Rear Caster
Inclinación Posterior
2 TON LOW PROFILE PROFESSIONAL SERVICE JACK
WARNING
•
•
•
•
•
•
•
•
•
STUDY, UNDERSTAND, AND FOLLOW ALL INSTRUCTIONS BEFORE OPERATING THIS DEVICE.
DO NOT EXCEED RATED CAPACITY
USE ONLY ON HARD LEVEL SURFACE
LIFTING DEVICE ONLY. IMMEDIATELY AFTER LIFTING. SUPPORT THE VEHICLE WITH APPROPRIATE MEANS
FAILURE TO HEED THESE MARKINGS MAY RESULT IN PERSONAL INJURY AND/OR PROPERTY DAMAGE
LIFT ONLY ON AREAS OF THE VEHICLE AS SPECIFIED BY THE VEHICLE MANUFACTURER
NO ALTERATIONS SHALL BE MADE TO THIS PRODUCT
ONLY ATTACHMENTS AND/OR ADAPTERS SUPPLIED BY THE MANUFACTURER SHALL BE USED
DO NOT MOVE OR DOLLEY THE VEHICLE WHILE ON THE JACK
2
Description
Descripción
Qty.
1
Front Wheel Axle
Eje, Rueda Delantera
1
2
Front Wheel
Rueda Delantera
1
3
Washer
Arandela
2
4
Screws M12
Tornillos M12
2
5
Screws M8
Tornillos M8
2
6
Left Side Plate
Placa Izquierda
1
7
Washer
Arandela
4
8
Screws M12
Tornillos M12
4
9
Caster Assembly
Unidad de Ruedecilla
2
10
Screws M8
Tornillos M8
4
11
Screws M6
Tornillos M6
4
12
Washer
Arandela
2
13
Screws M18
Tornillos M18
2
14
Washer
Arandela
2
15
Locking Nut
Contratuerca
2
16
Returning Spring
Muelle de Retorno
2
17
Ram Assembly
Conjunto del Ariete
1
18
Block Link (ram)
Eslabón de Bloqueo (ariete)
1
19
Cotter Pin
Pasador de Chavetas
1
20
Roll Pin
Pasador de Rodillo
1
21
Bolt
Perno
1
22
Yoke
Eje del Rodillo del Bombeador
1
23
Upper Handle
Manija Superior
1
24
Bolt M6
Perno M6
1
25
Lower Handle
Manija Inferior
1
26
Inspection Plate
Placa de inspección
1
27
C-Ring
Anillo en C
2
28
Bushing
Buje
2
29
Strut
Puntal de Suspensión
1
30
Shaft Arm
Brazo del Mango
1
31
Right Side Plate
Placa Derecha
1
32
Linkage Bolt
Perno de Unión
2
33
Washer
Arandela
1
34
Nut M12
Tuerca M12
2
35
Saddle
Asiento
1
36
Saddle Center Bolt
Perno Central del Soporte
1
37
Long Linkage
Unión Larga
2
38
C-Ring
Anillo en C
2
39
Saddle Platform Strut
Arandela 12
1
11
YOKE RETAINING WIRE REMOVAL
Your jack has been shipped with a retaining wire to hold the yoke in the downward position. This
must be removed. CAUTION: RETAINING WIRE UNDER LOAD AND COULD SNAP OFF AND CAUSE
PERSONAL OR PROPERTY DAMAGE. WEAR EYE PROTECTION AND GLOVES TO REMOVE. Push
down on the yoke until the hook portion of the wire retainer can be removed from the handle socket
or frame reinforcing strut. A second person may be needed to hold the front of the jack down while
applying downward force to the yoke. Remove the wire and allow the yoke to raise to it’s upper resting position.
OWNER AN/OR OPERATOR RESPONSIBILITY
It is the owner and/or operators responsibility to read and understand all WARNINGS , operating, and maintenance instructions contained on the product label and instruction manual prior to operation of this unit.
It is also the owner and/or operators responsibility to provide maintenance, maintain all decals or warning labels
and in general while in use, maintain the unit in good working order.
If the owner and/or operator is not fluent in English, French or Spanish, the product warnings and instructions
shall be read to and discussed with the operator in the operator’s native language by the purchaser/owner or his
designee, making sure that the operator comprehends its contents.
ASSEMBLY INSTRUCTIONS
REMOCIÓN DEL CABLE DE RETENCIÓN DE LA HORQUILLA
Su gato ha sido enviado con un cable de retención para sostener la horquilla hacia abajo. Este tiene
que quitarse. PRECAUCIÓN: EL CABLE DE RETENCIÓN DEBAJO DE LA CARGA PODRÍA SOLTARSE
Y OCASIONAR DAÑOS PERSONALES O A LA PROPIEDAD. USE PROTECCIÓN OCULAR Y GUANTES
PARA QUITARLO. Empuje la horquilla hacia abajo hasta que la porción del gancho del retén del cable
pueda quitarse del dado del mango o de la viga de refuerzo del marco. Es posible que se necesite
una segunda persona para sostener la parte de adelante del gato hacia abajo mientras se hace fuerza
hacia abajo en la horquilla. Quite el cable y permita que la horquilla se levante hasta alcanzar su
posición original superior.
This jack is completely assembled except for the handle. For removal of the yoke retaining block: slide lower section of handle into handle socket part ways making sure handle does not bind against handle socket screw.
Move handle and yoke in downward direction relieving pressure off yoke retaining block. Romove retaining block
1. Assemble handle by unscrewing bolt from lower handle section and inserting top handle section.
2. Align bolt holes of both handle sections and tighten handle bolt using 10mm wrench.
3. Move handle foam pad over bolt.
CAUTION: RETAINING BLOCK UNDER LOAD
4. Apply small amount of grease to handle socket.
AND COULD SNAP OFF AND CAUSE PERSONAL
5. Place the assembled handle into the handle socket. OR PROPERTY DAMAGE. WEAR EYE PROTEC6. Tighten the handle socket screw.
TION AND GLOVES TO REMOVE
OPERATING INSTRUCTIONS
Before use, a visual inspection of the jack should be made looking for bent, worn or loose parts, or hydraulic
leaks. If any of these conditions exist, the jack should be removed from service.
JACK USE
1. Make sure the jack and the vehicle are on a hard level surface.
2. Always set the vehicle parking brake and block the wheels.
3. Consult the vehicle owners manual to ascertain the location of jack points and position the jack beneath the
prescribed lift point.
4. Turn the handle clockwise to closed position. Do not over tighten!
5. Pump the handle and raise the vehicle to the desired height.
6. Place jack stands beneath the vehicle at locations recommended by the vehicle manufacturer, and do not get
under the vehicle without jack stands, as jacks are not designed to maintain these heavy loads for long time
periods.
7. Turn handle slowly counterclockwise to lower load onto jack stands.
LOWERING THE VEHICLE
1.
2.
3.
4.
Turn handle clockwise to closed position.
Pump handle to lift vehicle off of jack stands
Remove jack stands. Do not get under or let anyone else under the vehicle.
Turn handle SLOWLY counterclockwise to lower the vehicle onto the ground.
JACK STORAGE
Always store your jack in the fully lowered position. This will prevent critical areas from excessive corrosion.
MAINTENANCE
Monthly maintenance is recommended. Lubrication is critical to jacks as they support heavy loads. Any restriction due to dirt, rust, etc., can cause either slow movement or cause extremely rapid jerks, damaging the internal
components. The following steps are those designed to keep the jack well lubed:
1. Lubricate the ram, linkages, saddle and pump mechanism with light oil. Grease wheel bearings and axles.
10
3
2. Visually inspect for cracked welds, bent, loose, missing parts or hydraulic oil leaks.
3. If jack is subjected to abnormal load or shock, remove from service and have it examined by an Authorized
Repair Service.
4. Clean all surfaces and maintain all labels and warnings.
5. Check and maintain the ram oil level.
2. Con el gato en posición vertical, quite el tapón del aceite. El aceite debe estar parejo con el orificio del
fondo. Si no lo está, llénelo. No lo llene demasiado. Llene siempre con un aceite para gatos hidráulicos
limpio y nuevo.
3. Vuelva a colocar el tapón de carga.
4. Inspeccione el funcionamiento del gato.
En este momento, consulte con la sección de Resolución de Problemas para la Liberación del Sistema de Aire.
CHECKING OIL LEVEL
RESOLUCIÓN DE PROBLEMAS
Do not use brake or transmission fluids, or regular motor oil as they can damage the seals. Always purchase and
use products labeled Hydraulic Jack Oil.
1. Turn handle counterclockwise to allow ram to fully retract. It may be necessary to apply force to the saddle
for lowering.
2. With jack in upright position remove oil fill plug. Oil should be even with bottom of hole. If not, top up. Do
not overfill. Always fill with new, clean hydraulic jack oil.
3. Replace fill plug.
4. Check jack operation.
At this time, consult Troubleshooting section for System Air Purge.
TROUBLE SHOOTING
System Air Purge
1. Turn handle counterclockwise one full turn to open.
2. Pump handle eight full strokes.
3. Turn handle clockwise to close valve.
4. Pump handle until the lift arm reaches maximum height and continue to pump several times to remove
trapped air in the ram.
5. Turn handle counterclockwise one full turn and lower lift arm to the lowest position. Use force if necessary.
6. Turn handle clockwise to closed position and check for proper pump action. It may be necessary to perform
the above more than once to assure air is evacuated totally.
OTHER SYMPTOMS
PROBLEM
Jack will not lift to full height:
Jack will not hold load:
Lift arm will not lower:
Jack feels spongy when lifting:
POSSIBLE CAUSE
Low oil level
Release valve not closing
Hydraulic jack oil contaminated
Pump valves not sealing
Cylinder ram binding
Parts worn
Internal damage
Broken return spring or unhooked
Lift arm linkage bent or binding
See Air Purge section
ACTION
Check oil level
Call customer service
Call customer service
Any hydraulic jack found to be damaged in any way, is found to be worn or operates abnormally “SHALL BE
REMOVED FROM SERVICE UNTIL REPAIRED”. Owners and/or operators should be aware that repair of the
equipment requires specialized knowledge and facilities. Only factory authorized parts, labels and decals shall be
used on this equipment. Call the customer service department.
4
OTROS SÍNTOMAS
PROBLEMA
El gato no se levanta hasta la altura
completa
El gato no sostiene la carga
CAUSA POSIBLE
Nivel de aceite bajo
PROBLEMA
El brazo de elevación no baja
CAUSA POSIBLE
El émbolo del cilindro está unido
Piezas gastadas
Daño interno
Resorte de retorno roto o
desenganchado
La unión del brazo elevador está
doblado o unido.
Vea la sección de Purga de aire
El gato aparenta estar esponjoso al
levantar
La válvula de liberación no cerró
Aceite del gato hidráulico
contaminado
Las válvulas de la bomba no están
sellando
MEDIDAS
Inspeccione el nivel de
accite
Llame al servicio para
los consumidoress
MEDIDAS
Llame al servicio para
los consumidoress
Vea el procedimiento
para liberar el aire
SERVICIO DE FABRICA
See air purge procedure
FACTORY SERVICE
ALTERATIONS
Purgado del Sistema de Aire
1. Haga girar la manija en sentido contrario al que giran las manecillas del reloj una vuelta completa
para abrirla.
2. Bombee la manija ocho veces .
3. Para cerrar la válvula haga girar la manija en el mismo sentido que giran las manecillas del reloj.
4. Bombee la manija hasta que el brazo de elevación alcance la altura máxima y continúe bombeando varias
veces para quitar el aire que se encuentra atrapado en el émbolo.
5. Haga girar la manija en sentido contrario al que giran las manecillas del reloj una vuelta completa y baje el
brazo elevador hasta la posición más baja. Haga fuerza si fuera necesario.
6. Haga girar la manija en el mismo sentido que giran las manecillas del reloj hasta la posición cerrada y
verifique que la acción de bombeo sea la adecuada. Podrá ser necesario hacer lo indicado anteriormente
más de una vez para asegurarse de que el aire ha sido completamente evacuado.
Cualquier gato hidráulico que se compruebe que está dañado o gastado de algún modo o que funciona
anormalmente “DEBERÁ SER QUITADO DE SERVICIO HASTA HABER SIDO REPARADO”. Los propietarios
y/o operarios deberán estar conscientes que para reparar el equipo se necesita conocimientos e instalaciones
especializadas. Solomente las piezas, etiquetas y calcomanfas de fábrica autorizadas deberán ser utilizadas para
este equipo. Llame al departamento de servicios para el comsumidor.
ALTERACIONES
Debido a los peligros potenciales asociados con el mal uso de equipo de este tipo, no deberán realizarse
alteraciones al producto sin la autorización escrita del fabricante o proveedor.
9
INSTRUCCIONES PARA EL FUNCIONAMIENTO
Antes de utilizarlo, se deberá realizar una inspección visual del gato para buscar piezas dobladas, gastadas
o flojas o pérdidas hidráulicas. Si existiera alguna de estas condiciones deberá quitar el gato de servicio.
USO DEL GATO
1. Asegúrese de que el gato y el vehículo se encuentren en una superficie dura y nivelada.
2. Coloque siempre el freno de mano del vehículo y bloquee las ruedas.
3. Asegúrese de que no haya ningún obstáculo en la trayectoria para las ruedas del gato, ya que estas se
mueven durante el proceso de levantamiento.
4. Haga girar la manija en el mismo sentido que giran las manecillas del reloj hasta la posición cerrada. ¡No
ajuste demasiado!
5. Bombee la manija y eleve el vehículo hasta la altura deseada.
6. Coloque las bases del gato debajo del vehículo en los lugares recomendados por el fabricante del vehículo
y no vaya debajo del vehículo sin que las bases del gato estén en su lugar, ya que los gatos no han sido
diseãdos para mantener estas cargas pesadas durante largos períodos de tiempo.
7. Haga girar la manija en sentido contrario al que giran las manecillas del reloj para bajar la cargo hasta las
bases del gato.
Because of the potential hazards associated with the misuse of equipment of this type, no alterations shall be
made to the product without written authorization of the manufacturer or supplier.
GATO PARA GARAJE DE PERFIL BAJO DE 2 TONELADAS
ADVERTENCIA
• ESTUDIE, COMPRENDA Y RESPETE TODAS LAS INSTRUCCIONES ANTES DE PONER EN FUNCIONAMIENTO
A ESTE DISPOSITIVO.
• NO EXCEDA LA CAPACIDAD CALIFICADA
• UTILICE SOLAMENTE SOBRE UNA SUPERFICIE DURA Y NIVELADA
• DISPOSITIVO DE ELEVACIÓN SOLAMENTE. INMEDIATAMENTE DESPUÉS DE ELEVAR, APOYE EL VEHÍCULO
CONFORME A LOS MEDIOS ADECUADOS.
• SI NO RESPETA ESTAS INDICACIONES PODRÍA RESULTAR EN LESIONES PERSONALES Y/O EN DAÑOS A
LA PROPIEDAD.
• ELEVE SOLAMENTE EN LAS ÁREAS DEL VEHÍCULO CONFORME A LO ESPECIFICADO POR EL FABRICANTE
DEL VEHÍCULO.
• NO SE LE DEBERÁN HACER ALTERACIONES A ESTE PRODUCTO
• DEBERÁN UTILIZARSE SOLAMENTE AQUELLOS ACCESORIOS Y/O ADAPTADORES SUMINISTRADOS POR
EL FABRICANTE
• NO MUEVA NI AGITE EL VEHÍCULO MIENTRAS ESTÉ EN LA GATA
MODO DE BAJAR EL VEHÍCULO
1.
2.
3.
4.
Haga girar la manija en el mismo sentido que giran las manecillas del reloj hasta la posición cerrada.
Bombee la manija para elevar el vehículo de las bases del gato.
Quite las bases del gato. No se coloque debajo del vehículo ni permita que nadie lo haga.
Haga girar la manija LENTAMENTE en sentido contrario al que giran las manecillas del reloj para bajar
el vehículo hasta el piso.
ALMACENAMIENTO DEL GATO
Almacene su gato siempre en posición completamente descendida. Esto evitará que zonas importantes se oxiden
excesivamente.
MANTENIMIENTO
Se recomienda el mantenimiento mensual. La lubricación es de suma importancia para los gatos, ya que
soportan cargas esadas y cualquier restricción ocasionada por suciedad, oxidación, etc. puede causar, ya sea
un movimiento lento o saltos extremadamente rápidos, dañando los componentes internos. Los siguientes
pasos son los designados para mantener al gato bien lubricado:
1. Lubrique el ariete, uniones, asientos y el mecanismo de bombeo con aceite liviano. Engrase los conjinetes de
la ruedas y ejes.
2. Inspeccione visualmente de soldaduras agrietadas, piezas dobladas, sueltas o que faltan, o pérdidas de aceite
hidráulico.
3. Si al gato se lo somete a cargas anormales o choques, deje de utilizarlo y hágalo examinar por un Servicio de
Reparaciones Autorizado.
4. Limpie todas las superficies y mantenga todas las etiquetas y advertencias.
5. Inspeccione y mantenga el nivel de aceite del ariete.
MODO DE INSPECCIONAR EL NIVEL DE ACEITE
ADVERTENCIA
No utilice líquido para frenos ni para transmisión ni tampoco aceite para motores, ya que los mismos pueden
dañar las juntas. Compre y use siempre los productos etiquetados Aceite para Gatos Hidráulicos.
1. Haga girar la válvula de liberación en sentido contrario al que giran las manecillas del reloj para permitir que
el ariete se retraiga completamente. Puede ser necesario hacerle fuerza al asiento para bajarlo.
8
RESPONSABILIDAD DEL DUEÑO Y/O OPERARIO
El propietario y/o los operarios tienen la responsabilidad de leer y comprender todas las ADVERTENCIAS y las
instrucciones acera del funcionamiento y mantenimiento incluidas en la etiqueta del producto y en el manual de
instrucciones antes de poner a funcionar esta herramienta.
El propietario y/o operario es responsable además, de proporcionar el mantenimiento, de mantener todas las
calcomanías o etiquetas con advertencia y, en general, mientras se lo está utilizando, mantener la unidad en
buenas condiciones de funcionamiento.
Si el propietario y/o el operador no habla inglés, francés o español, el comprador/propietario del producto o su
designatario deberá leerle al operario las advertencias e instrucciones del producto en el idioma original en el que
dicho operario hable, asegurándose de que dicho operario entienda su contenido.
INSTRUCCIONES PARA ARMAR
Este gato está completamente armado excepto la manija. Se proporciona una almohadilla de protección de
espuma para evitar el daño accidental al vehículo debido a la manija. Para quitar el eje que sostiene la corredera
del bloque: hacer descender la sección de la manija en el casquillo de la manija parcialmente asegurándose de
que la manija no se una contra el tornillo del casquillo de la manija. Mover la manija y el eje en dirección hacia
abajo aliviando la presión que sostiene el bloque. Destornillar el tornillo del casquillo de la manija y quitar el
bloque que sostiene el eje.
1. Armar la manija destornillando el perno de la sección inferior de la manija y colocando la sección superior de
la manija.
2. Alinear los orificios del perno de ambas secciones de la manija y ajustar el perno de la manija utilizando una
llave de 10 mm.
Precaución: El bloque de
3. Mover la almohadilla de espuma de la manija por encima del perno.
4. Aplicar una pequeña cantidad de grasa al casquillo de la manija.
retención debajo de la carga
5. Colocar la manija armada en el casquillo de la manija
podría destrabarse y causar
6. Ajustar el tornillo del casquillo de la manija.
5
lesiones personales o daños
materiales. Use protección
ocular y guantes para retirarlo
6
7