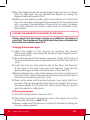
1
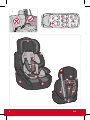
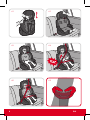
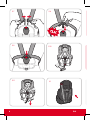
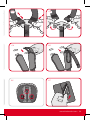
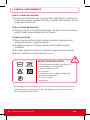
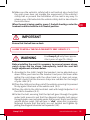
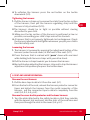
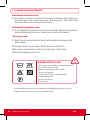
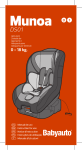
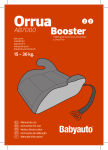
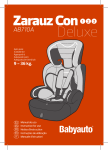
Sistema de retención infantil.
Child safety seat.
KEL123
LB517
Apto para
Suitable for
Manual de uso ES
Instruction for use EN
IMPORTANTE
Si desea el manual en otro idioma, visite nuestra pagina web:
IMPORTANT INFORMATION
If you need the manual in other lenguage, please visit our website:
INFORMATIONS IMPORTANTES
Si vous souhaitez consulter le manuel dans une autre langue, veuillez visiter
notre site internet:
IMPORTANTE
Se você quiser o manual em outro idioma, por favor visite nosso website:
IMPORTANTE
Se desidera il manuale in un’altra lingua, si colleghi al nostro sito Internet:
http://www.kindcomfort.com
2
ELX
Instrucciones de uso - Sistema de retención infantil
ES
Instruction for use - Child safety seat
EN
Grupo 1/2/3 de 9 a 36 kg. (de 9 meses a 12 años aprox.)
Group 1/2/3 from 9 kgs to 36 kgs (from 9 months to 12 Years aprox)
www.kindcomfort.com
3
1
2
A
B
C
D
E
K
F
G
H
L
M
M
J
N
I
O
P
P
Q
4
ELX
3.1
3.2
3.3
3.4
3.5
3.6
www.kindcomfort.com
5
6
4.1
4.2
4.3
4.4
4.5
4.5
ELX
5.1
A
5.2
B
C
5.3
5.4
5.5
5.6
www.kindcomfort.com
7
8
5.7
5.8
5.9
5.10
5.11
6.1
ELX
6.2
6.3
6.4
6.5
6.6
6.7
www.kindcomfort.com
9
IMPORTANTE
Lea cuidadosamente antes de
instalar la silla infantil en el
vehículo
Por favor, lea minuciosamente el manual de instrucción ANTES de
instalar el asiento infantil y consérvela para futuras consultas.
AVISO
1. Esta silla infantil debe utilizarse Con el sistema de arnés para niños
entre 9 y 18 Kg. (de 9 meses a 4 años aproximadamente). 2. Esta silla infantil puede utilizarse Sin el sistema de arnés para niños
de 15 de 36 Kg.(de 4 años a 12 años aproximadamente)
3.Por favor lea cuidadosamente las instrucciones porque una
instalación incorrecta podría causar serios daños. En ese caso el
fabricante no tendrá ningún tipo de responsabilidad.
4. Esta silla es acorde a la normativa de Regulación ECE 44/04
y puede ser instalada en la mayoría de vehículos equipados
con cinturones de 3 puntos acordes a la Regulación ECE 16. No
obstante, siempre debe probar la silla en su vehículo y con el
niño/a a bordo antes de la compra, para asegurarse que el modelo
cumple con sus necesidades. No está permitido utilizar la silla
asegurada solamente con cinturones de 2 puntos.
5.Bajo ninguna circunstancia se debe instalar la silla de seguridad
en el asiento delantero del vehículo en sentido contrario de la
marcha si va equipado con un Airbag activo.
6.Por favor nunca utilice la silla de seguridad sin la funda y sin los
protectores del arnés.
7. La instalación del niño con ropa de abrigo puede reducir la eficacia
del sistema de retención.
8. Proteja la silla de seguridad infantil del contacto directo con la luz
solar, porque la silla podría calentarse y lastimar al niño.
9.La silla o accesorios del arnés que estén dañados o hayan sido
utilizados incorrectamente deberán ser reemplazados.
10.No deje objetos pesados en el interior del coche, porque en caso
de accidente podrían lesionar al niño.
10
Sistema de retención infantil
ELX
11.Compruebe que la hebilla está correctamente cerrada, porque en
caso de emergencia el niño podrá ser liberado rápidamente.
12.Verifique que ninguna parte de la silla infantil está atrapada en la
puerta del vehículo o en un asiento reclinable. Además revise que
la silla de seguridad está asegurada e instalada correctamente.
13.No intente desmontar, modificar o agregar alguna pieza a la silla
infantil o al arnés porque afectaría seriamente sus funciones
básicas y la seguridad que proporciona la silla.
14.La silla de seguridad debe permanecer instalada al vehículo
mediante el cinturón de seguridad, aunque el niño no está
sentado en la silla. El niño nunca debe ser desatendido mientras
está sentado en la silla de seguridad, tampoco cuando esté fuera
del vehículo.
15.Si tuviese alguna duda sobre el uso o la instalación de la silla
de seguridad, por favor contacte con el servicio telefónico de
asistencia al cliente +34 943 833 013
16.Por favor mantenga la silla de seguridad lejos de productos
corrosivos.
17.El fabricante garantiza la calidad de sus productos, pero no la
calidad de los productos de segunda mano u otras marcas.
18.Las ilustraciones de las instrucciones son meramente
informativas. El sistema de retención infantil puede presentar
pequeñas diferencias respecto a las fotografías o imágenes
del manual de instrucciones. Estas variaciones no afectan a su
homologación por la Regulación ECE 44/04.
ES
1. APLICACIÓN PARA EL VEHÍCULO
Cinturón abdominal y
diagonal, 3 puntos.
Cinturón abdominal,
2 puntos.
Solamente debe ser utilizado
en este asiento SI tiene
el cinturón abdominal y
cinturón diagonal (3 puntos)
Grupo 1/2/3
Instalación correcta /
apropiada
Instalación incorrecta /
Inapropiada
Instalación opcional
www.kindcomfort.com
11
2. PARTES DE LA SILLA
A.Reposacabezas.
B.Ranuras para las cintas del arnés.
C.Respaldo.
D.Cinta del arnés.
E.Protectores del arnés.
F.Hebilla.
G.Botón de ajuste del arnés.
H.Protector de la hebilla.
I. Cinta ajustadora del arnés.
J. Cojín reductor.
K.Regulador de altura (15-36 Kg.).
L.Botón de ajuste de altura del reposacabezas.
M.Guia del cinturón.
N.Conector del protector del arnés.
O.Cinta del arnés.
P.Ranuras del cinturón.
Q.Conector del arnés.
3. INSTALACIÓN DE LA SILLA DEL NIÑO. GRUPO 1.
AVISO
Solamente para uso de Grupo 1 desde aprox.
9 meses a 4 años (9-18 Kg.)
1.Ponga la silla de retención infantil en el asiento del vehículo,
asegurándose que está presionado correctamente contra el
respaldo del asiento del vehículo (3.1).
2.Pase el cinturón del vehículo por la ranura P del respaldo de plástico
hasta llegar al punto de anclaje del vehículo y luego pase por la
siguiente ranura P y abroche el cinturón de seguridad en el punto de
anclaje del vehículo (3.2).
3.Compruebe que el cinturón de seguridad no se haya retorcido o
enredado, el cinturón abdominal pasa por debajo del reposabrazos
y que el cinturón diagonal pasa por encima del reposabrazos antes
de proseguir con la instalación (3.3).
4.Apoye su rodilla en el asiento de la silla infantil y sujete el cinturón
diagonal. Tire de él hacia arriba para tensarlo todo lo posible (3.4).
5.Termine de tensar el cinturón de seguridad del vehículo tirando del
cinturón diagonal hacia arriba hasta que no haya ninguna holgura y
el asiento infantil esté instalado firmemente (3.5).
12
Sistema de retención infantil
ELX
6.Asegúrese que el cinturón de seguridad del vehículo no esta
torcido, también verifique que la funda no impide el movimiento del
cinturón de seguridad del vehículo, ni impide la instalación de la silla
de ninguna manera. Para liberar a su niño desabroche el cinturón del
vehículo tal y como se describe en las instrucciones.
Cuando la silla se este utilizando para el grupo 1, el cinturón debe
de pasa por la ranura del reposacabezas y este debe de estar en la
posición mas baja
ES
IMPORTANTE
Preste atención que el cinturón esté completamente tenso.
4. INSTALACIÓN DE LA SILLA DEL NIÑO. GRUPO 2.
AVISO
Solamente para uso de Grupo 2 desde
aprox. 4 a 6 años (15-25 Kg.)
Antes de instalar la silla deberá quitar las cintas del arnés, las de la
entrepierna y de la zona abdominal. Luego instale el regulador de
altura del cinturón de seguridad como se muestra a continuación.
1.Según la altura del niño el reposacabezas podrá ser ajustado
hacia arriba o hacia abajo. Coloque su mano en el reposacabezas
y presione la palanca mientras con la otra mano tira de la silla hacia
abajo para que no se mueva. Siempre verifique que las cintas del
arnés están adecuadas a la altura de su niño (4.1).
2.Coloque la silla infantil en el asiento del vehículo, asegurándose
que ha sido presionado firmemente contra el respaldo del vehículo.
(4.2).
3.Coloque el niño en la silla de retención infantil con el regulador de
altura K en los hombros del niño (4.3).
4.Abroche el cinturón, asegurándose que el cinturón abdominal pasa
por debajo de ambos reposabrazos y que el cinturón diagonal pasa
por encima y por debajo del reposabrazos que está el lado del punto
de anclaje del vehículo. Compruebe que los cinturones no están
torcidos y tense tirando del cinturón diagonal hacia arriba (4.4).
Grupo 1/2/3
www.kindcomfort.com
13
5.Introduzca el cinturón diagonal por el regulador K y compruebe que
ha quitado toda la holgura del cinturón de seguridad del vehículo
(4.5).
6.Asegúrese que el cinturón de seguridad del vehículo no esta
torcido, también verifique que la funda no impide el movimiento del
cinturón de seguridad del vehículo, ni impide la instalación de la silla
de ninguna manera. Para liberar a su niño desabroche el cinturón del
vehículo tal y como se describe en las instrucciones.
5. AJUSTAR EL ARNÉS A LA ALTURA DEL NIÑO.
Siempre verifique que las cintas del arnés están adecuadas a la
altura de su niño. Los hombros del niño siempre deben estar justo
debajo de las ranuras del respaldo en una altura adecuada (5.1).
Cambiar la altura del arnés
1. Ajuste la altura del arnés, presione el botón de ajuste del arnés y tire
de los arneses hacia usted para poder aflojarlos (5.2).
2.Desde la parte de atrás de la silla, desenganche una de las cintas del
conector del arnés y tire de la cinta suelta hacia la parte delantera
de la silla (5.3 y 5.4).
3.Desde la parte frontal de la silla, introduzca la cinta del arnés por
la ranura de la tela y el respaldo. Luego inserte la cinta del arnés
en la ranura adecuada superior o inferior hacia la parte trasera del
asiento (5.5).
4.Vuelva a insertar la cinta del arnés en el conector de arnés en la
parte trasera de la silla. Al mismo tiempo vuelva a insertar la cinta
del protector de arnés en el conector del protector de arnés (5.6).
5.Vuelva a realizar el mismo procedimiento con la otra cinta del arnés.
Verifique que los 2 arneses pasan por las ranuras a la misma altura.
No utilizar las guías superiores del asiento infantil. Estas solamente
deberán ser utilizadas para guiar los cinturones de seguridad del
vehículo.
Abrochar el arnés
1. Una los 2 conectores metálicos de la hebilla (5.7).
2.Introduzca ambos conectores en la ranura ubicada en la parte
superior de la hebilla hasta oír un “clic” (5.8).
3.Siempre compruebe que el arnés esta bien abrochado tirando de
las cintas del arnés hacia arriba.
4.Para desabrochar el arnés presione el botón rojo de la hebilla hacia
abajo (5.9).
14
Sistema de retención infantil
ELX
Tensar el arnés
1.Tire las cintas del arnés hacia arriba para quitar la holgura de la
sección abdominal de arnés, luego tire de la cinta reguladora del
arnés hasta que el arnés esté completamente tensado (5.10).
2.El arnés debe de estar tensado lo máximo posible sin causar
incomodidad a su niño.
3.Asegúrese que la cinta del arnés de la sección abdominal está
posicionada lo más bajo posible, rodeando las caderas de su niño y
no su estómago.
4.Un arnés que no esté bien tensado puede ser peligroso. Comprobar
el ajuste del arnés y tensarlo cada vez que siente a su niño en la silla
infantil.
ES
Aflojar el arnés
1. El arnés se afloja pulsando el botón de ajuste del arnés (debajo de la
funda del Asiento) en la parte frontal de la silla (5.11).
2.Pulse la palanca que esta marcado con “press” hacia abajo con una
mano mientras sujeta ambas cintas del arnés con la otra mano.
3.Tire de las cintas del arnés hacia usted para aflojar el arnés.
4.Tenga cuidado cuando ajuste la cinta de| arnés para evitar atrapar
la cinta ajustadora del arnés cuando pulsa el botón de ajuste hacia
abajo.
6. DESMONTAR LA SILLA Y ARNES.
Quitar el arnés de la silla
1. Libere la cinta elástica en la parte de abajo del respaldo para tener
acceso al arnés (6.1).
2.Desde la parte de atrás de la silla, desenganche las cintas del
conector del protector del arnés y suelte los arnés del conector
metálico del arnés, tire de las cinta suelta hacia la parte delantera
de la silla, tire de la cinta del conector para separarla totalmente de
la silla (6.2, 6.3, 6.4 y 6.5).
Quitar el protector de la hebilla y el arnés inferior
1. Gire las dos placas de ambas cintas del arnés de modo que coincidan
con las ranuras más cercanas e insértelas en las ranuras de la base del
asiento y luego a través de las ranuras de la funda (6.6 y 6.7).
Grupo 1/2/3
www.kindcomfort.com
15
7. LIMPIEZA Y MANTENIMIENTO
Quitar la funda del respaldo
1.Primero tire del botón del respaldo de la silla. Retire el botón de la
funda del respaldo, deslice la funda, y quítela del respaldo. Ahora
puede lavar las fundas.
Quitar la funda del elevador
1. Primero separe el respaldo del elevador. Suelte la correa elástica y
quite la funda. Ahora puede lavar las fundas.
Limpieza de la silla
1. Para el lavado de las cintas y partes de plástico enjabonar con
detergente neutro y agua templada.
2. Asegúrese que no entra jabón dentro de la hebilla o piezas
metálicas.
3. No utilice productos químicos o lejía en ninguna parte de la silla.
4.Secar meticulosamente antes de su uso.
INSTRUCCIONES DE LAVADO:
· La funda es desmontable y lavable a 30º,
sólo se debe secar al aire libre.
· Lavar en máquina, en frio.
· No usar lejía
· Limpieza en seco, cualquier disolvente
excepto tricloroetileno.
· No usar secadora.
· No planchar.
Si tiene alguna duda sobre el uso o colocación de este producto o necesita
cualquier pieza de repuesto, por favor póngase en contacto con nuestro
servicio de atención al cliente.
16
Sistema de retención infantil
ELX
8. GARANTIA
KINDCOMFORT garantiza sus productos contra todo defecto de
fabricación durante un período de 2 años a partir de la fecha de
compra según la Ley 23/2003, de 10 de Julio, de Garantías de venta
de bienes de consumo.
ES
1.Quedan excluidos los defectos o averías producidas por uso inadecuado,
o el incumplimiento de las normas de seguridad de instalación y
mantenimiento descritas en las hojas de instrucciones que acompañan
los productos.
2.Garantizada la reparación totalmente gratuita de defectos originarios.
3.En los supuestos en que la reparación efectuada no fuera satisfactoria
y el producto no revistiese las condiciones óptimas para cumplir el uso
a que estuviese destinado, el titular de la garantía tendrá derecho a la
sustitución del artículo adquirido por otro de similares características o a
la devolución del precio pagado,en los 2 años siguientes a la fecha.
4.La garantía se considerará automáticamente cancelada si el artículo
adquirido hubiera sido reparado o hubiera intentado repararlo una
persona no autorizada por nuestra empresa.
Grupo 1/2/3
www.kindcomfort.com
17
IMPORTANT INFORMATION
Please read the following
instructions carefully before
installing the product.
Please read this Instructions Manual BEFORE fitting the child seat
and keep it for future reference.
WARNING
1. This child seat must be used with a harness system suitable for
children of 9kg to 18kg in weight (approx. 9 months to 4 years of
age).
2. This child seat can be used without harness for children of 15kg to
36 kg (approx. 4 years to 12 years of age).
3. Please read these instructions carefully for proper installation;
incorrect installation could cause serious injuries. In this case, the
manufacturer shall not be held liable.
4. This child restraint system complies with the rules of Regulation
ECE 44/04 and can be installed in most vehicles equipped with
3-point seat belts aligned to ECE Regulation 16. Anyway, you
should always test the seat in your vehicle and with children on
board before buying it, to ensure that this model meets all your
needs. Under no circumstances shall this seat be fitted only with a
2-point lap belt.
5. In no event shall this seat be fitted in the front seat rearwards
(opposite to direction of travel) whenever an airbag is active.
6. Do not use this seat without its cover and harness pads.
7. Fitting the child with warm clothing into this safety seat may
reduce the effectiveness of the restraint system.
8. Protect this seat from direct sunlight, since it may become hot and
injure the child.
9.When damaged or improperly used, replace the seat or the
harness components.
10.Do not leave heavy objects within the vehicle since these may
injure the child in the event of an accident.
18
Child restraint system
ELX
11. Check that the buckle is properly fastened. It is important that
in the event of an emergency the child can be released quickly.
12. Make sure the seat does not become caught by the vehicle´s
door or reclining seat. Likewise, check that the seat is properly
and sufficiently fitted.
13. Never try to remove, change or add pieces to the seat or harness
since their basic and security functions may be seriously
affected.
14. Always fasten this safety seat into the vehicle with the seat belt,
even when not in use. Never leave your child unattended when
seated or not.
15. Contact our Customer Service for any question about installing
this child safety seat: +34 943 833 013.
16. Please keep this safety seat away from corrosive products.
17.The manufacturer guarantees the quality of its products but not
the quality of second-hand products or those registered under
other trademarks.
18.The illustrations in this instructions booklet are for information
purposes only. The child restraint may have small differences from
the photographs or images in this instructions manual. These
variations do not affect its approval by ECE Regulation 44/04.
EN
1. USE IN VEHICLES
3-point lap and
diagonal seat belt
2-point lap seat belt
Only suitable for this
particular seat WHEN having
a lap and diagonal seat belt
(3 anchor points)
Group 1/2/3
Correct installation /
proper
Incorrect installation /
improper
Optional installation
www.kindcomfort.com
19
2. SEAT PARTS AND FITTINGS
A.Headrest.
B.Harness strap slot.
C.Back of the seat.
D.Harness straps.
E.Protectores del arnés.
F. Locking buckle.
G.Harness adjustment button.
H.Buckle pad.
I. Harness adjuster strap.
J. Ergo seat cushion.
K.Boosters height adjuster lever (15-36 Kg.).
L.Height adjuster lever.
M.Belt hook.
N.Harness pad connector.
O.H arness straps.
P.Belt hook.
Q.M etal harness connector.
3. INSTALLING CHILD SEAT. GROUP 1.
WARNING
Only suitable for Group 1, approx. 9
months to 4 years of age (9-18 Kg.)
1.Fit this child seat into the vehicle´s seat, making sure it is firmly
pressed against the vehicle seat backrest (3.1).
2.Slip the belt through the P guides in the plastic backrest then
pass the belt once more through the next P guide and fasten the
safety belt to the vehicle anchor point. You will hear a “click” when
properly fastened (3.2, 3.3 y 3.4).
3.Check that the seat belt is not twisted or tangled, that the lap belt
passes under the armrests and that the diagonal shoulder belt
passes over the headrest before proceeding then slip the diagonal
belt through the N guides (3.5, 3.6 y 3.7)
4.Place your knee on the seat of the child seat and hold the diagonal
shoulder belt. Pull it upwards to tighten it as much as possible
Finish tightening the vehicle seat belt by pulling the diagonal
shoulder belt upwards until there is no slack and the child seat is
securely installed (3.8).
20
Child restraint system
ELX
5.Make sure the vehicle’s safety belt is not twisted, also check that
the seat cover does not impede the movement of the vehicle’s
safety belt or prevent the installation of the seat in any way. To
release your child unbuckle the vehicle safety belt as described in
the instructions.
When the seat is being used for group 1, the belt should go under the
headrest and this should be in its lowest position.
EN
IMPORTANT
Ensure that the belt has no slack.
4. HOW TO INSTALL THE CHILD CAR SAFETY SEAT. GROUP 2 Y 3.
WARNING
Use Group 2 y 3 only from approx.
4 to 6 years of age (15-25 kg)
Before installing the seat it is necessary to remove harness straps,
crotch straps and lap straps. Subsequently, install the seat belt
height adjustment as shown below.
1. According to the child’s height the headrest can be adjusted up or
down. Place your hand on the headrest and press the lever while
pulling the seat down with the other hand so it does not move.
Always check that the harness straps are suitable for the height
of your child. (4.1).
2.Place the child seat on the seat of the vehicle, ensuring it is pressed
firmly against the back of the vehicle seat (4.2).
3.Place the child in the child restraint seat with height adjuster K at
the child’s shoulders (4.3).
4.Fasten the belt, ensuring that the lap belt goes through the guide
under both armrests and that the diagonal shoulder belt passes
through guide over and guide under the armrest that is next to the
vehicle anchor point. You will hear a “click” when this is properly
fastened. Ensure that the belts are not twisted and tighten by
pulling the diagonal shoulder belt upwards (4.4).
Group 1/2/3
www.kindcomfort.com
21
5.Pass the diagonal seat belt trough Height adjuster lever K. Check
that the seat belts are not twisted and tighten by pulling the
diagonal seat belt upwards (4.5).
6.Make sure the vehicle’s safety belt is not twisted, also check that
the seat cover does not impede the movement of the vehicle seat
belt or prevent the installation of the seat in any way. To release
your child unbuckle the vehicle safety belt as described in the
instructions.
5. ADJUST THE HARNESS TO THE HEIGHT OF THE CHILD.
Always check that the harness straps are suitable for the height of
your child. The shoulders of the child should always be just below the
back slots at a suitable height (5.1).
Changing the harness height
1.Adjust the height of the harness, by pressing the harness
adjustment button and pulling the harness straps towards you to
loosen them (5.2).
2. Then unhook one of the harness connector straps at the back of
the seat and pull the loose strap towards the front of the seat (5.3
y 5.4).
3. Insert the harness strap into the slot of the fabric and backrest
at the front of the seat. Then insert the harness strap into the
appropriate upper or lower slot at the rear of the seat (5.5).
4. Reinsert the harness strap in the harness connector on the back of
the seat. At the same time reinsert the harness protective tape to
the harness connector protector (5.6).
5. Then, do the same with the other harness strap. Verify that the 2
harness straps go through the slots at the same height. Do not use
the upper guides of the child seat. These should only be used to
guide the vehicle’s safety belts.
Fastening the harness
1. Join the 2 buckle metal connectors (5.7).
2. Pass both connectors through the slot in the upper part of the
buckle until you hear a “click” (5.8).
3.Always make sure the harness is properly fastened by pulling the
harness straps upwards.
22
Child restraint system
ELX
4.To unfasten the harness press the red button on the buckle
downwards (5.9).
Tightening the harness
1. Pull the harness straps up to remove the slack from the lap section
of the harness, then pull the harness regulating strap until the
harness is fully stretched (5.10).
2.The harness should be as tight as possible without causing
discomfort to your child.
3. Make sure the lap section of the harness is positioned as low as
possible, surrounding your child’s hips and not his stomach.
4. A harness that is not properly tightened can be dangerous. Check
the harness adjustment and tighten whenever you put your child in
the child safety seat.
EN
Loosening the harness
1. The harness is loosened by pressing the adjustment button of the
harness (under the seat cover) at the front of the seat. (5.11)
2. Press the lever that is marked with “press” down with one hand
while holding both harness straps with your other hand.
3. Pull the harness straps towards you to loosen the harness.
4. Be careful when adjusting the harness strap not to trap the harness
adjustment strap when you press the button down.
6. SEAT AND HARNESS REMOVAL.
Remove the seat harness
1. Pull the base tape to detach it from the seat (6.1).
2.From the back of the seat, unhook the harness protector connector
tapes and detach the harness from the metal connector of the
harness, pull the connector tape to detach completely from the
seat (6.2, 6.3, 6.4 y 6.5).
Remove the cover buckle protector and the lower harness
1. Turn the plate attached to the safety buckle so that they coincide
with the nearest slot and insert into the slots of the seat base and
then pass through the slots in the cover (6.6 y 6.7).
Group 1/2/3
www.kindcomfort.com
23
7. CLEANING AND MAINTENANCE
Remove the backrest cover
1.First pull the button of the seat backrest. Remove the button on
the backrest cover, slide the cover, and remove it from the seat
backrest. Now you can wash the covers.
Removing the elevator cover
1.First separate the backrest from the elevator. Release the elastic
strap and remove the cover. Now you can wash the covers.
Cleaning the seat
1.Wash the straps and plastic parts with neutral detergent and
warm water.
2. Ensure that no soap enters the buckle or metal parts.
3. Do not use chemicals or bleach on any part of the chair.
4. Dry thoroughly before use.
WASHING INSTRUCTIONS:
· The cover is removable and washable at 30º.
Dry in the fresh air only.
· Wash in washing machine (cold).
· Do not use bleach.
· Dry clean, with any solvent except
trichloroethylene.
· Do not use dryer.
· Do not iron.
If you have any question about using or installing this product, or if you
need a spare part contact our Customer Service.
24
Child restraint system
ELX
8. GUARANTEE
KINDCOMFORT guarantees its products against all manufacturing
faults for a period of 2 years as of the date of purchas, in accordance
with Law 23/2003, of 10 July 2003, relating to Consumer Goods Sale
Guarantees.
1.The guarantee does not include defects or disorders produced by
inappropriate use or non-compliance with the installation and
maintenance safety norms described on the instruction leaflets come
with the products.
EN
2.Repairs free of charge for any original defects and for the damages
caused by them.
3.In the event that the repair carried out is not satisfactory and the object
is not in optimum condition to fulfill the use to which it was destined, the
holder of the guarantee will have the right to a substitution of the article
for another of similar characteristics, or to the full refund of the price
paid.
4.The guarantee is considered automatically cancelled if the article
purchased has been repaired, or tried to be repaired, by any person not
authorised by our company.
Group 1/2/3
www.kindcomfort.com
25
26
ELX
www.kindcomfort.com
27
t. (00 34) 943 833 013
f. (00 34) 943 833 004
[email protected]
w. www.kindcomfort.com