1
Brew
Now
Regu
lar
Brew Stre
Strong
ngth
Max
12
10
10
8
8
6
6
4
4
2
2
3304
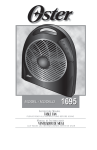
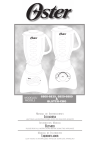
Ins t r uct ion Ma nual
12-CUP COFFEEMAKER WITH AUTO SHUT-OFF
PLEA S E R EA D A LL INS T R U C T IO NS BEF O R E U S I N G
Manual d e Ins t r uccione s
CAFETERA DE 12 TAZAS CON APAGADO AUTOMATICO
L EA TO D A S LA S INS T R U CC IO NES A N T E S D E U SA R
PARA MÉXICO SÓLAMENTE - FOR MEXICO ONLY
CAFETERA DE 12 TAZAS CON APAGADO AUTOMATICO
MODELO 3304, 3304-13
IMPORTADOR: SUNBEAM MEXICANA, S.A. DE C.V.
AV. JUÁREZ No. 40-201,
EX–HACIENDA DE SANTA MÓNICA,
TLALNEPANTLA, ESTADO DE MÉXICO,
C.P. 54050, R.F.C. SME570928G90, TEL. 53660800
PAÍS DE ORIGEN: CHINA
PAÍS DE PROCEDENCIA: CHINA, E.U.A.
LEA EL INSTRUCTIVO ANTES DE USAR EL APARATO
CARACTERÍSTICA ELÉCTRICAS
60 Hz 120 V~ 900 W
CONTENIDO: 1 PIEZA
©2006 Sunbeam Products, Inc., doing business as Jarden Consumer Solutions. All rights
reserved. Distributed by Sunbeam Latin America, LLC, 5200 Blue Lagoon Drive, Suite 470,
Miami, FL 33126. The product you buy may differ slightly from the one shown on this carton
due to continuing product development.
One year limited warranty – please see inside for details.
©2006 Sunbeam Products, Inc., operando bajo el nombre de Jarden Consumer Solutions.
Todos los derechos reservados. Distribuido por Sunbeam Latin America, LLC, 5200 Blue
Lagoon Drive, Suite 470, Miami, FL 33126. El producto que usted compró puede variar
ligeramente del que se muestra en el empaque debido a continuo desarrollo del producto.
Garantía limitada de un año – por favor consulte los detalles en el interior.
PRINTED IN CHINA
IMPRESO EN CHINA
P.N. 119960 Rev. A
CBA-111606
IMPO R TA N T S A F E GU AR D S
When using electrical appliances, basic safety precautions should always be followed
to reduce the risk of fire, electric shock and/or injury to persons, including the
following:
READ ALL INSTRUCTIONS BEFORE USING THE COFFEEMAKER.
• DO NOT touch hot surfaces. Use handles or knobs
• To protect against fire or electrical shock, DO NOT put cord, plug or appliance in
water or any other liquid
• Close adult supervision is necessary when the unit is used by or near children or
incapacitated persons
• Turn the coffeemaker off and unplug the power cord from the power source when
coffeemaker is not in use and before cleaning. Allow the coffeemaker parts to cool
before putting on or taking off parts and before cleaning the appliance
• DO NOT operate any appliance with a damaged cord or plug or operate it after the
appliance malfunctions, or has been damaged in any manner. Return this appliance
only to the nearest Authorized Oster® Service Center for examination, repair or
adjustment
• The use of accessory attachments not recommended or sold by the manufacturer
may cause fire, electrical shock or injury
• DO NOT use coffeemaker outdoors
• DO NOT let the power cord hang over the edge of a table or counter or allow it to
come in contact with hot surfaces
• DO NOT place this appliance on or near a hot gas or electric burner, or in a heated
oven
• To disconnect, turn the coffeemaker off, then remove the power plug from wall
outlet
• Place the coffeemaker on a hard, flat level surface to avoid interruption of air flow
underneath the appliance
• DO NOT use appliance for other than intended use
THIS UNIT IS FOR HOUSEHOLD USE ONLY.
1
SAVE THESE INSTRUCTIONS
DECANTER USE AND CARE
Follow the instruction below to reduce or eliminate the chance of breaking the decanter:
a. This decanter is designed for use with your Oster® coffeemaker and therefore must
never be used on a range top or in any oven, INCLUDING A MICROWAVE OVEN.
b. DO NOT set a hot decanter on a wet or cold surface.
c. DO NOT use a cracked decanter or a decanter having a loose or weakened handle.
d. DO NOT clean the decanter with abrasive cleansers, steel wool pads or other
abrasive materials
e. Discard the decanter immediately if it is ever boiled dry.
f. Protect the decanter from sharp blows, scratches or rough handling.
WARNING: To reduce the risk of fire or electric shock, do not remove any service
covers. There are no user serviceable parts inside the coffeemaker. Only authorized
personnel should repair the coffeemaker.
SPECIAL CORD SET INSTRUCTIONS
1. A short power-supply cord is provided to reduce the risk resulting from becoming
entangled in or tripping over a long cord.
2. Extension cords are available and may be used if care is exercised in their use.
3. If an extension cord is used, the marked electrical rating of the extension cord must
be the same as the product. The resulting extended cord must be arranged so that it
will not drape over the counter top or table top where it can be pulled on by
children or tripped over accidentally.
(For 120 & 127 Volts Only)
To reduce the risk of electrical shock, this appliance has a polarized plug (one blade is
wider than the other). This plug fits a polarized outlet only one way. This is a safety
feature intended to help reduce the risk of electrical shock. If the plug does not fit fully
into the outlet, reverse the plug. If it still does not fit, contact a qualified electrician. Do
not attempt to defeat this safety feature.
You can customize the length of the power cord so that it is the exact length you desire.
To increase the length of the power cord: grasp he power cord (not the power plug) and
gently lift it out of the slot, then pull away from the coffeemaker. To decrease the length
of the power cord: Grasp the power cord (not the power plug), lift it out of the slot and
gently feed it into the coffeemaker. Lock the cord in the slot when finished.
2
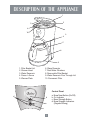
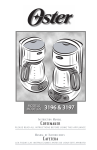
DESCRIPTION OF THE APPLIANCE
1
2
9
8
10
Brew
Now
Regula
r
Brew Stren
4
Strong
gth
3
7
Max
12
10
10
8
8
6
6
4
4
2
6
2
5
6. Glass Decanter
7. Dual Water Windows
8. Removable Filter Basket
9. Water Reservoir Pour Through Lid
10. Permanent Filter
1. Filter Basket Lid
2. Shower Head
3. Water Reservoir
4. Pause ’n Serve
5. Warmer Plate
Control Panel
d
b
Brew
Now
Regular
a
Strong
Brew strength
c
3
a. Brew Now Button (On/Off)
b. On Indicator
c. Brew Strength Button
d. Brew Strength Indicators
(Regular/Strong)
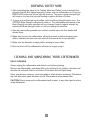
COFFEEMAKER FEATURES AND BENEFITS
Your new coffeemaker has the following features:
• Brewing Capacity – 12 cups
• Removable Filter Basket – The filter basket lifts out for fast and easy cleaning and
filling
• Pause ‘n Serve – Can’t wait for the coffee to finish brewing? The Pause ‘n Serve
feature allows you up to 30 seconds to pour a cup of coffee while the coffeemaker is
still brewing. Carefully remove the decanter and the Pause ‘n Serve feature will be
automatically activated, temporally stopping the flow of coffee into the decanter
• Dual Water Windows – Shows amount of water in the reservoir for accurate filling
• Non-Stick Warmer Plate – This feature allows you to keep your coffee hot after
brewing. The non-stick attribute prevents the decanter from sticking to the surface of
the warming plate
• Brew Strength Selector – Adjust the brewing time to create a more full flavored
coffee
• Cord Storage – Safety stores excess cord to keep your countertop neat
• On Indicator Light – Lets you know when your coffeemaker is “on”
• Two Hour Auto Shut-Off – Keeps your coffee hot for two hours, then automatically
shuts off
NOTE: If you have selected any of the operating functions, the coffeemaker will act
upon the last operation selected if the power is restored within 10 seconds after a
power outage.
CLEAN YOUR COFFEEMAKER BEFORE USING THE FIRST TIME
Make sure your first cup of coffee is a good as can be by cleaning your coffeemaker
before its first use. Just follow the simple steps:
1. Wash the decanter, decanter lid and the filter basket in a mixture of mild detergent
and water. Rinse each thoroughly (please refer for the parts diagram listed above).
2. Replace all the parts and close the lid. Then, run a brew cycle with water only,
without adding coffee and coffee filter.
3. When brewing is complete, turn your coffeemaker off, discard the water in the
decanter and rinse the decanter, decanter lid, and filter basket.
Your coffeemaker is now ready to use. Enjoy it!
4
PREPARING FOR USE
Selecting and Measuring Ground Coffee
For best results, use a level tablespoon for ground coffee measurement. Make sure
you use medium grind coffee for a perfect brew.
A. Suggested Coffee Measurement Chart
To Brew
12 Cups
10 Cups
8 Cups
6 Cups
4 Cups
Ground Coffee
9 tbsp.
7.5 tbsp.
6.5 tbsp.
4.5 tbsp.
3 tbsp.
1 level tablespoon (tbsp) = 5 gr./0.17 oz.
1 cup = 5 fl. oz. of brewed coffee
Use more or less coffee to suit your taste.
B. Adding Water and Ground Coffee
1. Lift and open the filter basket lid.
For your convenience, you can lift
out the removable filter basket.
2. Place the permanent filter or a
10-12 cup paper basket-style
filter into the removable
filter basket. (Figure 5)
Figure 6
3. Add the desired amount of coffee
and gently shake to level the coffee.
See the Suggested Coffee
Measurement Chart.
Figure 55
Figure
Brew
Now
Brew
Now
Regu
lar
Brew
Stren
Strong
gth
Regular
Strong
Brew Strength
4. Fill the decanter with cold, fresh water to the desired capability (1 cup equals 5
ounces) (Figure 6). For easy and accurate filling, the water markings on the glass
decanter and on the dual water windows show the amount of water needed to make
the corresponding desired number of cups. Do not fill past the “12 cup MAX line” or
water will flow out of the overfill hole in the back of the water reservoir.
The amount of coffee brewed will always be slightly less than the amount of water
poured in the water reservoir. This is due to the minimum absorption of water by
coffee grounds.
5. Lift the pour trough reservoir lid and pour the water into the water reservoir.
Close the lid and place the empty decanter onto the warmer plate.
NOTE: Make sure the decanter is fully placed on the warming plate or the water and
the grounds will overflow from the filter basket.
5
BREWING COFFEE NOW
1. After completing the steps in the “Adding Water and Coffee” section and with the
decanter and the filter basket securely in place, turn the coffeemaker on. Press the
BREW NOW button and the on light will come on. The green regular strength light
will come on to show that you are brewing a regular decanter of coffee.
2. To enjoy a more flavored cup of coffee, press the Brew Strength button once. The
STRONG Brew Strength red light will come on. The coffeemaker will remain in the
Brew Strength you have selected until you change it back to regular strength by
pressing the Brew Strength button or until you unplug the machine.
3. After the used coffee grounds have cooled, carefully open the filter basket and
discard them.
4. Make sure you turn the coffeemaker off and then back on before brewing more
coffee, otherwise the two-hour auto shut-off time period will not be restarted.
5. Make sure the decanter is empty before starting to brew coffee.
6. Be sure to turn off the coffeemaker off when no longer using it.
CLEANING AND MAINTAINING YOUR COFFEEMAKER
DAILY CLEANING
Always unplug the coffeemaker and allow to cool before cleaning.
Remove the filter basket, permanent filter (not including on all models), decanter and
decanter lid and wash them in a solution of hot water and mild liquid soap.
Never use abrasive cleaners, steel wool pads or other abrasive materials. Dishwasher
top rack safe parts: glass decanter and lid, filter basket and permanent filter.
CAUTION! Never immerse the coffeemaker itself in water, in any other liquid or place
in the dishwasher.
6
REGULAR CLEANING AND MAINTENANCE
Decalcifying your coffeemaker
Minerals (calcium/limestone) found in water will leave deposits in your coffeemaker and
will affect it. It’s recommended that you regularly remove these deposits by using
vinegar.
NOTE: 4 cups of 20 fl.oz. of undiluted, white household vinegar may be used.
1. Place the permanent filter or an empty 10-12 cup basket-style paper filter into the
filter basket and close.
2. Place the empty decanter back in the unit, centered on the warmer plate.
3. Brew three cups of vinegar through the coffeemaker.
4. Turn the coffeemaker off and let stand for 30 minutes.
5. Run the remainder vinegar through the coffeemaker.
6. Discard the vinegar and rinse the decanter thoroughly with clean water.
7. Fill the water reservoir with clean, fresh water.
8. Place the empty decanter back on the coffeemaker, centered on the warmer plate.
9. Remove the permanent filter was used during the cleaning, remove it and rinse it
thoroughly before replacing it in the filter basket. If a paper filter was used, remove
and discard it.
10. Begin brewing and allow the full brew cycle to complete.
11. Repeat Steps 7 through 10 one more time.
Your coffeemaker is now clean and ready to brew the next pot of delicious, hot coffee!
Cleaning the Decanter
Hard water can leave a whitish stain on the decanter, and coffee may then turn this
stain brown.
Suggested Decalcifying Interval
Type of Water
Soft Water
Hard Water
Clearing Frequency
Every 80 Brew Cycles
Every 40 Brew Cycles
To remove decanter stains:
1. Fill the decanter with a solution of equal parts water and vinegar and let the solution
stand in the decanter for approximately 30 minutes.
2. Discard the solution, them wash and rinse the decanter.
Do not use harsh abrasive cleaners that may scratch the decanter, scratches may
cause the decanter to break.
7
TROUBLESHOOTING YOUR COFFEEMAKER
PROBLEM
THE “BREW NOW/ON”
LIGHT DIES NOT LIGHT UP
POSSIBLE CAUSE
• The appliance is unplugged
• There’s a power outage
SOLUTION
• Plug unit in
• Wait for power
to be restored
THE COFFEE IS NOT BREWING • The appliance is unplugged
• There’s a power outage
• Plug unit in
• Wait for power
to be restored
• The water reservoir is empty
• Check the water windows
• The filter basket in not
properly inserted
• Insert filter basket
correctly
• The decanter is not placed
all the way in on the warmer
• Place decanter
correctly on the
warmer place
THE COFFEEMAKER ONLY
BREWS WATER
• There are no coffee grounds
in the filter basket
• Add the desired amount of
coffee to the filter
THE COFFEEMAKER BREWS
SLOWLY
• The coffeemaker needs
cleaning
• Clean coffeemaker
slowly as described
in “cleaning and
maintaining” section
THE FILTER BASKET
OVERFLOWS
• The filter basket is not
properly inserted
• Insert filter basket
correctly
• The decanter is not placed
all the way in on the warmer
• Place decanter
correctly on the
warmer place
• The decanter lid is not on
decanter
• Place lid on the
decanter
• Too many coffee grounds
were placed in the filter
• Remove the filter, discard
grounds. If permanent filter,
rinse. If paper filter, replace.
Begin brewing process again
• The decanter was removed
from the warmer plate for
more than 30 seconds cool
•Turn off and unplug the unit
allow to wipe up spill. Do
not set hot decanter back
on the wet warmer
8
TROUBLESHOOTING YOUR COFFEEMAKER (CONT’D)
PROBLEM
POSSIBLE CAUSE
SOLUTION
THE COFFEE TASTES BAD
• The ground coffee-to-water
• Use correct ground
ratio was unbalance
coffee-to-water ratio
• The coffeemaker needs cleaning • Clean coffeemaker as
described in “maintaining
your coffeemaker” section
THE GROUND ARE IN
THE COFFEE
• The filter is not properly seated
in the basket
• Seat liter properly
within the filter basket
• If paper filter is being used, filter
may have collapsed
• Remove filter and replace
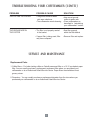
SERVICE AND MAINTENANCE
Replacement Parts
1. Coffee filters – For better tasting coffee an Oster® permanent filter or a 10-12 cup basket paper
filter. You can usually purchase a replacement permanent filter where you purchased your
coffeemaker or at an Authorized Oster® Service Center. Paper filters are available at most
grocery stores.
2. Decanters – You can usually purchase a replacement decanter from the store where you
purchased your coffeemaker or at an Authorized Oster® Service Center.
9
1 – YEAR LIMITED WARRANTY
Sunbeam Products, Inc. ("Sunbeam") doing business as Jarden Consumer Solutions
warrants that for a period of ONE year from the date of purchase, this product will be
free from defects in material and workmanship. Sunbeam, at its option, will repair or
replace this product or any component of the product found to be defective during the
warranty period. Replacement will be made with a new or remanufactured product or
component. If the product is no longer available, replacement may be made with a
similar product of equal or greater value. This is your exclusive warranty.
This warranty is valid for the original retail purchaser from the date of initial retail
purchase and is not transferable. Keep the original sales receipt. Proof of purchase is
required to obtain warranty performance. OSTER® dealers, service centers, or retail
stores selling OSTER® products do not have the right to alter, modify or any way
change the terms and conditions of this warranty.
This warranty does not cover normal wear of parts or damage resulting from any of the
following: negligent use or misuse of the product, use on improper voltage or current,
use contrary to the operating instructions, disassembly, repair or alteration by anyone
other than an Oster® Authorized Service Center. Further, the warranty does not cover:
Acts of God, such as fire, flood, hurricanes and tornadoes.
Sunbeam shall not be liable for any incidental or consequential damages caused by
the breach of any express, implied or statutory warranty or condition. Except to the
extent prohibited by applicable law, any implied warranty or condition of merchantability
or fitness for a particular purpose is limited in duration to the duration of the above warranty.
How To Obtain Warranty Service:
Please see the country specific warranty insert or contact your local authorized distributor.
PLEASE DO NOT RETURN THIS PRODUCT TO THE PLACE OF PURCHASE.
10
PR E C A U C I ON E S I M P O R TAN TES
Cuando se utiliza cualquier artefacto eléctrico siempre se deben seguir precauciones
básicas de seguridad para evitar el riesgo de incendio, Descarga eléctrica y/o
lesiones, incluyendo las siguientes:
LEA TODAS LAS INSTRUCCIONES ANTES DE UTILIZAR SU CAFETERA.
• NO toque las superficies calientes de la cafetera. Utilice las asas o perillas
• Para protegerse contra una descarga eléctrica, no sumerja el cable, el enchufe o la
cafetera en agua u otros líquidos
• Se requiere supervisión cuando esté siendo utilizado por un niño o cerca de ellos,
así como por personas incapacitadas. NO permita que los niños la utilicen como
juguete
• Apague la cafetera, desenchúfela del tomacorriente cuando ésta o el reloj no estén
en uso y espere que se enfríe antes de colocarle o retirarle piezas y antes de su
limpieza
• NO opere ningún artefacto con un cordón o enchufe dañados, después de que el
artefacto haya fallado o si se cae al suelo o se daña de cualquier otra manera.
Regrese el artefacto al Centro de Servicio Oster® Autorizado más cercano para
examinarlo, repararlo o para ajustarlo mecánica o eléctricamente
• El uso de accesorios no recomendados o no vendidos por el fabricante del
artefacto puede causar incendios, descargas eléctricas o lesiones corporales
• NO utilice este artefacto al aire libre
• NO permita que el cable cuelgue del borde de la mesa o mostrador o que entre en
contacto con superficies calientes
• NO coloque este artefacto sobre o cerca de quemadores de estufas de gas o
eléctricas, ni dentro de un horno caliente
• Para desconectar, coloque el control en la posición de APAGADO, después
remueva el enchufe del tomacorriente
• Coloque la cafetera sobre una superficie dura y nivelada para evitar la interrupción
del flujo de aire debajo del artefacto
• NO utilice este artefacto para otro propósito que no sea para el que ha sido
diseñado
ESTA UNIDAD ESTA DISEÑADA SOLO PARA USO DOMESTICO.
11
CONSERVE ESTAS INSTRUCCIONES
CUIDADO Y USO DE LA JARRA
Siga las siguientes instrucciones para reducir o eliminar el riesgo de romper la jarra:
a. Esta jarra está diseñada para ser utilizada con su cafetera Oster®, Por lo tanto
nunca debe ser usada sobre las hornillas de una estufa, horno ni TAMPOCO EN UN
HORNO MICROONDAS.
b. NO coloque la jarra de vidrio caliente sobre una superficie fría o mojada.
c. NO utilice una jarra quebrada o con un asa debilitada.
d. NO limpie la jarra con polvos limpiadores, fibras metálicas o de lana o cualquier
otro material abrasivo.
e. Deseche la jarra inmediatamente si sus contenidos se evaporan al hervir.
f. Proteja la jarra de filos, raspaduras o un manejo brusco.
ADVERTENCIA: Para reducir el riesgo de incendio o descarga eléctrica, no quite
ninguna cubierta para dar servicio al artefacto. En el interior de la cafetera no se
encuentra ninguna parte que pueda ser remplazada. Solamente el personal autorizado
debe reparar la cafetera. El que usted abra la cubierta inferior para dar servicio al
artefacto, anulará la garantía.
INSTRUCCIONES ESPECIALES DEL CABLE ELECTRICO
1. El artefacto cuenta con un cable eléctrico corto como medida de seguridad para
prevenir el riesgo de tropezar, tirar o enredarse con un cordón más largo.
2. Puede utilizar cables de extensión si se observan las precauciones adecuadas.
3. Si se usan los cables de extensión la capacidad nominal eléctrica del cable de
extensión debe ser el mismo del producto. Coloque el cable de extensión de manera
que no cuelgue del borde del mostrador o mesa donde pueda tirarlo un niño o pueda
tropezar con él accidentalmente.
(Para 120 y 127 Voltios)
Este artefacto cuenta con un enchufe polarizado (una clavija es más ancha que la otra).
Este enchufe entra sólo de una manera en un tomacorriente polarizado. Si el enchufe no
entra correctamente en el tomacorriente, simplemente colóquelo al revés. Si todavía no
entra, comuníquese con un electricista competente. De ninguna manera intente modificar
o forzar la conexión diseñada como medida de seguridad.
Usted puede ajustar el largo del cable eléctrico de manera que sea de la longitud precisa
que usted desee. Para aumentar el largo del cable eléctrico, agarre el cable eléctrico (no
el enchufe) y hálelo hacia arriba de su hendidura con delicadeza, retirándolo de la
cafetera. Para disminuir el largo del cable eléctrico: agarre el cable eléctrico (no el
enchufe) y hálelo hacia arriba de su hendidura, insertándolo con delicadeza en la
cafetera. Fije el cable en la hendidura cuando termine.
12
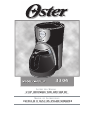
DESCRIPCION DEL ARTEFACTO
1
2
9
8
3
10
Colar
Regular
Selec tor
de Inten
4
Fuerte
sidad
7
Max
12
10
10
8
8
6
6
4
4
2
6
2
5
1. Tapa de la Canasta del Filtro
2. Regadera
3. Depósito de Agua
4. Pausa Automática para Servir
5. Plato Calefactor
6. Jarra de Vidrio
d
b
Colar
Regular
7. Ventanilla Doble con Indicador de
Nivel del Agua
8. Canasta de Filtro Removible
9. Tapa para Verter del Depósito
de Agua
10. Filtro Permanente
a
Fuerte
Selector de Intensidad
c
13
Panel de Control
a. Botón de Encendido (COLAR)
b. Luz Indicadora de Encendido
c. Botón de Intensidad del Colado
d. Luces de Intensidad del Colado
(Regular/Fuerte)
CARACTERISTICAS Y BENEFICIOS DE LA CAFETERA
Su nueva Cafetera Oster® cuenta con las siguientes características:
• Capacidad para Colar - 12 tazas
• Canasta Removible del Filtro – La canasta del filtro se saca para una limpieza fácil y rápida
• Pausa Automática para Servir - ¿No desea esperar a que el café termine de colarse?
Gracias a esta conveniente función usted cuenta con 30 segundos para servirse una taza
de café mientras la cafetera está aún colando. Retire la jarra con cuidado y la Pausa
Automática para Servir se activará automáticamente, deteniendo temporalmente el flujo de
café hacia la jarra
• Ventanilla Doble del Nivel de Agua – Muestra la cantidad de agua en el Depósito para un
llenado preciso
• Plato Calefactor Antiadherente – Esta característica le permite mantener su café caliente
luego de colado. El atributo antiadherente evita que la jarra se adhiera a la superficie del
plato calefactor
• Selector de Intensidad de Colado – Ajusta el período de colado para preparar un café
más cargado
• Sistema de Filtración del Agua - ¡Un café sabroso comienza con un agua óptima! El
sistema de filtración mejora el sabor del café al remover el 97% del cloro del agua que usted
utiliza para colar
• Almacenaje del Cable Eléctrico – Almacena el cable que sobra de manera segura para
que su mostrador se vea nítido
• Luz Indicadora de Encendido – Le permite saber cuándo su cafetera está encendida
• Apagado Automático en Dos Horas – Mantiene su café caliente durante dos horas, para
luego apagarse automáticamente
ADVERTENCIA: Si ocurre un apagón eléctrico y usted había seleccionado cualquiera de las
funciones, la cafetera efectuará la última función seleccionada si el servicio eléctrico es
restaurado durante los primeros 10 segundos.
LIMPIE SU CAFETERA ANTES DE UTILIZARLA POR PRIMERA VEZ
Asegúrese de que su primera taza de café sea tan buena como sea posible limpiando su
cafetera antes de utilizarla por primera vez. Sólo tiene que seguir estos sencillos pasos:
Asegúrese de que su primera taza de café sea tan buena como sea posible limpiando su
cafetera antes de utilizarla por primera vez. Sólo tiene que seguir estos sencillos pasos:
1. Lave la jarra, la tapa de la jarra y la canasta del filtro en una mezcla de detergente suave y
agua. Enjuague bien cada una (Favor refiérase al diagrama de partes).
2. Ponga todas las partes de vuelta y cierre la tapa. Luego, sin poner el filtro del café ni el
café, complete un ciclo de colado según se describe en el Paso 1 de “Colando Café Ahora”.
3. Una vez que se complete el colado apague su cafetera, bote el agua de la jarra y
enjuáguela, al igual que la tapa y la canasta del filtro.
Su cafetera está lista para ser utilizada ¡Disfrútela!
14
PREPARANDOSE PARA UTILIZAR LA CAFETERA
Seleccionando y midiendo el café molido
Para un buen resultado, utilice una cucharada nivelada para medir el café molido.
Asegúrese de utilizar café molido de textura mediana o “médium” para un colado
perfecto.
A. Tabla de medidas de café sugeridas
Para Colar
12 Tazas
10 Tazas
8 Tazas
6 Tazas
4 Tazas
Café Molido
9 cucharadas
7.5 cucharadas
6.5 cucharadas
4.5 cucharadas
3 cucharadas
1 cucharada rasa (cda.) = 5 gr./0.17 oz.
1 taza = 5 onzas de café colado
Utilice más o menos café según su gusto.
B. Añadiendo agua y café molido
1. Levante y abra la tapa de la canasta
del filtro. Para su conveniencia,
usted puede sacar la canasta
removible del filtro.
2. Inserte el filtro permanente o un
filtro de papel para 10-12 tazas en
la canasta removible del filtro
(Figura 5).
Figura 6
Figura 55
Figure
3. Añada la cantidad de café deseada y
sacúdala suavemente para nivelar el
café. Vea la “Tabla de Medidas de
Café Sugeridas”.
Brew
Now
Brew
Now
Regu
lar
Brew
Stren
Strong
gth
Regular
Strong
Brew Strength
4. Llene la jarra con agua fresca y fría a la capacidad deseada (1 taza equivale a 5
onzas) (Figura 6). Para poder llenarla de una manera fácil y precisa, usted puede
observar la medida de agua necesaria para hacer el número de tazas de café
deseadas, tanto en la jarra como en las ventanas duales de la cafetera. No la llene
sobre la línea de “12 tazas MAX”, ya que el agua se desbordaría del depósito de agua.
La cantidad de café colado siempre será menor que la cantidad de agua colocada
en el depósito de agua. Esto se debe a que los granos de café absorben una
mínima cantidad de agua.
5. Levante la tapa del depósito de agua y coloque el agua adentro. Cierre la tapa y
coloque la jarra vacía sobre el plato calefactor.
ADVERTENCIA: Asegúrese de que la jarra esté bien colocada dentro del plato
calefactor, ya que el agua podría desbordarse de la canasta del filtro.
15
COLANDO CAFE AHORA
1. Luego de completar los pasos en la sección “Añadiendo Agua y Café Molido” y con
la jarra de vidrio y la canasta del filtro colocadas en su sitio, encienda la cafetera.
Oprima el botón de COLAR y se encenderá. La luz verde de INTENSIDAD
REGULAR DEL COLADO (REGULAR) se encenderá para indicarle que está
colando una jarra de café de intensidad regular.
2. Para disfrutar de un café más cargado, oprima el botón SELECTOR DE
INTENSIDAD DE COLADO una sola vez. La luz roja de INTENSIDAD FUERTE se
encenderá. La cafetera se mantendrá en la intensidad del colado que usted ha
seleccionado hasta que vuelva a cambiarla a INTENSIDAD REGULAR oprimiendo
el botón de INTENSIDAD DE COLADO o hasta que desenchufe la unidad.
3. Luego de que la borra o café molido usado se haya enfriado, abra cuidadosamente
la canasta del filtro y descártela.
4. Asegúrese de apagar su cafetera y luego volverla a encender antes de colar más
café, sino el período de tiempo del apagado automático en dos horas no se volverá
a programar.
5. Asegúrese de que la jarra esté vacía antes de comenzar a colar café.
6. Asegúrese de apagar su cafetera cuando ya no la esté utilizando.
LIMPIANDO Y DANDOLE MANTENIMIENTO
A SU CAFETERA
LIMPIEZA DIARIA DE SU CAFETERA
Siempre desenchufe la cafetera y permita que se enfríe antes de limpiarla.
Saque la canasta del filtro, la jarra y la tapa de la jarra y lávelos en una solución de
agua caliente y detergente líquido suave.
Nunca utilice polvos limpiadores, fibras metálicas o cualquier otro material abrasivo. La
jarra de vidrio, la tapa y la canasta de colar si se pueden lavar en el escurridor superior
del lavaplatos.
ADVERTENCIA: Nunca sumerja la cafetera en agua ni en ningún otro líquido, ni la
coloque en el lavaplatos automático.
16
LIMPIEZA Y MANTENIMIENTO DE RUTINA
Cómo Limpiar los Depósitos Minerales de su Cafetera
Los minerales (calcio/piedra caliza) en el agua dejarán depósitos en su cafetera y le
afectarán. Se recomienda que los remueva regularmente utilizando vinagre.
ADVERTENCIA: Utilice 4 tazas o 20 onzas fluidas de vinagre blanco doméstico sin diluir.
1. Coloque el filtro permanente o un filtro de papel tipo canasta para 10-12 tazas vacío,
en la canasta del filtro y cierre la tapa.
2. Coloque la jarra vacía de vuelta en la unidad, centrada en el plato calefactor.
3. Cuele tres tazas de vinagre a través de la cafetera.
4. Apague la cafetera y déjela reposar durante 30 minutos.
5. Circule el remanente del vinagre a través de la cafetera.
6. Descarte la solución limpiadora y enjuague bien la jarra con agua limpia.
7. Llene el tanque de agua con agua fresca y limpia.
8. Coloque la jarra vacía de vuelta en la cafetera, centrada en el plato calefactor.
9. Saque el filtro permanente y lávelo bien antes de volver a colocarlo en la canasta
del filtro. Si utilizó un filtro de papel, retírelo y deséchelo.
10. Comience a colar y permita que concluya el ciclo de colar completo.
11. Repita los Pasos del 7 al 10 una vez más.
¡Su cafetera ya está limpia y lista para colar la próxima jarra de delicioso café caliente!
Cómo Lavar la Jarra
El agua dura puede dejar una mancha blancuzca en la jarra, y el café y el té pueden
hacer que esta mancha se torne marrón.
Intervalo de Limpieza Sugerido
Tipo de Agua
Agua blanda
Agua dura
Frecuencia de Limpieza
Cada 80 ciclos de colado
Cada 40 ciclos de colado
Para eliminar las manchas de la jarra:
1. Llene la jarra con una solución compuesta de partes iguales de agua y vinagre y
déjela reposar en la jarra por aproximadamente 20 minutos.
2. Descarte la solución, luego lave y enjuague la jarra.
No utilice limpiadores fuertes abrasivos que puedan rallar la jarra, las rallas pueden
hacer que la jarra se quiebre.
17
RESOLVIENDO POSIBLES PROBLEMAS
DE SU CAFETERA
PROBLEMA
CAUSA POSIBLE
LA LUZ DE COLAR AHORA/
• La unidad está desenchufada
ENCENDIDO NO SE ENCIENDE • Hay un apagón eléctrico
SOLUCION
• Enchufe la unidad
• Espere a que se
restaure el servicio
• La unidad está desenchufada
• Enchufe la unidad
• Hay un apagón eléctrico
• Espere a que se
restaure el servicio
• El tanque de agua está vacío
• Revise las ventanillas
del nivel del agua
• La canasta del filtro no está
insertada correctamente
• Inserte la canasta del filtro
• La jarra no está insertada
completamente sobre el
plato calefactor
• Coloque la jarra
correctamente sobre el
plato calefactor
LA CAFETERA SÓLO CUELA
AGUA
• No hay café molido en la
canasta del filtro
• Añada la cantidad
deseada de cafe al filtro
LA CAFETERA CUELA
LENTAMENTE
• La cafetera requiere ser
limpiada
• Limpie la cafetera segun se
indica en la seccion “dandole
Mantenimiento a su cafetera”
LA CANASTA DEL FILTRO
SE DESBORDA
• La canasta del filtro no está
insertada correctamente
• Inserte la canasta del
filtro correctamente
• La jarra no está insertada
completamente sobre el
plato calefactor
• Coloque la jarra
correctamente sobre
el plato calefactor
• La jarra no tiene su tapa
puesta
• Coloque la tapa sobre
la jarra
• Se puso demasiado café
molido en el filtro
• Saque el filtro, descarte la
borra o café usado. Lave el
filtro permanente, si utiliza un
filtro de papel, reemplacelo.
Comience el proceso de
colar nuevamente.
• La jarra se retiró del plato
calefactor por más de 30
segundos
• Apague la unidad y desconectela,
dejela enfriar. Recoja lo derramado.
No ponga la jarra caliente de vuelta
sobre el plato calefactor mojado
pues esta podria quebrarse
EL CAFÉ NO ESTÁ COLANDO
18
RESOLVIENDO POSIBLES PROBLEMAS
DE SU CAFETERA
PROBLEMA
CAUSA POSIBLE
EL CAFÉ NO SABE BIEN
• La proporción de café molido
y agua estaba desequilibrada
• Hay que limpiar la cafetera
HAY BORRA O CAFÉ MOLIDO
EN EL CAFÉ
• El filtro no está asentado
correctamente dentro de la
Canasta
• Si usa filtro de papel, puede
haber colapsado
SOLUCION
• Utilice una proporcion
Adecuada de cafe
Molido y agua
• Limpie la cafetera
Según se describe en
La seccion “dandole
Mantenimiento a su
Cafetera”
• Coloque el filtro
correctamente dentro
de la canasta
• Saque el filtro y
sustituyalo
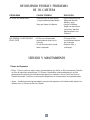
SERVICIO Y MANTENIMIENTO
Piezas de Repuesto
• Filtros – Para un café con mejor sabor, recomendamos que utilice un filtro permanente Oster® o
un filtro de papel tipo canasta para 10-12 tazas. Usualmente usted puede adquirir un filtro
permanente de repuesto en la tienda donde adquirió su cafetera o en un Centro de Servicio
Oster® Autorizado. Los filtros se encuentran disponibles en la mayoría de los supermercados
• Jarras – Usualmente usted puede adquirir una jarra de repuesto en la tienda donde adquirió su
cafetera o en un Centro de Servicio Oster®.
19
GARANTIA LIMITADA DE 1 AÑO
Sunbeam Products, Inc. (“Sunbeam”), una empresa de Jarden Consumer Solutions
garantiza que este producto estará libre de defectos en material o mano de obra por
un periodo de un año a partir de la fecha de la compra. Sunbeam, a su elección,
reparará o reemplazará este producto o cualquier componente del producto que se
encuentre defectuoso durante el período de garantía. El reemplazo será efectuado por
un producto o componente nuevo o remanufacturado. Si el producto ya no está
disponible, el reemplazo podrá ser efectuado por un producto similar de igual o mayor
valor. Esta es su garantía exclusiva.
Esta garantía es válida para el comprador original al detalle desde la fecha de compra
original al detalle y no es transferible. Guarde el recibo de venta original. Se requiere
prueba de compra para obtener la garantía. Los concesionarios Oster®, Centros de
Servicio Oster® Autorizado, o almacenes de ventas al detalle de productos
Oster® no tienen el derecho de alterar, modificar o cambiar, de manera alguna, los
términos y condiciones de esta garantía.
Esta garantía no cubre el desgaste normal de las piezas o daños causados por: uso
negligente o mal uso del producto, uso en voltaje o corriente inapropiada, uso contrario
a las instrucciones de operación, desarme, reparación o alteración por cualquier
persona que no sea de un Centro de Servicio Oster® Autorizado. Además, esta
garantía no cubre: Actos de la naturaleza, tales como incendios, inundaciones,
huracanes o tornados.
Sunbeam no será responsable por ningún daño incidental o consecuente causado por
el incumplimiento de la garantía o condición expresa, implícita o reglamentaria.
Excepto hasta donde lo prohíben las leyes aplicables, cualquier garantía implícita o
condición de comerciabilidad o aptitud para un propósito particular, está limitada en
base a la duración de la garantía descrita arriba.
Cómo obtener Servicio de Garantía: Por favor consulte el inserto de la garantía
correspondiente al país o póngase en contacto con su distribuidor autorizado local.
NO REGRESE ESTE PRODUCTO AL LUGAR DE COMPRA
20