1
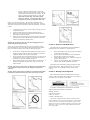
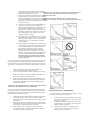
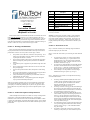
Model # 5027A 5027B 5027C 5027D 5027E 5027F 5027G Alexander Andrew, Inc. (dba FallTech) 1306 South Alameda Street Compton, CA 90221 USA 323-752-0066 www.falltech.com 5027H Instruction Manual 5027J Whiplash Tool Leashes Description Standard Duty Tool Leash Heavy Duty Tool Leash Heavy Duty with 2 Carabiners Standard Duty with SpeedClip Heavy Duty with SpeedClip SpeedClip 3-Pack Accessory Wrist Leash with SpeedClip Heavy Duty with Screw-Lock Carabiner Extreme Duty Tool Leash Max. Capacity 10 lbs 15 lbs 15 lbs 15 lbs 10 lbs * 5 lbs SelfTether Yes Yes Yes Yes Yes n/a 15 lbs Yes 25 lbs No *Max. capacity is based on the product to which the SpeedClip accessory is attached. FallTech Tool Leashes are elasticated lanyards that are intended to be used to tether tools and equipment to the user or to a structure adjacent to the user’s work location, so as to reduce the risk of injury from dropped objects. The user of this equipment must be provided with a copy of these instructions and must read, understand and adhere to all instructional materials, labels and warnings at all times. Failure to do so may result in serious injury or death. Warning: A falling object weighing as little as 15 lbs and falling only a few feet can generate forces of several hundred pounds or more when arrested without an energy absorber. These forces can cause you to loose your balance – always tie-off when working at height, particularly when using a Tool Leash that is tethered to your person. Section 1: Warnings and limitations Section 3: Instructions for use Please read, understand and heed all warnings in this section and those that may be printed elsewhere in this document and those that may be found on the product label. Failure to do so may result in serious injury or death. Step 1: Ensure the tool that you are tethering weighs less than the maximum capacity of your Tool Leash. This product is not for fall arrest, restraint or work positioing – never attempt to use this product to tie off, restrain or position yourself to any fall protection anchor or structure. Do not use this product to tether tools or equipment that weigh more than the rated capacity of this product (see Section 2 for additional details). Never tether any tool or equipment to yourself that weighs more than 15 lbs. Do not wrap lanyards around or allow them to come in contact with sharp or rough edges. Never use this product to tether a knife, sharp blade or other cutting tool. Do not use around machinery or equipment with moving parts where this product may become an entanglement hazard. Always use PPE that is appropriate to your tasks and the tools and equipment that you will be using. Inspect before each use – if this product appears to be damaged in anyway, discard immediately and replace. When you are working at height, ensure you are tied-off using a Personal Fall Arrest System (PFAS) that is appropriate to your jobsite, in accordance with your employer’s written fall protection plan. If you have any questions about these instructions or any other safety topic, consult a competent person on your job site. Step 2: Connect the Tool Leash to your tool using one of the methods below: For tools having a captive eye, either use the included carabiner to attach (see fig. 1), or pass the choker cord through the captive eye, then pass the body of the leash through the loop to choke. Cinch the cord lock to secure the choker connection (see fig. 2). For tools having a flanged handle, pass the handle through the choker cord and cinch down the cord-lock tightly to secure (see fig. 3). Check the cord-lock before each use of the tool to ensure it has not slipped out of adjustment. Do not attempt to use this product for smooth, straight handled tools having no captive eye (see fig. 4). Step 3: Tether the tool to yourself or to an adjacent structure using one of the methods below. Section 2: Product Descriptions and Specifications FallTech Whiplash Tool Leashes are available in a variety of configurations and capacities. This Instruction Manual addresses use, inspection and maintenance of all of the FallTech Tool Leash and Wrist Leash Models. Below is a listing by model number, description and maximum capacity: Never attempt to tether any tool or equipment that exceeds the stated maximum capacity on the product label. If wearing a Full Body Harness (FBH) that came with a workbelt, pass the workbelt through the web loop on the Tool Leash at the opposite end from the tool and then fasten the workbelt and wear as indicated in manufacturer’s instructions (see fig. 5). If wearing a tool belt or tool rig, pass the tool belt through the web loop on the Tool Leash at the opposite end from the tool and then fasten the tool belt and wear as indicated in the manufacturer’s instructions (see fig. 5). If wearing a Full Body Harness (FBH) that did not come with a workbelt, and you are not wearing any kind of tool belt or rig, you may choke the Tool Leash to the front torso strap, beneath the adjuster buckle and above the hip. Pass the Tool Leash webbing around the back side of the harness webbing and then pass the Tool Leash through the web loop to choke (see fig. 6). For #5027G Wrist Leash, wrap the wrist band around your wrist, pass through plastic buckle and use hook and loop closure to secure (see fig. 7). The wristband should be snug, but not tight. If working in an aerial lift, scissor lift or on some other structure, you may tether your Tool Leash directly to the structure. Choose an anchor-point that is secure and capable of supporting at least 500 lbs. Use the web loop to choke the Tool Leash directly to the structure. Do not tether to an anchor-point that has sharp or rough edges. Model #5027J Extreme Duty Tool Leashes must be tethered to a structure – never attempt to tether any tool or equipment to yourself if it weighs more than 15 lbs. Step 4: Use of SpeedClip accessory: The SpeedClip is intended to allow multiple tools to be used interchangeably with a single Tool Leash. If using a Tool Leash with SpeedClip, follow the steps below for attachment – if not, skip to Step 5. Use choker cord to connect to each tool with a SpeedClip Accessory as instructed in Step 2. Tether the Tool Leash or Wrist Leash as instructed in Step 3. When you wish to change tools, unfasten the SpeedClip buckle by depressing the wings on both sides. Fasten a new tool to your Tool Leash or Wrist Leach by inserting the male half of the SpeedClip buckle into the female half. Ensure the buckle wings click and are locked securely. Warning: Be careful not to drop your tools when changing from one to another using the SpeedClip Accessory. Step 5: Once you have attached your tool to your Tool Leash/Wrist Leash – proceed carefully with your work. While working with tools that are tethered using a Tool or Wrist Leash, be sure to adhere to the following points: Be sure there is enough fall clearance beneath you so that if a tool is dropped, it will not hit the next lower level, damage any structure or equipment and that it will not strike another person. Do not work with the Tool Leash at full extension – the tension of the Leash may cause you to lose your grip, and will increase the tool’s fall distance, as well as the resulting “arrest force”. When working at heights, always utilize 100% tie-off procedures. A dropped tool tethered to your person can cause you to lose your balance and fall. Warning: This product is not to be used as a fall protection connecting device – never attempt to use this product to tie your self off to a fall protection anchorage. Warning: Misuse of this product, and failure to read, understand and adhere to instructions, labels and warnings may result in serious injury or death. Section 4: Inspection and Maintenance This product must be inspected before each use and should be inspected at least twice annually by a competent person. Inspect Tool Leash for cuts, tears, fraying, loose stitching or other signs of wear and tear. Inspect cord-lock and carabiner for correct mechanical function and for cracks, dents or bent parts. Check all parts for heavy soil or residue such as paint, oil, grease or other substances. If there is any sign of damage, defect, contamination or excessive wear, discard immediately and replace. This product can be cleaned using a damp rag soaked in a mild soap and water solution. Hang up and allow to air-dry. Store in a cool, dry location. Do not attempt to modify, repair or alter in anyway. Section 5: Markings and Composition Read, understand and adhere to the instructional content and warnings on the product label, which is adjacent to the web loop on your Tool Leash. An example is shown below: This product is manufactured in strict adherence to FallTech quality standards using materials as stated below: Webbing: Polyester Choker Cord: Polyester Cord-Lock: Nylon-6 Carabiner: Aluminum Alloy This product is manufactured in a manner consistent with the highest standards and best practices of the industry, and is intended to be used to secure tools and personal equipment to protect from falling objects in support of OSHA 1926.300(c),1926.451(h)(2) and 1926.502(j). There is presently no ANSI standard that pertains to this type of product. Alexander Andrew, Inc. (dba FallTech) 1306 South Alameda Street Compton, CA 90221 USA 323-752-0066 www.falltech.com N° del modelo 5027A 5027B 5027C Manual de instrucciones 5027D Correas de tralla para herramientas 5027E Las correas para herramientas de FallTech son cuerdas elásticas que se utilizan para atar herramientas y equipo al usuario o a una estructura adyacente a su área de trabajo, a fin de reducir el riesgo de sufrir heridas causadas por objetos que se caen. El usuario de este equipo debe ser provisto de una copia de estas instrucciones y debe leer, comprender y respetar todos los materiales, las etiquetas y las advertencias instructivas siempre. De lo contrario, podría resultar gravemente herido o morir. 5027F Sección 1: Advertencias de seguridad y limitaciones Lea, comprenda y respete todas las advertencias de seguridad de esta sección y aquellas que puedan estar impresas en otra parte de este documento y en la etiqueta del producto. De lo contrario, podría resultar gravemente herido o morir. Este producto no es para detener caídas, permanecer fijo o mantenerse en la posición de trabajo adecuada. Nunca intente utilizarlo para atarse, permanecer fijo o mantenerse en la posición adecuada en una estructura o sostén de protección contra caídas. No utilice este producto para atar herramientas ni equipo que pesen más de lo que el producto es capaz de soportar (consulte la sección 2 para más información). Nunca ate ninguna herramienta ni equipo que pese más de 15 libras (7 kg aprox.). No coloque las cuerdas alrededor de bordes ásperos o filosos y evite que entren en contacto. Nunca utilice este producto para atar un cuchillo, una cuchilla filosa ni cualquier otra herramienta de corte. No utilice estas correas alrededor de maquinaria o equipos que tengan piezas movibles y corran peligro de enredarse. Siempre utilice el EPP (equipo de protección personal) adecuado para las tareas que va a realizar y para las herramientas y el equipo que va a utilizar. Verifique que el producto se encuentre en buenas condiciones cada vez que vaya a utilizarlo. Si presenta daños, deséchelo inmediatamente y reemplácelo por otro. Cuando trabaje en alturas, asegúrese de estar amarrado con un sistema de detención de caídas personal (PFAS, por sus siglas en inglés) que sea adecuado a su lugar de trabajo, de acuerdo con el plan de protección contra caídas que confeccionó su empleador. Si tiene alguna duda con respecto a estas instrucciones o cualquier otro tema referido a la seguridad, consulte con una persona competente en su ámbito laboral. 5027G 5027H 5027J Correa para herramientas estándar Correa para herramientas reforzada Reforzada con 2 mosquetones Estándar con sistema SpeedClip Reforzada con sistema SpeedClip Accesorio de 3 SpeedClips Correa para muñeca con sistema SpeedClip Reforzada con mosquetón con tornillo de traba Correa para herramientas de resistencia extrema Capacidad máxima 10 lbs (4,5 kg) 15 lbs (7 kg aprox.) Autosujeción . Sí 15 lbs (7 kg aprox.) 15 lbs (7 kg aprox.) 10 lbs (4,5 kg) * Sí 5 lbs (2 kg aprox.) 15 lbs (7 kg aprox.) 25 lbs (11 kg aprox.) Sí Sí Sí N/A Sí Sí No La capacidad máxima según el producto al que se sujeta el accesorio con SpeedClip. Advertencia: Un objeto que se cae desde una altura baja y pesa sólo 15 lbs (7 kg aprox.) puede generar una fuerza de varios cientos de libras o más cuando se detiene sin un amortiguador de energía. Esta fuerza puede hacer que pierda el equilibrio; por lo tanto, siempre amárrese cuando trabaje en alturas, especialmente cuando tenga una correa para herramientas atada a usted. Sección 3: Instrucciones de uso Paso 1: Asegúrese de que la herramienta que está atando pese menos que la capacidad máxima que puede soportar su correa para herramientas. Paso 2: Sujete la correa a su herramienta mediante uno de los siguientes métodos: Sección 2: Especificaciones y descripción del producto Las correas de tralla para herramientas de FallTech están disponibles en varias configuraciones y modelos que soportan distintos pesos. Este manual de instrucciones hace referencia al uso, la verificación y el mantenimiento de todos los modelos de correas para herramientas y muñecas de FallTech. A continuación se encuentra un listado con el número, la descripción y la capacidad máxima de cada modelo. Nunca intente amarrar ninguna herramienta ni equipo que exceda la capacidad máxima indicada en la etiqueta del producto. Descripción En las herramientas que tengan un ojo cautivo, utilice el mosquetón proporcionado para sujetar (vea la fig. 1) o pase la cuerda de apriete a través del ojo cautivo y luego pase el cuerpo de la correa a través de la lazada y tire para apretar. Coloque la traba de la cuerda para asegurar el amarre. (vea la fig. 2) En las herramientas que tengan un mango con reborde, pase la cuerda de apriete a través del mango y asegure la traba de la cuerda hacia abajo firmemente (vea la fig. 3) Verifique que la traba de la cuerda no se haya desajustado antes de utilizar la herramienta. No utilice este producto con herramientas de mangos lisos y derechos que no tengan un ojo cautivo (vea la fig. 4). Paso 3: Amarre la herramienta a su cuerpo o a una estructura adyacente siguiendo uno de los métodos que se encuentran a continuación. Si tiene puesto un arnés de cuerpo completo (FBH, por sus siglas en inglés) provisto de un cinturón, pase el cinturón a través de la lazada en la correa para herramientas que se encuentran en el extremo opuesto al de la herramienta y luego asegure el cinturón y utilícelo según se indica en las Advertencia: No se debe utilizar este producto como dispositivo de amarre de instrucciones del fabricante (vea la fig. 5). protección contra caídas. Jamás lo utilice para atarse a un anclaje de protección contra caídas. Si tiene puesto un cinturón portaherramientas o un equipo para herramientas, pase el cinturón a través de la lazada de Advertencia: Si no utiliza este producto ni lee, entiende y respeta las la correa para herramientas que se encuentra en el extremo instrucciones, las etiquetas y las advertencias, puede sufrir graves heridas o la opuesto al de la herramienta y luego asegure el cinturón y utilícelo según lo indicado en las instrucciones del muerte. fabricante (vea la fig. 5). Si tiene puesto un arnés de cuerpo completo (FBH) que no está provisto de un cinturón y no tiene ningún otro cinturón o equipo portaherramientas, debe ajustar la correa en la correa del torso delantera, que está debajo de la hebilla de ajuste y arriba de la cadera. Pase la correa para herramientas en forma de red alrededor de la parte trasera de la cincha del arnés y luego, colóquela a través de la lazada para ajustarla (vea la fig. 6). En el caso de la correa para muñeca N° 5027G, coloque la banda alrededor de la muñeca, pásela a través de la hebilla de plástico y utilice el gancho y el cierre de la lazada para asegurarla (vea la fig. 7). La banda debe estar ajustada, pero no demasiado. Si está trabajando sobre un andamio motorizado, sobre un elevador de tijera o sobre otro tipo de estructura, debe atar la correa para herramientas a la estructura directamente. Elija un punto de anclaje que sea seguro y capaz de soportar al menos 500 lbs (227 kg aprox.). Utilice la lazada para sujetar la correa directamente a la estructura. No amarre en un punto de anclaje que tenga bordes filosos o ásperos. La correa modelo N° 5027J de resistencia extrema debe atarse a una estructura. Nunca amarre a su cuerpo ninguna herramienta ni equipo que pese más de 15 lbs (7 kg aprox.). Paso 4: Uso del accesorio con sistema SpeedClip: El sistema SpeedClip permite que se utilicen múltiples herramientas de manera intercambiable con una sola correa. Si utiliza una correa para herramientas con SpeedClip, siga los pasos que se mencionan a continuación para el acoplamiento. De lo contrario, vaya al paso 5. Utilice la cuerda de apriete para unir cada herramienta con un accesorio con SpeedClip como se indicó en el paso 2. Ate la correa para herramientas o muñeca según se indicó en el paso 3. Cuando quiera cambiar de herramienta, desenganche la hebilla con SpeedClip presionando las alas a ambos lados. Asegure la nueva herramienta a la correa para herramientas o para muñeca insertando la mitad macho de la hebilla con SpeedClip en la mitad hembra. Asegúrese de que las alas de la hebilla hagan clic y estén trabadas firmemente. Advertencia: Tenga cuidado de que no se le caigan las herramientas cuando cambia una por otra utilizando el accesorio con SpeedClip. Paso 5: Una vez que sujetó la herramienta a la correa para herramientas/correa para muñeca, continúe con su trabajo cuidadosamente. Siempre que trabaje con herramientas que estén atadas con una correa para herramientas o para muñeca, asegúrese de respetar los siguientes puntos: Asegúrese de que haya suficiente distancia despejada en caso de que se caiga algún objeto, de manera que si eso sucede, no golpee el siguiente nivel inferior, ni dañe alguna estructura ni equipo, ni golpee a un individuo. No trabaje con una correa extendida por completo, ya que la tensión puede aflojarle la horquilla, y esto aumentará la distancia de caída de la herramienta y la “fuerza de detención” consiguiente. Cuando trabaje en alturas, siempre lleve a cabo el 100% de los procedimientos de amarre. Si una herramienta atada a su cuerpo se cae, usted puede perder el equilibrio y caer. Sección 4: Inspección y mantenimiento Este producto debe ser inspeccionado antes de cada uso y al menos dos veces por año por una persona competente. Verifique que la correa para herramientas no tenga cortes, roturas, partes deshilachadas, puntos flojos ni otros signos de desgaste y de roturas. Verifique que la mecánica de la traba de la cuerda y del mosquetón funcione correctamente y que no haya partes dobladas, abolladas ni agrietadas. Compruebe que las partes no contengan demasiada suciedad o residuos, tales como restos de pintura, de aceite, de grasa u otras sustancias. Si se presentan signos de daño, imperfecciones, contaminación o desgaste excesivo, deseche el producto inmediatamente y reemplácelo. Este producto puede limpiarse con un trapo húmedo embebido en jabón neutro y agua. Cuélguelo y déjelo secar al aire libre. Guárdelo en un lugar fresco y seco. No modifique, repare ni altere el producto de ninguna manera. Sección 5: Marcas y composición Lea, comprenda y respete las advertencias y el contenido instructivo que se encuentran en la etiqueta del producto, que está adyacente a la lazada de su correa para herramientas. A continuación se muestra un ejemplo: Este producto está fabricado según los estándares de calidad de FallTech con los materiales: Cincha: Poliéster Cuerda de ajuste: Poliéster Traba de la cuerda: Nylon 6 Mosquetón: Aleación de aluminio Este producto está fabricado conforme a los estándares más altos y las mejores prácticas de la industria, y debe ser utilizado para asegurar herramientas y equipo personal a fin de evitar que se caigan objetos, a favor de la Administración de Seguridad y Salud Ocupacional (OSHA, por sus siglas en inglés). Actualmente no existe un estándar del Instituto Nacional de Normalización Estadounidense (ANSI, por sus siglas en inglés) que esté relacionado con este tipo de producto.