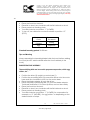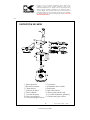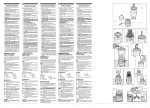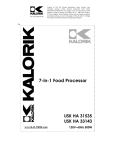
1
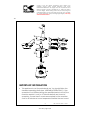
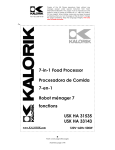
Fax +32 2 359 95 50
Copies of the I/B. Please reproduce them without any
changes except under special instruction from Team
International BELGIUM. The pages must be reproduced and
folded in order to obtain a booklet A5 (+/- 148.5 mm width x
210 mm height). When folding, make sure you keep the good
numbering when you turn the pages of the I/B. Don’t change
the page numbering. Keep the language integrity. Print only
what is inside the frame.
7-in-1 Food Processor
Procesadora de
Comida 7-en-1
USK HA 31535
USK HA 33143
www.KALORIK.com
120V~60Hz 500W
Front cover page (first page)
Assembly page 1/28
Fax +32 2 359 95 50
Copies of the I/B. Please reproduce them without any
changes except under special instruction from Team
International BELGIUM. The pages must be reproduced and
folded in order to obtain a booklet A5 (+/- 148.5 mm width x
210 mm height). When folding, make sure you keep the good
numbering when you turn the pages of the I/B. Don’t change
the page numbering. Keep the language integrity. Print only
what is inside the frame.
IMPORTANT SAFEGUARDS
When using electrical appliances, basic safety precautions should
always be followed, including the following:
1. READ ALL INSTRUCTIONS
2. Check that your mains voltage corresponds to that stated on the
rating plate of the appliance before using the appliance.
3. To protect against electrical shock do not immerse cord, plug, or
the motor unit in water or other liquid.
4. Close supervision is necessary when the appliance is used by or
near children.
5. Unplug from outlet when not in use and before putting on or
taking off parts or before cleaning.
6. Do not operate any appliance with a damaged cord or plug or
after the appliance malfunctions or has been damaged in any
manner. Return appliance to the nearest authorized service
facility for examination, repair, or adjustment.
7. The use of accessory attachments, including canning jars, not
recommended by the appliance manufacturer may cause
injuries.
8. Do not use outdoors.
9. Do not let cord hang over edge of table or counter or touch hot
surfaces.
10. Do not place on or near a hot gas or electric burner, or in a
heated oven.
11. Always attach plug to appliance first, then plug cord into the wall
outlet. To disconnect remove the plug from the wall outlet.
12. Do not use appliance for other than intended use.
13. This kind of appliance cannot function continuously; it is not a
professional type of appliance. It is necessary to make temporary
stops. Check the section “Important information" in the
instruction manual.
14. It is absolutely necessary to keep this appliance clean at all times
as it comes into direct contact with food.
15. The bowl should be assembled correctly on the motor base
before you plug it into the mains. The appliance is equipped with
2
Assembly page 2/28
USK HA 31535 / 33143 - 110127
Fax +32 2 359 95 50
Copies of the I/B. Please reproduce them without any
changes except under special instruction from Team
International BELGIUM. The pages must be reproduced and
folded in order to obtain a booklet A5 (+/- 148.5 mm width x
210 mm height). When folding, make sure you keep the good
numbering when you turn the pages of the I/B. Don’t change
the page numbering. Keep the language integrity. Print only
what is inside the frame.
a safety, which prevents the motor from working if it the
appliance is not assembled correctly.
16. The appliance is designed for the preparation of small quantities
of food, which have to be consumed rather quickly. It is not
designed for the preparation of large quantities at once.
17. Keep hands and utensils out of container while operating to
reduce the risk of severe personal injury and/or damage to the
appliance. A rubber spatula may be used but must be used only
when the appliance is not running.
18. To reduce the risk of injury, never place the cutting unit blades on
base without the bowl properly installed.
19. Always operate the appliance with lid in place, except for the
fruit juicer attachment
20. Always close the bowl with the lid before starting the operation.
21. Install blades properly and cautiously. Injury can result if moving
blades accidentally become exposed.
22. Do not leave the appliance unattended while it is operating.
23. To disconnect cord, turn the speed selector to "0”, then remove
the plug from wall outlet.
24. Avoid contacting moving parts.
25. Do not blend hot liquids.
26. To reduce the risk of injury, never place cutting blade or discs on
base without first putting bowl properly in place.
27. Be certain cover is securely locked in place before operating
appliance.
28. Never feed food by hand. Always use food pusher.
29. Do not attempt to defeat the cover interlock mechanism.
30. Do not open the cover until blades stop.
SAVE THESE INSTRUCTIONS
HOUSEHOLD USE ONLY
3
Assembly page 3/28
USK HA 31535 / 33143 - 110127
Fax +32 2 359 95 50
Copies of the I/B. Please reproduce them without any
changes except under special instruction from Team
International BELGIUM. The pages must be reproduced and
folded in order to obtain a booklet A5 (+/- 148.5 mm width x
210 mm height). When folding, make sure you keep the good
numbering when you turn the pages of the I/B. Don’t change
the page numbering. Keep the language integrity. Print only
what is inside the frame.
POLARIZED PLUG INSTRUCTIONS
This appliances is equipped with a polarized plug (one blade is wider
than the other). To reduce the risk of electric shock, this plug will fit
into the polarized outlet only one way. If the plug does not properly
fit into the outlet at first, reverse it. If it still does not fit, contact a
competent qualified electrician. Do not attempt to modify the plug in
any way.
SHORT CORD INSTRUCTIONS
A short power supply cord is provided to reduce the hazards resulting
from becoming entangled in, or tripping over a longer cord.
Extension cords may be used if care is exercised in their use.
• The electrical rating of the extension cord should be at least
that of the appliance. If the electrical rating of the extension
cord is too low, it could overheat and burn.
• The resulting extended cord should be arranged so that it will
not drape over the counter top or tabletop where it can be
pulled on by children or tripped over.
PART DESCRIPTION
1. Motor Base
3. Processing Bowl
5. Bowl lid
7. Disc Holder
9. Shredding Disc
11. Chopping blade
13. Emulsifying disk
15. Citrus juicer cone
2. Driver
4. Blade Adapter
6. Pusher
8. Slicing Disc
10. French fry Disc
12. Kneading knife (plastics)
14. Citrus juicer sieve
4
Assembly page 4/28
USK HA 31535 / 33143 - 110127
Fax +32 2 359 95 50
Copies of the I/B. Please reproduce them without any
changes except under special instruction from Team
International BELGIUM. The pages must be reproduced and
folded in order to obtain a booklet A5 (+/- 148.5 mm width x
210 mm height). When folding, make sure you keep the good
numbering when you turn the pages of the I/B. Don’t change
the page numbering. Keep the language integrity. Print only
what is inside the frame.
IMPORTANT INFORMATION
•
This appliance is not for professional use. You should follow the
standard operating times (see “ASSEMBLY/OPERATION”). If the
operation is not finished during the specified period, shut off the
machine and let it cool for 10 minutes before next round of
operation. If more than 5 rounds are required, let the machine
cool for 90 minutes at room temperature before the next round.
5
Assembly page 5/28
USK HA 31535 / 33143 - 110127
Fax +32 2 359 95 50
Copies of the I/B. Please reproduce them without any
changes except under special instruction from Team
International BELGIUM. The pages must be reproduced and
folded in order to obtain a booklet A5 (+/- 148.5 mm width x
210 mm height). When folding, make sure you keep the good
numbering when you turn the pages of the I/B. Don’t change
the page numbering. Keep the language integrity. Print only
what is inside the frame.
This can lengthen the lifespan of the machine. Failure to follow
this instruction carefully may result in damage to the motor.
•
To avoid spillage or overflow, please process food according to
the specified maximum capacity:
40 Oz. / 1200ML capacity for dry food
66 Fl.Oz. / 2000ML capacity for liquids
FIRST USE
After unpacking, disassemble unit before using first time. Refer to
“HOW TO DISASSEMBLE” for directions.
Wash all parts except motor base in warm, soapy water. Rinse and
dry immediately. Be careful: blades are sharp. Motor can be
cleaned with a slightly damp cloth.
DO NOT PUT ANY PARTS IN AN AUTOMATIC DISH-WASHER. DO NOT
IMMERSE MOTOR BASE IN WATER.
ASSEMBLY AND OPERATION
IMPORTANT NOTICE: When assembling the bowl on the base, please
make sure to always position the handle of the bowl on the right side,
facing the food processor, or the safety switches will not be triggered
and the appliance will not work
CHOPPING BLADE ASSEMBLY
•
•
•
•
•
•
Position the driver (2) upright on motor base (1).
Position the processing bowl (3) around the driver onto the motor
base and turn clockwise to lock it on the motor base.
Place blade adaptor (4) onto the driver.
Cautiously place the chopping blade (11) onto the blade
adaptor. The blade shall lie flat, if in correct position, and not be
wobbly
Place the food into the bowl.
Place lid on bowl, turn clockwise until the lid interlocks on bowl.
6
Assembly page 6/28
USK HA 31535 / 33143 - 110127
Fax +32 2 359 95 50
Copies of the I/B. Please reproduce them without any
changes except under special instruction from Team
International BELGIUM. The pages must be reproduced and
folded in order to obtain a booklet A5 (+/- 148.5 mm width x
210 mm height). When folding, make sure you keep the good
numbering when you turn the pages of the I/B. Don’t change
the page numbering. Keep the language integrity. Print only
what is inside the frame.
•
•
•
Place pusher into feeding chute
Turn dial clockwise on position “1” (LOWER) or “2” (HIGHER)
depending on the desired results. If some parts are not chopped
to your liking, use the ”P” position (for “Pulse”) by turning
counterclockwise until getting the desired results.
To turn off, turn dial back counter-clockwise on position “O”
(STOP).
P r oc es s e d
F o od
C h oc o l a t e
C h ee s e
meat
Te a or Sp i c e
Fruit &
Ve g e ta b l e
Onion
M ax . q u a n t i t y
p e r b a tc h
≤ 10 0 g
≤ 20 0 g
≤ 50 0 g
5 0 ~ 1 00 g
100~300g
≤ 50 0 g
Standard chopping period: 30-60 sec.
Tips and Warning
Always assemble the chopping blade inside the bowl before adding
the food (do NOT add the blade after the food is already in the
bowl).
Use pulse function for several times to avoid cutting too fine. Do not
run for too long while cutting hard cheese or chocolate. Otherwise
they might overheat and begin to melt.
KNEADING BLADE ASSEMBLY
The kneading blade can be used to mix a variety of ingredients
together, prepare a dough or batter, mix eggs, etc …
•
•
•
•
Position the driver (2) upright on motor base (1).
Position the processing bowl (3) around the driver onto the motor
base and turn clockwise to lock it on the motor base.
Place the blade adaptor (4) onto the driver.
Place the plastics kneading blade (12) onto the blade adaptor.
The blade shall lie flat, if in correct position, and not be wobbly
7
Assembly page 7/28
USK HA 31535 / 33143 - 110127
Fax +32 2 359 95 50
Copies of the I/B. Please reproduce them without any
changes except under special instruction from Team
International BELGIUM. The pages must be reproduced and
folded in order to obtain a booklet A5 (+/- 148.5 mm width x
210 mm height). When folding, make sure you keep the good
numbering when you turn the pages of the I/B. Don’t change
the page numbering. Keep the language integrity. Print only
what is inside the frame.
•
•
•
•
•
Place the food into the bowl.
Place lid on bowl, turn clockwise until the lid interlocks on bowl.
Place pusher into feeding chute
Turn dial clockwise on position “1” (LOWER).
To turn off, turn dial back counter-clockwise on position “O”
(STOP).
P r oc e s s e d
Food
F l o u r or S o f t
C h e es e
M e as u r em e n t
P er b a tc h
Egg
≤ 5 p i ec es
≤300g
Standard kneading period: 30-180 sec.
Tips and Warning
Always assemble the kneading blade inside the bowl, before adding
the food (do NOT add the blade after the food is already in the
bowl).
EMULSIFYING DISK ASSEMBLY
The emulsifying disk can be used to prepare mayonnaise, whisk egg
whites, etc…
•
•
•
•
•
•
•
•
Position the driver (2) upright on motor base (1).
Position the processing bowl (3) around the driver onto the motor
base and turn clockwise to lock it on the motor base.
Place the blade adaptor (4) onto the driver.
Place the plastics emulsifying disk (13) onto the blade adaptor.
The blade shall lie flat, if in correct position, and not be wobbly
Place the food into the bowl.
Place lid on bowl, turn clockwise until the lid interlocks on bowl.
Place pusher into feeding chute
Turn dial clockwise on position “1” (LOWER), for mayonnaise for
example, or “2” (HIGHER) – for egg whites – or depending on the
desired results or recipe.
8
Assembly page 8/28
USK HA 31535 / 33143 - 110127
Fax +32 2 359 95 50
Copies of the I/B. Please reproduce them without any
changes except under special instruction from Team
International BELGIUM. The pages must be reproduced and
folded in order to obtain a booklet A5 (+/- 148.5 mm width x
210 mm height). When folding, make sure you keep the good
numbering when you turn the pages of the I/B. Don’t change
the page numbering. Keep the language integrity. Print only
what is inside the frame.
•
To turn off, turn dial back counter-clockwise on position “O”
(STOP).
P r oc e s s e d
Food
Egg
M e a s u r em e n t
P e r b a tc h
2 ~ 5 pc s
Oil
1 2 5 ~ 35 0m l
Standard emulsifying period: 60-180 sec.
Tips and Warning
The emulsifying disc can be used to mix cheese and egg, to make
mayonnaise and pudding rapidly, or replace a whisk in most cases
(egg whites, etc …)
NEVER use the emulsifying Disc to knead flour.
SLICING DISC, SHREDDING DISC & FRENCH FRY DISC ASSEMBLY
•
•
•
•
•
•
•
•
•
Position the driver (2) upright on motor base (1).
Position the processing bowl (3) around the driver onto the motor
base and turn clockwise to lock it on the motor base.
Install the desired disc (8), (9) or (10) onto the disc holder (7).
Place disc holder onto the driver.
Place the lid on the bowl, turn the lid clockwise until it interlocks
on the bowl.
Put food into the feeding chute.
Use pusher (6) to push the food down for processing.
Turn dial clockwise on position “1” (LOWER) for soft food or
position “2” (HIGHER) for hard food.
To turn off, turn dial back counter-clockwise on position “O”
(STOP).
Tips and Warning
• Choose the desired disc according to the processed food and
desired shape of food.
• Push softly when feeding food.
• Pre-cut food into smaller pieces according to the diameter of
feeding tube.
9
Assembly page 9/28
USK HA 31535 / 33143 - 110127
Fax +32 2 359 95 50
Copies of the I/B. Please reproduce them without any
changes except under special instruction from Team
International BELGIUM. The pages must be reproduced and
folded in order to obtain a booklet A5 (+/- 148.5 mm width x
210 mm height). When folding, make sure you keep the good
numbering when you turn the pages of the I/B. Don’t change
the page numbering. Keep the language integrity. Print only
what is inside the frame.
•
Feed gradually for better results. When cutting soft food, choose
a lower speed (Position “1” to avoid the food turning soupy. If a
large quantity food needs to be cut, please cut it in several
batches. Please process maximum 40 Oz. per batch. Respect the
recommended pauses in the operation between batches.
CITRUS JUICER ASSEMBLY
•
•
•
•
•
•
•
Position the driver (2) upright on motor base (1).
Position the processing bowl (3) around the driver onto the motor
base and turn clockwise to lock it on the motor base.
Place the citrus juicer sieve (14) on the bowl and turn clockwise to
lock into position.
Position the Citrus Juicer Cone (15) on the driver.
Turn dial clockwise on position “1” (LOWER)
Juice the citrus by pressing the citrus cut in half on the rotary
cone.
To turn off, turn dial back counter-clockwise on position “O”
(STOP).
Tips and Warning
•
•
Only lower speed (Position “1”) should be chosen for operating
the citrus juicer attachment.
The maximum time for continuous operation is 30 (thirty) seconds,
operations can be repeated 10 times with pauses of 15 seconds.
OTHER PRACTICAL ADVICE
•
•
•
Do NOT use other utensils in place of the pushing device (for
example: fingers, forks, knives, etc.).
To obtain finely and uniformly chopped food, cut the solid food
into small pieces before placing it in the appliance; in some
cases (parsley for example) it is best to use the “pulse” function to
chop at intervals and to mix the food from time to time before
chopping again.
When slicing foods, different thicknesses can be obtained by
varying the force with which they are pressed against the disc; in
any case do NOT apply excessive pressure.
10
Assembly page 10/28
USK HA 31535 / 33143 - 110127
Fax +32 2 359 95 50
Copies of the I/B. Please reproduce them without any
changes except under special instruction from Team
International BELGIUM. The pages must be reproduced and
folded in order to obtain a booklet A5 (+/- 148.5 mm width x
210 mm height). When folding, make sure you keep the good
numbering when you turn the pages of the I/B. Don’t change
the page numbering. Keep the language integrity. Print only
what is inside the frame.
•
Do not chop foods with hard parts, the central core of
pineapples for example (woody shells, etc.); do not chop
particularly hard types of food (ice, hard cheese, etc.).
HOW TO DISASSEMBLE
•
•
•
•
Remove the pusher. Turn the lid or citrus sieve counterclockwise,
lift and remove.
Lift the blade holder or disk holder from the driver.
Lift the blade / disk and remove from blade holder / disk holder.
Be careful, blades are sharp.
Turn bowl counterclockwise to unlock from motor base. Lift and
remove.
HOW TO CLEAN
•
•
•
•
•
Always unplug from outlet before cleaning.
To clean the motor body, use a soft, slightly damp cloth; do not
use metal pads or abrasive products. Do not wash it under
running water; do not submerge it in water; do not wash in the
dishwasher. Before use, check that it is perfectly dry, especially
the contacts.
All the stainless steel disks and blades, and the non-mechanical
plastic parts (juicer, etc.) can be dish-washed or hand-washed.
To clean the blades, free them from the disc, and remove with
due care.
The transparent parts can be dish-washed, but we recommend
hand-washing as this will keep the finish new for a longer period
of time
Check that they are perfectly dry before putting away or using
them.
11
Assembly page 11/28
USK HA 31535 / 33143 - 110127
Fax +32 2 359 95 50
Copies of the I/B. Please reproduce them without any
changes except under special instruction from Team
International BELGIUM. The pages must be reproduced and
folded in order to obtain a booklet A5 (+/- 148.5 mm width x
210 mm height). When folding, make sure you keep the good
numbering when you turn the pages of the I/B. Don’t change
the page numbering. Keep the language integrity. Print only
what is inside the frame.
TROUBLESHOOTING
Problems
Machine does not work.
Machine stops running
suddenly.
Motor is running, while
components do not run.
Some liquids is spilling on the
countertop
Solutions
Make sure the appliance is
plugged on the mains, make
sure the plug is powered, check
the assembly of the bowl and
the lid is correct, make sure the
handle of the bowl is positioned
on the right, while facing the
food processor
The Processing bowl or lid may
have been disassembled or
loosen during fierce processing.
Please reassemble. Proceed
with a gentler processing.
Make sure the driver part is
installed correctly
This is what happens in case of
overflow. The overflowing
liquid is redirected to the
bottom of the base by a tube,
in order to protect the motor
from liquids.
Please use smaller batches of
liquid or food
12
Assembly page 12/28
USK HA 31535 / 33143 - 110127
Fax +32 2 359 95 50
Copies of the I/B. Please reproduce them without any
changes except under special instruction from Team
International BELGIUM. The pages must be reproduced and
folded in order to obtain a booklet A5 (+/- 148.5 mm width x
210 mm height). When folding, make sure you keep the good
numbering when you turn the pages of the I/B. Don’t change
the page numbering. Keep the language integrity. Print only
what is inside the frame.
WARRANTY
We suggest that you complete and return the enclosed Product
Registration Card promptly to facilitate verification of the date of
original purchase. However, return of the Product Registration Card is
not a condition of these warranties. You can also fill this warranty
card online, at the following address: www.KALORIK.com
This KALORIK product is warranted in the U.S.A. for 1 year from the
date of purchase against defects in material and workmanship. This
warranty is not transferable. Keep the original sales receipt. Proof of
purchase is required to obtain warranty performance.
During this period, the KALORIK product that, upon inspection by
KALORIK, is proved defective, will be repaired or replaced, at
Kalorik’s option, without charge to the customer. If a replacement
product is sent, it will carry the remaining warranty of the original
product.
This warranty does not apply to any defect arising from a buyer's or
user's misuse of the product, negligence, failure to follow KALORIK
instructions noted in the user’s manual, use on current or voltage
other than that stamped on the product, wear and tear, alteration
or repair not authorized by KALORIK, or use for commercial purposes.
There is no warranty for glass parts, glass containers, filter basket,
blades and agitators, and accessories in general. There is also no
warranty for parts lost by the user.
ANY WARRANTY OF MERCHANTABILITY OR FITNESS WITH RESPECT TO
THIS PRODUCT IS ALSO LIMITED TO THE ONE YEAR LIMITED WARRANTY
PERIOD.
Some states do not allow limitation on how long an implied warranty
lasts or do not allow the exclusion of incidental or consequential
damages, so the above limitations may not apply to you. This
warranty gives you specific legal rights, and you may also have other
rights which vary from state to state.
If the appliance should become defective within the warranty
period and more than 30 days after date of purchase, do not return
13
Assembly page 13/28
USK HA 31535 / 33143 - 110127
Fax +32 2 359 95 50
Copies of the I/B. Please reproduce them without any
changes except under special instruction from Team
International BELGIUM. The pages must be reproduced and
folded in order to obtain a booklet A5 (+/- 148.5 mm width x
210 mm height). When folding, make sure you keep the good
numbering when you turn the pages of the I/B. Don’t change
the page numbering. Keep the language integrity. Print only
what is inside the frame.
the appliance to the store: often, our Consumer Service
Representatives can help solve the problem without having the
product serviced. If servicing is needed, a Representative can
confirm whether the product is under warranty and direct you to the
nearest service location.
If this is the case, bring the product, or send it, postage prepaid by
the user (all Kalorik customers are responsible for the initial shipment
back to the warranty center), along with proof of purchase and
indicating a return authorization number given by our Consumer
Service Representatives, to the authorized KALORIK Service Center
(please visit our website at www.KALORIK.com or call our Customer
Service Department for the address of our authorized KALORIK
Service Center).
If you send the product, please include a letter explaining the nature
of the claimed defect.
If you have additional questions, please call our Consumer Service
Department (please see below for complete contact information),
Monday through Friday from 9:00am - 6:00pm (EST). Please note
hours are subject to change.
If you would like to write, please send your letter to:
KALORIK Consumer Service Department
Team International Group of America Inc.
1400 N.W 159th Street, Suite 102
Miami Gardens, FL 33169 USA
Or call:
Toll Free: +1 888-521-TEAM / +1 888-KALORIK
Only letters can be accepted at this address above. Shipments and
packages that do not have a return authorization number will be
refused.
14
Assembly page 14/28
USK HA 31535 / 33143 - 110127
Fax +32 2 359 95 50
Copies of the I/B. Please reproduce them without any
changes except under special instruction from Team
International BELGIUM. The pages must be reproduced and
folded in order to obtain a booklet A5 (+/- 148.5 mm width x
210 mm height). When folding, make sure you keep the good
numbering when you turn the pages of the I/B. Don’t change
the page numbering. Keep the language integrity. Print only
what is inside the frame.
INSTRUCCIONES DE FUNCIONAMIENTO
ADVERTENCIAS DE SEGURIDAD
Al utilizarse aparatos eléctricos siempre se deberán acatar las
precauciones básicas de seguridad, incluyendo las siguientes:
LEA TODAS LAS INSTRUCCIONES
1. Verifique que la corriente eléctrica corresponda a la indicada en
la placa de potencia eléctrica del aparato, antes de ser
utilizado.
2. Para protegerse de una posible descarga eléctrica no sumerja
el cable, el enchufe o el motor del aparato en agua ni en ningún
otro líquido.
3. Se requiere la supervisión de un adulto en caso de que el
aparato sea utilizado por niños o cerca de éstos.
4. Desconectar el aparato cuando no esté en uso, como así
también antes de colocar o quitar accesorios, o antes de su
limpieza.
5. Nunca ponga en funcionamiento un aparato cuyo cable y/o
enchufe estén dañados, ni en caso de que no esté funcionando
apropiadamente o haya sufrido algún daño. Devuelva el
aparato a la agencia autorizada más cercana a su hogar para
su revisación, reparación, o ajuste.
6. El uso de accesorios, incluyendo los frascos de conservas, no
recomendados por el fabricante del aparato, podría causar
daños en el mismo.
7. No utilizar el aparato a la intemperie o al aire libre.
8. No permita que el cable cuelgue del borde de una mesa o
mesada, o toque superficies calientes.
9. No coloque el aparato encima o cerca de hornallas calientes,
ya sean a gas o eléctricas, o adentro de un horno caliente.
10. Siempre conecte primero el enchufe en el aparato, luego
conecte el cable en el tomacorriente. Para desconectar
desenchufe el aparato del tomacorriente.
11. Utilice el aparato pura y exclusivamente para los fines indicados.
12. Este tipo de aparato no puede funcionar ininterrumpidamente;
no es un aparato de tipo profesional. Es imprescindible
interrumpir su funcionamiento temporariamente. Vea la sección
“Información Importante” en el manual de instrucciones.
15
Assembly page 15/28
USK HA 31535 / 33143 - 110127
Fax +32 2 359 95 50
Copies of the I/B. Please reproduce them without any
changes except under special instruction from Team
International BELGIUM. The pages must be reproduced and
folded in order to obtain a booklet A5 (+/- 148.5 mm width x
210 mm height). When folding, make sure you keep the good
numbering when you turn the pages of the I/B. Don’t change
the page numbering. Keep the language integrity. Print only
what is inside the frame.
13. Es absolutamente necesario mantener este aparato limpio
permanentemente dado que está en contacto directo con la
comida
14. El bol deberá ser ajustado correctamente en la base de motor
antes de conectar el aparato en el tomacorriente. Este aparato
está equipado con un dispositivo de seguridad, lo cual impide
que el motor funcione en caso de que el aparato no esté
correctamente ensamblado
15. Este aparato está diseñado para la preparación de pequeñas
cantidades de comida, que preferentemente debe ser
consumida a la brevedad. No está diseñado para la
preparación de grandes cantidades a la vez.
16. Mantenga sus manos y los utensilios fuera del recipiente mientras
el aparato esté en funcionamiento, para evitar el riesgo de
graves daños personales y/o el daño del aparato. Se puede
utilizar una espátula de goma siempre y cuando se la utilice
solamente cuando el aparato no esté en funcionamiento.
17. Para evitar el riesgo de daños personales, nunca coloque las
cuchillas en la base antes de haber instalado el bol
correctamente.
18. Las cuchillas son filosas, manéjelas con cuidado.
19. El aparato debe utilizarse siempre con su tapa correctamente
colocada, salvo en el caso de usarse el accesorio para jugos de
frutas,
20. El bol debe utilizarse siempre con su tapa antes de iniciar la
operación.
21. Instale las cuchillas correctamente y con sumo cuidado. La
instalación incorrecta de las cuchillas podría causar graves
daños.
22. No descuide el aparato mientras esté funcionando.
23. Para desconectar, gire el selector de velocidades, y luego
desenchufe el cable del tomacorriente.
24. Evite el contacto con las partes en movimiento.
25. No licúe líquidos calientes.
26. Para evitar el riesgo de daños personales, nunca coloque las
cuchillas o discos en la base sin primero colocar el bol en el lugar
correcto.
27. Asegúrese de que la tapa esté correctamente ajustada antes de
poner el aparato en funcionamiento.
16
Assembly page 16/28
USK HA 31535 / 33143 - 110127
Fax +32 2 359 95 50
Copies of the I/B. Please reproduce them without any
changes except under special instruction from Team
International BELGIUM. The pages must be reproduced and
folded in order to obtain a booklet A5 (+/- 148.5 mm width x
210 mm height). When folding, make sure you keep the good
numbering when you turn the pages of the I/B. Don’t change
the page numbering. Keep the language integrity. Print only
what is inside the frame.
28. Nunca incorpore comida manualmente. Siempre utilice un
utensilio para empujar la comida.
29. No trate de destruir o alterar el cierre de seguridad de la tapa .
30. No abra la tapa hasta que las cuchillas hayan dejado de
funcionar.
GUARDE ESTAS INSTRUCCIONES
SOLAMENTE PARA USO DOMESTICO
INSTRUCCIONES PARA ENCHUFE POLARIZADO
Este aparato cuenta con un enchufe polarizado (una clavija es más
ancha que la otra). Para evitar todo riesgo de shock eléctrico, dicho
enchufe va a encajar en la salida polarizada solamente de una
forma. Si en un principio el enchufe no encaja en el tomacorriente,
inviértalo. Si aun así no encaja, solicite el servicio de un electricista
habilitado y certificado. No trate por ningún medio de modificar el
enchufe.
INSTRUCCIONES PARA CABLE CORTO
Este aparato está provisto de un cable corto, con el fin de evitar el
peligro de posibles enredos en el mismo, o de posibles tropiezos con
un cable largo. Se puede utilizar una extensión de cable siempre y
cuando se lo utilice con la precaución necesaria.
• La potencia eléctrica de la extensión de cable deberá ser
como mínimo igual a la del aparato. En caso de que la
potencia eléctrica de la extensión de cable fuese
demasiado baja, podría recalentarse y quemarse.
• La extensión de cable deberá ser acomodada de forma tal
que no cuelgue de la mesada o de la mesa y evitar así que los
niños tropiecen o tiren de la misma.
17
Assembly page 17/28
USK HA 31535 / 33143 - 110127
Fax +32 2 359 95 50
Copies of the I/B. Please reproduce them without any
changes except under special instruction from Team
International BELGIUM. The pages must be reproduced and
folded in order to obtain a booklet A5 (+/- 148.5 mm width x
210 mm height). When folding, make sure you keep the good
numbering when you turn the pages of the I/B. Don’t change
the page numbering. Keep the language integrity. Print only
what is inside the frame.
DESCRIPCIÓN DE PARTES
1. Base de Motor
3. Bol de Procesado
5. Tapa del bol
7. Soporte de disco
9. Disco rallador
11. Cuchilla de picar
13. Disco de emulsión
15. Cono para jugos cítricos
2. Conductor
4. Adaptador de cuchillas
6. Empujador
8. Disco rebanador
10. Disco para papas fritas
12. Cuchillo amasador (plástico)
14. Tamiz para jugos cítricos
18
Assembly page 18/28
USK HA 31535 / 33143 - 110127
Fax +32 2 359 95 50
Copies of the I/B. Please reproduce them without any
changes except under special instruction from Team
International BELGIUM. The pages must be reproduced and
folded in order to obtain a booklet A5 (+/- 148.5 mm width x
210 mm height). When folding, make sure you keep the good
numbering when you turn the pages of the I/B. Don’t change
the page numbering. Keep the language integrity. Print only
what is inside the frame.
INFORMACIÓN IMPORTANTE
•
Este aparato no ha sido diseñado para uso profesional. Usted
deberá atenerse a los tiempos normales de funcionamiento (vea
“ENSAMBLADO/FUNCIONAMIENTO”). Si la función no ha
finalizado dentro del período específico de tiempo, apague el
aparato y déjelo enfriar durante 10 minutos antes de volver a
ponerlo en funcionamiento. Si tuviera que repetir esto más de 5
veces, deje enfriar el aparato durante 90 minutos a temperatura
ambiente antes de volver a ponerlo en funcionamiento. Esto
puede prolongar la vida del aparato. Siga estas instrucciones
cuidadosamente y con la precaución necesaria, de lo contrario
el motor podría dañarse.
•
Por favor, procese comida de acuerdo a la capacidad máxima
especificada:
40 Oz. / 1200ML: capacidad para comida seca
66 Fl.Oz. / 2000ML: capacidad para líquidos.
AL USARSE POR PRIMERA VEZ
Luego de retirar el aparato de su caja, desmonte la unidad antes de
usarla por primera vez. Vea “CÓMO DESMONTAR” para obtener
instrucciones.
Lave todas las partes, excepto la base de motor, en una solución
de agua tibia y jabón. Enjuague y seque inmediatamente. Tenga
cuidado: las cuchillas son filosas. El motor puede limpiarse con un
trapo ligeramente húmedo.
NO PONGA NINGUNA DE LAS PARTES EN UN LAVAPLATOS
AUTOMÁTICO. NO SUMERJA LA BASE DE MOTOR EN AGUA.
AVISO IMPORTANTE: Al montar el bol de procesado en la base,
asegúrese de colocar el asa siempre al lado derecho del frontal de
la base, como se indica en la foto de despieces, o los interruptores
de seguridad no se activaran y el aparato no funcionara.
19
Assembly page 19/28
USK HA 31535 / 33143 - 110127
Fax +32 2 359 95 50
Copies of the I/B. Please reproduce them without any
changes except under special instruction from Team
International BELGIUM. The pages must be reproduced and
folded in order to obtain a booklet A5 (+/- 148.5 mm width x
210 mm height). When folding, make sure you keep the good
numbering when you turn the pages of the I/B. Don’t change
the page numbering. Keep the language integrity. Print only
what is inside the frame.
ENSAMBLADO Y FUNCIONAMIENTO
ENSAMBLADO DE LA CUCHILLA DE PICAR
•
•
•
•
•
•
•
•
•
Coloque el conductor (2) en sentido vertical en la base de motor
(1).
Coloque el bol de procesado (3) alrededor del conductor en la
base de motor y gire en el sentido de las agujas del reloj para
trabar en la base de motor.
Coloque el adaptador de cuchilla (4) en el conductor.
Con sumo cuidado coloque la cuchilla de picar (11) dentro del
adaptador de cuchilla. La posición correcta de la cuchilla es
cuando la misma está en posición plana, y no tambaleante.
Coloque la comida adentro del bol.
Coloque la tapa en el bol, gírela en el sentido de las agujas del
reloj hasta que la tapa se trabe en el bol.
Coloque el empujador en el tubo de entrada de comida.
Gire el dial en dirección de las agujas del reloj hacia la posición
“1” (BAJA) o “2” (ALTA) dependiendo de los resultados
deseados. En caso de que algunas partes no se hayan picado a
su gusto, use la posición ”P” (para “Oprima”) girando el dial en
sentido contrario a las agujas del reloj hasta obtener los
resultados deseados.
Para apagar, gire nuevamente el dial en sentido contrario a las
agujas del reloj hasta la posición “O” (PARAR).
C om i d a
procesada
C h oc o l a t e
Q ue s o
Carne
T é o E s p ec i a s
F r u ta &
Ve g e ta l es
Cebolla
C a n t i d ad m áx .
p o r r em e s a
≤ 10 0 g
≤ 20 0 g
≤ 50 0 g
5 0 ~ 1 00 g
100~300g
≤ 50 0 g
Período regular de picado: 30-60 seg.
20
Assembly page 20/28
USK HA 31535 / 33143 - 110127
Fax +32 2 359 95 50
Copies of the I/B. Please reproduce them without any
changes except under special instruction from Team
International BELGIUM. The pages must be reproduced and
folded in order to obtain a booklet A5 (+/- 148.5 mm width x
210 mm height). When folding, make sure you keep the good
numbering when you turn the pages of the I/B. Don’t change
the page numbering. Keep the language integrity. Print only
what is inside the frame.
Consejos y Advertencias
Coloque siempre la cuchilla de picar en el bol antes de añadir la
comida (NO coloque la cuchilla después de haber añadido la
comida en el bol).
Use la función “Oprimir” varias veces para evitar que el picado sea
demasiado fino. No deje el aparato funcionando durante
demasiado tiempo cuando corte quesos duros o chocolate. En tal
caso, estos productos podrían calentarse y comenzar a derretirse.
ENSAMBLADO DE LA CUCHILLA DE AMASAR
La cuchilla de amasar puede ser utilizada para mezclar diferentes
ingredientes juntos, preparar masas o mezclas para freír, batir
huevos, etc…
•
•
•
•
•
•
•
•
•
Coloque el conductor (2) en sentido vertical en la base de motor
(1).
Coloque el bol de procesado (3) alrededor de la base de motor
y gírelo en sentido de las agujas del reloj en la base de motor.
Ubique el adaptador de cuchilla (4) en el conductor.
Ubique la cuchilla plástica de amasar (12) en el adaptador de
cuchilla. La posición correcta de la cuchilla es cuando la misma
está en posición plana, y no tambaleante.
Coloque la comida en el bol.
Coloque la tapa en el bol, gire en sentido de las agujas del reloj
hasta que la tapa se trabe en el bol.
Coloque el empujador en el tubo de entrada de comida.
Gire el dial en sentido de las agujas del reloj hasta la posición “1”
(BAJA).
Para apagar, gire de Nuevo el dial en sentido contrario a las
agujas del reloj hasta la posición “O” (PARAR).
C om i d a
P r o c e s a da
Harina o
Q ue s o B l a n d o
Medida
p or
R em es a
Huevo
≤ 5 un i d a de s
≤300g
Período regular de amasado: 30-180 seg.
21
Assembly page 21/28
USK HA 31535 / 33143 - 110127
Fax +32 2 359 95 50
Copies of the I/B. Please reproduce them without any
changes except under special instruction from Team
International BELGIUM. The pages must be reproduced and
folded in order to obtain a booklet A5 (+/- 148.5 mm width x
210 mm height). When folding, make sure you keep the good
numbering when you turn the pages of the I/B. Don’t change
the page numbering. Keep the language integrity. Print only
what is inside the frame.
Consejos y Advertencias
Instale siempre la cuchilla de amasar en el bol antes de añadir la
comida. NO instale la cuchilla después de haber añadido la comida
al bol.
ENSAMBLADO DEL DISCO EMULSIFICADOR
El disco emulsificador puede ser utilizado para preparar mayonesa,
batir claras de huevo, etc…
•
•
•
•
•
•
•
•
•
Coloque el conductor (2) en sentido vertical en la base de motor
(1).
Coloque el bol de procesado (3) alrededor del conductor en la
base de motor y gire en sentido de las agujas del reloj para
trabarlo en la base de motor.
Coloque el adaptador de cuchilla (4) en el conductor.
Coloque el disco emulsificador plástico (13) en el adaptador de
cuchilla. La posición correcta de la cuchilla es cuando la misma
está en posición plana, y no tambaleante.
Añada la comida al bol.
Coloque la tapa en el bol, gírela en sentido de las agujas del
reloj hasta que la tape se trabe en el bol.
Coloque el empujador en el tubo de entrada de comida.
Gire el dial en sentido de las agujas del reloj hasta la posición “1”
(BAJA), para mayonesa, por ejemplo, o “2” (ALTA) – para claras
de huevo – o de acuerdo a los resultados deseados que figuren
en la receta.
Para apagar, gire el dial nuevamente en sentido contrario a las
agujas del reloj hasta la posición “O” (PARAR).
C om i d a
P r oc e s a da
Huevo
M e d i d a or
R em es a
2 ~ 5 pc s
Aceite
1 2 5 ~ 35 0m l
Período regular de emulsificación: 60-180 seg.
22
Assembly page 22/28
USK HA 31535 / 33143 - 110127
Fax +32 2 359 95 50
Copies of the I/B. Please reproduce them without any
changes except under special instruction from Team
International BELGIUM. The pages must be reproduced and
folded in order to obtain a booklet A5 (+/- 148.5 mm width x
210 mm height). When folding, make sure you keep the good
numbering when you turn the pages of the I/B. Don’t change
the page numbering. Keep the language integrity. Print only
what is inside the frame.
Consejos y Advertencias
El disco emulsificador puede ser utilizado para mezclar queso y
huevo, para preparar mayonesa y postres rápidamente, o, en la
mayoría de los casos, reemplazar a un batido (claras de huevo,
etc…)
NUNCA utilice el Disco emulsificador para amasar harina
ENSAMBLE DEL DISCO REBANADOR, DEL DISCO RALLADOR & DEL
DISCO PARA PAPAS FRITAS
•
•
•
•
•
•
•
•
•
Coloque el conductor (2) en posición vertical en la base de
motor (1).
Coloque el bol de procesado (3) alrededor del conductor en la
base de motor y gire en sentido de las agujas del reloj hasta que
el bol se trabe en la base de motor.
Instale el disco deseado (8), (9) o (10) dentro del soporte de
disco (7).
Coloque el soporte de disco en el conductor.
Coloque la tapa en el bol, gire la tapa en sentido de las agujas
del reloj hasta que la tapa se trabe en la base de motor.
Añada la comida en el tubo de entrada de comida.
Utilice el empujador (6) para empujar la comida adentro para
ser procesada.
Gire el dial en sentido de las agujas del reloj hasta la posición “1”
(BAJA) para comidas blandas, o hasta la posición “2” (ALTA)
para comidas duras.
Para apagar, gire el dial nuevamente en sentido contrario a las
agujas del reloj hasta la posición “O” (PARAR).
Consejos y Advertencias
• Elija el disco adecuado para el procesado de la comida y para
el formato deseado de la misma.
• Al añadir comida, empújela suavemente.
• Corte previamente la comida en pequeños trozos de acuerdo al
diámetro del tubo de entrada de comida.
• Para obtener mejores resultados, vaya añadiendo la comida
gradualmente. Seleccione una velocidad más bajar cuando
corte comidas blandas, (Posición “1”) para evitar que la comida
quede con la textura de sopa. Si necesita cortar un gran
cantidad de comida, por favor córtela en varias remesas. Por
23
Assembly page 23/28
USK HA 31535 / 33143 - 110127
Fax +32 2 359 95 50
Copies of the I/B. Please reproduce them without any
changes except under special instruction from Team
International BELGIUM. The pages must be reproduced and
folded in order to obtain a booklet A5 (+/- 148.5 mm width x
210 mm height). When folding, make sure you keep the good
numbering when you turn the pages of the I/B. Don’t change
the page numbering. Keep the language integrity. Print only
what is inside the frame.
favor, procese un máximo de 40 onzas por remesa. Respete las
pausas recomendadas en el proceso entre remesas.
ENSAMBLE DE LA FABRICADORA DE JUGOS CÍTRICOS
•
•
•
•
•
•
•
Coloque el conductor (2) en sentido vertical en la base de motor
(1).
Coloque el bol de procesado (3) alrededor del conductor en la
base de motor y gire en sentido de las agujas del reloj para
trabarlo en la base de motor.
Coloque el tamiz para jugos cítricos (14) en el bol y gire para
trabarlo en su posición correcta.
Coloque el Cono para Jugos Cítricos (15) en el conductor.
Gire el dial en sentido de las agujas del reloj hasta la posición “1”
(BAJA)
Exprima el fruto cítrico cortado en mitades en el cono giratorio.
Para apagar, gire el dial nuevamente en sentido contrario a las
agujas del reloj hasta la posición “O” (PARAR).
Consejos y Advertencias
•
•
Para utilizar el accesorio de jugos cítricos deberá seleccionarse
solamente la velocidad BAJA (Posición “1”)
El tiempo máximo de continuidad para esta operación es 30
(treinta) segundos. Esta operación puede ser repetida 10 veces
con pausas de 15 segundos.
OTRO CONSEJO PRÁTICO
•
•
•
NO utilice otros medios para reemplazar el empujador de
comida (Por ejemplo: dedos, tenedores, cuchillos, etc.).
A los efectos de obtener comida fina y uniformemente picada,
corte la comida sólida en trozos pequeños antes de colocarla en
el aparato; en algunos casos (como por ejemplo perejil) lo ideal
es utilizar la función “oprimir” y picar a intervalos y para mezclar
la comida de vez en cuando antes de volver a picarla.
Al cortar la comida en rebanadas, se pueden obtener distintos
grosores variando la fuerza con la que son presionados contra el
disco; NO se debe ejercer excesiva presión en ningún caso.
24
Assembly page 24/28
USK HA 31535 / 33143 - 110127
Fax +32 2 359 95 50
Copies of the I/B. Please reproduce them without any
changes except under special instruction from Team
International BELGIUM. The pages must be reproduced and
folded in order to obtain a booklet A5 (+/- 148.5 mm width x
210 mm height). When folding, make sure you keep the good
numbering when you turn the pages of the I/B. Don’t change
the page numbering. Keep the language integrity. Print only
what is inside the frame.
•
No pique comidas con sus partes duras. El centro de los ananás,
por ejemplo, (cáscaras “de madera”, etc.); en particular, no
pique tipos duros de comidas (hielo, quesos duros, etc.).
CÓMO DESENSAMBLAR
•
•
•
•
Retire el empujador. Gire la tapa o el tamiz de cítricos en sentido
contrario a las agujas del reloj, levante y retire.
Retire el soporte de cuchilla o el soporte de disco del conductor.
Retire la cuchilla / disco y retire del soporte de cuchilla/soporte
de disco. Tenga cuidado, las cuchillas son filosas.
Gire el bol en sentido contrario a las agujas del reloj para
destrabar de la base de motor. Levante y retire.
CÓMO LIMPIAR
•
•
•
•
•
Siempre desenchufe el aparato del tomacorriente antes de
limpiarlo.
Para limpiar el cuerpo del motor, utilice un trapo suave y
ligeramente húmedo; no utilice esponjas de metal ni productos
abrasivos. No lo lave colocándolo debajo del agua (grifo, etc.);
no lo sumerja en el agua; no lo lave en el lavaplatos. Antes de ser
utilizado nuevamente, verifique que esté perfectamente seco,
especialmente las conexiones/ enchufes.
Todos los discos o cuchillas de acero inoxidable, como las piezas
de plástico no mecánicas (exprimidor...) pueden ser lavados en
el lavavajillas o a mano. Para limpiar las cuchillas ralladoras y
rebanadoras, sepárelas del disco con el debido cuidado. Para
lavar la cuchilla de picar, retírela del soporte de cuchilla con el
debido cuidado.
Las piezas transparentes pueden lavarse en el lavavajillas, pero
se recomienda lavarlas a mano para manter durante más
tiempo su acabado.
Verifique que estén perfectamente secos antes de guardarlos o
utilizarlos.
25
Assembly page 25/28
USK HA 31535 / 33143 - 110127
Fax +32 2 359 95 50
Copies of the I/B. Please reproduce them without any
changes except under special instruction from Team
International BELGIUM. The pages must be reproduced and
folded in order to obtain a booklet A5 (+/- 148.5 mm width x
210 mm height). When folding, make sure you keep the good
numbering when you turn the pages of the I/B. Don’t change
the page numbering. Keep the language integrity. Print only
what is inside the frame.
SOLUCIÓN DE PROBLEMAS
Problemas
El aparato no funciona.
El aparato deja de funcionar
repentinamente.
El motor trabaja, mientras que
los componentes no lo hacen.
Algo del líquido se derrama
sobre el mostrador.
Soluciones
Asegúrese de que el aparato
esté conectado, asegúrese de
que el enchufe tenga carga
eléctrica, verifique que el
ensamblado del bol y la tapa
sean correctos; para el buen
asabalado del bol compruebe
que su asa se encuentra bien
posicionada en el lado derecho
sobre el frente de la base.
Probablemente el bol o la tapa
se hayan desensamblado y
desajustado durante un
procesado muy intenso. Por
favor, reajústelos. Prosiga con
un procesado más suave.
Asegúrese de que el conductor
esté instalado correctamente.
Esto ocurre cuando se ha
utilizado demasiado líquido o
alimento. El líquido
desbordado va dirigido hacía
la base vía un tubo, para
proteger el motor de líquidos.
Por favor use una cantidad
menor de líquidos o alimentos.
26
Assembly page 26/28
USK HA 31535 / 33143 - 110127
Fax +32 2 359 95 50
Copies of the I/B. Please reproduce them without any
changes except under special instruction from Team
International BELGIUM. The pages must be reproduced and
folded in order to obtain a booklet A5 (+/- 148.5 mm width x
210 mm height). When folding, make sure you keep the good
numbering when you turn the pages of the I/B. Don’t change
the page numbering. Keep the language integrity. Print only
what is inside the frame.
GARANTÍA
Le sugerimos rellenen y nos envíen rápidamente la Tarjeta de
Registro de Producto adjunta para facilitar la verificación de la
fecha de compra. Por lo tanto, la devolución de esa Tarjeta de
Registro de Producto no es una condición imprescindible para la
aplicación de esa garantía. Puede también rellenar dicha tarjeta de
garantía en línea en la dirección siguiente: www.KALORIK.com
A partir de la fecha de compra, este producto KALORIK está
garantizado un año contra los defectos materiales y de fabricación,
en los Estados Unidos. Esta garantía no es transferible. Conserve la
prueba de compra original. Se exige una prueba de compra para
obtener la aplicación de la garantía.
Durante este período, si el producto KALORIK después de una
inspección por parte de KALORIK, se manifiesta defectuoso, será
reparado o reemplazado, según lo que decida KALORIK, sin gastos
para el consumidor. Si se envía un producto de reemplazo, se
aplicará la garantía que queda del producto original.
Esta garantía no se aplica a los defectos causados por una mala
utilización por parte del comprador o del usuario, o una negligencia
al no respeto del manual de instrucciones KALORIK, o una utilización
en un circuito eléctrico cuyo voltaje es diferente al que figura en el
producto, o un desgaste normal, o modificaciones o reparaciones
no autorizadas por KALORIK, o por un uso con fines comerciales. No
existe garantía por las partes de cristal, jarras de cristal, filtros, cestos,
cuchillas y accesorios en general. No existe tampoco garantía por
las piezas perdidas por el usuario.
Toda garantía de valor comercial o de adaptabilidad a este
producto está limitada a un año también.
Algunos estados no ponen límites a la duración de la garantía tácita
o no autorizan la exclusión de daños y perjuicios accesorios o
indirectos, por lo que puede que las restricciones anteriormente
mencionadas no le sean aplicables a Usted. Esta garantía le otorga
derechos legales particulares, pero usted puede tener también otros
27
Assembly page 27/28
USK HA 31535 / 33143 - 110127
Fax +32 2 359 95 50
Copies of the I/B. Please reproduce them without any
changes except under special instruction from Team
International BELGIUM. The pages must be reproduced and
folded in order to obtain a booklet A5 (+/- 148.5 mm width x
210 mm height). When folding, make sure you keep the good
numbering when you turn the pages of the I/B. Don’t change
the page numbering. Keep the language integrity. Print only
what is inside the frame.
derechos que varían de un estado a otro y algunos derechos
pueden variar de un estado a otro.
Si el aparato tuviera un defecto durante el periodo de garantía y / o
más de 30 días después de que se compró, no devuelva el aparato
en la tienda donde le compró: a menudo, nuestro Servicio al
Consumidor puede ayudar a resolver el problema sin que el
producto tenga que ser reparado. Si hace falta una reparación, uno
de nuestros representantes puede confirmar si el producto está bajo
garantía y dirigirle al servicio post-venta más próximo.
Si fuera el caso, traiga el producto (o envíelo, correctamente
franqueado) con la prueba de compra que mencione el número de
autorización de devolución indicado por nuestro Servicio al
Consumidor, al servicio post-venta KALORIK más próximo. (Visite
nuestra web www.KALORIK.com o llame al Servicio al Consumidor
para obtener la dirección del Servicio post-venta KALORIK exclusivo
más próximo).
Si envía el producto, le rogamos añadan una carta explicando la
naturaleza del defecto.
Si tiene preguntas adicionales, por favor llame al Servicio al
Consumidor (véase abajo para los datos completos), de lunes a
viernes, de las 9 a las 18 (EST). Note que las horas pueden ser
modificadas.
Si quiere escribirnos, puede hacerlo a la dirección siguiente:
KALORIK Servicio al Consumidor
Team International Group of America Inc.
1400 N.W 159th Street, Suite 102
Miami Gardens, FL 33169 USA
O llame gratuitamente (U.S.A.) al +1 888-521-TEAM / +1 888-KALORIK
Las cartas se aceptan solamente en la dirección anteriormente
mencionada. Los envíos y paquetes que no tengan número de
autorización de devolución serán rechazados.
28
Assembly page 28/28
USK HA 31535 / 33143 - 110127