1
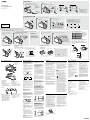
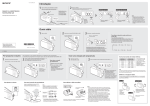
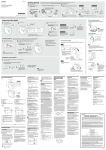
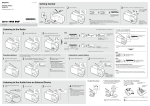
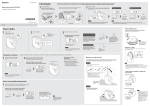
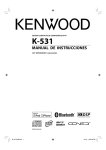
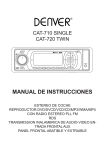
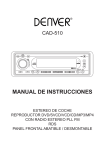
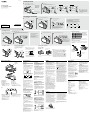
4-527-232-11(1) Getting Started 1 2 Connect the radio to a wall outlet. Connect the AC power cord to the AC IN jack first, then connect it to a wall outlet. FM/SW/MW/LW PLL SYNTHESIZED RADIO Set the clock. “0:00” will flash on the display when the batteries are installed or the AC power cord is plugged in for the first time. Hour setting Minute setting Extend the telescopic antenna when listening to FM and SW stations. Extending the antenna is not necessary when listening to MW/LW stations. Telescopic antenna Operating Instructions GB Manual de instrucciones ES Notes Connect securely. Press and hold SET CLOCK until the hour indication starts flashing. AC power cord (supplied) To a wall outlet To AC IN jack Press + or to set the hour, and then press ENTER. • The clock setting mode will be cancelled after 65 seconds if there is no operation. • The clock setting will reset to the factory default if you remove both the AC power cord and batteries from the unit after you set the clock. Press + or to set the minutes, and then press ENTER. Listening to the Radio 1 2 Turn on the radio. Select the band (FM, SW, MW or LW). 3 Repeatedly pressing the button switches the band. For customers in Europe Register now for free updates at : www.sony-europe.com/myproducts 1 To change the meter band in the SW function Press + or to tune to the desired station. Press SW BAND repeatedly. Each time you press the button, the meter band changes as follows. Once changing the meter band, the unit receives the lowest frequency in the selected meter band and starts tuning from that frequency among the whole SW band. 49 mb 41 mb 31 mb 19 mb 22 mb 25 mb Currently selected band ©2014 Sony Corporation Printed in China When you press and hold the button, the unit changes the tuning mode to scan tuning mode. Scan tuning automatically scans the stations in the frequency range of the current band, receiving tuned signals for 3 seconds for each station. For more details on scan tuning, see “Scan Tuning” under “Convenient functions.” ICF-M780SL Presetting stations Tune to the station you want. Listening to a preset station Preset favourite stations to the 5 preset buttons. You can preset up to 5 stations each for FM, SW, MW and LW bands. 2 Tune to the station you want. Press and hold the desired preset button (1 – 5) until you hear a beep and the preset number appears on the display. 1 To change the preset station Follow steps 1 to 3 in “Listening to the Radio” above. Select the band (FM, SW, MW or LW). 2 About the meter bands Press the desired preset button (1 – 5). Meter band Frequency range (kHz) 49 mb 5,800 6,250 1 Tune to a new station. 2 Press and hold the preset button 41 mb 7,100 7,550 31 mb 9,300 10,000 25 mb 11,500 12,220 you want to change. 22 mb 13,500 13,900 The preset station on the selected button will be replaced by the new one. 19 mb 15,000 15,900 Example: Presetting FM 87.50 to preset number 1. Note Notes • To prevent the preset from being changed by mistake, do not hold the preset button down. • If no station has been preset to the pressed button, “Non” appears and the unit returns to the frequency before the button was pushed. Automatic tuning mode will only be available within the range of the current meter band. When in outside of the range, the tuning mode changes to manual tuning mode. Improving radio reception When radio receptions are poor, receptions will be improved by reorienting or adjusting the length of the antenna (FM and SW), or reorienting the unit itself (MW/LW). For FM To adjust the volume To listen through headphones Connect headphones that have a stereo or monaural mini plug (not supplied). You will hear monaural sound through the headphones. When connecting headphones to the radio, use a headphones cable with a stereo (3-pole) or monaural (2-pole) mini plug. Sound may not be heard when using other types of plugs. Compatible plug types Other types of plugs cannot be used. Guide to parts and controls Press down on the battery compartment cover at and slide it in the direction of the arrow . The serial number is located on the nameplate on the bottom exterior of the unit. Stereo mini plug 2 rings Three LR14 (size C) batteries (not supplied) 3 or more rings * It is recommended that you use the monaural headphones (ø 3.5 mm mini-plug) with this radio. You can also use stereo headphones, but the headphone output will be monaural. Sleep Timer To close the cover, slide it in the direction of the arrow until it clicks into place. Scan Tuning The radio automatically turns off after a set time has elapsed. 1 Press SLEEP. The “SLEEP” indicator starts flashing and the default setting (“90”) appears on the display. If you press SLEEP while the radio is off, the radio turns on automatically. 2 Press SLEEP repeatedly to select the desired setting while the “SLEEP” indicator is flashing. 1 Press FM/SW/MW/LW to select the band, then press and hold + or . The unit starts scanning stations in the frequency of the band. 2 Press ENTER to stop scan tuning when the desired station is received. When scan tuning begins, the unit automatically starts scanning from the previously received frequency and pauses for 3 seconds when a station is received, then the scanning continues. Listen to the 3‑second radio previews and press ENTER when you encounter the desired station. Note Each time you press the button, the duration (in minutes) changes on the display as follows: 90 60 30 15 OFF 3 Press ENTER. The selected setting is confirmed and the “SLEEP” indicator stops flashing. Tips / (power) button VOLUME control* SW BAND button FM/SW/MW/LW button (headphones) jack +, buttons* ENTER/SET CLOCK button (holding down the button enters the clock setting mode.) ON TIMER/SET TIMER button (holding down the button enters the timer setting mode.) SLEEP button Speaker Display Preset buttons* Telescopic antenna AC IN jack Battery compartment cover Carrying handle * The “MAX” position of VOLUME control, the + button and the preset button numbered 3 has a tactile dot. Use the tactile dot as a reference when operating the radio. • If you do not press ENTER within about 3 seconds, the currently selected setting is confirmed automatically. • You can check the time left until the radio turns off by pressing SLEEP again after setting the sleep timer. To cancel the sleep timer You can cancel the sleep timer using either method below: • Set the sleep timer to “OFF.” • Turn off the radio once, and then turn it on again. To change the sleep timer setting Display Press SLEEP repeatedly to select other settings. On Timer For the SW band, if scanning starts from a frequency inside the range of a meter band, scanning is performed only within the current meter band. If scanning starts from a frequency outside the range of a meter band and reaches the following meter band, scanning will continue within that meter band. About Backlight The backlight will turn off if no operation is performed for 15 seconds to minimize power consumption. Tip The backlight will stay on when performing scan tuning. To change the MW tuning interval 1 Press / to turn off the radio. 2 Press and hold the preset button 1 and FM/SW/MW/LW at the same time until you hear a beep. Each time you press and hold the buttons, the MW tuning interval changes cyclically. Changing the tuning interval erases all the MW preset stations stored in the unit. Reset your preset stations after changing the tuning interval. The radio automatically turns on at a preset time. When using the on timer, make sure to tune to the station you want to listen beforehand. Note The MW tuning interval can be changed only when the radio is turned off. Be sure to turn off the radio beforehand. The minute indication flashes on the display. 3 Press + or to set the minutes, and then press ENTER. The “ON TIMER” indicator stops flashing and the on timer function is activated. If the radio is turned on, press / and turn off the radio. Notes As the main plug is used to disconnect the unit from the mains, connect the unit to an easily accessible AC outlet. Should you notice an abnormality in the unit, disconnect the main plug from the AC outlet immediately. Should any problems persist after you have made the following checks, consult your nearest Sony dealer. To reduce the risk of fire, do not cover the ventilation of the apparatus with newspapers, tablecloths, curtains, etc. And do not place lighted candles on the apparatus. To reduce the risk of fire or electric shock, do not expose this apparatus to dripping or splashing, and do not place objects filled with liquids, such as vases, on the apparatus. The unit is not disconnected from the AC power source (mains) as long as it is connected to the wall outlet, even if the unit itself has been turned off. The nameplate and important information concerning safety are located on the bottom exterior. Excessive sound pressure from earphones and headphones can cause hearing loss. Batteries or batteries installed apparatus shall not be exposed to excessive heat such as sunshine, fire or the like. In case of battery leakage If battery fluid has leaked, do not touch the fluid with your bare hands. Battery fluid may remain inside the unit. Consult your nearest Sony dealer. If battery fluid gets into your eyes, do not rub your eyes, as blindness may occur. Quickly wash your eyes with plenty of clean water and immediately seek medical attention. If battery fluid gets onto your body or clothing, burns or injury may occur. Quickly wash off with clean water, and seek medical attention if skin inflammation or injuries occur. This symbol on the product, the battery or on the packaging indicates that the product and the battery shall not be treated as household waste. On certain batteries this symbol might be used in combination with a chemical symbol. The chemical symbols for mercury (Hg) or lead (Pb) are added if the battery contains more than 0.0005% mercury or 0.004% lead. By ensuring these products and batteries are disposed of correctly, you will help prevent potentially negative consequences for the environment and human health which could otherwise be caused by inappropriate waste handling. The recycling of the materials will help to conserve natural resources. In case of products that for safety, performance or data integrity reasons require a permanent connection with an incorporated battery, this battery should be replaced by qualified service staff only. To ensure that the battery and the electrical and electronic equipment will be treated properly, hand over these products at end-of-life to the applicable collection point for the recycling of electrical and electronic equipment. For all other batteries, please view the section on how to remove the battery from the product safely. Hand the battery over to the applicable collection point for the recycling of waste batteries. For more detailed information about recycling of this product or battery, please contact your local Civic Office, your household waste disposal service or the shop where you purchased the product or battery. Display is dim, or no indication is displayed. • The radio is being used in extremely high or low temperatures or in a place with excessive moisture. Very weak or interrupted sound, or unsatisfactory reception. • If you are in a building, listen near a window. • Try improving radio receptions using the following procedures. FM: Extend the telescopic antenna and adjust the length and the angle for best reception. SW: Extend the telescopic antenna vertically. MW/LW: An MW/LW antenna is built in the unit. Reorient the unit itself for best reception. When adjusting for FM or SW reception, adjust the direction of the antenna by holding it at the bottom. The antenna can be damaged if you move the antenna with excessive force. • Replace all the batteries with new ones if they are exhausted. To change the clock display mode 1 Press / to turn off the radio. 2 Press and hold + and the preset button 1 until the clock display mode is changed. Each time you press and hold the buttons, the clock display mode changes from the 24-hour system to the 12-hour system (or vice versa). • Operate the unit only on the power sources specified in “Specifications.” For battery operation, use three LR14 (size C) alkaline batteries. For AC operation, use the supplied AC power cord; do not use any other cord. • Unplug the unit from the wall outlet when it will not be used for an extended period of time. • When operating the unit on batteries, it is recommended that you remove the AC power cord from the wall outlet. • Use the unit within a temperature range of 0°C to 40°C. If it is used in temperatures higher than this range, the display may gradually turn black. If it is used in temperatures lower than this range, the display may change very slowly. (These irregularities will disappear and there will be no damage to the unit when the unit is used in the recommended temperature range again.) • When carrying the radio, grasp the handle at the rear of the unit to prevent the radio from falling. Time display 12-hour system/24-hour system To deactivate the on timer Note The clock display mode can be changed only when the radio is turned off. Be sure to turn off the radio beforehand. • Avoid exposure to temperature extremes, direct sunlight, moisture, sand, dust or mechanical shock. Never leave in a car parked in the sun. • Make sure you have selected the desired band (FM, SW, MW or LW) before you press the preset button. One station for each band can be set to each button. • You may have held down the preset button to which the station was preset, causing the station to be replaced by a new one. Preset the desired station again. The message “Non” appears and the preset button indicator (“PRESET” and the preset number) lights up on the display when a preset button is pressed. • No station has been preset to the corresponding button. Preset a station. Battery life* Frequency range SW 5.8 MHz 15.9 MHz (5 kHz step) * When listening through the speaker on Sony (LR14SG) alkaline batteries. (The actual battery life may vary depending on the unit and operating conditions.) Intermediate frequency FM: 128 kHz SW: 45 kHz MW: 45 kHz LW: 45 kHz 500 mW Output (headphones) jack (ø 3.5 mm mini jack) If you have any questions or problems concerning your unit, please consult your nearest Sony dealer. A desired station cannot be received when a preset button is pressed. Specifications LW 153 kHz 279 kHz (9 kHz step) • Should any solid object or liquid fall into the unit, disconnect the AC power cord and remove the batteries, and have the unit checked by a qualified personnel before operating it any further. • Since a strong magnet is used for the speakers, keep personal credit cards using magnetic coding or spring-wound watches away from the unit to prevent possible damage from the magnetism. • To clean the casing, use a soft dry cloth. Do not use any type of solvent, such as alcohol or benzine, which may damage the finish. • Do not operate the unit with wet hands since doing so may cause a short circuit. • When carrying the unit, grasp the handle at the rear of the unit to prevent the unit from dropping. • Be sure to turn off the radio when not using it. See “Battery life” under “Specifications” for details about the estimated battery life. • When “ ” starts flashing, replace all the batteries with new ones. • If a mobile phone is placed close to the radio, a loud noise may be heard from the radio. Keep the phone away from the radio. MW 531 kHz 1,602 kHz (9 kHz step) 530 kHz 1,610 kHz (10 kHz step) This product has been manufactured by or on behalf of Sony Corporation, 1-7-1 Konan Minato‑ku Tokyo, 108-0075 Japan. Inquiries related to product compliance based on European Union legislation shall be addressed to the authorized representative, Sony Deutschland GmbH, Hedelfinger Strasse 61, 70327 Stuttgart, Germany. For any service or guarantee matters, please refer to the addresses provided in the separate service or guarantee documents. Batteries become exhausted very quickly. There is noise in the speaker output. FM 87.5 MHz 108 MHz (50 kHz step) Notice for customers: the following information is only applicable to equipment sold in countries applying EU directives • The on timer setting mode will be cancelled after 65 seconds if there is no operation. • When the on timer function turns the radio on, the sleep timer is automatically activated and the radio goes off after 90 minutes. Until the radio will go off, the display shows both the on timer and sleep timer indicators. Press ON TIMER (the “ON TIMER” indicator disappears). Repeatedly pressing the button allows you to activate or deactivate the on timer. Once you set and activate the on timer, the radio turns on at the preset time everyday. Disposal of waste batteries and electrical and electronic equipment (applicable in the European Union and other European countries with separate collection systems) Precautions the preset buttons, or when selecting a preset station. Frequency/time/message display area Indicates the currently selected band. radio to be turned on, and then press ENTER. Troubleshooting Do not install the appliance in a confined space, such as a bookcase or built-in cabinet. For SW Extend the telescopic antenna vertically. WARNING The validity of the CE marking is restricted to only those countries where it is legally enforced, mainly in the countries EEA (European Economic Area). Reorient the unit itself to find good reception. (A ferrite bar antenna is built into the unit.) Audio power output Lights up when presetting the stations to 2 Press + or to set the hour for the Extend the telescopic antenna and adjust the length and the angle for good reception. • When the battery power drops to a certain level, the sound may become weak or distorted, and the battery indicator (“ ”) will start flashing on the display. After that, when the batteries become fully exhausted, the status of the indicator will change from “flashing” to “lit-up,” and the power will go off. If this happens, replace all the batteries with new ones. • Be sure to turn off the radio and replace the batteries within 60 seconds. Otherwise, the settings such as for the clock, on timer and preset stations will be initialized. Should this happen, perform the necessary settings again. Note that the battery indicator (“ ”) will remain lit even after the batteries are replaced. The battery indicator disappears when you turn on the radio after battery replacement. • Remove the batteries from the unit if the unit is not to be used for an extended period of time. When using the radio again, perform the necessary settings, such as for the clock, on timer and preset stations. Approx. 10 cm dia., 12 Ω, monaural The “ON TIMER” indicator and the hour indication start flashing on the display. on, or when the unit is in the on timer setting mode. Lights up or flashes when the battery power is low. Replace all the batteries with new ones when this indicator starts flashing. Lights up when the sleep timer is turned on, or when the unit is in the sleep timer setting mode. Notes Speaker 1 Press and hold ON TIMER. Lights up when a station is tuned in. Lights up when the on timer is turned Insert the side of the battery first. Monaural* mini plug 1 ring Convenient functions Unit For MW/LW To use the radio on batteries Note To (headphones) As the SW frequencies are assigned to the meter bands as shown in the table, you can make a quick search for a desired frequency by changing the corresponding meter band. Power requirements 230 V AC, 50 Hz (AC power supply) 4.5 V DC, three LR14 (size C) alkaline batteries Approx. 100 hours (FM reception) Approx. 100 hours (SW reception) Approx. 100 hours (MW reception) Approx. 100 hours (LW reception) Dimensions Approx. 253 mm × 136.3 mm × 61.2 mm (W/H/D) Mass Approx. 860 g (excl. batteries) Approx. 1,060 g (incl. batteries) Supplied accessories AC power cord (1) Design and specifications are subject to change without notice. Preparativos 1 FM/SW/MW/LW PLL SYNTHESIZED RADIO Operating Instructions GB Manual de instrucciones ES 2 Conecte la radio a una toma de corriente de la pared. Conecte el cable de alimentación de ca a la toma AC IN primero, después conéctelo a una toma de corriente de la pared. Extienda la antena telescópica cuando escuche emisoras de FM y SW. Para escuchar emisoras Antena telescópica de MW/LW no es necesario extender la antena. Ajuste el reloj. Cuando instale las pilas o enchufe el cable de alimentación por primera vez, parpadeará “0:00” en el visualizador. Ajuste de los minutos Notas Conecte firmemente. Mantenga pulsado SET CLOCK hasta que empiece a parpadear la indicación de la hora. Cable de alimentación de ca (suministrado) A una toma de corriente de la pared A la toma AC IN Ajuste de la hora Pulse + o para ajustar la hora, y después pulse ENTER. • El modo de ajuste del reloj se cancelará después de 65 segundos si no se realiza ninguna operación. • Si retira el cable de alimentación de ca y las pilas de la unidad después de haber ajustado el reloj el ajuste del reloj se restaurará al predeterminado en fábrica. Pulse + o para ajustar los minutos, y después pulse ENTER. Escucha de la radio 1 2 Encienda la radio. Seleccione la banda (FM, SW, MW o LW). 3 Sintonice la emisora que quiere. La banda cambia pulsando repetidamente el botón. Pulse SW BAND repetidamente. Cada vez que pulse el botón, la banda métrica cambiará de la forma siguiente. Una vez cambiado la banda métrica, la unidad recibirá la frecuencia más baja en la banda métrica seleccionada y comenzará a sintonizar desde esa frecuencia en toda la banda SW. Para clientes en Europa Para conseguir actualizaciones gratis regístrese ahora en: www.sony-europe.com/myproducts 49 mb 41 mb 31 mb 19 mb 22 mb 25 mb Banda seleccionada actualmente Cuando mantenga pulsado el botón, la unidad cambiará el modo de sintonización a modo de sintonización de búsqueda. La sintonización de búsqueda busca automáticamente las emisoras en la gama de frecuencias de la banda actual, recibiendo las señales sintonizadas de cada emisora durante 3 segundos. Para más detalles sobre la sintonización de búsqueda, consulte “Sintonización de búsqueda” en “Funciones convenientes”. ICF-M780SL Presintonización de emisoras 1 Para cambiar la banda métrica en la función SW Pulse + o para sintonizar la emisora deseada. 2 Sintonice la emisora que quiere. Presintonice las emisoras favoritas en los 5 botones de presintonización. Puede presintonizar hasta 5 emisoras de cada una de las bandas FM, SW, MW y LW. Mantenga pulsado el botón de presintonía deseado (1 – 5) hasta que escuche un pitido y el número de presintonía aparezca en visualizador. Para cambiar la emisora presintonizada Siga los pasos 1 al 3 en “Escucha de la radio” de arriba. Escucha de una emisora presintonizada 1 Seleccione la banda (FM, SW, MW o LW). 2 Acerca de las bandas métricas Pulse el botón de presintonía deseado (1 – 5). Banda métrica Gama de frecuencias (kHz) 49 mb 5.800 6.250 41 mb 7.100 7.550 1 Sintonice una emisora nueva. 2 Mantenga pulsado el botón de presintonía que quiere cambiar. La emisora presintonizada en el botón seleccionado será reemplazada con la nueva. Ejemplo: Presintonización de FM 87,50 en el número de presintonía 1. Notas • Para evitar que la presintonía sea cambiada por error, no mantenga pulsado el botón de presintonía. • Si en el botón pulsado no hay presintonizada una emisora, aparecerá “Non” y la unidad volverá a la frecuencia de antes de pulsar el botón. 31 mb 9.300 10.000 25 mb 11.500 12.220 22 mb 13.500 13.900 19 mb 15.000 15.900 Nota El modo de sintonización automática estará disponible solamente dentro de la gama de la banda métrica actual. Cuando se encuentre fuera de la gama, el modo de sintonización cambiará a modo de sintonización manual. Para mejorar la recepción de la radio Cuando la recepción de la radio no sea buena, podrá mejorarla reorientando o ajustando la longitud de la antena (FM y SW), o reorientando la propia unidad (MW/LW). Para FM Para ajustar el volumen Para escuchar a través de auriculares Para utilizar la radio a pilas Nota Conecte unos auriculares que tengan miniclavija Cuando conecte auriculares a la radio, utilice un cable estéreo o monofónica (no suministrados). A través de los auriculares oirá sonido monofónico. de auriculares que tenga una miniclavija estéreo Presione hacia abajo la tapa del compartimiento de las pilas en y deslícela en la dirección de la flecha . (3 polos) o monofónica (2 polos). Es posible que cuando utilice otros tipos de clavijas no se escuche sonido. Tipos de clavija compatibles No se pueden utilizar otros tipos de clavijas. Inserte el lado de la pila primero. Miniclavija estéreo 2 anillos Tres pilas LR14 (tamaño C) (no suministradas) 3 o más anillos * Se recomienda que utilice auriculares monofónicos (miniclavija de ø 3,5 mm) con esta radio. También puede utilizar auriculares estéreo, pero el sonido emitido por los auriculares será monofónico. Para MW/LW Notas Miniclavija monofónica* 1 anillo Como las frecuencias de SW se asignan a las bandas métricas como se muestra en la tabla, usted puede hacer una busca rápida de una frecuencia deseada cambiando la banda métrica correspondiente. Para cerrar la tapa, deslícela en la dirección de la flecha hasta que encaje en su sitio con un chasquido. • Cuando la potencia de las pilas caiga a un cierto nivel, el sonido podrá debilitarse o distorsionarse, y el indicador de pilas (“ ”) comenzará a parpadear en el visualizador. A continuación, cuando las pilas se agoten completamente, el estado del indicador cambiará de “parpadeando” a “encendido”, y se desconectará la alimentación. Si ocurre esto, reemplace todas las pilas con otras nuevas. • Asegúrese de apagar la radio y reemplace las pilas en 60 segundos. De lo contrario, los ajustes tales como para el reloj, el temporizador de encendido y las emisoras presintonizadas se inicializarán. Si ocurre esto, realice los ajustes necesarios otra vez. Tenga en cuenta que el indicador de pilas (“ ”) permanecerá encendido aun después de haber reemplazado las pilas. El indicador de pilas desaparecerá cuando encienda la radio después de reemplazar las pilas. • Retire las pilas de la unidad si la unidad no va a ser utilizada durante un periodo de tiempo prolongado. Cuando utilice la radio otra vez, realice los ajustes necesarios, tales como para el reloj, el temporizador de encendido y las emisoras presintonizadas. Reoriente la propia unidad para encontrar una buena recepción. (La unidad lleva incorporada una antena de barra de ferrita.) Extienda la antena telescópica y ajuste la longitud y el ángulo para obtener una buena recepción. Para SW Extienda la antena telescópica verticalmente. A (auriculares) Guía de las partes y controles Funciones convenientes Unidad El número de serie está ubicado en la placa de características de la parte inferior exterior de la unidad. Temporizador de dormir La radio se apaga automáticamente después de haber transcurrido un tiempo programado. El indicador “SLEEP” comienza a parpadear y el ajuste predeterminado (“90”) aparece en el visualizador. Si pulsa SLEEP mientras la radio está apagada, la radio se encenderá automáticamente. 2 Pulse SLEEP repetidamente para seleccionar el ajuste deseado mientras el indicador “SLEEP” está parpadeando. Cada vez que pulse el botón, el tiempo (en minutos) cambiará en el visualizador de la forma siguiente: 60 30 15 OFF 3 Pulse ENTER. Botón / (alimentación) Control VOLUME* Botón SW BAND Botón FM/SW/MW/LW Toma (auriculares) Botones +, * Botón ENTER/SET CLOCK (manteniendo pulsado el botón se entra en el modo de ajuste del reloj.) Botón ON TIMER/SET TIMER (manteniendo pulsado el botón se entra en el modo de ajuste del temporizador.) Botón SLEEP Altavoz Visualizador Botones de presintonía* Antena telescópica Toma AC IN Tapa del compartimiento de las pilas Asa de transporte * La posición “MAX” del control VOLUME, el botón + y el botón de presintonía número 3 tienen un punto táctil. Utilice el punto táctil como referencia cuando realice operaciones en la radio. Se confirma el ajuste seleccionado y el indicador “SLEEP” deja de parpadear. Observaciones • Si no pulsa ENTER dentro de unos 3 segundos, el ajuste seleccionado actualmente será confirmado automáticamente. • Puede comprobar el tiempo que falta hasta que la radio se apague pulsando SLEEP otra vez después de ajustar el temporizador de dormir. Para cancelar el temporizador de dormir Puede cancelar el temporizador de dormir utilizando cualquiera de los métodos de abajo: • Ajuste el temporizador de dormir a “OFF”. • Apague la radio una vez, y después enciéndala otra vez. Visualizador Para cambiar el ajuste del temporizador de dormir Pulse SLEEP repetidamente para seleccionar otros ajustes. Temporizador de encendido Se ilumina cuando hay sintonizada una Se ilumina cuando se presintonizan emisora. Se ilumina cuando el temporizador de encendido está activado, o cuando la unidad está en el modo de ajuste del temporizador de encendido. Se ilumina o parpadea cuando las pilas tienen poca potencia. Reemplace todas las pilas con otras nuevas cuando este indicador comience a parpadear. Se ilumina cuando el temporizador de dormir está activado, o cuando la unidad está en el modo de ajuste del temporizador de dormir. emisoras en los botones de presintonía o cuando se selecciona una emisora presintonizada. Área de visualización de la frecuencia/ hora/mensajes Indica la banda seleccionada actualmente. Una vez que ajuste y active el temporizador de encendido, la radio se encenderá todos los días a la hora programada. Sintonización de búsqueda 1 Pulse SLEEP. 90 ADVERTENCIA La radio se encenderá automáticamente a la hora programada. Cuando utilice el temporizador de encendido, asegúrese de sintonizar previamente la emisora que quiere escuchar. 1 Pulse FM/SW/MW/LW para seleccionar la banda, después mantenga pulsado + o . La unidad comenzará a buscar emisoras en la frecuencia de la banda. 2 Pulse ENTER para detener la sintonización de búsqueda cuando haya recibido la emisora deseada. Cuando comienza la sintonización de búsqueda, la unidad empieza a buscar desde la frecuencia recibida anteriormente y hace una pausa de 3 segundos cuando recibe una emisora, después continúa la búsqueda. Escuche las presentaciones de 3 segundos de la radio y pulse ENTER cuando encuentre la emisora deseada. Nota Para la banda SW, si la búsqueda comienza desde una frecuencia dentro de la gama de una banda métrica, la búsqueda se realizará solamente dentro de la banda métrica actual. Si la búsqueda comienza desde una frecuencia fuera de la gama de una banda métrica y alcanza la banda métrica siguiente, la búsqueda continuará dentro de esa banda métrica. Acerca de la luz de fondo La luz de fondo se apagará si no se realiza ninguna operación durante 15 segundos para minimizar el consumo de energía. Observación La luz de fondo permanecerá encendida cuando esté realizando sintonización de búsqueda. Para cambiar el intervalo de sintonización de MW Cada vez que mantenga pulsados los botones, el intervalo de sintonización de MW cambiará cíclicamente. Al cambiar el intervalo de sintonización se borran todas las emisoras MW presintonizadas almacenadas en la unidad. Restaure las emisoras presintonizadas después de cambiar el intervalo de sintonización. Nota La indicación de los minutos parpadea en el visualizador. 3 Pulse + o para ajustar los minutos, y después pulse ENTER. El indicador “ON TIMER” deja de parpadear y se activa la función de temporizador de encendido. Si la radio está encendida, pulse / y apague la radio. Notas • El modo de ajuste del temporizador de encendido se cancelará después de 65 segundos si no se realiza ninguna operación. • Cuando la función de temporizador enciende la radio, el temporizador de dormir se activa automáticamente y la radio se apaga después de 90 minutos. Hasta que la radio se apaga, el visualizador muestra los indicadores del temporizador de encendido y del temporizador de dormir. Para desactivar el temporizador de encendido Pulse ON TIMER (el indicador “ON TIMER” desaparece). Pulsando repetidamente el botón puede activar o desactivar el temporizador de encendido. Para reducir el riesgo de un incendio, no cubra los orificios de ventilación del aparato con periódicos, manteles, cortinas, etc. Y no ponga velas encendidas encima del aparato. Para reducir el riesgo de que se produzca una descarga eléctrica, no exponga este aparato a goteo o salpicaduras, y no ponga objetos llenos de líquido, tales como jarrones, encima del aparato. La unidad no estará desconectada de la fuente de alimentación de ca (toma de corriente) mientras esté conectada a la toma de pared, aunque esté apagada. La placa de características y otra información importante relacionada con la seguridad están ubicadas en la parte inferior exterior. Una excesiva presión de sonido de los auriculares y los cascos podrá ocasionar una pérdida auditiva. Las pilas y los aparatos con pilas instaladas no deberán ser expuestos a un calor excesivo tal como al sol, fuego o por el estilo. En caso de fuga Si se ha fugado líquido de las pilas, no lo toque con las manos desprotegidas. El líquido de las pilas podría quedarse dentro de la unidad. Consulte con el distribuidor Sony más cercano. Si entra líquido de las pilas en sus ojos, no se frote los ojos, porque podrá ocasionar ceguera. Lávese los ojos rápidamente con abundante agua limpia y solicite atención médica inmediatamente. Si líquido de las pilas entra en contacto con su cuerpo o ropas, podrá producirle quemaduras o heridas. En caso de lesiones o inflamación en la piel, enjuáguese rápidamente con agua limpia y solicite atención médica. presintonía 1 y FM/SW/MW/LW al mismo tiempo hasta que escuche un pitido. El indicador “ON TIMER” y la indicación de la hora comienzan a parpadear en el visualizador. que quiere que la radio se encienda, y después pulse ENTER. No instale la unidad en un lugar de espacio reducido, tal como en una estantería para libros o vitrina empotrada. 1 Pulse / para apagar la radio. 2 Mantenga pulsados el botón de 1 Mantenga pulsado ON TIMER. 2 Pulse + o para ajustar la hora a la Como para desconectar la unidad de la red eléctrica se utiliza la clavija principal, conecte la unidad a una toma de corriente de ca fácilmente accesible. Si nota alguna anormalidad en la unidad, desconecte la clavija principal de la toma de corriente de ca inmediatamente. El intervalo de sintonización de MW puede ser cambiado solamente cuando la radio está apagada. Asegúrese de apagar la radio previamente. Para cambiar el modo de visualización del reloj 1 Pulse / para apagar la radio. 2 Mantenga pulsados + y el botón de presintonía 1 hasta que el modo de visualización del reloj sea cambiado. Cada vez que mantenga pulsados los botones, el modo de visualización del reloj cambiará del sistema de 24 horas al sistema de 12 horas (o viceversa). Nota El modo de visualización del reloj puede ser cambiado solamente cuando la radio está apagada. Asegúrese de apagar la radio previamente. Solución de problemas Aviso para clientes: la información siguiente es aplicable solamente para equipos vendidos en países en los que se aplican las directivas de la UE. Este producto ha sido fabricado por, o en nombre de Sony Corporation, 1-7-1 Konan Minato-ku Tokyo, 108-0075 Japón. Las consultas relacionadas con la conformidad del producto basadas en la legislación de la Unión Europea deben dirigirse al representante autorizado, Sony Deutschland GmbH, Hedelfinger Strasse 61, 70327 Stuttgart, Alemania. Para cualquier asunto relacionado con el servicio o la garantía, por favor diríjase a la dirección indicada en los documentos de servicio o garantía adjuntados con el producto. Si después de haber hecho las comprobaciones siguientes persistiera algún problema, consulte con el distribuidor Sony más cercano. La visualización es débil, o no se visualiza ninguna indicación. • La radio está siendo utilizada a una temperatura extremadamente alta o baja o en un lugar con excesiva humedad. Sonido muy débil o interrumpido, o recepción no satisfactoria. • Si se encuentra en un edificio, escuche cerca de una ventana. • Intente mejorar la recepción de la radio utilizando los procedimientos siguientes. FM: Extienda la antena telescópica y ajuste la longitud y el ángulo para obtener la mejor recepción. SW: Extienda la antena telescópica verticalmente. MW/LW: La unidad lleva incorporada una antena de MW/LW. Reoriente la propia unidad para obtener la mejor recepción. La validez de la marca CE está limitada a aquellos países en los que la legislación la impone, principalmente los países de EEE (Espacio económico europeo). Tratamiento de las baterías y equipos eléctricos y electrónicos al final de su vida útil (aplicable en la Unión Europea y en países europeos con sistemas de tratamiento selectivo de residuos) Este símbolo en el producto, en la batería o en el embalaje indica que el producto y la batería no pueden ser tratados como un residuo doméstico normal. En algunas baterías este símbolo puede utilizarse en combinación con un símbolo químico. El símbolo químico del mercurio (Hg) o del plomo (Pb) se añadirá si la batería contiene más del 0,0005% de mercurio o del 0,004% de plomo., Al asegurarse de que estos productos y baterías se desechan correctamente, usted ayuda a prevenir las consecuencias potencialmente negativas para el medio ambiente y la salud humana que podrían derivarse de la incorrecta manipulación. El reciclaje de materiales ayuda a conservar los recursos naturales. En el caso de productos que por razones de seguridad, rendimiento o mantenimiento de datos sea necesaria una conexión permanente con la batería incorporada, esta batería solo deberá ser reemplazada por personal técnico cualificado para ello. Para asegurarse de que la batería será tratada correctamente, entregue estos productos al final de su vida útil en un punto de recogida para el reciclado de aparatos eléctricos y electrónicos. Para las demás baterías, consulte la sección donde se indica cómo extraer la batería del producto de forma segura. Deposite la batería en el correspondiente punto de recogida para el reciclado de baterías. Para recibir información detallada sobre el reciclaje de este producto o de la batería, póngase en contacto con el ayuntamiento, el punto de recogida más cercano o el establecimiento donde ha adquirido el producto o la batería. Cuando ajuste para la recepción de FM o SW, ajuste la dirección de la antena sujetándola por la parte inferior. La antena se podrá dañar si la mueve con fuerza excesiva. • Reemplace las pilas con otras nuevas cuando se agoten. Visualización de la hora Sistema de 12 horas/sistema de 24 horas • Evite la exposición a temperaturas extremas, luz solar directa, humedad, arena, polvo o golpes mecánicos. No deje nunca la unidad dentro de un automóvil aparcado al sol. No se puede recibir una emisora deseada cuando se pulsa un botón de presintonía. • Asegúrese de que ha seleccionado la banda deseada (FM, SW, MW o LW) antes de pulsar el botón de presintonía. En cada botón se puede presintonizar una emisora de una banda. • Es posible que haya mantenido pulsado el botón de presintonía en el que fue presintonizada la emisora, ocasionando que la emisora haya sido reemplazada con otra nueva. Presintonice la emisora deseada otra vez. Aparece el mensaje “Non” y el indicador del botón de presintonía (“PRESET” y el número de presintonía) se ilumina en el visualizador cuando se pulsa un botón de presintonía. • No ha sido presintonizada una emisora en el botón correspondiente. Presintonice una emisora. Duración de las pilas* SW 5,8 MHz 15,9 MHz (en pasos de 5 kHz) * Cuando se escucha a través del altavoz con pilas alcalinas (LR14SG) de Sony. (La duración real de las pilas podrá variar dependiendo de la unidad y de las condiciones de utilización.) FM 87,5 MHz 108 MHz (en pasos de 50 kHz) MW 531 kHz 1.602 kHz (en pasos de 9 kHz) 530 kHz 1.610 kHz (en pasos de 10 kHz) LW 153 kHz 279 kHz (en pasos de 9 kHz) Frecuencia intermedia FM: 128 kHz SW: 45 kHz MW: 45 kHz LW: 45 kHz Altavoz Aprox. 10 cm diá. 12 Ω, monofónico Salida de potencia de audio 500 mW 230 V ca, 50 Hz (suministro de alimentación de ca) 4,5 V cc, tres pilas alcalinas LR14 (tamaño C) Si tiene alguna pregunta o problema relacionado con su unidad, le rogamos que consulte con el distribuidor de Sony más cercano. • Asegúrese de apagar la radio cuando no la esté utilizando. Consulte “Duración de las pilas” en “Especificaciones” para ver detalles sobre la duración estimada de las pilas. • Cuando “ ” comience a parpadear, reemplace todas las pilas con otras nuevas. Requisitos de alimentación • Si cae dentro de la unidad algún objeto sólido o líquido, desconecte el cable de alimentación de ca y retire las pilas, y deje que personal cualificado compruebe la unidad antes de volver a utilizarla. • Dado que para los altavoces se utiliza un imán fuerte, mantenga las tarjetas de crédito personales que utilicen codificación magnética y los relojes de cuerda alejados de la unidad para evitar posibles daños causados por el magnetismo. • Para limpiar la caja, utilice un paño suave y seco. No utilice ningún tipo de disolvente, tal como alcohol o bencina, que pueden dañar el acabado. • No utilice la unidad con las manos mojadas porque si lo hace podrá ocasionar un cortocircuito. • Cuando transporte la unidad, agárrela por el asa de la parte posterior de la unidad para evitar que la unidad se caiga. Las pilas se agotan muy rápidamente. Gama de frecuencia Toma (auriculares) (miniclavija de ø 3,5 mm) • Utilice la unidad solamente con las fuentes de alimentación especificadas en “Especificaciones”. Para usar la radio a pilas, utilice tres pilas alcalinas LR14 (tamaño C). Para utilización con ca, utilice el cable de alimentación de ca suministrado; no utilice ningún otro cable. • Desenchufe la unidad de la toma de corriente de la pared cuando no vaya a utilizarla durante un periodo de tiempo prolongado. • Cuando utilice la unidad a pilas, se recomienda que retire el cable de alimentación de ca de la toma de corriente de la pared. • Utilice la unidad dentro de una gama de temperatura de 0°C a 40°C. Si es utilizada a temperaturas más altas que esta gama, es posible que el visualizador se vuelva oscuro gradualmente. Si es utilizada a temperaturas más bajas que esta gama, la visualización podrá cambiar muy lentamente. (Estas irregularidades desaparecerán sin producir daño alguno a la unidad cuando la unidad vuelva a ser utilizada dentro de la gama de temperatura recomendada.) • Cuando transporte la radio, agárrela por el asa de la parte posterior de la unidad para evitar que la radio se caiga. • Si pone un teléfono móvil cerca de la radio, es posible que se escuche un ruido fuerte procedente de la radio. Mantenga el teléfono alejado de la radio. Especificaciones Salida Precauciones Hay ruido en la emisión del altavoz. Aprox. 100 horas (recepción FM) Aprox. 100 horas (recepción SW) Aprox. 100 horas (recepción MW) Aprox. 100 horas (recepción LW) Dimensiones Aprox. 253 mm × 136,3 mm × 61,2 mm (An/Al/Pr) Peso Aprox. 860 g (excl. las pilas) Aprox. 1.060 g (incl. las pilas) Accesorios suministrados Cable de alimentación de ca (1) El diseño y las especificaciones están sujetos a cambio sin aviso.