1
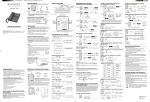
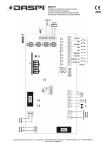
After firmly mounting PRIVÉ on your desired location, using service door key, open front service door and find the battery compartment in top left corner. Open battery chamber lid, LQVHUW´'µFHOOEDWWHULHVDQGFORVHWKHEDWWHU\FKDPEHUFRYHU As you insert the batteries, lid will automatically open and close for the first time.(If the lid doesn’t respond, make sure the power button is on.) Test sensor operation by placing hand over the sensor ZLQGRZIRUDXWRPDWLFOLGRSHUDWLRQ:KHQHYHU\WKLQJ functions correctly, close the front service door. Now your PRIVÉ is ready to serve. :LWKQRUPDORSHUDWLRQ´'µFHOOEDWWHULHVZLOOUXQ PRIVÉ for up to 1 year. :KHQEDWWHU\SRZHULVORZDUHGLQGLFDWRUOLJKWZLOOEH shown on sensor window. Sanitary Nakin Disposal System Sistema de Eliminación de Servilletas Sanitarias Después de instalar firmemente PRIVÉ en el lugar deseado, utilizando la llave de la puerta de servicio, abra la puerta de servicio delantera y localice el compartimiento// para las baterías en la esquina superior izquierda. Abra la tapa del compartimiento para las baterías, inserte 2 baterías ´'µ\FLHUUHQXHYDPHQWHHOFRPSDUWLPLHQWR Al insertar las baterías, la tapa se abrirá y se cerrará automáticamente por primera vez. (Si la tapa no responde, asegúrese que el botón de encendido esté activado) Pruebe el funcionamiento del sensor colocando la mano sobre la ventana del sensor para el funcionamiento automático de la tapa. Cuando todo funcione correctamente, cierre la puerta de servicio delantera. Ahora su PRIVÉ está listo para servicio. &RQXQDRSHUDFLyQQRUPDOEDWHUtDV´'µKDUiQIXQFLRQDU35,9eKDVWDSRUDxR *Cuando la batería está baja, una luz indicadora de color rojo aparecerá en la ventana del sensor. INSTRUCTION MANUAL MANUAL DE INSTRUCCIONES 3OHDVHDWWDFK8VHU1RWLFH/DEHO on the wall above PRIVÉ. Por favor coloque la Etiqueta de Aviso al 8VXDULRHQODSDUHGHQFLPDGH35,9e For further assistance, please contact our Customer Service at 800-856-0332. Para asistencia adicional, por favor contacte a nuestro Servicio al Cliente en el 800-856-0332. 0RGHO 8QLW'LPHQVLRQ :HLJKW 0DWHULDO &RORU 35,9É (model# MPV10A) µ[[µ /EV $%6 *UD\*ULV JANIBELL Ontario, California USA www.janibell.com ©Janibell ©Janibell t Contents / Contenido tInstallation / Instalación PRIVÉ has 2 mounting options: First, using VHB tape attached on the back side of the unit. Simply peel off the protective cover off the tape and mount PRIVÉ on the cleaned, dry surface. VHB tape is a semi-permanent & very stong adhesive.Please consider the location carefully before mounting. Service Key Set “D” Cell Batteries (2) / Juego de llaves de servicio / “D” Baterías (2) PRIVÉ Touch-Free Disposal. PLEASE DO NOT FLUSH NAPKINS OR TAMPONS. PRIVÉ tiene 2 opciones de montaje: En primer lugar, con una cinta de montaje adhesiva incluida en la parte trasera de la unidad. Simplemente retire la cubierta protectora de la cinta e instale PRIVÉ en una superficie limpia y seca. La cinta de montaje adhesiva es un adhesivo semi-permanente y muy fuerte. Por favor considere la ubicación cuidadosamente antes de instalar. Please place hand over sensor window. Lid will open & close automatically. If Red Light is blinking, please notify facility manager for battery replacement. Facility management can be reached at ( UNIT NO. ___________________ Mounting Screws (3) PRIVÉ / Tornillos de montaje (3) ) © JANIBELL Mounting Tape User Notice Label / Cinta de Montaje / Etíqueta de Aviso al Usuario * PRIVÉ comes with a free liner (pre-installed) for immediate use. * PRIVÉ viene con una bolsa gratis (pre-instalada) para su uso inmediato. tSpecifications / Especificaciones IR Sensor Window / Ventana del sensor infrarroio Lid / Tapa Second oprion is to use the included mounting screws. Open front service door and take out refill cartridge. You will see 3 screw holes on the back panel. Mount PRIVÉ using mounting screws. Insert refill cartridge back into PRIVÉ and close front door. Battery Compartment / Compartimiento para batería Service Door / Puerta de servicio La segunda opción es utilizar los tornillos de montaje incluidos. Abra la puerta de servicio delantera y saque el cartucho de recarga. Verá tres agujeros para los tornillos en el panel posterior. Instale PRIVÉ con los tornillos de montaje. Inserte de nuevo el cartucho de recarga en PRIVÉ y cierre la puerta. Manual Button / Butón mañual 1 Remove Refill Cartridge Power Switch / Remueva el cartucho de recarga / Interruptor de encendido Continuous Liner / Bolsa Continua 2 Safety Cutter / Cortador de Seguridad Mount PRIVÉ using mounting screw. / Instale PRIVÉ utilizando los tornillos de montaje 3 Insert refill cartridge back into PRIVÉ / Inserte el cartucho de recarga nuevamente en el PRIVÉ