1
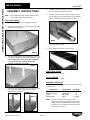
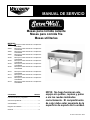
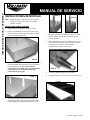
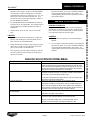
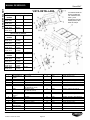
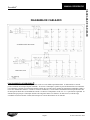
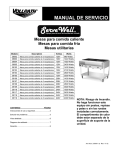
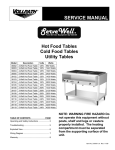
SERVICE MANUAL Hot Food Tables Cold Food Tables Utility Tables MODELS: 38002 2-Well Hot Food Table 38003 3-Well Hot Food Table 38004 4-Well Hot Food Table 38005 5-Well Hot Food Table 38102 2-Well Hot Food Table 38103 3-Well Hot Food Table 38104 4-Well Hot Food Table 38105 5-Well Hot Food Table 38116 2-Well Hot Food Table 38117 3-Well Hot Food Table 38118 4-Well Hot Food Table 38119 5-Well Hot Food Table TABLE OF CONTENTS 120V/960W 120V/1440W 120V/1920W 120V/2400W 120V/1400W 120V/2100W 120V/2800W 120V/3500W 240V/1600W 240V/2400W 240V/3200W 240V/4000W PAGE Operating and Safety Instructions ..................... 2 Troubleshooting ................................................. 5 Exploded View ................................................... 6 Wiring Diagram .................................................. 7 Warranty ............................................................ 8 NOTE: Do not operate this equipment without posts, shelf and legs or casters properly installed. The heating compartment must be separated from the supporting surface of the unit. Item No. 21609 Rev. 0905 ServeWell® OPERATING AND SAFETY INSTRUCTIONS SERVICE MANUAL 5. Attach the bottom shelf using 8 screws. Remember to face top of shelf toward bottom of base. 6. Assemble each of the four stationary peg legs to the four triangular peg leg mounting plates using locknuts. Nuts are permanently attached inside the plates. ASSEMBLY INSTRUCTIONS Note: Place cardboard or drop cloth on floor to protect work surface of unit during assembly. HOT FOOD TABLES 1. Remove all components from shipping container. 2. Place base assembly on floor with well openings down and bottom pan facing up. Step 6 7. Lift unit and place on legs. 8. Place cutting board on top of work surface Step 8 Step 2 3. Assemble drain shut-off faucets to tailpiece below each well. These should be hand tightened until snug. Do not use Teflon tape or any tools when assembling. Use of tools will cause cracking of the drain assembly resulting in water leaks. Step 3 . COLD FOOD TABLES Follow steps 1, 2, 4, 5, 6 and 7. UTILITY TABLES Follow steps 1, 2, 4, 5, 6 and 7. ASSEMBLY PARTS LIST Each Vollrath ServeWell® unit is packed with the following assembly parts: 4. Attach four legs to base using 16 screws (4 screws per leg). The nuts for these screws are permanently attached inside the base. Description Legs Stationary Peg Legs Screws Shut-off Faucet Step 4 Step 5 Note: Item No. 21609 Rev. 0905 Page 2 Part Number 28702-2516 23433-1058 26570-1058 23424 Quantity 4 4 32 1 per well Each ServeWell® unit will also have the appropriate bottom shelf included. Poly cutting boards will be packed with the hot food servers. Hot well servers will have only one drain faucet (#23424) for each well. ServeWell® SERVICE MANUAL WARNING ® ELECTRICAL SHOCK HAZARD Keep water level at or below the required level. If level is too high, water may overflow when the food container is inserted. The overflow could enter the electrical compartment and cause a short circuit or electric shock. Thank you for purchasing this Vollrath ServeWell food warmer. Before operating this unit, read and familiarize yourself with the following operating and safety instructions. SAVE THESE INSTRUCTIONS FOR FUTURE REFERENCE. WARNING Electric shock, fire or burn injuries can occur if this equipment is not used properly. To reduce risk of injury: Plug only into grounded electrical outlets matching the nameplate rated voltage. Unit should only be used in flat, level position. Unplug hot units and let cool before cleaning or moving. Do not spray controls or outside of unit with liquids or cleaning agents. Handle hot water carefully. Do not operate unattended. IMPORTANT: Do not operate this equipment without posts, shelf and legs or casters properly installed. The heating compartment must be separated from the supporting surface of the unit. FUNCTION AND PURPOSE This unit is intended to hold containers of hot food at proper serving temperature. This unit is not designed or intended to cook raw food or reheat prepared food. OPERATION Place the food warmer unit on a flat, stable surface. 2. Fill each well with the following amount of water: Model 38002, 38003, 38004, 38005 (480 Watt/well) All other models Plug power cord into electrical outlet with nameplate rated voltage. 4. Preheat the water in wells by covering wells with empty food containers or covers, and then setting the heat control to the maximum heat setting. Preheat times: Model 38002, 38003, 38004, 38005 All other models IMPORTANT: Do not operate this unit without water in wells. 1. 3. Preheat Time 60 minutes 45 minutes 5. Place containers of hot food into the preheated food warmer wells. To prevent spills, do not overfill the food containers. 6. Set heat control to maintain safe food holding temperature. Monitor food temperatures closely for food safety. (See food safety note.) FOOD SAFETY PRECAUTIONARY NOTE Monitor food temperatures closely for food safety. The United States Public Health Service recommends that hot food be held at a minimum of 140° F (60° C) to help prevent bacteria growth. Maintain water level at approximately 3/8” from bottom of well. Periodically (approx. 2 hours) remove container of food and check the water level. Add hot water if needed. WARNING Amount of Water 2 Quarts ONLY BURN HAZARD Hot water and steam in the well can burn skin. Use protective gloves, mitts or potholders when removing food containers or covers. Hot food can also cause burns. Handle hot food carefully 4 Quarts The water level mark inside the wells is at approximately 4 Quarts. Do not overfill wells. Do not operate wells without water. Page 3 Item No. 21609 Rev. 0905 OPERATING AND SAFETY INSTRRUCTIONS HOT FOOD TABLES ServeWell® OPERATING AND SAFETY INSTRUCTIONS SERVICE MANUAL NON-REFRIGERATED COLD FOOD TABLES CLEANING To maintain appearance and increase the service life, the food warmer should be cleaned at least daily. FUNCTION AND PURPOSE This non-refrigerated cold food table is intended to be used with ice and hold containers of cold food. It is not designed to lower the temperature of raw or prepared food product. 1. Before cleaning or moving, unplug the unit and let it cool completely. 2. Carefully drain water from wells. 3. Wipe the entire interior of each water pan and well with clean, damp cloth. 4. To avoid damaging the finish, do not use abrasive materials, scratching cleaners or scouring pads to clean water deposits from the wells. 5. Note: The ability to maintain holding temperatures of 40°F or below is influenced by factors that include ambient air temperature, amount of ice, and length of time the food product is held. OPERATION 1. If soap or chemical cleaners are used, be sure they are completely rinsed away with clear water, immediately after cleansing. Chemical residue could corrode the surface of the unit. Partially fill the well with crushed, shaved or cube ice. Position food containers in the well and complete filling the well with ice. Food product should not extend above the level of the ice. If it does, the top layer of the food product will warm rapidly and exceed maximum holding temperature. WARNING WARNING ELECTRICAL SHOCK HAZARD Do not spray water or cleaning product. Liquid could enter the electrical compartment and cause a short circuit or electric shock. HEALTH HAZARD Ice used to hold product is designated as used in a food contact zone. It is subject to food spills and contamination and MUST NOT be used for human consumption. REPAIR There are no user serviceable parts within this appliance. To avoid serious injury or damage, never attempt to repair the food warmer or replace a damaged power cord yourself. 2. Monitor the food temperature frequently for food safety. The United States Public Heath Service recommends that potentially hazardous food be held at 41° F (5° C) or below to help prevent bacteria growth. If safe temperature levels are exceeded, replace the food product with properly chilled food. 3. The recommended maximum depth food pan or container is four inches. This will allow ice to be placed below the pan to aid temperature maintenance. 4. Add ice as needed. Drain excess water. Contact a competent professional repair service. WARNING ELECTRICAL SHOCK HAZARD Do not use this equipment if any well has been removed. Contact with any metal part could cause an electrical shock resulting in severe injury or death. Item No. 21609 Rev. 0905 CLEANING Page 4 1. Remove all food product containers from well. Remove any food product that has been spilled on the ice. Discard spilled food product. 2. Place a bucket under the drain and allow the water to flow into the container. Warm water may be poured over the ice to shorten melting time. 3. Wipe interior of well and all surface areas to remove remaining water and food spills. 4. If soap or chemical cleaners are used to clean the metal surfaces, be sure they are completely rinsed away with a clean damp cloth or sponge. Chemical residue may corrode the surface of the cold food table. SERVICE MANUAL UTILITY TABLES FUNCTION AND PURPOSE This utility table is intended to hold non-perishable food products or supplies. It is NOT to be used for the holding or serving of food items that require temperature maintenance for safe consumption. CLEANING 1. Wipe all surfaces with a clean, damp cloth. 2. If soap or chemical cleaners are used to clean the metal surfaces, be sure they are completely rinsed away with a clean damp cloth or sponge. Chemical residue may corrode the surface of the utility table. TROUBLESHOOTING GUIDE Symptom One well does not get as hot as all the others. Elements burn out after a short time. Probable Cause Thermostats could be out of calibration. To test, when the unit is cold, turn the thermostat from the off position slowly to full on. You should hear a “click” at about the second or third position. If the click is heard much later, the thermostats are out of calibration and must be replaced. Knocking the thermostats can cause them to be thrown out of calibration. Check voltage. 208V units are not designed to operate on 240V. Check the power supply. Operators often plug 120V 5-30 and 5-50 plugs into 208V or 240V receptacles. Drains leak. Elements must always be covered with water. If the unit is used without water, the elements will burn out prematurely. Check for obstructions preventing the valve to close properly. Unit heats when thermostat dial is in off position. Plastic drain adapter is cracked where brass reducer or valve is screwed into drain adapter. The drain parts should be hand tightened only. Teflon tape should not be used when installing drain valves. Over-tightening the drain parts will crack the plastic. Thermostat is wired wrong. Wires should be on terminals 1 and 2. Unit does not get hot enough. Thermostat is damaged and must be replaced. Too much water. 480 Watt units should only have 2 Quarts of water and must be preheated with a cover for 1 hour. Check to see the unit has the proper voltage. A unit requiring 120V supply will not perform properly if the voltage supplied is low. Page 5 Item No. 21609 Rev. 0905 OPERATING AND SAFETY INSTRUCTIONS/TROUBLESHOOTING ServeWell® ServeWell® EXPLODED VIEW SERVICE MANUAL EXPLODED VIEW Element Part Numbers For Model # Voltage Use Part # 38002, 38003, 120 Volt 44200-1 38004, 38005 38102, 38103, 120 Volt 44204-1 38104, 38105 38106, 38107, 208 Volt 44227-1 38108, 38109 Only 38116, 38117, 208/240 Volt 44277-1 38118, 38119 Poly Cutting Board Part Numbers For Model # Use Part # 38002, 38102, 2-Well Units 23428-1 38106, 38116 38003, 38103, 3-Well Units 23429-1 38107, 38117 38004, 38104, 4-Well Units 23431-1 38108, 38118 38005, 38105, 5-Well Units 23432-1 38109, 38119 Bottom Shelf Part Number For Model # Use Part # 38002, 38102, 2-Well Units 28747-2 38106, 38116 38003, 38103, 3-Well Units 28704-2 38107, 38117 38004, 38104, 4-Well Units 28729-2 38108, 38118 38005, 38105, 5-Well Units 28715-2 38109, 38119 Item No. 1 2 3 4 5 6 7 8 9 10 11 12 13 14 15 Part No. See Shelf Chart 28702-1 28707-2 23433-1 29838-1 17533-1 17532-1 17021-1 See Element Chart 17124-1 23423-1 23540-1 17362-1 See Cutting Board Chart 21607-3 17651-1 Item No. 21609 Rev. 0905 Description Item No. Shelf, bottom 16 Upright leg 17 Bracket, caster 18 Leg, adjustable 19 Caster - 4˝ swivel (optional) 20 Well, plastic (Mfg. After 7/1/00) 21 Well, plastic (Mfg. Before 7/1/00) 22 O-ring, element 23 Element 24 Thermostat 25 Knob, thermostat 26 Switch, toggle. DPST, 30A 27 Drain Adapter 28 Cutting Board 29 Label, switch 30 Screw, #14 x .750 thread cutting Page 6 Part No. 17014-1 17741-1 23424-2 17496-1 17365-1 17236-1 44459-2 17504-1 17020-1 25181-1 17019-1 26530-1 17117-1 28799-2 17668-1 This unit shown is a three well unit. The two, four and five well units use the same parts, except where noted. Description Screw, #10-32 x .500 Lg. Clamp, loop Valve and nipple assembly Screw, #6-32 x .250 Lg. O-Ring adapter, drain Nut, acorn #10-24 Bracket – high limit switch Switch, high limit Screw, #6-32 x .500 Lg. Washer, lock - #6 internal tooth #6-32 keps nut Screw, #1/4-20 x .500 Screw, #10-32 x .25 Lg. Spacer, with optional caster Relay switch (Model 38104 & 38105 Only) ServeWell® SERVICE MANUAL WIRING DIAGRAM WIRING DIAGRAM SERVEWELL® OPERATION All units come standard with a properly rated cord and plug. Power is controlled first by a double pole lighted switch. The switch when closed allows power to the thermostats. The thermostats are a capillary bulb thermostat that will react to temperature changes as transmitted to the bulb through the element casting. When the thermostats close, power is then sent to the high limit switch. The high limit switch is normally closed. It will open if the temperature exceed 175° C ± 9° for safety. Power passing through the high limit switch will then energize the element. The neutral wire (or secondary load wire in 208V or 240V systems) from the switch is connected directly to the element. Page 7 Item No. 21609 Rev. 0905 WARRANTY INFORMATION Warranty Policy for The Vollrath Co. L.L.C The Vollrath Company L.L.C. warranties all products it manufactures and distributes against defects in materials and workmanship for a period of one year - except as listed below: Refrigeration compressors – 5 year warranty Intrigue & Classic Select cookware – Limited lifetime warranty Replacement parts – 90 (ninety days) on the part only Fry pans and coated cookware – 90 (ninety days) All warranties cover normal use and service only and are void if the product has been damaged by accident, neglect, improper use or other causes not arising out of defects in material or workmanship. The Vollrath Company shall not be liable for loss of use of the product or other incidental or consequential costs, expenses or damage incurred by the purchaser. Warranty work must have prior approval from The Vollrath Company L.L.C. ServeWell® Warranty All ServeWell® models are to be repaired or replaced in the field, at the discretion of The Vollrath Company L.L.C., in accordance with the warranty policy listed above. Should you have a problem with your unit and it is under warranty, please contact an authorized service center nearest to you or call The Vollrath Service number for the location of a service center near you. Please have the model number, series number and date of purchase information available when calling. The Vollrath Company L.L.C. Service Number 1-800-628-0832 The Vollrath Company, L.L.C. 1236 North 18th Street Sheboygan, WI 53082-0611 U.S.A. Main Tel: 800.624.2051 Service Tel: 800.628.0832 FAX: 800.752.5620 Vollrath of Canada, Co. Tel: 800.695.8560 FAX: 800.752.5620 Item No. 21609 Rev. 0905 MANUAL DE SERVICIO Equipo para servicio de comidas de Vollrath Mesas para comida caliente Mesas para comida fría Mesas utilitarias MODELOS: 38002 38003 38004 38005 38102 38103 38104 38105 38116 38117 38118 38119 Mesa para comida caliente de 2 receptáculos 120V/960W Mesa para comida caliente de 3 receptáculos 120V/1440W Mesa para comida caliente de 4 receptáculos 120V/1920W Mesa para comida caliente de 5 receptáculos 120V/2400W Mesa para comida caliente de 2 receptáculos 120V/1400W Mesa para comida caliente de 3 receptáculos 120V/2100W Mesa para comida caliente de 4 receptáculos 120V/2800W Mesa para comida caliente de 5 receptáculos 120V/3500W Mesa para comida caliente de 2 receptáculos 240V/1600W Mesa para comida caliente de 3 receptáculos 240V/2400W Mesa para comida caliente de 4 receptáculos 240V/3200W Mesa para comida caliente de 5 receptáculos 240V/4000W CONTENIDO PÁGINA Instrucciones de uso y seguridad ...............................2 Solución de problemas...............................................5 Vista detallada............................................................6 Diagrama de cableado ...............................................7 NOTA: No haga funcionar este equipo sin postes, repisas y patas o sin las ruedas instaladas correctamente. El compartimento de calor debe estar separado de la superficie de soporte de la unidad. Garantía .....................................................................8 Art. Núm. 21609 Rev. 0905 INSTRUCCIONES DE USO Y SEGURIDAD MANUAL DE SERVICIO Paso 4 INSTRUCCIONES DE MONTAJE Nota: Paso 5 Ponga un cartón o paño protector en el piso para proteger la superficie de trabajo de la unidad durante el montaje. MESAS PARA COMIDA CALIENTE 1. Saque todos los componentes de la caja de envío. 2. Ponga el ensamblaje de la base sobre el piso con las aberturas para los receptáculos hacia abajo y la fuente inferior apuntando hacia arriba. 5. Instale la repisa inferior usando 8 tornillos. Recuerde apuntar la parte superior de la repisa hacia la parte inferior de la base. 6. Monte cada una de las patas estacionarias en las cuatro placas de montaje para las patas triangulares usando contratuercas. Las tuercas están instaladas permanentemente dentro de las placas. Paso 2 3. Monte las llaves de cierre de drenaje en la pieza de cola bajo cada unidad. Deben apretarse con la mano hasta que queden firmes. No use cinta de teflón ni herramientas al ensamblar. El uso de herramientas causará grietas en el ensamblaje del drenaje produciendo fugas de agua. Paso 3 Paso 6 7. Levante la unidad y póngala sobre las patas. 8. Ponga la tabla para cortar sobre la superficie de trabajo. Paso 8 4. Instale cuatro patas en la base usando 16 tornillos (4 tornillos por pata). Las tuercas para estos tornillos están instaladas permanentemente dentro de la base. . Art. Núm. 21609 Rev. 0905 ServeWell® MANUAL DE SERVICIO IMPORTANTE: No haga funcionar este equipo sin postes, repisas y patas o sin las ruedas instaladas correctamente. El compartimento de calor debe estar separado de la superficie de soporte de la unidad. MESAS UTILITARIAS Siga los pasos 1, 2, 4, 5, 6 y 7. LISTA DE PIEZAS DE ENSAMBLAJE Cada unidad Vollrath ServeWell® se empaca con las siguientes piezas de ensamblaje: Descripción Patas Patas estacionarias Tornillos Válvula de cierre Nota: Número de pieza 28702-2516 23433-1058 26570-1058 23424 FUNCIÓN Y OBJETIVO Esta unidad está destinada a mantener fuentes de comida caliente a la temperatura apta para servir. Esta unidad no está diseñada ni destinada para cocinar comida cruda ni recalentar comida preparada. Cantidad 4 4 32 1 por receptáculo OPERACIÓN Cada unidad ServeWell® también tendrá incluida la repisa inferior adecuada. Las tablas para cortar de plástico se empacarán con los servidores de comida caliente. Los servidores con receptáculos calientes tendrán solamente una llave de drenaje (23424) para cada receptáculo. 1. Ponga la unidad calentadora de comida sobre una superficie plana y estable. 2. Llene cada receptáculo con la siguiente cantidad de agua: Modelo 38002, 38003, 38004, 38005 (480 Watt/receptáculo) Todos los otros modelos Cantidad de agua 1.9 litros (2 cuartos) SOLAMENTE 3.8 litros (4 cuartos) La marca de nivel del agua dentro de los receptáculos está aproximadamente en 3.8 litros (4 cuartos). No llene los receptáculos en exceso. No haga funcionar los receptáculos sin agua. MESAS PARA COMIDA CALIENTE Gracias por comprar este calentador de comida Vollrath ServeWell®. Antes de hacer funcionar esta unidad, lea y familiarícese con las siguientes instrucciones de uso y seguridad. CONSERVE ESTAS INSTRUCCIONES PARA REFERENCIA FUTURA. ADVERTENCIA Pueden ocurrir lesiones por quemaduras, incendios o choque eléctrico si no se usa este equipo correctamente. Para reducir el riesgo de lesiones: Enchufe la unidad solamente en tomacorrientes con conexión a tierra y que concuerden con el voltaje nominal de la placa de identificación. La unidad debe usarse solamente en posición nivelada y plana. Desenchufe las unidades calientes y déjelas enfriarse antes de limpiarlas o trasladarlas. No rocíe los controles ni el exterior de la unidad con líquidos ni agentes de limpieza. Maneje con cuidado el agua caliente. No deje la unidad funcionando sin supervisión. ADVERTENCIA PELIGRO DE CHOQUE ELÉCTRICO Mantenga el nivel de agua en el punto necesario o bajo el mismo. Si el nivel es demasiado alto, puede desbordarse el agua cuando se inserte la fuente con comida. El desborde podría ingresar al compartimiento eléctrico y causar un corto circuito o choque eléctrico. 3. Enchufe el cable eléctrico en un tomacorriente con el voltaje nominal de la placa de identificación. 4. Precaliente el agua dentro de los receptáculos cubriéndolos con fuentes vacías o tapas, y luego fijando el control de temperatura en la selección máxima. Tiempos de precalentamiento: Modelo 38002, 38003, 38004, 38005 Todos los otros modelos 5. Página 3 Tiempo de precalentamiento 60 minutos 45 minutos Ponga las fuentes con comida caliente dentro de los receptáculos calentadores de comida previamente calentados. Para evitar derrames, no llene en exceso las fuentes de comida. Art. Núm. 21609 Rev. 0905 INSTRUCCIONES DE USO Y SEGURIDAD IMPORTANTE: No haga funcionar esta unidad sin agua en los receptáculos. MESAS PARA COMIDA FRÍA Siga los pasos 1, 2, 4, 5, 6 y 7. ServeWell® INSTRUCCIONES DE USO Y SEGURIDAD MANUAL DE SERVICIO 6. Fije el control de temperatura a un nivel seguro para mantener la comida. Vigile cuidadosamente las temperaturas de la comida para mantener el nivel de seguridad. (Vea la nota de seguridad de la comida.) ADVERTENCIA PELIGRO DE CHOQUE ELÉCTRICO No rocíe agua ni productos de limpieza. El líquido podría ingresar al compartimiento eléctrico y causar un corto circuito o choque eléctrico. NOTA DE PRECAUCIÓN PARA LA SEGURIDAD DE LOS ALIMENTOS REPARACIÓN Dentro de este aparato, no hay piezas a las cuales pueda dar servicio el usuario. Para evitar lesiones graves o daños, nunca intente reparar usted mismo el calentador de comida ni cambiar un cable eléctrico dañado. Vigile cuidadosamente las temperaturas de la comida para mantener el nivel de seguridad. El Servicio de Salud Pública de los Estados Unidos recomienda que se mantenga la comida caliente a una temperatura mínima de 60° C (140° F) para evitar el crecimiento de bacterias. Mantenga el nivel de agua aproximadamente a 10 mm (3/8 de pulg.) del fondo del receptáculo. Retire periódicamente (aprox. 2 horas) la fuente de comida y revise el nivel del agua. Añada agua caliente si es necesario. Póngase en contacto con un servicio de reparación profesional competente. ADVERTENCIA PELIGRO DE CHOQUE ELÉCTRICO No use este equipo si se ha sacado alguno de los receptáculos. El contacto con cualquier pieza de metal podría causar un choque eléctrico resultante en lesiones graves o fatales. ADVERTENCIA PELIGRO DE QUEMADURA El agua caliente y el vapor dentro del receptáculo pueden quemar la piel. Use guantes protectores, guantes para el horno o tomaollas al quitar las fuentes de comida o las tapas. La comida caliente también puede causar quemaduras. Maneje con cuidado la comida caliente. MESAS PARA COMIDA FRÍA NO REFRIGERADAS FUNCIÓN Y OBJETIVO Esta mesa para comida fría no refrigerada está destinada a usarse con hielo y mantener fuentes de comida fría. No está diseñado para bajar la temperatura de productos alimentarios preparados o crudos. LIMPIEZA Para mantener la apariencia y aumentar la vida útil del calentador de comida, es necesario limpiarlo por lo menos todos los días. Nota: 1. Antes de limpiarla o trasladarla, desenchufe la unidad y déjela enfriarse totalmente. 2. Drene con cuidado el agua de los receptáculos. 3. Limpie con un paño limpio y húmedo todo el interior de cada fuente de agua y receptáculo. 4. Para evitar dañar el acabado, no use materiales abrasivos, limpiadores que rayen ni esponjas ásperas para limpiar depósitos de agua de los receptáculos. 5. Si se usa jabón o limpiadores químicos, fíjese que se enjuaguen totalmente con agua corriente, inmediatamente después de la limpieza. El residuo químico podría corroer la superficie de la unidad. Art. Núm. 21609 Rev. 0905 La capacidad de mantener las temperaturas de conservación de 4° C (40° F) o menos se ve influenciada por factores como temperatura ambiente, cantidad de hielo y tiempo que se conserve el producto. OPERACIÓN 1. Llene parcialmente el receptáculo con hielo picado, molido o en cubos. Ponga las fuentes de comida en el receptáculo y termine de llenar el receptáculo con hielo. El producto no debe pasar del nivel del hielo. Si pasa el nivel, la capa superior del producto se calentará rápidamente y superarála temperatura máxima de conservación. ADVERTENCIA PELIGRO PARA LA SALUD El hielo que se usa para conservar el producto se designa como usado en una zona de contacto con alimentos. Es susceptible a derrames de comida y contaminación y NO DEBE usarse para consumo humano. Página 4 ServeWell® MANUAL DE SERVICIO Vigile la temperatura de la comida frecuentemente para mantener el nivel seguro. El Servicio de Salud Pública de los Estados Unidos recomienda que los alimentos potencialmente peligrosos se mantenga a 5° C (41° F) o menos para evitar el crecimiento de bacterias. Si se exceden los niveles seguros de temperatura, cambie la por otra debidamente enfriada. 3. La profundidad máxima recomendada de la fuente de comida es de 10 cm (4 pulgadas). Esto permitirá que se coloque hielo bajo la fuente para mantener mejor la temperatura. 4. Añada el hielo que se necesite. Drene el exceso de agua. LIMPIEZA 4. Si se usa jabón o limpiadores químicos para limpiar las superficies de metal, revise que se eliminen totalmente con un paño limpio humedecido o una esponja. El residuo químico puede corroer la superficie de la mesa para comida caliente. MESAS UTILITARIAS FUNCIÓN Y OBJETIVO Esta mesa utilitaria está destinada a conservar productos alimentarios o suministros no perecibles. NO debe usarse para conservar ni servir alimentos que necesiten mantener una temperatura apta para consumo seguro. LIMPIEZA 1. Quite todas las fuentes de comida de los receptáculos. Elimine toda comida que se haya derramado sobre el hielo. Descarte la comida derramada. 2. Ponga un balde bajo el drenaje y deje que fluya el agua dentro de él. Puede verterse agua tibia sobre el hielo para acortar el tiempo de derretimiento. 3. Pase un paño por el interior del receptáculo y todas las áreas de la superficie para eliminar el resto de agua y derrames de comida. 1. Limpie todas las superficies con una toalla limpia y húmeda. 2. Si se usa jabón o limpiadores químicos para limpiar las superficies de metal, revise que se eliminen totalmente con un paño limpio humedecido o una esponja. El residuo químico puede corroer la superficie de la mesa utilitaria. GUÍA DE SOLUCIÓN DE PROBLEMAS Síntoma Hay un receptáculo que no se calienta tanto como los demás. Los elementos se queman después de poco tiempo. Los drenajes tienen fugas. La unidad se calienta cuando el selector del termostato está en la posición apagada. La unidad no se calienta lo suficiente. Causa probable Los termostatos pueden estar descalibrados. Para probarlos, cuando esté fría la unidad, gire el termostato de la posición apagada lentamente a la encendida. Debe oírse un chasquido aproximadamente en la segunda o tercera posición. Si se oye un chasquido mucho después, están descalibrados los termostatos y deben cambiarse. Si se golpean los termostatos puede hacer que se descalibren. Revise el voltaje. Las unidades de 208V no están diseñadas para funcionar a 240V. Compruebe el suministro de energía. Los operadores a menudo conectan enchufes de 120V 5-30 y 5-50 en tomacorrientes de 208V ó 240V. Los elementos siempre deben estar cubiertos de agua. Si se usa la unidad sin agua, se quemarán los elementos prematuramente. Revise si hay obstrucciones que impidan que se cierre bien la válvula. Está agrietado el adaptador de drenaje plástico donde va atornillado el reductor de latón o válvula en el adaptador de drenaje. Deben apretarse a mano solamente las piezas del drenaje. No debe usarse cinta de teflón al instalar válvulas de drenaje. Si se aprietan en exceso las piezas del drenaje, se agrietará el plástico. El termostato está mal cableado. Los alambres deben estar en los terminales 1 y 2. El termostato está dañado y debe cambiarse. Demasiada agua. Las unidades de 480 vatios deben tener solamente 1.9 litros (2 cuartos) de agua y deben precalentarse con tapa durante una hora. Revise si la unidad tiene el voltaje correcto. Si la unidad necesita 120V de suministro, no podrá funcionar bien si el voltaje de alimentación es bajo. Página 5 Art. Núm. 21609 Rev. 0905 INSTRUCCIONES DE USO Y SEGURIDAD/SOLUCIÓN DE PROBLEMAS 2. ServeWell® VISTA DETALLADA MANUAL DE SERVICIO VISTA DETALLADA La unidad mostrada es de tres receptáculos. Las unidades de dos, cuatro y cinco receptáculos usan las mismas piezas, salvo donde se indique. Números de pieza de los elementos Para el Voltaje Usar pieza modelo 38002, 38003, 38004, 38005 38102, 38103, 38104, 38105 38106, 38107, 38108, 38109 38116, 38117, 38118, 38119 120 Voltios 44200-1 120 Voltios 44204-1 208 Voltios solamente 208/240 Volt 44227-1 44277-1 Números de pieza de tablas para cortar de plástico Para el Usar pieza modelo 38002, 38102, 38106, 38116 38003, 38103, 38107, 38117 38004, 38104, 38108, 38118 38005, 38105, 38109, 38119 Unidades de 2 recep. Unidades de 3 recep. Unidades de 4 recep. Unidades de 5 recep. 23428-1 23429-1 23431-1 23432-1 Número de pieza de la repisa inferior Para el Usar pieza modelo 38002, 38102, 38106, 38116 38003, 38103, 38107, 58117 38004, 38104, 38108, 58118 38005, 38105, 38109, 58119 Unidades de 2 recep. Unidades de 3 recep. Unidades de 4 recep. Unidades de 5 recep. Núm.art. Núm. de pieza 1 2 3 4 5 6 Vea el diagrama de la repisa 28702-1 28707-2 23433-1 29838-1 17533-1 17532-1 7 8 9 10 11 12 13 14 15 17021-1 Vea el diagrama de elementos 17124-1 23423-1 23540-1 17362-1 Vea el diagrama de tablas para cortar 21607-3 17651-1 Art. Núm. 21609 Rev. 0905 28747-2 28704-2 28729-2 28715-2 Descripción Núm.art. Núm. de pieza Descripción Repisa, inferior 16 17014-1 Tornillo, #10-32 x 0.5 Lg. Pata vertical Soporte, rueda Pata, ajustable Rueda - 10 cm (4˝) giratoria (opcional) Receptáculo, plástico (Fab. después del 1 Jul 00) Receptáculo, plástico (Fab. antes del 1 Jul 00) Junta tórica, elemento Elemento 17 18 19 20 21 17741-1 23424-2 17496-1 17365-1 17236-1 Abrazadera, aro Ensamblaje de válvula y niple Tornillo, #6-32 x 0.250 Lg. Adaptador de junta tórica, drenaje Tuerca, tapa #10-24 22 44459-2 Soporte – interruptor de límite alto 23 24 17504-1 17020-1 Interruptor, límite alto Tornillo, #6-32 x 0.500 Lg. Termostato Perilla, termostato Interruptor, conmutador. DPST, 30A Adaptador de drenaje Tabla para cortar 25 26 27 28 29 25181-1 17019-1 26530-1 17117-1 28799-2 Arandela, seguridad – diente interno #6 Tuerca keps #6-32 Tornillo, #1/4-20 x 0.500 Tornillo, #10-32 x 0.25 Lg. Separador, con rueda opcional Rótulo, interruptor Tornillo, #14 x 0.750 roscante 30 17668-1 Interruptor de relé (38104 y 38105 sola.) Página 6 ServeWell® MANUAL DE SERVICIO DIAGRAMA DE CABLEADO DIAGRAMA DE CABLEADO FUNCIONAMIENTO DE SERVEWELL® Todas las unidades vienen con un cable y enchufe eléctricos con la debida capacidad nominal. La alimentación se controla primero mediante un interruptor bipolar iluminado. Al cerrarse el interruptor se permite el paso de alimentación a los termostatos. Los termostatos consisten en un termostato de bulbo capilar que reacciona con los cambios de temperatura transmitidos al bulbo a través de la moldura del elemento. Cuando se cierran los termostatos, se envía entonces alimentación al interruptor de límite alto. El interruptor de límite alto está normalmente cerrado. Se abrirá si la temperatura excede 175° C ± 9° para fines de seguridad. La alimentación que pasa por el interruptor de límite alto energizará entonces el elemento. El cable neutro (o cable de carga secundaria en sistemas de 208V ó 240V) del interruptor se conecta directamente con el elemento. Página 7 Art. Núm. 21609 Rev. 0905 INFORMACIÓN DE GARANTÍA Norma de garantía de The Vollrath Co. L.L.C The Vollrath Company L.L.C. garantiza todos los productos que fabrica y distribuye contra defectos en materiales y fabricación por un período de un año; salvo según se indica a continuación: Compresores de refrigeración – garantía de 5 años Utensilios de cocina Intrigue y Classic Select – Garantía vitalicia limitada Piezas de repuesto – 90 (noventa días) solamente por la pieza Sartenes y utensilios recubiertos – 90 (noventa días) Todas las garantías cubren el uso y servicio normales solamente y quedan nulas si se ha dañado el producto por accidente, negligencia, uso indebido u otras causas que no surjan de defectos de material o fabricación. The Vollrath Company no se responsabilizará por la pérdida de uso del producto ni por otros costos, gastos o daños fortuitos o consecuenciales incurridos por el comprador. El trabajo de garantía debe contar con la aprobación previa de The Vollrath Company L.L.C. Garantía ServeWell® Se deben reparar o reemplazar todos los modelos ServeWell® en el campo, a discreción de The Vollrath Company L.L.C., en conformidad con la norma de garantía señalada más arriba. En caso de que tenga algún problema con la unidad y esté bajo garantía, diríjase al centro de servicio autorizado más cercano o llame al número de The Vollrath Service para conocer la ubicación de un centro de servicio en la cercanía. Al llamar tenga a mano el número de modelo, el número de serie y la fecha de compra. Número de servicio de The Vollrath Company L.L.C. 1-800-628-0832 The Vollrath Company, L.L.C. 1236 North 18th Street Sheboygan, WI 53082-0611 EE.UU. Tel. Principal: 800.624.2051 Tel. de servicio: 800.628.0832 FAX: 800.752.5620 Vollrath of Canada, Co.. Tel: 800.695.8560 FAX: 800.752.5620 Item No. 21609 Rev. 0905