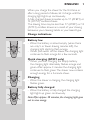
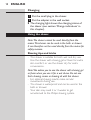
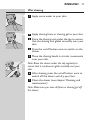
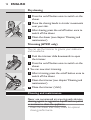
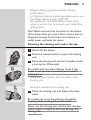
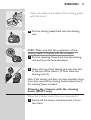
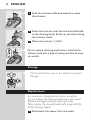
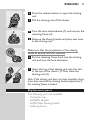
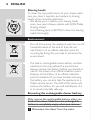
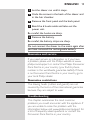
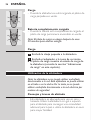
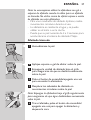
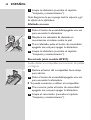
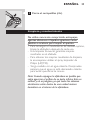
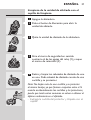
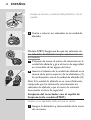
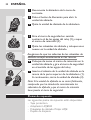
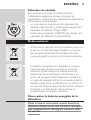
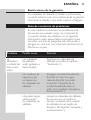
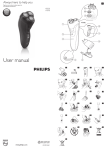
1
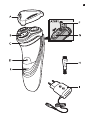
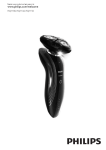
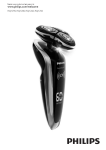
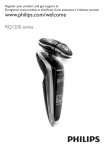
Register your product and get support at
www.philips.com/welcome
AT891, AT751
1
AT891,AT751_Argentina
English 6
Español 22
6
English
Introduction
Congratulations on your purchase and welcome
to Philips! To fully benefit from the support that
Philips offers, register your product at
www.philips.com/welcome.
Please read this user manual, as it contains
information about the wonderful features of this
shaver as well as some tips to make shaving easier
and more enjoyable.
What’s in the box
--------
Shaver
Protection cap
Cleaning brush
Adapter
User manual
Local guarantee leaflet
World wide guarantee leaflet
General description (Fig. 1)
A
B
C
D
E
F
G
H
I
Protection cap
Shaving unit
Shaving unit release button
Shaver on/off button
Charging light
Trimmer (AT891 only)
Trimmer release slide (AT891 only)
Cleaning brush
Adapter
Note:You can find the type number on the back of the
shaver.
English
7
Important
Read this user manual carefully before you use the
appliance and save it for future reference.
Danger
-- Make sure the adapter does not get wet.
Warning
-- The adapter contains a transformer. Do not cut
off the adapter to replace it with another plug, as
this causes a hazardous situation.
-- This appliance is not intended for use by persons
(including children) with reduced physical, sensory
or mental capabilities, or lack of experience
and knowledge, unless they have been given
supervision or instruction concerning use of the
appliance by a person responsible for their safety.
-- Children should be supervised to ensure that they
do not play with the appliance.
-- Always unplug the shaver before you clean it
under the tap.
Caution
-- Never use water hotter than 80°C to rinse the
shaver.
-- Be careful with hot water. Always check if the
water is not too hot, to prevent your hands from
getting burnt.
-- The shaver and the other accessories are not
dishwasher-proof.
-- Water may leak from the socket at the bottom
of the shaver when you rinse it. This is normal
and not dangerous because all electronics are
enclosed in a sealed power unit inside the shaver.
-- Do not use the shaver, adapter or any other part
if it is damaged, as this may cause injury. Always
replace a damaged adapter or part with one of
the original type.
8
English
-- Use, charge and store the appliance at a
temperature between 10°C and 35°C.
-- Always place and use the shaver on a surface that
is fluid-resistant.
-- Only use the adapter and accessories supplied.
-- Always put the protection cap on the shaver
to protect the shaving heads when you are
travelling.
-- If the shaver is subjected to a major change
in temperature, pressure or humidity, let
it acclimatise for 30 minutes before you use it.
Compliance with standards
-- This shaver complies with the internationally
approved safety regulations and can be safely used
in the bath or shower and cleaned under the tap.
-- This Philips appliance complies with all standards
regarding electromagnetic fields (EMF). If handled
properly and according to the instructions in this
user manual, the appliances are safe to use based
on scientific evidence available today.
General
-- The appliance is equipped with an automatic
voltage selector and is suitable for mains voltages
ranging from 100 to 240 volts.
-- The adapter transforms 100-240 volts to a safe
low voltage of less than 24 volts.
Charging
Note:The shaver cannot be used directly from the
mains.
AT891: It takes approx. 1 hour to fully charge the
shaver.
AT751: It takes approx. 8 hours to fully charge the
shaver.
English
9
When you charge the shaver for the first time or
after a long period of disuse, let it charge until the
charging light lights up continuously.
A fully charged shaver provides up to 17 (AT891) or
14 (AT751) cordless shaves.
The shaving time may be less than 17 (AT891) or 14
(AT751) cordless shaves as a result of your shaving
behaviour, your cleaning habits or your beard type.
Charge indications
Battery low
-- When the battery is almost empty (when there
are only 5 or fewer shaving minutes left), the
charging light starts to flash orange.
-- When you switch off the shaver, the charging light
continues to flash orange for a few seconds.
Quick charging (AT891 only)
-- When you start charging the empty battery,
the charging light alternately flashes orange and
green. After approx. 3 minutes the charging light
continues to flash green. The shaver now contains
enough energy for a 5-minute shave.
Charging
-- When the shaver is charging, the charging light
flashes green.
Battery fully charged
-- When the battery is fully charged, the charging
light lights up green continuously.
Note: After approx. 30 minutes, the charging light goes
out to save energy.
10
English
Charging
1 Put the small plug in the shaver.
2 Put the adapter in the wall socket.
,, The charging light shows the charging status of
the shaver (see section ‘Charge indications’ in
this chapter).
Using the shaver
Note:The shaver cannot be used directly from the
mains.This shaver can be used in the bath or shower.
It can therefore not be used directly from the mains for
safety reasons.
Shaving tips and tricks
-- This shaver is suitable for both wet and dry use.
Use the shaver with shaving gel or foam for extra
skin comfort, or use the shaver dry for extra
convenience.
Note:We advise you to use the shaver with shaving gel
or foam when you use it for a wet shave. Do not use
thick shaving cream or shaving oil with this shaver.
-- For optimal shaving results, make circular
movements during use.
-- The shaver is waterproof and can be used in the
bath or shower.
-- Your skin may need 2 or 3 weeks to get
accustomed to the Philips shaving system.
English 11
Wet shaving
1 Apply some water to your skin.
2 Apply shaving foam or shaving gel to your skin.
3 Rinse the shaving unit under the tap to ensure
that the shaving unit glides smoothly over your
skin.
4 Press the on/off button once to switch on the
shaver.
5 Move the shaving heads in circular movements
over your skin.
Note: Rinse the shaver under the tap regularly to
ensure that it continues to glide smoothly over your
skin.
6 After shaving, press the on/off button once to
switch off the shaver and dry your face.
7 Clean the shaver (see chapter ‘Cleaning and
maintenance’).
Note: Make sure you rinse all foam or shaving gel off
the shaver.
12
English
Dry shaving
1 Press the on/off button once to switch on the
shaver.
2 Move the shaving heads in circular movements
over your skin.
3 After shaving, press the on/off button once to
switch off the shaver.
4 Clean the shaver (see chapter ‘Cleaning and
maintenance’).
Trimming (AT891 only)
You can use the trimmer to groom your sideburns
and moustache.
1 Push the trimmer slide downwards to open
the trimmer.
2 Press the on/off button once to switch on the
shaver.
,, You can now start trimming.
3 After trimming, press the on/off button once to
switch off the shaver.
4 Clean the trimmer (see chapter ‘Cleaning and
maintenance’).
5 Close the trimmer (‘click’).
Cleaning and maintenance
Never use compressed air, scouring pads, abrasive
cleaning agents or aggressive liquids such as petrol
or acetone to clean the appliance.
-- Clean the shaver after every shave for optimal
shaving performance.
English 13
-- Regular cleaning guarantees better shaving
performance.
-- For the best cleaning results, we advise you to use
the Philips Cleaning spray (HQ110).
-- Be careful with hot water. Always check if the
water is not too hot, to prevent your hands from
getting burnt.
Note:Water may leak from the socket at the bottom
of the shaver when you rinse it.This is normal and not
dangerous because all electronics are enclosed in a
sealed power unit inside the shaver.
Cleaning the shaving unit under the tap
1 Switch off the shaver.
2 Press the release button to open the shaving
unit.
3 Rinse the shaving unit and hair chamber under
a hot tap for 30 seconds.
Be careful with hot water. Always check if the
water is not too hot, to prevent your hands from
getting burnt.
-- Rinse the hair chamber and the inside of the
shaving unit.
-- Rinse the outside of the shaving unit.
4 Close the shaving unit and shake off excess
water.
Be careful not to hit the shaving unit against
anything while shaking off excess water.
Never dry the shaving unit and the hair chamber
with a towel or tissue, as this may damage the
shaving unit.
14
English
5 Open the shaving unit again and leave it open
to let the shaver dry completely.
Cleaning the shaving unit with the cleaning
brush
1 Switch off the shaver.
2 Press the release button to open the shaving
unit.
3 Pull the shaving unit off the shaver.
4 Turn the lock anticlockwise (1) and remove the
retaining frame (2).
5 Remove and clean one shaving head at a time.
Each shaving head consists of a cutter and a
guard.
Note: Do not clean more than one cutter and guard
at a time, since they are all matching sets. If you
accidentally mix up the cutters and guards, it may take
several weeks before optimal shaving performance is
restored.
-- Remove the cutter from the shaving guard and
clean it with the brush.
English 15
-- Clean the inside and outside of the shaving guard
with the brush.
6 Put the shaving heads back into the shaving
unit.
AT891: Make sure that the projections of the
shaving heads fit exactly into the recesses.
7 Put the retaining frame back into the shaving
unit and turn the lock clockwise.
8 Insert the lug of the shaving unit into the slot
in the top of the shaver (1). Then close the
shaving unit (2).
Note: If the shaving unit does not close smoothly, check
if you have inserted the shaving heads properly and if
the retaining frame is locked.
Cleaning the trimmer with the cleaning
brush (AT891 only)
Clean the trimmer every time you have used it.
1 Switch off the shaver and disconnect it from
the mains.
16
English
2 Push the trimmer slide downwards to open
the trimmer.
3 Clean the trimmer with the short-bristled side
of the cleaning brush. Brush up and down along
the trimmer teeth.
4 Close the trimmer (‘ click’).
Tip: For optimal trimming performance, lubricate the
trimmer teeth with a drop of sewing machine oil every
six months.
Storage
-- Put the protection cap on the shaver to prevent
damage.
Replacement
For maximum shaving performance, we advise
you to replace the shaving heads every two years.
Replace damaged shaving heads right away.
Only replace the shaving heads with original HQ8
Philips Shaving Heads.
1 Disconnect the shaver from the mains.
English 17
2 Press the release button to open the shaving
unit.
3 Pull the shaving unit off the shaver.
4 Turn the lock anticlockwise (1) and remove the
retaining frame (2).
5 Remove the shaving heads and place new ones
in the shaving unit.
Make sure that the projections of the shaving
heads fit exactly into the recesses.
6 Put the retaining frame back into the shaving
unit and turn the lock clockwise.
7 Insert the lug of the shaving unit into the slot
in the top of the shaver (1). Then close the
shaving unit (2).
Note: If the shaving unit does not close smoothly, check
if you have inserted the shaving heads properly and if
the retaining frame is locked.
Replacement parts
The following parts are available:
-- Protection cap
-- HQ8505 adapter
-- HQ8 Philips Shaving Heads
-- Cleaning brush
18
English
Shaving heads
To retain the top performance of your shaver, make
sure you clean it regularly and replace its shaving
heads at the recommended time.
-- We advise you to replace your shaving heads
every two years. Always replace with HQ8 Philips
Shaving Heads.
-- Use Cleaning spray (HQ110) to clean the shaving
heads thoroughly.
Environment
-- Do not throw away the appliance with the normal
household waste at the end of their life, but
hand them in at an official collection point for
recycling. By doing this, you help to preserve the
environment.
-- The built-in rechargeable shaver battery contains
substances that may pollute the environment.
Always remove the battery before you discard or
hand in the shaver at an official collection point.
Dispose of the battery at an official collection
point for batteries. If you have trouble removing
the battery, you can also take the appliance to a
Philips service centre. The staff of this centre will
remove the battery for you and will dispose of it
in an environmentally safe way.
Removing the rechargeable shaver battery
Only remove the rechargeable battery when you
discard the shaver. Make sure the rechargeable
battery is completely empty when you remove it.
1 Disconnect the shaver from the mains.
English 19
2 Let the shaver run until it stops.
3 Undo the screws in the back of the shaver and
in the hair chamber.
4 Remove the front panel and the back panel.
5 Bend the 6 hooks aside and take out the
power unit.
Be careful, the hooks are sharp.
6 Remove the battery.
Be careful, the battery strips are sharp.
Do not connect the shaver to the mains again after
you have removed the rechargeable battery.
Guarantee and service
If you need service or information or if you have
a problem, please visit the Philips website at www.
philips.com/support or contact the Philips Consumer
Care Centre in your country (you find its phone
number in the worldwide guarantee leaflet). If there
is no Consumer Care Centre in your country, go to
your local Philips dealer.
Guarantee restrictions
The shaving heads (cutters and guards) are not
covered by the terms of the international guarantee
because they are subject to wear.
Troubleshooting
This chapter summarises the most common
problems you could encounter with the appliance. If
you are unable to solve the problem with the
information below, visit www.philips.com/support for
a list of frequently asked questions or contact the
Consumer Care Centre in your country.
20
English
Problem
Possible cause
Solution
The shaver does
not shave as well
as it used to.
The shaving
heads are
damaged or
worn.
Replace the shaving heads (see
chapter ‘Replacement’).
Foam or gel
residues clog
up the shaving
heads.
Rinse the shaving unit under a
hot tap (see section ‘Cleaning
the shaving unit under the
tap’ in chapter ‘Cleaning and
maintenance’).
Long hairs
obstruct the
shaving heads.
Clean the shaving heads one by
one (see section ‘Cleaning the
shaving unit with the cleaning
brush’ in chapter ‘Cleaning and
maintenance’).
You have not
inserted the
shaving heads
properly.
Make sure that the projections
of the shaving heads fit exactly
into the recesses (see section
‘Cleaning the shaving unit with
the cleaning brush’).
The
rechargeable
battery is
empty.
Recharge the battery (see
chapter ‘Charging’).
The
temperature
of the shaver is
too high. In this
case, the shaver
does not work.
As soon as the temperature
of the shaver has dropped
sufficiently, you can switch on the
shaver again.
The shaver does
not work when I
press the on/off
button.
English 21
Problem
Possible cause
Solution
The shaver
does not work,
although it is
connected to the
mains.
This shaver is
not designed to
be used directly
from the mains.
Recharge the battery (see
chapter ‘Charging’) and
disconnect it from the mains.
22
Español
Introducción
Enhorabuena por la compra de este producto y
bienvenido a Philips. Para sacar el mayor partido
de la asistencia que Philips le ofrece, registre su
producto en www.philips.com/welcome.
Lea atentamente este manual de usuario, en el
cual encontrará información sobre las excelentes
características de esta afeitadora, así como algunos
consejos para que el afeitado le resulte más fácil y
agradable.
Contenido de la caja
--------
Afeitadora
Tapa protectora
Cepillo de limpieza
Adaptador de corriente
Manual de usuario
Folleto de garantía local
Folleto de garantía mundial
Descripción general (fig. 1)
A
B
C
D
E
F
G
Tapa protectora
Unidad de afeitado
Botón de liberación de la unidad de afeitado
Botón de encendido/apagado de la afeitadora
Piloto de carga
Recortador (sólo modelo AT891)
Botón de liberación del recortador (sólo
modelo AT891)
H Cepillo de limpieza
I Adaptador de corriente
Nota: Puede encontrar el número de modelo en la
parte posterior de la afeitadora.
Español 23
Importante
Antes de usar el aparato, lea atentamente este
manual de usuario y consérvelo por si necesitara
consultarlo en el futuro.
Peligro
-- Asegúrese de que el adaptador no se moje.
Advertencia
-- El adaptador incorpora un transformador. No
corte el adaptador para sustituirlo por otra clavija,
ya que podría provocar situaciones de peligro.
-- Este aparato no debe ser usado por personas
(adultos o niños) con su capacidad física, psíquica
o sensorial reducida, ni por quienes no tengan
los conocimientos y la experiencia necesarios, a
menos que sean supervisados o instruidos acerca
del uso del aparato por una persona responsable
de su seguridad.
-- Asegúrese de que los niños no jueguen con este
aparato.
-- Desenchufe siempre la afeitadora antes de
limpiarla bajo el grifo.
Precaución
-- No utilice nunca agua a una temperatura superior
a 80 °C para enjuagar la afeitadora.
-- Tenga cuidado con el agua caliente. Compruebe
siempre que el agua no esté demasiado caliente
para evitar quemarse las manos.
-- La afeitadora y sus accesorios no se pueden lavar
en el lavavajillas.
-- Cuando enjuague la afeitadora es posible que
salga agua por el orificio de su parte inferior. Esto
es normal y no es peligroso, ya que todos los
sistemas electrónicos están dentro de una unidad
motora hermética en el interior de la afeitadora.
24
Español
-- No utilice la afeitadora, el adaptador ni ninguna
otra pieza si están dañados, ya que podría
ocasionar lesiones. Sustituya siempre un adaptador
o una pieza dañados con uno del modelo original.
-- Utilice y guarde el aparato a una temperatura
entre 10 °C y 35 °C.
-- Coloque y utilice siempre la afeitadora sobre una
superficie resistente a los líquidos.
-- Utilice sólo el adaptador y los accesorios
suministrados.
-- Siempre que lleve la afeitadora de viaje, póngale
su tapa protectora con el fin de proteger los
cabezales de afeitado.
-- Si la afeitadora sufre un cambio brusco de
temperatura, presión o humedad, deje que se
aclimate durante 30 minutos antes de utilizarla.
Cumplimiento de normas
-- Esta afeitadora cumple las normas de seguridad
aprobadas internacionalmente, se puede utilizar
de manera segura en el baño o en la ducha y se
puede lavar bajo el grifo.
-- Este aparato Philips cumple todos los estándares
sobre campos electromagnéticos (CEM). Si
se utiliza correctamente y de acuerdo con
las instrucciones de este manual, los aparatos
se puede usar de forma segura según los
conocimientos científicos disponibles hoy en día.
General
-- El aparato está equipado con un selector
automático de voltaje y es apto para voltajes de
red entre 100 y 240 voltios.
-- El adaptador transforma la corriente de 100
- 240 voltios en un bajo voltaje de seguridad
inferior a 24 voltios.
Español 25
Carga
Nota: La afeitadora no se puede utilizar enchufada
directamente a la red.
Modelo AT891: Se tarda aproximadamente 1 hora
en cargar completamente la afeitadora.
Modelo AT751: Se tarda aproximadamente 8 horas
en cargar completamente la afeitadora.
Cuando cargue la afeitadora por primera vez, o
después de un largo periodo sin usarla, cárguela
hasta que el piloto de carga se ilumine de manera
continua.
Una afeitadora completamente cargada proporciona
hasta 17 (modelo AT891) o 14 (modelo AT751)
afeitados sin cable.
El tiempo de afeitado puede ser menor a 17
(modelo AT891) o 14 (modelo AT751) afeitados
sin cable dependiendo de su forma de afeitarse, sus
hábitos de limpieza o del tipo de barba.
Indicaciones de carga
Batería baja
-- Cuando la batería está casi descargada (cuando
quedan 5 minutos o menos de afeitado), el piloto
de carga comienza a parpadear en naranja.
-- Al apagar la afeitadora, el piloto de carga sigue
parpadeando en naranja durante unos segundos.
Carga rápida (sólo modelo AT891)
-- Cuando comienza a cargar la batería descargada,
el piloto de carga parpadea de forma alterna en
naranja y verde. Después de aproximadamente
3 minutos, el piloto de carga continúa
parpadeando en verde. La afeitadora contiene
ahora suficiente energía para un afeitado de
5 minutos.
26
Español
Carga
-- Cuando la afeitadora se está cargando, el piloto de
carga parpadea en verde.
Batería completamente cargada
-- Cuando la batería está completamente cargada, el
piloto de carga permanece encendido en verde.
Nota: El piloto de carga se apaga después de unos
30 minutos para ahorrar energía.
Carga
1 Enchufe la clavija pequeña a la afeitadora.
2 Enchufe el adaptador a la toma de corriente.
,, El piloto de carga muestra el estado de carga de
la afeitadora (consulte la sección “Indicaciones
de carga” en este capítulo).
Utilización de la afeitadora
Nota: La afeitadora no se puede utilizar enchufada
directamente a la red. Esta afeitadora se puede utilizar
en el baño o en la ducha. Por lo tanto, no se puede
utilizar enchufada directamente a la red eléctrica por
motivos de seguridad.
Consejos y trucos de afeitado
-- Esta afeitadora es adecuada para uso en seco y
húmedo. Utilice la afeitadora con gel o espuma
para el afeitado para conseguir una comodidad
adicional para la piel, o utilice la afeitadora en seco
para mayor facilidad.
Español 27
Nota: Le aconsejamos utilizar la afeitadora con gel o
espuma de afeitado cuando la utilice para un afeitado
en húmedo. No utilice crema de afeitar espesa o aceite
de afeitado con esta afeitadora.
-- Para unos resultados de afeitado óptimos, realice
movimientos circulares durante el uso.
-- La afeitadora es resistente al agua y se puede
utilizar en el baño o en la ducha.
-- Puede que su piel necesite de 2 a 3 semanas para
acostumbrarse al sistema de afeitado Philips.
Afeitado húmedo
1 Humedézcase la piel.
2 Aplique espuma o gel de afeitar sobre la piel.
3 Enjuague la unidad de afeitado bajo el grifo
para asegurarse de que se desliza suavemente
sobre la piel.
4 Pulse el botón de encendido/apagado una vez
para encender la afeitadora.
5 Desplace los cabezales de afeitado en
movimientos circulares sobre la piel.
Nota: Enjuague la afeitadora bajo el grifo regularmente
para asegurarse de que sigue deslizándose suavemente
sobre la piel.
6 Tras el afeitado, pulse el botón de encendido/
apagado una vez para apagar la afeitadora y
séquese la cara.
28
Español
7 Limpie la afeitadora (consulte el capítulo
“Limpieza y mantenimiento”).
Nota: Asegúrese de que enjuaga toda la espuma y gel
de afeitar de la afeitadora.
Afeitado en seco
1 Pulse el botón de encendido/apagado una vez
para encender la afeitadora.
2 Desplace los cabezales de afeitado en
movimientos circulares sobre la piel.
3 Tras el afeitado, pulse el botón de encendido/
apagado una vez para apagar la afeitadora.
4 Limpie la afeitadora (consulte el capítulo
“Limpieza y mantenimiento”).
Recortado (sólo modelo AT891)
Puede utilizar el cortapatillas para recortar las patillas
y el bigote.
1 Deslice el botón del cortapatillas hacia abajo
para abrirlo.
2 Pulse el botón de encendido/apagado una vez
para encender la afeitadora.
,, Ya puede comenzar a utilizar el cortapatillas.
3 Tras recortar, pulse el botón de encendido/
apagado una vez para apagar la afeitadora.
4 Limpie el recortador (consulte el capítulo
“Limpieza y mantenimiento”).
Español 29
5 Cierre el cortapatillas (clic).
Limpieza y mantenimiento
No utilice nunca aire comprimido, estropajos,
agentes abrasivos ni líquidos agresivos, como
gasolina o acetona, para limpiar el aparato.
-- Para conseguir un rendimiento de afeitado óptimo,
limpie la afeitadora después de cada uso.
-- Una limpieza frecuente garantiza mejores
resultados en el afeitado.
-- Para obtener los mejores resultados de limpieza,
le aconsejamos utilizar el spray limpiador de
Philips (HQ110).
-- Tenga cuidado con el agua caliente. Compruebe
siempre que el agua no esté demasiado caliente
para evitar quemarse las manos.
Nota: Cuando enjuague la afeitadora es posible que
salga agua por el orificio de su parte inferior. Esto es
normal y no es peligroso, ya que todos los sistemas
electrónicos están dentro de una unidad motora
hermética en el interior de la afeitadora.
30
Español
Limpieza de la unidad de afeitado bajo el
grifo
1 Apague la afeitadora.
2 Pulse el botón de liberación para abrir la
unidad de afeitado.
3 Enjuague la unidad de afeitado y la cámara de
recogida del pelo durante 30 segundos con
agua caliente del grifo.
Tenga cuidado con el agua caliente. Compruebe
siempre que el agua no esté demasiado caliente
para evitar quemarse las manos.
-- Enjuague la cámara de recogida de pelo y el
interior de la unidad de afeitado.
-- Enjuague el exterior de la unidad de afeitado.
4 Cierre la unidad de afeitado y sacuda el exceso
de agua.
Tenga cuidado de no golpear la unidad de afeitado
contra algo al sacudir el exceso de agua.
No seque nunca la unidad de afeitado ni la cámara
de recogida del pelo con una toalla o un paño, ya
que esto podría dañar la unidad de afeitado.
5 Vuelva a abrir la unidad de afeitado y déjela
abierta para que se seque completamente.
Español 31
Limpieza de la unidad de afeitado con el
cepillo de limpieza
1 Apague la afeitadora.
2 Pulse el botón de liberación para abrir la
unidad de afeitado.
3 Quite la unidad de afeitado de la afeitadora.
4 Gire el cierre de seguridad en sentido
contrario al de las agujas del reloj (1) y saque
el marco de retención (2).
5 Retire y limpie los cabezales de afeitado de uno
en uno. Cada cabezal de afeitado consta de una
cuchilla y su protector.
Nota: No limpie más de una cuchilla y su protector
al mismo tiempo, ya que forman conjuntos entre sí. Si
mezcla accidentalmente las cuchillas y los protectores,
puede que tarde varias semanas en volver a obtener el
óptimo rendimiento en el afeitado.
-- Extraiga la cuchilla del protector y límpielo con el
cepillo.
32
Español
-- Limpie el interior y exterior del protector con el
cepillo.
6 Vuelva a colocar los cabezales en la unidad de
afeitado.
Modelo AT891: Asegúrese de que los salientes de
los cabezales de afeitado encajan exactamente en
las ranuras.
7 Coloque de nuevo el marco de retención en la
unidad de afeitado y gire el cierre de seguridad
en el sentido de las agujas del reloj.
8 Inserte el saliente de la unidad de afeitado en la
ranura de la parte superior de la afeitadora. (1).
A continuación, cierre la unidad de afeitado (2).
Nota: Si la unidad de afeitado no se cierra fácilmente,
compruebe que ha introducido correctamente los
cabezales de afeitado y que el marco de retención
tiene puesto el cierre de seguridad.
Limpieza del recortador con el cepillo de
limpieza (sólo modelo AT891)
Limpie el cortapatillas cada vez que lo utilice.
1 Apague la afeitadora y desconéctela de la toma
de corriente.
Español 33
2 Deslice el botón del cortapatillas hacia abajo
para abrirlo.
3 Limpie el cortapatillas con el lado de cerdas
cortas del cepillo de limpieza. Cepille hacia
arriba y hacia abajo a lo largo de los dientes del
cortapatillas.
4 Cierre el recortador (clic).
Consejo: Para conseguir unos resultados óptimos,
lubrique los dientes del cortapatillas con una gota de
aceite de máquina de coser cada seis meses.
Almacenamiento
-- Para evitar deterioros, coloque la tapa protectora
en la afeitadora.
Sustitución
Para un rendimiento de afeitado óptimo, le
aconsejamos que sustituya los cabezales de afeitado
cada dos años. Sustituya inmediatamente los
cabezales de afeitado si están dañados.
Sustituya los cabezales de afeitado únicamente por
cabezales de afeitado originales Philips HQ8.
34
Español
1 Desconecte la afeitadora de la toma de
corriente.
2 Pulse el botón de liberación para abrir la
unidad de afeitado.
3 Quite la unidad de afeitado de la afeitadora.
4 Gire el cierre de seguridad en sentido
contrario al de las agujas del reloj (1) y saque
el marco de retención (2).
5 Quite los cabezales de afeitado y coloque unos
nuevos en la unidad de afeitado.
Asegúrese de que los salientes de los cabezales de
afeitado encajan exactamente en las ranuras.
6 Coloque de nuevo el marco de retención en la
unidad de afeitado y gire el cierre de seguridad
en el sentido de las agujas del reloj.
7 Inserte el saliente de la unidad de afeitado en la
ranura de la parte superior de la afeitadora. (1).
A continuación, cierre la unidad de afeitado (2).
Nota: Si la unidad de afeitado no se cierra fácilmente,
compruebe que ha introducido correctamente los
cabezales de afeitado y que el marco de retención
tiene puesto el cierre de seguridad.
Piezas de repuesto
Las siguientes piezas de repuesto están disponibles:
-- Tapa protectora
-- Adaptador HQ8505
-- Cabezales de afeitado Philips HQ8
-- Cepillo de limpieza
Español 35
Cabezales de afeitado
Para mantener el máximo rendimiento de
la afeitadora, asegúrese de que la limpia con
regularidad y reemplace los cabezales de afeitado en
el momento recomendado.
-- Le aconsejamos reemplazar sus cabezales de
afeitado cada dos años. Sustitúyalos siempre por
cabezales de afeitado Philips HQ8.
-- Utilice spray limpiador (HQ110) para limpiar los
cabezales de afeitado en profundidad.
Medio ambiente
-- Al final de su vida útil, no tire el aparato junto con
la basura normal del hogar. Llévelos a un punto
de recogida oficial para su reciclado. De esta
manera ayudará a conservar el medio ambiente.
-- La batería recargable de la afeitadora contiene
sustancias que pueden contaminar el medio
ambiente. Quite siempre la batería antes de
deshacerse de la afeitadora o de llevarla a un
punto de recogida oficial. Deposite la batería en
un lugar de recogida oficial. Si no puede quitar la
batería, puede llevar la afeitadora a un centro de
servicio de Philips. El personal del mismo extraerá
la batería y se deshará de ella de forma no
perjudicial para el medio ambiente.
Cómo quitar la batería recargable de la
afeitadora
Quite la batería únicamente cuando deseche la
afeitadora. Asegúrese de que la batería recargable
esté completamente descargada cuando la quite
del aparato.
36
Español
1 Desconecte la afeitadora de la toma de
corriente.
2 Deje que la afeitadora funcione hasta que se
pare.
3 Desenrosque los tornillos de la parte posterior
de la afeitadora y en la cámara de recogida del
pelo.
4 Retire el panel frontal y el panel de la parte
posterior.
5 Doble los seis ganchos hacia un lado y saque la
unidad motora.
Tenga cuidado con los ganchos, ya que están
afilados.
6 Quite la pila.
Tenga cuidado con las tiras de la batería ya que
están afiladas.
No vuelva a conectar la afeitadora a la toma de
corriente una vez que haya quitado la batería
recargable.
Garantía y servicio
Si necesita información o si tiene algún problema,
visite la página Web de Philips en www.philips.
com/support, o póngase en contacto con el Servicio
de Atención al Cliente de Philips en su país (hallará
el número de teléfono en el folleto de la garantía
mundial). Si no hay Servicio de Atención al Cliente
de Philips en su país, diríjase a su distribuidor local
Philips.
Español 37
Restricciones de la garantía
Los cabezales de afeitado (cuchillas y protectores)
no están cubiertos por las condiciones de la garantía
internacional debido a que están sujetos a desgaste.
Guía de resolución de problemas
En este capítulo se resumen los problemas más
frecuentes que pueden surgir con el aparato. Si
no puede resolver el problema con la siguiente
información, visite www.philips.com/support para
consultar una lista de preguntas más frecuentes o
póngase en contacto con el Servicio de Atención al
Cliente en su país.
Problema
Posible causa
Solución
La
afeitadora
no afeita tan
bien como
antes.
Los cabezales
de afeitado
están gastados o
deteriorados.
Sustituya los cabezales de
afeitado (consulte el capítulo
“Sustitución”).
Los residuos de
espuma o gel
se atascan en
los cabezales de
afeitado.
Enjuague la unidad de afeitado
durante un rato con agua
caliente del grifo (consulte
la sección “Limpieza de la
unidad de afeitado bajo el
grifo” en el capítulo “Limpieza y
mantenimiento”).
Hay pelos largos
obstruyendo
los cabezales de
afeitado.
Limpie los cabezales de afeitado
de uno en uno (consulte la
sección “Limpieza de la unidad
de afeitado con el cepillo de
limpieza” del capítulo “Limpieza y
mantenimiento”).
38
Español
Problema
La
afeitadora
no funciona
cuando
pulso el
botón de
encendido/
apagado.
La
afeitadora
no funciona,
aunque está
conectada
a la red
eléctrica.
Posible causa
Solución
No ha introducido
los cabezales
de afeitado
correctamente.
Asegúrese de que los salientes de
los cabezales de afeitado encajan
exactamente en las ranuras
(consulte la sección “Limpieza
de la unidad de afeitado con el
cepillo de limpieza”).
La batería
recargable está
descargada.
Recargue la batería (consulte el
capítulo “Carga”).
La temperatura
de la afeitadora
es demasiado
alta. En ese caso,
la afeitadora no
funciona.
En cuanto la temperatura de la
afeitadora descienda lo suficiente,
puede volver a encenderla.
Esta afeitadora
no está diseñada
para ser utilizada
enchufada
directamente a la
red eléctrica.
Recargue la batería (consulte el
capítulo “Carga”) y desconéctela
de la red eléctrica.
4222.002.5299.1