1
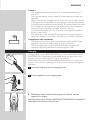
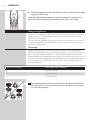
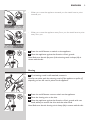
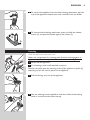
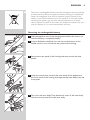
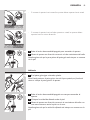
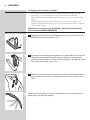
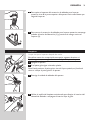
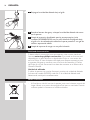
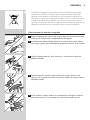
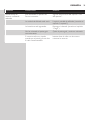
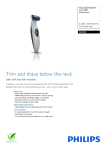
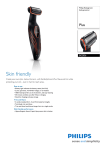
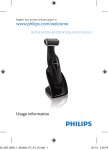
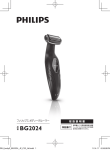
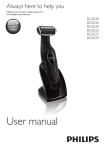
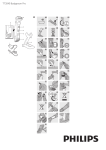
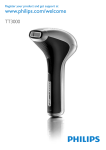
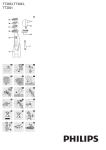
Always here to help you
Register your product and get support at
www.philips.com/welcome
BG2038
BG2036
BG2028
BG2026
BG2025
BG2024
User manual
1
BG2038, BG2036, BG2028, BG2026, BG2025, BG2024
English 6
Español 16
Français 26
Indonesia 36
한국어 46
Bahasa Melayu 56
Português 66
ภาษาไทย 76
Tiếng Việt 85
繁體中文 95
简体中文 104
6
English
Introduction
Congratulations on your purchase and welcome to Philips! To fully benefit
from the support that Philips offers, register your product at
www.philips.com/welcome.
The Philips Bodygroom offers you a safe, gentle, quick and smooth
shave and trim for every body part below the neckline. With this new
rechargeable shaver and trimmer in one you can easily shorten and
remove body hair wherever you like, wet or dry!
General description (Fig. 1)
1 Trimming comb 1 (3mm/0.11 inch)
2 Trimming comb 2 (5mm/0.19 inch) (BG2038/BG2036/BG2028/
BG2026 only)
3 Trimming comb 3 (7mm/0.27 inch) (BG2038/BG2036/BG2028/
BG2026 only)
4 Comb size indication (1, 2 or 3)
5 Shaving unit
6 On/off button
7 Battery status indicator
8Adapter
9 Cleaning brush (BG2038/BG2036/BG2028/BG2026 only)
10 Back shaving attachment (BG2038/BG2036 only)
11 Battery status indicator
12Adapter
13 Charging stand
Important
Read this user manual carefully before you use the appliance and save it for
future reference.
Danger
-- Keep the adapter dry.
Warning
-- Check if the voltage indicated on the adapter corresponds to the local
mains voltage before you connect the appliance.
-- The adapter contains a transformer. Do not cut off the adapter to
replace it with another plug, as this causes a hazardous situation.
-- This appliance is not intended for use by persons (including children)
with reduced physical, sensory or mental capabilities, or lack of
experience and knowledge, unless they have been given supervision or
instruction concerning use of the shaver by a person responsible for
their safety.
-- Children should be supervised to ensure they do not play with the
appliance.
-- Always check the appliance before you use it. Do not use the appliance
if it is damaged, as this may cause injury.
English
7
Caution
-- Use, charge and store the appliance at a temperature between 5°C
and 35°C.
-- Only use the adapter and the charging stand supplied to charge the
appliance.
-- Never immerse the charging stand in water nor rinse it under the tap.
-- If the appliance is subjected to a major change in temperature, pressure
or humidity, let the appliance acclimatise for 30 minutes before you use it.
-- If the adapter or charging stand is damaged, always have it replaced
with one of the original type in order to avoid a hazard.
-- Do not use the appliance if any of its parts is damaged or broken, as
this may cause injury.
-- This appliance is only intended for shaving and trimming body parts
below the neckline. Do not use it to shave or trim facial or scalp hair.
Compliance with standards
-- The appliance complies with the internationally approved IEC safety
regulations and can be safely used in the bath or shower.
-- This Philips appliance complies with all applicable standards and
regulations regarding exposure to electromagnetic fields.
Charging
Charging takes 1 hour (BG2038/BG2036) or 8 hours (BG2028/BG2026/
BG2025/BG2024) depending on the model. When the appliance is fully
charged, it has an operating time of up to 50 minutes.
When the battery status indicator flashes red, the battery is running low
(approx. 10 minutes of operating time left) and you need to recharge the
appliance.
1Insert the small plug into the charging stand.
2Put the appliance in the charging stand.
,, The battery status indicator flashes green to indicate that the
appliance is charging.
Note:The battery status indicator of BG2028, BG2026, BG2025 and BG2024
looks different, but works in the same way.
English
8
,, When the appliance is fully charged, the battery status indicator lights
up green continuously.
Note: If the fully charged appliance is still in the plugged-in charging stand
after 30 minutes, the battery status indicator goes out to save energy.
Using the appliance
Take your time when you first start to shave sensitive areas. You have to
acquire practice with the appliance. Your skin also needs some time to
adjust to the procedure.
You can use the appliance wet or dry to shave or trim hair on all parts of
the body below the neckline. Do not use this appliance to shave or trim
facial hair or scalp hair.
Trimming
BG2025 and BG2024 come with trimming comb 1. BG2038, BG2036,
BG2028 and BG2026 come with trimming combs 1, 2 and 3. The back of
each comb has been numbered 1, 2 and 3 (see the table below for the
corresponding hair lengths after trimming). A trimming comb allows you to
cut hair to a specific length (see the table below). If your appliance comes
with 3 combs, start trimming with trimming comb 3 to acquire practice
with this appliance.
Comb size indication
Hair length after trimming
1
3mm/0.11 inch
2
5mm/0.19 inch
3
7mm/0.27 inch
1Snap the appropriate trimming comb onto the appliance. Make sure
the teeth of the comb point in the direction in which you are going
to move the appliance.
English
9
-- When you move the appliance towards you, the teeth have to point
towards you.
-- When you move the appliance away from you, the teeth have to point
away from you.
2Press the on/off button to switch on the appliance.
3Move the appliance against the direction of hair growth.
Note: Make sure that the flat part of the trimming comb is always fully in
contact with the skin.
Shaving
1If a trimming comb is still attached, remove it.
Note:You can either push the trimming comb off the appliance or pull it off,
depending on how the comb is placed on the appliance.
2Press the on/off button once to switch on the appliance.
3Place the shaving unit on the skin.
4Move the appliance against the direction of hair growth with one
hand, while you stretch the skin with the other hand.
Note: Make sure that the shaving unit is always fully in contact with the skin.
10
English
Trimming and shaving tips
-- If the hairs are longer than 10mm, you can trim them first with
trimming comb 1 to a length of 3mm to make shaving easier.
-- You get the best trimming results when the skin and hair are dry.
-- You can use the appliance to shave in the shower or bath. To ensure
easier gliding, apply some shaving foam or shower gel to your skin.
Shaving with the back shaving attachment (BG2036/BG2038
only)
1Press and hold the release button (1) and open the back shaving
attachment (2).
2Place the bottom of the appliance in the lower part of the holder of
the back shaving attachment. Then press the top against the top part
of the holder until it locks into position with a click.
3Shave your back by moving the back shaving attachment with the
appliance up and down by its handle.
Note: For your convenience, the back shaving attachment can be folded to
different angles.
English
11
4To remove the appliance from the back shaving attachment, pull the
top of the appliance towards you until it unlocks from the holder.
5To close the back shaving attachment, press and hold the release
button (1) and push the handle against the holder (2).
Cleaning
Clean the appliance after every use.
Never use compressed air, scouring pads, abrasive cleaning agents or
aggressive liquids such as petrol or acetone to clean the appliance.
1Switch off the appliance.
2If a trimming comb is still attached, remove it.
Note:You can either push the trimming comb off the appliance or pull it off,
depending on how the comb is placed on the appliance.
3Pull the shaving unit out of the appliance.
4Use the cleaning brush supplied to clean the inside of the shaving
head or rinse the inside under the tap.
12
English
5Rinse the shaving unit under the tap.
6Shake off excess water and place the shaving unit back into the
appliance.
7Clean the back shaving attachment (BG2038/BG2036 only) with a
moist cloth. Rinse it under the tap if you used it to shave your back
with shower gel or shaving foam.
8Clean the charging stand with a moist cloth.
Ordering accessories
To purchase accessories for this appliance, please visit our online shop at
www.shop.philips.com/service. If the online shop is not available in
your country, go to your Philips dealer or a Philips service centre. If you
have any difficulties obtaining accessories for your appliance, please contact
the Philips Consumer Care Centre in your country. You find its contact
details in the worldwide guarantee leaflet.
Shaving unit
If you use the appliance very frequently, replace the shaving unit (type
number BG2000) every year. Replace a damaged shaving unit immediately.
Environment
-- Do not throw away the appliance with the normal household waste
at the end of its life, but hand it in at an official collection point for
recycling. By doing this, you help to preserve the environment.
English
13
-- The built-in rechargeable battery contains substances that may pollute
the environment. Always remove the battery before you discard and
hand in the appliance at an official collection point. Dispose of the
battery at an official collection point for batteries. If you have trouble
removing the battery, you can also take the appliance to a Philips
service centre. The staff of this centre will remove the battery for you
and will dispose of it in an environmentally safe way.
Removing the rechargeable battery
1Take the appliance out of the charging stand and let the motor run
until the battery is completely empty.
2Insert a flathead screwdriver into the slot at the bottom of the
handle and turn it to unlock the rear panel of the housing.
3Remove the rear panel of the housing and then remove the side
panels.
4Undo the screws that connect the inner body of the appliance to
the front panel of the housing and separate the inner body from the
front panel.
5Turn over the inner body. Then detach the cover of the inner body
with the control panel from the inner body.
14
English
6Lift the printed-circuit board out of the inner body, turn it over and
cut the wires that connect the battery to the power unit.
Guarantee and service
If you need service or information or if you have a problem, please visit
the Philips website at www.philips.com/support or contact the Philips
Consumer Care Centre in your country. You find its phone number in the
worldwide guarantee leaflet. If there is no Consumer Care Centre in your
country, go to your local Philips dealer.
Guarantee restrictions
The shaving unit is not covered by the terms of the international guarantee
because it is subject to wear.
Troubleshooting
This chapter summarises the most common problems you could
encounter with the appliance. If you are unable to solve the problem with
the information below, visit www.philips.com/support for a list of frequently
asked questions or contact the Consumer Care Centre in your country.
Problem
Possible cause
Solution
The appliance does not
work.
The battery is empty and/or the
appliance does not charge.
Recharge the battery (see chapter
‘Charging’) and check if you have followed
all instructions in chapters ‘Important’ and
‘Charging’.
The appliance makes
more noise and/or
vibrates more strongly
than usual.
One or more parts are broken,
perhaps because you dropped
the appliance.
Take the appliance to your dealer or to
an authorised Philips service centre for
examination or repair.
If this appliance is used
Do not use the appliance professionally.
professionally, it will reach the end
of its life earlier
The operating time on
a full charge decreases.
The shaving unit is dirty.
Clean the shaving unit (see chapter
‘Cleaning’).
The shaving unit is worn.
Replace the shaving unit.
The shaving unit is dirty.
Clean the shaving unit (see chapter
‘Cleaning’).
English
15
Problem
Possible cause
Solution
Reduced trimming and/
or shaving performance
You use the appliance in the
wrong way.
Follow the instructions in chapter ‘Using
the appliance’.
The shaving unit is dirty.
Clean the shaving unit (see chapter
‘Cleaning’).
The battery is running low.
Recharge the battery (see chapter
‘Charging’).
You have not attached the
trimming comb properly.
Remove the trimming comb and reattach
it.
If you are trimming very curly
hair, the trimming comb may not
be able to straighten the hair
properly.
Try straightening the hair with your hands
during trimming.
16
Español
Introducción
Enhorabuena por la compra de este producto y bienvenido a Philips. Para
sacar el mayor partido de la asistencia que Philips le ofrece, registre su
producto en www.philips.com/welcome.
Bodygroom de Philips le ofrece un afeitado y recorte suave, rápido y
seguro de cualquier zona del cuerpo por debajo del cuello. Con esta nueva
afeitadora corporal recargable podrá recortar y afeitar fácilmente el vello
corporal incluso bajo la ducha.
Descripción general (fig. 1)
1 Peine-guía 1 (3 mm/0,11 pulgadas)
2 Peine-guía 2 (5 mm/0,19 pulgadas) (solo modelos BG2038/BG2036/
BG2028/BG2026)
3 Peine-guía 3 (7 mm/0,27 pulgadas) (solo modelos BG2038/BG2036/
BG2028/BG2026)
4 Indicación de tamaño del peine-guía (1, 2 o 3)
5 Unidad de afeitado
6 Botón de encendido/apagado
7 Indicador del estado de la pila
8 Adaptador de corriente
9 Cepillo de limpieza (solo modelo BG2038/BG2036/BG2028/BG2026)
10 Accesorio de afeitado para la parte posterior (solo modelo BG2038/
BG2036)
11 Indicador del estado de la pila
12 Adaptador de corriente
13 Soporte de carga
Importante
Antes de usar el aparato, lea atentamente este manual de usuario y
consérvelo por si necesitara consultarlo en el futuro.
Peligro
-- Mantenga el adaptador seco.
Advertencia
-- Antes de enchufar el aparato, compruebe si el voltaje indicado en el
adaptador se corresponde con el voltaje de red local.
-- El adaptador incorpora un transformador. No corte el adaptador
para sustituirlo por otra clavija, ya que podría provocar situaciones de
peligro.
-- Este aparato no debe ser usado por personas (adultos o niños) con
su capacidad física, psíquica o sensorial reducida, ni por quienes no
tengan los conocimientos y la experiencia necesarios, a menos que
sean supervisados o instruidos acerca del uso de la afeitadora por una
persona responsable de su seguridad.
-- Asegúrese de que los niños no jueguen con este aparato.
-- Compruebe siempre el aparato antes de utilizarlo. No utilice el aparato
si está dañado, ya que podría ocasionar lesiones.
Español
17
Precaución
-- Utilice, cargue y guarde el aparato a una temperatura entre 5 °C y 35 °C.
-- Utilice solo el adaptador y el soporte de carga suministrado para
cargar el aparato.
-- No sumerja nunca el soporte de carga en agua ni lo enjuague bajo el
grifo.
-- Si el aparato sufre un cambio brusco de temperatura, presión o
humedad, deje que se aclimate durante 30 minutos antes de utilizarlo.
-- Si el adaptador o el soporte de carga están dañados, sustitúyalos siempre
por otros del modelo original para evitar situaciones de peligro.
-- No utilice el aparato si alguna de sus piezas está dañada o rota, ya que
podría ocasionar lesiones.
-- Este aparato ha sido diseñado únicamente para afeitar y recortar el
vello de zonas del cuerpo por debajo del cuello. No lo utilice para
afeitarse la cara o la cabeza.
Cumplimiento de normas
-- El aparato cumple las normas de seguridad IEC aprobadas
internacionalmente, y se puede utilizar de manera segura en el baño o
en la ducha.
-- Este aparato de Philips cumple los estándares y las normativas
aplicables sobre exposición a campos electromagnéticos.
Carga
La carga tarda 1 hora (BG2038/BG2036) u 8 horas (BG2028/BG2026/
BG2025/BG2024) en función del modelo. Cuando el aparato esté
completamente cargado, proporcionará un tiempo de funcionamiento de
hasta 50 minutos.
Si el indicador de estado de la batería parpadea en rojo, la batería se
está agotando (quedan aproximadamente 10 minutos de tiempo de
funcionamiento) y debe recargar el aparato.
1Inserte la clavija pequeña en el soporte de carga.
2Coloque el aparato en el soporte de carga.
,, El indicador de estado de la batería parpadea en verde para indicar
que el aparato se está cargando.
Nota: El indicador de estado de la batería de los modelos BG2028, BG2026,
BG2025 y BG2024 parece diferente, pero funciona de la misma forma.
18
Español
,, Cuando el aparato está completamente cargado, el indicador de
estado de la batería se ilumina en verde de forma continua.
Nota: Si el aparato completamente cargado sigue colocado en el soporte de
carga después de 30 minutos, el indicador de estado de la batería se apaga
para ahorrar energía.
Uso del aparato
Tómese su tiempo la primera vez que afeite zonas sensibles. Debe adquirir
práctica con el aparato. Su piel también necesita algún tiempo para
adaptarse al procedimiento.
Puede utilizar el aparato para afeitar o recortar en seco o en húmedo el
vello de cualquier zona del cuerpo por debajo del cuello. No utilice este
aparato para afeitarse o recortase el vello de la cara o la cabeza.
Cómo recortar
Los modelos BG2025 y BG2024 incluyen el peine-guía 1. Los modelos
BG2038, BG2036, BG2028 y BG2026 incluyen los peines-guía 1, 2 y 3. La
parte posterior de cada peine-guía tiene los números 1, 2 y 3 (consulte
la tabla siguiente para conocer las longitudes correspondientes después
de recortar). Un peine-guía le permite cortar el pelo con una longitud
específica (consulte la tabla siguiente). Si el aparato incluye 3 peines-guía,
comience a recortar con el peine-guía 3 para adquirir práctica con el
aparato.
Indicación de tamaño del peine-guía
Longitud del pelo después del corte
1
3 mm/0,11 pulgadas
2
5 mm/0,19 pulgadas
3
7 mm/0,27 pulgadas
1Coloque el peine-guía adecuado en el aparato. Asegúrese de que las
puntas del peine-guía apuntan en la dirección hacia la que va a mover
el aparato.
Español
19
-- Si mueve el aparato hacia usted, las puntas deben apuntar hacia usted.
-- Si mueve el aparato hacia el lado opuesto a usted, las puntas deben
apuntar hacia la misma dirección.
2Pulse el botón de encendido/apagado para encender el aparato.
3Mueva el aparato en dirección contraria a la de crecimiento del vello.
Nota: Asegúrese de que la parte plana del peine-guía esté siempre en contacto
con la piel.
Afeitado
1Si el peine-guía sigue colocado, quítelo.
Nota: Puede presionar el peine-guía o tirar de él para quitarlo, en función de
cómo se coloque el peine-guía en el aparato.
2Pulse el botón de encendido/apagado una vez para encender el
aparato.
3Coloque la unidad de afeitado sobre la piel.
4Mueva el aparato en dirección contraria al crecimiento del vello con
una mano mientras estira la piel con la otra.
Nota: Asegúrese de que la unidad de afeitado esté siempre en contacto con la
piel.
20
Español
Consejos para recortar y afeitar
-- Si el vello tiene más de 10 mm, puede recortarlo primero con el
peine-guía 1 a una longitud de 3 mm para facilitar el afeitado.
-- Obtendrá los mejores resultados de recorte si la piel y el vello están
secos.
-- Puede utilizar el aparato para afeitarse en la ducha o el baño. Para
facilitar el deslizamiento, ponga un poco de espuma de afeitar o gel de
ducha sobre la piel.
Afeitado con el accesorio de afeitado para la parte posterior
(solo modelos BG2036/BG2038)
1Mantenga pulsado el botón de liberación (1) y abra el accesorio de
afeitado para la parte posterior (2).
2Coloque la parte inferior del aparato en la parte inferior del soporte
del accesorio de afeitado para la parte posterior. A continuación,
presione la parte superior contra la parte superior del soporte hasta
que encaje en su lugar con un clic.
3Aféitese la parte posterior moviendo el accesorio de afeitado para la
parte posterior junto con el mango del aparato hacia arriba y hacia
abajo.
Nota: Para su comodidad, el accesorio de afeitado para la parte posterior se
puede plegar en diferentes ángulos.
Español
21
4Para quitar el aparato del accesorio de afeitado para la parte
posterior, tire de la parte superior del aparato hacia usted hasta que
salga del soporte.
5Para cerrar el accesorio de afeitado para la parte posterior, mantenga
pulsado el botón de liberación (1) y presione el mango contra el
soporte (2).
Limpieza
Limpie siempre el aparato después de usarlo.
No utilice nunca aire comprimido, estropajos, agentes abrasivos ni
líquidos agresivos, como gasolina o acetona, para limpiar el aparato.
1Apague el aparato.
2Si el peine-guía sigue colocado, quítelo.
Nota: Puede presionar el peine-guía o tirar de él para quitarlo, en función de
cómo se coloque el peine-guía en el aparato.
3Extraiga la unidad de afeitado del aparato.
4Utilice el cepillo de limpieza suministrado para limpiar el interior del
cabezal de afeitado o enjuague el interior bajo el grifo.
22
Español
5Enjuague la unidad de afeitado bajo el grifo.
6Sacuda el exceso de agua y coloque la unidad de afeitado de nuevo
en el aparato.
7Limpie el accesorio de afeitado para la parte posterior (solo
modelos BG2038/BG2036) con un paño húmedo. Enjuáguelo bajo
el grifo si lo ha utilizado para afeitarse la parte posterior con gel de
ducha o espuma de afeitar.
8Limpie el soporte de carga con un paño húmedo.
Solicitud de accesorios
Si desea adquirir accesorios para este aparato, visite nuestra tienda en
línea en www.shop.philips.com/service. Si la tienda en línea no está
disponible en su país, diríjase a su distribuidor Philips o a un centro de
servicio Philips. Si tiene cualquier dificultad para obtener accesorios para
su aparato, póngase en contacto con el Servicio de Atención al Cliente
de Philips en su país. Encontrará los datos de contacto en el folleto de la
Garantía Mundial.
Unidad de afeitado
Si utiliza el aparato con mucha frecuencia, sustituya la unidad de afeitado
(número de modelo BG2000) cada año. Si la unidad de afeitado está
deteriorada, sustitúyala inmediatamente.
Medio ambiente
-- Al final de su vida útil, no tire el aparato junto con la basura normal del
hogar. Llévelo a un punto de recogida oficial para su reciclado. De esta
manera ayudará a conservar el medio ambiente.
Español
23
-- La batería recargable incorporada contiene sustancias que pueden
contaminar el medio ambiente. Quite siempre la batería antes de
deshacerse del aparato o de llevarlo a un punto de recogida oficial.
Deposite la batería en un lugar de recogida oficial. Si no puede extraer
la batería, puede llevar el aparato a un servicio de asistencia técnica
de Philips. El personal del servicio de asistencia extraerá la batería y se
deshará de ella de forma no perjudicial para el medio ambiente.
Cómo extraer la batería recargable
1Saque el aparato del soporte de carga y deje que el motor funcione
hasta que la batería esté completamente descargada.
2Introduzca un destornillador plano en la ranura de la parte inferior
del mango y gírelo para desbloquear el panel posterior de la carcasa.
3Quite el panel posterior de la carcasa y, a continuación, quite los
paneles laterales.
4Desenrosque los tornillos que conectan el cuerpo interior del
aparato con el panel frontal de la carcasa y separe el cuerpo interior
del panel frontal.
5Dé la vuelta al cuerpo interior. A continuación, extraiga la cubierta
del cuerpo interior con el panel de control del cuerpo interior.
24
Español
6Extraiga el circuito impreso del cuerpo interior, dele la vuelta y corte
los cables que conectan la batería a la unidad de alimentación.
Garantía y servicio
Si necesita información o si tiene algún problema, visite la página Web de
Philips en www.philips.com/support, o póngase en contacto con el
Servicio de Atención al Cliente de Philips de su país. Hallará el número de
teléfono en el folleto de la garantía mundial. Si no hay Servicio de Atención
al Cliente en su país, diríjase a su distribuidor local de Philips.
Restricciones de la garantía
La unidad de afeitado no está cubierta por las condiciones de la garantía
internacional debido a que está sujeta a desgaste.
Guía de resolución de problemas
En este capítulo se resumen los problemas más frecuentes que pueden
surgir con el aparato. Si no puede resolver el problema con la siguiente
información, visite www.philips.com/support para consultar una lista de
preguntas más frecuentes o póngase en contacto con el Servicio de
Atención al Cliente en su país.
Problema
Posible causa
Solución
El aparato no funciona.
La batería está vacía o el aparato
no se carga.
Recargue la batería (consulte el capítulo
“Carga”) y compruebe que ha seguido
las instrucciones de los capítulos
“Importante” y “Carga”.
El aparato produce más Una o más piezas están rotas,
ruido o vibra más de lo quizás porque el aparato se ha
normal.
caído.
El tiempo de
funcionamiento con
una carga completa se
ha reducido.
Lleve el aparato a su distribuidor o a un
centro de servicio autorizado por Philips
para su revisión o reparación.
Si el aparato se utiliza
profesionalmente, llegará al final
de su vida útil antes
No utilice el aparato profesionalmente.
La unidad de afeitado está sucia.
Limpie la unidad de afeitado (consulte el
capítulo “Limpieza”).
La unidad de afeitado está
desgastada.
Sustituya la unidad de afeitado.
La unidad de afeitado está sucia.
Limpie la unidad de afeitado (consulte el
capítulo “Limpieza”).
Español
Problema
Posible causa
Solución
Rendimiento de
recorte o afeitado
reducido
Está utilizando el aparato de
forma incorrecta.
Siga las instrucciones del capítulo “Uso
del aparato”.
La unidad de afeitado está sucia.
Limpie la unidad de afeitado (consulte el
capítulo “Limpieza”).
La batería se está agotando.
Recargue la batería (consulte el capítulo
“Carga”).
No ha colocado el peine-guía
correctamente.
Quite el peine-guía y vuelva a colocarlo.
Si recorta vello muy rizado,
puede que el peine-guía no alise
el vello correctamente.
Intente alisar el vello con las manos
mientras lo recorta.
25