1
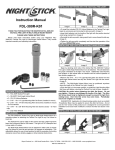
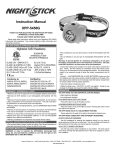
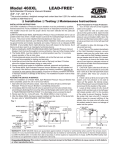
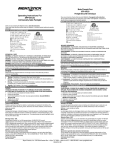
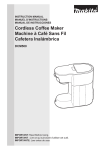
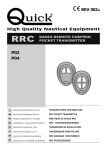
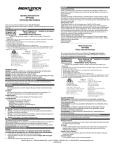
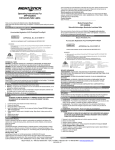
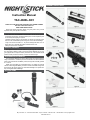
ASSEMBLY INSTRUCTIONS Instruction Manual TAC-460XL-K01 THANK YOU FOR SELECTING THE NIGHTSTICK XTREME LUMENS TACTICAL LONG GUN LIGHT KIT SAVE THESE INSTRUCTIONS Please read these instructions before using this product. They include important safety and operation information. WARNINGS NOT FOR USE IN HAZARDOUS LOCATIONS. Do not use this product in explosive atmospheres, near flammable liquids, or where explosion proof or intrinsically safe lighting is required. DO NOT use this product in the proximity of vehicles or equipment when there is a risk of flammable liquids coming into contact with the flashlight. Light can become hot while on. To prevent damage DO NOT cover or place next to any potentially flammable materials while in use. Keep out of the reach of children. PRODUCT OVERVIEW The Nightstick Xtreme Lumens Tactical Long Gun Light Kit contains all of the components needed to add a high-power tactical flashlight to any long gun equipped with a mil spec Picatinny or Weaver rail. The included remote pressure switch provides momentary on/off control over the light. PERFORMANCE INFORMATION The TAC-460XL flashlight is rated at 800 lumens with a beam distance rating of 205 meters. Powered by the two included CR-123 Lithium batteries inside of the included CR-123 Battery Carrier, the light will nominally operate for 1.5 hours. NOTE: The TAC-460XL is rechargeable-ready. By adding the optional Lithium-ion Rechargeable Battery, the wall or vehicle mountable Charger and the AC and/or DC Power Supply, the TAC-460XL flashlight can operate as a fully rechargeable tactical flashlight. INCLUDED ITEMS Bayco Products, Inc. • 640 South Sanden Blvd. • Wylie, TX 75098 • 1-800-233-2155 • 1-469-326-9400 • www.mynightstick.com INS-T460XL-K01-15 The TAC-460XL tactical flashlight comes with the tail cap switch already attached. As such, the light can be used right out of the packaging as a conventional tactical flashlight once the included CR-123 batteries and CR123 Battery Carrier are installed. This light may be converted back to this configuration at any time. The Remote Pressure Switch provides Momentary On/Off operation of the light only. Using this switch, gives the operator full and instant control over when the light is on, and when it is off STEPS NECESSARY TO ASSEMBLE THE NIGHTSTICK XTREME LUMENS TACTICAL LONG GUN KIT 1. Remove the Tail Cap Switch (Figure 1-A) and the CR-123 Battery Carrier (Figure 1-B). NOTE: Keep the Tail Cap Switch for future use if this light is to ever be converted back to a conventional Tactical Flashlight. If the Quad Lock Mount has been positioned correctly (see Step 5 above), changing the batteries may be accomplished without removing the light from the Quad Lock Mount, and depending on your installation location, it may be possible to change the batteries without removing the mount from your weapon. 2. Install the two included CR-123 Batteries (Figure 2-A) into the CR-123 Battery Carrier (Figure 2-B). The positive terminals on each battery should be oriented in the direction of the arrow on the CR-123 Battery Carrier and then inserted into the flashlight with the + end terminals pointing in the direction of the flashlight’s bezel (Figure 3-A). To change the batteries, first separate the two halves of the Velcro Strip from each other so that one half stays adhered to your weapon and the other remains attached to the back side of the Remote Pressure Switch. Next unscrew the Remote Pressure Switch, remove the CR-123 Battery Carrier and replace the batteries (see Step 2 above). 3. Install the Remote Pressure Switch (Figure 3-B) and tighten into place. 4. Test the operation of the Remote Pressure Switch (Figure 3-C) and the Side Switch (Figure 3-D). The Remote Pressure Switch provides Momentary On/Off operation of the light only. The Side Switch provides Momentary On/Off operation by pressing slightly on the button, or Constanton by pressing until the button clicks. 5. Decide where the Quad Lock Mount (Figure 4-A) is to be located on the light. It is important that the mount remain clear of the Remote Pressure Switch, otherwise accessing the batteries and CR-123 Battery Carrier will require complete disassembly of the Quad Lock Mount. 6. Once the appropriate location of the Quad Lock Mount along the handle of the light has been determined, remove all 4 of the Cap Head Screws (Figure 5-A) using the supplied Allen Wrench (Figure 5-B). 7. While holding the lower half of the Quad Lock Mount (Figure 5-C) in place on the light, press each of the top rails (Figure 5-D) in to alignment with the lower half and start all 4 of the Cap Head Screws (Figure 5-A). IMPORTANT: Get all 4 of the Cap Head Screws partially installed before tightening. 8. Begin tightening all 4 Cap Head Screws (Figure 6-A) by alternating back and forth and tightening a little at a time. When all 4 are tightened into place (DO NOT over-tighten), the gap between the lower half of the mount and the two top rails should be approximately 1/16” and should be equal on both sides. 9. Test fit the Quad Lock Mount on to the mil spec Picatinny or Weaver rail of the long gun (Figure 9-A). At the same time, determine the desired location of the Remote Pressure Switch (Figure 9-B). NOTE: The Remote Pressure Switch may be attached to any clean, dry flat surface on the long gun. The location indicated in Figure 9 is just one possibility. The actual location on your long gun will be determined by your weapon’s configuration and by your preferences. 10. Once the location of the Quad Lock Mount (Figure 9-A) and the Remote Pressure Switch (Figure 9-B) have been determined, clean the location on your weapon where the Remote Pressure Switch will be located as well as the inside surface of the Remote Pressure Switch (Figure 7-A) using the supplied Alcohol Swab (Figure 7-B). 11. Peel back one of the paper backings on the included Velcro Pressure Sensitive Adhesive Strip (Figure 8-A) and press it into place on the back side of the Remote Pressure Switch (Figure 8-B). 12. Attach the Quad Lock Mount with the light installed onto the mil spec Picatinny or Weave rail of your weapon (Figure 9-A) 13. Peel back the paper backing on the Velcro Pressure Sensitive Adhesive Strip and press it into place on the previously cleaned area on your long gun (Figure 9-B). 14. NOTE: The Pressure Sensitive Adhesive will set up and make a semipermanent bond after about 24 hours, so please do not move/remove the Pressure Sensitive Adhesive Strips once they have been placed. Additionally, do not attempt to separate the two Velcro sections until after that time. The Side Switch provides Momentary On/Off operation by pressing slightly on the button, or Constant-on by pressing until the button clicks. BAYCO PRODUCTS LIMITED LIFETIME WARRANTY WARRANTY Bayco Products, Inc. warrants this product to be free from defects in workmanship and materials for the original purchaser’s lifetime. The Limited Lifetime Warranty includes the LEDs, housing and lenses. Rechargeable batteries, chargers, switches, electronics and included accessories are warranted for a period of two years with proof of purchase. Disposable, nonrechargeable batteries are excluded from this warranty. Normal wear and failures which are caused by accidents, misuse, abuse, faulty installation and lightning damage are also excluded. In the event that Bayco Products, Inc. receives notice that any product does not conform to its warranty, the original purchaser’s sole and exclusive remedy, and Bayco Products, Inc.’s sole and exclusive liability, shall be for Bayco Products, Inc., at its sole option, to either repair or replace the non-conforming product in accordance with this limited warranty. The original purchaser shall follow the instructions below to qualify for a repair or replacement product. This is the only warranty, expressed or implied, including any warranty of merchantability or fitness for a particular purpose. IN NO EVENT WILL BAYCO PRODUCTS, INC. OR ITS AFFILIATES OR SUPPLIERS BE LIABLE FOR ANY INDIRECT, SPECIAL, INCIDENTAL OR CONSEQUENTIAL DAMAGES OF ANY KIND REGARDLESS OF THE FORM OF ACTION, WHETHER IN CONTRACT, TORT (INCLUDING NEGLIGENCE), STRICT LIABILITY OR OTHERWISE. THE TOTAL CUMULATIVE LIABILITY TO CUSTOMER, FROM ALL CAUSES OF ACTION AND ALL THEORIES OF LIABILITY, WILL BE LIMITED TO AND WILL NOT EXCEED THE PURCHASE PRICE OF THE PRODUCT PAID BY CUSTOMER. If this product is used for rental purposes, the warranty term is reduced to 90 days from the date of purchase. WARRANTY CLAIMS – USA Return the product to the place of purchase for all warranty related issues. If this is not possible, contact Bayco Customer Service at (800) 2332155 M-F 8-5 Central Time for a Return Goods Authorization (RGA). Do not return this product to Bayco without first receiving an RGA Number from Bayco Customer Service. When returning the product, the RGA Number must be written on the outside of the shipping box. WARRANTY CLAIMS – OUTSIDE OF USA Return the product to the place where purchased for all warranty related issues. EXTENT OF COVERED WARRANTY WORK Bayco will repair or replace this product at our option. If it is determined that the warranty is no longer in effect, Bayco will contact you with a repair estimate before beginning any work. WARRANTY QUESTIONS If you have any questions about this warranty or any other Bayco product inquiries, please contact Bayco Customer Service at (800) 2332155 M-F 8-5 Central Time. PRODUCT INFORMATION OPERATION The Nightstick Xtreme Lumens Tactical Long Gun Kit is now fully installed and ready for use. Date of Purchase __________________________________________ Bayco Products, Inc. • 640 South Sanden Blvd. • Wylie, TX 75098 • 1-800-233-2155 • 1-469-326-9400 • www.mynightstick.com INS-T460XL-K01-15 Mode d’emploi momentanément en appuyant légèrement sur le bouton, ou de laisser la lampe torche allumée en appuyant sur le bouton jusqu’à ce que vous entendiez un déclic. TAC-460XL-K01 5. Décidez où vous souhaitez placer le support Quad Lock (Figure 4-A). Il est important que le support ne touche pas le pressostat à distance, sinon il vous faudra complètement démonter le support Quad Lock pour accéder au porte-batterie CR-123. MERCI D’AVOIR CHOISI LE KIT DE LAMPE TORCHE TACTIQUE NIGHTSTICK XTREME LUMENS POUR ARME À FEU LONGUE. VEUILLEZ CONSERVER CES INSTRUCTIONS. Veuillez lire ces instructions avant d’utiliser ce produit. Elles comprennent des informations importantes liées à la sécurité et à l’utilisation de ce produit. AVERTISSEMENTS NE PAS UTILISER DANS DES ENDROITS DANGEREUX. Ne pas utiliser ce produit dans des atmosphères explosibles, à proximité de liquides inflammables, ou un endroit antidéflagrant ou un emplacement dont un éclairage à sécurité intrinsèque est requis. NE PAS utiliser ce produit à proximité de véhicules ou équipements quand il y a risque de liquides inflammables entrant en contact avec la lampe de poche. La lumière peut être chaude lorsqu’elle est allumée. Pour éviter tout dommage NE PAS couvrir ou placer à proximité de matériaux potentiellement inflammables pendant qu’elle est allumée. Garder hors de la portée des enfants. PRÉSENTATION DU PRODUIT Le kit de lampe torche tactique Nightstick Xtreme Lumens pour arme à feu longue contient tous les éléments requis pour installer une lampe torche tactique haute-puissance sur toute arme à feu longue équipée d’un rail Picatinny ou Weaver conforme aux spécifications militaires. Le pressostat à distance compris permet d’éteindre et allumer la lampe torche momentanément. INFORMATIONS FONCTIONNELLES Lampe torche TAC-460XL à flux lumineux de 800 lumens, avec une portée de 205 mètres. Alimentée par les deux batteries au lithium CR-123 comprises dans la boîte, placées dans le porte-batterie CR-123 compris dans la boîte, la torche devrait fonctionner pendant 1,5 heures. REMARQUE : La lampe torche TAC-460XL est prête à être rechargée. Si vous ajoutez la batterie rechargeable optionnelle au lithium-ion, le chargeur montable pour mur ou véhicule et l’alimentation c.a. et/ou c.c., la lampe torche TAC-460XL peut être utilisée comme lampe torche tactique rechargeable. INSTRUCTIONS DE MONTAGE La lampe torche tactique TAC-460XL est fournie avec le capuchon arrière déjà en place. La torche peut donc être utilisée dès que vous la sortez de son emballage en tant que lampe torche tactique conventionnelle une fois que les batteries CR-123 et le porte-batterie CR-123 inclus sont en place. La configuration de cette torche peut être changée à tout moment. COMMENT MONTER LA LAMPE TORCHE TACTIQUE NIGHTSTICK XTREME LUMENS POUR ARME À FEU LONGUE 1. Enlevez l’interrupteur du capuchon arrière (illustration 1-A) et le portebatterie CR-123 (illustration 1-B). REMARQUE : Conservez le commutateur du capuchon arrière pour utilisation ultérieure au cas où vous voudriez réutiliser cette torche en tant que lampe torche tactique conventionnelle. 2. Installez les deux batteries CR-123 comprises (illustration 2-A) dans le porte-batterie CR-123 (illustration 2-B). Les terminaux positifs de chaque batterie doivent être orientés dans la direction de la flèche sur le portebatterie CR-123, puis insérés dans la lampe torche de façon à ce que les terminaux + soient orientés dans la direction de la tête lumineuse (illustration 3-A). 3. Installez le pressostat à distance (illustration 3-B) et fixez-le en position. 4. Testez le fonctionnement du pressostat à distance (illustration 3-C) et de le commutateur de côté (illustration 3-D). Le pressostat à distance compris permet d’éteindre et allumer la lampe torche momentanément. Le commutateur de côté permet d’éteindre et allumer la lampe torche 6. Une fois que vous avez choisi l’emplacement du support Quad Lock, retirez les 4 vis à six pans creux (illustration 5-A) à l’aide de la clef Allen fournie (illustration 5-B). 7. Tout en maintenant en place la moitié inférieure du support Quad Lock (illustration 5-C), appuyez sur chacun des rails supérieurs (illustration 5-D) pour les aligner avec la moitié inférieure et placez les 4 vis à six pans creux (illustration 5-A). IMPORTANT : Les 4 vis à six pans creux doivent être partiellement installées avant de les serrer. 8. Commencez à serrer les 4 vis à six pans creux (illustration 6-A) en les alternant en avant et en arrière et en les vissant petit à petit. Une fois les 4 vis fixées (NE PAS trop serrer), l’espace entre la moitié inférieure du support et les deux rails supérieurs doit être d’environ 1/16e de pouce et doit être égal des deux côtés. 9. Testez l’ajustement du support Quad Lock sur le rail Picatinny ou Weaver militaire de l’arme à feu longue (illustration 9-A). En même temps, choisissez où vous allez placer le pressostat à distance (illustration 9-B). REMARQUE : Le pressostat à distance peut être placé sur toute surface propre, sèche et plate sur l’arme à feu longue. L’emplacement indiqué sur l’illustration 9 n’est qu’une possibilité. L’emplacement choisi sur votre propre arme à feu longue dépendra de la configuration de votre arme et de vos préférences. 10. Une fois que vous avez choisi où placer le support Quad Lock (illustration 9-A) ) et le pressostat à distance (illustration 9-B), nettoyez l’emplacement sur votre arme où vous comptez placer le pressostat à distance ainsi que la surface interne du pressostat à distance (illustration 7-A) à l’aide du tampon d’alcool fourni (illustration 7-B). 11. Décollez une des deux bandes Velcro adhésives autocollantes de son verso en papier (illustration 8-A) et appuyez fermement pour la fixer à l’arrière du pressostat à distance (illustration 8-B). 12. Ensuite, fixez le support Quad Lock, avec la torche en place, sur le rail Picatinny ou Weaver militaires de votre arme à feu (illustration 9-A). 13. Décollez la deuxième bande Velcro adhésive autocollante de son verso en papier et appuyez fermement pour la fixer sur l’emplacement nettoyé sur votre arme à feu longue (illustration 9-B). 14. REMARQUE : L’adhésif autocollant collera de façon semi-permanente après environ 24 heures, aussi veuillez ne pas déplacer ou enlever les bandes adhésives autocollantes une fois qu’elles sont en place. D’autre part, veuillez ne pas séparer les deux sections Velcro après cette période. FONCTIONNEMENT La lampe torche tactique Nightstick Xtreme Lumens pour arme à feu longue est maintenant montée et est prête à être utilisée. Le pressostat à distance compris permet d’éteindre et allumer la lampe torche momentanément. Utiliser ce pressostat donne à l’utilisateur un contrôle immédiat sur la lumière, qu’elle soit éteinte ou allumée. Le commutateur de côté permet d’éteindre et allumer la lampe torche momentanément en appuyant légèrement sur le bouton, ou de laisser la lampe torche allumée en appuyant sur le bouton jusqu’à ce que vous entendiez un déclic. Si le support Quad Lock a été positionné correctement (voir étape 5 cidessus), il est possible de changer les batteries sans avoir à retirer la lampe torche du support Quad Lock et, selon le lieu où se trouve l’équipement, il peut être possible de changer les batteries sans enlever le support de votre arme. Pour changer les batteries, commencez par séparer les deux faces de la bande Velcro de façon à ce qu’une face adhère à votre arme à feu et que l’autre adhère au dos du pressostat à distance. Puis, dévissez le pressostat à distance, retirez le porte-batterie CR-123 et remplacez les batteries (voir étape 2 ci-dessus). Bayco Products, Inc. • 640 South Sanden Blvd. • Wylie, TX 75098 • 1-800-233-2155 • 1-469-326-9400 • www.mynightstick.com INS-T460XL-K01-15 Manual de Instrucción GARANTIE LIMITÉE À VIE SUR LES PRODUITS BAYCO GARANTIE Bayco Products, Inc. garantit que ce produit est exempt de défauts de matériaux et de main d’œuvre à l’acheteur original pendant toute une période de vie. La garantie limitée à vie inclut les DEL, le boîtier et les lentilles. Les piles rechargeables, les chargeurs, les électroniques, les boutons d’interrupteur et les accessoires inclus sont garantis pour une période de deux ans avec une preuve d’achat. Les piles non rechargeables et jetables ne sont pas couvertes par la garantie. La présente garantie ne s’étend pas à l’usure normale et défaillances causées par des accidents, la mauvaise utilisation, l’emploi abusif, une installation défectueuse et des dommages occasionnés par la foudre. Au cas où Bayco Products, Inc. reçoit un avis que le produit n’est pas conforme à sa garantie, le seul et unique recours de l’acheteur original et la responsabilité unique et exclusive de Bayco Products, Inc. étant que Bayco Products, Inc., à sa seule discrétion, répare ou remplace le produit non conforme selon la garantie limitée. L’acheteur original doit suivre les instructions ci-dessous afin d’être éligible à une réparation ou à un remplacement du produit. Ceci est la seule garantie, explicite ou implicite, y compris toute garantie de qualité marchande ou d’adaptation à un usage particulier. EN AUCUN CAS, BAYCO PRODUCTS, INC. OU SES SOCIÉTÉS AFFILIÉES OU FOURNISSEURS NE SERA TENU RESPONSABLE DE TOUS DOMMAGES INDIRECTS, SPÉCIAUX, ACCIDENTELS OU SECONDAIRES QUELLE QUE SOIT LA FORME DE L’ACTION, QUELLE SOIT CONTRACTUELLE, DÉLICTUELLE (MÊME EN CAS DE NÉGLIGENCE), DE RESPONSABILITÉ SANS FAUTE OU AUTRE. LA RESPONSABILITÉ CUMULATIVE TOTALE ENVERS LE CLIENT RELATIVE À TOUTES LES CAUSES ET CONFORME AUX THÉORIES DE RESPONSABILITÉS, SERA LIMITÉE ET NE DÉPASSERA PAS LE PRIX D’ACHAT DU PRODUIT PAYÉ PAR LE CLIENT. Si ce produit est utilisé à des fins de location, la période de garantie est réduite à 90 jours à partir de la date de l’achat. RÉCLAMATIONS AU TITRE DE LA GARANTIE – ÉTATS-UNIS Veuillez retourner le produit à l’endroit où vous l’avez acheté pour tous problèmes ou questionnements relatifs à la garantie. Si ce n’est pas possible, veuillez contacter le service à la clientèle de Bayco au 1-800233-2155 du lundi au vendredi de 8 heures à 17 heures, heure normale du Centre pour vous procurez un numéro d’autorisation de retour de marchandise (RGA). Ne retournez pas la marchandise à Bayco sans avoir obtenu avant un numéro d’autorisation de retour (RGA) de la part du service à la clientèle de Bayco. Lorsque vous retournez la marchandise, le numéro d’autorisation de retour (RGA) doit être écrit à l’extérieur de la boîte d’expédition. TAC-460XL-K01 GRACIAS POR ELEGIR EL KIT NIGHTSTICK XTREME DE LÚMENES TÁCTICOS DE PISTOLA TÁCTICA LARGA DE LUZ GUARDE ESTAS INSTRUCCIONES Por favor, lea estas instrucciones antes de usar este producto. Incluyen información importante sobre seguridad y operación. ADVERTENCIAS NO PARA USO EN LUGARES PELIGROSOS. No utilice este producto en ambientes explosivos, cerca de líquidos inflamables, o donde se requiere la iluminación a prueba de explosión o de seguridad intrínseca. NO utilice este producto en las proximidades de vehículos o equipos cuando hay un riesgo de que líquidos inflamables entren en contacto con la linterna. La luz puede calentarse mientras que está encendida. Para evitar daños, NO cubra ni la coloque al lado de cualquier material potencialmente inflamable mientras esté en uso. Mantener fuera del alcance de los niños. RESUMEN DEL PRODUCTO El Kit Nightstick Xtreme de lúmenes táctico de Pistola Larga de Luz contiene todos los componentes necesarios para agregar una linterna táctica de alta potencia a cualquier arma larga equipada con una especificación mil Picatinny o Weaver de riel. El interruptor de presión remoto incluido ofrece control momentáneo encendido / apagado sobre la luz. INFORMACIÓN DE RENDIMIENTO La linterna TAC-460XL tiene una potencia de 800 lúmenes con una especificación de distancia de rayo de 205 metros. Desarrollado por las dos baterías incluidas CR-123 de litio dentro de la CR-123 Batería Carrier incluida, la luz será nominalmente funcional durante 1,5 horas. NOTA: El TAC-460XL está listo recargable. Mediante la adición de la batería opcional de litio-ion recargable, el cargador montable de pared o de vehículo y el aire acondicionado y / o fuente de corriente continua, la linterna TAC-460XL puede funcionar como una linterna táctica completamente recargable. INSTRUCCIONES DE ENSAMBLAJE RÉCLAMATIONS AU TITRE DE LA GARANTIE – À L’EXTÉRIEUR DES ÉTATS-UNIS La linterna táctica TAC-460XL viene con el interruptor del casquillo de la tapa posterior que ya está fijado. Como tal, la luz se puede utilizar al sacarla de su caja como una linterna táctica convencional una vez que se hayan instalado las baterías incluidas CR-123 y CR-123. Esta luz se puede convertir de nuevo a esta configuración en cualquier momento. Veuillez retourner le produit à l’endroit où vous l’avez acheté pour tous problèmes ou questionnements relatifs à la garantie. PASOS NECESARIOS PARA MONTAR EL KIT NIGHTSTICK XTREME DE LÚMENES TÁCTICOS DE LA PISTOLA LARGA DE LUZ. ÉTENDUE DU TRAVAILCOUVERT PAR LA GARANTIE Bayco se réserve le droit de réparer ou remplacer ce produit à son choix. Si toutefois la réparation n’est plus couverte par la garantie, Bayco vous contactera avec une estimation des coûts de réparation avant de commencer le travail. QUESTIONS CONCERNANT LA GARANTIE Si vous avez des questions concernant cette garantie ou sur n’importe quel produit Bayco, veuillez contacter le service à la clientèle de Bayco au 1-800-233-2155 du lundi au vendredi de 8 heures à 17 heures, heure normale du Centre. INFORMATION SUR LE PRODUIT Date d’achat ____________________________________________ 1. Retire el interruptor de la tapa posterior (Figura 1-A) y el soporte de la batería CR-123 (Figura 1-B). NOTA: Mantenga el interruptor del casquillo de la tapa posterior para su uso futuro si esta luz alguna vez se convierte de nuevo a una linterna táctica convencional. 2. Instale las dos baterías incluidas (Figura 2-A) CR-123 en el soporte de la batería CR-123 (Figura 2-B). Los terminales positivos en cada batería deben estar orientados en la dirección de la flecha en el soporte de la batería CR-123 y luego se insertan en la linterna con el extremo terminal + apuntando en la dirección del bisel de la linterna (Figura 3-A). 3. Instale el Interruptor de Presión Remoto (Figura 3-B) y apriételo en su lugar. 4. Pruebe el funcionamiento del Interruptor de Presión Remoto (Figura 3-C) y el botón lateral (Figura 3-D). El interruptor de Presión Remoto proporciona operación momentánea de encendido / apagado de sólo la luz. El interruptor lateral ofrece operación momentánea de encendido / apagado presionando ligeramente el botón, o Constante presionando hasta que el botón haga clic. 5. Decida donde el Quad Lock Mount (Figura 4-A) se encuentra localizado Bayco Products, Inc. • 640 South Sanden Blvd. • Wylie, TX 75098 • 1-800-233-2155 • 1-469-326-9400 • www.mynightstick.com INS-T460XL-K01-15 en la luz. Es importante que la montura permanezca clara del Interruptor de Presión Remoto, de otro modo el acceder a las baterías y al CR-123 Battery Carrier requerirá el desmontaje completo de la cerradura del Quad Lock Mount. 6. Una vez que se ha determinado la ubicación adecuada del Quad Lock Mount a lo largo de la manija de la luz, quite todos los 4 tornillos de cabeza (Figura 5-A) utilizando la llave Allen suministrada (Figura 5-B). 7. Mientras sostiene la mitad inferior de la cerradura Quad Lock Mount (Figura 5-C) en lugar de la luz, presione cada uno de los carriles de la tapa (Figura 5-D) alineando con la mitad inferior y empezando con los 4 tornillos de cabeza (Figura 5 A). IMPORTANTE: Mantenga todos los 4 tornillos de cabeza parcialmente instalados antes de apretar. 8. Comience por apretar los 4 tornillos de cabeza (Figura 6-A) alternando de un lado a otro y apretando un poco a la vez. Cuando los 4 estén apretados en su lugar (NO apriete en exceso), la brecha entre la mitad inferior de la montura y los dos carriles de la tapa debe ser aproximadamente 1/16 “y debe ser igual en ambos lados. 9. Compruebe el ajuste del Quad Lock Mount en la especificación mil Picatinny o Weaver del carril de arma larga (Figura 9-A). Al mismo tiempo, determine la ubicación deseada del Interruptor de Presión Remoto (Figura 9-B). NOTA: El interruptor de Presión Remoto puede estar unido a cualquier superficie limpia, plana y seca en el arma larga. La ubicación indicada en la figura 9 es sólo una posibilidad. La ubicación real de su arma larga será determinada por la configuración de su arma y por sus preferencias. 10. Una vez que se ha determinado la ubicación Quad Lock Mount (Figura 9-A) y el Interruptor de Presión Remoto (Figura 9-B), limpie el lugar de su arma en la que se encuentra el Interruptor de Presión Remoto, así como la superficie interior del Interruptor de Presión Remoto (Figura 7-A) utilizando el hisopo de alcohol suministrado (Figura 7-B). 11. Despegue una de las partes de tras del papel adhesivo de velcro (Figura 8-A) y presiónelo en su lugar en la parte posterior del Interruptor de Presión Remoto (Figura 8-B). 12. Fije el Quad Lock Mount con la luz instalada en la especificación mil Picatinny o el carril de la armadura de su arma (Figura 9-A) 13. Despegue el papel adhesivo de velcro y presiónelo en su lugar en el área previamente limpia de su arma larga (Figura 9-B). 14. NOTA: El Adhesivo Sensible a Presión hará un enlace semi-permanente después de aproximadamente 24 horas, así que por favor no mueva ni quite las tiras adhesivas una vez que han sido colocadas. Además, no trate de separar las dos secciones de velcro hasta después de ese momento. FUNCIONAMIENTO El Kit Nightstick Xtreme de lúmenes táctico de la Pistola Táctica Larga está completamente instalado y listo para su uso. El interruptor de Presión Remoto proporciona operación momentánea de encendido / apagado de sólo la luz. El uso de este interruptor, le da el control total e inmediato al operador de cuando la luz está encendida, y cuando está apagada. El interruptor lateral ofrece operación momentánea de encendido / apagado presionando ligeramente el botón, o presionando constantemente hasta que el botón haga clic. accesorios incluidos están garantizados por un periodo de dos años con el comprobante de compra. Las baterías desechables, no recargables están excluidas de esta garantía. También se excluyen el desgaste normal y fallas que son causadas por accidentes, mal uso, abuso, instalación incorrecta y daños causados por rayos. En el caso de que Bayco Products, Inc. reciba aviso de que cualquier producto no se ajusta a la garantía, el único y exclusivo recurso del comprador original, y Bayco Products Inc, con responsabilidad única y exclusiva, será por Bayco Products, Inc. a su exclusivo criterio, de reparar o reemplazar el producto no conforme de acuerdo con esta garantía limitada. El comprador original deberá seguir las instrucciones a continuación para calificar para un producto de reparación o reemplazo. Esta es la única garantía, expresa o implícita, incluyendo cualquier garantía de comerciabilidad o aptitud para un propósito particular. EN NINGÚN CASO, BAYCO PRODUCTS, INC. O SUS AFILIADOS O PROVEEDORES SERÁN RESPONSABLES DE LOS DAÑOS INDIRECTOS, ESPECIALES, IMPREVISTOS O DE CUALQUIER TIPO, INDEPENDIENTEMENTE DE LA FORMA DE ACCIÓN, YA SEA EN CONTRATO, AGRAVIO (INCLUYENDO NEGLIGENCIA), RESPONSABILIDAD OBJETIVA O DE OTRA MANERA. LA RESPONSABILIDAD ACUMULADA TOTAL A CLIENTE, DE TODAS LAS CAUSAS DE ACCIÓN Y TODAS LAS TEORÍAS DE RESPONSABILIDAD, ESTARÁ LIMITADA Y NO SUPERARÁ EL PRECIO DE COMPRA DEL PRODUCTO PAGADO POR EL CLIENTE. Si este producto se utiliza para fines de alquiler, el plazo de garantía se reduce a 90 días desde la fecha de compra. RECLAMOS DE GARANTÍA - EE.UU. Devuelva el producto al lugar de compra para todos los asuntos relacionados con la garantía. Si esto no es posible, póngase en contacto con el Servicio al Cliente de Bayco al (800) 233-2155 de lunes a viernes de 8:00 a.m. a 5 p.m. Hora del Centro para una Autorización de Regreso de Mercancías (RGA). No devuelva este producto a Bayco sin antes recibir un Número RGA de Servicio al Cliente de Bayco. Al devolver el producto, el número RGA debe escribirse en el exterior de la caja de envío. RECLAMOS DE GARANTÍA - FUERA DE EE.UU. Devuelva el producto al lugar donde lo compró para todos los asuntos relacionados con la garantía. ALCANCE DE COBERTURA DE GARANTÍA POR TRABAJO Bayco reparará o reemplazará este producto a nuestra discreción. Si se determina que la garantía ya no está en vigor, Bayco se pondrá en contacto con usted con un presupuesto de reparación antes de comenzar cualquier trabajo. PREGUNTAS SOBRE LA GARANTÍA Si usted tiene alguna pregunta sobre esta garantía o sobre otras consultas de productos Bayco, por favor póngase en contacto con Servicio al Cliente de Bayco al (800) 233-2155 de lunes a viernes de 8:00 a.m. a 5 p.m. Hora del Centro. INFORMACIÓN DEL PRODUCTO Fecha de Compra __________________________________________ Si el Quad Lock Mount se ha colocado correctamente (ver paso 5), el cambio de las baterías pueden llevarse a cabo sin la eliminación de la luz del bloqueo de Quad Lock Mount, y en función de la ubicación de instalación, puede que sea posible cambiar las baterías sin necesidad de retirar la montaje de su arma. Para cambiar las baterías, primero separe las dos mitades de la tira de velcro entre sí de modo que una mitad se mantiene adherida a su arma y el resto unido a la parte trasera del Interruptor de Presión Remoto. Ahora desenrosque el Interruptor de Presión Remoto, quite el soporte de la batería CR-123 y vuelva a colocar las pilas (vea el paso 2). BAYCO PRODUCTS GARANTÍA LIMITADA DE POR VIDA GARANTÍA Bayco Products, Inc. garantiza que este producto está libre de defectos de fabricación y materiales durante la vida del comprador original. La garantía limitada de por vida incluye los LEDs, el caparazón y las lentes. Las baterías recargables, cargadores, interruptores, la electrónica y los Bayco Products, Inc. • 640 South Sanden Blvd. • Wylie, TX 75098 • 1-800-233-2155 • 1-469-326-9400 • www.mynightstick.com INS-T460XL-K01-15 Bayco Products, Inc. • 640 South Sanden Blvd. • Wylie, TX 75098 • 1-800-233-2155 • 1-469-326-9400 • www.mynightstick.com INS-T460XL-K01-15