1
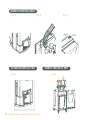
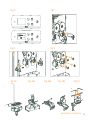
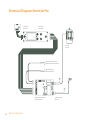
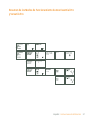
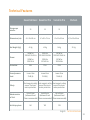
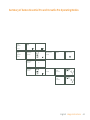
ESSENTIAL BASIC · ESSENTIAL PRO · VERSATILE PRO
1
2
ESPAÑOL · MANUAL DE USUARIO
ENGLISH · USER´S MANUAL
3
Sólo ZUMEX le ofrece:
Un sistema de exprimido original y la tecnología antibacterías ASP.
ORIGINAL SYSTEM
Sistema de exprimido original patentado por ZUMEX.
Los tambores de exprimido extraen la máxima cantidad de zumo evitando el contacto
con la corteza y garantizando su mejor calidad, sabor e higiene.
4
ASP
La primera generación de exprimidoras con tecnología antibacterias exclusiva.
ZUMEX ASP es la única tecnología antibacterias basada en los iones de plata que
inhibe el crecimiento de bacterias entre lavado y lavado garantizando una protección
extra eficaz y duradera.
www.zumexasp.com
Con la presencia de humedad...
ZUMEX ASP emite iones de plata.
Aditivo antimicrobiano
Ion de plata
Los iones son atraídos hacia las bacterias...
y se unen a su enzima molecular provocando
su extinción definitiva.
Bacteria
5
6
Diagrams with parts: Basic
9
10
8
7
6
5
4
3
11
2
12
13
1
15
6
14
16
Diagrams with parts: Basic
7
Diagrams with parts: Essential Pro
18
8
9
7
5
4
3
2
10
1
11
12
16
6
13
14
15
17
8
Diagrams with parts: Essential Pro
Diagrams with parts: Versatile Pro
15
20
19
18
9
8
7
5
4
3
2
10
1
11
12
16
6
13
14
15
17
Diagrams with parts: Versatile Pro
9
ZUMEX ESSENTIAL BASIC
Fig. 1
Fig. 2
ZUMEX ESSENTIAL PRO
Fig. 4
10
Essential Basic · Essential Pro · Versatile Pro
Fig. 3
ZUMEX VERSATILE PRO
Fig. 5
Fig. 6
Fig. 7
Frutas
Fig. 8
Fig. 10
Fig. 9
Fig. 11A
Fig. 12A
Fig. 12B
Fig. 13
90º
Essential Pro · Versatile Pro
11
Electrical Diagram Essential Pro
CIRCUITO IR
IR CIRCUIT
BOTONERA
kEYBOARD
MOTOR
MOTOR
DETECTOR CUBETA ZUMO
DETECTOR JUICE CONTAINER
DETECTOR GRIFO
DETECTOR FAUCET
CIRCUITO DE MANIOBRA
CONTROL CIRCUIT
12
Electrical Diagram
TOMA DE TIERRA
GROUND
Electrical Diagram Versatile Pro
BOTONERA
kEYBOARD
MOTOR
MOTOR
DETECTOR CUBETA ZUMO
DETECTOR JUICE CONTAINER
DETECTOR GRIFO
DETECTOR FAUCET
CIRCUITO DE MANIOBRA
CONTROL CIRCUIT
TOMA DE TIERRA
GROUND
Electrical Diagram
13
El siguiente Manual hace referencia a
los siguientes modelos: Essential Basic ·
Essential Pro · Versatile Pro
14
íNDICE GENERAL
4 Original System
5 ASP
7 Figuras
10 Detalles
12 Diagrama Eléctrico
16 Información General Importante
17 Características Técnicas
18 Garantía
19 Instrucciones de utilización
19 Descripción general
20 Preparación
21 Funcionamiento
28 Limpieza
30 Detección de averías
32 Declaración CE de conformidad
Zumex se reserva el derecho a modificar sin previo
aviso la información contenida en este manual.
15
Información General Importante
· Novedad Zumex Essential Pro y Zumex Versatile Pro
- Nueva configuración botonera táctil: más sencillo e intuitivo
- 23 idiomas a elegir.
- Grifo antigoteo
· Los datos específicos de su exprimidora Zumex (tensión, frecuencia y otros datos de interés), se encuentran en la Etiqueta de Identificación que encontrará en la propia máquina.
· Recuerde que para cualquier consulta técnica, debe ponerse en contacto con su
Distribuidor habitual / Servicio de Asistencia Técnica Oficial, mencionando siempre
el Número de Serie de la Etiqueta de Identificación de la máquina.
· Antes de proceder a la limpieza de la máquina o realizar cualquier mantenimiento,
desconéctela siempre de la red.
· En el territorio español Zumex adopta las medidas necesarias para que las máquinas puestas en el mercado sean recogidas de manera selectiva y tengan una correcta
gestión ambiental. Por favor póngase en contacto con su distribuidor autorizado de
Zumex para desechar correctamente estas máquinas.
· Este aparato no está destinado para ser usado por personas (incluido niños) cuyas
capacidades físicas, sensoriales o mentales estén reducidas, o carezcan de experiencia o conocimiento, salvo si han tenido supervisión o instrucciones relativas al uso
del aparato por una persona responsable de su seguridad.
Si tienen cualquier sugerencia o comentario para mejorar nuestras máquinas o
red de servicio, le agradeceríamos que contactase directamente con Zumex en la
siguiente dirección:
ZUMEX GROUP S.A
16
Información General Importante Español
Características Técnicas
Essential Basic Essential Pro
Naranjas por
minuto:
Versatile Pro
Podium
22
22
22
47 x 50 x 88 cm
47 x 50 x 75 cm
47 x 55 x 85 cm
47,5 x 58 x 80 cm
45 Kg
45 Kg
54 Kg
33 Kg
280W para
220-240V 50-60 Hz
280W para
220-240V 50-60 Hz
280W para
220-240V 50-60 Hz
320W para
115V 60 Hz
320W para
115V 60 Hz
320W para
115V 60 Hz
IPX4
IPX4
IPX4
Nivel de
presión acústica:
Inferior a 70 dB (A).
Inferior a 70 dB (A).
Inferior a 70 dB (A).
Seguridad:
Doble detector mag- Doble detector mag- Doble detector magnético de seguridad. nético de seguridad. nético de seguridad.
Protección electró- Protección electró- Protección electrónica del motor.
nica del motor.
nica del motor.
Dimensiones (cm):
Peso Neto (Kg):
Potencia:
Protección:
Tamaño máximo
de la fruta:
Sistema antigoteo
Hasta 81 mm
(recomendable
entre 65 y 78mm).
Hasta 81 mm
(recomendable
entre 65 y 78mm).
Hasta 81 mm
(recomendable
entre 65 y 78mm).
NO
SI
SI
Español Características Técnicas
17
Garantía
Alcance de la garantía: Esta máquina está garantizada por un periodo de
dos años contra toda reclamación por fallos de materiales o de construcción
que perjudique su buen funcionamiento, siempre que no haya manipulación
en su interior o en sus mecanismos. Se excluyen de la presente garantía los
conceptos detallados a continuación.
Exclusiones: Mano de obra, desplazamiento, transporte, piezas deterioradas
por desgaste natural a consecuencia del uso, así como daños que sean resultado de un mal uso o de su incorrecta instalación, y averías producidas por
causas de fuerza mayor.
La manipulación en la Etiqueta de identificación de la máquina anula la presente Garantía. Asimismo, dado que sólo el personal de Servicio de Asistencia
Técnica Oficial, está cualificado para manipular esta máquina, esta garantía
quedaría sin efecto en el caso de que otras personas la manipularan.
Para dirigirse a nuestro Servicio Técnico, será indispensable mencionar el Nº
DE SERIE de la Etiqueta de Identificación.
Repuestos originales
Zumex le recomienda la utilización de repuestos y accesorios originales Zumex, para
el perfecto mantenimiento de la máquina. Han sido expresamente homologados para
su tipo de máquina y objeto de un control especial por nuestra parte que permite
constatar la fiabilidad, seguridad y calidad que exigen las normas de Zumex.
Todas nuestras piezas originales te ofrecen una garantía de 3 meses.
18
Garantía Español
Instrucciones de Utilización
Descripción General
Zumex Essential Basic
1
2
3
4
5
6
Cubeta zumo Fume
Filtro cubeta
Cubierta Zumex
Tambor Macho
Tambor Hembra
Depósito de cortezas
naranja
7 Cuña extractora derecha
8 Tapón soporte retén
9 Goma protección
pulsador
10 Portacuchillas
11 Kit tubo de alimentación
12 Cierre cubierta
13 Cuña extractora
izquierda
14 Filtro posavasos
15 Bandeja posavasos
16 Volante plástico
Zumex Essential Pro
Zumex Versatile Pro
1
2
3
4
5
6
1
2
3
4
5
6
Cubeta zumo
Filtro cubeta
Cubierta Zumex
Tambor Macho
Tambor Hembra
Depósito de cortezas
orange, silver o graphite
7 Cuña extractora derecha
8 Tapón soporte retén
9 Portacuchillas
10 Kit tubo de alimentación
11 Cierre cubierta
12 Cuña extractora
izquierda
13 Filtro posavasos
14 Bandeja posavasos
15 Volante plástico
inyección
16 Kit grifo completo
17 Pulsador grifo
18 Carátula
19 Base plato
20 Kit plato
Español Instrucciones de Utilización
19
Preparación
Para comenzar a exprimir deberá seguir los siguientes pasos:
Paso 1 Desembale su exprimidora y colóquela sobre una superficie lo más horizontal
posible.
Paso 2 Asegúrese de que la tensión de la red esté dentro de los márgenes indicados
en la etiqueta de identificación de la máquina que encontrará tanto en la portada de
este manual como en la propia máquina.
Paso 3 Sitúe los depósitos de cortezas tal como lo indica la Fig. 1 y 4.
Paso 4 Asegúrese de que la cubeta de zumo y su filtro estén correctamente situados y
la cubierta esté cerrada y asegurada por el cierre.
Si usted ha adquirido una exprimidora con podium, deberá colocar la exprimidora
sobre el podium, atorníllelo según indica la instrucción suministrada en el podium. No
olvide frenar las ruedas delanteras del mismo. Posteriormente posicione la tolva y los
depósitos de cortezas de base abierta que encontrará en el interior del mueble (Fig. 2).
RECUERDE: Utilice fruta que no exceda de 81 mm de diámetro. (Aconsejado
entre 65 y 78 mm)
Funcionamiento
Una vez seguidos los pasos anteriores, proceda a conectar la clavija de conexión a
una base de enchufe provista de toma de tierra normalizada. Y pulse el botón
de
la carátula para la puesta en marcha de la máquina.
Cuando active la máquina por primera vez desde su compra, le aparecerá un mensaje de
“Choose your language:” a fin de que seleccione el idioma de operación de la máquina.
La selección se realizará utilizando las flechas
y presionando “ON”. Una vez
seleccionado, la máquina estará lista para operar en modo “Self-Service”.
Como norma general, para operar dentro del menú, consideramos el botón “ON”
como aceptar y “OFF” como cancelar.
20
Instrucciones de Utilización Español
Modos de Funcionamiento en Zumex Essential Pro
Zumex Essential Pro puede funcionar en dos modos de trabajo:
Autostart: La máquina detecta las naranjas en el tubo de alimentación y se pone en
marcha al paso de las mismas.
Self-service: La máquina se pone en marcha accionando el grifo self-service ya sea
presionando sobre el grifo o accionando el pulsador de palanca, para poder operar
con este pulsador de palanca ver fig. 9A y 9B. En este modo puede también trabajar en
continuo girando 90º el bloqueo del grifo (Fig. 13).
Selección del modo de funcionamiento:
Paso 1 Pulse la tecla MENÚ durante unos segundos para entrar en el modo de programación.
Paso 2 Seleccióne la Opción MODO DE TRABAJO situándose sobre la misma con los
cursores
y pulse ON para confirmar su selección.
Paso 3 Seleccione el modo de trabajo deseado, Autostart o Self-Service, con los
cursores
pulse ON para confirmar su selección. Pulse OFF repetidamente hasta
salir del MENU.
Modos de Funcionamiento en Zumex Versatile Pro
Zumex Versatile Pro puede funcionar en dos modos de trabajo:
Professional: Podrá programar el nº de naranjas a exprimir en cada ciclo con los cursores
, podrá programar hasta 20 naranjas en cada ciclo o seleccionar la opción
‘c’ para exprimido en continuo. El exprimido comenzará al presionar ‘ON’ y finalizará
al terminar de exprimir el nº de naranjas programadas o si presiona ‘OFF’.
Self-service: La máquina se pone en marcha accionando el grifo self-service ya sea
presionando sobre el grifo o accionando el pulsador de palanca. En este modo puede
también trabajar en continuo girando 90º el bloqueo del grifo (Fig. 13).
Español Instrucciones de Utilización
21
Selección del modo de funcionamiento:
Paso 1 Pulse la tecla MENÚ durante unos segundos para entrar en el menú.
Paso 2 Seleccione la Opción MODO DE TRABAJO situándose sobre la misma con los
cursores
y pulse ON para confirmar su selección.
Paso 3 Seleccione el modo de trabajo deseado, Profesional o Self-Service, con los cursores
pulse ON para confirmar su selección. Pulse OFF repetidamente hasta salir del MENU.
Configuración
Su exprimidora Zumex le permite ajustar parámetros según sus preferencias, todos
los ajustes se realizan desde MENÚ > CONFIGURACIÓN. Pulse la tecla MENÚ durante
unos segundos para entrar en el menú y seleccione CONFIGURACIÓN, pulse ON para
confirmar su selección.
Iluminación: Cambia el nivel de luminosidad de la pantalla.
Dentro del menú de CONFIGURACIÓN seleccione ILUMINACIÓN y presione ON para
. Una vez
confirmar su selección. Regule el nivel de luminosidad con los cursores
ajustado confirmamos pulsando ON. Los cambios quedarán memorizados.
Idioma: Cambia el idioma del menú de la exprimidora.
Dentro del menú de CONFIGURACIÓN seleccione IDIOMA y presione ON para con. Una vez
firmar su selección. Seleccione el idioma deseado con los cursores
seleccionado confirme pulsando ON. Los cambios quedarán memorizados.
Offset: Según la tipología de fruta a exprimir, el valor podrá ser ajustado para su
óptimo conteo.
Seleccionamos OFFSET, pulsamos la tecla ON, e inmediatamente se nos preguntará
por su PIN. En caso de no poseerlo, consulte con su Servicio Técnico. A continuación,
configuramos el número deseado utilizando para ello los cursores. Una vez finalizado
el ajuste, pulsamos ON para guardar los cambios. Esta operación debe realizarse
únicamente bajo la supervisión de un servicio técnico autorizado.
NOTA: Recuerde que si pulsa OFF cancelará los cambios realizados previamente y
regresará al menú anterior.
22
Instrucciones de Utilización Español
Servicio Técnico
Las exprimidoras Zumex Essential Pro y Versatile Pro le dan la información requerida
para el correcto mantenimiento de la unidad, además de disponer de contador de
naranjas exprimidas que se puede configurar en este modo. Pulse la tecla MENÚ
durante unos segundos para entrar en el menú y seleccione SERVICIO TÉCNICO, pulse
ON para confirmar su selección y OFF para volver al menú anterior.
Número de serie: Le muestra el nº de serie de su exprimidora, imprescindible para
qualquier consulta de SERVICIO TÉCNICO.
Dentro del menú de SERVICIO TÉCNICO seleccione NÚMERO DE SERIE y presione ON
para confirmar su selección. Podrá visualizar el número de serie en pantalla. Vuelva al
menú anterior pulsando OFF.
Voltaje: Le muestra el voltaje que tiene la red en el momento de la consulta, imprescindible para cualquier servicio de asistencia técnica.
Dentro del menú de SERVICIO TÉCNICO seleccione VOLTAJE y presione ON para confirmar su selección. Podrá visualizar el voltaje en pantalla. Vuelva al menú anterior
pulsando OFF.
Calibración: Le muestra el valor de calibración de su máquina, que es necesario ajustar
en casos excepcionales en los que el contador no cuente correctamente, esta información es imprescindible para cualquier consulta de asistencia técnica. También proporciona la posibilidad de modificar los valores manualmente, este procedimiento debe
realizarse sólo por indicación y con ayuda de un servicio de asistencia técnica autorizado.
· Valor calibración: Dentro del menú de SERVICIO TÉCNICO seleccione CALIBRACIÓN > VALOR CALIBRACIÓN y presione ON para confirmar su selección. Podrá
visualizar el número de calibración en pantalla. Vuelva al menú pulsando OFF.
· Valor Offset: Dentro del menú de SERVICIO TÉCNICO seleccione CALIBRACIÓN
> VALOR OFFSET y presione ON para confirmar su selección. Podrá visualizar el
número de offset en pantalla. Vuelva al menú pulsando ON.
Español Instrucciones de Utilización
23
· Calibrar: Seleccione CALIBRAR y pulse ON. A continuación introduzca su PIN y
pulse ON. La máquina le pedirá confirmación ‘¿Calibrar?’, pulse ‘ON’ para confirmar
la calibración automática. A continuación la máquina realizará dicha calibración y
mostrará el valor de calibración ajustado. Vuelva al menú pulsando OFF.
Esta opción se realizará únicamente bajo supervisión del servicio técnico y cuando haya sido expresamente indicado.
Pin: Su exprimidora cuenta con una contraseña para que usted pueda acceder a los
contadores y modificar parámetros de configuración. El PIN programado de serie es el
0000, puede personalizar este PIN.
Dentro del menú de SERVICIO TÉCNICO seleccione PIN y presione ON para confirmar su
selección. Si es la primera vez que modifica el PIN aparecerá el PIN de serie 0000, pulse ON.
En caso de haber programado ya alguna contraseña anteriormente, inserte la contraseña
antigua, seleccione con los cursores
cada dígito, pulse OFF para pasar de dígito a
dígito y ON para confirmar la contraseña. Al insertar el PIN correcto aparecerá la pantalla
“Nuevo PIN”. Programe la nueva contraseña, seleccione con los cursores
cada dígito,
pulse OFF para pasar de dígito a dígito y ON para confirmar el nuevo PIN.
Para recuperar el Pin en caso de olvido: entrar en MENU y seleccionar CONFIGURACIÓN. Mantenga pulsado el cursor y pulse simultáneamente. A continuación, introduzca en nuevo Pin
deseado y pulse ON.
Contadores: Podrá controlar el contador y descontador de su exprimidora. El contador
le permite conocer el nº de naranjas exprimidas, la función descontador le permite
programar un nº de naranjas determinado e ir consumiendo naranjas de este saldo.
· Contador parcial: Le muestra el nº de naranjas consumidas, se puede poner a cero.
Dentro del menú de SERVICIO TÉCNICO seleccione CONTADORES > CONTADOR PARCIAL
y presione ON para confirmar su selección. Introduzca su PIN (Recuerde: Seleccione con
cada dígito, pulse OFF para pasar de dígito a dígito y ON para confirlos cursores
mar la contraseña). Podrá visualizar número de naranjas exprimidas en pantalla. Para
y confirme con ON, en display de la máquina verá que
poner a cero el contador pulse
el contador se ha puesto a cero. Vuelva al menú pulsando OFF repetidamente.
24
Instrucciones de Utilización Español
· Contador total: Le muestra todas las naranjas consumidas en toda la vida de la
exprimidora, este contador no se puede borrar.
Dentro del menú de SERVICIO TÉCNICO seleccione CONTADORES > CONTADOR TOTAL
y presione ON para confirmar su selección. Podrá visualizar número de naranjas en
pantalla. Vuelva al menú anterior pulsando OFF.
· Descontador: Le permite programar un nº de naranjas determinado e ir consumiendo naranjas de este saldo. Dentro del menú de SERVICIO TÉCNICO seleccione
CONTADORES > DESCONTADOR y presione ON para confirmar su selección. Introduzcada dígito, pulse OFF para
ca su PIN (Recuerde: Seleccione con los cursores
pasar de dígito a dígito y ON para confirmar la contraseña) y entrará en el menú del
, después
descontador. Programe cada dígito del descontador con los cursores
de cada dígito pulse OFF para pasar al siguiente, repita esta acción para cada dígito
en el último dígito pulse ON y la selección quedará automáticamente memorizada.
A continuación seleccione si quiere que el descontador esté visible o no en el menú
principal (opción visible/oculto). Vuelva al menú pulsando OFF repetidamente.
Una vez el descontador llega a cero la exprimidora se parará hasta que se le
cargue un nuevo saldo de naranjas o se cambie a la función de contador entrando en
el menú “CONTADOR PRINCIPAL” y confirmando pulsando ON.
Cuando esté programado el descontador visible, en la pantalla normal de funcionamiento aparecerá una ‘D’ delante de los dígitos del contador. Si está programado el
descontador en oculto no se mostrará ninguna cifra.
Español Instrucciones de Utilización
25
Resumen de los Modos de Funcionamiento Zumex Essential Pro
y Versatile Pro
Profesional
Frutas
Idioma
1/23
Pin ?
Offset
30
0000
0000
231
97
30
Pin ?
0000
26
Instrucciones de Utilización Español
85
Resumen de los Modos de Funcionamiento Zumex Essential Pro
y Versatile Pro
borrar ?
000010
76
000000
Español Instrucciones de Utilización
27
Limpieza
Para una correcta limpieza deberá seguir los siguientes pasos:
Paso 1 Desconecte la máquina de la red.
Paso 2 Desmonte la cubierta delantera.
Paso 3 Desmonte el portacuchillas (Fig. 7) tirando hacia Vd., desde el asa.
¡Atención! maneje esta pieza con mucho cuidado, ya que podría cortarse.
Paso 4 Saque de sus soportes las cuñas extractoras de cortezas (Fig. 8).
Paso 5 Desmonte los tambores de exprimido por parejas, desenroscando previamente los volantes que los sujetan (Fig. 9).
Paso 6 Desmonte la cubeta y el filtro de zumo (Fig. 10).
Paso 7 Desmonte el grifo (Fig. 11A).
· Todas las piezas, EXCEPTO LA CUBIERTA, pueden introducirse en el lavavajillas para
su lavado.
· La limpieza de la zona de exprimido y de la cubierta, deberá hacerla usando una
bayeta suave empapada con agua y jabón apto para vajillas. Después, aclare con
abundante agua limpia para que no queden restos de jabón.
· Una vez terminado el proceso de limpieza , deberá montar todos los elementos en
orden inverso a su desmontaje. Asegúrese de que todas las piezas están correctamente ensambladas y sujetas.
· Recuerde que cada extractor (Fig. 8) sólo encaja en un lado, por lo que no son
intercambiables. Cuando los coloque asegúrese de que la pala de la cuña entre hasta
el fondo en la ranura del tambor de exprimido macho.
· Con objeto de evitar la acumulación de cera, es importante limpiar frecuentemente
el alimentador de fruta de los modelos Zumex Versatile.
· En los modelos con mueble limpie la tolva y el interior del mueble
asegurándose de que no queden cortezas ni restos de pulpa.
28
Instrucciones de Utilización Español
RECUERDE: No introducir la cubierta delantera en el lavavajillas. Para su
limpieza puede utilizar una bayeta suave empapada en agua y jabón apto
para vajillas.
En ningún caso deberá utilizar productos abrasivos ni ningún producto anti-cal.
Español Instrucciones de Utilización
29
Detección de Averías
AVERIA: La máquina no funciona
Causa posible
Corrección
Máquina desenchufada.
Conéctela a la red.
No llega corriente al enchufe.
Compruebe el enchufe.
Cubierta mal colocada.
Asegúrese de su correcta colocación.
Cubeta zumo mal colocada.
Asegúrese de su correcta colocación.
Hay un bloqueo de los tambores.
Desconectar la máquina de la red y
desbloquear los tambores.
Detectores seguridad averiados.
Avisar al Servicio Técnico.
Pulsador ON/OFF defectuoso.
Avisar al Servicio Técnico.
Circuito defectuoso.
Avisar al Servicio Técnico.
AVERIA: La máquina se bloquea a menudo en el momento de exprimir
Causa posible
Corrección
Tensión de red insuficiente.
Comprobar que la tensión sea la indicada en el manual.
Circuito defectuoso.
Avisar al Servicio Técnico.
AVERIA: Los tambores pierden sincronismo
Causa posible
Corrección
Avería en un eje.
Avisar al Servicio Técnico.
AVERIA: Cuña extractora se rompe
Causa posible
Corrección
Cuña extractora mal colocada.
Colocarla en su posición correcta introduciéndola
totalmente hasta comprobar que hace tope (fig. 8)
AVERIA: Se oye funcionar el motor pero no giran los tambores
30
Causa posible
Corrección
Avería interna.
Avisar al Servicio Técnico.
Detección de Averías Español
AVERIA: El grifo se obstruye
Causa posible
Corrección
El zumo tiene semillas o exceso de pulpa.
Desmontar y limpiar el grifo según Fig. 11A.
AVERIA: La máquina se para cada poco tiempo
Causa posible
Corrección
Insuficiente ventilación.
Revisar que las rejillas de ventilación
de la máquina no estén obstruidas.
Sobrecarga.
Avisar al Servicio Técnico.
AVERIA: Pantalla no muestra información
Causa posible
Corrección
Alteración en la red eléctrica.
Apagar la máquina y volver a conectar.
AVERIA: La máquina está en función Self-Service y no deja de funcionar
Causa posible
Corrección
Grifo no colocado o colocado incorrectamente.
Coloque el grifo tal y como se indica en la Fig. 11A
Grifo bien colocado: posible avería interna.
Avisar al Servicio Técnico.
Bloqueo de grifo activado.
Coloque el bloqueo en posición horizontal
presionando el grifo hacia abajo.
ATENCIÓN: Cualquier acción para desbloquear la máquina debe realizarse
desconectando la misma de la red. Si después de realizar las comprobaciones
aquí mencionadas la máquina no funciona, llame al servicio técnico.
Español Detección de Averías
31
Mensajes en la Pantalla
Mensaje en display
Causa
Solución
Sobrecorriente.
Se ha sobrepasado el nivel máximo de consumo
eléctrico durante al menos un segundo.
Desconectar de red y volver
a conectar.
Sin naranjas.
El motor permanece dos minutos en
marcha sin detectar exprimido.
Reponer naranjas en alimentador
y pulsar ON.
Memoria iniciada.
Se detecta un error en la memoria.
Llamar al servicio técnico.
Calibración.
Se detecta un valor erróneo en la calibración.
Proceder a calibrar (Veáse pag. 18)
Fuera de servicio.
El contador ha llegado a cero.
Modificar el valor del descontador,
según se indica en pag. 19 , o pasar
a la función contador entrando en
CONTADOR PARCIAL y pulsando ON.
EEPROM
Error detectado en la memoria EEPROM.
Avisar al servicio técnico.
Fuera de rango.
La tensión de alimentación de entrada
es inferior a 80V o superior a 260V.
Avisar al servicio técnico.
Error de teclado (Error 1). No se puede comunicar con el teclado (Avería interna). Avisar al servicio técnico.
Dibujo cubeta
parpadeando
La cubeta de zumo o la cubierta no están
colocadas correctamente
Asegurar su correcta colocación
según Fig. 4. En caso de persistir
consulte con su servicio técnico.
* El mensaje: “Error de teclado” puede no aparecer en el display debido a que no hay comunicación entre la CPU y la placa botonera.
Declaración CE de Conformidad
Nosotros ZUMEX GROUP S.A. con domicilio en Polígono Industrial de Moncada III,
C/ Molí, 2 46113 Moncada, Valencia (España) declaramos bajo nuestra exclusiva
responsabilidad que los modelos de máquinas exprimidoras de Zumo Essential Basic
- Essential Pro - Versatile Pro son conforme a las siguientes normas armonizadas:
EN ISO 12100-1
Seguridad de las máquinas. Conceptos básicos, principios generales para el
diseño. Parte 1: Terminología básica, metodología.
EN ISO 12100-2
Seguridad de las máquinas. Conceptos básicos, principios generales para el
diseño. Parte 2: Principios técnicos.
EN 60335-1
Seguridad de los aparatos electrodomésticos y análogos. Parte 1: Requisitos generales.
2003
2003
2002
32
Mensajes en la Pantalla · Declaración CE de Conformidad Español
EN 60335-2-14
Seguridad de los aparatos electrodomésticos y análogos. Parte 2-14: Requisitos particulares para máquinas de cocina.
EN 50366
Aparatos electrodomésticos y análogos. Campos electromagnéticos. Métodos de evaluación y medición.
EN 55014-1
Compatibilidad electromagnética. Requisitos para aparatos electrodomésticos, herramientas eléctricas y equipos análogos. Parte 1: Emisión. Norma
de familia de productos.
EN 55014-2
Compatibilidad electromagnética. Requisitos para aparatos electrodomésticos, herramientas eléctricas y equipos análogos. Inmunidad. Norma de
familia de productos.
EN 61000-3-2
Compatibilidad electromagnética. Parte 3: Límites – Sección 2: Límites para
las emisiones de corriente armónica (equipos con corriente de entrada ≤ 16A
por fase).
EN 61000-3-3
1995
Compatibilidad electromagnética. Parte 3: Límites – Sección 3: Limitación
de las fluctuaciones de tensión y del flicker en redes de baja tensión para
los equipos con corriente de entrada ≤ 16A.
EN 1672-2
Maquinaria para el proceso de alimentos. Conceptos básicos. Parte 2: Requisitos de higiene.
2006
2003
2006
1997
2006
2005
Cumpliendo las disposiciones de las Directivas Europeas que se detallan a continuación:
98/37/CE
Aproximación de legislaciones de los Estados Miembros sobre máquinas.
2006/95/CE
Directiva relativa a la aproximación de las legislaciones de los Estados
miembros sobre el material eléctrico destinado a utilizarse con determinados límites de tensión.
2004/108/CE
Directiva relativa a la aproximación de las legislaciones de los Estados
miembros en materia de compatibilidad electromagnética.
2002/72/CE
Directiva relativa a los materiales y objetos plásticos destinados a entrar en
contacto con productos alimenticios.
2002/95/CE
Directiva sobre restricciones a la utilización de determinadas sustancias
peligrosas en aparatos eléctricos y electrónicos. (ROHS)
2002/96/CE
Directiva sobre residuos de aparatos eléctricos y electrónicos. (RAEE)
Español Declaración CE de Conformidad
33
The following Manual refers to the
following models: Essential Basic ·
Essential Pro · Versatile Pro
34
36 Original System
ENGLISH
íNDICE GENERAL
37 ASP
7 Figures
10 Details
12 Electric Diagram
38 Important General Information
39 Technical Features
40 Warranty
41 Usage Instructions
41 General description
42 Preparation
43 Operation
50 Cleaning
52 Fault detection
54 CE Declaration of Conformity
Zumex reserves the right to modify the information
contained in this manual without prior notice.
35
ZUMEX offers:
A Original squeezing system and Technology antibacterial ASP.
ORIGINAL SYSTEM
Original squeezing system patented by ZUMEX.
The rotating squeezing units extract the maximum amount of juice preventing their
contact with the cortex and thus ensuring better quality, taste and hygiene.
36
ASP
The first generation of orange juicers with exclusive antibacterial technology.
ZUMEX ASP is a unique antibacterial technology based on silver ions that inhibit
bacterial growth between washes providing extra-effective protection and durability.
www.zumexasp.com
Under moist conditions...
ZUMEX ASP delivers silver ions.
Anti Microbial Additive
Silver Ion
Bacteries are attracted by the ions...
and they join its molecular enzyme, causing
its permanent disappearance.
Bacteria
37
Important General Information
· New model Zumex Essential Pro and Zumex Versatile Pro
- New touch control configuration: more user-friendly
- 23 languages to choose from.
- Anti-drip tap
· The specific particulars about your Zumex juicer (voltage, frequency and other data of
interest) are stated on the Identification Label on the machine itself.
· Remember that for any technical consultation you should get in touch with your
usual Distributor/ Official Technical Assistance Service, always stating the Serial
number of the machine’s Identification Label.
· Before cleaning the machine or carrying out any maintenance, always turn it off at
the mains.
· In Spain Zumex adopts the measures required to ensure that the machines put
into the market are subject to selective collecti0on and have correct environmental
management. Please get in touch with your authorised Zumex distributor to dispose
of these machines correctly.
· This appliance is not designed for use by people (including children) whose physical,
sensorial or mental abilities are reduced or who lack experience or knowledge unless
they have had supervision or instructions about the use of the appliance by someone
responsible for their safety.
If you have any suggestion or comment to improve our machines or service network,
please get in touch with Zumex directly at the address below:
ZUMEX GROUP S.A
38
Important General Information English
Technical Features
Essential Basic Essential Pro
Oranges per
minute:
Versatile Pro
Podium
22
22
22
Dimensions (cm):
47 x 50 x 88 cm
47 x 50 x 75 cm
47 x 55 x 85 cm
47,5 x 58 x 80 cm
Net Weight (Kg):
45 Kg
45 Kg
54 Kg
33 Kg
280W for
220-240V 50-60 Hz
280W for
220-240V 50-60 Hz
280W for
220-240V 50-60 Hz
320W for
115V 60 Hz
320W for
115V 60 Hz
320W for
115V 60 Hz
IPX4
IPX4
IPX4
Lower than
70 dB (A).
Lower than
70 dB (A).
Lower than
70 dB (A).
Power:
Protection:
Sound pressure
level:
Safety:
Dual magnetic safety Dual magnetic safety Dual magnetic safety
sensor. Electronic
sensor. Electronic
sensor. Electronic
motor protection.
motor protection.
motor protection.
Maximum size
of fruit:
Up to 81 mm
Up to 81 mm
Up to 81 mm
(between 65 and
(between 65 and
(between 65 and
78mm recommended) 78mm recommended) 78mm recommended)
Anti-drip system
NO
YES
YES
English
Technical Features
39
Warranty
Scope of the warranty: This machine is guaranteed for a period of two years
against any complaint owing to faults in materials or construction which
hinder their smooth operation as long as the interior or mechanisms have
not been interfered with. The items set out below are excluded from the
present warranty.
Exclusions: Labour, transport, parts deteriorated by natural wear and tear
owing to use, as well as any damages resulting from misuse or incorrect installation and malfunctions caused by force majeure.
Any handling of the machine identification label makes the present Warranty
null and void. Furthermore, in view of the fact that only Official Technical
Assistance Service staff are qualified to repair this machine, this warranty will
be null and void if anyone else interferes with it.
When contacting our Technical Service, you must mention the SERIAL No. of
the Identification Label.
Replacement of original parts
Zumex recommends the use of Zumex spare parts and accessories for keeping the
machine in perfect condition. These parts have been expressly adapted for your type
of machine and have been subjected to our strict controls ensuring their reliability;
safety and quality meet demanding standards by Zumex.
All of our original spare parts have a guarantee of 3 months.
40
Warranty English
Usage Instructions
General Description
Zumex Essential Basic
Zumex Essential Pro
Zumex Versatile Pro
1 Fume juice container
2 Filter container
3 Zumex cover
4 Lower pressing unit
5 Upper pressing unit
6 Orange peel buckets
7 Right peel ejector
8 Fastener support cap
9 Button rubber protection
10 Blade holder
11 Feeder tube kit
12 Cover catch
13 Left peel ejector
14 Glass holder filter
15 Glass holder tray
16 Plastic knob
1
2
3
4
5
6
1
2
3
4
5
6
Juice container
Filter container
Zumex cover
Lower pressing unit
Upper pressing unit
Orange, silver or graphite
peel bucket
7 Right peel ejector
8 Fastener support cap
9 Blade holder
10 Feeder tube kit
11 Cover catch
12 Left peel ejector
13 Glass holder filter
14 Glass holder tray
15 Plastic securing knob
16 Complete faucet kit
17 Faucet button
18 Sleeve
19 Dish base
20 Dish kit
English Usage Instructions
41
Preparation
To start squeezing you must follow the steps below:
Step 1 Unpack your juicer and place it on a surface as horizontal as possible.
Step 2 Ensure that the mains power falls within the margins indicated on the Identification Label of the machine which you will find both on the cover page of this
manual as well as on the machine itself.
Step 3 Place the peel buckets as indicated in Fig. 1 and 4.
Paso 4 Make sure that the juice container and its filter are placed correctly and that the
cover is closed and secured by the catch.
If you have acquired a juicer with a podium, you must place the juicer on the podium,
screw it as indicated in the instruction supplied on the podium. Don’t forget to secure
the front wheels. Then place the hopper and the peel buckets with an open base
which you will find inside the stand (Fig. 2).
REMEMBER: Use fruit which does not exceed 81 mm in diameter. (Between
65 and 78 mm recommended)
Operation
Once the previous steps have been followed, connect the connecting plug to a socket
base fitted with a standardized ground. And press the sleeve button
to start up
the machine.
When you turn on the machine for the first time after purchase, a message will appear:
“Choose your language” in order to select the operating language of the machine.
The choice can be made using the arrows
and pressing “ON”. Once selected, the
machine will be ready for operation in “Self-Service” mode.
As a general rule, to operate within the menu, we can regard the “ON” button as
accept and “OFF” as cancel.
42
Usage Instructions English
Operating Modes with Zumex Essential Pro
Zumex Essential Pro can work in two operating modes:
Autostart: The machine detects the oranges in the feeder tube and starts up as the
oranges pass by.
Self-service: The machine starts up by activating the self-service faucet either by
pressing the faucet or by activating the switch lever; in order to be able to operate
with this switch lever see fig. 9A and 9B. In this mode you can also work continuously
by turning the faucet block 90º (Fig. 13).
Selection of operating mode:
Step 1 Press the MENU key for a few seconds to enter the programming mode.
Step 2 Select the WORKING MODE option by positioning the
cursors
over it and pressing ON to confirm your selection.
Step 3 Select the desired working mode, Autostart or Self-Service using the cursors
and press on to confirm your selection. Press OFF several times until you exit MENU.
Operating Modes with Zumex Versatile Pro
Zumex Versatile can operate in two working modes:
Professional: You can programme the no. of oranges to be squeezed in each cycle
using the cursors
, and you can programme up to 20 oranges in each cycle or select the ‘c’ option to squeeze continuously. The squeezing will start by pressing ‘ON’ and
it will end after ceasing to squeeze the no. of oranges programmed or if you press ‘OFF’.
Self-service: The machine starts up by activating the self-service faucet either by
pressing the faucet or activating the switch lever. You can also work continuously in
this mode by turning the faucet block 90º (Fig. 13).
English Usage Instructions
43
Selection of the operating mode:
Step 1 Press the MENU key for a few seconds to enter the menu.
Step 2 Select the WORKING MODE option by positioning the cursors
ON to confirm your selection.
and pressing
Step 3 Select the desired working mode, Professional or Self-Service using the cursors
and pressing ON to confirm your selection. Press OFF several times until you exit MENU.
Configuration
Your Zumex juicer allows you to adjust the parameters according to your preferences. All
adjustments are made at MENU > CONFIGURATION. Press the MENU key for a few seconds
to enter the menu and select CONFIGURATION, press ON to confirm your selection.
Lighting: Changes the screen brightness level.
On the CONFIGURATION menu select LIGHTING and press ON to confirm your selection.
. Once adjusted, confirm by pressing
Adjust the brightness level using the cursors
ON. The changes will be memorised.
Language: Changes the juicer menu language.
On the CONFIGURATION menu select LANGUAGE and press ON to confirm your selec. Once selected confirm by
tion. Select the language desired using the cursors
pressing ON. The changes will be memorised.
Offset: Depending on the type of fruit to be squeezed, the value can be adjusted for
its optimum counting.
Select OFFSET and press the ON key and you will be immediately asked for your PIN.
If you don’t have one, consult your Technical Service. Then you configure the desired
number using the cursors. Once the adjustment has been concluded, press ON to
save the changes. This operation must only be carried out under the supervision of an
authorised Technical Service.
NOTE: Remember that if you press OFF, you will cancel any changes made before and
you will return to the previous menu.
44
Usage Instructions English
Technical Service
The Zumex Essential Pro and Versatile Pro juicers provide you with the information
you need for correct unit maintenance. They are also fitted with a squeezed orange
counter which can be configured in this mode. Press the MENU key for a few seconds
to enter the menu and select TECHNICAL SERVICE, press ON to confirm your selection
and OFF to return to the previous menu.
Serial number: This shows you your juicer’s serial number which is essential for any
TECHNICAL SERVICE consultation.
On the TECHNICAL SERVICE menu select SERIAL NUMBER and press ON to confirm
your selection. You can see the serial number on the screen. Return to the previous
menu by pressing OFF.
Voltage: This shows you the mains voltage at the time of the consultation, vital for
any Technical Assistance Service.
On the TECHNICAL SERVICE menu select VOLTAGE and press ON to confirm your selection.
You can view the voltage on the screen. Return to the previous menu, pressing OFF.
Calibration: This shows you the calibration value of your machine which must be
adjusted in exceptional cases when the counter is not counting correctly. This information is vital for any Technical Assistance consultation. It also lets you change the values
manually. This procedure must only be carried out at the indication and with the aid of an
authorised Technical Assistance Service.
· Calibration value: On the TECHNICAL SERVICE menu select CALIBRATION >
CALIBRATION VALUE and press ON to confirm your selection. You can view the
calibration number on the screen. Return to the menu, pressing OFF.
· Offset Value: On the TECHNICAL SERVICE menu select CALIBRATION
> OFFSET VALUE and press ON to confirm your selection. You can view the offset
number on the screen. Return to the menu, pressing ON.
English Usage Instructions
45
· Calibrate: Select CALIBRATE and press ON. Next, set your PIN number and press
ON. The machine will ask for confirmation: ‘Calibrate?’, press ‘ON’ to confirm the
automatic calibration. The machine will then carry out said calibration and display the adjusted calibration value. Return to the menu, pressing OFF.
This option must only be carried out under the supervision of the Technical Service and when it has been specifically indicated.
Pin: Your juicer has a password so you can access the counters and modify configuration parameters. The standard programmed PIN is 0000 but you can personalise
this PIN. On the TECHNICAL SERVICE menu select PIN and press ON to confirm your
selection. If this is the first time you have changed your PIN, the standard PIN 0000
will appear and press ON; if you have already programmed a password previously,
enter the old password, use the cursors
to select each digit, press OFF to move
from digit to digit and ON to confirm the password. Upon entering the correct PIN the
“New PIN” screen will appear. Programme the new password, select each digit with
the cursors
, press OFF to move from digit to digit and ON to confirm the new PIN.
If you forget the Pin number programed, you will be required to reset machine’s
MENU. In order, to do that, enter CONFIGURATION press button, and while pressed,
press button simultaneously.
Counters: You can control the counter and discounter of your juicer. The counter
allows you to establish the no. of oranges squeezed, the discounter function allows you
to programme a given no. of oranges and gradually consume oranges from this total.
· Partial counter: This shows you the no. of oranges consumed and it can be set to zero.
On the TECHNICAL SERVICE menu select COUNTERS > PARTIAL COUNTER
and press ON to confirm your selection. Enter your PIN (Remember: Select each digit
, press OFF to move from digit to digit and ON to confirm the paswith the cursor
sword). You can view the number of oranges squeezed on the screen. To set the counter
and confirm using ON and on the machine display you will see that the
to zero press
counter has been set to zero. Return to the menu, pressing OFF repeatedly.
46
Usage Instructions English
· Total counter: This shows you all the oranges consumed throughout the life of the
juicer, this counter cannot be deleted.
On the TECHNICAL SERVICE menu select COUNTERS > TOTAL COUNTER and press ON
to confirm your selection. You can view the number of oranges on the screen. Move
up to the upper menu by pressing OFF.
· Discounter: This allows you to programme a given no. of oranges and gradually
consume oranges from this total. On the TECHNICAL SERVICE menu select
COUNTERS > DISCOUNTER and press ON to confirm your selection. Enter your PIN
, press OFF to move from digit
(Remember: Select each digit using the cursors
to digit and ON to confirm the password) and you will enter the discounter menu.
and after each digit
Programme each digit of the discounter using the cursors
press OFF to move on to the next one and repeat this action for each digit; on the
last digit press ON and the selection will be memorised automatically. Then select
whether you want the discounter to be visible or not on the main menu (visible/
concealed option). Return to the menu, pressing OFF repeatedly.
Once the discounter is at zero, the juicer will stop until a new sum of oranges is
loaded or a change is made to the counter function, entering the “MAIN COUNTER”
menu and confirming by pressing ON.
When the visible discounter has been programmed, a ‘D’ will appear on the normal
operating screen in front of the counter digits. If the concealed discounter has been
programmed, no figure will be displayed.
English Usage Instructions
47
Summary of Zumex Essential Pro and Versatile Pro Operating Modes
Working mode
Configuartion
Technical Service
Professional
Professional
Working mode
Configuartion
Technical Service
Working mode
Configuartion
Technical Service
Professional
Fruits
Lighting
Language
Offset
Lighting
Lighting
Language
Offset
Language
English
Lighting
Language
Offset
Pin ?
Serial number
Voltage
Calibration
Pin
Counters
Serial number
Serial number
Voltage
Calibration
Pin
Counters
Voltage
Serial number
Voltage
Calibration
Pin
Counters
Calibration value
Offset value
Calibration
Calibration value
Calibration value
Offset value
Calibration
Offset value
1/23
Offset
0000
0000
231
Calibration value
Offset value
Calibration
48
Usage Instructions English
30
97
30
Calibration
0000
Calibration?
Calibration
Calibration
85
Summary of Zumex Essential Pro and Versatile Pro Operating Modes
New Pin
Serial number
Voltage
Calibration
Pin
Counters
Serial number
Voltage
Calibration
Pin
Counters
Partial Counters
Total Counter
Discounter
Partial Counters
Total Counter
Discounter
Partial Counters
Total Counter
Discounter
Partial Counters
Delete ?
Partial Counters
000010
Total Counter
76
Discounter
000000
Visible
Concealed
Visible
Concealed
English Usage Instructions
49
Cleaning
For correct cleaning you must follow the steps below:
Step 1 Turn the machine off at the mains.
Step 2 Disassemble the front cover.
Step 3 Disassemble the blade holder (Fig. 7), pulling it towards you by the handle.
Be careful! Handle this part with great care as you may cut yourself.
Step 4 Remove the peel ejectors from their supports (Fig. 8).
Step 5 Disassemble the pressing units in pairs after unscrewing the securing knobs (Fig. 9).
Step 6 Disassemble the container and the juice filter (Fig. 10).
Step 7 Disassemble the faucet (Fig. 11A).
· All the parts EXCEPT FOR THE COVER are dishwasher safe.
· When cleaning the squeezing and cover area you should use a soft cloth dipped in
water and washing-up liquid. Then rinse thoroughly in clean water so no soap remains.
· Once the cleaning process has finished, you must assemble all the elements in
reverse order to their disassembly. Make sure that all the parts have been correctly
assembled and secured.
· Remember that each peel ejector (Fig. 8) only fits on one side and so they are not
interchangeable. When you place them make sure that you insert the peel ejector
paddle right down to the end of the lower pressing unit.
· In order to avoid the accumulation of wax it is important to clean the fruit feeder
frequently of Zumex Versatile Pro models.
· On models with a base stand clean the hopper and the inside of the stand, making
sure to eliminate any peel or pulp remains.
50
Usage Instructions English
REMEMBER: Do not put the front cover in the dishwasher. To clean it you
can use a soft cloth dipped in water and washing-up liquid.
Under no circumstances must you use abrasive products nor anti-lime products.
English Usage Instructions
51
Detecting Faults
FAULT: The machine doesn’t work
Possible cause
Correction
Machine not plugged in.
Plug it in.
No power is reaching the plug.
Check the socket.
Cover not fitted properly.
Make sure it has been fit properly.
Juice container not fitted properly.
Make sure it has been fit properly.
Blocked pressing units.
Turn off the machine at the mains and
unblock the pressing units.
Safety sensors malfunctioning.
Contact your technical service.
Faulty ON/OFF button.
Contact your technical service.
Faulty circuit.
Contact your technical service.
FAULT: The machine blocks frequently during juicing
Possible cause
Correction
Insufficient voltage.
Check that the voltage matches that indicated in the manual.
Faulty circuit.
Contact your technical service.
FAULT: The pressing units are not synchronized
Possible cause
Correction
Fault in an axle.
Contact your technical service.
FAULT: Peel ejector breaks
Possible cause
Correction
Peel ejector incorrectly fitted.
Place it in its correct position inserting it totally
until observing it has madecontact (fig. 8)
FAULT: You can hear the motor running but the pressing units are not turning
52
Possible cause
Correction
Internal fault.
Contact your technical service.
Detecting Faults
English
FAULT: The faucet gets blocked
Possible cause
Correction
The juice has seeds or too much pulp.
Disassemble and clean the faucet according Fig. 11A.
FAULT: The machine stops every now and again
Possible cause
Correction
Insufficient ventilation.
Check that the appliance’s ventilation
grilles are not blocked.
Overload.
Contact your technical service.
FAULT: Screen does not display information
Possible cause
Correction
Alteration to mains systems.
Turn off the machine and turn it back on again.
FAULT: The machine is in Self-Service mode and won’t stop operating
Possible cause
Correction
Faucet not fitted or fitted incorrectly.
Fit the faucet in the manner indicated in Fig. 11A
Faucet well fitted: possible internal fault.
Contact your technical service.
Faucet block activated.
Put the block in horizontal position by
pressing the faucet downwards.
WARNING: Any action to unblock the machine must be carried out by disconnecting
it from the mains. If, after making the checks stated here, the machine does not work,
call the technical service.
English Detecting Faults
53
Screen Messages
Display message
Cause
Solution
Excess current.
The maximum electrical consumption level has
been exceeded for at least one second.
Turn off at mains and turn
back on again.
No oranges.
The motor remains on for two minutes
detecting any squeezing.
Put oranges back in feeder again
without and press ON.
Memory initiated.
Se detecta un error en la memoria.
Contact your technical service.
Calibration.
A memory error has been detected.
Calibrate (See page 18).
Out of service.
The counter has reached zero.
Modify the discounter value as
indicated in page 19 or move on to
counter function entering PARTIAL
COUNTER and pressing ON.
EEPROM
Error detected in EEPROM memory
Contact your technical service.
Out of range .
The input power voltage is less than 80V
or greater than 260V.
Contact your technical service.
Keyboard error (Error 1). No communication with the keyboard (Internal fault). Contact your technical service.
Juice tray picture
flashing.
Check the juice tray and front cover are
placed correctly.
Place the tray and cover in its correct
position as Fig. 4. If the picture does not
disappear, contact your technical service.
* The message: “Keyboard error” may not appear on the display as there is no communication between the CPU and the keyboard panel-
CE Declaration of Conformity
ZUMEX GROUP S.A., whose registered offices are situated at Polígono Industrial de
Moncada III, C/ Molí, 2 - 46113 Moncada, Valencia (Spain) does hereby declare, under
its sole responsibility, that the Essential Basic - Essential Pro - Versatile Pro juicer
machine models conform to the following harmonised standards:
EN ISO 12100-1
Machine safety. Basic concepts, general principles for design. Part 1: Basic
terminology, methodology.
EN ISO 12100-2
Machine safety. Basic concepts, general principles for design. Part 2:
Technical principles.
EN 60335-1
Safety of household electrical appliances and similar. Part 1: General
requirements.
2003
2003
2002
54
Screen Messages · CE Declaration of Conformity English
EN 60335-2-14
Safety of household electrical appliances and similar. Part 2-14: Specific
requirements for kitchen appliances.
EN 50366
Household electrical appliances and similar. Electromagnetic fields. Evaluation and measurement methodologies.
EN 55014-1
Electromagnetic compatibility. Requirements for household electrical
appliances, electrical tools and similar equipment. Part 1: Emission. Product
family standard.
EN 55014-2
1997
Electromagnetic compatibility. Requirements for household electrical
appliances, electrical tools and similar equipment. Immunity. Product
family standard.
EN 61000-3-2
Compatibilidad electromagnética. Part 3: Limits – Section 2: Limits for harmonic current emissions (equipment with input current ≤ 16A per phase).
EN 61000-3-3
1995
Electromagnetic compatibility. Part 3: Limits – Section 3: Limitation of
voltage fluctuations and flicker on low voltage systems for equipment with
input current ≤ 16A.
EN 1672-2
Food processing machinery. Basic concepts. Part 2: Hygiene requirements.
2006
2003
2006
2006
2005
Copying with the provisions of the European Directives set out below:
98/37/CE
Approximation of the laws of the Member States relating to machinery.
2006/95/CE
Directive relating to the approximation of the laws of the Member
States concerning electrical equipment designed for use within certain
voltage limit.
2004/108/CE
Directive relating to the approximation of the laws of the Member
States as regards electromagnetic compatibility.
2002/72/CE
Directive relating to plastic materials and articles intended to come into
contact with foodstuffs.
2002/95/CE
Directive on restrictions of the use of certain hazardous substances in
electrical and electronic equipment. (ROHS)
2002/96/CE
Directive on waste electrical and electronic equipment. (RAEE)
English CE Declaration of Conformity
55
56
www.zumex.com