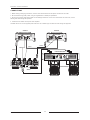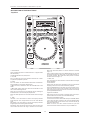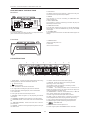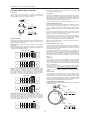
1
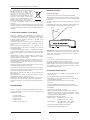
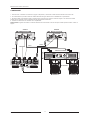
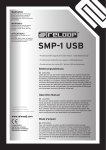
PROFESSIONAL
CD-USB MEDIA PLAYER
MANUAL DE USUARIO
USER MANUAL
Actualización Firmware XCEED 2011-01
XCEED
ESPAÑOL
ACTUALIZACIÓN FIRMWARE V.15.12
La unidad XCEED que viene en esta caja no incorpora la última actualización
de firmware disponible para este reproductor de CD/USB/MP3.
Para que todas las funciones del XCEED que se describen en el Manual de
Usuario estén disponibles recomendamos instalar la última actualización que
encontrará en nuestra web: www.akiyamadj.com
En el documento que encontrará en la web, “Actualización Firmware XCEED
2011-01” está detallada la forma de actualización del reproductor XCEED. Lea y
siga detenidamente las instrucciones para actualizar el firmware y poder
disfrutar de todas las nuevas funciones que hemos incorporado al reproductor
de CD/USB/MP3
ENGLISH
FIRMWARE UPDATE V.15.12
The unit XCEED you can find in this gift box it have not the last available
update firmware for this CD/USB/MP3 Player
To enjoy all the functions described on the XCEED User Manual we recomend to
update it with the last firmware version available, that you can find in our
website: www.akiyamadj.com
On the mentioned document on the web, “Actualización Firmware XCEED 201101" (Updating Firmware XCEED 2011-01) is listed in detail the firmware update
process. Read and carefully follow the instructions to update the firmware and
enjoy all the new features we've added to this player CD/USB/MP3.
1
Manual usuario Xceed. Advertencias
Este símbolo indica que existen
importantes instrucciones sobre
mantenimiento y funcionalidad
en este manual
Este símbolo indica la existencia
de voltaje que constituye riesgo
de descarga eléctrica
PRECAUCIÓN: PARA REDUCIR EL RIESGO DE ELECTROCUCIÓN, NO MANIPULE EL INTERIOR DEL EQUIPO. EN EL EQUIPO NO HAY PARTES
EN EL INTERIOR QUE DEBAN SER SUPERVISADAS POR EL USUARIO. PARA REALIZAR EL MANTENIMIENTO DEL EQUIPO PÓNGASE EN
CONTACTO CON PERSONAL CUALIFICADO
ADVERTENCIA: PARA EVITAR RIESGO DE ELECTROCUCIÓN ASEGÚRESE DE NO EXPONER EL EQUIPO A SUSTANCIAS LIQUIDAS DE NINGÚN
TIPO. ASÍ COMO A NO EMPLAZAR EL EQUIPO EN LUGARES HÚMEDOS.
siguiendo las instrucciones o recomendaciones dadas en este
manual o por el fabricante directamente.
INSTRUCCIONES DE SEGURIDAD
INFORMACIÓN SOBRE LA GARANTÍA
14. Precaución durante tormentas. Durante una tormenta
desconecte el equipo de la red para evitar que los posibles picos
de corriente dañen el equipo.
1. Lea detenidamente este manual antes de utilizar su equipo.
2. Mantenga el manual a su disposición para su uso en el futuro.
15. Durante cualquier manipulación del equipo, para mantener
todas las cualidades de éste tanto en prestaciones como en
seguridad para el operante es necesario utilizar sólo recambios
originales. Consecuentemente asegúrese de que la empresa que
realice el mantenimiento esté autorizada por el fabricante o
importador.
3. Siga las advertencias que se le proporcionan en este manual.
4. Siga las instrucciones consignadas en este manual, un uso
indebido podría dejar sin efecto la garantía.
5. Agua y humedad. No utilice el equipo cerca del agua o en
lugares muy húmedos (fregadero, lavadora, etc.) para evitar
riesgos de descarga eléctrica o fuego.
16. Utilice sólo cables conforme a la regulación vigente.
Pregunte a su distribuidor al respecto del particular.
6.Transporte del equipo. Transporte el equipo
con mucho cuidado. Los golpes o las
vibraciones fuertes pueden dañarlo
mecánicamente.
17. No utilice su equipo inmediatamente en caso de haberlo
trasladado súbitamente de un ambiente muy frío a un ambiente
caliente.
7. Fuentes de calor. Tenga cuidado de no colocar el equipo cerca
de fuentes de calor (Ej. Radiadores, estufas, amplificadores)
18. Limpieza. Nunca utilice sprays de limpieza en la zona del
equipo donde están los controles (botones, faders, conectores,
etc.). Utilice un trapo húmedo.
8. Líquidos y objetos extraños. En caso de que algún fluido o
pequeñas partículas sólidas sean derramadas sobre el aparato y
se introduzcan en los circuitos apague el aparato y llévelo a su
distribuidor.
19. Audio ON. Cuando termine de instalar el equipo y esté listo
para comenzar a reproducir música asegúrese antes de situar el
control de volumen tanto general como de auriculares al
mínimo.
9. Daños en el quipo que precisen reparación. El equipo deberá
ser reparado o revisado por personal cualificado en caso de:
20. Comprobación de seguridad. Una vez realizada una
reparación o servicio del equipo pida al personal cualificado que
realice una comprobación para asegurarse de que el equipo le es
devuelto en perfectas condiciones de uso.
A. Objetos o líquidos se han introducido en el equipo.
B. El aparato ha sido expuesto a la lluvia.
C. El equipo no parece funcionar o lo hace de modo poco
usual.
D. El aparato ha caído al suelo o presenta deterioros en su
caja exterior.
21. Control de seguridad. La diferencia de potencial entre la
toma de corriente de la pared y cualquier pieza metálica del
equipo debe ser de al menos 100.000 ohmios.
10. Mantenimiento. Según estipulan las directivas Europeas no
está permitido realizar ninguna modificación al aparato. No
abra el equipo para labores de mantenimiento pues en este
aparato no hay piezas que necesiten manutención. En caso de
que abriendo el equipo sea éste dañado o lo sea la persona que
lo manipula la empresa no tomará ninguna responsabilidad por
este servicio de mantenimiento no autorizado. Además en este
caso la garantía perdería su vigencia.
CONDICIONES DE USO
Este equipo ha sido concebido y fabricado para ser utilizado
como reproductor de discos compactos y memorias flash.
Cualquier uso alternativo anularía la garantía.
El aparato viene con un número de serie. No lo arranque pues
podría perder sus derechos de garantía.
11. Ventilación. El aparato está provisto de hendiduras de
ventilación, es importante no cubrirlas o bloquearlas. La
ventilación del aparato podría verse comprometida resultando
en un sobrecalentamiento que podría dañar el equipo. Tenga
siempre en cuenta que colocar el aparato en un lugar sin
ventilación puede producir un sobrecalentamiento de éste.
CERTIFICACIÓN DE SEGURIDAD
12. Nunca utilice accesorios o modificaciones no autorizados
por el fabricante. Ello puede afectar la seguridad del aparato y el
fabricante no tendrá ninguna responsabilidad en este caso.
Propiedades del diodo láser
Material: Ga.-Al-As
Longitud de onda: 755-815 nm (25oC)
Salida de láser: onda continua máx. 0,5mW
13. Accesorios. No deposite o instale el equipo sobre superficies
o estructuras inestables. El aparato podría precipitarse y causar
lesiones a las personas en las proximidades de éste. Cualquier
montaje o
instalación del equipo deberá ser realizado
1
Manual usuario Xceed. Utilización segura y eficiente
Este producto no puede ser tratado como un
residuo doméstico. En su lugar, se debe
entregar al punto de recogida para el
reciclaje de aparatos eléctricos y
electrónicos. Al garantizar que este
producto se desecha correctamente, usted
ayudará a evitar posibles consecuencias
negativas para el medio ambiente y la salud
humana que podrían derivarse de la
incorrecta manipulación de este producto.
PRIMEROS PASOS
Instalación del equipo
Instalar el equipo sobre una superficie horizontal estable.
Asegúrese de que el reproductor se instala en una zona ventilada
y no expuesta a rayos solares directos, extrema humedad o alta
temperatura
Posicione el equipo lo más lejos posible de televisores y aparatos
de radio.
El reciclaje de materiales ayuda a conservar los recursos
naturales.
La pantalla luminosa LCD de la unidad está diseñada para verse
claramente con los ángulos que se muestran en la Figura.
Para obtener más información detallada sobre el reciclaje de este
producto, póngase en contacto con la oficina local de su ciudad,
el servicio de recogida de basuras o la tienda donde adquirió el
producto.
10
Sight point
45
UTILIZACIÓN SEGURA Y EFICIENTE
Seleccione la ubicación de la instalación de la unidad con
cuidado. Evite colocarlo bajo la luz directa del sol. Evite también
los lugares donde haya polvo y vibraciones, calor, frío o
humedad. Mantener alejado de fuentes de zumbido, como
transformadores o motores.
El aparato no debe ser expuesto a goteos o salpicaduras. No
coloque objetos que contengan líquidos, como floreros, sobre el
aparato.
Para desconectar completamente este producto de la
alimentación eléctrica, desconecte el enchufe de la toma de
corriente de la pared.
El enchufe de alimentación eléctrica se utiliza para interrumpir
por completo el suministro de alimentación eléctrica a la unidad
y debe de encontrarse en un lugar al que el usuario tenga fácil
acceso.
PRECAUCIÓN. El aparato funcionará correctamente cuando esté
montado con el panel frontal a 15 grados de la vertical. Si el
equipo está excesivamente inclinado los discos pueden no
funcionar correctamente.
ADVERTENCIA: El usuario no deberá colocar el aparato en un
espacio cerrado, en el que durante su utilización no se pueda
acceder fácilmente al enchufe de red.
Conexiones
No utilice este reproductor de discos compactos donde hay
temperaturas extremas (por debajo de 5 º C o superior a 35 º C)
(1) Desconectar el interruptor de encendido, “Power”.
(2) Conectar el cable RCA a la entada del mezclador.
No abra la tapa ya que esto podría resultar en daños al aparato o
una descarga eléctrica.
ATENCIÓN. Asegúrese de usar los cables que le suministramos.
Utilizar cualquier otro cable puede dañar el equipo. Asegúrese
de desconectar el equipo antes de conectar los cables, de otro
modo podría dañar el equipo.
Cuando desconecte el cable de alimentación de la toma de CA,
tómelo de la clavija. No tire nunca del cable.
No usar la fuerza cuando se accionan los interruptores y botones.
Antes de mover el aparato, asegúrese de desconectar el cable de
alimentación y todos los cables de conexión.
FUNCIONES PRINCIPALES
Para mantener limpio el lector láser, no se olvide de cerrar la
bandeja del disco.
- CD-Text de apoyo (con pantalla de desplazamiento para los
nombres largos)
No intente limpiar la unidad con disolventes químicos, ya que
podría dañarlo. Utilice un paño limpio y seco.
- Entrada USB para dispositivo de almacenamiento USB
Asegúrese de tener las manos limpias cuando coja los discos.
Nunca inserte un disco que tenga una grieta en su superficie.
- Salida digital en la frecuencia de muestreo constante de 44,1
kHz para todas las funciones.
Guarde este manual en un lugar seguro para posible referencia
futura.
- Seamlessloop, bucle sin interrupción. (A / B / Reloop)
- 3 HOT CUE.
- Contador de BPM: Manual por pulsaciones y automático
PRELIMINARES
- Control de Pitch bend vía jog-wheel (rueda) o bien por botones.
- Función Relay
- Remote Control (Tact / Lock /cue start )
Por favor, le rogamos que al abrir el embalaje se asegure que el
contenido del mismo es correcto. Al revisar el contenido de la
caja deberá encontrar:
- 5 Efectos: SCRATCH / REVERSE / FILTER / ECHO / FLANGER.
- Visualización en el display de: Tiempo transcurrido / tiempo
restante / Total de tiempo restante (para CDDA), y Tiempo
transcurrido / tiempo restante (MP3)
1- Unidad Principal
1- Manual de Instrucciones
1- Cable RCA (L/R)
1- Cable Auto-start
1- Cable AC de conexión a red
- Single Auto CUE / Continue / Normal
- Rangos de pitch:
Para CDDA (± 8%, ± 16%, ± 100%)
Para MP3 (± 8%, ± 16%, ± 100%)
- Tempo Master:
Para CDDA (± 8%, ± 16%, ± 100%)
Para MP3 (± 8%, ± 16%, ± 100%)
- Programa del sistema (Firmware) actualizable.
- Program list setup (Unidad programable)
2
Manual usuario Xceed. Conexiones
CONEXIONES
1. Antes de hacer o cambiar las conexiones, apague el dispositivo y desconecte el cable de alimentación de la toma de CA.
2. Le recomendamos que utilice cables de calidad: Obtendrá una gran diferencia en la fidelidad de la reproducción.
3. No utilice cables excesivamente largos. Asegúrese que las tomas de los mismos están bien sujetas. Las conexiones sueltas
pueden causar zumbidos, ruido o intermitencia que podría dañar los altavoces.
4. Conecte los cables RCA a las entradas de su amplificador.
PRECAUCIÓN: Asegúrese de utilizar el cable de alimentación suministrado. El uso de otro tipo de cable puede ocasionar daños al
equipo.
XCEED A
XCEED B
POWER
POWER
AC IN
AC IN
DIGITAL OUT
LINE OUT
L
ON
REMOTE
RELAY
OFF
DIGITAL OUT
LINE OUT
ON
OFF
XCEED
CD/USB MEDIA PLAYER
L
REMOTE
AC 230V - 50Hz22W
MADE IN CHINA
CD/USB MEDIA PLAYER
XCEED
CD/USB MEDIA PLAYER
RELAY
AC 230V - 50Hz22W
MADE IN CHINA
CD/USB MEDIA PLAYER
R
R
AKIYAMA.08191 BARCELONA (SPAIN)
AKIYAMA.08191 BARCELONA (SPAIN)
REMOTE B
REMOTE A
RELAY
AUDIO B
AUDIO A
ETAPA DE POTENCIA
10
POWER
10
12
12
8
8
PROTECT
6
15
6
15
CLIP
4
19
-10dB
4
19
-20dB
29
29
2
2
SIGNAL
8
8
dB
0
CHANNEL 1
ACTIVE
dB
0
CHANNEL 2
FADER START A
ALTAVOCES
FADER START B
MEZCLADOR
AUDIO OUTPUT
3
Manual usuario Xceed. Descripción de funciones. Frontal
DESCRIPCIÓN DE FUNCIONES.
Frontal
12
1
WHEEL
EFFECTS
FLANGER
21
IN
8
SEAMLESS
LOOP
USB
2
CD/USB
FOLDER/
TRACK
3
TIME
CONT.
Sleep mode
5
4
Partitions
Start/Brake
REVERSE
-
6
21
Remote control
wheel
FILTER
OUT
8
M
7
RELOOP/EXIT
ECHO
8
71
72
73
25
22
Auto Loop
beat lenght
LOOP EDIT
wheel
HOT CUE
MEMORY
21
SCRATCH
SEARCH
wheel
23
21
RELAY
Gain
Parameter
wheel
9
FOLDER
TRACK
CUT
PITCH
BEND
10
10
LOOP TRIM
18
18
EXTN
PROG.
24
11
19
MANUAL TAP
AUTO BMP
PITCH
ON/OFF
15
13
CUE
RANGE
8%-16%-100%
16
PLAY/PAUSE
REV
FWD
MASTER
TEMPO
20
14
1. Conector USB
17
El rango es de 0 a 6 segundos.Vea más información acerca de
Start/ Brake en EXPLICACIÓN DE FUNCIONES página 8.
Conecte un dispositivo de almacenamiento de datos USB (Pen
Drive, HDD). Sólo reproduce archivos en formato Mp3.
Sleep (modo Stand by): mantenga presionado el botón y
presione
FOLDER TRACK
para seleccionar el tiempo que
tardará el aparato en entrar en modo “Sleep”. El rango es de
15, 30 y 60 minutos. Vea más información acerca del modo
Sleep en EXPLICACIÓN DE FUNCIONES página 8.
Compatible con sistemas de archivos: FAT, NTFS, HFS+.
2. Selector CD / USB
Presione el conmutador para escoger fuente de reproducción
entre USB y CD. Sólo podrá realizar la selección cuando el equipo
no esté en reproducción (modo Pausa). Al encender el
reproductor XCEED detectará por defecto el CD Player.
5. CONT./SGL (Reproducción Continua y Simple)
Presione el botón para conmutar entre modo Continuo y modo
Simple AUTO CUE.
3. Carpeta (Folder)
Modo Continuo:
Presione este botón para conmutar entre una carpeta MP3 y un
archivo MP3. Seleccione una Carpeta presionando el botón una
segunda vez.
Reproduce continuamente desde la primera hasta la última pista.
FOLDER TRACK
Si presionamos
hacia una pista nueva la
reproducción continua a partir de dicha pista hasta la última
pista.
En modo MP3, Total-Track indica el número total de archivos MP3
en la Carpeta
FOLDER TRACK
Presionando
en modo Continuo no cambia
el punto CUE principal que sigue por defecto al inicio de la
primera pista. O en caso de que hayamos memorizado un nuevo
FOLDER TRACK
punto CUE no variará al presionar
.
En MP3 modo Carpeta, Total-Track indica el número total de
Carpetas en el CD o dispositivo de almacenamiento USB
Si utiliza un disco duro como dispositivo USB de almacenamiento
de datos, mantenga presionado el botón unos 2 segundos para
“saltar” entre las particiones del disco duro. Vea más información
acerca de Particiones de disco en EXPLICACIÓN DE FUNCIONES
página 8.
Modo Simple AUTO CUE:
Reproduce una pista y entra en modo PAUSA en la pista siguiente
en el punto AUTO CUE que por defecto se crea al principio de
cada pista.
4. TIME (Tiempo)
Control Remoto (FADER START)
En modo CD: presione el botón para conmutar entre “Single
Elapsed Time“ (tiempo transcurrido de pista), “Single Remain
Time“ (tiempo restante de pista) y “Total Remain Time“ (tiempo
restante total).
Selección de función “Fader Start”: Mantenga presionado CONT y
FOLDER TRACK
presione
para seleccionar el tipo de
interacción (LOCK, TACT, CUE/PLAY) entre un mezclador externo
con función FADER START y uno o dos reproductores XCEED.
NOTA: el mezclador debe disponer de la función FADER START y
debe conectarlo a su XCEED.
En modo MP3: presione el botón para conmutar en el display
entre “Single Elapsed Time“ (tiempo transcurrido de pista),
“Single Remain Time“ (tiempo restante de pista).
Start/Break (Arranque/Frenado): mantenga presionado el botón
y manipule la rueda para ajustar el tiempo de arranque y frenado.
4
Manual usuario Xceed. Descripción de funciones. Frontal
Seleccione: Lock, Tack y Cue/Play utilizando SWITCH MODE (Tipo
de interacción).
Cuando la unidad está en pausa, al pulsar este botón durante 2
segundos puede seleccionar las listas de reproducción. Muestra
los cuatro modos de reproducción M3U, XML, WPL y carpeta
normal. Manteniendo apretado el botón TITLE/LIST pulse el
botón
FOLDER/TRACK
para cambiar entre estos cuatro
modos. Una vez que decida el formato que desee reproducir (se
supone que ha dejado XML), suelte el botón TITLE/LIST. Esto le
llevará a todas las listas de reproducción que tengan este tipo de
formato. Si desea salir de esta lista de reproducción, mantenga
presionado el botón TITLE/LIST y mientras mantiene presionado
este botón, presione una vez el botón FOLDER/TRACK
(10) y
automáticamente saldrá del modo playlist y tendrá acceso a
todos los folders de su memoria USB.
LOCK:
Cuando el crossfader del mezclador perteneciente al canal donde
hemos conectado XCEED es desplazado hacia su posición de
máximo nivel, el reproductor XCEED comenzará la reproducción
y entrará en modo PAUSA inmediatamente.
TACT:
Cuando, por primera vez, el Crossfader del mezclador es
desplazado hacia el lado donde tenemos asignado el canal donde
se conecta el reproductor éste comienza la reproducción.
Cuando el Crossfader del mezclador es desplazado hacia el lado
opuesto donde tenemos asignado el canal donde se conecta el
reproductor éste entra en modo Pausa.
*NOTA: Sólo para archivos MP3.
Más información en EXPLICACIÓN DE FUNCIONES página 8.
CUE/PLAY:
7. HOT-CUE
Cuando el Crossfader del mezclador es desplazado hacia el lado
donde tenemos asignado el canal donde se conecta el
reproductor éste comienza la reproducción desde el último
punto CUE almacenado.
XCEED le permite la reproducción desde tres puntos CUE
distintos instantáneamente.
A. Guardar un punto CUE en memoria: primero presione el botón
MEMO y a continuación presione el botón CUE de su elección para
almacenar el punto CUE. El botón CUE seleccionado se iluminará.
Vea más información acerca del Control Remoto en EXPLICACIÓN
DE FUNCIONES página 8.
B. Reproducir puntos CUE almacenados: Presione el botón CUE
apropiado (HOT CUE 1,2,3) para realizar esta función.
Con éste botón también se puede ajustar el nivel de sensibilidad
del detector superior de la rueda “Touch Sensitive Adjustment”.
Con este botón también podrá seleccionar la función AUTOLOOP.
Vea más información acerca de la función Autoloop en
EXPLICACIÓN DE FUNCIONES página 8.
Con XCEED apagado mantenga presionado el botón CONT. (5) y
ponga XCEED en marcha. Entrara en el modo de ajuste de
sensibilidad. Aproxime su mano a la parte superior de la rueda
sin llegar a tocarla, detectara el valor de sensibilidad actual. Si
por ejemplo queremos aumentar la sensibilidad en 2 grados
presione el botón SKIP para modificar la sensibilidad y obtener el
valor deseado. A continuación presione MEMO para guardar el
nuevo valor de sensibilidad y reinicie su equipo.
8. LOOP (Bucle)
a. Presione IN para memorizar el inicio de un Loop y a
continuación presione OUT para establecer el punto final del
Loop y memorizarlo. El Loop comienza su reproducción
instantáneamente.
* Este ajuste sólo es necesario en caso de que instale su equipo en
un lugar nuevo. Las condiciones del entorno pueden influir en la
sensibilidad de la rueda.
b. Presione OUT otra vez para editar la duración del Loop
mientras lo reproduce. Manipulando la rueda podrá alargar o
acortar el Loop.
c. Presione RELOOP para salir de la reproducción del Loop o
para reiniciar el Loop.
Ajuste de “Touch Sensitive” de rueda
1
d. El inicio (IN) y final (OUT) de un loop debe establecerse en
una sola pista MP3. No podrá realizar un Loop donde el punto
de inicio éste en una pista y el punto final en otra.
XCEED APAGADO
CONT.
En el caso de reproducción de CDDA (Compact Disk Digital
Audio) sí podrá establecer Loop que incluyan dos pistas distintas.
HOLD
+
Editar un loop
1 REALIZE UN LOOP
ENCENDER XCEED
2 PRESIONE Y MANTENGA BOTON OUT, USE LA RUEDA PARA
2
EDITAR EL LOOP
OUT
ACORTA LOOP
LOOP EDIT
wheel
ALARGA LOOP
HOLD
DISPLAY
Pase su mano por encima de la parte superior de
la rueda y observará como la barra reacciona a la
proximidad.
DURACIÓN DE LOOP >
9. RELAY (Reproducción Alterna)
NOTA: necesita dos unidades XCEED conectadas entre sí a través
del conector RELAY (4) para realizar esta función. Ver partes del
equipo en vista trasera.
Sensibilidad
Presione los botones para ajustar la
sensibilidad.
FOLDER
TRACK
MENOS
CUT
LOOP TRIM
Presione el botón RELAY para activar esta función. Cuando un
reproductor XCEED está en modo PLAY el otro está en modo
PAUSA. Presione PAUSE en el reproductor activo y este entra en
modo PAUSA y el otro automáticamente comienza la
reproducción (modo PLAY).
MAS
* Este control también sirve para conmutar entre parámetros de
GAIN y parámetros de los efectos mostrados en el display.
EXTN
10.
3 Presione el botón MEMO para guardar los
cambios y apague/encienda el equipo para uso
normal.
FOLDER/TRACK
10.1. Utilícelo para seleccionar una Pista, una Carpeta o una
Partición de su HDD (disco duro). Manténgalo presionado y
manipule la rueda para realizar una búsqueda rápida de Pistas.
Nota: No se recomienda manipular el Ajuste de sensibilidad si no
es por fallo de la misma.
10.2. Cuando ha establecido un Loop, presionando
doblará
la duración del Loop. Presionando
acortará la duración del
Loop en una mitad.
6. TITLE/LIST (Información de pista en Display)
Presione el botón para seleccionar en el display: FILE, TITLE,
ALBUM y ARTIST.
* Durante la reproducción del Loop el control FOLDER/TRACK no
realizará la función de salto a la siguiente pista.
5
Manual usuario Xceed. Descripción de funciones. Frontal
11. TAP
la reproducción programa, puede añadir más canciones al
programa.
Presione el botón en sincronía con el beat para, manualmente,
obtener una lectura del valor de BPM de la pista. En modo
manual el display muestra BPM. Para volver a modo AUTO BPM
mantenga el botón presionado 2 segundos. En el display leerá
AUTO BPM.
Salir de PROG Reproducción-Editar: En modo de pausa, al pulsar
este botón durante dos segundos se puede volver a la
reproducción normal. Una vez que regrese a la reproducción
normal, pulsando este botón se puede entrar en el programa de
nuevo. Puede continuar la reproducción del programa,
almacenar más canciones en el programa o eliminar el programa.
12. DISPLAY
Indica las funciones que van realizándose en tiempo real en
XCEED además de información variada. Vea más información en
el apartado dedicado al “Display” en página 7
PROG.
1 ENTRAR EN MODEO PLAY/PAUSE
2 PRESIONAR PROG
> ENTRAMOS EN MODO PROG
13. CUE
En el modo de pausa, pulse este botón para establecer un punto
en el tiempo que quiera memorizar en su reproducción. En
modo reproducción, pulse este botón para pausar la música y
volver al punto memorizado. Si mantiene pulsado este botón se
iniciará la reproducción desde el punto de referencia. Cuando
deje de presionarlo, dejará de reproducirlo y volverá al punto
memorizado.
> PROG en Display parpadea
DISPLAY >
3 SELECCIONAR PISTAS CON LOS BOTONES SKIP > En Display podra ver la pista seleccionada.
PROG.
4 PRESIONE PLA; PROGRAM COMIENZA
4 SALIR DE MODO PROGRAM .
> PRESIONAR BOTON PROG. 2 seg
PRESS 2 seg.
20. OPEN/CLOSE
Después de pulsar este botón para memorizar el punto
deseado, los anteriores serán eliminados.
Presione para expulsar el disco. Eyecta el disco. Para evitar la
eyección accidental durante la reproducción, ésta no se produce
a menos que el equipo esté en modo Cue o Pause.
14. PLAY/PAUSE
Nota: El disco no puede ser expulsado a menos CUE o PAUSE ha
sido presionado primero.
Presione este botón para iniciar la reproducción o pausarla.
15. PITCH ON/OFF
21. EFECTOS DE SONIDO
Presione este botón para activar o desactivar el ajuste de pitch.
Ajustable mediante el deslizador PITCH (25).
Estos cuatro botones activan los efectos de sonidos. Presionando
cada uno de ellos activará el efecto flanger, filter, eco, o reverse
(reproducción hacia atrás). Cuando seleccione estos efecos se
iluminará y parpadeará el botón RELAY (9). Presione RELAY para
alternar entre ganancia y parámetro (el seleccionado
parpadeará). Utilice el Jog-Wheel (la rueda) para cambiar el valor
de los mismos.
16. PITCH RANGE
Cambie el rango de pitch entre el +/-8%, +/-16 % y +/-100%.
A. Cuando la luz LED está apagado, se establece +/-8%.
B. Cuando la luz LED está encendido, se establece +/-16%.
C. Cuando la luz LED parpadea, se establece +/-100%.
Flanger:
Filtro:
Echo:
PRESIONE” RANGE” TRES VECES:
RANGE
RANGE
RANGE
8%-16%-100%
8%-16%-100%
8%-16%-100%
8%
PRESS
16%
Ganancia: 0 ~ 100. Parámetro: 1/32 ~ 16/1
Ganancia: 0 ~ 100. Parámetro: -60 ~ +60
Ganancia: 0 ~ 100: Parámetro: 1/32 ~ 1/1
1 SELECIONE EFECTO i.e. FLANGER & ACTIVELO
2 PRESIONE EL BOTON RELAY PARA ESCOGER ENTRE: GAIN o PARAMETER
100%
2.1 SELECCIONAMOS GAIN > EN DISPLAY “G ###” PARPADEA (GAIN > DRY/WET)
2.2 SELECCIONAMOS PARAMETER > EN DISPLAY “Parameter value” PARPADEA
> PARPADEA
17. MT MASTER TEMPO
GAIN
Cuando se activa esta función, la nota de la canción permanece
inalterada aunque manipule el pitch control (25) y/o el rango de
pitch (16)
Parpadea
> GAIN= 28%
Parpadea
PARAMETER
> PARAMETER = 8 Ciclos Flange por Beat
3 GIRE LA RUEDA PARA DETERMINAR GAIN Y PARAMETER (el efecto debe estar activado)
Nos permite seleccionar el modo Key Lock (Master Tempo). En
modo Key Lock nos permite alterar el valor de PITCH de una pista
sin cambiar la percepción de la nota original. Cuando el modo
Key Lock está activado se iluminará el LED adjunto al botón KEY
LOCK. Si esta función no está activa y modificamos
significativamente el valor de velocidad de reproducción
mediante el potenciómetro Pitch (25) escucharemos la música
considerablemente modificada. Al incrementar la velocidad
escucharemos el llamado efecto “Mickey Mouse” al disminuir la
velocidad escucharemos el llamado efecto "James Earl Jones".
Cualquiera de los tres efectos puede ser parametrizado como
acabamos de describir. Así como la función REVERSE.
22. SCRATCH
Presione este botón para activar la función SCRATCH. Toque y
gire la superficie superior plana de la rueda (Jog-Wheel) de
desplazamiento para realizar este efecto. Podemos aplicar
cualquier efecto junto a la función SCRATCH.
23. BÚSQUEDA
18. PITCH BEND
Presione este botón para realizar búsqueda. Después de haberlo
seleccionado mueva la rueda de desplazamiento para realizar la
búsqueda rápida hacia delante o hacia atrás.
Pulse “+” para aumentar la velocidad y ”-“ para disminuir la
velocidad.
24. RUEDA (Jog-Wheel)
BOTONES PITCH -/+. La velocidad de reproducción disminuirá o
se acelerará automáticamente cuando presionemos el botón “ - “
o “+” y volverá a la velocidad de reproducción original cuando
dejemos de presionar el botón. El pitch bend actúa aún cuando el
botón pitch ON/OFF (15) no esté activado. El rango de pitch bend
depende del rango seleccionado con el botón (16).
Utilice la rueda para:
24.1. Modo Pitch > ”Pitch Bend”: Use la rueda para ajustar la
velocidad para obtener un BPM más exacto.
24.2. Modo SCRATCH: La superficie plana superior se utiliza para
el efecto SCRATCH. El anillo de la rueda se utiliza para ajustar la
velocidad.
19. PROG
El número máximo de pistas que se puede editar es de 99.
24.3. Modo efecto: En conjunción con el control RELAY para
ajustar la ganancia y el parámetro del efecto digital.
Iniciar PROG-Editar: En modo de pausa, pulse este botón para
editar el programa. La posición de pantalla MM: SS: FF mostrará
"P-xx" y luego parpaderá "xx". Seleccione una pista presionando
SKIP (*) y luego pulse este botón para almacenar. Repita el mismo
proceso y, finalmente, pulse este botón otra vez para terminar un
programa.
25. PITCH CONTROL
Deslizando este potenciómetro ajusta la velocidad de
reproducción.
Se utiliza para determinar el porcentaje de Pitch. Al mover el
control deslizante fijamos un porcentaje de Pitch que será fijo
hasta que volvamos a actuar sobre dicho control o desactivemos
la función Pitch (15). Recordar que para modificar el Pitch control
deberemos primero activar la función Pitch ON/OFF. El
porcentaje de Pitch aplicado se mostrará en el Display. Utilice
este control para igualar el valor de BPM de ambas pistas.
(*)Si quiere cambiar de folder, primero pulse el botón FOLDER (3)
y presione el botón SKIP para moverse dentro de las carpetas
disponibles. Una vez elegida la carpeta deseada vuelva a
presionar el botón Folder para entrar en el modo Pistas .
Reproducir PROG: Pulse PLAY / PAUSE para reproducir el
programa y PROG parpadeará en el display. Una vez que detenga
6
Manual usuario Xceed. Descripción de funciones. Trasero
DESCRIPCIÓN DE FUNCIONES
Panel Trasero
3. REMOTO
Este conector se utiliza para conectar a un mezclador con la
función Fader Start.
4. CONECTOR RELAY
POWER
1
DIGITAL OUT
LINE OUT
ON
2
L
REMOTE
RELAY
3
R
4
5
6
Este conector se utiliza para conectar a otro reproductor de CD y
permitir reproducir alternadamente entre los dos reproductores.
AC IN
OFF
XCEED
Permite la reproducción alternada de dos reproductores de CD.
Al conectar el equipo a un mezclador que disponga la función
Fader Start podemos reproducir alternadamente mediante el
Crossfader del mezclador.
CD/USB MEDIA PLAYER
AC 230V - 50Hz22W
MADE IN CHINA
CD/USB MEDIA PLAYER
AKIYAMA.08191 BARCELONA (SPAIN)
5. POWER (interruptor)
1. CONECTORES DE SALIDA (RCA)
Salida de audio analógico de la unidad. Conectar a la entrada de
línea del mezclador.
Pulse el interruptor de encendido para encender la unidad, y el
indicador LED frontal (1) se iluminará. Para apagar la unidad
presione de nuevo el interruptor POWER.
2. DIGITAL OUT
6. CABLE DE ALIMENTACIÓN CA
Salida de audio digital de la unidad. Conectar, por ejemplo, a las
entradas de un mezclador digital.
Conecte el cable de alimentación a una toma de corriente con el
voltaje adecuado.
Panel Delantero
1. LED DE ENCEDIDO
1
El led se ilumina cuando el aparato está encendido.
2. RANURA DE INSERCIÓN DEL CD
2
Ranura de inserción para el CD.
DESCRIPCIÓN DE FUNCIONES DE LA PANTALLA LCD
1
14
9
10
11
19
12
21
3
2
5
13
6
4/8 7
18
15
16
1. TOTAL DE PISTA - Muestra el número total de pistas del CD que
hay en la unidad. En modo selección de carpetas, muestra las
carpetas totales de este CD.
2.
- La unidad está reproduciendo
3.
- La unidad está en pausa
17
20 22
23
25
24
14. PISTA - Muestra el número de pista que se está
reproduciendo.
15. MINUTOS - Muestra los minutos restantes o transcurridos
dependiendo de la configuración del modo TIME.
16. SEGUNDOS - Muestra los segundos restantes o transcurridos
dependiendo de la configuración del modo TIME.
4. CUE - Indica que un punto CUE ha sido memorizado.
17. FRAMES (trozitos) - El reproductor de CD divide un segundo
en 75 frames para poder establecer puntos CUE con gran
exactitud. Muestra los frames restantes o transcurridos
dependiendo del modo que tenga establecido.
5. CD - Se ilumina al cambiar la fuente de reproducción al modo
CD.
6. USB - Se ilumina cuando se cambia la fuente de reproducción al
modo USB.
18. MODO DE PANTALLA - Muestra el nombre del efecto de
sonido, o el nombre del archivo MP3/carpeta. El nombre de la
carpeta no se puede mostrar.
7. PC - NO tiene una función atribuida
8. CUE - Se ilumina cuando un punto CUE está memorizado.
19. PITCH - Se enciende para indicar el valor de tono es en virtud
del mismo.
9. CONTINUE - Cuando está encendida, se reproduce sin
interrupción.
10. MODO DE TIEMPO (ELAPSED) - Muestra el tiempo
reproducido.
20. PROG - Se enciende para indicar que hay una lista de
programas que existen en la reproducción normal. Parpadea
cuando la lista de programas se está realizando.
11. MODO DE TIEMPO (TOTAL) - Muestra el tiempo restante que
falta para reproducir todo el CD completo.
21. MT - Se ilumina cuando la función Master Tempo está activa.
22. RELOOP - Se ilumina cuando se realiza la función de bucle.
12. MODO DE TIEMPO (REMAIN) - Muestra el tiempo restante que
falta por reproducir de la pista actual.
23.
13. BARRA DE TIEMPO – Nos da una indicación del tiempo de
reproducción de pista dependiendo de la configuración del modo
TIME.
- Muestra el valor de BPM.
24. BPM - Se ilumina cuando la unidad está encendida. Si sólo
aparece BPM estamos en modo Contador BPM Manual.
25. AUTO - Se ilumina cuando la función AUTO BPM está activado.
7
Manual usuario Xceed. Explicación de funciones
EXPLICACIÓN DE FUNCIONES
MODO SLEEP
Cada rápido desplazamiento de B a A le permite escuchar la
música brevemente y entrará en modo Pause.
Si la unidad permanece sin utilizarse, a los 15 minutos se
apagará automáticamente. El tiempo necesario para que XCEED
entre en modo “Sleep” es programable entre 15, 30 y 60 minutos.
AUTOLOOP
TIME
Mantenga presionado el botón MEMORY y manipule la rueda para
determinar el número de Beats de Auto Loop. Una vez
seleccionado el beat deseado, al soltar el botón MEMO se
iluminará indicando que está listo para efectuar la reproducción
del Auto Loop. Presione IN y el Auto Loop del que hemos
determinado su duración en Beats comenzará su reproducción
Sleep mode
HOLD
FOLDER
TRACK
CUT
LOOP TRIM
SLEEP TIME UP >
DISPLAY
La longitud del Auto Loop puede seleccionarse en un rango de
1/32 a 32/1.
EXTN
> SLEEP IN 30 min
PARTICIÓN/CARPETA/PISTA
FOLDER
TRACK
CUT
LOOP TRIM
SLEEP TIME DOWN >
Cuando el dispositivo de almacenamiento excede los 500MB
(HDD o Disco Duro) se suele realizar Particiones del disco tal
como C, D, E…Podemos organizar el disco duro en particiones en
función del tipo de música o artista en las distintas particiones.
DISPLAY
EXTN
> SLEEP IN 15 min
Estando en modo Pausa presionamos el botón
FOLDER/PARTITION durante 3 seg. En Display aparece la
partición total. Podemos seleccionar una partición presionando
el botón y realizar la búsqueda de Carpetas y Pistas en la
partición.
CONTROL REMOTO
Asegúrese de que su mezclador dispone de función “Remote”.
Conecte su reproductor al Remote A (izquierdo) del mezclador.
Conecte su reproductor al mezclador y asigne el canal a
Crossfader A.
En caso de utilizar un dispositivo USB con una sola partición la
función “PARTITION” queda anulada. Presionando el botón
cambiaremos de Carpetas a Pistas (archivos o Tracks).
- Modo Cue/Play. Al seleccionar este modo en Display vemos
(CUE/PLAY)
EDITAR Y REPRODUCIR LISTAS
Al mover el Crossfader de B a A el reproductor comienza la
reproducción. Al mover el Crossfader hacia B el reproductor
entra en modo Pause.
Si disponemos de un disco duro de 500GB y deseamos buscar la
pista que deseamos reproducir a continuación de la que está
sonando será complicado encontrar la pista deseada. Es mejor
realizar “Playlists” primero mediante nuestro PC. Por ejemplo, si
deseamos reproducir unas 50 pistas determinadas para la sesión
será mejor editarlas en “Playlists” que buscarlas directamente.
1 Comienza reproduccion
A
EDITAR LISTAS
B
En primer lugar conecte su USB a su PC y cargue en éste los temas
que desea incluir en la lista de reproducción. A continuación abra
el programa que más desee para crear la lista. Ya sea iTunes o
Flash Media (XML), Winamp (M3U), Windows Media Placer (WPL).
Debe crear la lista seleccionando las Pistas guardadas en su USB.
Una vez completada la lista guarde el archivo de lista en la raíz de
su USB (Pen Drive o HDD). *Busque más información de cómo
crear un Playlist en nuestra web, producto XCEED.
XFADER
2 Entra en modo Pausa
A
B
XFADER
- ModoTact . Al seleccionar este modo en Display vemos (TACT)
REPRODUCIR LISTAS
Estando su reproductor en modo reproducción avance el
Crossfader hacia B, A no se ve afectado. Al avanzar otra vez hacia
A el reproductor entra en modo Pausa. Repita la operación. Hacia
B y vuelta hacia A. Entramos en modo reproducción. Esto ocurrirá
cada vez que desplacemos el Crossfader hacia A. Tendremos una
alternación de los modos Play y Pause. Partimos con el
reproductor en modo Playback:
Presione 2 segundos el botón TITLE/LIST y mediante el botón
FOLDER/TRACK (10) muevase por los diferentes Playlist creados.
Seleccione entre M3U (lista creada con Winamp), XML (lista
creada con iTunes o Flash Media), WPL (lista creada con Windows
Media Player). Suelte el botón TITLE/LIST en la lista que desee y en
el Display aparecerán las listas creadas con el software escogido
(por su extensión M3U, XML, WPL).
TIEMPO DE ARRANQUE Y PARADA (START & BREAK)
1 Entra en modo Pausa
A
XCEED le permite ajustar el tiempo de arranque y de parada de
reproducción. Siga las instrucciones del gráfico:
B
XFADER
2
HOLD
Comienza reproducción
Start/Brake
wheel
A
DISPLAY
B
TIEMPO DE FRENADO >
XFADER
TIEMPO DE FRENADO
- Modo Lock. Al seleccionar este modo en Display vemos (LOCK)
> ARRANQUE EN 0,3s
Cada vez que mueva el Crossfader hacia A podrá escuchar
brevemente la reproducción y entrará en modo Pause. Sonará
como un Corte (Chopping) o Scratch Kill. Esta función le
permitirá realizar interesantes efectos de mezcla tipo beat
juggling.
TIEMPO DE ARRANQUE
TIEMPO DE ARRANQUE >
A
DISPLAY
B
XFADER
> FRENADO EN 1,2s
8
Manual usuario Xceed. Información técnica
INFORMACIÓN TÉCNICA
Cuantización
1 bit linear/Channel, 3 Beam Laser
Oversampling rate
8 Times
Frecuencia de “Sampleo”
44.1 kHz
Respuesta en frecuencia
20 Hz a 20 kHz ±2db
*T.H.D. + RUIDO
Menos de 0,03%
S/N ratio (IHF-A)
> 75 dB
Rango Dinámico
> 75 dB
Nivel de salida
1.0 Volts R.M.S. ±0.2V
Tipo de disco
Compact discs Standard, AUDIO CD, CD-R & MP3 CD-ROM (MP3)
Puertos USB
USB
Time Display
Track Elapsed, Track Remain, or Total Remain
Text Mode
Text Mode – displays CD-TEXT and ID3 tag information.
Pitch control range
± 8, 16, 100% slider
Formato MP3:
GENERAL
Alimentación
AC 230V , 50Hz.
Consumo
15W
Temperatura de uso
+5˚C – +35˚C
Peso
2.729g
Dimensiones
217,8(Largo) x 320,7(Ancho) x 101,4(Alto) mm.
9
Xceed user manual. Warnings
The exclamation point within the
equilateral triangle is intended to
alert the user to the presence of
important operation and
maintenance (servicing) instructions
in the literature accompanying this
appliance.
The lightning flash with arrowhead
symbol within the equilateral
triangle is intended to alert the use
to the presence of un-insulated
“dangerous voltage” within
CAUTION: TO REDUCE THE RISK OF ELECTRIC SHOCK, DO NOT REMOVE ANY COVER. NO USER-SERVICEABLE PARTS
INSIDE. REFER SERVICING TO QUALIFIED SERVICE PERSONNEL ONLY.
WARNING: TO PREVENT FIRE OR SHOCK HAZARD. DO NOT EXPOSE THIS APPLIANCE TO RAIN OR MOISTURE.
16. Damage Requiring Service. The appliance should be serviced
by qualified service personnel when:
A: The power-supply cord or the plug has been damaged; or
B: Objects have fallen, or liquid has been spilled into the
appliance; or
C: The appliance has been exposed to rain; or
D:The appliance does not appear to operate normally or
exhibits a marked change in performance; or
E: The appliance has been dropped, or the enclosure
damaged.
17. Servicing. The user should not attempt any service to the
appliance beyond that described in the operating instructions.
All other servicing should be referred to qualified service
personnel.
18. Ventilation Slots and openings in the cabinet are provided
for ventilation and to ensure reliable operation of the product
and to protect it from overheating, and these openings must not
be blocked or covered. The openings should never be blocked
by placing the product on a bed, sofa, rug, or other similar
surface. This product should not be placed in a built-in
installation such as a bookcase or rack unless proper ventilation
is the manufacturer's instructions have been adhered to.
19. Attachments do not use attachments not recommended by
the product manufacturer as they may cause hazards.
20. Accessories Do not place this product on an unstable cart,
stand, tripod, bracket, or table. The product may fall, causing
serious injury to a child or adult, and serious damage to the
product. Use only with a cart, stand, tripod, bracket, or table
recommended by the manufacturer, or sold with the product.
Any mounting of the product should follow the manufacturer's
instructions, and should use a mounting accessory
recommended by the manufacturer.
21. Lightning For added protection for this product during a
lightning storm, or when it is left unattended and unused for
long periods of time, unplug it from the wall outlet and
disconnect the antenna or cable system. This will prevent
damage to the product due to lightning and power-line surges.
22. Replacement Parts When replacement parts are required,
be sure the service technician has used replacement parts
specified by the manufacturer or have the same characteristics
as the original part. Unauthorized substitutions may result in
fire, electric shock, or other hazards.
23. Safety Check Upon completion of any service or repairs to
this product, ask the service technician to perform safety checks
to determine that the product is in proper operating condition.
SAFETY INSTRUCTIONS
WARRANTY INFORMATION
1. Read Instructions All the safety and operating instructions
should be read before this product is operated.
2. Retain Instructions. The safety and operating instructions
should be retained for future reference.
3. Heed Warnings. All warnings on the appliance and in the
operating instructions should be adhered to.
4. Follow Instructions. All operating and use instructions should
be followed.
5. Water and Moisture. The appliance should not be used near
water - for example, near a bathtub, washbowl, kitchen sink,
laundry tub, in a wet basement, or near a swimming pool, and
the like.
6. Carts and Stands . The appliance should be
used only with a cart or stand that is
recommended by the manufacturer. An
appliance and cart combination should be
moved with care. Quick stops, excessive force,
and uneven surfaces may cause the appliance
and cart combination to overturn.
7. Wall or Ceiling Mounting. The product should be mounted to a
wall or ceiling only as recommended by the manufacturer.
8. Heat. The appliance should be situated away from heat
sources such as radiators, heat registers, stoves, or other
appliances (including amplifiers) that produce heat.
9. Power Sources This product should be operated only from the
type of power source indicated on the rating label. If you are not
sure of the type of power supply to your home, consult your
product dealer or local power company. For products intended
to operate from battery power, or other sources, refer the
operating instructions.
10. Grounding or Polarization This product may be equipped
with a polarized alternation-current line plug (a plug having one
blade wider than the other). This plug will fit into the power
outlet only one way. This is a safety feature. If you are unable to
insert the plug fully into the outlet, try reversing the plug. If the
plug should still fail to fit, contact your electrician to replace
your obsolete outlet. Do not defeat the safety purpose of the
polarized plug.
11. Power-Cord Protection. Power-supply cords should be
routed so that they are not likely to be walked on or pinched by
items placed upon or against them, paying particular attention
to the cord in correspondence of plugs, convenience
receptacles, and the point where they exit from the appliance.
12. Cleaning The appliance should be cleaned only as
recommended by the manufacturer. Clean by wiping with a cloth
slightly damp with water. Avoid getting water inside the
appliance.
13. For AC line powered units - Before returning repaired unit to
user, use an ohm-meter to measure from both AC plug blades to
all exposed metallic parts. The resistance should be more than
100,000 ohms.
14. Non-use Periods. The power cord of the appliance should be
unplugged from the outlet when left unused for a long period of
time.
15. Object and Liquid Entry. Care should be taken so that objects
do not fall and liquids are not spilled into the enclosure through
openings.
TERMS OF USE
This equipment has been designed and manufactured for use as
CD and USB player. Any alternative use will void the warranty.
The device comes with a serial number. Do not rip you may lose
your warranty rights.
SAFETY CERTIFICATION
Laser Diode Properties
Material: Ga.-Al-As
Wavelength: 755-815 nm (25oC)
Laser Output: Continuous Wave max. 0.5mW
10
Xceed user manual. For safe and efficient operation.
Try to place the unit as far as possible from TVs and tuners, as
the unit may cause undesirable interference.
This product shall not be treated as
household waste. Instead it shall be handed
over to the applicable collection point for
the recycling of electrical and electronic
equipment. By ensuring this product is
disposed of correctly, you will help prevent
potential negative consequences for the
environment and human health, which
could otherwise be caused by
inappropriate waste handling of this
product.
The unit panel's LCD is designed to be clearly visible within the
angles. Mount the control unit so that the visual angle is within
this range.
10
Sight point
45
The recycling of materials will help to conserve natural
resources.
For more detailed information about recycling of this product,
please contact your local city office, your household waste
disposal service or the shop where you purchased the product.
FOR SAFE AND EFFICIENT OPERATION
Select the installation location of your unit carefully.
Avoid
placing it in direct sunlight. Also avoid locations subject to
vibration and excessive dust, heat, cold or moisture. Keep away
from sources of hum such as transformers or motors.
The apparatus shall not be exposed to dripping or splashing and
that no objects filled with liquids, such as vases, shall be placed
on the apparatus.
CAUTION: The player will work normally when the main unit is
mounted with the front panel at within 15 degrees of the vertical
plane. If the unit is tilted excessively, discs may not be loaded or
unloaded properly.
The MAINS plug is used as the disconnected device, the
disconnect device shall remain readily operable.
WARNING: The user shall not place this apparatus in the
confined area during he operation so that the mains switch can
be easily accessible.
Connections
Do not use this compact disc player where there are extremes in
temperature ( below 41 o F/5 o C or exceeding 95 o F/35 o C )
(1) Turn off the POWER switch
(2) Connect the RCA cord to the input on your mixer.
Do not open the cabinet as this might result in damage to the set
or electrical shock.
CAUTION. Be sure to use the supplied cables. Using another type
of cable may result in damage. Be sure the power is off when
connecting the cables. Otherwise the units may not work
properly.
When disconnecting the power cord form the AC outlet, always
grasp it by the plug. Never pull the cord.
Do not use force when operating the switches and buttons.
Before moving the set, be sure to disconnect the power cord and
all connecting cables.
MAIN FUNCTIONS
To keep the laser pickup clean, do not forget to close the disc
tray.
Do not attempt to clean the unit with chemical solvents as this
might damage the finish. Use a clean, dry cloth.
- CD-Text support (it lets you see large names)
Be sure your hands are clean when handing discs. Never insert a
disc which has a crack on its surface.
- Digital output with constant sampling frequency of 44.1 kHz
for all functions.
Keep this manual in a safe place for future reference.
- Seamlessloop (A / B / Reloop)
- USB port.
- 3 HOT CUE.
- BPM: Manual and automatic.
PRELIMINARY
- Pitch bend control by jog-wheel or buttons
Please, open the package to ensure that the content is correct. In
reviewing the contents of the box should have:
- Relay function
- Remote Control (Tact / Lock /cue start )
1-The main unit
- 5 Effects: SCRATCH / REVERSE / FILTER / ECHO / FLANGER.
1- Instruction manual
- Displays:
For CDDA: Single elapsed time /single remain time / Total
remain time
1- RCA cable (L/R)
1- Auto-start cable
For MP3: Single elapsed time /single remain time.
1- AC cable
- Single Auto CUE / Continue / Normal
- Pitch range:
For CDDA (± 8%, ± 16%, ± 100%)
- Master tempo:
For (± 8%, ± 16%, ± 100%)
FIRST STEPS
For MP3 (± 8%, ± 16%, ± 100%)
For (± 8%, ± 16%, ± 100%)
Install
- Firmware upgradable.
Place your unit on a flat surface or mount it in a secure case.
- Program list setup
Be sure the player is mounted in a well-ventilated area where it
will not be exposed to direct sunlight, high temperatures, or
high humidity.
11
Xceed user manual. Connections.
CONNECTIONS
1. Before making or changing connections, turn the device off and disconnect the power cord from the AC outlet.
2. We recommend using quality cables: You get a big difference in fidelity of reproduction.
3. Do not use excessively long cables. Make sure the footage of them are secure. Loose connections can cause hum, noise or
flashing that could damage the speakers.
4. Connect the RCA cables to the inputs of the amplifier.
CAUTION: Be sure to use the supplied power cable. The use of another type of cable can cause damage to equipment.
XCEED A
XCEED B
POWER
POWER
AC IN
AC IN
DIGITAL OUT
LINE OUT
L
ON
REMOTE
RELAY
OFF
DIGITAL OUT
LINE OUT
ON
OFF
XCEED
CD/USB MEDIA PLAYER
L
XCEED
CD/USB MEDIA PLAYER
RELAY
REMOTE
AC 230V - 50Hz22W
MADE IN CHINA
CD/USB MEDIA PLAYER
AC 230V - 50Hz22W
MADE IN CHINA
CD/USB MEDIA PLAYER
R
R
AKIYAMA.08191 BARCELONA (SPAIN)
AKIYAMA.08191 BARCELONA (SPAIN)
REMOTE B
REMOTE A
RELAY
AUDIO B
AUDIO A
POWER AMPLIFIER
10
POWER
10
12
12
8
8
PROTECT
6
15
6
15
CLIP
4
19
-10dB
4
19
-20dB
29
29
2
2
8
8
dB
SIGNAL
0
CHANNEL 1
ACTIVE
dB
0
CHANNEL 2
FADER START A
LOUDSPEAKERS
FADER START B
MIXER
AUDIO OUTPUT
12
Xceed user manual. Description of the functions. Top view.
DESCRIPTION OF THE FUNCTIONS
Top View
12
1
WHEEL
EFFECTS
FLANGER
21
SEAMLESS
LOOP
IN
8
USB
2
CD/USB
FOLDER/
TRACK
3
TIME
CONT.
Sleep mode
5
4
Partitions
Start/Brake
REVERSE
-
21
6
Remote control
wheel
FILTER
OUT
8
M
7
21
RELOOP/EXIT
ECHO
8
71
72
73
25
22
Auto Loop
beat lenght
LOOP EDIT
wheel
SCRATCH
HOT CUE
MEMORY
SEARCH
wheel
23
21
RELAY
Gain
Parameter
wheel
9
FOLDER
TRACK
CUT
PITCH
BEND
10
10
LOOP TRIM
18
18
EXTN
PROG.
24
11
19
MANUAL TAP
AUTO BMP
PITCH
ON/OFF
15
13
CUE
RANGE
8%-16%-100%
16
PLAY/PAUSE
REV
FWD
MASTER
TEMPO
20
14
1. USB Connector
17
More info about Start/brake on General Functions Overview
(Page 17).
Hoop a USB storage device to load audio files. It supports MP3
files format only.
Sleep - Hold this button and press FOLDER/TRACK (10) to select
the unused minutes for sleep mode. It can switch between 15,
30 and 60 minutes. More info about Sleep mode on General
Functions Overview (Page 17).
Compatible with files: FAT, NTFS, HFS+.
2. CD / USB
Press to switch the play source between USB and CD. It works
only when the playback is paused.
5. CONT./SGL
Press this button to switch between Continue Mode and Single
AUTO CUE Mode.
3. Folder
Press this button to switch between MP3 folder and MP3 file.
Select a folder by pressing this button again.
Continue Mode:
Playing from the first track continually to the last track. When
skipping to the next track, it will continue the playback.
In MP3 File mode, Total-Track shows the total MP3 files in the
folder.
Pressing FOLDER/TRACK (10) under this mode, the Main Cue is
still set at the first track or the new Main Cue which has just
been memorized. It won't renew to the new Cue of each track by
pressing FOLDER/TRACK (10).
In MP3 Folder mode, Total-Track shows the total folders in the
CD or in the USB storage device.
When you use a hard drive as your USB play source, holding this
button down for 2 seconds will jump to partitions.
Single Auto Cue Mode:
More info about partitions on General Functions Overview (Page
17).
When going on to the next track or skipping to the next track, it
pauses at the main cue of the next track automatically.
4. TIME
Remote Control (FADERT START)
CD Mode - Press this button to switch time display between
Single Elapsed Time, Single Remain Time and Total Remain
Time.
To select remote control: Hold CONT and press FOLDER/TRACK
(10) to select the type of switch in the mixer for FADERT START
wire remote control). You can select: Lock, Tack and Cue/Play by
using this switch mode.
MP3 Mode- Press this button to switch time display between
Single Elapsed Time and Single Remain TIME.
NOTE: the mixer must have remote control and you must
connect the remote control of the mixer to your XCEED unit.
Start/Break- Hold this button and dial the wheel to adjust the
time of start and break. The range is between 0 to 6 seconds.
13
Xceed user manual. Description of the functions. Top view.
LOCK:
modes: M3U, XML, WPL, and normal Folder. Holding TITLE/LIST
press
FOLDER/TRACK
to switch between these four
modes. Once you decide the format you want to play (assume
you have stopped at XML), release TITLE/LIST button. It will lead
to the all play-lists in this kind of format. If you want to exit this
play list, press and hold LIST button and then one press
FOLDER/TRACK
When the mixer's crossfader is moved to the end belonging to
the channel of the player every time, the playback will start and
then pause instantly.
TACT:
When the mixer's crossfader is moved to the end belonging to
the channel of the player for the first time, the playback will
start.
*NOTE: It supports MP3 format only.
When the mixer's crossfader is moved to the end belonging to
the channel of the player again, the playback will pause.
7. HOT-CUE
More info at GENERAL FUNCTIONS OVERVIEW page 17.
XCEED will allow you to play from 3 cue points instantly.
CUE/PLAY:
A. Set CUE memory: Press MEMO first and then press a certain
CUE button to finish the CUE record. The set CUE button will
light on.
When the mixer's crossfader is moved toward the channel of the
player, the playback will be started from the last Main CUE.
With this button you can adjust the touch Sensitive too.
B. Play” CUE” memory: Press the set CUE button to perform this
function.
Holding this button and switching on the power will lead into the
mode for adjusting the sensitivity of Touch Wheel. Float your
hand very close to the jog wheel. It will detect the sensitive
value. It has to increase 2 degree from the value detected. Press
SKIP to reach the value and press MEMO to save the value and
reboot for returning to normal use.
*Hold MEMO and dial the jog wheel to preset the beat length of
Auto Loop. This means it's ready to execute the auto loop
playback. Pressing IN will auto form an auto loop according the
beat to length you set.
The bar range of auto loop can be selected from 1/32~32/1.
* This adjustment only needs when finding the sensitivity
difference in a specific environment.
More info about autoloop on General Functions Overview (Page
17).
More info about remote control on General Functions Overview
(Page 17).
8. LOOP
a. Press IN to memorize a start point and press OUT to
memorize an end point. Then the Loop starts playing.
Touch Sensitive Adjustment
1
b. Press OUT again to edit the Loop playback. The length of the
Loop playback can be enlarged or shortened by turning jog
wheel.
XCEED OFF
CONT.
c. Press the RELOOP to exit or call the Loop playback.
d. The loop function will be limited at the same track for MP3. It
can't set the IN at track 1 and cross to set the OUT at track 2.
HOLD
On the contrary, it can be set a loop crossing between track to
track for CDDA.
+
SWITCH XCEED ON
EDIT A LOOP
2
1 SET LOOP
2 PRESS & HOLD OUT, TURN WHEEL TO EDIT
OUT
SHORTEN LOOP
LOOP EDIT
wheel
Float yout hand over wheel top and check the
bar movement indicating touch wheel
response.
HOLD
Sensibility
LENGTHEN LOOP
DISPLAY
Press buttons to increase of diminish
sensibility.
FOLDER
TRACK
DOWN
LOOP EDIT TIME INFO >
UP
9. RELAY
CUT
LOOP TRIM
NOTE: You will need two EXCEED units interconnected through
RELAY connector.
EXTN
Press the “RELAY” button to activate this function. When one unit
is in play mode, and the other unit is in “pause” mode. Then,
pause the playing unit and the other unit will automatically start
to play.
3 Press MEMO to save the value and reboot for
retuning to normal use.
*This button is also for switching between the gain and the
parameter of the digital effect showing in the display.
10.
Note: Not recommended to manipulate the sensitivity setting if
not for failure.
FOLDER/TRACK
10.1. To select a track, a folder or a partition. Hold it and dial the
jog wheel to do tracks fast search.
6. TITLE/LIST
10.2. When a loop is formed, pressing
will trim the loop
double and pressing
will trim the loop to half.
Press this button to show FILE, TITLE, ALBUM and ARTIST.
When the unit is under pause, pressing this button during 2
seconds can enter into play lists selecting. It shows the four play
*It can't skip the track during the loop playback.
14
Xceed user manual. Description of the functions. Top view.
11. TAP
Exit PROG Play/Edit:
Press this button with the beat to get the BPM of the music
manually. Press and hold this button during two seconds to
activate Auto BPM.
In pause mode, pressing this button for two seconds can return
to the normal playback. Once returning to the normal playback,
pressing this button can enter the program again. You can
continue the program playback, store more songs into the
program or wipe out the program in this condition.
12. DISPLAY
Indicates all the functions as they are occurring. Please see more
details on LCD instructions on page16.
13. CUE
PROG.
1 PLAY/PAUSE MODE
In pause mode, press this button to set a memorized point for
instant play. In play mode, press this button to pause the music
and return to the memorized point.
2 PRESS PROG > ENTER PROG MODE
PRESS
> PROG at Display will blink
DISPLAY >
Holding down this button will start the playback from the cue
point. Releasing it will pause the track and return to the cue
point.
3 SELECT TRACKS WITH SKIP BUTTONS > View selected song at Display.
4 PRESS PLAY AND PROGRAM STARTS
4 EXIT PROGRAM MODE > PRESS PROG. BUTTON 2 sec.
PROG.
PRESS 2 sec.
After pressing this button to set the new cue, the stutter
condition will be eliminated.
14. PLAY/PAUSE
Press this button to start the playback or let the playback pause.
15. PITCH ON/OFF
20. OPEN/CLOSE
Press this button to activate or deactivate pitch adjustment.
Press to eject the disc.
16. PITCH RANGE
Switch the pitch range between 8%, 16 % and 100%.
Note: Disc can't be ejected unless CUE or PAUSE button has been
pressed first. Thus will avoid any undesired ejection.
A. When the LED light is off, it sets under 8%.
21. SOUND EFFECT
B. When the LED light is on, it sets under 16%.
C. When the LED light is blinking, it sets under 100%.
These buttons will activate Flanger, Filter, Echo, Reverse effects.
When any effect is selected, REALY button (19) will light and
flash. Press Relay to switch between Gain & Parameter (the
selected one will be blinking) showing in the display. Use the jog
wheel to change the value of them.
PRESS RANGE SEVERAL TIMES:
Flanger: Gain- 0~100, Parameter: 1/32~ 16/1
Filter: Gain- 0~100, Parameter: -60~+60
RANGE
RANGE
RANGE
8%-16%-100%
8%-16%-100%
8%-16%-100%
8%
16%
Echo: Gain- 0~100, Parameter: 1/32~1/1
100%
1 SELECT EFFECT i.e. FLANGER & TURN IT ON
2 PRESS RELAY BUTTON TO CHOOSE BETWEEN GAIN or PARAMETER
2.1 GAIN SELECTED > IN DISPLAY “G ###” BLINK
(GAIN > DRY/WET)
2.2 PARAMETER SELECTED > IN DISPLAY “Parameter value” BLINK
17. MT (MASTER TEMPO)
GAIN
When this function is activated, the key of the song will be locked
even though the pitch fader is adjusted.
PARAMETER
Blink
Blink
> GAIN= 28%
It allows us to select the Key Lock (Master Tempo). Key Lock
mode allows us to alter the value of PITCH in a track without
changing the perception of the original note. When the Key Lock
mode is activated LED lights attached to the KEY LOCK button. If
this feature is not active and significantly modify the playback
speed value by potentiometer Pitch (25) listen to the music
considerably modified. By increasing the speed will hear the
effect called "Mickey Mouse". When slow we will hear the effect
called "James Earl Jones.”
> PARAMETER = 8 Flange cicles per Beat
3 TURN WHEEL TO SET GAIN AND PARAMETER (Effect must be ON)
All the three above effects can be parameterize in the same way.
And the same applies to the REVERSE function.
22. SCRATCH
Press this button to activate the scratch function. Touch and turn
the top flat surface of the jog wheel to perform scratch effect.
You can play any effect during scratch mode.
18. PITCH BEND
Press “+” to rise up the speed and Press “-” to Slow down the
speed. To return to the original playback speed, release the
button. The pitch bend acts even when the pitch button ON /
OFF (15) is not activated. The pitch bend range depends on the
range selected with the button (16).
23. SEARCH
Press this button first and dial the jog wheel to perform the fast
search forward or backward.
24. JOG WHEEL
19. PROG
24.1. Pitch Mode: Use the wheel to adjust the speed to get an
even close BPM with another playing unit.
The maximum tracks can be edited are 99.
Start PROG-Edit:
24.2. Scratch Mode: The top flat surface is used for scratch
effect. The ring of the wheel is used for adjusting the speed.
In pause mode, press this button to edit program. The display
MM:SS: FF position will show “P-xx” and then “xx” will flash.
Select a track by pressing SKIP (CD/MP3) or Folder-SKIP (only
MP3) and then press this button to store it. Repeat the same
process and finally press this button again to finish a program.
24.3. Effect Mode: Adjust the gain and the parameter of the
digital effect.
25. PITCH CONTROL SLIDER
(*) If you want to change the folder, first press the FOLDER (3)
and press the SKIP button to move within the available folders.
After selecting the desired folder, press the FOLDER button to
enter the mode tracks.
To match the beat of the other music piece you should adjust the
Pitch Control to change the speed.
To adjust the pitch you first have to activate the Pitch function
(15). The percentage of pitch applied will be displayed on the
display.
Play PROG:
Press PLAY/PAUSE to play the program and PROG will flash in the
display. Once stopping the program playback, it can be added
more songs to the program continually.
15
Xceed user manual. Description of the functions. Rear view.
DESCRIPTION OF THE FUNCTIONS
2. DIGITAL OUT
Rear View
The digital audio from each CD player is output from this jack.
Connect to the line input of the D/A Amplifier.
3. REMOTE
This connector is used for connecting to FADERSTART wire
remote control unit.
POWER
1
DIGITAL OUT
LINE OUT
ON
2
L
REMOTE
RELAY
3
R
4
5
6
4. RELAY CONNECTOR
AC IN
OFF
This connector is used for connecting to another CD player to
allow Relay function to work.
XCEED
CD/USB MEDIA PLAYER
AC 230V - 50Hz22W
MADE IN CHINA
CD/USB MEDIA PLAYER
5. POWER (Power Switch)
AKIYAMA.08191 BARCELONA (SPAIN)
Press the power switch to turn the unit on, and the LED indicator
will be light. To switch the POWER off by pressing the POWER
switch again.
1. LINE OUT (RCA Jacks)
6. AC POWER CORD
The analogue audio from each CD player is output from these
jacks. Connect to the line input of the mixer.
Connect this power cord into an AC wall outlet with the proper AC
voltage.
Front View
1. POWER ON LIGHT
It lights when the power is on.
1
2. DISC SLOT
Insert or remove the disc.
2
LCD INSTRUCTION
1
14
9
10
11
19
12
21
3
2
5
13
6
4/8 7
18
15
16
1. TOTAL TRACK - It shows the track numbers of this CD. During
selecting folders, it shows the total folders of this CD.
2.
- The unit is in play.
3.
- The unit is paused
17
20 22
23
25
24
14. TRACK - Shows the track number that is playing.
15. MINUTES - Shows the elapsed or remaining minutes
depending on time mode setting.
16. SECONDS - Shows the elapsed or remaining seconds
depending on time mode setting.
4. CUE - It indicates a cue has been memorized.
17. FRAMES - The CD Player breaks down a second into 75
frames for accurate cueing. This shows the frames elapsed or
remaining depending on mode setting.
5. CD - Lights when switching the play source to CD mode.
6. USB - Lights when switching the play source to USB mode.
7. PC - No Function.
18. MODE DISPLAY - Show the sound effect name, or MP3 file
name /Folder. Folder name can not be displayed.
8. CUE - Lights up when a memorized point exists.
19. PITCH - Lights to indicate the pitch value is under it.
9. CONTINUE - When the light is on, the playback goes without
interruption.
20. PROG - Lights to indicate there's a program list existing in
normal playback. Blinks when the program list is performing.
10. TIME MODE (ELAPSED) - Shows the time as it is taking place.
21. MT - Lights up when performing master tempo function.
11. TIME MODE (TOTAL) - Shows how much time is left on the full
CD.
22. RELOOP - Lights up when performing the loop function.
12. TIME MODE (REMAIN) - Shows how much time is left on a
particular track.
23.
- Shows BPM value.
24. BPM - Illuminates when the power is on.
13. TIME BAR – Show the time length depending on the setting of
the “TIME” mode.
25. AUTO - Lights up when AUTO BPM function is activated.
16
Xceed user manual. General functions overview.
Every sharp move from B to A will allow for a short play of the
music and immediately pause.
GENERAL FUNCTIONS OVERVIEW
SLEEP MODE
AUTOLOOP
If the unit is unused, within 15 minutes will turn off
automatically. The time required for XCEED into sleep mode is
programmable between 15, 30 and 60 minutes.
Hold down the MEMORY button and manipulate the wheel to
determine the number of Auto Beats Loop. After selecting the
desired beat, releasing the MEMO button will light, indicating it is
ready to make playing the Auto Loop. Press IN and Auto Loop we
have determined its duration will begin to play.
TIME
Sleep mode
HOLD
CUT
LOOP TRIM
Auto Loop length can be selected from a range of 1 / 32 to 32 / 1.
PARTITION/FOLDER/TRACK
FOLDER
TRACK
SLEEP TIME UP >
DISPLAY
When your storage device exceeds more than 500 MB or even 500
GB. You will make many partitions like C, D, E... and so on in your
PC. You may put many music at different folder and put many
folders at different partitions. We have supported this partition
design.
EXTN
> SLEEP IN 30 min
FOLDER
TRACK
CUT
LOOP TRIM
SLEEP TIME DOWN >
DISPLAY
If on pause mode pressing three seconds, it will appear the total
partition. Selecting the partition first so that you can choose the
folder music and track you would like to play.
EXTN
> SLEEP IN 15 min
When plugging in your USB device, if it only got a single partition,
it will not appear the command to let you select the partition.
Because it's already go to the first partition. But if many
partitions, the condition just like my description above.
REMOTE CONTROL
With a normal pressing (not for 3 seconds), it switch the total
folders and the total tracks.
Plug remote connector of ACU-4 Player at A (left side) of the Mixer
remoter Fader Start. Plug Audio RCA output of ACU-4 Player to
the Mixer channel selected to A.
EDITING AND CALLING “LISTS”
Mode Cue/Play. When selected at Display it will appear
(CUE/PLAY)
Every time you raise Crossfader from B side to A side the ACU-4
Player will start Playback and when you slide the Crossfader to B
side player will enter Pause mode.
If you have a 500GB USB storage device and you want to play the
second track when it's already playing the first track. Maybe you
will not exactly know at which folders and partition you put the
song you would like to play .
Some DJs will make Playlist on computer first. For example, you
wanna play 50 songs as a party. But it's impossible to search the
song when you are Djing because maybe your storage data are
not classified at the same folder. So editing the Playlist by your
computer and store the list in your USB device. ACU-4 can call the
list out.
1. Starts Playback
A
B
XFADER
EDIT A LIST
First of all, you must hook up your USB device to your PC. Place
the music you wanna use to your USB device. Then open your
MP3 media player like I Tune, Winamp and Windows Media
Player. Select to make a list through the software but must select
from your USB device.
2.Enters Pause
A
B
Now you can add the songs to make the lists. In the end when
completing the list, save in the list in the root of your USB. You
can add the songs crossing many folders in your USB device.
*More info how to create a Playlist at our website, product
XCEED.
XFADER
ModeTact . When selected at Display it will appear (TACT). If your
XCEED is playing, advance it to B. A is not affected. When
advancing back to A, XCEED is paused. The same action do it
again. To B and back to A. The pause status is becoming to play.
So you will see that every time you touch A. It will play, pause,
play, pause... If we have an XCEED in Playback mode:
PLAY THE LIST
Press and hold 2 seconds TITLE/LIST button and then press
FOLDER/TRACK (10) button to go through Playlist. Select
between M3U (list created with Winamp), XML (list created with I
Tunes or Flash Media), WPL (list created with Windows Media
Player). Release TITLE/LIST button at list type you desire and the
Display will show the available lists of that extension.
1. Enters Pause
A
B
START AND BREAK ADJUSTMENT
XFADER
XCEED lets you adjust the start and break functions. Please follow
below instructions:
2. Starts Playback
HOLD
A
Start/Brake
B
wheel
DISPLAY
BRAKE TIME >
XFADER
Mode Lock . When selected at Display it will appear (LOCK)
Every time you close the fader to A (slide from B to A), it will cause
a short play of the music and immediately pause. It sounds like
the Scratch skill, Chopping. All these function you can connect a
player with TACK/LOCK to B. Interesting feature to perform
strange mix effect like beat juggling.
BRAKE TIME
> START IN 0,3s
START TIME
A
START TIME >
B
DISPLAY
XFADER
> BRAKE IN 1,2s
17
Xceed user manual. Technical information
TECHNICAL INFORMATION
Quantization
1 bit linear/Channel, 3 Beam Laser
Oversampling rate
8 Times
Sampling Frequency
44.1 kHz
Frequency response
20 Hz to 20 kHz ±2db
T.H.D. + NOISE
Less Than 0.03%
S/N ratio (IHF-A)
> 75 dB
Dynamic range
> 75 dB
Output level
1.0 Volts R.M.S. ±0.2V
Disc Type
Standard Compact discs, AUDIO CD, CD-R & MP3 CD-ROM (MP3 files)
USB Ports
USB
Time Display
Track Elapsed, Track Remain, or Total Remain
Text Mode
Text Mode displays CD-TEXT and ID3 tag information.
Pitch control range
± 8, 16, 100% slider
MP3 Format
GENERAL
Power requirements
AC 230V , 50Hz.
Power Consumption
15W
Operating temperature
+5˚C +35˚C
Weight
2.729g
Dimensions
217.8(D) x 320.7(W) x 101.4(H) mm.
18
C/ Praga nº11. Pol. Ind. Cova Solera
08191 Rubí . Barcelona (SPAIN)
www.akiyamadj.com
[email protected]