Transcript
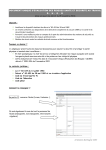
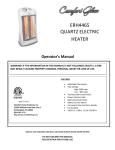
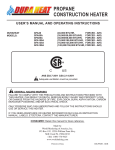
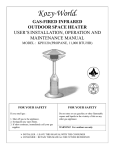
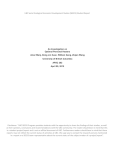
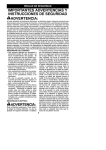
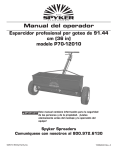
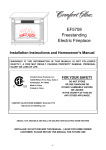
WICK INSTALLATION INSTRUCTIONS(Shaft Type)
INSTRUCCIONES PARA LA INSTALACIÓN DE LA MECH
Before starting be sure to turn off your heater, allow to cool and drain all fuel.
Antes de empezar, asegúrese de que apaga su estufa, la deja enfriar y drena todo el combustible.
1.
Locate the Owners Manual that came with your Kerosene Heater.
1.
Localice el Manual de Usuario que venía con su Estufa de Queroseno.
2.
Following the instructions in your Owners Manual, remove the batteries, chimney assembly, knobs, cartridge
tank (if removable), and protective grill.
2.
Siguiendo las instrucciones de su Manual de Usuario, saque las pilas, el ensamblaje de la chimenea, los botones,
el tanque de cartucho (si es removible), y el enrejado protector.
3.
Locate the screws that hold the cabinet in place. Remove these screws and carefully lift the cabinet off the
heater.
3.
Localice los tornillos que sujetan la caja protectora. Quite estos tornillos y levante con cuidado la caja pro tectora
de la estufa.
4.
Remove the radiation plate or heat shield (if any) and proceed to remove the wing nuts on the wick frame or
outer wick guide, and lift off this part.
4.
Retire la placa de irradiación o el escudo de la estufa (si lo hubiera) y proceda a retirar las tuercas de alitas en el
marco de la mecha o el riel exterior de la mecha, y despegue esta parte.
5.
(With shaft clip) Look down into the heater and take note if there is a clip holding the shaft in place. If so,
remove clip by pulling upwards. Then grasp the knob and pull towards you to release the shaft from the wick
holder. Remove the wick and wick holder by lifting upwards and away from the heater. (Fig.2)
(No shaft clip) If no clip, turn the wick up to it’s highest point. Grasp the wick and twist it counter clockwise
to release it. (Fig. 2)
5.
(Con gancho de eje) Mire en la parte de debajo de la estufa y vea si hay un gancho que mantiene el eje en su
sitio. Si lo hay, retire este gancho tirando hacia arriba. Después agarre el tirador y tire hacia usted para liberar el
eje del aguantador de mecha. Retire la mecha y el aguantador de mecha tirando hacia arriba y hacia afuera de la
estufa. (Fig.2)
(Sin gancho de eje) Si no hay un gancho, de vueltas hacia arriba hasta que la mecha llegue a su punto más alto.
Agarre la mecha y gírela en sentido contrario a las agujas del reloj para liberarla. (Fig. 2)
(Spring case) Some models have a spring case assembly located behind the knob. For these models, push
the spring case lever upward to release it from it’s locking groove and pull the knob towards you. Remove the
wick holder by lifting upwards and away from the heater (Fig. 3).
(Con funda de muelles) Algunos modelos tienen un ensamblaje de funda de muelles situado detrás del botón. En
estos modelos, empuje el nivelador de la funda de muelles hacia arriba para liberarlo de su ranura de cierre y tire
del tirador hacia usted. Retire el aguantador de mecha tirando hacia arriba y hacia afuera de la estufa (Fig. 3).
Locking groove
Ranura retentiva
Wick holder
If
Clip
Snap Ring
Aro automático
Figure 1/Figura 1
6.
If No Soporte de la
Clip mecha
Figure 2/Figura 2
Wick
Mecha
Clean away all carbon deposits from the burner & wick adjuster assembly with a wire brush or steel wool.
8.
Align the set line on the orange band or if no set line, align the bottom edge of the band with the bottom edge of
the wick holder and press the wick firmly into the wick holder. (Fig. 4)
(See owners manual)
10.
Mecha
Dimple
Linea negra Hoyuelo
Agujero
Wick holder
Soporte de la
mecha
Rack
Cremallera
Figure 3/Figura 3
7.
9.
Wick
Black line
Hole
Spring case lever
Palanca de la caja del resorte
Using a siphon pump drain the kerosene from the sub-fuel tank and wipe tank clean with a paper towel
& fresh K-1 kerosene. Remove the old wick from the wick holder by pushing toward the center. Discard of
properly. If your heater has a removable metal wick holder, be careful that you do not discard it. (Figure 5)
(holes)
NOTE:
Wick Holder
Soporte de la mecha
Figure 4/Figura 4
Utilizando una bomba de sifón drene el queroseno el tanque secundario de combustible y limpie el tanque con una
toalla de papel y con queroseno fresco K-1. Retire la mecha vieja del aguantador empujando hacia el centro.
Deseche de forma adecuada. Si su estufa tiene un aguantador de mecha de metal, tenga cuida do de no
desecharlo. (Figura 1)
7.
Limpie todos los depósitos de carbón del quemador y el ensamblaje del ajustador de mecha con un cepillo de
alambre o con lana de acero.
Alinee la línea señalada en la banda naranja o, si no hay línea señalada, alinee el filo inferior de la banda con el filo
inferior del aguantador de mecha y presione firmemente la mecha hacia adentro del aguantador de mecha. (Fig. 4)
(Véase manual de usuario)
8.
If your wick has holes, make sure these holes line up with dimples on the wick holder. (Fig. 5)
If your wick has a notch, it is intended to be aligned with the position of the igniter bulb.
Reinstall the wick adjuster or wick frame and check for easy operation. Make sure the wick is at the correct
height and is even all the way around the wick adjuster. A wick that is too high or uneven may smoke.
Check the extinguishing system several times for proper operation. (IMPORTANT)
operate your heater
with a faulty extinguisher.
11.
Clean the exterior cabinet surfaces with a non-aerosol cleaner. Then, replace the cabinet, batteries,
chimney assembly, knobs & cartridge tank (if removable), and protective grill.
12.
Refuel the heater with only K-1 Kerosene & allow the wick to soak for 60 minutes before lighting. Failure to do
this may cause damage to your new wick. NEVER LEAVE HEATER UNATTENDED WHILE IN OPERATION.
DO NOT LEAVE YOUR HOME OR GO TO SLEEP WHILE HEATER IS IN USE.
If you experience any difficulty, please see your Servicing Dealer for further assistance.
While we have made every effort to insure accuracy in these instructions, World Marketing of America, Inc. assumes no responsibility for
errors and/or damage therein caused. Please consult the Owners Manual that came with your heater for specific instructions.
© 2005 World Marketing of America, Inc. All Rights Reserved.
Cat. Part. No. WM2 / Pièce de Cat. No. WM2
www.worldmkting.com
Figure 5/Figura 5
6.
(Agujeros) Si su mecha tiene agujeros, asegúrese de que estos agujeros están alineados con los hoyitos del
aguantador de mecha. (Fig. 5)
NOTA: Si su mecha tiene una muesca, debe estar alineada con la posición de la cabeza del encendedor.
9.
Reinstale el ajustador de mecha o el marco de mecha y compruebe que funciona sin dificultad. Asegúrese de que
la mecha está a la altura correcta y está nivelada todo alrededor del ajustador de mecha. Una mecha que está
demasiado alta o desnivelada podría echar humo.
10. Compruebe el sistema de extinción varias veces para asegurarse de que funciona correctamente.
(IMPORTANTE) NUNCA haga funcionar su estufa con un extintor defectuoso.
11. Limpie las superficies exteriores de la caja protectora con un limpiador sin aerosol. Luego, reemplace la caja
protectora, las pilas, el ensamblaje de la chimenea, los botones y el tanque de cartucho (si procede), y el enrejado
protector.
12. Recargue el combustible de la estufa solamente con queroseno K-1 y permita que la mecha se empape durante 60
minutos antes de encenderla. Si no lo hace, podría causar daños a su nueva mecha. NUNCA DEJE LA MECHA
DESATENDIDA CUANDO ESTÁ FUNCIONANDO. NO SE VAYA DE CASA O SE DUER MA CUANDO LA
ESTUFA ESTÁ EN USO.
Si tiene algún problema, por favor consulte con su Distribuidor de Servicios para ayuda adicional.
Aunque hemos hecho todos los esfuerzos posibles para asegurarnos de la exactitud de estas instrucciones, World Marketing of America,
Inc. no asume ninguna responsabilidad de los errores y /o los daños causados por las mismas. Por favor, consulte el Manual de Usuario
que venía con la estufa para instrucciones específicas.