1
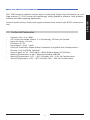
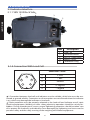
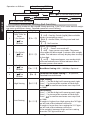
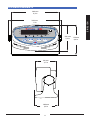
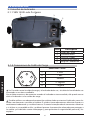
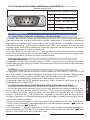
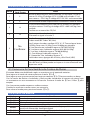
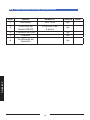
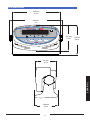
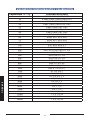
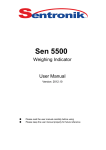
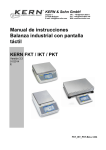
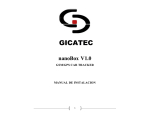
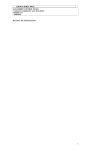
Before operating the unit, read this manual and retain it for future
reference.
ENGLISH
WELCOME!
THANK YOU FOR PURCHASING THIS SEN1500 WEIGH
INDICATOR.
WITH THIS WEIGH INDICATOR, YOU CAN CAPTURE
SUCH PRECISE WEIGHS OF ANY SCALE
OR BALANCE WITH SUPERIOR QUALITY.
ITS DISPLAY IS PACKED WITH FEATURES SEN1500
ADVANCED, YET IS EASY TO USE.
SOON BE ENJOYING A PRODUCT
YOU CAN USE FOR YEARS AND YEARS.
FCC Caution:
To assure continued compliance, follow the
attached installation instructions and use only
shielded interface cables when connecting to
peripheral devices.
Any changes or modify cations not expressly
approved by the party responsible for compliance could void the user’s authority to operate
this equipment.
This device complies with Part 15 of the FCC
Rules. Operation is subject to the following
two conditions:
(1) This device may not cause harmful interference, and
(2) this device must accept any interference received, including interference that may cause
undesired operation.
WARNING:
TO REDUCE THE RISK OF FIRE, ELECTRIC SHOCK OR
PRODUCT DAMAGE,
• DO NOT EXPOSE THIS APPARATUS TO RAIN, MOISTURE,
DRIPPING OR SPLASHING AND THAT NO OBJECTS FILLED
WITH LIQUIDS, SUCH AS VASES, SHALL BE PLACED ON THE
APPARATUS.
• USE ONLY THE RECOMMENDED ACCESSORIES.
• DO NOT REMOVE THE COVER (OR BACK); THERE ARE NO
USER SERVICEABLE PARTS INSIDE. REFER SERVICING TO
QUALIFIED SERVICE PERSONNEL.
NOTE:
THE CHANGES OR MODIFICATIONS NOT
EXPRESSLY APPROVED BY THE PARTY RESPONSIBLE FOR COMPLIANCE COULD VOID
THE USER’S AUTHORITY TO OPERATE THE
EQUIPMENT.
CAUTION
RISK OF ELECTRIC SHOCK
DO NOT OPEN
CAUTION: TO REDUCE THE RISK OF ELECTRIC SHOCK,
DO NOT REMOVE SCREWS.
NO USER-SERVICEABLE PARTS INSIDE.
REFER SERVICING TO QUALIFIED SERVICE PERSONNEL
The lightning flash with arrowhead symbol, within
an equilateral triangle, is intended to alert the user
to the presence of un-insulated “dangerous voltage” within the product’s enclosure that may be of
sufficient magnitude to constitute a risk of electric
shock to persons.
The exclamation point within an equilateral triangle is intended to alert the user to the presence of
important operating and maintenance (servicing)
instructions in the literature accompanying the
appliance
CAUTION
Danger of explosion if battery is incorrectly replaced.
Replace only with the same or equivalent type recommended
by the manufacturer. Dispose of used batteries according to
the manufacturer’s instructions.
The socket outlet shall be installed near the
equipment and easily accessible. The mains
plug of the power supply cord shall remain
readily operable. To completely disconnect
this apparatus from the AC Mains, disconnect
the power supply cord plug from AC receptacle.
2
Recycling
Your product is designed and manufactured
with high quality materials and components,
which can be recycled and reused.
Never dispose of your product with other
household waste. Please inform yourself
about the local rules on the separate collection of electrical and electronic products. The
correct disposal of your old product helps
prevent potentially negative consequences
on the environment and human health.
The packaging of this product is intended to
be recycled. Contact your local authorities
for information about how to recycle the
packaging.
Compliance to the following standards is indicated by the corresponding marking on the product.
Marking
Standard
AS/NZS4251.1, AS/NZS4252.1
Important Notice for verified weighing instruments
Weighing Instruments verified at the place of manufacture bear one of the preceding
marks on the packing label and the green ‘M’ (metrology) sticker on the descriptive plate.
They may be put into service immediately.
Weighing Instruments to be verified in two stages have no green ‘M’ (metrology) on the
descriptive plate and bear one of the preceding identification mark on the packing label.
The second stage of the initial verification must be carried out by the approved service
organization of the authorized representative within the EC or by the national weights &
measures (W+M) authorities.
The first stage of the initial verification has been carried out at the manufacturer’s work. It comprises all tests according to the adopted European standard EN 45501:1992, paragraph 8.2.2.
If national regulations limit the validity period of the verification, the user of the weighing instrument must strictly
observe the re-verification period and inform the respective W+M authorities.
Disposal
In conformance with the European Directive 2002/96/EC on Waste Electrical and Electronic
Equipment (WEEE) this device may not be disposed of in domestic waste. This also applies to
countries outside the EU, per their specific requirements.
Please dispose of this product in accordance with local regulations at the collecting point specified for electrical and electronic equipment.
If you have any questions, please contact the responsible authority or the distributor from which
you purchased this device.
Should this device be passed on to other parties (for private or professional use), the content of
this regulation must also be related.
Thank you for your contribution to environmental protection.
FCC Note
This equipment has been tested and found to comply with the limits for a Class A digital device, pursuant to Part 15
of the FCC Rules. These limits are designed to provide reasonable protection against harmful interference when the
equipment is operated in a commercial environment. This equipment generates, uses, and can radiate radio frequency
energy and, if not installed and used in accordance with the instruction manual, may cause harmful interference to radio communications. Operation of this equipment in a residential area is likely to cause harmful interference in which
case the user will be required to correct the interference at his own expense.
Industry Canada Note
This Class A digital apparatus complies with the Canadian ICES-003.
Cet appareil numérique de la classe A est conforme à la Norme NMB-003 du Canada.
3
ENGLISH
This product conforms to the EMC Directive 89/336/EEC, the Low Voltage Directive 73/23/
EEC and the Non-automatic Weighing Instruments Directive 90/384/EEC. The complete Declaration of Conformity is available from Sentronik Corporation.
ENGLISH
INDEX
1.0 BRIEF INTRODUCTION........................................................................5
1.1 Technical Parameter..................................................................5
2.0 INSTALLATION........................................................................................6
2.1 Indicator Interface.......................................................................6
2.1.1 SEN 1500 Back Side..................................................................6
2.1.2 Connection With Load Cell...................................................6
2.1.3 Serial Port Wire Connection..................................................7
3.0 OPERATION..............................................................................................7
3.1 Auto Zero When Turn On And Off..........................................7
3.2 Manually Zero...............................................................................7
3.3 Tare....................................................................................................7
3.4 “Operation For Total”, “Total Display” And “Total Clear”..7
3.5 Other Parameter Setting And Function...............................8
4.0 COMMUNICATION MODE FORMAT..............................................9
5.0 ERROR NOTICE.......................................................................................9
SEN 1500 LIST................................................................................................10
6.0 MEASUREMENTS...................................................................................11
SETUP AND CALIBRATION VALUES......................................................13
LIMITED WARRANTY...................................................................................14
1.0 BRIEF INTRODUCTION
Features: kg/lb one key switch, total, upper and lower limit, animal scale, RS232 communication
1.1 Technical Parameter
•
•
•
•
•
•
•
•
•
•
•
Accuracy Class: III, n=3000
A/D Conversion Mode: Adopts Σ--Δ Technology, 10 Times per Second
Input Sensitivity ≥1.5uV/e
Excitation: DC 5V
Input Signal: -16mV ~18mV
Load Cell Connection Mode: 6 Wire Connection (Long Wire Auto Compensation )
Division: 1/2/5/10/20/50 Optional
Power Supply: AC 85 ~ 245V, 50Hz ~ 60Hz; Build-in Battery DC 6V/4AH
Working Temperature: 0~40°C; Working Humidity ≤90%RH
Working Temperature: -10oC ~ 40oC; Humidity 10% ~ 85%, No Condensation
Storing Temperature: -30oC ~ 60oC, Humility 10% ~ 70%, No Condensation
5
ENGLISH
SEN 1500 weighing indicator adopts high anti-jamming Single-chip microprocessor and
high precision ∑- Δ A/D conversion technology, wildly applied in platform scale, platform
balance and other weighing applications.
2.0 INSTALLATION
2.1 Indicator Interface
2.1.1 SEN 1500 Back Side
4
5
3
2
ENGLISH
1
Item
Description
1
2
3
4
5
Load Cell
Communication
120V AC Cable Power
Battery Cover
Calibration Plug
2.1.2 Connection With Load Cell
3
4
2
5
DESCRIPTION
+ Exc
- Exc
Shield
+ Signal
- Signal
1
2
3
4
5
! Connection between load cell and indicator must be reliable, shield wire must be connected to ground reliably. Connection or disconnection are not allowed when the indicator
is on, which may damage the indicator or load cells.
! Static protection must be properly adopted as the load cell and indicator are all static
sensitive equipments. Welding or other strong electricity operation should be strictly forbidden. During thunderstorm season, proper lightening protection should be taken care
of to protect the load cells and indicators from damaging by lightening and to ensure the
personal safety and the safely running of the weighing and related equipments.
6
2.1.3 Serial Port Wire Connection
Serial Port Chart
1
2
6
3
7
4
8
1
2
3
4
5
5
9
TXD
RXD
GND
3.0 OPERATION
3.1 Auto Zero When Turn On And Off
The indicator power can be controlled by the on-off key on the front faceplate. The indicator
will perform self-check after turned on. If the scale was found departure from the calibrate
zero however still within the range of turn on auto zero then the indicator will display “0”
and the indicator light for “zero digit” will be on. If the scale was found departure from the
calibrate zero and out of the range of turn on auto zero then the indicator will display the
current read
If the range setting of the turn on zero is “- -“ which means zero of last turn off, then zero
operation will not be carried on and the zero of last turn off will be automatically reading
and the current weight will be displayed.
3.2 Manually Zero
Indicator will back to zero when pressing “ZERO” key if the gross weight is within the range
of manually zero and stable. Manually zero is not valid under the “NET” displaying mode;
3.3 Tare
TARE Operation can be carried out if both gross weight and net weight are above zero and
stable. The indicator will display “0” after pressing the “TARE” key. The tared weight is current
gross weight. And the indicator will enter “NET” displaying mode and the “NET” indicator
lights will be on;
The indicator will exit “NET” displaying mode after pressing “TARE” when the gross weight is
“0” and under “NET” displaying mode.
3.4 “Operation For Total”, “Total Display” And “Total Clear”
1. In case, the net weight is bigger than the minimum measurable value (5 division) and
stable, when pressing “TOTAL”, the current net weight will be added and the “TOTAL” indicator light will be on and total value will be displayed, which will be changed to adding times
(n ***) after 3 seconds and exit the total displaying status after another 3 seconds. Next
operation will be only valid when the net weight is smaller than the minimum measurable
value.
2. If keep pressing “TOTAL” until buzzer alarms under the weighing status, “FUNCTION” and
” to see the add“TOTAL” lights will be on and you can check the total value by pressing “
” to exit.
ing times and again “
3. If you press “→” after keep pressing “TOTAL” and enter the total displaying status there will
” to clear and
be an notice 【CLRAr-】which means to clear the total value or not. Press “
“FUNCTION” to exit and keep the value.
7
ENGLISH
Assignment
Operation as follows:
Keep Pressing “TOTAL“
Display Total Value
Press “→” to Clear Total
Press“
Press “
“to Confirm Clear
“ to see the adding times
Press “
“ to Exit
ENGLISH
Press“FUNCTION“ to Cancel
3.5 Other Parameter Setting And Function
Parameter setting mode can be entered if keep pressing “FUNCTION” under normal weighing status until buzzer alarms. Detailed operations are as follows:
Steps Operations
Display
Note
Keep Pressing
“Function” Setting:
“FUNCTION” to
【 Lb】: One Key Switch (kg/lb),(Not available
Enter
under net weighing status).
【Fn **】
1
“↑”to Switch
【ANL】: Animal Scale, One key total and lock
” to
“
display.
Confirm
【 --】: No Function
2
3
4
5
6
“↑”to Switch
” to
“
Confirm
“↑”to Switch
” to
“
Confirm
“↑”to Switch
” to
“
Confirm
High Setting
Low Setting
【PS **】
Power Save Setting:
【 oFF】: Power save mode off
【 oN】:Open power save mode. The power
save mode will be entered 5 minutes after weight
stable. The indicator will only display date circultly
in last digit
【 onP】: Enhanced power save mode which
will automatically turn off the indicator after 5
minutes power save mode.
【br ****】 Baud Rate Setting: 600 ~ 9600 bps Optional.
【Co *】
Communicate Mode Setting: 1~ 6 Optional,
Detailed format followed
High Setting:
Press“→”the flash digit will move towards right
【H *****】 Press“↑”to increase the number of flash digit
”to confirm and enter next step such
Press “
as 2000
【L *****】
Low Setting:
Press“→”the flash digit will move towards right.
Press“↑”to increase the number of flash digit.
”to confirm and enter next step such
Press “
as 1000.
If weight is higher than High setting the “HI” light
on left side of the indicator will be on.
If weight is lower than Low setting the “LO” light
on left side of the indicator will be on.
If the weight is between High and Low setting
then the “OK” light will be on.
8
4.0 COMMUNICATION MODE FORMAT
Serial
Number of each
frame
1
8
Reversely send the Net Weight date. For example if the net
weight is 23.45 kg, ASCII code 54.3200 will be sent. And if the
net weight is –23.45 kg, ASCII code 54.320- will be sent.
2
8
Reversely send Gross Weight date. The format is same as serial
1
3
14
Positively send the Net Weight date with unit. For example if
the net weight is
23.45kg, ASCII code =0023.45 (kg) will be sent.
End with HEX number OD,OA
4
14
Positively send the Net Weight date with unit. The format is
same as serial 3
5
No Comfirm
Order Response Mode: Order mode 02 “Order” 03 (Hex)
There are 5 pieces order, ASCII code ‘A’~’E’. Take gross weight
23.45kg,
net weight 13.45kg and tare 10.00kg for example
‘A’: Read gross weight, indicator back: GW: 0023.45(kg)
‘B’: Read net weight, indicator back: NW: 0013.45(kg)
‘C’: Read tare, indicator back: TW:0010.00(kg)
‘D’: Manually zero, indicator back:’D’
‘E’: Tare operation, indicator back:’E’
All order back add 02 at the beginning and 03 at the end (HEX)
Net and total weight can be automatically output in Total
operation and the date can be printed if connected with serial
printer.
6
5.0 ERROR NOTICE
Display
Err 01
Note
Exceed the Zero Range
Err 02
Not Meet the Requirement of Total
Err 03
Weight Overloaded
Err 04
Err 09
Weight not stable during Calibration
Load Calibration Error. Too low load or Calibration code too small or AD
reverse
Data read verify Error, Data Memory Damaged
Err 10
Boot verify Error, SCM damaged
Err 05
9
ENGLISH
Note
SEN 1500 PACKING LIST
ENGLISH
Serial
Name
Model no.
Quantity
1
Indicator
Communication
Plug
9 Core D Type
Jacket
Manual
Certificate
SEN 1500
1pc
9 Core D Type (Pin)
1pc
3
4
5
6
1pc
1pc
1pc
10
Remarks
6.0 MEASUREMENTS
240 mm
9,4 in
ENGLISH
280 mm
11 in
HI
kg
OK
LO
lb
Fn
Net
Zero
94 mm
3,7 in
100 mm
3,9 in
11
150 mm
5,9 in
170 mm
6,6 in
SETUP AND CALIBRATION VALUES
ENGLISH
Capacity lb / kg
Resolution
5
10
15
20
25
30
40
50
60
75
100
120
150
200
250
300
400
500
600
750
1000
1200
1500
2000
2500
3000
5000
6000
7500
10000
12000
15000
20000
0.0005, 0.001, 0.002, 0.005
0.0005, 0.001, 0.002, 0.005, 0.01
0.001, 0.002, 0.005, 0.01
0.001, 0.002, 0.005, 0.01, 0.02
0.002, 0.005, 0.01, 0.02
0.002, 0.005, 0.01, 0.02
0.002, 0.005, 0.01, 0.02
0.005, 0.01, 0.02, 0.05
0.005, 0.01, 0.02, 0.05
0.005, 0.01, 0.02, 0.05
0.005, 0.01, 0.02, 0.05, 0.1
0.01, 0.02, 0.05, 0.1
0.01, 0.02, 0.05, 0.1
0.02, 0.01, 0.02, 0.05, 0.1, 0.2
0.05, 0.1, 0.2
0.02, 0.05, 0.1, 0.2
0.02, 0.05, 0.1, 0.2
0.05, 0.1, 0.2, 0.5
0.05, 0.1, 0.2, 0.5
0.05, 0.1, 0.2, 0.5
0.05, 0.1, 0.2, 0.5, 1
0.1, 0.2, 0.5, 1
0.1, 0.2, 0.5, 1
0.1, 0.2, 0.5, 1, 2
0.2, 0.5, 1, 2
0.2, 0.5, 1, 2
0.5, 1, 2, 5
0.5, 1, 2, 5
0.5, 1, 2, 5
0.5, 1, 2, 5, 10
1, 2, 5, 10, 20
1, 2, 5, 10
1, 2, 5, 10, 20
12
www.sentronik.com
Printed In U.S.A.
Design H.M.G
Sentronik.com products are warranted against defects in materials and workmanship from
the date of delivery through the duration of the warranty period. During the warranty period Sentronik.com will repair, or, at its option, replace any component(s) that proves to be
defective at No charge, provided that the product is returned, freight prepaid, to Sentronik.
com.
This warranty does Not apply if the product has been damaged by accident or misuse, exposed to radioactive or corrosive materials, has foreign material penetrating to the inside
of the product, or as a result of service or modification by other than Sentronik.com. In lieu
of a properly returned warranty registration card, the warranty period shall begin on the
date of shipment to the authorized dealer. No other express or implied warranty is given
by Sentronik.com Corporation. Sentronik.com Corporation shall Not be liable for any consequential damages.
As warranty legislation differs from state to state and country to country, please contact
Sentronik.com or your local Sentronik.com dealer for further details.
ENGLISH
LIMITED WARRANTY
w w w. s e n t r o n i k . c o m
7825 NW 29 Street #137
Miami, Florida 33122
United States of America
Sentronik reserves the right to improve, enhance or modify features and specifications without prior notice. Copyright 2010 Sentronik. Printed in USA
Antes de utilizar el indicador, lea este manual y consérvelo para
futuras referencias
¡BIENVENIDOS!
GRACIAS POR LA COMPRA DE ESTE INDICADOR DE PESO
SEN1500.
CON ESTE INDICADOR DE PESO, PUEDE CAPTURAR ESOS
PESOS PRECISOS DE CUALQUIER BASCULA O BALANZA
CON UNA CALIDAD SUPERIOR.
ESTE INDICADOR SEN1500 ESTÁ REPLETO DE
CARACTERÍSTICAS AVANZADAS,Y ES FÁCIL DE USAR.
PRONTO DISFRUTARA DE UN PRODUCTO QUE PODRÁ
UTILIZAR POR AÑOS Y AÑOS.
PRECAUCIÓN
PELIGRO DE DESCARGA
ELÉCTRICA NO ABRIR
PRECAUCIÓN: PARA REDUCIR EL RIESGO DE DESCARGA ELÉCTRICA,
NO RETIRE LA TAPA (NI LA CUBIERTA TRASERA), EN EL INTERIOR
NO HAY PIEZAS MANIPULABLES POR EL USUARIO. CUALQUIER
REPARACIÓN DEBERÁ SER REALIZADA POR PERSONAL TÉCNICO
CUALIFICADO.
El símbolo de relámpago con punta de flecha,
dentro de un triángulo equilátero, alerta al
usuario de la presencia de “voltaje peligroso“ sin
aislar en el interior del producto, que puede ser
de la suficiente magnitud como para constituir
un riesgo de descarga eléctrica para las personas
El signo de exclamación dentro de un triángulo
equilátero alerta al usuario dentro de la
existencia de importantes instrucciones sobre
funcionamiento y mantenimiento (asistencia) en
el manual que acompaña al equipo.
FCC PRECAUCIÓN:
Para asegurar el cumplimiento continuo, siga
las instrucciones de instalación adjuntas y
utilice solamente cables de interfaz protegidos
al conectar a los dispositivos periféricos.
Cualquier cambio o modificación que no
estén expresamente aprobados por la parte
responsable del cumplimiento podrían anular
la autoridad al usuario para operar este equipo.
Este dispositivo cumple con la Parte 15 de las
Normas de la FCC. La operación está sujeta a
las siguientes condiciones:
(1) Este dispositivo no puede causar
interferencias perjudiciales y
(2) este dispositivo debe aceptar cualquier
interferencia
recibida,
incluyendo
interferencias que puedan causar un
funcionamiento no deseado.
NOTA:
LOS CAMBIOS O MODIFICACIONES NO
EXPRESAMENTE APROBADOS POR LA PARTE
RESPONSABLE DEL CUMPLIMIENTO PODRÍA
ANULAR LA AUTORIDAD AL USUARIO PARA
OPERAR EL EQUIPO.
Reciclado
E S PA Ñ O L
El producto se ha diseñado y fabricado con
materiales de alta calidad y componentes,
que pueden ser reciclados y reutilizados.
Nunca tire el producto con otros residuos
domésticos. Obtenga información sobre la
legislación local de la recogida selectiva de
aparatos eléctricos y electrónicos. El desecho
correcto del producto antiguo ayuda a evitar
posibles consecuencias negativas sobre el
medio ambiente y la salud humana.
El empaque de este producto está diseñado
para ser reciclado. Póngase en contacto
con las autoridades locales para obtener
información sobre cómo reciclar el embalaje.
PRECAUCIÓN
Peligro de explosión si la batería se sustituye de forma
incorrecta. Reemplace sólo con el mismo tipo o equivalente
recomendado por el fabricante. Deseche las baterías usadas
según las instrucciones del fabricante.
El tomacorriente debe estar instalado cerca
del equipo y fácilmente accesible. El enchufe
del cable de alimentación debe estar siempre
disponible. Para desconectar completamente
este aparato de la red de AC, desconecte el
enchufe del cable de toma de AC.
2
La marca correspondiente en el producto indica la conformidad con los siguientes estándares.
Marking
Standard
Este producto está en conformidad con la Directiva EMC 89/336/EEC, con la Directiva para
Voltaje Bajo 73/23/EEC y con la Directiva para Instrumentos de Pesaje no Automáticos 90/384/
EEC. La Declaración de Conformidad está disponible a través de Sentronik Corporation.
AS/NZS4251.1, AS/NZS4252.1
Aviso importante para los instrumentos de pesaje verificados
Los instrumentos de pesaje verificados en el lugar de fabricación sustentan una de las
marcas anteriores en la etiqueta de empaque, y la etiqueta adhesiva de metrología ‘M’
de color verde en la placa descriptiva. Dichos instrumentos pueden comenzar a usarse
inmediatamente.
Los instrumentos de pesaje que se verifican en dos etapas no tienen la etiqueta de
metrología ‘M’ de color verde en la placa descriptiva y no sustentan una de las marcas
de identificación en la etiqueta del empaque. La segunda etapa de la verificación inicial
debe estar a cargo de una organización de servicio aprobada por el representante
autorizado dentro de la CE, o de las autoridades de pesos y medidas.
La primera etapa de la verificación inicial se ha llevado a cabo en el lugar de fabricación. Ésta comprende todas las
pruebas según el estándar europeo EN 45501:1992, párrafo 8.2.2.
Si las regulaciones nacionales limitan el periodo de validez de la verificación, el usuario del instrumento de
pesaje debe apegarse estrictamente al periodo marcado para una nueva verificación e informar a las autoridades
correspondientes de pesos y medidas.
Desecho
En conformidad con la Directiva Europea 2002/96/EC sobre Equipos Eléctricos y Electrónicos
(WEEE), este dispositivo no puede desecharse con la basura doméstica.
Esto también es aplicable para países fuera de la UE, según sus requerimientos específicos.
Deseche este producto de acuerdo con las regulaciones locales en el punto de recolección
especificado para equipos eléctricos y electrónicos.
Si tiene alguna pregunta, comuníquese con la autoridad responsable o con el distribuidor con
el que compró este dispositivo.
Gracias por su contribución a la protección ambiental.
Nota de la FCC
Este equipo ha sido probado y se encontró que cumple con los límites para un dispositivo digital clase A, consecuente
con la Parte 15 de las Pautas de la FCC. Estos límites están diseñados para proporcionar una protección razonable
contra interferencia dañina cuando el equipo es operado en un ambiente comercial. Este equipo genera, usa y puede
irradiar frecuencias de radio y, si no es instalado y utilizado de acuerdo con el manual de instrucciones, puede causar
interferencia dañina a las radiocomunicaciones. Es probable que la operación de este equipo en un área residencial
cause interferencia dañina, en cuyo caso se le exigirá al usuario que corrija la interferencia con gastos a su cargo.
Industry Canada Note
Este aparato digital Clase A cumple con la norma canadiense ICES-003.
Cet appareil numérique de la classe A est conforme à la Norme NMB-003 du Canada.
3
E S PA Ñ O L
En caso que este dispositivo sea transferido a otras partes (para uso privado o profesional),
también deberá mencionarse el contenido de esta regulación.
INDEX
1.0 BREVE INTRODUCCIÓN......................................................................5
1.1 Parámetros Técnicos.................................................................5
2.0 INSTALACIÓN..........................................................................................6
2.1 Interfaz de Indicador..................................................................6
2.1.1 SEN 1500 Lado Posterior........................................................6
2.1.2 Conexiones de Celda de Carga............................................6
2.1.3 Conexión de Cables del Puerto serial RS232..................7
3.0 OPERACIÓN.............................................................................................7
3.1 Auto Cero Cuando se Apaga y de Enciende.......................7
3.2 Cero Manual...................................................................................7
3.3 Tara....................................................................................................7
3.4 Operación para Total, Display Total y Borrador de Total.......7
3.5 Configuración de Otros Parámetros y Funciones.............8
4.0 MODO DE FORMATO DE COMUNICACIÓN................................9
4.1 Como usar la Característica de Conteo de Piezas............9
5.0 AVISOS DE ERROR................................................................................9
SEN 1500 LISTADO DE PARTES EN CAJA...........................................10
6.0 MEDIDAS..................................................................................................11
VALORES DE CONFIGURACIÓN Y CALIBRACIÓN...........................12
GARANTÍA LIMITADA.................................................................................13
E S PA Ñ O L
1.0 BREVE INTRODUCCIÓN
SEN 1500 indicador de peso adopta un microprocesador anticonflicto con una alta
tecnología en el procesamiento de conversión Σ - Δ A/D ampliamente utilizado en básculas
de plataforma, balanzas de plato y otras aplicaciones de pesaje.
CARACTERÍSTICAS:
Una tecla para kg / lb, total, limites superior e inferior, bascula para pesar animales,
comunicación RS232.
1.1 Parámetros Técnicos
Clase de exactitud: III, n=3000
Modo de Conversión A/D: Adopta Tecnología Σ--Δ T, 10 Veces por Segundo.
Sensibilidad de Entrada ≥1.5 uV/e
Excitación: DC 5V
Señal de Entrada: -16mV ~18mV
Modo de Conexión de Celda de Carga: Conexión para celdas de 4 y 6 señales (Auto
Compensación por Cable largo)
•
Divisiones: 1/2/5/10/20/50 Opcional
•
Fuente de Alimentación: AC 85 ~ 245V, 50Hz ~ 60Hz;
Batería Interna Recargable DC 6V/4AH
•
Temperatura de Trabajo: 0~40°C; Humedad de Trabajo ≤90%RH
•
Temperatura de Trabajo: -10oC ~ 40oC; Humedad 10% ~ 85%, No condensante
•
Temperatura de Almacenamiento: -30oC ~ 60oC, Humedad 10% ~ 70%, No condensante
E S PA Ñ O L
•
•
•
•
•
•
5
2.0 INSTALACIÓN
2.1 Interfaz de Indicador
2.1.1 SEN 1500 Lado Posterior
4
5
3
2
1
Item
1
2
3
4
5
Description
Celda de Carga
Comunicación
120V AC Cable
Cubierta de Batería
Plug de Calibración
2.1.2 Conexiones de Celda de Carga
3
4
2
E S PA Ñ O L
5
DESCRIPTION
+ Exc
- Exc
Shield
+ Signal
- Signal
1
2
3
4
5
! La Conexión entre la celda de carga y el indicador debe ser , el cable de la malla debe ser
conectado a una tierra confiable.
No se debe conectar o desconectar cuando el indicador esta encendido; ello puede causar
daño al indicador o a las celdas de carga.
! Se debe utilizar una adecuada protección estática dado que tanto el indicador como las
celdas son elementos sensibles a estática. El soldar o hacer operaciones eléctricas fuertes es
totalmente inadecuado y no debe hacerse. Durante la temporada de tormentas eléctricas
o si el área es susceptible a ellas, se deberá proveer la protección adecuada para proteger a
las celdas y el indicador contra relámpagos y para garantizar la seguridad de personal y los
equipos
6
2.1.3 Conexión de Cables del Puerto serial RS232
Tabla de Puerto Serial
1
2
6
3
7
4
8
Conexiones Puerto Serial
1
2
TXD - Transmisión
3
RXD - Recepción
4
5
GRD - Tierra
5
9
3.0 OPERACIÓN
3.1 Auto Cero Cuando se Apaga y de Enciende
La energía del indicador puede ser controlada por el botón ON / OFF en el panel frontal. El
indicador efectuará una auto verificación cuando se enciende. Si la bascula se encuentra
fuera del cero calibrado pero aun así dentro del rango del cero al encender, entonces el
indicador marcará “0” y la luz piloto indicadora de CERO se encenderá. Si la bascula esta
fuera del rango de cero de la calibración y fuera del rango de cero del auto cero, entonces el
indicador desplegara la lectura corriente real.
Si el rango fijado de cero de inicio es “- -“ que significa cero de la ultima vez que se apagó,
entonces la operación de cero no será efectuada y el cero de la ultima vez que se apago será
la lectura automática y el peso corriente será desplegado.
3.2 Cero Manual
El indicador volverá a cero cuando se oprima “CERO“ si el peso bruto esta dentro del rango
establecido para cero manual y estable. El cero manual no funciona cuando el indicador esta
en función “NETO“.
3.4 Operación para Total, Display Total y Borrador de Total
1. En caso de que el peso neto sea mayor que el valor de la división mínima medible (5 divisiones mínima) y esté estable, cuando se oprime “TOTAL“, el peso actual neto será agregado
y la luz piloto de “TOTAL“ será encendida y el valor total será indicado, que será sumado a
tiempos sumandos 【n ***】Después de 3 segundos y salir del display de total después
de otros 3 segundos. La siguiente operación solo será valida cuando el peso neto es menor
que el valor mínimo medible.
2. Si se continua presionando “TOTAL“ hasta que la alarma debajo de las luces “FUNCION“ y
“ para ver
“TOTAL“ esten encendidas y se puede obtener el valor del total presionando “
“ para salir.
y agregar y otra vez “
3. Si se presiona “→” despues de presionar “TOTAL” y entra al status del display del total, en“ para
tonces habra un aviso【CLRAr-】que significa borrar el valor total o no. Presione “
borrar y “FUNCTION” para salir y guardar el valor.
7
E S PA Ñ O L
3.3 Tara
La operación “TARA“ puede ser llevada a cabo estando en PESO BRUTO o PESO NETO y el
peso esté estable. El indicador desplegará “0“ después de presionar el botón “TARA“, el peso
destarado es entonces el peso corriente bruto y el indicador entrara en modo “NETO”.
Encendiendo la luz piloto que indica que se encuentra en modo neto.
El indicador saldra de “NETO” despues de oprimir “TARA“ cuando el peso bruto es “0“ y el
modo del display es bajo “NETO“.
Operación como sigue:
Siga Oprimiendo “TOTAL“
Display Valor Total
Oprima “→” Para Borrar Total
“
Oprima “
“ Confirma Borrar
“ para ver las sumatorias
Oprima “
“ para salir
“FUNCTION“ Para Cancelar
3.5 Configuración de Otros Parámetros y Funciones
El fijado de parámetros puede ser dado si presiona “Fn” dentro del status de pesado normal
hasta que suene la alarma. Las operaciones detalladas son como sigue:
Pasos Operaciones
Display
Nota
Continúe
Ajuste “Función” :
presionando
【CoT】: Habilitar el modo de conteo
“FUNCTION”
【 Lb】: Un botón (kg/lb),(No accesible dentro
Para entrar
【Fn **】 del status de peso neto).
1
“↑” cambiar
【ANL】: Bascula de Animales, una tecla de total
”
“
y bloqueo del display.
confirmar
【 --】: Sin Función
“↑”Cambiar
2
3
4
E S PA Ñ O L
5
6
”
“
Confirmar
“↑”para cambiar
” Confirmar
“
“↑”para cambiar
” Confirmar
“
Ajuste ahorro de energía:
【 oFF】: Modo ahorro de energía apagado
【 oN】:Habilita la función ahorro de energía.
El modo de ahorro de energía entrará 5 min
【PS **】
después de que el peso es estable. El indicador solo
desplegara el ultimo digito.
【onP】: Modo mayor de ahorro de energía que
automáticamente apagará el display después de 5 min.
【br ****】 Ajuste Baud Rate: 600 ~ 9600 bps Opcional.
【Co
*】
Ajuste Modo comunicación: 1~ 6 Opcional,
Seguido de Formatos Detallados
Ajuste
Limite Alto
Establecer ALTO:
Oprima “→” el digito que flashea se moverá a la derecha
【H *****】 Oprima“↑”Para incrementar el numero digito que flashea
” para confirmar y meter el siguiente paso
Press “
por ejemplo 2000.
Ajuste
Limite Bajo
Establecer BAJO:
Oprima “→” el digito que flashea se movera a la derecha
Oprima “↑” para incrementar el numero en el digito
”para confirmar e ingrese un valor, por
Oprima“
ejemplo 1000
【L *****】 Si el valor establecido es mayor que el valor establecido ALTO la luz indicadora “HI” a la izquierda del
indicador estará encendida.
Si el peso es mas bajo que BAJO la luz “LO” en el
lado izquierdo del indicador se iluminará.
Si el peso esta entre HIGH y LOW la luz “OK” encenderá
8
4.0 MODO DE FORMATO DE COMUNICACIÓN
Serial
Numero de
Cada Trama
Nota
1
8
Manda el dato del peso neto invertido. Por ejemplo si el peso
neto es 23.45 kg, El código ASCII 54.3200 será enviado. Y si el
peso neto es –23.45 kg, El código ASCII 54.320- será transmitido.
2
8
Envia invertido el dato de peso bruto. El formato es similar al serial 1.
3
14
Envia positivamente el peso neto con la unidad. Por ejemplo
si el peso neto es 23.45 kg, el código ASCII =0023.45 (kg) sera
enviado.
Finalize con numero Hex OD,OA
4
14
Envía en positivo el valor del peso neto con la unidad.
El formato es igual a la serie 3.
5
No
Confirmar
Modo de respuesta de Orden:
Orden modo 02 “Order” 03 (Hex)
Hay 5 piezas de orden, codigo ASCII ‘A’~’E’. Tome el peso bruto
23.45kg, Peso neto 13.45kg y tara 10.00kg por ejemplo.
‘A’: Lee peso bruto, indicador regresa: GW: 0023.45(kg)
‘B’: Lee peso neto, indicador regresa: NW: 0013.45(kg)
‘C’: Lee tara, indicador regresa: TW:0010.00(kg)
‘D’: Cero Manual, indicador regresa: ’D’
‘E’: Operación Tara, indicador regresa: ’E’
Todo orden atras agregue 02 al inicio y 03 al final (HEX)
Neto y peso total pueden automáticamente entregar en operación de Total y el dato puede ser impreso si esta conectado una
impresora serial.
6
5.0 AVISOS DE ERROR
Display
Err 01
Err 02
Err 03
Err 04
Err 05
Err 09
Err 10
Indicación
Excede el rango de cero.
No cumple con el requerimiento de acumulado.
Sobre peso.
Peso no estable durante calibración.
Error de carga en calibración. Peso demasiado Bajo o problemas en la
sección de conversión Analógica digital.
Dato de memoria leído con error, Memoria de datos dañada.
Error en el sector de arranque. SCM dañado
9
E S PA Ñ O L
4.1 Como usar la Característica de Conteo de Piezas
El conteo debe estar habilitado según se menciono en el apartado anterior .
Para ingresar al modo de conteo presione la tecla 【Fn 】.
Para ingresar una nueva muestra presione nuevamente 【Fn 】hasta escuchar un beep.
Con las teclas de flecha a la derecha y flecha arriba introduzca el numero de piezas que
se encuentran en ese momento en la bascula. Presione la tecla de 【Cero / Enter 】para
aceptar.
Con la muestra puede empezar a realizar conteos.
Cambie las muestras cuantas veces sea necesario.
Para volver al modo peso, presione la tecla 【Fn 】.
SEN 1500 LISTADO DE PARTES EN CAJA
Serial
Nombre
Modelo no.
Cantidad
1
Indicador
Conector de
Puerto RS232
Cubierta de DB9
Manual
Certificado de
Garantia.
SEN 1500
Conector DB9
9 pines
1pc
3
4
5
6
1pc
1pc
1pc
1pc
E S PA Ñ O L
10
Notas
6.0 MEDIDAS
240 mm
9,4 in
280 mm
11 in
HI
kg
OK
LO
lb
Net
Zero
150 mm
5,9 in
170 mm
6,6 in
94 mm
3,7 in
E S PA Ñ O L
Fn
100 mm
3,9 in
11
VALORES DE CONFIGURACIÓN Y CALIBRACIÓN
E S PA Ñ O L
Capacidad lb / kg
Division de Escala
5
10
15
20
25
30
40
50
60
75
100
120
150
200
250
300
400
500
600
750
1000
1200
1500
2000
2500
3000
5000
6000
7500
10000
12000
15000
20000
0.0005, 0.001, 0.002, 0.005
0.0005, 0.001, 0.002, 0.005, 0.01
0.001, 0.002, 0.005, 0.01
0.001, 0.002, 0.005, 0.01, 0.02
0.002, 0.005, 0.01, 0.02
0.002, 0.005, 0.01, 0.02
0.002, 0.005, 0.01, 0.02
0.005, 0.01, 0.02, 0.05
0.005, 0.01, 0.02, 0.05
0.005, 0.01, 0.02, 0.05
0.005, 0.01, 0.02, 0.05, 0.1
0.01, 0.02, 0.05, 0.1
0.01, 0.02, 0.05, 0.1
0.02, 0.01, 0.02, 0.05, 0.1, 0.2
0.05, 0.1, 0.2
0.02, 0.05, 0.1, 0.2
0.02, 0.05, 0.1, 0.2
0.05, 0.1, 0.2, 0.5
0.05, 0.1, 0.2, 0.5
0.05, 0.1, 0.2, 0.5
0.05, 0.1, 0.2, 0.5, 1
0.1, 0.2, 0.5, 1
0.1, 0.2, 0.5, 1
0.1, 0.2, 0.5, 1, 2
0.2, 0.5, 1, 2
0.2, 0.5, 1, 2
0.5, 1, 2, 5
0.5, 1, 2, 5
0.5, 1, 2, 5
0.5, 1, 2, 5, 10
1, 2, 5, 10, 20
1, 2, 5, 10
1, 2, 5, 10, 20
12
GARANTÍA LIMITADA
www.sentronik.com
Impreso En U.S.A.
Diseño H.M.G
E S PA Ñ O L
Los productos Sentronik están garantizados contra defectos de materiales y mano de
obra desde la fecha de entrega hasta la duración total del periodo de garantía. Durante el
periodo de garantía, Sentronik reparará, o a opción de Sentronik, reemplazará cualquier
componente(s) que resulte defectuoso, sin cargo alguno, con la condición de que el
producto sea devuelto a Sentronik con flete prepagado.
Esta garantía no se aplica en caso de que el producto haya sido dañado por accidente o mal
uso, expuesto a sustancias radioactivas o corrosivas, si presenta material extraño penetrando
en el interior del producto, o como resultado de un servicio o modificación hecha por otros
que no sean de Sentronik. En lugar de una tarjeta de registro de garantía debidamente
procesada, el periodo de garantía se iniciará en la fecha de envío al distribuidor autorizado.
Sentronik.com no otorga ninguna otra garantía, expresa o implícita. Sentronik.com no será
responsable por daños consecuentes.
Puesto que la legislación sobre garantías difiere entre estados y países, favor de comunicarse
con su distribuidor Sentronik para mayor información.
w w w. S e n t r o n i k . c o m
7825 NW 29 Street #137
Miami, Florida 33122
United States of America
Sentronik se reserva el derecho de mejorar o modificar las caracteristicas y especificaciones de este instrumento sin previo aviso. Copyright 2010 Sentronik. Impreso en USA.