1
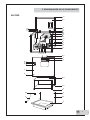
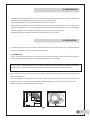
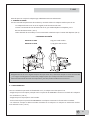
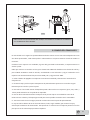
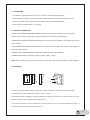
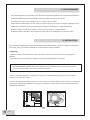
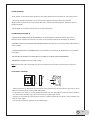
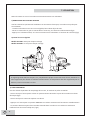
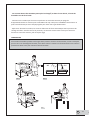
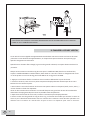
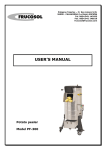
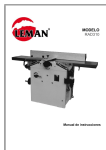
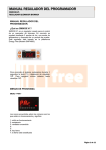
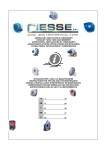
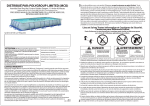
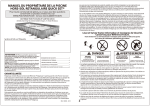
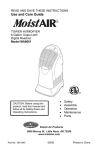
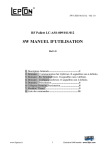
frucosol frucosol frucosol MANUAL DE USUARIO USER'S MANUAL MANUEL DE L'UTILISATEUR SECADORA DE CUBIERTOS CUTLERY POLISHERS ESSUYEUR Á COUVERTS SERIAL NUMBER ....................... MANUFACTURED IN ....................... INDICE / INDEX . Presentación........................................................1 Presentation........................................1 Preséntation.......................................1 . Desembalaje.......................................................2 Unpacking..........................................2 Déballage............................................2 . Denominación de los componentes....................3 Part names.......................................3 Le nom des pieces...............................3 . Advertencias........................................................8 Warning................................................19 Avertissements....................................29 . Instalación..............................................................8 Instalation.........................................19 Installation..........................................29 . Uso.........................................................................10 Use...................................................21 Utilisation..............................................31 . Cambio del granulado.............................................12 Change of the vegetal granulate........23 Changer la sciure vegetal.......................33 . Mantenimiento por parte del usuario...............13 User maintenance.................................24 Entretien de la part l'utilisateur.............34 . Medidas de precaución....................................14 Cautions................................................24 Moyens de precautions......................34 . Soluciones y problemas..................................16 Solutions and problems........................26 Problèmes et solutions.....................36 . Especificaciones............................................17 Specifications...................................27 Specifications...................................37 . Ficha de seguridad del producto........................18 Security information about product....28 Fiche de securité du produit................38 . Recuperación y reciclaje..........................................39 Recovery and recycling..............................39 Récuperation et recycling........................39 . Instrucciones para el transporte.........................40 Moving instructions...........................40 Instructions pour le transport............40 . Declaración ''CE'' de conformidad......................41 Conformity Declaration ''CE'' Declaration ''CE'' de conformité.........42 1.PRESENTACIÓN Usted ha adquirido una máquina secadora abrillantadora de cubiertos. Su máquina ha sido producida con las más avanzadas tecnologías en cuanto a seguridad, fiabilidad y diseño, lo que le confiere una gran durabilidad y bajo mantenimiento. En estas páginas hallará las principales características del producto aquellas operaciones necesarias que se deben realizar para el buen funcionamiento y conservación del mismo. Usted sólo deberá seguir los sencillos consejos que le describiremos en este manual para sacarle el máximo rendimiento a su máquina. Las decisiones y características que figuran en este documento se dan a título informativo y no son de índole contractual. El fabricante se reserva el derecho de efectuar, sin precio aviso, todos los cambios o mejoras que considere necesarios para garantizar la calidad del producto. 1.INTRODUCTION You have acquired a dryer ans polisher machine for cutlery. This machine has been manufactured using the most advanced technology for safety, reliability and design. It is extremely robust and requires very little maintenence. In these pages you will find the main characteristics of the product and the necessary operations for a good working and its maintenance. You only have to follow the simple advices described in this handbook to get the most efficient working. The descriptions and characteristics of this document are informative and they aren't contractual. The manufactured can make , without notice, all changes or improvements that maybe considered neccesary to guarantee the quality of the product. 1. PRÉSENTATION Vous venez d'acquérir une machine couvert. Cette machine a été créé avec les plus grandes avancées technologiques pour la sécurite, la fiabilité et la conception, ce qui permet d'obtenir une grande longévité et un entretien réduit. Dans ce mode d'emploi vous trouverez les principales caractéristiques et les opérations nécessaire à réaliser pour assurer son bon fonctionnement Et sa bonne conservation. Vous devez simplement suivre les conseils décrit dans le manuel afin d'obtenir un rendement maximum de la machine. Les informations et caractéristiques qui figurent dans ce document, se donnet à titre informatif et ne sont pas de nature contractuelle. Le fabricant se réserve le froit d'effectuer sans préavis tous les changments ou améliorations considéré nécessaire pour garantir la qualité du produit. E 1 2. DESEMBALAJE 5 1 2 6 3 4 1.- Manual de usuario 2.- Carga de serrín vegetal 3.- Palet 4.- Bandeja 5.- Brazos 6.- Caja 1.- Operation Manual 2.- Vegetal granulate 3.- Palet 4.- Tray 5.- Arms 6.- Box 1 2 5 4 3 1.- Manual de usuario 2.- Carga de serrín vegetal 3.- Palet 4.- Bandeja 5.- Brazos 6.- Caja 1.- Livre d'instruction 2.- Recharge de sciure végétale 3.- Pallet 4.- Bab 5.- Bras 6.- Carton d'emballage 6 1.- Operation Manual 2.- Vegetal granulate 3.- Palet 4.- Tray 5.- Arms 6.- Box 1.- Livre d'instruction 2.- Recharge de sciure végétale 3.- Pallet 4.- Bab 5.- Bras 6.- Carton d'emballage + Conserve la caja y el material de embalaje. Pueden usarse de nuevo si alguna vez tuviera que transportar la máquina. + Save the carton and packing materials. These can be used again for transporting the machine, if it should be necessary. + Conserve le carton et matériel d'emballage. Ils peuvent être réutilisés pour le transport de la machine en cas de besoin. E 2 3. DENOMINACIÓN DE LOS COMPONENTES SH-7000 1.- Base 2.- Tornillo M5*10 3.- Soporte caja de conexiones 4.- Caja de conexiones 5.- Tornillo M8*35 6.- Arandela M8 7.- Arandela grower M8 8.- Motor 9.- Condensador 10.- Soporte condensador 11.- Tornillo M5*10 12.- Arandela M8 13.- Tuerca M8 14.- Amortiguador 15.- Goma amortiguador 16.- Depósito 17.- Tornillo M6*20 18.- Tapa depósito 19.- Tornillo negro 20.- Lámpara 21.- Portalámparas 22.- Cortinas 23.- Soporte cortinas 24.- Remache 25.- Tornillo M5*10 26.- Visagra 27.- Arandela M5 28.- Amortiguador inox 29.- Tapa 30.- Tapón goma 31.- Remache 32.- Ventilador 33.- Resistencia 34.- Interruptor 35.- Fusible 36.- Portafusible 37.- Tapa delantera 38.- Tuerca enjaulada 39.- Tornillo M6*20 40.- Brazos 41.- Bandeja 42.- Carro 43.- Rueda 44.- Rueda con freno 45.- Cable de red 46.- Cubierta cable de red 47.- Tornillo M3*10 48.- Micro de seguridad 49.- Soporte micro seguridad E 3 1.- Base 2.- Screw M5*10 3.- Connection Box Support 4.- Connection Box 5.- Screw M8*35 6.- Washer M8 7.- Washer grower M8 8.- Motor 9.- Capacitor 10.- Capacitor Support 11.- Screw M5*10 12.- Washer M8 13.- Nut M8 14.- Buffer 15.- Buffers rubber 16. -Deposit 17.- Screw M6*20 18.- Deposits lid 19.- Black screw 20.- Lamp 21.- Lamp support 22.- Curtains 23.- Curtains support 24.- Rivet 25.- Screw M5*10 26.- Hinge 27.- Washer M5*10 28.- Inox Washer 29.- Lid 30.- Rubber top 31.- Rivet 32.- Fan Motor 33.- Heating element 34.- Switch button 35.- Fuse 36.- Fuse support 37.- Front cover 38.- «In cage» nut 39.- Screw M6*20 40.- Arms 41.- Tray 42.- Cart 43.- Wheel 44.- Wheel with brake 45.- Network cable 46.- Network cable cover 47.- Screw M3*10 48.- Security micro 49.- Security micro support 1.- Base 2.- Vis M5*10 3.- Support boîte de jonction 4.- Boîte de jonction 5.- Vis M8*35 6.- Rondelle M8 7.- Rondelle grower M8 8.- Moteur 9.- Condensateur 10.- Support condensateur 11.- Vis M5*10 12.- Rondelle M8 13.- Ecrou M8 14.- Amortisseur 15.- Caoutchouc amortisseur 16.- Dépôt 17.- Vis M6*20 18.- Couvercle dépôt 19.- Vis noir 20.- Lampe 21.- Lampe-support 22.- Rideaux 23.- Support rideaux 24.- Rivet 25.- Vis M5*10 26.- Charnière 27.- Rondelle M5*10 28.- Amortisseur Inox 29.- Couvercle 30.- Bouchon du caoutchouc 31.- Rivet 32.- Ventilateur 33.-Elément chauffant 34.- Interrupteur 35.- Fusible 36.- Fusible support 37.- Couverture 38.- Ecrou «en cage» 39.- Vis M6*20 40.- Bras 41.- Bac 42.- Chariot 43.- Roues 44.- Roues avec frain 45.- Câble du réseau 46.- Couverture câble du réseau 47.- Vis M3*10 48.- Micro sécurité 49.- Support du micro de sécurité 3. DENOMINACIÓN DE LOS COMPONENTES SH-7000 30 29 28 49 48 47 27 26 25 19 18 17 16 1 15 14 8 9 10 11 12 13 31 34 35 36 32 33 37 38 42 44 43 46 39 45 40 41 E 4 3. DENOMINACIÓN DE LOS COMPONENTES SH-3000 1.- Pata de goma 2.- Tuerca M6 3.- Arandela M6 4.- Base 5.- Tornillo M5*10 6.- Soporte caja de conexión 7.- Caja de conexiones 8.- Tornillo M8*35 9.- Arandela M8 10.- Arandela grower M8 11.- Motor 12.- Condensador 13.- Soporte condensador 14.- Tornillo M5*10 15.- Arandela M8 16.- Tuerca M8 17.- Amortiguador 18.- Goma amortiguador 19.- Depósito 20.- Tornillo M6*20 21.- Tapa depósito 22.- Tornillo negro 23.- Lámpara 24.- Portalámpara 25.- Tornillo M5*10 26.- Visagra 27.- Arandela M5 28.- Amortiguador inox 29.- Tapa 30.- Tapón de goma 31.- Remache 32.- Ventilador 33.- Resistencia 34.- Interruptor 35.- Fusible 36.- Portafusible 37.- Tapa delantera 38.- Tuerca enjaulada 39.- Tornillo M6*20 40.- Brazos 41.- Bandeja 42.- Cable de red 43.- Cubierta cable de red 44.- Tornillo M3*10 45.- Micro de seguridad 46.- Soporte micro de seguridad E 5 1.- Rubber foot 2.- Nut M6 3.- WasherÊM6 4.- Base 5.- Screw M5*10 6.- Connection Box Support 7.- Connection Box 8.- Screw M8*35 9.- Washer M8 10.- Washer grower M8 11.- Motor 12.- Capacitor 13.- Capacitor Support 14.- Screw M5*10 15.- Washer M8 16.- Nut M8 17.- Buffer 18.- Buffers rubber 19.- Deposit 20.- Screw M6*20 21.- Deposits lid 22.- Black screw 23.- Lamp 24.- Lamp support 25.- Screw M5*10 26.- Hinge 27.- Washer M5*10 28.- Inox buffer 29.- Lid 30.- Rubber top 31.- Rivet 32.- Fan motor 33.- Heating element 34.- Switch button 35.- Fuse 36.- Fuse support 37.- Front cover 38.- «In cage» nut 39.- Screw M6*20 40.- Arms 41.- Tray 42.- Network cable 43.- Network cable cover 44.- Screw M3*10 45.- Security micro 46.- Security micro support 1.- Patte du caoutchouc 2.- Ecrou M6 3.- RondelleÊM6 4.- Base 5.- Vis M5*10 6.- Support boîte de jonction 7.- Boîte de jonction 8.- Vis M8*35 9.- Rondelle M8 10.- Rondelle grower M8 11.- Moteur 12.- Condensateur 13.- Support condensateur 14.- Vis M5*10 15.- Rondelle M8 16.- Écrou M8 17.- Amortisseur 18.- Caoutchouc amortisseur 19.- Dépôt 20.- Vis M6*20 21.- Couvercle dépôt 22.- Vis noir 23.- Lampe 24.- Lampe-support 25.- Vis M5*10 26.- Charnière 27.- Rondelle M5*10 28.- Amortisseur inox 29.- Couvercle 30.- Bouchon du caoutchouc 31.- Rivet 32.- Ventilateur 33.- Elément chauffant 34.- Interrupteur 35.- Fusible 36.- Fusible support 37.- Couverture 38.- Ecrou «en cage» 39.- Vis M6*20 40.- Bras 41.- Bac 42.- Câble du réseau 43.- Couverture câble du réseau 44.- Vis M3*10 45.- Micro sécurité 46.- Support du micro de sécurité 3. DENOMINACIÓN DE LOS COMPONENTES SH-3000 30 29 28 46 45 44 24 23 27 26 25 22 21 20 19 4 10 9 8 18 17 7 6 5 11 12 13 14 15 16 3 2 1 31 32 33 34 35 36 37 38 43 42 39 40 41 E 6 4. INSTALACIÓN ELÉCTRICA SH-7000 / SH-3000 G I E H C F B J D A A.- Enchufe B.- Interruptor C.- Lámpara germicida D.- Masa E.- Motor F.- Fusible G.- Turbina H.- Condensador I.- Resistencia J.- Micro de seguridad E 7 A.- Plug B.- Switch C.- Ultraviolet lamp D.- Mass E.- Motor F.- Fuse G.- Fan H.- Condenser I.- Heating element J.- Security micro A.- Prise B.- Interrupteur C.- UV lampe D.- Masse E.- Moteur F.- Fusible G.- Ventilateur H.- Condensaterur I.- Elément chauffant J.- Micro de sécurité 5. ADVERTENCIAS Lea todas las instrucciones antes de usar la máquina y guárdelas para posteriores consultas. El fabricante declina toda responsabilidad de no respetarse las normas del manual. La presente máquina es una Secadora-Abrillantadora para cubiertos. Esta máquina está destinada sólo para el uso para el cual ha sido fabricada. Otro uso inapropiado sería peligroso. El fabricante no se hace responsable por daños eventuales producidos por un uso inapropiado. Antes de instalar y usar la máquina se debe leer atentamente el presente manual. El fabricante podrá introducir cambios técnicos o estéticos sin previo aviso. 6. INSTALACIÓN La instalación incorrecta puede resultar en deterioro de la máquina. Sírvase observar lo siguiente durante la primera instalación y siempre que reubique la máquina. 1.- DESEMBALAJE - Cortar los flejes exteriores, sacar la caja de cartón tirando hacia arriba y retirar el poliestireno exterior. - Bajar la máquina del palet sobre el que está posicionada para su transporte. INSPECCIONE LA MÁQUINA POR SI HA SUFRIDO DAÑOS EN EL TRANSPORTE O MANEJO INDEBIDO. Presentar una reclamación antes de 24 horas a la empresa de transportes, si fuera necesario. Abrir la tapa superior y extraer del interior los trozos de poliestireno y cartón que se encuentran en los laterales del depósito. Una vez realizadas estas operaciones, proceda a retirar los tres tornillos negros de la parte superior del depósito y extraer la bolsa de serrín colocada dentro del depósito. Volver a colocar los tres tornillos sujentando la pieza transparente superior. ( FIG.0 ) FIG. 0 E 8 2.- EMPLAZAMIENTO - Para asegurar un óptimo funcionamiento, colocar la máquina en un sitio totalmente plano. - Una vez situada la máquina, accionar los frenos de las patas delanteras para evitar cualquier tipo de desplazamiento. Desactivar los frenos cada vez que la máquina vaya a ser desplazada. Sólo para el modelo SH-7000. -No desplazar la máquina cuando esté funcionando. 3.- CONEXIÓN ELÉCTRICA - EVITE TODA PUESTA EN MARCHA ACCIDENTAL. Antes de conectar el aparato, verificar que todos los elementos de la máquina estén bien colocados, de lo contrario podría causar una avería. - COMPRUEBE QUE EL VOLTAJE DE LA RED se corresponde con el de la chapa de identificación de la máquina. - LA INSTALACIÓN DE CONEXIÓN debe poseer protección diferencial y magneto térmica propia; también protegida aguas arriba. - NO PONGA EL APARATO EN FUNCIONAMIENTO SI EL CABLE O ENCHUFE ESTÁN DAÑADOS. - CONECTE EL ENCHUFE a la red (230 V - 220 V - 110 V) Nota: Asegúrese de que la conexión de tierra esté realizada correctamente y de acuerdo con la normativa vigente. 4.- ENCENDIDO Y APAGADO OFF ON off on Compruebe que todos los elementos de la máquina están en su posición correcta y que el enchufe de la máquina está conectado a la red de (230 V - 220 V - 110 V). El interruptor está situado en un lateral derecho de la máquina; para proceder a la puesta en marcha presione el interruptor de tal forma que el círculo quede en la zona que sobresalga. (FIG. 1) Pulse el botón del interruptor, situado en la parte frontal de la máquina, para proceder a la puesta en marcha. (FIG. 1) Para parar la máquina pulse el botón. ( FIG. 1) E 9 7. USO Antes de poner en servicio la máquina siga cuidadosamente estas indicaciones: 1.- LLENADO DE SERRÍN Una vez realizada las operaciones de instalación y conexión eléctrica la máquina está lista para el uso. La máquina funciona con un serrín vegetal, hecho de mazorca de maíz. Vierta el contenido de una de la bolsa de serrín, que estaba alojada en el depósito, por la abertura de alimentación. ( FIG. 2) Pulse el botón de encendido y el serrín comenzará a distribuirse por el interior del depósito. (FIG. 3) CANTIDADES DE SERRÍN MODELO SH-7000 9 Kg para cada cambio. MODELO SH-3000 3,2 Kg para cada cambio. Obligatoriamente el serrín vegetal siempre tiene que estar seco, totalmente limpio sin restos de suciedad y sin ningún microorganismo o elemento patógeno para que la máqina funcione correctamente. Para esterilizarlo debe elevarlo de temperatura, para ello puede introducirlo en un horno. 2.- FUNCIONAMIENTO Una vez realizada la operación del llenado del serrín, la máquina está lista para el uso - Asegúrese que el interruptor principal está en la posición de APAGADO. Conecte el enchufe de la máquina a la red eléctrica. ( FIG. 4) - Asegúrese que la tapa superior está cerrada. - Pulse el interruptor en posición de ENCENDIDO. La máquina comenzará a funcionar de inmediato. - Los cubiertos siempre se deben introducir húmedos en la máquina. La máquina es totalmente ineficaz ante cubiertos secos. ( FIG. 5) E 10 Los cubiertos deben ser introducidos nada más terminar el proceso de lavado; o bien si ha transcurrido un tiempo tras su salida deberán ser humedecidos con agua fría. - Comenzar a introducir los cubiertos por la abertura superior o de alimentación en manojos de . aproximadamente doce unidades para la SH-7000 y de cinco unidades para la SH-3000. Se debe dejar un pequeño intervalo entre un manojo y otro para evitar así cualquier tipo de atasco ( FIG. 6) - Tras comenzar a alimentar la máquina los cubiertos realizarán de forma automática todo el proceso de secado y abrillantado. Una vez finalizado el proceso los cubiertos comenzarán a salir por la abertura frontal o de salida listo para su uso. ( FIG. 7) OBSERVACIÓN Si la máquina ha estado trabajando un largo periodo de tiempo, unas cuatro horas aproximadamente y observa que el serrín tiene un alto grado de humedad, deberá dejar la máquina encendida sin cubiertos durante media hora para que el exceso de humedad sea eliminado. NO FIG. 4 FIG. 5 FIG. 6 E 11 SI FIG. 7 PARA EVITAR CUALQUIER PELIGRO NO ACERQUE LAS MANOS A LA ZONA DE LA LÁMPARA Y LA TURBINA DE AIRE CALIENTE. 8. CAMBIO DEL GRANULADO La vida útil del serrín vegetal es aproximadamente de dos meses con tres horas de trabajo diarias. Esto son datos aproximados, cada cliente podrá ir observando en su aspecto exterior cuando el cambio es necesario. Cuando el serrín requiere ser cambiado, el grosor del granulado ha disminuido, su aspecto exterior es similar a polvo. Cada caja contiene un total de 27 kilos, para el Mod. SH-7000 está dividida en tres bolsas de 9 kilos y para el Mod. SH-3000 un total de 10 kilos, está dividida en tres bolsas de 3,2 kg. El cambio de serrín requiere una única bolsa de 9 kilos para la SH-7000 y de 3,2 kg para la Sh-3000. 1.- Pulse el botón de apagado si la máquina se encuentra encendida y desconecte el enchufe de la clavija de red. 2.- Levante la tapa y verá una pieza transparente de policarbonato sujeta con tres tornillos negros. Desenrosque los tornillos y retire la pieza. 3.- Para retirar el serrín del interior del depósito puede o bien utilizar un recipiente ( jarra, vaso, cubo ) o bien puede extraerlo con la ayuda de un aspirador. 4.- Para un buen mantenimiento de la máquina sería preciso aspirar con cuidado las zonas de la turbina de aire caliente y la lámpara germicida para retirar posibles restos de serrín acumulados. 5.- Tras retirar todo el serrín antiguo proceder a colocar de nuevo la pieza de policarbonato. 6.- Coja una de las bolsas de serrín de 9 kilos ó de 3,2 hilos, según modelo, que contiene la caja y viértela por la abertura de alimentación. Esta operación se realizará con la máquina puesta en marcha para que el serrín se distribuya por todo el depósito. E 12 9. MANTENIMIENTO POR PARTE DEL USUARIO Un cuidado adecuado es esencial para alargar la vida de la máquina. Preocúpese de dedicar algunos minutos para limpiar con regularidad la secadora. Antes de proceder a la limpieza, asegúrese de desconectar el interruptor y desenchufar el cable de alimentación de la toma de corriente. No use disolventes, benceno u otros productos volátiles para limpiar el interior del depósito. Ello podría causar alteraciones en el serrín vegetal. Use un paño húmedo con un poco de jabón neutro y asegúrese de aclarar cualquier resto de jabón que pudiera quedar. Para limpiar el exterior puede utilizar un trapo y un limpia cristales. El limpia cristales nunca debe entrar en contacto con el producto vegetal. Ajustes a realizar por el movimiento vibratorio de la máquina: - Dos veces al año ajuste los tornillos que sirven para sujetar la turbina de aire caliente y la lámpara germicida. Estos quedan a la vista con tan solo levantar la tapa. - Dos veces veces al año suelte y retire la cubierta delantera de acero inoxidable que está sujeta en cada lateral por tres tornillos. Ajuste tanto los cuatro tornillos de los muelles como los tornillos del motor vibrador. - Siga las indicaciones del fabricante a la hora del cambio del serrín. Recuerde que si la máquina trabaja con el serrín muy usado no realizará su trabajo adecuadamente. Ajustes a realizar por el movimiento vibratorio de la máquina: - Dos veces al año ajuste los tornillos que sirven para sujetar la turbina de aire caliente y la lámpara germicida. Estos quedan a la vista con tan solo levantar la tapa. - Dos veces veces al año suelte y retire la cubierta delantera de acero inoxidable que está sujeta en cada lateral por tres tornillos. Ajuste tanto los cuatro tornillos de los muelles como los tornillos del motor vibrador. - Siga las indicaciones del fabricante a la hora del cambio del serrín. Recuerde que si la máquina trabaja con el serrín muy usado no realizará su trabajo adecuadamente. E 13 10. MEDIDAS DE PRECAUCIÓN Siga las instrucciones dadas a continuación para el uso de la presente máquina secadora-abrillantadora de cubiertos: TENGA EN CUENTA EL ENTORNO DE TRABAJO Coloque la secadora sobre una superficie firme y nivelada. No instale la secadora en un lugar húmedo o polvoriento. La máquina no está pensada para trabajar en la intemperie, ni para operar sin iluminación. No exponga la secadora a la lluvia. No utilice la secadora en la proximidad de líquidos o gases inflamables. Mantenga el orden en su campo de trabajo, así evitará posibles accidentes. Preste atención a la hora de trabajar con la máquina y obre con sentido común. NO DEBE SUMERGIR NI ROCIAR CON AGUA LA MÁQUINA. NO INTRODUCIR ANIMALES DENTRO DE LA MÁQUINA. APAGAR LA MÁQUINA DESPUÉS DE TRABAJAR CON ELLA. PARAR 15 MINUTOS CADA 4 HORAS CONTINUADAS DE TRABAJO MANTENGA A LOS NIÑOS A DISTANCIA. La máquina debe ser manipulada por personal cualificado y debidamente formado. Sólo debe ser manejada por personas adultas. No permita que los niños la manejen o jueguen con ella. Tenga especial precaución cuando la máquina esté encendida. EN NINGÚN CASO ACERCAR LAS MANOS O MANIPULAR LAS ZONAS DE LA LÁMPARA GERMICIDA Y LA TURBINA DE AIRE CALIENTE CUANDO LA SECADORA ESTÁ FUNCIONANDO. PROTÉJASE CONTRA LAS DESCARGAS ELÉCTRICAS. Evite el contacto de la máquina con materiales de conducción eléctrica. La máquina siempre ha de estar con un aislamiento de protección en el contacto con otros materiales. LAS OPERACIONES DE REGULACIÓN, REPARACIÓN, CONSERVACIÓN Y LIMPIEZA DE LA MÁQUINA SE EFECTÚAN CON LA MÁQUINA PARADA Y DESCONECTADA DE LA CLAVIJA DE LA RED. En caso de no utilizar la máquina y antes de proceder al mantenimiento o a la sustitución de una pieza, debe desconectarse la máquina de la red. CABLE DE EMPALME PARA EXTERIORES. Al exterior utilice solamente cables de empalme homologados por la CE y convenientemente marcados. LAS REPARACIONES SOLAMENTE LAS PODRÁ REALIZAR UN ESPECIALISTA. Esta máquina eléctrica ha sido fabricada cumplimentando todas las normas de seguridad que exigen los organismos oficiales. Las reparaciones solamente las puede realizar un especialista; En caso contrario se pueden provocar accidentes al usuario. E 14 CONTROLE SI SU APARATO TIENE DETERIOROS. Todos los componentes deben cumplir los requisitos y homologaciones CE para garantizar el perfecto funcionamiento del aparato. Toda pieza, interruptor o cable de alimentación, deteriorados deberá ser cambiada o reparada de modo apropiado por un taller del servicio post-venta o por personal cualificado para evitar cualquier peligro. NO EMPLEE MÁS QUE LOS ACCESORIOS Y LOS DISPOSITIVOS ADAPTABLES MENCIONADOS EN LAS INSTRUCCIONES, O QUE HAYAN SIDO RECOMENDADOS POR EL FABRICANTE DE LA MÁQUINA. La utilización de otros accesorios, excepción hecha de aquellos recomendados en las instrucciones, en el catálogo, o recomendados por el fabricante pueden significar para usted un peligro de accidente. Todos los elementos de seguridad únicamente deben ser sustituidos por otros equivalentes, homologados por la CE y estar siempre en perfecto estado. POR MEDIDAS DE HIGIENE OBSERVE QUE LA LÁMPARA GERMICIADA ESTÉ SIEMPRE EN FUNCIONAMIENTO. E 15 11. SOLUCIONES Y PROBLEMAS Algunos problemas de funcionamiento se deben a causas que pueden ser eliminadas fácilmente sin recurrir al servicio técnico. Para ello sigue las siguientes indicaciones: PROBLEMA La secadora no funciona CAUSA POSIBLE ¿Está la secadora enchufada? Enchufe la secadora a una toma de corriente con tierra. ¿Está conmutado el interruptor? Conmute el interruptor. ¿Funciona la turbina de aire caliente correctamente? Coloque una cuchara cargada de serrín cerca de la salida y compruebe si lo retira para ver si funciona correctamente. Si no lo retira la turbina no funciona. ¿Está alimentando la máquina con un exceso de cubiertos? Salen restos de serrín al exterior ¿Está trabajando con serrín demasiado usado? ¿Está el serrin vegetal demasiado húmedo? ¿Están lavados los cubiertos correctamente? ¿Está alimentando correctamente la máquina? Atascos de cubiertos SOLUCIÓN ¿Ha introducido alguna pieza de menaje demasiado grande? ¿Se ha cruzado alguna pieza obstruyendo el paso a las demás? Un exceso de cubiertos impide que la secadora realice de forma correcta su trabajo. Recuerde que debe alimentar la máquina en puñados de 12 ó 5 cubiertos aproximadamente dejando pequeños intervalos entre ellos. Si el serrin ha perdido su granulado inicial es posible que se adhiera al cubierto. En este caso debe cambiar el serrin. Si observa que el serrin tiene un grado de humedad alto, deje la máquina funcionando sin cubiertos durante media hora para que el exceso de humedad sea eliminado. Si los cubiertos no se han lavado correctamente y queda sobre ellos una ligera capa de grasa. Esta capa es la causante de que salgan restos pegados al cubierto. En este caso deberá lavar correctamente los cubiertos de nuevo. Un exceso de cubiertos impide que la secadora realice de forma correcta su trabajo. Recuerde que debe alimentar la máquina en puñados de 12 ó 5 cubiertos aproximadamente dejando pequeños intervalos entre ellos. Recuerde que la máquina está diseñada para el secado y abrillantado de cubiertos. No aconsejamos introducir piezas de servicio entre ellos. Desconecte la máquina pulsando el botón rojo de parada, levante la tapa con cuidado y retire la pieza que ha producido el atasco. Baje la tapa de nuevo y ya puede volver a utilizarla. E 16 12. ESPECIFICACIONES Tipo Secadora - Abrillantadora de cubiertos Producción MOD. SH-7000 7000 - 8000 cubiertos / hora MOD. SH-3000 3000 cubiertos / hora Tiempo del primer recorrido 150 segundos Alimentación Abertura superior con alimentación manual Consumo eléctrico MOD. SH-7000 850 W MOD. SH-3000 750 W Voltaje 240 V - 230 V - 220 V - 110 V Dimensiones de las secadoras L x An x AL MOD. SH-7000 620 mm x 650 mm x 870 mm MOD. SH-3000 570 mm x 550 mm x 400 mm MOD. SH-7000 82 Kilogramos MOD. SH-3000 48 Kilogramos Peso Condiciones ambientales Temperatura: 10 ºC a 30 ºC Humedad relativa 20% hasta 85% Nivel de emisión acústica El nivel del ruido durante el funcionamiento de las máquinas secadoras-abrillantadoras Mod SH-7000 y Mod SH-3000 están dentro de los límites permitidos por el R.D 1316 / 89 sobre la protección de los trabajadores frente a los riesgos derivados de la exposición al ruido durante el trabajo. + Como parte de nuestra política de constante perfeccionamiento, se reserva el derecho a introducir modificaciones de diseño y características sin previo aviso destinadas a la mejora del producto. Los valores de rendimiento especificados son nominales para unidades de producción. En algunas unidades pueden existir divergencias con estos valores. E 17 13. FICHA DE SEGURIDAD DEL PRODUCTO 1.- IDENTIFICACIÓN Serrín de mazorca de maíz extraido de la parte dura de la mazorca de maíz. 2.- COMPOSICIÓN FORMACIÓN SOBRE INGREDIENTES Celulosa y semicelulosa de la mazorca del maíz. 3.- INDICACIÓN DEL PELIGRO El producto es inerte: No presenta peligro su manipulación pero se incendia a una temperatura de 200ºC. 4.- PRIMEROS AUXILIOS Inexistentes 5.- MEDIDAS DE LUCHAS CONTRA INCENDIOS El punto de ignición es de 200ºC se debe usar agua para extinguir el eventual incendio 6.- MEDIDAS EN CASO DE VERTIDO ACCIDENTAL No crea posiblidad porque es un producto neutro y natural 7.- MANIPULACIÓN Y ALMACENAMIENTO Debe almacenarse en un lugar seco y protegido. El producto puede absorber agua e iniciase un proceso de fermetación. 8.- MANTENIMIENTO Obligatoriamente el serrín vegetal siempre tiene que estar seco, totalmente limpio sin restos de suciedad y sin ningún microorganismo o elemento patógeno para que la máquina funcione correctamente. Para esterilizarlo debe elevarlo de temperatura, para ello puede introducirlo en un horno. 9.- CONTROLES DE EXPOSICIÓN / PROTECCIÓN INDIVIDUAL No presenta ningún peligro para el operador. 10.- PROPIEDADES FÍSICAS QUÍMICAS. Estado físico: Granulado de diversa mesura. Color: Marrón claro. Olor: Neutro 11.- ESTABILIDAD Y REACTIVIDAD El producto es estable en el tiempo. A humedad constante, el producto se conserva por muchos años. 12.- INFORMACIÓN TOXICOLÓGICA No es producto tóxico. 13.- INFORMACIÓN ECOLÓGICA No presenta ningún problema para el ambiente ( se descompone más rapido en contacto con el agua) 14.- CONSIDERACIONES RELATIVAS A LA ELIMINACIÓN Debe ser eliminado en base al producto absorbente ( aceite, producto químico, minerales...etc) 15.- INFORMACIÓN SOBRE EL TRANSPORTE Transporte al cubierto: El produco puede mojarse y y alterara sus propiedades 16.- INFORMACIÓN SOBRE LA REGLAMENTACIÓN Directiva CEE Nº91 / 155 CE E 18 5. WARNING Read the instructions carefully before using the machine and keep them for future references. The manufacturer declines all responsibilities if the standards of the manual are not respected. The present machine is a cutlery dryer and polisher. This machine should be only used for the purpose for which it has been designed. Any other use is inappropriate and therefore dangerous. The manufacturer will not be responsible for any damage caused by inappropriate use. Before installing and using the machine read carefully this instruction manual. The manufacturer will be able to introduce technical or aesthetic changes without previous notice. 6. INSTALLATION Improper installation may damage the dryer machine. Please note the following during initial installation and whenever the dryer machine is moved. 1.- UNPACKING - Cut the external strips, take out the carboard container, pullig up from it and retire the external polistyrene. - Take the machine down from the pallet. This pallet is using for transporting the machine. INSPECT THE MACHINE FOR POSSIBLE DAMAGES IN THE TRANSPORT OR UNDUE HANDLIG. If it was necessary present a reclamation before 24 hours to the transport company. Open the upper cover and take away the wooden piece from the interior, and the polystyrene and cardboard pieces that are in the lateral sides of the deposit. Once carried out these operations, retire the three black screws from the upper deposit and extract the sawdust bag placed inside it. Place again these three black screws holding the superior transparent piece. ( FIG. 0) FIG. 0 EN 19 2.- POSITIONING - To guarantee a good operation, place the machine in a completely plane place. - Once placed the machine, activate the brakes of the front wheels to avoid any displacement. - Disable the brakes every time the machine be moved. Only for SH-7000 Model. -Don't move the machine when it´s working. 3.- ELECTRICAL CONNECTION - AVOID ALL ACCIDENTAL GROUND STARTING. Before connecting the machine, verify that all the elements of the machine are properly placed; otherwise it could cause a breakdown. - CHECK THAT VOLTAGE OF ELECTRIC NETWORK is the same as the one shown in the identification sheet of the machine. - THE CONNETION INSTALLATION should possess differential protection and own thermal magneto, also protected upstream. - DO NOT START THE MACHINE IF THE ELECTRIC CABLE OR PLUG ARE DAMAGED. - CONNECT THE PLUG to the electric network (230 V - 220 V - 110 V) Note: Make sure that the ground connection is propely done and according with the valid standards. 4.- ON AND OFF OFF ON off on Check that all the elements of the machine are in good position and that the machine's plug is connected to the electric network of (230 V - 220 V - 110 V). The switch button is located in the right side of the machine; to switch it on press the button in a way that the circle is in the area that stands out. (FIG. 1) To stop the machine, press the switch in a way that the line is in the area that stands out. (FIG. 1) To stop the machine push the button. ( FIG. 1) EN 20 7. USE Before start working, read carefully these indications: 1.- REFILLING OF GRANULATE The machine works with a vegetable granulate, made from the cob of corn. Pour the granulate bag, through out the opening entry (FIG.2) Push On and the granulate will being to be distributed inside the deposit (FIG.3) AMOUNT OF GRANULATE SH-7000 MODEL 9 Kg, each time SH-3000 MODEL 3,2 Kg, each time The vegetal granulate must be always dry, completely clean and without any rest of dirty, bacteria or micro-organism in order to get the best working. Its temperature must be increased in order to sterilize it; you can get into an oven. 2.- OPERATION Once the granulate filling operation has been carried out, the machine is ready. - Make sure that the master switch is in the OFF position. Connect the plug to the electrical net (FIG .4) - Make sure that the superior cover is closed. - Push the switch On. The machine will begin to work immediately. - The cutlery should always be damp before introducing it into the machine. It´s completely ineffective with dry cutlery. (FIG.5) EN 21 - Cutlery can be introduced immediately after finishing the laundry in the dishwasher; the cutlery must get wet with cold water if some time has passed after its exit. - Introduce the cutlery through the upper opening ( groups of twelve pieces for SH-7000 and five pieces for SH-3000 ).A small interval should be left between a bundle and another to avoid any type of block. ( FIG.6) - After beginning to feed the machine it will carry out automatically the drying and polishing process. Once finished the process, the cutlery will begin to leave for the outlet and be ready to be used. ( FIG.7). If the machine has been working for a long time, four hours more or less and you observe that the sawdust has a high degree of humidity, you will have to leave the machine working without cutlery for half and hour to eliminate the excess of humidity. NO FIG. 4 YES FIG. 5 FIG. 6 EN 22 FIG. 7 TO AVOID ANY DANGER DON'T BRING HANDS NEAR THE LAMP AND HOT AIR TURBINE AREA 8. CHANGE OF THE VEGETAL GRANULATE The useful life of the vegetal granulate is approximately two months with three daily working hours. This is approached data; each customer will be able to check its external aspect and when the sawdust´s change is necessary. The granulate has to be changed when its thickness has diminished; its external aspect is similar to powder, dust. For the SH-7000 the box has 27 kilograms, distributed in three bags of 9 kilograms, and for SH-3000 the box has 10 kilograms; three bags of 3,2 Kg. Each change of sawdust only needs a bag of 9 kilograms for the SH-7000 and a bag of 3,2 kilograms for the SH-3000. 1.- Push the off-button if the machine is working and disconnect the plug from the net peg. 2.- Raise the cover and you will see a transparent polycarbonate piece fixed with three black screws; retire the piece. 3.- To remove the sawdust of the deposit you can use a recipient ( jar, glass, cube ); as well you can extract it with the help of a vacuum cleaner. 4.- For a good maintenance of the machine it would be necessary to aspire the hot air turbine and germicidal lamp areas carefully to retire possible accumulated sawdust remains. 5.- After retiring all old sawdust, put the polycarbonate piece again. 6.- Take a sawdust bag of 9 kilograms or 3,2 kilograms according to the model that it is contained in the box, and pour it for the feed opening. This operation will be carried out with the machine working so that sawdust will be distributed for the whole deposit. EN 23 9. USER MAINTEINANCE A proper care is essential in order to make the machine's life longer. Be sure to take a few minutes to clean the machine regularly. Before cleaning it, be sure to turn the power switch off and remove the power cord from the outlet. Don't use thinner, benzene or other volatile cleaning agents for cleaning inside the machine. Use a damp cloth with a bit of neuter soap and make sure to clarify any rest of soap that could still remain. To clean the exterior you can use a cloth and a wipers liquid. The wipers liquid cannot be in contact with the inside or with the vegetal product. Adjustments to be carried out for the vibratory movement of the machine: Twice a year adjust the screws which hold the hot air turbine and the germicidal lamp. You could see them just elevating the cover. Twice a year loose and retire the stainless steel front cover that is subject in each lateral by three screws. Adjust not only the four screws from the wharves but also the screws of the vibrant motor. Follow the manufacturer indications about the granulate change. Remember that if the machine works with very used sawdust it won´t carry out its work appropriately. 10. CAUTIONS Follow the cautions bellow when using these cutlery polishers: TAKE INTO ACCOUNT THE WORK ENVIRONMENT Place the dryer on a firm, level surface. Do not install the dryer in a humid or dusty location. The machine is not worthy working in the bleakness, nor operating without ilumination. Do not expose the dryer to the rain. Do not use the dryer near liquids or inflammable gases. Maintain the order in your working zone; this will avoid possible accidents. Pay attention when working with the machine and work with common sense. DON'T SUBMERGE OR DEW THE MACHINE WITH WATER. DON'T INTRODUCE ANIMALS INSIDE OF THE MACHINE. SWITCH THE MACHINE OFF AFTER FINISHING THE WORK. STOP 15 MINUTES EVERY 4 CONTINUOS HOURS OF WORKING. MAINTAIN THE CHILDREN AT DISTANCE. The machine should be manipulated by qualified and properly formed staff. The machine must be managed by adults. Don't allow the children to use or play with it. Have special caution when the machine is working. EN 24 NEVER BRING THE HANDS NEAR OR MANIPULATE THE GERMICIDAL LAMP AND THE HOT AIR TURBINE AREAS WHEN THE DRYER IS WORKING. PROTECT YOUSELF AGAINST ELECTRICAL SHOCKS. Avoid the contact of the machine with electric conduction materials.The machine should always have an isolation protection when being in contact with other materials. THE REGULATION, CONSERVATION, REPAIR AND CLEANNING OPERATIONS OF THE MACHINE ARE CARRIED OUT WITH THE MACHINE STOPPED AND DISCONNECTED FROM THE NET. If you haven't been using the machine and before proceeding to the maintenance or the substitution of a piece disconnect it from the net. CONNECTION CABLE FOR EXTERNAL. Only use marked confirmed and meetly jumper leads. THE REPAIRS WILL ONLY BE CARRIED OUT BY AN SPECIALIST. This electric machine has been manufactured executing the rules that official organisms demand. The repairs can only be carried out by an specialist; otherwise accidents can happen. CONTROL IF YOUR MACHINE HAS ANY DETERIORATION. All the components should complete CE requirements and approvals to guarantee the perfect working of the machine. Any deteriorated piece, switch or feeding cable will be changed or repaired by a post-sale service workshop, or by qualified staff to avoid any danger. USE ONLY THE ACCESSORIES AND THE ADAPTIVE UNITS MENTIONED IN THE BRIEFINGS, OR ANY THAT HAVE BEEN RECOMMENDED BY THE MANUFACTURER OF THE MACHINE. The use of other accessories, except those recommended in the briefings, in the catalogue, or recommended by the manufacturer can be dangerous. All the security elements should be substituted only by other equivalents, homologated by the CE, and always be in perfect state. AVOID ANY CONTAMINATION POLLUTION RISK CARRYING OUT AT LEAST TWO DAILY CLEANINGS; CLEAN ALL THE PIECES AND INSIDE PARTS EFFICIENTLY WITH NEUTER SOAP. USE ONLY THE ACCESSORIES AND THE ADAPTIVE UNITS MENTIONED IN THE BRIEFINGS, OR ANY THAT HAVE BEEN RECOMMENDED BY THE MANUFACTURER OF THE MACHINE. The use of other accessories, except those recommended in the briefings, in the catalogue, or recommended by the manufacturer can be dangerous. All the security elements should be substituted only by other equivalents, homologated by the CE, and always be in perfect state. AVOID ANY CONTAMINATION POLLUTION RISK CARRYING OUT AT LEAST TWO DAILY CLEANINGS; CLEAN ALL THE PIECES AND INSIDE PARTS EFFICIENTLY WITH NEUTER SOAP. EN 25 12. SOLUTIONS AND PROBLEMS Some operation problems are due to causes that can be eliminated easily without appealing to the technical service. Pay attention to the following indications: PROBLEMA La secadora no funciona CAUSA POSIBLE ¿Está la secadora enchufada? Enchufe la secadora a una toma de corriente con tierra. ¿Está conmutado el interruptor? Conmute el interruptor. ¿Funciona la turbina de aire caliente correctamente? Coloque una cuchara cargada de serrín cerca de la salida y compruebe si lo retira para ver si funciona correctamente. Si no lo retira la turbina no funciona. ¿Está alimentando la máquina con un exceso de cubiertos? Salen restos de serrín al exterior ¿Está trabajando con serrín demasiado usado? ¿Está el serrin vegetal demasiado húmedo? ¿Están lavados los cubiertos correctamente? ¿Está alimentando correctamente la máquina? Atascos de cubiertos SOLUCIÓN ¿Ha introducido alguna pieza de menaje demasiado grande? ¿Se ha cruzado alguna pieza obstruyendo el paso a las demás? Un exceso de cubiertos impide que la secadora realice de forma correcta su trabajo. Recuerde que debe alimentar la máquina en puñados de 12 ó 5 cubiertos aproximadamente dejando pequeños intervalos entre ellos. Si el serrin ha perdido su granulado inicial es posible que se adhiera al cubierto. En este caso debe cambiar el serrin. Si observa que el serrin tiene un grado de humedad alto, deje la máquina funcionando sin cubiertos durante media hora para que el exceso de humedad sea eliminado. Si los cubiertos no se han lavado correctamente y queda sobre ellos una ligera capa de grasa. Esta capa es la causante de que salgan restos pegados al cubierto. En este caso deberá lavar correctamente los cubiertos de nuevo. Un exceso de cubiertos impide que la secadora realice de forma correcta su trabajo. Recuerde que debe alimentar la máquina en puñados de 12 ó 5 cubiertos aproximadamente dejando pequeños intervalos entre ellos. Recuerde que la máquina está diseñada para el secado y abrillantado de cubiertos. No aconsejamos introducir piezas de servicio entre ellos. Desconecte la máquina pulsando el botón rojo de parada, levante la tapa con cuidado y retire la pieza que ha producido el atasco. Baje la tapa de nuevo y ya puede volver a utilizarla. EN 26 13. SPECIFICATIONS Type Dryer- Polisher machine for cutlery Output MOD. SH-7000 7000 - 8000 cutlery / hour MOD. SH-3000 3000 cutlery / hour First-Course time 150 seconds Feeder Superior opening with manual feeding Power consumptiom 850 W Voltage 240 V - 230 V - 220 V - 110 V Dryer dimensions LxDxH MOD. SH-7000 620 mm x 650 mm x 870 mm MOD. SH-3000 570 mm x 550 mm x 400 mm MOD. SH-7000 82 Kg. MOD. SH-3000 48 Kg. Weight Operating conditions Temperature: 10 ºC to 30 ºC Humidity 20% to 85% Noise level The noise level during the operation of the machines dryer-polisher Mod. SH-7000 nd Mod. SH-3000 is beneath of the allowed limits for the R.D. 1316/89 about the workers protection in front of the derivative risks to the exhibition the noise during the work. Their maximum rateable this in 69,3 dB and the half is equal to 69,3 dB. + As a part of our policy of continuous improvement, reserves the right to make design and specification changes for product improvement without prior notice. The performance specification figures indicated are nominal values of production units. There may be some deviation from these values in individual units. EN 27 14. SECURITY INFORMATION ABOUT PRODUCT 1.- IDENTIFICATION Sawdust of corn ear. It is extracted from the hard part of corn. 2.- COMPOSITION / INFORMATION ABOUT INGREDIENTS Cellulose and hemicelluloses of corn. 3.- INDICATION OF DANGER The product is inert: Its manipulaion doesn't have danger but it catches fire to a temperature higher than 200ºC. 4.- FIRST AIDS No existent. 5.- STEPS AGANIST FIRES The ignition point is 200ºC. You must user water to extinguish a possible fire. 6.- STEPS IN CASE OF ACCIDENTAL POURING There is no possibility because it is a neuter and natural product. 7.- MANIPULATION AND STORAGE It must be stored in a dry and covered placed. The granulate may absorb water and start a fermentation process. 8.- MAINTENANCE The vegetal granulate must be always dry, completely clean and without any rest of dirty, bacteria or micro-organism in order to get the best working. Its temperature must be increased in order to sterilize it; you can get it into an oven. 9.- CONTROL OF EXPOSURE / INDIVUAL PROTECTION Do not present any danger for the operator. 10.- CHEMICAL- PHYSICAL PROPERTIES -Physical state: Granulated of diverse measure. -Colour: Brown ( clear) - Smell: Neutre 11.- STABILITY AND REACTIVITY The product is stable in time. With constant humidity, the product can be storage many years. 12.- TOXICOLOGICAL INFORMATION It's not a toxic product. 13.- ECOLOGICAL INFORMATION It doesn't present any problem for the atmosphere ( the products breaks down quicker in contact with water) 14.- CONSIDERATIONS RELATIVE TO THE ELIMINATION It should be eliminated in bse of the absorbent product ( oils, chemical product, minerals, etc) 15.- INFORMATION ABOUT TRANSPORT Transport to the place setting: the product can be wet and its properties be altered. 16.- INFORMATION ABOUT REGULATION Regulate CEE nº 91 / 155 CEE EN 28 5. AVERTISSEMENTS Lisez attentivement les instructions avant dutiliser la machine et gardez les en cas de besoin postérieur. Le fabricant décline toute responsabilité en cas de respect des normes du manuel. La machine que vous venez dacquérir est une machine sèche couvert. Cette machine est destinée à un seul usage celui pour lequel il a été conçu. Un usage inapproprié serait dangereux. Le fabricant ne sera responsable des incidents produits par un usage inapproprié. Avant dinstaller et dutiliser la machine, il faut lire attentivement le mode demploi. Le fabricant pourra introduire des changements techniques ou esthétiques sans aucun préavis. 6. INSTALLATION Une mauvaise installation peut provoquer la détérioration de la machine. Tenez en compte les instructions du manuel, pour la première installation et si vous devez la changer dendroit. 1) Déballage · Couper les colliers rilsan extérieurs, enlever le carton en tirant vers le haut et retirer le polystyrène extérieur. · Descendre la machine du palet sur lequel elle a été positionnée durant le transport. INSPECTER LA MACHINE AU CAS OU ELLE AURAIT REÇU UN COUP DANS LE TRANSPORT OU UNE MAUVAISE MANIPULATION. Vous devrez présenter une réclamation avant 24 heures, auprès de lentreprise de transports, au cas ou cela serait nécessaire. · Ouvrir le couvercle supérieur et extraire de lintérieur les morceaux de polystyrènes et cartons qui se trouvent sur le coté du réservoir. · Une fois ses opérations réalisées, retirez les trois vis noirs de la partie supérieure du réservoir et extraire le sac de sciure végétale de lintérieur du réservoir. Remonter les trois vis à leur place en soutenant la pièce transparente supérieure. FIG. 0 F 29 2) EMPLACEMENT . Pour assurer un fonctionnement optimum, vous devez positionner la machine sur une surface plane. . Une fois la machine en position, activer les freins des pattes avant pour éviter tout type de déplacements. Désactiver les freins chaque fois que la machine doit être déplacé. Seulement pour le modèle SH-7000. . Ne pas déplacer la machine quand elle est en fonctionnement. 3) CONNEXION ELECTRIQUE . EVITER TOUTE MISE EN ROUTE ACCIDENTELLE. Avant de brancher lappareil vérifier que tous les éléments de la machine sont biens à leur place, le cas échéant il pourrait se provoquer un incident. . ASSUREZ VOUS QUE LE VOLTAGE DE LINSTALLATION correspond avec celui de la plaque didentification de la machine. . LINSTALLATION POUR LA CONNECTION, devra posséder une protection de différentiel et un magneto thermique. . NE PAS METTRE EN ROUTE LA MACHINE SI LE CABLE ET LA PRISE SONT ENDOMMAGÉS. . BRANCHER LA PRISE au réseau ( 230V- 110V) Nbê: assurez vous que la connexion à la terre soit réalisés correctement et accord avec la norme en vigueur. 4) ALLUMER / ÉTEINDRE OFF ON off on · Vérifier que tous les éléments de la machine soient positionnés correctement et que la prise de la machine soit branché au réseau (230V-220V-110V) · Linterrupteur est situé sur le coté gauche de la machine, pour procéder à la mise en marche appuyez sur linterrupteur de telle façon que le cercle soit sur la partie qui ressort. · Appuyer sur le bouton de linterrupteur situé sur la partie frontale de la machine, pour procéder à la mise en route. (fig1) · Pour arrêter la machine appuyer sur le bouton (fig 1) F 30 7. UTILISATION Avant de mettre en service la machine suivant attentivement ses indications. 1) REMPLISSAGE DE LA SCIURE VEGETALE Une fois réalisée les opérations dinstallations et connexions électriques, la machine sera prête pour son utilisation. · La machine fonctionne avec une sciure végétale, faite à base dépis de maïs. · Verser le contenu du sac, qui se trouvait dans le réservoir, par louverture dalimentation.(fig2) · Appuyer sur le bouton allumé, et la sciure commencera à se distribuer a lintérieur du réservoir.(fig3) Quantité de sciure végétale Modèle SH-7000 = 9 KG pour chaque recharge Modèle SH-3000 = 3.2 KG pour chaque recharge Le végétal granule doit être toujours sec, complètement prope et sans tout reste de sale, bactéries ou micro-organisme pour obtenir le meilleur fonctionnement. Sa température doit être augmentée pour le stériliser; vous le mettre dans un four. 1) FONCTIONNEMENT Une fois réalisée lopération de remplissage de la sciure, la machine est prête à travailler. . Assurez vous que linterrupteur est bien en position Eteinte. Brancher la prise de la machine au réseau électrique (fig4) . Assurez vous que le couvercle supérieur soit fermé . Appuyer sur linterrupteur en position MARCHE. La machine commencera à fonctionner immédiatement. . Les couverts doivent toujours être introduits humides dans la machine. La machine est totalement inefficace face aux couverts déjà secs.( fig5) F 31 . Les couverts doivent être introduits juste après leur lavageÊ; ou bien sils ont séchés , il faudra les humidifier avec de leau froide. . Commencer à introduire par louverture supérieure ou entrée des couverts par poignées dapproximativement 12 couverts pour la SH 7000 et de cinq unités pour la SH3000. il faudra laisser un petit intervalle de temps entre chaque poignées pour éviter tous types dobstruction. . Après avoir alimenté la machine, les couverts réaliseront de forme automatique tout le processus de séchage et brillant. Une fois terminé le processus, les couverts commencent à sortir par louverture frontale ou sortie des couverts, prêt à lemploi. (fig7) OBSERVATION Si la machine à travailler pendant une longue durée, environ 4 heures successivement, et vous remarquez que la sciure à un haut degré dhumidité, vous devrez laisser la machine en fonctionnement sans couverts pendant une demi heure pour éliminer lexcès dhumidité. NO FIG. 4 OUI FIG. 5 FIG. 6 F 32 FIG. 7 POUR ÉVITER TOUS RISQUES D'ACCIDENT N'APPROCHEZ PAS VOUS MAINS PROCHE DE LA ZONE DE LAMPE ET DE LA TURBINE D'AIR CHAUD 8. CHANGER LA SCIURE VEGETAL La vie utile de la sciure végétale est approximativement de deux mois avec environ trois heures de travail journalier. Ce sont des données approximatives, car chaque client pourra observer son aspect et juger quand le changement est nécessaire. Quand la sciure à besoin dêtre changé, la grosseur du granulé a diminué, son aspect devient similaire à la poussière. Chaque carton contient un total de 27 kg de sciure pour le modèle SH 7000, divisé en 3 sacs de 9 kilos, et pour le modèle SH 3000 un total de 10 kilos, étant divisé en 3 sacs de 3.2 kilos. Le changement de sciure ne se fait quavec un seul sac de 9 kg pour la SH-7000 et de 3.2 kg pour la SH-3000. 1. Appuyer sur le bouton darrêt si la machine est en marche et débrancher la prise du réseau. 2. relever le couvercle, vous verrez une pièce transparente de polycarbonate soutenue par des vis noirs. Dévisser les vis et enlever la pièce. 3. Pour enlever la sciure de lintérieur du réservoir vous pouvez utiliser un récipient (carafe, verres, seaux, ) ou bien lextraire à laide dun aspirateur. 4.Pour un bon entretien de la machine il est conseillé daspirer avec grand soin la zone de la turbine dair chaud et de la lampe germicide pour retirer les possibles restes de particules. 5. Après avoir enlevé toute la sciure usée, remonter à nouveau la pièce de polycarbonate. 6. Prenez un des sacs de granulé de 9 kg ou de 3.2 kg, en fonction du modèle que contient le carton et versez le par la bouche dalimentation situé sur le dessus de la machine. Cette dernière opération sera réalisée avec la machine en marche afin de que la sciure se répartisse pour tout le réservoir. F 33 9. ENTRETIEN DE LA PART L'UTILISATEUR Une attention particulière est essentielle pour prolonger la durée de vie de la machine. Préoccupez vous de consacrer quelques minutes pour la nettoyer régulièrement. Avant de la nettoyer, assurez vous déteindre la machine et de débrancher le câble dalimentation. Nutiliser pas de dissolvants, benzènes, ou autres types de produits de nettoyage pour nettoyer le réservoir. Ils pourraient provoquer laltération de la sciure végétale. Utiliser un chiffon humide avec un peu de savon neutre, et assurez vous de bien rincer et ne laisser aucun reste de savons. Pour nettoyer lextérieur vous pouvez utiliser un chiffon humide et du produit pour les vitres. Le produit pour nettoyer les vitres ne devra jamais rentrer en contact avec la sciure végétale. Réglages á réaliser pour le mouvement vibratoire de la machine: - Deux fois par ans resserrer les vis qui servent à soutenir la turbine dair chaud et la lampe germicide: Ces derniers sont bien en vue après avoir relevé le couvercle. - Deux fois par ans retirer le cash de devant en inox, qui est soutenu par 3 vis de chaque côtés. Resserrez les 4 vis des ressorts tout comme ceux du moteur vibrateur. - Suivez les indications du fabricant au moment de changer la sciure. Noubliez pas que si la machine travaille avec de la sciure top usée la machine ne pourra pas réaliser son travail correctement. 10. MOYENS DE PRECAUTIONS Suivez les instructions données par la suite pour lusage de la présente machine qui fait sécher et briller les couverts: TENEZ COMPTE DE SON ENVIRONNEMENT DE TRAVAIL · · · · · · · Installer la sécheuse sur une superficie ferme et nivelée Ninstaller pas la machine dans un lieu humide ou poussiéreux. La machine na pas été conçue pour travailler à lintempérie, ni sans électricité. Nexposé pas la machine à la pluie. Nutiliser pas la machine à proximité de liquides ou gaz inflammables. Maintenez en ordre son champ de travail, pour éviter de possibles accidents. Soyez attentif lors de lutilisation de la machine et travaillez avec bon sens. NE PAS SUBMERGER NI VAPORISER LA MACHINE AVEC DE LEAU. NE PAS INTRODUIRES DANIMAUX DANS LA MACHINE. ETEINDRE LA AMCHINE APRES LAVOIR UTILISÉE. ETEINDRE LA MACHINE 15 MINUTES APRÈS 4 HEURES DE TRAVAIL CONSÉCUTIFS MAINTENIR LES ENFANTS Á DISTANCE, la machine doit être faite par des personnes qualifiées, formées au paravant. Elle devra seulement être manipulé par des personnes adultes. Ne laissez pas des enfants la manipuler ou jouer avec. Soyez prudent lorsque la machine est en marche F 34 LORS DE SON FONCTIONNEMENT NAPPROCHEZ PAS VOS MAINS , OU NE MANIPULEZ PAS LES ZONES DE LA LAMPE GERMICIDE ET DE LA TURBINE DAIR CHAUD. PROTEGEZ VOUS CONTRE LES DECHARGES ELECTRIQUES. Eviter le contact de la machine avec des matériaux de conduction électrique. La machine doit toujours être isolée pour la protéger du contact avec dautres matériaux. LES OPERATIONS DE REGLAGE, REPARATION, CONSERVATION, ET NETTOYAGE DE LA MACHINE DEVRONT SE FAIRE AVEC LA MACHINE ARRÉTÉE, ET LA PRISE DEBRANCHÉE. Au cas ou vous nutilisez pas la machine, avant de procéder à lentretien ou la substitution dune des pièces, débranchez la prise. CABLE POUR RALONGER POUR LEXTERIEUR,. A lextérieur, utilisez seulement des cables homologués par la CE et correctement marqués pour rallonger. LES REPARATIONS DEVRONT ETRE FAITES PAR UN SPECIALISTE. Cette machine électrique a été conçue pour remplir les conditions des normes de sécurité qui existe dans les organismes officiels. Les réparations peuvent seulement être réalisé par un spécialisteÊ; dans le cas contraire il pourrait se provoquer des accidents. F 35 11. PROBLÈMES ET SOLUTIONS PROBLÈMES La machine ne fonctionne pas CAUSÉ PAR La machine est elle bien branché? SOLUTION Brancher la machine sèche couverts à une prise de courant connecté à la terre. Avez-vous appuyez sur linterrupteur? Appuyez sur linterrupteur? La turbine dair chaud fonctionne telle correctement? Mettre une cuillère à café Remplie de sciure à la sortie, vérifier si elle laspire, elle fonctionne correctement. Le cas échéant elle ne fonctionne pas. La machine est elle alimentée avec un excès de couverts? La sciure sort à lextérieur de la machine. La sciure est elle trop usée? La sciure est elle trop humide? Les couverts sont ils lavés correctement? La machine est elle alimentée correctement? Un exces de couverts ne permet pas à la machine de réaliser correctement son travail. Noubliez pas que vous devez alimenter la machine par poignées de 2 à 5 couverts, en laissant un intervalle entre chaque poignés. Si la sciure à perdu son granulé initial, il est possible quil saccroche aux couverts. Il faut donc la changer. Si vous trouvez que la sciure a un haut degrés dhumidité, laissez la machine en marche sans couverts pendant une demi heure pour que lexcès dhumidité soit éliminé. Si les couverts nont pas été lavés correctement, et sont recouverts dune légère couche de graisse. Cette graisse sera la cause des couverts avec des traces. Dans ce cas vous devrez relaver les couverts Un excès de couverts peut provoquer le mauvais fonctionnement de la machine. Noubliez pas que vous devez mettre de 12 à 5 couverts, approximativement avec un court intervalle de temps. Encombrement des couverts Avez-vous introduit un ustensile ménager trop grand? Une pièce sest croisée, empêche telle la sortie des autres? Noubliez pas que la machine est conçue pour sécher et faire briller les couverts. Nous vous déconseillons dintroduire les pièces du service entre autres. Arrêter la machine en appuyant sur le bouton darrêt rouge, lever le couvercle délicatement et retirer la pièce qui bloque a sortie. Baisser a nouveau le couvercle et remettre en marche F 36 12. SPECIFICATIONS Type Machine seche couvert ( polisseuse ) Production MOD. SH-7000 7000 - 8000 couverts/heure MOD. SH-3000 3000 couverts/heure Temps du parcours 1min 50 s Alimentation Ouverture supérieure avec alimentation manuelle Consommation électrique MOD. SH-7000 850 W MOD. SH-3000 750 W Voltage 240 V - 230 V - 220 V - 110 V Dimensions de la machine hauter LxPxH MOD. SH-7000 620 mm x 650 mm x 870 mm MOD. SH-3000 570 mm x 550 mm x 400 mm MOD. SH-7000 82 Kg MOD. SH-3000 48 Kg Poids Conditions environnementales 10 ºC a 30 ºC Humedité relative 20% hasta 85% Niveau d'émissions acoustiques Le niveau du bruit pendant le fonctionnement de la machine qui fait sécher et briller les couverts modèle sh 7000, modèle sh 3000 est inférieur à 80 db, étant dans la limite permise par le R.D 1316/89 sur la protection des travailleurs face aux risques dérivés à lexposition dans leur travail. Dû à notre politique de perfectionnement constant, FRUCOSOL, se réserve le droit de modifier la conception et les caractéristiques sans aucun préavis, afin daméliorer le produit. Les valeurs de rendements quant à elles sont nominales par unité de production. Dans certaines unités il peut y avoir une divergence avec ces valeurs F 37 13. FICHE DE SECURITÉ DU PRODUIT 1.- INDENTIFICATION Sciure à base d'épis de maïs extrait de la partie dure de l'épi. 2.- COMPOSITION / FORMATION A PROPS DES INGREDIENTS Cellulose et semi cellulose d'épi de maïs. 3.- SIGNALISATION DE DANGER Le produit est inerte: sa manipulacion ne présent aucun danger, mais il prend feu à une température de 200ºC. 4.-PREMIERS SECOURS Inexistants. 5.- PAS CONTRE FEUX Le point de l'ingnition est 200ºC. Vous devez utiliser de l'eau pour éteindre un feu possible. 6.- PRECAUTIONS EN CAS VERSEMENT ACCIDENDEL Aucune préoccupation car le produit est neutre et naturel. 7.- MANIPULATION ET STOCKAGE Il doit être entreposé dans un placé sec et couvert. Le granulez peut absorber de l'eau er commencer un processus de fermentation 8.- ENTRETIEN Le végétal granule doit être toujours sec, complèment prope et sans tout reste de sale, bactéries ou micro-organisme por obtenir le meilleur fonctionnement. Sa temperature doit être augmentée pour le stériliser; vous pouvez le mettre dans un four. 9.- CONTRÔLE D'EXPOSISITON / PROTECTION INDIVIDUELLE Ne présent aucun danger pour l'opérateur. 10.- PROPRIÉTES PHYSIQUE / CHIMIQUES -État physique: Granulé de plusieurs diamètres. -Couleur: Marron clair. - Odeur: Neutre. 11.- ESTABILITÉ ET RÉACTIVITÉ - Le produit est stablw dans le temps - Á humidité constante le produit se conserve pendant plusieurs années. 12.- INFORMATION TOXICOLOGIQUE Ce n'est pas un produit toxique 13.- INFORMATION ÉCOLOGIQUE Il ne présent aucun problème pour l'environnement ( il se décompose plus vite avec le contact de l'eau ) 14.-CONSIDERATION RELATIVES A L'ELIMINATION Les produits absorbants doivent être élimines ( huile, produit chimique, minéraux...) 15.- INFORMATION SUR LE TRANSPORT Le moyen de transport doit être couvert, le produit pourrait se mouiller et altérer ses. 16.- INFORMATION SUR LA REGLAMENTATION Directive CEE Nº91 /155 CE F 38 14. RECUPERACIÓN Y RECICLAJE Tras finalizar el periodo de explotación, los dispositivos viejos hay que enviarlos para su recuperación conforme a los reglamentos vigentes de cada pais. Recomendamos contactar con una empresa especializada en dicha rama o con eldepartamento de asuntos de recuperación de desechos. Frucosol posee su propio sistema individual de gestión de residuos que ese extiende a todo el ámbio Nacional ( España) .Frucosol se encargará de recoger en cualquier punto del territorio español la recogida de cualquier aparato fabricado por nosotros sin coste alguno para el cliente y será llevado a las instalaciones de Pol. Tejerias Norte C/ Los Huertos Nº26 de Calahorra ( La Rioja) ¡ ATENCIÓN¡ Para evitar eventuales abusos, y sus riegos de peligro, antes de enviar el dispositovo para su recuperación, asegúrese de que ya no funciona. ¡INDICACIÓN¡ Durante la recuperación del dispositivo, siga al pie de la letra las leyes establecidas o regionales. 14. RECOVERY AND RECYCLING At the end of its working life, old devices have to be sent back for recovery following each country rules. We recommend you to contact with any specialized company in this task or with the waste recoery matters department. Frucosol has its own individual system of waste management that covers all the National Territory ( Spain). Frucosol will take back any equipment manufactured by us within the Spanish territory without any cost for the customer and will be sent to the warehouse of Pol. Tejerias C/ Los Huertos Nº26 in Calahorra ( La Rioja) ¡ ATTENTION¡ In order to avoid some abuse and possible dangers, be sure the device doesn't work before sending it. ¡INDICATION¡ Follow carefully the national or regional rules during the recovery of the device. 14. RÉCUPERATION ET RECYCLING À la fin de sa vie du fonctionnement, les vieux appareils doivent être envoyé arrière pour récupération qui suit les règles de pays. Nous vous recommandons pour contacter avec toute compagnie spécialisée dans cette tâche ou avec le département de la récupération du gaspillage. Frucosol a son propre système individuel de gestion des déchets qui couvre tout le Territoire National (Espagne). Frucosol reprendra tout matériel fabriqué par nous dans le territoire espagnol sans tout coût pour le client et sera envoyé à l'entrepôt de Pol. Tejerías C /. Los Huertos Nº26 dans Calahorra (La Rioja). ATTENTION! Pour éviter quelque abus et dangers possibles, soyez sûr l'appareil ne travaille pas avant de l'envoyer. INDICATION! Suivez avec soin les règles nationales ou régionales pendant la récupération de l'appareil. F 39 15. INSTRUCCIONES PARA EL TRANSPORTE Siga el método siguiente para el transporte de la secadora: 1.- Desconmute el interruptor y desenchufe el cable de red. 2.- Retire el serrín vegetal del interior del depósito. Introduzca todo el serrín en la bolsa. Colóquelo en el interior del depósito. 3.- Coloque un taco de madera encajándolo en el chasis. 4.- Coloque en todos los laterales que quedan entre el depósito y el chasis trozos de poliestireno. 5.- Forre el exterior de la máquina con planchas de poliestireno e introdízcala en la caja. SIGA TODAS LAS MEDIDAS INDICADAS PARA EVITAR DAÑOS EN EL TRANSPORTE. 15. MOVING INSTRUCTIONS When moving this polisher, follow the produce below. 1.- Turn the power switch off and disconnect the power cord. 2.- Take the granulate out from the deposit. Take it into a bag, and place it inside the deposit. 3.- Put a wooden piece to fix the deposit. 4.- Put polystirene pieces in all sides between the deposit and the body of the machine. 5.- Cover the external side with polystirene pieces and get it in to the box. FOLLOW ALL RULES TO PREVENT SHIPPING DAMAGE. 15. INSTRUCTIONS POUR LE TRANPORT Suivez la méthode suivante pour le transport de la machine sèche couverts 1.- Appuyer sur linterrupteur, laissez le en position éteinte et débrancher la prise du réseau. 2.- Protéger les rouleaux avec leur sac correspondant. 3.-Envelopper lextérieur de la machine avec des morceaux de polystyrène et mettez la dans un carton. 4.- Mette en morceaux polystyrêne tous les côtés entre le dêpôt et le corps de la machine. 5.- Couvrir le côte des morceaux polystyrène et obtenir dans la boîte. SUIVEZ POUTES LES INDICATIONS POUR ÉVITER DES DOMMAGES LORS DU TRANSPORT F 40 16. DECLARACIÓN 'CE' DE CONFORMIDAD FRUCOSOL Polígono Industrial Tejerías Norte C/ Los Huertos Nº26. 26500 CALAHORRA (La Rioja) ESPAÑA DECLARA QUE EL DISEÑO Y FABRICACIÓN DE LA MÁQUINA: Máquina.................................MÁQUINA SECADORA DE CUBIERTOS Modelo:................................................................SH-3000/ SH-7000 Fabricante:........................................................................FRUCOSOL ES CONFORME A LAS DISPOSICIONES DE: - La Directiva sobre Máquinas: 89 / 392 / CEE. - Las modificaciones a la Directiva: 91 / 368 / CEE, 93 / 68 / CEE -Directiva de bajo voltaje 2006/95/CE -Directiva CEM 2004/108/CE La conformidad con la norma requiere la correcta instalación del producto y el cumplimiento de las indicaciones de instalación y la documentación del producto. La conformidad se ha comprobado con configuraciones específicas. Deben tenerse en cuenta las instrucciones de seguridad del manual. NORMAS DE REFERENCIA: - Norma UNE-EN 292, de Abril de 1993, Seguridad de las Máquinas, conceptos básicos, principios generales para el diseño. Parte 1: Terminología básica, metodología. - Norma UNE-EN 292-2, de Abril de 1993, Seguridad de las Máquinas. Conceptos básicos, principios generales para el diseño. Parte 2: Requisitos generales. - Norma UNE-EN 292-2 /A1, Seguridad de las Máquinas. Conceptos básicos, principios generales para el diseño. Parte 2: Requisitos generales. - Equipo Eléctrico de máquinas UNE 60204. - Norma UNE-EN 1050, Seguridad de las Máquinas. Evaluación del riesgo. - Norma UNE-EN - 1088: 1996. Seguridad de las máquinas. Dispositivos de enclavamiento asociados a resguardos. - Norma UNE-EN 1672. Maquinaria para el procesado de alimentos. Conceptos básicos. Requisitos de higiene. 16. CONFORMITY DECLARATION 'CE' FRUCOSOL Polígono Industrial Tejerías Norte C/ Los Huertos Nº26. 26500 CALAHORRA (La Rioja) ESPAÑA DECLARES THAT DESIGN AND MANUFACTURE OF MACHINE: Machine ...................Cutlery Polishers Model:.......................SH-3000 / SH-7000 Maker: ..............................................................................FRUCOSOL IT IS ACCORDING TO THE DISPOSITIONS OF: - Directive about machine: 89 / 392 / CEE. - Modifications to the Directive: 91 / 368 / CEE, 93 / 68 / CEE -Low Voltage Directive 2006/95/EC -EMC Directive 2004/108/EC Compliance of the directive requires the correct installlation of the product, the observance of specific installation notes and product documentation. This was tested on specific system configurations. The safety instructions of the manual are to be considered. REFERENCE STANDARDSES: -Norme UNE-EN 292, April of 1993, '' Security of machine, basic concepts, general principles for the desing'' Part 1: Basic terminology, methodology'' -Norme UNE-EN 292-2, April of 1993, ''Security of machine, basic concepts, general principles for the desing'' Part 2: General requierementses'' - Norme UNE-EN 292-2/ A1, ''Security of machine, basic concepts, general principles for the design'' Part 2: General requirementses'' - Electric equipment of machine UNW 60204. - Norme UNE-EN 1050, ''Security of machine.Evaluation of risk'' -Norme UNE-EN 1088: 1996. ''Security of machine.Devices of location associated to receipts'' -Norme UNE-EN 1672.''Machines for the transform of food. Basic concepts. Requirementses of hygiene'' F 41 16. DECLARATION 'CE' DE CONFORMITÉ FRUCOSOL, DÉCLARE QUE LA CONCEPTION ET LA FABRICATION DE LA MACHINE: Machine: .............ESSEYEUR À COUVERTS Modèle:............... SH-3000/SH-7000 Fabricant: ............FRUCOSOL EST CONFORME AUX DISPOSITIONS ÊSUIVANTES : - De la directive à propos des machines. 89/392/CE - Des modifications de la directiveÊ:91/368/CEE, 93/68 CEE - Directive de Voltage bas 2006/95/CE - EMC Directive 2004/108/EC L'acquiescement de la directive exige l'installaction correcte du produit, l'observation d'installation spécofique note, et documentation du produit. Cela a été testé sur les configurations du système spécifiques.Les directives de la sécuritçé du manuel seront considérées. NORMES DE RÉFÉRENCESÊ: - norme UNE-EN 292, davril 1993, sécurité des machines, concepts basiques, principes généraux pour la conception. Partiê1: terminologie basique, méthodologie. - norme UNE-EN 292, davril 1993, sécurité des machines, concepts basiques, principes généraux pour la conception. Partiê2. conditions générales. - Equipement électrique des machines UNE 60204 - Normes UNE-EN 1050, sécurité des machines et évaluation des risques - Normes UNE-EN 1088 sécurité des machines, dispositifs denclaves associés a la protection. - Normes UNE-EN 1672. machine pour le processus alimentaire, concepts basiques, conditions dhygiène. F 42 GARANTÍA Este producto está garantizado por Frucosol durante una año a partir de la fecha de su factura. Esta garantía cubre la reparación o sustitución de las piezas, materiales o equipos defectuosos de fabricación. ( Los gastos de transporte que se pueden originar para cubrir esta garantía quedan excluidos y serán por cuenta del cliente) Frucosol repara o sustituirá el producto o las piezas defectuosas en las condiciones que se especifican a continuación y sin ningún cargo por mano de obra o piezas. Frucosol se reserva el derecho ( a su exclusiva discreción) de reemplazar componentes de productos bajo coste de otros nuevos o reciclados, de acuerdo con lo establecido en las leyes nacionales de cada país. CONDICIONES: 1.- Esta garantía tendrá validez solamente cuando se presente con la factura original o recibo de venta, modelo y el nombre del distribuidor) junto con el producto defectuoso. Frucosol se reserva el derecho a no ofrecer el servicio de garantía si no se presentan los documentos indicados o si la información que los mismos contienen es incompleta o ilegible. 2.- Esta garantía no será de aplicación si el número de serie del producto ha sido alterado, borrado, desaparecido o resulta ilegible. 3.- La sustitución de las piezas, materiales o equipos defectuosos, no implica prorroga de la garantía. 4.- Quedan excluidas de esta garantía las averías o deterioros, debidos a la utilización de los productos para fines distintos a los que le son propios, o no hayan sido instalados de acuerdo con las instrucciones de instalación y utilización. 5.- Quedan excluidas de esta garantía, las piezas, materiales o equipos de hayan sido manipulados por personal no autorizado por Frucosol. También quedan excluidos aquellos equipos que no posean las piezas originales de Frucosol. 6.- Nuestros almacenes no admiten devolución de mercancía sin previa autorización de entrada. En cualquier caso se cargará una depreciación en concepto de revisión y chequeo. 7.- Esta garantía no cubre ninguno de los supuestos siguientes: A.- Mantenimiento periódico y reparación o sustitución de piezas derivado del uso y desgaste normales. B.- Adaptaciones o cambios para ampliar el producto, alterando las características que se describen en el manual de instrucciones, sin consentimiento previo y por escrito de Frucosol. C.- Daños derivados de: - Reparaciones efectuadas por el personal no autorizado o por el propio cliente. - Accidentes, golpes, caídas, rayos, agua, ventilación inadecuada o cualquier causa que se quede fuera del control de Frucosol. - Defectos del sistema al que se incorpore el producto. 8.- Excluimos de esta garantía reconocimiento de indemnización por eventuales daños directos a cualquier persona o cosa. WARRANTY This Frucosol product has a warranty of one year from the purchase date of the invoice. This warranty covers the reparairing or replacement of the faulky spare parts, materials or equipment. The shipping costs involved in these services are not covered by the warranty and must be paid by the customer. Frucosol will repair or replace the product or faulty spare parts under the following conditions and free of spare parts or labour costs. Frucosol will have the right to replace low cost spare parts pieces by a new ones according with the national laws of each country. CONDITIONS: 1.- This warranty will be only valid together the original invoice or ticket ( with the date, model and name of distributor) and the faulty product. Frucosol will have the right of not offering the warranty service if these documents are not presented or if the information o it cannot be properly read or understood. 2.- This warranty won't be valid if the serial number of the product has been changed, deleted, erased or cannot be read. 3.- The replacement of the faulty spare parts, pieces or equipment doesn't mean an increase in the warranty period. 4.- The breakdowns and faulty spare parts, pieces or equipment doesn't mean an increase in the warranty period. 5.- Those pieces that have been handle by people not belonging to Frucosol won't be covered by the warranty. Those machines that do not have original Frucosol spare parts will be excluded. 6.- Our warehouse won't allow devolutions without an entry authority. In any case, a small depreciation will be charged as checking. 7.- This warranty doesn't cover the following situations: A.- Periodical maintenance and repairing or replacement of spare parts caused by the normal use. B.- Adaptations or changes to improve the product, changing the characteristics detailed on the manual of instructions without having informed Frucosol. C.- Breakdowns caused by: - Repairings carried out by no authorized staff by the customer. - Accidents,blows, rays, water, fire, inappropiate ventilations or any other external cause out of Frucosol control. - Lacks of the systems where the product is installed. 8.- We exclude from this warranty any compensation for possible direct or indirect to any damages to any person or thing. GARANTIE Ce produit est garanti par Frucosol pendant un an à partir de la date de facturation. Cette garantie couvre la réparation ou le remplacement des pièces, des matériaux ou des équipements de fabrication défectueuse. (Les frais de transport peuvent survenir pour répondre à cette garantie sont exclus et sont payables par le client). Frucosol s'engage à réparer ou changer du produit ou toute pièce défectueuse dans les conditions précisées ci-dessous, et sans frais pour la main-d'uvre ou des pièces. Frucosol se réserve le droit (à sa seule discrétion) pour remplacer les composants du produit à faible coût des nouveaux ou recyclés, conformément aux dispositions de la législation nationale de chaque pays. CONDITIONS: 1.- Cette garantie est valable uniquement lorsqu'il est présenté avec la facture originale ou le reçu de vente, le modèle et le nom du fournisseur ainsi que le produit défectueux. Frucosol réserve le droit de refuser tout service de garantie si les documents ne sont pas inscrites ou si les informations contenues sont incomplètes ou illisibles. 2.- Cette garantie ne s'applique pas si le numéro de série du produit a été modifié, effacé, enlevé ou rendu illisible. 3.- Le remplacement de pièces, de matériaux défectueux ou de l'équipement n'implique pas l'extension de garantie. 4.- Sont exclus de cette garantie les pannes ou des dommages, en raison de l'utilisation de produits à des fins autres que celles de son propre, ou n'ont pas été installé conformément aux instructions d'installation et d'utilisation. 5.- Sont exclus de cette garantie, les pièces, les matériaux ou de l'équipement qui a été modifié par des personnes non autorisées par Frucosol. Sont également exclus les équipes qui n'ont pas des pièces d'origine de Frucosol. 6.- Nos entrepôts ne supportent pas de retour de marchandise sans autorisation d'entrée. Dans tous les cas, une charge de dépréciation en ce qui concerne de l'examen et vérifier. 7.- Cette garantie ne couvre pas les cas suivants: A.- L'entretien périodique et la réparation ou le remplacement des pièces en raison de l'usure normale. B.- Les modifications ou changements visant à accroître le produit, en modifiant les caractéristiques décrites dans le manuel d'instruction, sans le consentement écrit préalable de Frucosol. C.- Les dommages résultant de: - Les réparations effectuées par du personnel non autorisé ou par le client. - Les accidents, les chocs ou les chutes, la foudre, l'eau, ventilation insuffisante ou toute autre cause qui échappe au contrôle de Frucosol. - Les défauts du système à laquelle le produit est incorporé. 8.- Sont exclus de cette garantie, la reconnaissance de la compensation pour tout préjudice direct à toute personne ou chose. frucosol Pol. Ind.Tejerías Norte C/Los Huertos 26 26500. Calahorra.Spain. Tel.0034 941147653 Fax.0034 941148519 www.frucosol.com [email protected]