1
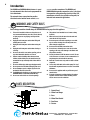
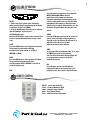
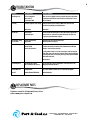
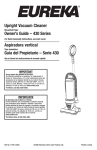
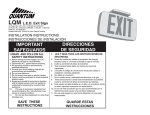
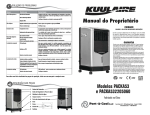
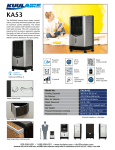
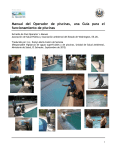
1 Owner’s Manual CAUTION SAVE AND READ THESE IMPORTANT INSTRUCTIONS Read all instructions carefully before setting up and operating this unit. This manual was designed to provide you with important information needed to setup, operate, maintain, and trouble-shoot your cooler. Failure to follow these instructions may damage and/or impair its operation and void the warranty. Model PACKA54 and PACKA542205060 Port-A-Cool, LLC • 709 Southview Circle • Center, TX 75935 www.kuulaire.com • 1-888-999-6511 2 Introduction The PACKA54 and PACKA542205060 feature a 3-speed fan and automatic timer that can be programmed for 10 to 990 minutes. The automatic louver sweep function provides directional control and the remote control (batteries not included), provides convenience. The PACKA54 and PACKA542205060 portable evaporative cooler is the latest in evaporative cooling technology from Port-A-Cool, LLC, manufacturer of world-class portable cooling units, for industrial and commercial applications. ! WARNINGS AND SAFETY RULES ▲ Basic safety precautions should always be followed when using any electrical appliance. 1. This unit is intended for indoor use. Any other use is not recommended and may cause fire, electric hazard, or injury to persons or property, and may void the warranty. 2. Unplug the unit from power outlet when filling and refilling water reservoir. 3. Unplug the unit from power outlet when moving the unit. 4. Unplug the unit from power outlet when cleaning or servicing. 5. Do not use the unit in areas where gasoline, paint or any other flammable chemicals are stored. 6. Extreme caution should be taken when used near children and the elderly. The unit should not be left unattended for any extended period of time while in operation. 7. Do not let children play with any packaging material. ! 8. Do not operate the unit with a damaged power cord. 9. Do not attempt to repair or adjust any electrical or mechanical functions of the unit. 10. The PACKA54 unit should run on 110-120v 60 only and PACKA542205060 on 220-240V 50/60Hz AC only. 11. Do not cover unit air inlet or air outlet openings. LOCATION PARTS DESCRIPTION ELECTRICAL ASSEMBLY INSTRUCTIONS AND SAFETY RULES ▲ WARNINGS TROUBLESHOOTING LOCATION 12. This product is not intended for use in wet or damp locations. 13. When not in use, drain the water from the tank and store the unit in a dry location. 14. Do not run power cord under carpeting or cover with rugs or runners. Arrange the cord away from areas where it may be tripped over. 15. Do not use the unit with an extension cable. 16. Do not insert or allow objects to enter the air outlet opening, as this may cause damage to the blower and may void the warranty. 17. Use only fresh water to fill the water reservoir. The use of air fresheners or cleaners is not recommended as it may damage the unit and void the warranty. 18. Drain the reservoir once every week to reduce calcium saturation. 19. 19. The unit is built with a direct drive pump. The ‘Cool’ function will stop when the water reservoir is not filled with water. 20. Do not use this appliance with any solid-state speed control device. 21. If the unit is damaged or malfunctioning, discontinue operation and refer to the trouble-shooting section and/or contact a service technician. WARRANTY PARTS DESCRIPTION 1 4 CLEANING AND MAINTENANCE ELECTRICAL Water Flow 1. Control Panel 2. Water Level Gauge 3. Base 4. Water Flow Control 5 6 2 TECHNICALINSTRUCTIONS SPECIFICATIONS ASSEMBLY 3 REMOTE CONTROL TROUBLESHOOTING 5. Rear Cover 6. Casters Port-A-Cool, LLC • 709 Southview Circle • Center, TX 75935 www.kuulaire.com • 1-888-999-6511 LOCATION 3 USE AND OPERATION PARTS DESCRIPTION ! ▲ ELECTRICAL ON/OFF 1. Connect the cord to a power outlet. Alternating amber/red pilot light will start flashing and the display is animated. The unit is in STANDBY. 2. Press the ON/OFF button to turn the unit on. Indicator light will illuminate. To turn off, press the POWER button again. When the ON/OFF button is pressed, the cooler will start at level 2 speed (medium) then drops to level 1 speed (Low) ASSEMBLY INSTRUCTIONS TROUBLESHOOTING SPEED Press the SPEED button to select the desired fan speed. The selected fan speed indicator LED light will light up. Fan speed settings are 1( LOW) - 2 (MEDIUM) - 3 (HIGH). WARRANTY CLEANING AND MAINTENANCE MODE: Press the MODE button to select the desired fan mode. The selected fan mode indicator LED light will light up. When SLEEP or NATURAL is selected, air speed will randomly vary. TECHNICAL SPECIFICATIONS COOL To use the unit as an evaporative cooler, adjust the WATER FLOW CONTROL KNOB on the side panel. Water will be pumped up to the water distributor compartment and start wetting out the cellulose cooling media in the rear of the unit. After approximately three minutes, as the pad becomes saturated, the air from the outlet should be cool. Turn the knob to OFF position when ‘Cool’ function is not desired. SWING: Press the SWING button to direct the air stream. The vertical louvers will begin to move automatically from side to side. The indicator LED will come on. To adjust the vertical direction of air flow, adjust the horizontal louvers manually. TIMER The unit comes with an 990 minutes timer. To set, press the TIMER button to the desired operation time. The selected time will be displayed. When the pre-selected time has elapsed, the unit will automatically shut off. ION: Press ION button once to start. LED light will illuminate. Unit will release negative ions for air purifying function. Press again to stop the function. REMOTE CONTROL USE AND OPERATION ! ▲ ON/OFF – start or turn off the unit Speed – 1 (Low)/2 (Medium)/3 (High) Swing – automatic swing of louvers Mode – Sleep/Natural/Normal Timer – timer function up to 990 minutes Port-A-Cool, LLC • 709 Southview Circle • Center, TX 75935 www.kuulaire.com • 1-888-999-6511 4 TECHNICAL SPECIFIC PARTS DESCRIPTION Warning: Unplug the unit from power outlet prior to moving or servicing, or filling or draining the water reservoir. WARRANTY ELECTRICAL Filling the Reservoir with Water The water fill door is located on the side of the unit. Open the water fill door and pour water carefully into the reservoir. Pay attention to the water level indicator to avoid overfilling the unit. The capacity of the reservoir is 20 liter. You can also fill water from the top compartment. CLEANING AND MAINTENANCE ASSEMBLY INSTRUCTIONS REMOTE CONTROL USE AND OPERATION Side Water Fill Draining the Reservoir TECHNICAL SPECIFICATIONS TROUBLESHOOTING Move the unit to a location where water can be disposed of safely. Remove the drain plug which is located at the back of the unit to release water from the reservoir. Once it is completely drained, replace the drain plug. The unit is ready to be filled with fresh water. Adjusting Humidity Level at the Outlet REMOTE CONTROL WARRANTY The unit is equipped with a water flow regulator which is located on the side of the unit. You can adjust humidity and cooling level of the air coming out of the vent by turning the regulator from OFF to MAX. MAX will allow for full flow of water to the pads and provide maximum cooling. Turn to OFF position when ‘Cool’ function is not required. ▲ ! WARNING: Unplug the unit from power outlet prior to moving or servicing, or filling or draining the water reservoir. USE AND OPERATION CLEANING AND MAINTENANCE WARNING: ! ▲ TECHNICAL AND SPECIFICATIONS WARNINGS SAFETY RULES ! ▲ Unplug the unit from power outlet prior to moving or servicing, or filling or draining the water reservoir. Dampen a clean cloth with water and use it on the exterior of the unit to remove any dust or dirt. Never use harsh detergents, solvents, and corrosive cleaners to clean the unit. When not in use, drain the water reservoir and store the unit in an area where it is dry and out of sunlight. REMOTE CONTROL LOCATION Maintenance: USE AND OPERATION PARTS DESCRIPTION Regular draining, at least once each week, will decrease the water mineral build up and extend the life of the rigid media pad. A damp cloth can be used to remove calcium build-up inside and outside of the unit. When operating the unit, turn Water Flow Control Knob to OFF position to dry out the pad. The dust filter/cover can be removed easily and can be cleaned weekly. The inside of the water reservoir can be cleaned once or twice in a season to maintain air quality. Deeper Clean: Remove the screw holding the dust filter/cover. You now can take out the cooling media for cleaning. Wash the dust filer/cover and honey comb media pad in clean water. ! ELECTRICAL ▲ Model No. PACKA54 (110-120V 60Hz, 150W) Water Tank Capacity 20 Liters Dimensions 75cm H x 41cm W x 39cm D Shipping Weight 12.0 kg ASSEMBLY INSTRUCTIONS Model No. PACKA542205060 (220-240V 50/60Hz, 150W) TROUBLESHOOTING Port-A-Cool, LLC • 709 Southview Circle • Center, TX 75935 www.kuulaire.com • 1-888-999-6511 WARRANTY 5 TROUBLESHOOTING Symptom Possible Cause Possible Solution Circuit breaker/GFCI Make sure cord is plugged in and try to turn the unit on pressing buttons on control panel and remote control. Check the circuit breaker or check GFCI reset button. Cord is not plugged in WARRANTY Power is not on No discharge of air Not cooling Water flow regulator at low setting Change the water regulator setting to MAX. Check the water level and turn on the pump by pressing COOL button. Low/No water Check Water Odor emission Brand new unit Brand new media will initially have an odor which will dissipate within a Old unit with algae week of initial use. If the unit is not new, there may be an algae issue – replace the pad and maintain regularly. CLEANING AND MAINTENANCE TECHNICAL SPECIFICATIONS Water droplets coming out of air outlet Calcium saturated water Clogged media Drain water, deep clean and clean the media. Media may need to be replaced. The unit will not respond Damaged PCB Moisture in PCB Remote control batteries Try with remote control. If the unit responds, PCB board fasteners loose. If neither control panel nor remote control command works, PCB board damaged - contact service technician. Try using remote control to see if the unit responds. If the unit responds briefly, likely cause is the moisture in the PCB. Turn off unit by unplugging it from the power. Drain, clean and dry the unit, possibly replace the media. Refill it with fresh water. Check Batteries Unit is making noise Calcium build up in blower Low or no water in the reservoir Deep clean the unit -remove calcium debris. If the water level is near empty pump will make loud noise. The unit will not Damaged PCB Try to use remote control to see if the unit responds turn off Remote Control Batteries Check batteries REMOTE CONTROL USE AND OPERATION ! ▲ REPLACEMENT PARTS To obtain a current list of Replacement Parts, visit us online at www.port-a-coolparts.com. PARTES DE REPUESTO Port-A-Cool, LLC • 709 Southview Circle • Center, TX 75935 www.kuulaire.com • 1-888-999-6511 6 Manual de Usuario PRECAUCIÓN LEA Y GUARDE ESTAS INSTRUCCIONES IMPORTANTES Lea todas las instrucciones cuidadosamente antes de instalar y usar esta unidad. Este manual esta diseñado para proveerle importante información necesaria para instalar, usar, mantener y solucionar problemas menores para su unidad. La falta de seguir estas instrucciones puede dañar y/o deteriorar el uso y anular la garantía. Modelo PACKA54 y PACKA542205060 Port-A-Cool, LLC • 709 Southview Circle • Center, TX 75935 www.kuulaire.com • 1-888-999-6511 SOLUCIONES Introducción 7 El PACKA54 y PACKA542205060 ofrecen un ventilador de 3 velocidades y contador de tiempo que puede ser programado de 10 a 990 minutos. GARANTÍA Las persianas automáticas proveen control direccional y el control remoto (Baterías no incluidas), provee conveniencia. EL ventilador de enfriamiento evaporativo PACKA54 y PACKA542205060 es lo más reciente en la tecnología de enfriamiento de PORT-A-COOL LLC, fabricantes de unidades de enfriamiento mundialmente, para aplicaciones industriales y comerciales. LIMPIEZA Y MANTENIMIENTO ! SEGURIDAD Y ADVERTENCIAS ▲ Cuando use aparatos eléctricos precauciones de seguridad básicas siempre deben ser seguidas. ESPECIFICACIONES TÉCNICAS LOCATION 1. 2. 3. 4. 5. Esta unidad esta diseñada para uso interno. Cualquier otro uso no es recomendable y puede causar incendios, fallas eléctricas o dañar personas o propiedades, y puede anular la garantía. Desconecte la unidad cuando llene la reserva de agua. Desconecte la unidad cuando mueva la unidad. Desconecte la unidad para realizar mantenimiento. No use la unidad es áreas cercas de gasolina, pintura u otros químicos inflamables. Se debe tomar precaución máxima cuando se use cercas de niños y personas mayores. Esta unidad no se debe dejar operando sin vigilancia por largos periodos de tiempo. No permita que los niños jueguen con el empaque de la unidad. No use ningún producto con cables o enchufes dañados. No intente reparar o ajustar ninguna función mecánica o eléctrica del enfriador ya que esto causa que la garantía sea anulada. La unidad PACKA54 debe funcionar con 110-120v 60 solamente y PACKA54 en 220-40v/50 AC solamente. No cubra las entradas o salidas de aire en el aparato CONTROL REMOTO DIBUJO SECCIONADO 6. USO Y MANEJO ELECTRICIDAD 7. ! INSTRUCCIONES DE ARMADO ▲ 8. 9. 10. 11. SOLUCIONES PARTES DE REMPLASO 12. Este producto no esta hecho para locaciones mojadas o de extrema humedad. 13. Cuando la unidad no esta en uso, drene el agua y guárdelo en un área seca. 14. No pase corriente bajo carpetas, cubra con mantas o muebles con ruedas. 15. No use una extensión con este aparato. 16. No inserte o deje que objetos entren en ninguna ventilación o abertura de extracción ya que esto causa daño al producto y puede anular la garantía. 17. Use agua fresca solamente para llenar la reserva. El uso aromatizantes de aire no es recomendado ya que puede dañar la unidad y anular la garantía. 18. Drene la reserva una vez ala semana para reducir la saturación de calcio. 19. La unidad esta fabricada con una bomba de manejo directo. La función “Cool” dejara de funcionar si la reserva esta vacía. 20. No use este aparato con un dispositivo de control sólido. 21. Si la unidad esta dañada o no funciona, deje de usarla. Revise la sección de solución a problemas y/o por favor busque ayuda profesional. GARANTÍA DESCRIPCIÓN DE LAS PARTES 1 4 5 6 LIMPIEZA Y MANTENIMIENTO Water Flow 2 ESPECIFICACIONES TÉCNICAS 1. Panel de control 4. Control de fluyo de agua 2. Indicador del nivel 5. Cubierta frontera de agua 6. Ruedas 3. Base 3 CONTROL REMOTO Port-A-Cool, LLC • 709 Southview Circle • Center, TX 75935 www.kuulaire.com • 1-888-999-6511 8 USO Y MANEJO DIBUJO SECCIONADO ! ▲ ELECTRICIDAD ON/OFF (PRENDER Y APAGAR) 1. Enchufe el cable ala fuente de corriente. Una luz rojiza se prendera y apagara mientras le visualización es animada. La unidad esta en espera. 2. Oprima el botón (On/Off) para encender la unidad. La luz indicante se iluminara, para apagar la unidad oprima el botón (On/Off ) nuevamente. Cuando se prende el aparato, el enfriador comenzará en el nivel mediano de enfriamiento y después se reducirá a l nivel bajo. PARTES DE REMPLASO INSTRUCCIONES DE ARMADO SOLUCIONES DESCRIPCIÓN DE LAS PARTES bombeada al compartimento distribuidor de agua y comenzará a humedar los modios de celulosa detrás de la unidad. Después de aproximadamente tres minutos, mientras el panel se satura de agua, el aire sacado debería ser frío. Apague la función “COOL” si esta función no es usada. SWING (OSCILACION) Oprima el botón SWING para dirigir la dirección del aire. Las persianas verticales se moverán automáticamente de lado a lado. La luz indicante se prendera. Para ajustar la dirección vertical del fluyo de aire ajuste la persianas horizontales manualmente. SPEED (VELOCIDAD) Oprima el botón SPEED para seleccionar la velocidad deseada. La luz indicara que velocidad esta seleccionada. Las velocidades de la unidad son LOW-bajo, MEDIUM-mediana – HIGH-alta. TIMER (TIEMPO) La unidad viene con un contador de tiempo de 990 minutos. Para programar, oprima el botón TIMER y seleccione el tiempo deseado. El tiempo seleccionado aparecerá el en panel. Cuando el tiempo seleccionado pase la unidad se apagara automáticamente. MODE(Modo) Oprima el botón (MODE) para seleccionar el modo deseado. La luz indicara que modo esta seleccionado. Cuando el modo SLEEP o NATURAL son seleccionados la velocidad variara. ION: (OINES) Oprima el botón ION para comenzar. La luz indicante se prendera. La unidad soltara iones negativos para purificar el aire. Oprima el botón de nuevo para parar la función. GARANTÍA LIMPIEZA Y MANTENIMIENTO ESPECIFICACIONES TÉCNICAS COOL (FRIO) Para usar la unida como enfriador evaporativo, ajuste el control de fluyo de agua que esta al lado del panel. Agua será CONTROL REMOTO USO Y MANEJO ON/OFF – Prender o apagar la unidad SPEED- Velocidad (1-baja) 2(mediana) 3(Alta) SWING- Oscilación – Persianas de movimiento automático MODE- Modo – Dormido/Natural/Normal ! ▲ TIMER – Marcador de tiempo – función de asta 990 minutos PARTES DE REMPLASO DESCRIPCIÓN DE LAS PARTES Port-A-Cool, LLC • 709 Southview Circle • Center, TX 75935 www.kuulaire.com • 1-888-999-6511 TECHNICAL SPECIFIC DIBUJO SECCIONADO 9 Aviso: Desconecte la unidad antes de mover, mantener, llenar WARRANTY o vaciar la reserva de agua. REMOTE CONTROL ELECTRICIDAD LLENANDO LA RESERVA DE AGUA La puertilla para llenar el agua esta ubicada al lado de la unidad. Habrá la puertilla y vacíe el agua cuidadosamente hacia la reserva. Ponga atención al indicador del nivel de agua para que la unidad no se sobrellene, La capacidad de la reserva son 20 litros. También puede llenar la reserva desde el compartimento de arriba. CLEANING AND MAINTENANCE INSTRUCCIONES DE ARMADO USE AND OPERATION Para Llenar de agua al lado DRENANDO LA RESERVA Ubique la unidad en un lugar donde el agua puede ser eliminada. Retire el tapón de drenaje que esta ubicado en la parte trasera de la unidad para soltar agua de la unidad. Una vez que este completamente drenada, reponga el tapón. La unida esta lista para ser llenada de agua. TECHNICAL SPECIFICATIONS SOLUCIONES AJUSTANDO EL NIVEL DE HUMEDAD DE SALIDA La unidad esta equipada con un regulador de agua que esta ubicado en el lado de la unidad. Usted puede ajustar la humedad y el nivel de enfriamiento que sale del aparato de OFF a MAX. MAX le permitirá fluyo máximo de agua hacia los paneles y proveerá máximo enfriamiento. Apague la función “COOL” no es requerida. REMOTE CONTROL GARANTÍA ▲ ! AVISO- Desconecte la unidad de la fuente de corriente antes de mover mantener o vaciar, la unidad USE AND OPERATION LIMPIEZA Y MANTENIMIENTO ! ▲ ESPECIFICACIONES TÉCNICAS ! SEGURIDAD Y ADVERTENCIAS ▲ AVISO- Desconecte la unidad de la fuente de corriente antes de mover, mantener o llevar, o. vaciar la unidad. Use un trapo mojado con agua y limpie el exterior para retirar polvo o tierra. Nunca use detergentes, disolventes o líquidos corrosivos para limpiar la unidad. Cuando no se use, drene el agua de la reserva y guarde la unidad en un área seca y fuera del sol. CONTROL REMOTO LOCATION semanalmente. La reserva se puede limpiar una o dos veces cada temporada. LIMPIESA PROFUNDA Retire el tornillo que sostiene el filtro de polvo. Puede sacar los paneles para limpieza. Lave el filtro del polvo y cepille los paneles con agua limpia. Mantenimiento Drenaje regular, por lo menos una vez ala semana, reducirá los almacenes de minerales y prolongara la vida de los paneles. Un trapo mojado se puede usar para retirar calcio almacenado afuera y adentro de la unidad. Cuando use la unidad, apague el control de fluyo de agua. La cubierta de polvo puede ser retirada y limpiada USO Y MANEJO DIBUJO SECCIONADO ! ELECTRICIDAD ▲ Modelo – PACKA54 (110-120v-60hz – 150w) Capacidad de agua- 20 litros PACKA542205060 (220-240V 50-60hz – 150W) Dimensiones 75cm x 41cm x39 cm PARTES DE REMPLASO PESO DE ENVIO- 12.0KG INSTRUCCIONES DE ARMADO SOLUCIONES DESCRIPCIÓN DE LAS PARTES Port-A-Cool, LLC • 709 Southview Circle • Center, TX 75935 www.kuulaire.com • 1-888-999-6511 GARANTÍA ELECTRICIDAD SOLUCIONES 10 Causa Posible INSTRUCCIONES DE ARMADO No ay descarga de aire GARANTÍA El cable no esta conectado Sintoma SOLUCIONES No esta encendido Interruptor de Circuito LIMPIEZA Y MANTENIMIENTO GARANTÍA La unidad no se apaga PCB dañado Baterías del control remoto Calcio acumulado en el soplador ESPECIFICACIONES TÉCNICAS El regulador de fluyo de agua esta en función baja Solucion Posible Asegúrese que el cable este conectado y el interruptor de suplemento este prendido Trate de prender la unidad oprimiendo los botones en el panel de control o con el control remoto Reajuste el botón GCFI Trate de usar el control verificar funcionamiento Verifique baterías Limpie la unidad profundamente- retire los desecho de calcio Cambie la función del control de fluyo de agua LIMPIEZA Y MANTENIMIENTO Calcio saturado en soplador CONTROL REMOTO Nivel de agua bajo/ No Agua en La unidad hace sonidos la reserva Limpie la unidad profundamente- retire los desecho de calcio. Si el nivel de agua esta casi vacío la bomba creara un sonido. ESPECIFICACIONES TÉCNICAS USO Y MANEJONivel de agua bajo/ No Agua El censor del nivel de agua esta atorado CONTROL REMOTO No esta enfriando Omisión de olor ! ▲ Nueva unidad ▲ Drene/ rellene con agua fresca y/o limpie el tanque de agua Cuando la unidad es usada por primera vez, los medios rígidos de enfriamiento tendrán un olor, el cual se desaparecerá una semana después de comenzar a usar. USO Y MANEJOVieja unidad con algas Talvez existe un problema con algas. Remplace los medios rígidos de enfriamiento. Contacte al centro de servicio Agua saturada con calcio PARTES DE REMPLASO Drene el agua, limpie profundamente y limpie los paneles Gotas de agua salen de la unidad ! Verifique el nivel de agua Paneles obstruidos Los paneles necesitan ser remplazados DESCRIPCIÓN DE LAS PARTES PARTES DE REMPLASO Para obtener una lista de partes de reemplazo, visítenos en www.port-a-coolparts.com. DESCRIPCIÓN DE LAS PARTES Port-A-Cool, LLC • 709 Southview Circle • Center, TX 75935 www.kuulaire.com • 1-888-999-6511