1
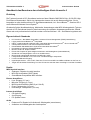
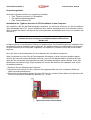
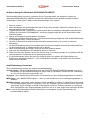
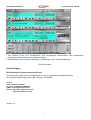
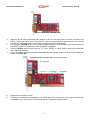
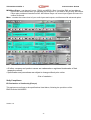
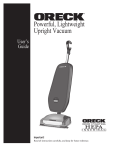
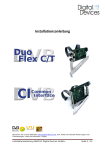
TYPHOON ACOUSTIC 4
Article Number: #51000
TYPHOON ACOUSTIC 4
4.1 Channel PCI Sound Card
Handbuch des Benutzers
Manual de usuario
Manuel Utilisateur
Manuale d’Uso
User’s Manual
Version 1.0
Deutsh
2
Espanol
7
Francais
11
Italiano
15
English
19
1
TYPHOON ACOUSTIC 4
Article Number: #51000
Handbuch des Benutzers der stichhaltigen Karte Acoustic 4
Einleitung
Die Typhoon Acoustic 4 PCI Soundkarte basiert auf dem CMedia CMI8738SX Chip -32- Bit PCI High
Performance Busstandard. Gleich vier Lautsprecher lassen sich an die Karte anschließen. Sie ist
kompatibel zu allen herkömmlichen PC Soundkartenstandards, incl. Sound BlasterTM, Genuine OPL3
sowie Microsoft Windows Sound SystemTM .
Ob aktuelle Spiele, Musikbearbeitung, Multimedia- Anwendungen oder MP3-Wiedergabe die Typhoon
Acoustic 4 PCI Soundkarte bietet für jede Anwendung die optimalen Ausstattungsmerkmale. Sowohl
Gamer als auch professionelle Anwender werden von dieser 4Kanal - 3D - Soundkarte begeistert sein.
Eigenschaften & Standards
•
•
•
•
•
•
•
•
•
•
•
•
•
•
PCI Version 2.1 Bus Master kompatibel, Advanced Power Management (PPMI) Unterstützung
Legacy audio Sound Blaster 16TM kompatibel
HRTF – basierendes 3D positional Audio, unterstützt Microsoft DirectSoundTM 3D und Aureal A3DTM
C3DX positional audio in vier Kanal Lautsprecher Modus
Downloadable Wavetabel Music Synthesizer unterstützt DirectMusicTM
Kompatibel zur Microsoft PC98 Spezifikation
Build-in 16 Bit Voll- Duplex CODEC
Echtes Voll- Duplex für gleichzeitiges Aufnehmen und Wiedergeben (Internettelefonie)
Aufnahmen mit Samplingraten von bis zu 48 KHz stereo
Build-in dual analog/digital Gameport und MPU401 UART
Lautsprecheranschlüsse 2 x 3,5 mm Front- und Rückwärtige Lautsprecher
Line IN und Mikrofon Eingang
Input/Output Stecker - Line-In, MIC, Rear-Out, Front-Out und MPU-401/MIDI schließen an den Port an.
Tragen Sie die direkte Verbindung von Line-In/Line-Out zwischen dem Umschlag PC und der Lärmkarte.
Details:
MIDI/Joystick Interface
• Analoges / Digitales Joystick Interface
• MPU-401 kompatibel (UART Mode)
• SoundBlaster kompatibles MIDI Interface
Externe Anschlüsse
• Line- Eingang (3,5 mm)
• Mikrofon- Eingang (3,5 mm)
• MIDI/Joystick Interface (IBM 15 pol. Sub-D)
• Front- Lautsprecher (3,5 mm)
• Rückwärtige- Lautsprecher (3,5 mm)
Interne Anschlüsse
• CD-Audio-Eingang
• Aux Eingang
• PC Speaker intern
Audio
•
•
Enhanced Full Duplex bei Aufnahme & Wiedergabe (mono/stereo)
Aufnahme und Wiedergabe aller Audioquellen
2
TYPHOON ACOUSTIC 4
Article Number: #51000
Verpackungsinhalt:
Sie sollten folgenden Inhalt in der Verpackung vorfinden:
• Eine Typhoon Acoustic 4 PCI Soundkarte
• Ein Handbuch/Quickinstallation
• Eine Treiber/Software CD
Installation der Typhoon Acoustic 4 PCI Soundkarte in den Computer
Wir empfehlen, daß Sie das Betriebssystem installieren (ex: Microsoft Windows) vor Ihnen installieren
diese stichhaltige Karte PCI, und sie installieren keine andere stichhaltige Karte in Ihr aktuelles System.
(bitte uninstall und löschen alle Spuren der vorhergehenden stichhaltigen Karte, bevor es installiert das
Acoustic 4).
Bevor Sie mit der Installation Ihrer Soundkarte beginnen,
schalten Sie Ihren Computer und sämtliche damit verbundenen
Geräte aus!
Computer gibt es in verschiedenen Größen und Ausführungen. Die Durchführungen der Installation Ihrer
Soundkarte in diesem Handbuch gelten allgemein. Sie sollten deshalb die nachfolgenden Anweisungen
mit dem Handbuch Ihres Computers vergleichen um Schäden zu vermeiden, bevor Sie mit der Arbeit
beginnen.
Es ist ein (Kreuz-) Schraubenzieher für die Installation der Soundkarte erforderlich.
Wenn Sie bereits eine nicht Plug & Play kompatible Soundkarte in Ihrem Computer installiert haben,
müssen Sie zuerst die alten Audiotreiber entfernen, bevor Sie die Karte ausbauen. Beziehen Sie sich
dabei auf die vorhandene Dokumentation der alten Soundkarte bezüglich weiterer Details. Wenn Ihre
bestehende Soundkarte Plug & Play kompatibel ist, können Sie direkt mit der Installation Ihrer neuen
Soundkarte fortfahren.
1. Entfernen Sie das Gehäuse des Computers
2. Suchen Sie einen freien PCI Slot, entfernen Sie gegebenenfalls das noch vorhandene Slotblech
(Bitte Schraube aufbewahren)
3. Richten Sie die Soundkarte gerade über dem PCI Slot aus, stecken Sie die Karte, ohne Gewalt in den
Slot bis Sie deutlichen Wiederstand bemerken (5 – 8 mm)
Typhoon Acoustic 4 Soundkarte
3
TYPHOON ACOUSTIC 4
Article Number: #51000
4. Fixieren Sie die Karte mit der Schraube des Slotbleches
5. Schließen Sie gegebenenfalls das Audio- Kabel eines CDRom/DVD Laufwerkes sowie weitere.
Interne Komponenten an die Soundkarte an. (AUX, PC Speaker). schließen Sie bitte CDROMAUDIOKABEL in Einfaßungen J3 (für SONY) oder J4 (für Panasonic) an, wenn CD-ROM
vorhanden ist.
6. Schließen Sie AUX-In audioquelle wie Fernsehapparattuner, MPEG oder andere ähnliche Karten in
Einfaßung J2 an, wenn sie vorhanden sind.
7. Wenn Ihr PC-Gehäuse Schnittstelle der Frontabdeckung Line-I/O unterstützt, schließen Sie bitte sein
4-Anschlußstiftaudiokabel in untereren Anschlußstift der Einfaßung JL1 an.
8. Montieren / schließen Sie das Gehäuse des Computers
9. Schließen Sie vorhandene Lautsprecher (bis zu vier), Mikrofon usw. an die Soundkarte an achten Sie darauf, dass der Lautstärkeregler der Lautsprecher auf leise eingestellt ist.
10. Die Hardware- Installation ist abgeschlossen, Schalten Sie nun Ihren Computer ein.
4
TYPHOON ACOUSTIC 4
Article Number: #51000
Software-Anlage für Windows® 95/98/2000/NT4.0/ME/XP
Die stichhaltige Karte Acoustic 4 unterstützt Plug-n-Playeigenschaft, die Anlage im System der
Windows® 95/98/2000/NT/4.0/ME/XP schnell und einfach bildet. Diese Software-Anlage installiert
stichhaltigen Treiber Karte C-Media und Audiozahnstange in Ihr System.
1. Start von system.
2. Wenn das System die stichhaltige Karte durch Plug-n-Play ermittelt, wählen Sie Löschen aus, um
den Abfragung Prozeß zu stoppen.
3. Folgender Einsatz der Treibercd-rom und Automobil-lassen Installation Dialogfeld erscheint laufen.
(Stöbern Sie sonst den CD-ROMINHALT durch und doppelt klicken Sie an die autorunikone oder –
ausführungdatei)
4. Klicken zum Beginnen des Installation Prozesses.
5. Wählen Sie InstallAnwendungen Aus. C-Mediaaudiozahnstange installieren und InstallcGerätetreiber
für stichhaltigen Karte Treiber auswählen.
6. Click OK to kontinuierlich and follow the Instruktion presented man your screen to complete
Einrichtung.
7. Auf den Rückstellung Standort zu installierende Sie können entweder ein anderes Heft beschließen,
um die Anwendungen zu installieren oder sie zu lassen.
8. Nach der Beendigung der Anlage, beginnen Sie bitte Windows wieder.
9. Jetzt sind Sie betriebsbereit, die stichhaltige Karte zu benutzen.
10. Gehen Sie bitte zum Mischer, der an der rechten Seite vom taskbar gelegen ist und justieren Sie die
unterschiedlichen Audiostufen auf Ihr gewünschtes Hören.
11. Für Aufnahmestufen gehen Sie bitte zum Optionen Menü und wählen Sie Eigenschaften aus.
Zunächst im Adjustdatenträger für., in der auserwählten Aufnahme und justieren Sie die einzelne
Stufe auf Ihren Wunsch.
AudioZahnstange Verwenden
Die Audiozahnstange besteht aus einigen Hauptbestandteilen:
Control Center - Steuert die Bildschirmanzeige der PCIAUDIOZAHNSTANGE Bestandteile. um einen
Bestandteil von der Bildschirmanzeige zu zeigen oder zu verstecken, klicken Sie das Teilbutton(s)
an, das auf die Oberseite ausgedruckt wird.
CD Player - kann Standardaudio DS spielen und erlaubt Ihnen, Ihre Lieblingssongspielliste zu erstellen.
MIDI Player - kann MIDIDATEIEN spielen, * mid/*.rmi und erlaubt Ihnen, Ihre Lieblingssongspielliste zu
erstellen.
MP3/Wave Player - kann mp3, Welle, Dateien CDDA und MPEG-1 spielen. Er liefert EAX und Entzerrer,
um den stichhaltigen Effekt zu verbessern, wenn Sie Playback, das der Audio archiviert. Wenn Sie
einen Song singen möchten, stellt MP3-/Wavespieler auch eine Funktion Karaoke zur Verfügung.
MP3-/Wavespieler kann Eingangssignale speichern und es in einer Welle Datei außerdem sichern.
Mixer - steuert die Datenträgerstufe Ihrer Audioinput und Ausgaben und die Eigenschaften mit
hochentwickelter Option.
5
TYPHOON ACOUSTIC 4
Article Number: #51000
• Alle weiteren Firma- und Produktnamen sind eingetragene Warenzeichen oder eingetragene
eingetragene Warenzeichen ihrer jeweiligen Inhaber.
• Spezifikationen und Prozeduren abhängig von Änderungen ohne vorherige Mitteilung.
- Ende der Anlage -
Safty Befolgung
EU-Erklärung der Übereinstimmung (Europa)
Diese Ausrüstung paßt sich an die Spezifikationen an, die nachstehend aufgeführt werden
und folgt den Bestimmungen des X EMC Directive 89/336/EEC
Hotline:
Anubis Electronic GmbH
Tel: 0180 - 5 8974666 0,24DM/min.
E-Mail: [email protected]
Internet: http://www.typhoonline.com
http://www.anubisline.com
Version 1,0
6
TYPHOON ACOUSTIC 4
Article Number: #51000
Manual de usuario - Tarjeta de sonido PCI ACOUSTIC 4 Typhoon
Introducción
Esta tarjeta de sonido PCI Acoutsic 4 Typhoon está basada en el controlador de audio de altas
prestaciones 32-bit PCI CMedia (CMI8738SX). Esta tarjeta de sonido es compatible con la mayoría de
los estándares de sonido para PC, incluyendo Sound BlasterTM, Genuine OPL3, Microsoft Windows
Sound SystemTM, y algunos más.
Supone una solución integrada de audio tanto para aplicaciones en negocios, educación y
entretenimiento como en otro tipo de aplicaciones multimedia.
Características
•
•
•
•
•
•
•
•
•
•
•
•
Cumple las especificaciones PCI Versión 2.1, y Bus Master Advanced Power Management
(PPMI).
Compatible con Legacy audio Sound Blaster 16TM.
Basada en audio posicional HRTF-3D, soporta Microsoft DirectSoundTM 3D e interface A3DTM.
Soporta altavoces laterales y traseros, modo altavoces en 4-canales en audio posicional C3DX.
El sintetizador wavetable basado en DLS soporta DirectMusicTM.
En concordancia con las especificaciones Microsoft PC98.
Incorpora CODEC 16-bit full duplex.
Soporta funcionamiento Full-Duplex para grabación y reproducción simultanea como por ejemplo
Teléfono de Internet.
Reproducción y captura Full Duplex verdaderas con diferentes tasas de muestreo hasta 48KHz
estereo.
Incorpora puerto de juegos dual analógico/digital y UART MPU401 compatible.
Conector de la entrada-salida - Line-In, MIC, Rear-Out, Front-Out y MPU-401/MIDI viran hacia el
lado de babor.
Supporta la connexion directe avant du panneau Line-In/Line-Out entre l'enveloppe de PC et la
carte de bruit.
¿Que contiene la caja?
Usted deberá encontrar el siguiente contenido en la caja:
•
•
•
Una tarjeta de sonido PCI.
Un manual de usuario
Un CD con los Drivers
Instalación de la tarjeta en su PC
Recomendamos que usted instala el sistema operativo (ex: Microsoft Windows) antes de usted instalan
esta tarjeta de los sonidos del PCI, y usted no instala ninguna otra tarjeta de los sonidos en su actual
sistema (por favor el uninstall y quita todos los rastros de la tarjeta anterior de los sonidos antes de
instalar Acoustic 4).
1. Apague el PC y todos los dispositivos conectados al mismo.
2. Retire la tapa del PC. Para más detalles consulte el manual de su PC.
7
TYPHOON ACOUSTIC 4
Article Number: #51000
3. Busque una ranura PCI libre y retire la pestaña metálica protectora. Guarde la pestaña para usarla
posteriormente.
Tarjeta de Sonido ACOUSTIC 4 TYPHOON
4. Alinee horizontalmente la tarjeta de sonido respecto de la ranura PCI, e insértela en la ranura de
manera firme y uniforme. Tenga cuidado de no forzarla en la ranura. Una vez que haya situado la
tarjeta en su posición, asegúrela mediante el tornillo de fijación de la pestaña metálica protectora
que retiró previamente.
5. Si dispone de una unidad CDROM en su PC, conecte por favor el cable audio del cd-rom en los
socketes J3 (para SONY) o J4 (para Panasonic), cuando el cd-rom está disponible.
6. Conecte la fuente audio de AUX-In tal como sintonizador de la TV, MPEG, u otras tarjetas similares
en el socket J2, cuando están disponibles.
7. Si su cubierta de la PC utiliza el interfaz del panel delantero Line-I/O, conecte por favor su cable
audio de los 4-contactos en un contacto más bajo del socket JL1.
8. Coloque la tapa del PC.
9. Conecte los altavoces o cascos a la toma SPK-Out de la tarjeta de sonido. Si tiene otro par de
altavoces, puede conectarlos a la toma Rear-Out del sistema de altavoces en 4-canales.
8
TYPHOON ACOUSTIC 4
Article Number: #51000
10. Encienda el PC. Usted está ahora en condiciones de cargar el controlador.
Instalación del Logiciel en Windows® 95/98/2000/NT4.0/ME/XP
Esta tarjeta de sonido soporta la características Plug & Play, lo que hace que su instalación en Windows
® 95/98/2000/NT4.0/ME/XP sea rápida y fácil. Esta instalación del software lógica instalará el programa
piloto de la tarjeta de los sonidos de C-Media y el Estante Audio en su sistema.
1. Arranque su sistema.
2. Cuando el sistema detecta la tarjeta de los sonidos con Plug-n-Play, seleccione la cancelación para
parar el proceso de la detección.
3. El separador de millares siguiente el cd-rom del programa piloto y automóvil-ejecuta el rectángulo de
diálogo de la instalación aparecerá. (hojee el contenido del cd-rom y doble haga clic encendido el
fichero del icono o de la ejecución del autorun)
4. Tecleo para comenzar el proceso de la instalación.
5. Seleccione Las Aplicaciones Del Install. para instalar el estante audio de C-Media y seleccionar el
driver de dispositivo del Install para el programa piloto de la tarjeta de los sonidos.
6. Haga clic el OK. para continuar y para seguir las instrucciones presentadas en su pantalla a la
instalación completa.
7. Usted puede elegir una diversa carpeta para instalar las aplicaciones o para dejarlas que se
instalará en la localización del valor por defecto.
8. Después de la terminación de la instalación, recomience por favor los Windows.
9. Ahora, usted es listo utilizar la tarjeta de los sonidos.
10. Vaya por favor al mezclador situado en el derecho del taskbar y ajuste los diversos niveles audio a
su escuchar deseado.
11. Para los niveles de la grabación, vaya por favor al menú de las opciones y seleccione las
características. Después en volumen del Adjust para., la grabación selecta y ajuste el nivel individual
a su deseo.
Usando Audio El Estante
El estante audio consiste en varios componentes importantes:
Control Center - Controla la visualización de los componentes audio del estante del PCI. Para mostrar
o para ocultar un componente de la visualización, haga clic el button(s) componente enumerado
en el superior.
9
TYPHOON ACOUSTIC 4
Article Number: #51000
CD Player - puede jugar el audio estándar DS, y permite que usted cree su lista preferida del juego de
la canción.
MIDI Player - puede jugar los ficheros de MIDI, * el mid/*.rmi, y permite que usted cree su lista preferida
del juego de la canción.
MP3/Wave Player - puede jugar mp3, la onda, los ficheros CDDA, y MPEG-1. Proporciona a EAX y al
equalizador para mejorar el efecto sonoro cuando usted aparato de lectura que el audio clasifía.
Si usted desea cantar una canción, el jugador de MP3/Wave también proporciona a una función
de Karaoke. El jugador de MP3/Wave puede registrar señales de entrada de información y
salvarlas en un fichero de la onda también.
Mixer - controla el nivel del volumen de sus entradas de información y salidas audio, y características
con la opción avanzada.
• Todos los nombres de compañías y nombres de productos, son marcas o marcas registradas
propiedad de sus respectivos dueños.
• Especificaciones y procedimientos conforme a cambios sin la notificación anterior.
- extremo de la instalación -
Conformidad De Safty
Declaración del EU de la conformidad (Europa)
Este equipo se conforma con las especificaciones enumeradas abajo, siguiendo las
provisiones del EMC Directive 89/336/EEC
Versión 1,0
10
TYPHOON ACOUSTIC 4
Article Number: #51000
Manuel Utilisateur Carte son Typhoon Acoustic 4
Introduction
Cette carte son Typhoon Acoustic 4 possède le controlleur audio haute performance Cmedia
( CMI8738SX ) 32-bit PCI.
Cette carte son est compatible avec la majorité des systèmes, incluant Sound Blaster, Genuine OPL3,
Microsoft Windows Sound System et bien d’autres.
Caractéristiques :
-
PCI Version 2.1 Bus Master et Advanced Power Management ( PPMI )
Compatible Legacy audio Sound Blaster16
HRTF-based positional audio, supporte Microsoft DirectSound 3D et A3D
Supporte enceintes C3DX 4 voies.
Supporte Direct Music
Compatible specifications Microsoft PC 98
Full duplex 16-bit Codec
Supporte opérations Full duplex pour des enregistrements simultanés
Full duplex Playback
48 KHz stereo
Port analogue/digitale et MPU401 compatible UART
Connecteur d'entrée-sortie - Line-In, MIC, Rear-Out, Front-Out et MPU-401/MIDI mettent en
communication.
supporte la connexion directe de Line-In/Line-Out entre l'enveloppe de PC et la carte de bruit.
Votre packaging comprend:
-une carte son PCI
-un manuel utilisateur
-un driver CD
Installation De Matériel
Nous recommandons que vous installez le système d'exploitation (ex: Microsoft Windows) avant vous
installent cette carte saine de PCI, et vous n'installez aucune autre carte saine dans votre système
actuel. (s'il vous plaît l'uninstall et retirent toutes les traces de carte saine précédente avant d'installer la
Acoustic 4).
1. Eteigner votre ordinateur et les périphériques éventuellement connectés à ce dernier.
2. Démonter le boîtier. Référez-vous au manuel utilisateur de votre ordinateur si nécessaire
3. Chercher un emplacement libre.
.
11
TYPHOON ACOUSTIC 4
Article Number: #51000
Carte Son Typhoon Acoustic 4
4. Aligner la carte son de façon horizontale et insérer la fermement dans l’emplacement en
question. Attention tout de même à ne pas dégrader l’emplacement ou votre carte elle-même.
5. Si votre ordinateur possède un lecteur CD Rom, veuillez relier le câble sonore de disque
compact-cRom dans les plots J3 (pour SONY) ou J4 (pour Panasonic), quand le disque
compact-cRom est disponible.
6. Reliez la source sonore d'AUX-In telle que le tuner de TV, le MPEG, ou d'autres cartes
semblables dans le plot J2, quand ils sont disponibles.
7. Si votre enveloppe de PC supporte l'interface du panneau avant Line-I/O, reliez s'il vous plaît
son câble sonore de 4-broches dans la broche inférieure du plot JL1.
8. Remonter le boîtier à présent.
9. Brancher vos enceintes ou/et microphones à prise Jack SPK out de votre carte son. Si vous
possédez une autre paire d’enceintes, vous pouvez les connecter à la prise Jack Rear-Out.
.
12
TYPHOON ACOUSTIC 4
Article Number: #51000
10. Allumer votre ordinateur. Vous pouvez à présent installer votre driver.
Installation Driver Windows® 95/98/2000/NT4.0/ME/XP
Grâce au Plug&Play, l’installation sous Windows® 95/98/2000/NT4.0/ME/XP est rapide et simplifiée..
Cette installation de logiciel installera le gestionnaire sain de carte de C-Media et l'Armoire Sonore dans
votre système.
1.
2.
Délmarrer votre système.
Quand le système détecte la carte saine par Plug-n-Play, choisissez l'annulation pour arrêter le
procédé de détection.
3. La prochaine insertion le disque compact-cRom de gestionnaire et automobile-exécutent la zone de
dialogue d'installation apparaîtra. (Parcourez autrement le contenu de disque compact-cRom et
double cliquetez en fonction le fichier de graphisme ou d'exécution d'autorun)
4. Déclic pour commencer le procédé d'installation
5. Choisissez Les Applications D'Install. pour installer l'armoire sonore de C-Media et choisir le module
de gestion de périphérique d'Install pour le gestionnaire sain de carte
6. Cliquetez l'cOk. pour continuer et suivre les instructions présentées sur votre écran à l'installation
complete.
7. Vous pouvez choisir une chemise différente pour installer les applications ou pour les laisser à
installer sur l'emplacement de défaut.
8. Après l'accomplissement de l'installation, relancez s'il vous plaît les Windows.
9. Maintenant, vous êtes prêt à utiliser la carte saine.
10. Veuillez aller au mélangeur situé au bon côté du taskbar et ajustez les différents niveaux sonores
sur votre écoute désirée.
11. Pour des niveaux d'enregistrement, veuillez aller au menu d'options et choisissez les propriétés.
Ensuite en volume d'Adjust pour., enregistrement choisi et ajustez le niveau individuel sur votre
désir.
Utilisant Sonore L'Armoire
L'armoire sonore se compose de plusieurs composants principaux:
Contrôlez Centre - Contrôle l'affichage des composants sonores d'armoire de PCI. Pour montrer ou
cacher un composant de l'affichage, cliquetez le button(s) composant énuméré sur le supérieur..
.
13
TYPHOON ACOUSTIC 4
Article Number: #51000
CD Player - peut jouer l'acoustique standard DS, et vous permet de créer votre liste préférée de jeu de
chanson.
MIDI Player - peut jouer des fichiers du MIDI, * le mid/*.rmi, et vous permet de créer votre liste préférée
de jeu de chanson.
MP3/Wave Player - peut jouer mp3, vague, fichiers CDDA, et MPEG-1. Il fournit EAX et égaliseur pour
améliorer l'effet sain quand vous playback que l'acoustique classe. Si vous voulez chanter une
chanson, le joueur de MP3/Wave fournit également une fonction de Karaoke. Le joueur de
MP3/Wave peut enregistrer des signaux d'entrée et les sauvegarder dans un fichier de vague
aussi bien.
Mixer - contrôle le niveau de volume de vos entrées et sorties sonores, et des dispositifs avec avançée
l'option.
• Tous autres noms de compagnie et de produit sont des marques déposées ou des marques déposées
registre de leurs propriétaires respectifs.
• Caractéristiques et procédures sujet aux changements sans avis préalable.
- fin d'installation -
Conformité De Safty
Déclaration d'cEu de la conformité (l'Europe)
Ce matériel se conforme aux caractéristiques énumérées ci-dessous, suivant les
dispositions du EMC Directive 89/336/EEC
Version 1,0
.
14
TYPHOON ACOUSTIC 4
Article Number: #51000
Manuale d’Uso Scheda Audio Typhoon Acoustic 4
Introduzione
Questa scheda audio Typhoon Acoustic 4 è basata sul controllo audio CMedia (CMI8738SX) 32-bit PCI
ad alta prestazione . Questa scheda audio è compatibile con tutti i maggiori standard audio dei PC,
incluso Sound BlasterTM, Genuine OPL3, Microsoft Windows Sound SystemTM e altri. Sono integrate
soluzioni audio per business audio,suoni educazionali ed di intrattenimento ed altre applicazioni
multimediali
Caratteristiche
•
•
•
•
•
•
•
•
•
•
•
•
Conforme a PCI Version 2.1 Bus Master e specifiche Advanced Power Management (PPMI).
Compatibile Legacy audio Sound Blaster 16TM.
Audio Posizionabile HRTF-based 3D, supporta Microsoft DirectSoundTM 3D ed interfaccia A3DTM.
Supporta speakers lato posteriore, audio posizionale C3DX in modo 4 canali.
Sintetizzatore wavetable DLS-based supporta DirectMusicTM.
Conforme alle specifiche Microsoft PC98.
Full duplex Build-in 16-bit CODEC.
Supporta operazioni Full-Duplex per registrazione e riproduzione simultanee come Internet Phone.
Vero Full Duplex riproduzione e cattura con differenti sampling rate fino a 48KHz stereo.
Porta gioco analogica/digitale e MPU401 compatibile UART.
Connettore dell' ingreso/uscita - Line-In, MIC, Rear-Out, Front-Out e MPU-401/MIDI port.
Sostiene il collegamento diretto anteriore del pannello Line-In/Line-Out fra l' intelaiatura del PC e la
scheda del suono.
Cosa c’è nell’imballo?
Nelli’mballo troverete i seguenti materiali:
•
•
•
Una Scheda Audio PCI
Un manuale d’uso
Un CD con driver
Installazione della scheda audio sul PC
Suggeriamo che installate il sistema operativo (ex: Microsoft Window) prima di voi installano questa
scheda sana del PCI, ed non installate qualunque altra scheda sana nel vostro corrente sistema (prego
il uninstall e rimuove tutte le tracce della scheda sana precedente prima dell' installazione Acustic 4).
1. Spegnete il vostro computer e le altre periferiche collegate.
2. Rimuovete il coperchio. Rifereritevi al manuale utente del PC per ulteriori informazioni.
3. Trovate una slot PCI libera e rimuovete la copertura metallica. Coservate le viti della copertura per
un uso successivo.
.
15
TYPHOON ACOUSTIC 4
Article Number: #51000
Scheda Audio Typhoon Acoustic 4
4. Allineate orizzontalmente la scheda audio rispettivamente alla slot e inseritela nella slot in modo
deciso ed uniforme. Attenzione a non forzarla nella slot. Una volta posizionata correttamente la
scheda nella slot, assicuratela con le viti che avete tenuto della copertura.
5. Se avete il lettore CDROM nel vostro computer, collegare prego il cavo audio del CD-ROM negli
zoccoli J3 (per SONY) o J4 (per Panasonic), quando il CD-ROM è disponibile.
6. Collegare la sorgente audio di AUX-In quali il sintonizzatore della TV, il MPEG, o altre schedi simili
nello zoccolo J2, quando sono disponibili.
7. Se la vostra intelaiatura del pc sostiene l' interfaccia del pannello anteriore Line-I/O, collegare prego
il relativo cavo audio dei 4-perni nel perno più basso dello zoccolo JL1.
8. Rimettete il coperchio del PC.
9. Collegate gli speaker o cuffie al jack SPK–Out della scheda audio. Se avete un’altra coppia di
speaker, potete connetterle al jack Rear-Out per il modo 4 Speaker.
.
16
TYPHOON ACOUSTIC 4
Article Number: #51000
10. Accendete il computer. Siete pronti per installare i driver!
Installazione del Software per Windows® 95/98/2000/NT4.0/ME/XP
Questa scheda audio supporta le caratteristiche Plug & Play che rendono l’installazione in Windows®
95/98/2000/NT4.0/ME/XP facile e veloce. Questa installazione del software installerà il driver sano della
scheda di C-Media e la Cremagliera Audio nel vostro sistema.
1. Avviate vostro sistema.
2. Quando il sistema rileva la scheda sana con Plug-n-Play, selezionare l' annullamento per arrestare il
processo di rilevazione.
3. L' inserto seguente il CD-ROM del driver ed automobile-fa funzionare la zona di dialogo dell'
installazione comparirà. (Altrimenti passare in rassegna il soddisfare del CD-ROM e doppio scattare
sopra l' archivio dell' icona o di esecuzione del autorun)
4. Scatto per iniziare il processo dell' installazione.
5. Selezionare Le Applicazioni Del Install. per installare la cremagliera audio di C-Media e selezionare il
driver di dispositivo del Install per il driver sano della scheda.
6. Scattare il OK. per continuare e seguire le istruzioni presentate sul vostro schermo ad installazione
completa.
7. Potete scegliere un dispositivo di piegatura differente per installare le applicazioni o per lasciarle da
installare sulla posizione di difetto.
8. Dopo il completamento dell' installazione, ricominciare prego i Window.
9. Ora, siete pronti ad usare la scheda sana.
10. Andare prego al miscelatore situato alla parte di destra del taskbar e regolare i livelli audio differenti
a vostro ascoltare voluto.
11. Per i livelli della registrazione, andare prego al menu di opzioni e selezionare le proprietà. Dopo nel
volume del Adjust per., nella registrazione prescelta e regolare il livello specifico al vostro desiderio.
Per mezzo Audio Della Cremagliera
La cremagliera audio consiste di parecchi componenti importanti:
Control Center - Gestisce la visualizzazione dei componenti audio della cremagliera del PCI. Per
mostrare o nascondere un componente dalla visualizzazione, scattare il button(s) componente
elencato sulla parte superiore.
.
17
TYPHOON ACOUSTIC 4
Article Number: #51000
CD Player - può giocare l' audio standard DS e che permettono che creiate la vostra lista favorita del
gioco di canzone.
MIDI Player - può giocare gli archivi del MIDI, * il mid/*.rmi e che permette che creiate la vostra lista
favorita del gioco di canzone.
MP3/Wave Player - possono giocare mp3, l' onda, CDDA e gli archivi MPEG-1. Fornisce EAX ed il
compensatore per migliorare l' effetto sano quando voi playback che l' audio archivia. Se
desiderate cantare una canzone, il giocatore di MP3/Wave egualmente fornisce una funzione di
Karaoke. Il giocatore di MP3/Wave può registrare i segnali in ingresso e salvarlo in un archivio dell'
onda pure.
Mixer - gestisce il livello del volume dei vostri input ed uscite audio e le caratteristiche con opzione
avanzata.
• Tutte le altre compagnie o prodotti sono marchi registrati dai rispettivi proprietari.
• Specifiche e procedure conforme ai cambiamenti senza notifica anteriore.
- End of installation -
Conformità Di Safty
Dichiarazione dell' EU di conformità (Europa)
Questa apparecchiatura è conforme alle specifiche elencate qui-sotto, seguendo le
disposizioni della EMC Directive 89/336/EEC
Versione 1,0
.
18
TYPHOON ACOUSTIC 4
Article Number: #51000
User’s Manual of Typhoon Acoustic 4 PCI Sound Card
Introduction
The Typhoon Acoustic 4 sound card is based on the C-Media (CMI8738SX) 32-bit PCI high performance
audio controller. This sound card is compatible with all major PC sound standards, including Sound
BlasterTM, Genuine OPL3, Microsoft Windows Sound SystemTM and more. It provides an integrated
sound solution for business audio, educational and entertainment sound and other multimedia
applications.
Features
•
•
•
•
•
•
•
•
•
•
•
•
Compliant to PCI Version 2.1 Bus Master and Advanced Power Management (PPMI) specification.
Legacy audio Sound Blaster 16TM compatible.
HRTF-based 3D positional audio, supporting Microsoft DirectSoundTM 3D and A3DTM interface.
Supports rear side speakers, C3DX positional audio in 4-channel speaker mode.
DLS-based wavetable music synthesizer supports DirectMusicTM.
Complaint to Microsoft PC98 specification.
Build-in 16-bit full duplex CODEC.
Supports Full-Duplex operation for simultaneous recording and playback such as Internet Phone.
True Full Duplex playback and capture with different sampling rate of up to 48KHz stereo.
Built-in dual analog/digital game port and MPU401 compatible UART.
Input/Output Connector - Line-In, MIC, Rear-Out, Front-Out and MPU-401/MIDI port.
Support front panel Line-In/Line-Out direct connection between PC Casing and sound card.
What is in your package?
You should have the following items in your package:
•
•
•
One PCI sound card
One User’s Manual
One Driver CD
Hardware Installation
We recommend that you install the Operating System (e.g., Microsoft Windows) before you install this
PCI sound card, and you do not install any other sound card in your current system (please uninstall and
remove all traces of previous sound card before installing the Acoustic 4).
1.
2.
3.
Shut down and turn off your computer and all external devices connected to it.
Remove the computer’s case cover to access the PCI slots. Refer to your computer user’s manual
for more details.
Find an unused PCI slot and remove the metal bracket. Save the bracket screw for later use on the
Sound card.
19
TYPHOON ACOUSTIC 4
Article Number: #51000
Typhoon Acoustic 4 Sound Card
4.
5.
6.
7.
8.
9.
Align the sound card horizontally with respect to the PCI slot and insert it into the slot firmly and
evenly. Take care not to force it into the slot. Once you have properly positioned the sound card
into the slot, secure the sound card with the bracket screw you have saved.
If you have a CDROM drive in your system, please connect CD-ROM audio cable into sockets J3
(for SONY) or J4 (for Panasonic), when CD-ROM is available.
Connect AUX-In audio source such as TV Tuner, MPEG, or other similar cards into socket J2,
when they are available.
If your pc casing supports front panel Line-I/O interface, please connect its 4-pin audio cable into
socket JL1 lower pin.
Replace the computer’s cover.
Connect your speakers or headphone to the SPK jack of the sound card. If you have another pair
of speakers, you can connect it to the Rear jack for 4-Channel Speaker Mode.
20
TYPHOON ACOUSTIC 4
10.
Article Number: #51000
Turn your computer on. You are now ready to install the driver!
Software Installation for Windows® 95/98/2000/NT4.0/ME/XP
The Acoustic 4 sound card supports Plug-n-Play feature, which makes installation in Windows
95/98/2000/NT/4.0/ME/XP system quick and easy. This software installation will install C-Media sound
card driver and Audio Rack in your system.
1.
2.
3.
4.
5.
6.
7.
8.
9.
10.
11.
Start your system.
When the system detects the sound card through Plug-n-Play, select cancel to stop the detection
process.
Next insert the driver CD-ROM and the auto-run installation dialog box will appear. (Else browse
the CD-ROM contents and double click on the autorun icon or execution file)
Click to start the installation process.
Select “install Applications” to install C-Media Audio Rack and select “Install Device Driver” for
sound card driver.
Click “OK” to continue and follow the instructions presented on your screen to complete installation.
You can either choose a different folder to install the applications or leave it to be installed on the
default location.
After the completion of the installation, please restart Windows.
Now, you are ready to use the sound card.
Please go to the Mixer located at the right side of the taskbar and adjust the different audio levels
to your desired listening.
For Recording levels, please go to the Options menu and select Properties. Next in “Adjust volume
for …”, select Recording and adjust the individual level to your desire.
Using Audio Rack
The Audio Rack consists of several major components:
Control Center - Controls the display of the PCI Audio Rack components. To show or hide a component
from the display, click the component button(s) listed on the top.
CD Player - can play standard audio CDs, and allow you to create your favorite song play list.
MIDI Player - can play MIDI files, *.mid/*.rmi, and allow you to create your favorite song play list.
21
TYPHOON ACOUSTIC 4
Article Number: #51000
MP3/Wave Player - can play mp3, wave, CDDA, and MPEG-1 files. It provides EAX and equalizer to
improve the sound effect when you playback the audio files. If you want to sing a song, MP3/Wave
Player also provides a Karaoke function. MP3/Wave Player can record input signals and save it in
a wave file as well.
Mixer - controls the volume level of your audio inputs and outputs, and features with advanced option.
• All other company and product names are trademarks or registered trademarks of their
respective owners.
• Specification and procedures are subject to change without prior notice.
- End of installation -
Safty Compliance
EU Declaration of Conformity (Europe)
This equipment conforms to the specifications listed below, following the provisions of the
EMC Directive 89/336/EEC
Version 1.0
22