1
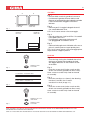
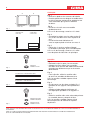
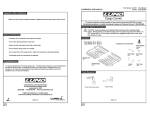
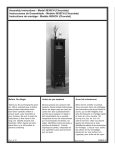
1
PROFESSIONAL MEDICAL PRODUCTS
Gima S.p.A. - Via Marconi, 1 - 20060 Gessate (MI) Italy
Italia: tel. 199 400 401 - fax 199 400 403
Export: tel. +39 02 953854209/221/225 fax +39 08 95380056
[email protected] - [email protected]
www.gimaitaly.com
SCRIVANIA CON DUE CASSETTI
DESK WITH 2 DRAWERS
BUREAU À DEUX TIROIRS
ESCRITORIO CON DOS CAJONES
M-27919-I-EN-F-E-Rev.0.11.12
Manuale utente - User manual - Notice d’utilisation - Manual del usuario
z
ATTENZIONE: Gli operatori devono leggere e capire completamente questo manuale
prima di utilizzare il prodotto.
ATTENTION: The operators must carefully read and completely understand the present
manual before using the product.
AVIS: Les opérateurs doivent lire et bien comprendre ce manuel avant d’utiliser le produit.
ATENCIÓN: Los operadores tienen que leer y entender completamente este manual antes
de utilizar el producto.
0123
Gima S.p.A.
Via Marconi, 1
20060 Gessate (MI) Italy
2
A
A
B
C
1 GAMBA SX
1 LEFT LEG
2 GAMBA DX
2 RIGHT LEG.
Fig. 1
1 GAMBA SX
1 LEFT LEG
2 GAMBA DX
2 RIGHT LEG.
ITALIANO
Fig. 1
-Estrarre dalla scatola le gambe e le traverse.
-Posizionare le gambe di fronte alle bussole
filetatte nel telaio del pianale imbottito tenendo
il foro con diametro maggiore all’esterno
del letto.
Fig. 3
-Utilizzare per il fissaggio le brugole da 6x35
con ranella diametro 6x18.
N.B.: le viti vanno serrate a fine montaggio.
Fig. 4
-Unire le gambe con i tubi ovali B e C fissandoli
nei rispettivi fori B e C.
-Posizionare il tubo tondo A diametro 25
con poggiapiedi fissandolo ai fori A.
Fig. 5
-Utilizzare le brugole 8x20 infilando sulle stesse
prima la ranella spaccata e poi quella piana.
N.B.: le viti vanno serrate a fine montaggio prima
di posizionare i tappi in plastica
Fig. 2
ENGLISH
Fig. 3
RONDELLA PIANA
flat wheel
C TUBO OVALE - CROSSBAR 40X20
B TUBO OVALE - CROSSBAR 40X20
A TUBO TONDO - CROSSBAR Ø 25
Fig. 4
Fig. 1
-Place the legs facing the threaded sleeve into
the frame of the desk by keeping the hole
with bigger diameter on the exterminal side
of the desk.
Fig. 3
-Insert the screws 6x35 (make sure that their
wheels are correctly placed into allen screw).
Note: screws must be firmly fixed at the end
of assembly.
Fig. 4
-Place the crossbars as shown in the drawing:
crossbar C end B in the C end B.
crossbar A in the A (image 1.1).
Fig. 5
-Insert the screws 8x20 (make sure that their
wheels are correctly placed into allen screw).
Note: screws must be firmly fixed at the end
of assembly.
RONDELLA SPACCATA
open wheel
Fig. 5
RONDELLA PIANA
flat wheel
GIMA SPA NON SI ASSUME ALCUNA RESPONSABILITÀ PER INCIDENTI DERIVATI DA UN MONTAGGIO ERRATO O DA UN USO
IMPROPRIO DELL’ATTREZZATURA IN OGGETTO
GIMA S.P.A. DISCLAIMS ANY RESPONSIBILITY IN CASE OF ACCIDENTS DUE TO WRONG ASSEMBLY OR INCORRECT USE.
3
A
A
B
C
1 pied gauche
1 PATA IZQ.
2 pied droit
2 PATA DCHA.
Fig. 1
1 pied gauche
1 PATA IZQ.
2 pied droit
2 PATA DCHA.
FRANÇOIS
Fig. 1
-Enlever les pieds et les traverses de la boîte.
-Plaer les pieds face aux bagues taraudées dans le châssis du plan rembourré en gardant le trou avec le diamètre plus grand à l’extérieur
du divan.
Fig. 3
-Placer les vis 6x35 avec une rondelle
de diamètre 6x18.
N.B.: en fin de montage, serrer les vis à fond.
Fig. 4
-Assembler les pieds avec les tubes ovales B
et C et les fixer dans leurs trous respectifs B
et C.
-Placer le tube rond A diamètre 25
avec les repose-pieds et le fixer aux trous A
Fig. 5
-Utiliser les vis 8x20 en enfilant d’abord
la rondelle en plastique, puis la rondelle plate.
N.B.: en fin de montage, serrer les vis à fond
avant de placer les bouchons en plastique.
Fig. 2
ESPAÑOL
Fig. 3
RONDELLE
ARANDELA LLANA
C tube ovale - TUBO OVALADO 40X20
B tube ovale - TUBO OVALADO 40X20
A tube rond - TUBO REDONDO Ø 25
Fig. 3
- Para la fijación, utilice los tornillos allen
de 6x35 con arandela de diámetro 6x18.
N.B.: los tornillos se deben apretar al final
del montaje.
Fig. 4
-Una las patas con los tubos ovalados B y C fijándolos en los agujeros correspondientes
B y C.
-Coloque el tubo redondo A diámetro 25
con reposapiés fijándolos a los agujeros A.
Fig. 4
rondelle ouverte
ARANDELA GROWER
Fig. 5
Fig. 1
-Retire de la caja las pata y los travesaños.
-Coloque las patas frente a los casquillos
roscados en el armazón del tablero manteniendo
el agujero con diámetro mayor en el exterior
del escritorio.
rondelle plate
ARANDELA LLANA
Fig. 5
- Utilice los tornillos allen 8x20 colocando primero
las arandela Grower y después la llana.
N.B.: los tornillos se deben apretar al final
del montaje antes de colocar los tapones
de plástico.
GIMA SPA N’EST PAS RESPONSABLE POUR LES ACCIDENTS DUS À UN MONTAGE ERRONÉ OU À UNE UTILISATION INCORRECTE
DU MATÉRIEL
GIMA S.P.A. NO SE ASUME NINGUNA RESPONSABILIDAD POR ACCIDENTES DERIVADOS DE UN MONTAJE INCORRECTO
O DE UN USO INDEBIDO DE ESTE EQUIPO.