1
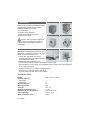
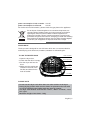
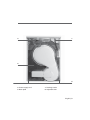
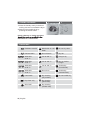
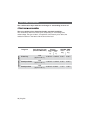
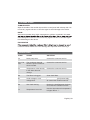
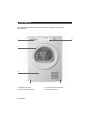
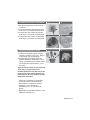
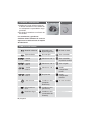
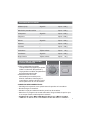
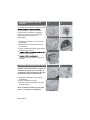
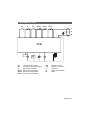
User Manual HD70-A82
HD80-A82
Heat Pump Dryer
TABLE OF CONTENTS
Dear customer ................................................................................................3
Scope of delivery ............................................................................................3
Intended use ...................................................................................................3
Safety instructions .........................................................................................4
Unpacking .......................................................................................................6
Installation ......................................................................................................6
Using the dryer rack ....................................................................................... 7
Front view .......................................................................................................8
Rear view .........................................................................................................9
Control panel ................................................................................................10
Program modes ............................................................................................12
Preparing the dryer ...................................................................................... 13
Preparing the laundry .................................................................................. 13
Loading the dryer .........................................................................................14
Care chart ......................................................................................................14
Load reference ..............................................................................................15
Set program & start ......................................................................................15
End of dry cycle ............................................................................................16
Empty the water tank ................................................................................... 16
........................................................................................17
............................................................................ 17
Heat pump technology ................................................................................. 18
Consumption table ....................................................................................... 18
Cleaning & care ............................................................................................19
Error codes ...................................................................................................19
Troubleshooting ...........................................................................................20
Electric circuit diagram ................................................................................ 21
Customer service .........................................................................................22
2 | English
DEAR CUSTOMER
Instructions showing this icon
need special attention for safe
handling.
Thank you for your purchase of a Haier
product. Please read the manual and
safety instructions carefully and keep
them for future reference and pass
them on to any future owner.
SCOPE OF DELIVERY
1
2
Please check, if the accessories and
literature is in accordance with this list.
1 User manual
2 Rack
INTENDED USE
This heat pump tumble dryer is
designed for household use only. It
should be used to dry items which
have been washed in a water solution
and are marked on the manufacturer's
care label as being suitable for tumble
drying.
It is not intended for commercial or
outdoor use.
Haier cannot be held liable for
damage resulting from incorrect or
improper use or operation.
This tumble dryer conforms to current
safety requirements.
English | 3
SAFETY INSTRUCTIONS
r The tumble dryer must NOT be used by people with reduced physical, sensory
or mental capabilities, or lack of experience or knowledge, if they are supervised
when using it or have been shown how to use it in a safe way and understand
the hazards involved.
Children under 8 years of age must be kept away from the tumble dryer unless
they are constantly supervised.
r Children 8 years and older may only use, clean or maintain the tumble dryer
without supervision if they have been shown how to do so in a safe way and
understand the hazards involved.
r The tumble dryer is not a toy! To prevent the risk of injury, do not allow children
to play with it or near it, or to play with the controls.
r Before setting up the tumble dryer, check it for any externally visible damage.
r Do not install or use a damaged tumble dryer.
r Before connecting the tumble dryer, ensure that the connection data match the
mains electricity supply. if in any doubt, consult a qualified electrician.
r The electrical safety of this tumble dryer can only be guaranteed when
correctly earthed.
r Do not connect the tumble dryer to the mains electricity supply by an extension
lead.
r If the supply cord is damaged, it must be replaced by the manufacturer, its
service agent or similarly qualified person.
r Faulty components must be replaced by original spare parts.
r The tumble dryer must be isolated from the mains supply in the event of a fault
and during cleaning and maintenance.
r Do not install the tumble dryer in a room where there is a risk of frost occurring.
The ambient temperature should be between 5 °C and 35 °C.
r Do not install the tumble dryer behind a lockable door, a sliding door or a door
with hinges on the opposite side of the tumble dryer door as this limits the full
opening of the tumble dryer door.
r Always keep the area around the tumble dryer free of dust and lint. Also make
sure that the area is dry and well ventilated.
r The tumble dryer must not be used in a non-stationary location (e.g. a ship).
r Do not make any alterations to the tumble dryer, unless authorised to do so by
Haier.
r In areas which may be subject to infestation by cockroaches or other vermin,
pay particular attention to keeping the tumble dryer and its surroundings in a
clean condition at all times.
r Do not dry unwashed items in the tumble dryer.
r Do not load more than Nominal load.
r Items which contain residues of inflammable substances such as cooking oil,
acetone, alcohol, benzine, petrol, kerosene, spot removers, turpentine, waxes,
wax removers or other chemicals should not be dried in the tumble dryer.
r If it is unavoidable to dry items that contain vegetable oil, cooking oil, hair care
or cosmetical products, they should be washed using additional detergent and
select a high temperature. If in doubt, wash the items several times.
4 | English
r Items which contain a large proportion of rubber, foam rubber (latex foam)
or rubber like materials such as shower caps, waterproof textiles, rubberised
articles and items of clothing and pillows with foam rubber filling should not be
dried in the tumble dryer.
r Items which have been cleaned using chemicals such as professional
drycleaning agents, should not be dried in the tumble dryer.
r Do not dry damaged items which contain padding or fillings (e.g. pillows,
jackets), as the filling can get out with the risk of igniting in the dryer.
r Remove all items such as lighters and matches from pockets.
r The end of a dryer cycle runs without heat (cool down cycle) to ensure that the
items do not get damaged and are at a handleable temperature.
r Warning: Do not switch the tumble dryer off before the drying cycle is finished.
Afterwards, the laundry must be hung up or spread out to cool it down.
r Fabric softeners and similar products must be used as specified by the
manufacturer's packaging.
r The dryer must not be used without the lint filters in place or with damaged
filters.
r The lint filters must be cleaned regularly.
r Close the door once the laundry is removed to prevent children, animals and
objects getting into the drum.
r Do not sit or lean on the door, as this can cause the tumble dryer to tilt.
r Condensed water is not drinking water. It can cause health problems in both
people and animals.
English | 5
UNPACKING
Remove all packaging material including
the polystyrene base. All packaging
material should be recycled.
1 Cut the strips.
2 Lift the cover upwards.
3 Remove the protective parts.
4 Remove the base.
1
2
3
4
1
2
Ensure that any plastic wrappings,
bags, etc are kept out of the reach of
babies and young children. Danger of
suffocation.
INSTALLATION
WARNING. Following transportation and
installation, you MUST leave the dryer to
stand for two hours before use.
1 Check the dryer does not rock or
wobble.Adjust the four feet to level the
dryer before operation.
2 Make sure the socket meets the
requirements and connect it to an earthed socket outlet.
• Do not install in a room which is susceptible to frost. Water may cause damage
once it starts to freeze.
• Transport the dryer in a vertical upright position.
• There may be residual water in the dryer.
This can leak out if the dryer is at an angle.
TECHNICAL DATA
Power
Nominal load (kg)
HD70-A82
HD80-A82
Drying programs
Max. power (W)
Fuse (A)
Ambient temperature (°C)
Dimensions (H x D x W mm)
Net weight (kg)
Water protection level
6 | English
220 - 240 V~ / 50 Hz
7
8
12
900
min. 10
5 - 35
845 x 650 x 595
approx. 51,5
IPX4
power consumption in left on mode: 0.05 W
power consumption in off mode:
0.05 W
For further technical information, please check the type plate on the appliance.
Do not dispose of electrical appliances as unsorted municipal waste, use
separate collection facilities.Contact your local government for information
regarding the collection systems available. If electrical appliances are
diaposed of in landfills or dumps, hazardous substances can leak into the
groundwater and get into the food chain, damaging your health and well-being.
When replacing old appliances with new ones, the retailer is legally obligated
to take back your old appliance for diaposals at least free of charge.
USING THE DRYER RACK
DRYER RACK
The dryer rack is designed for use with items which are not recommended for
tumble drying such as trainers, sneakers, sweaters or delicate lingerie.
TO USE THE DRYER RACK
1. Open the dryer door.
2. Check that the drum is empty.
3. Put the dryer rack into the
drum.
4. Make sure the catches are
inserted in the hole of the
lint filter and locked in the
hook of basket.
Hook of basket
Drum openings
Drum
Dryer rack
Lint filter
PLEASE NOTE
r Do not use this dryer rack when there are other clothes in the dryer.
r During drying, please make sure the items are placed on the rack with
r The dryer rack must be used with the “Timer”, “Wool” or “Rack”, “Cool
Air” cycle.
r Maximum weight of wet items: 1.5kg.
English | 7
FRONT VIEW
The pictures may differ from the appliance you have purchased due to technical
improvements.
1
4
2
3
1 Water tank
2 Tumble dryer door
8 | English
3 Service door
4 Control panel
REAR VIEW
5
7
6
8
5 Power supply cord
6 Back plate
7 Drainage outlet
8 Adjustable feet
English | 9
CONTROL PANEL
1
2
3
4
5
6
7
Synthetic
Start
Delay
+
Timer
L
Temp.
H
M
-
Extra Dry
Extra Dry
Ready to
Store
Ready to
Iron
Ready to
Store
Ready to
Iron
Sport
Delicate
8
Anti-Crease
9
Rack
10
Cool Air
11
Cotton
Power
Mix
Towel
Timer
Wool
Baby
Garment
Start/Pause
12
13
14
1 Temp button
Set temperature to the desired level.
2 Start Delay button
Press button for delayed start (in 1 hour intervals
-up to 19 hours). The appliance should be
the delayed operation.
3
Filters must be cleaned regularly.
See Lint Filter Cleaning or Condenser
Filter Cleaning section of the manual.
4 Display
The display shows the remaining time, the delay
time and other related information.
Note: The remaining time is a default value,
this time will be re-calculated depending on
additional program settings and the moisture
content of the laundry.
5 Child-lock indicator
To activate the Child-lock function after a cycle
has been started, press the Rack & Cool-Air
buttons for 3 sec. until the indicator lights up. To
deactivate press both button for 3 sec. again.
Note: When the cycle ends or the power
supply is interrupted the function will be
deleted automatically.
10 | English
6 Timer buttons
Modify the default time to your needs, using the +
and - timer buttons.
7 Empty tank indicator
Water tank must be emptied.
Important: Empty the water tank after each
drying cycle. See Empty the water tank section
of the manual.
8 Delicate button
Use this function for delicate fabrics. It lowers the
temperature and lengthens the drying cycle time
to take better care of the laundry.
9 Anti-Crease button
Use this function to lengthen the automatic
anticrease phase at the end of each program by
60 minutes.
Note: The laundry can be removed at any time
during the anti-crease phase.
10 Rack button
Press the Rack button if the rack should be used
in a drying cycle.
11 Cool Air button
Use this function for fabrics that can not be dried
with one of the heat settings.
12 Start/Pause button
Press Start/Pause to Start a drying cycle. Press
button again to pause the drying cycle – indicator
light is flashing. Press button again to continue.
13 Program knob
Select one of the 12 programs using this knob.
The indicator of the respective program lights up.
See Program Modes section of the manual for
further information.
14 Power button
Press Power button to switch on/off the tumble
dryer.
signal
You can choose signal as you need. To activate
the signal function after the Cool air cycle has
been selected, press temp & delicate for 5 sec.
until the screen show beep on. To deactivate
press both button for 5 sec. again until the screen
show beep off.
English | 11
SPECIAL
SYNTHETICS
COTTON /
LINEN
PROGRAM MODES
PROGRAM
DRYING
DEGREE
RECOMMENDED
LAUNDRY
MAX. LOAD
HD80 HD70
Extra Dry
Extra dry
Heavy cotton, sheets,
gowns
8 kg
7 kg
Ready to Store *) Ready to wear
Cotton, sheets, coats
8 kg
7 kg
Ready to Iron
Damp
Ordinary cotton
8 kg
7 kg
Extra Dry
Extra dry
Heavy synthetic
4 kg
4 kg
Ready to Store
Ready to wear
Ordinary synthetic
4 kg
4 kg
Ready to Iron
Ready to wear
Ordinary synthetic
4 kg
4 kg
Sport
Ready to wear
Sportswear
4 kg
4 kg
Towel
Ready to wear
Towels
8 kg
7 kg
Wool **)
Fluff but not dry
Woollen clothing
1 kg
1 kg
Baby Garment
Ready to wear
Baby clothing
4 kg
4 kg
Timer
Ready to wear
Heavy fabrics, need
further drying
8 kg
7 kg
Mix
Ready to wear
Heavy fabrics, need
further drying
4 kg
4 kg
*) EN 61121 test program setting.
**) Special program for careful treating of woollen fabrics with warm air, after they
have been worn or stored for long periods. Wool fibres stand up and the wool
becomes soft and cosy.
12 | English
PREPARING THE DRYER
1 Connect the tumble dryer to a power
socket.
2 Make sure the water tank is empty
and properly installed.
3 Make sure that the lint filter is clean
and properly installed.
4 Make sure that the condenser filter is
clean and properly installed.
PREPARING THE LAUNDRY
1
2
3
4
1
2
1 Sort clothes according to fabric (cotton,
synthetics, wool etc.). Only laundry
that has been spun.
2 Empty pockets of all sharp or
flammable objects such as keys,
lighters and matches. Remove harder
decorative objects such as brooches.
Follow the instructions on the laundry
label and dry only machine-dryable
garments. Do not dry silk, down or
other delicate fabrics to avoid damage
to the laundry.
– Close zippers and hooks, make sure
the buttons are sewn on tightly and
place small items such as socks, bras
etc. in a wash bag.
– Unfold large pieces of fabric such as
bed sheets, table cloth etc.
English | 13
LOADING THE DRYER
1
2
1 Place the laundry evenly in the drum
making sure not to overload the dryer.
2 Switch on the tumble dryer by
pressing the Power button.
Fabric softeners or similar products
manufacturer’s instructions.
CARE CHART
Resistant material
Bleachable in cold
water
Do not dry clean
Delicate fabric
Do not bleach
Dry flat
Washable
at 95 °C
Iron at 200 °C
Hang to dry
Washable
at 60 °C
Iron at 150 °C
Dry on clothes
hanger
Washable
at 40 °C
Iron at 100 °C
Tumble dry
(normal heat)
Washable
at 30 °C
Do not iron
Tumble dry
(reduced heat)
Hand wash
Dry cleaning
(any solvent)
Do not tumble dry
Dry clean only
Dry cleaning
(pericloride)
Wool seal
Dry cleaning
(aviation fuel)
14 | English
LOAD REFERENCE
Bed sheet (single)
Cotton
Approx. 800 g
Blended fabric clothes
/
Approx. 800 g
Jackets
Cotton
Approx. 800 g
Jeans
/
Approx. 800 g
Overalls
Cotton
Approx. 950 g
Pyjamas
/
Approx. 200 g
Shirts
/
Approx. 300 g
Socks
Blended fabrics
Approx.
T-Shirts
Cotton
Approx. 300 g
Underwear
Blended fabrics
Approx.
SET PROGRAM & START
1
50 g
70 g
2
1 Turn the program knob to select the
desired program. It can be modified
by use of the Timer and Temperature
buttons.
2 Set functions such as Delay, Delicate,
Anti-Crease. Afterwards press the
Start/Pause button to start the dry
cycle.
ENVIRONMENTAL TIPS
– Spin the laundry as dry as possible before putting it into the tumble dryer.
– Avoid overloading the tumble dryer.
– Shake the laundry loose before putting it into the tumble dryer.
– Choose a proper drying program. Make sure the laundry is not dried longer
than needed.
– Make sure to use the tumble dryer with cleaned filters.
English | 15
END OF DRY CYCLE
1
2
3
4
The tumble dryer stops operation
automatically when a dry cycle is
complete. The display shows END. Open
the tumble dryer door and remove the
laundry. If the laundry is not removed the
anti-crease program starts automatically.
1 Switch off the tumble dryer by pressing
the Power button.
2 Unplug the tumble dryer from the
power socket.
3 Empty the water tank after each dry
cycle.
4 Clean the lint filter after each dry
cycle.
5 Clean the condenser filter approx.
every 20 dry cycles.
EMPTY THE WATER TANK
5
1
During operation, steam condenses to
water which is collected in the water
tank. Empty the water tank after each
drying cycle.
1 Pull out the water tank from its
housing.
2 Empty the water tank.
3 Reinstall the water tank to the tumble
dryer.
Note: Do not use the water for any
kind of drinking or food processing.
16 | English
3
2
LINT FILTER CLEANING
1
2
3
4
1
2
3
4
5
6
cycle.
1 Re move the lint filter from the drum.
2 Open up the lint filter.
3 Clean the lint filter form any lint
residuals.
4 Reinstall the cleaned lint filter in the
tumble dryer.
can be cleaned under running water.
Let it dry thoroughly before use.
CONDENSER FILTER CLEANING
!!
"
every 20 dry cycles.
1 Open the Service door.
2 Open the four levers of the condenser
filter.
3 Pull out the condenser filter from its
housing.
4 Remove the rear filter screen.
5 Clean the condenser filter form any
residuals.
6 Reinstall the rear filter to the
condenser filter.
To reinstall the condenser filter, follow
the above steps 3 to 1 in reverse order.
dirty, it can be cleaned under running
water. Let it dry thoroughly before
use.
English | 17
HEAT PUMP TECHNOLOGY
The condensation dryer with heat exchanger is outstanding in terms of
These are guide values determined under standard conditions.
The values may differ from those given, depending on overvoltage and
undervoltage, the type of fabric, composition of the laundry to be dried, the
residual moisture in the fabric and the size of the load.
CONSUMPTION TABLE
Program
Spin Speed in rpm
Energy
(Residual Moisture) Consumption
COTTON / LINEN
HD80
8kg
HD70
7kg
DRYING TIME
HD80 HD70
7kg
8kg
Extra Dry
1000
(approx. 60 %)
2.08 kwh 1.84kwh 2:50 h
2:28 h
Ready to Store
1000
(approx. 60 %)
1.95 kwh 1.73kwh 2:40 h
2:20 h
Ready to Iron
1000
(approx. 60 %)
0.90 kwh 0.8kwh
1:06 h
18 | English
1:15 h
CLEANING & CARE
TUMBLE DRYER
Wipe the outside of the tumble dryer and the control panel with a damp cloth. Do
not use any organic solvent or corrosive agent to avoid damage to the device.
DRUM
After some operation time, fabric care agents or calcium contained in the water
some detergent to remove it. Do not use any organic solvent or corrosive agent
to avoid damage to the device.
EVAPORATOR
a vacuum cleaner. Make sure not to damage the evaporator while cleaning it.
ERROR CODES
CODE
CAUSE
SOLUTION
F2
Drain pump error.
Contact the customer service.
F31, F32,
F33
The condenser thermal
sensor is open-circuited or
short-circuited.
Contact the customer service.
F4
Temperature of the laundry
in the drum does not
change.
Contact the customer service.
E6
The filters is clogged.
Clean both filters.
E7
Under voltage or over
voltage fault.
Check the voltage of power suply.
Or contact the customer service.
E8
Over load warning.
Reduce the load,Repower the dryer.
Or contact the customer service.
Lo
Temperature is too low.
Use the dryer when air temperature
is higher than 2 ℃.
English | 19
TROUBLESHOOTING
Before contacting the customer service, please check the following
circumstances:
PROBLEM
CAUSES
SOLUTION
Tumble dryer
– Poor connection to the
fails to operate. power supply.
– Power failure.
– No drying program is set.
– Device has not been
switched on.
– The water tank is full.
– The door is not closed
properly.
▪
Tumble dryer
– The laundry has reached
fails to operate
the condition defined by
and the display
the program.
shows END.
– There is no laundry in the
drum.
▪
Check if the program setting is
appropriate.
▪
Check if there is laundry in the
drum.
Drying time is
too long and
the results are
not satisfactory.
– The program setting is not
correct.
– The filter is clogged.
– The evaporator is blocked.
– The tumble dryer is
overloaded.
– The laundry is too wet.
▪
Make sure the program is set
correctly.
Clean the filter screen.
Clean the evaporator.
Reduce the amount of laundry.
– The vent duct is blocked.
▪
▪
▪
▪
▪
▪
▪
▪
▪
▪
Check connection to the power
supply.
Check the power supply.
Set a drying program.
Switch the device on.
Empty the water tank.
Close the door properly.
Spin the laundry properly
before drying.
Check the vent duct and
unblock it.
The automatic adjustment is a
Remaining time The remaining time will be
on the display adjusted continuously based normal operation.
stops or skips. upon the following factors:
– Type of laundy.
– Loaded amount.
– Moisture degree of the
laundry.
– Ambient temperature.
20 | English
ELECTRIC CIRCUIT DIAGRAM
K1
H
K2
NTC1
NTC2
NTC3
L
G
N
PCB
HP
K1
K2
H
NTC1
NTC2
NTC3
DP
Door switch
Water level switch
Humidity sensor
Temperature sensor
Temperature sensor
Temperature sensor
L
F
M
HP
DP
L
F
M
Heat pump
Drainage pump
Lamp
Fan motor
Motor
English | 21
CUSTOMER SERVICE
If you have a problem with your appliance, first see the Troubleshooting section
of the manual. If you cannot find a solution there, please contact your local
dealer or try one of the following numbers.
Before contacting the customer service, ensure that you have the following data
available. The data can be found on the rating plate:
MODEL
SERIAL NUMBER
Also check the Warranty Card supplied with the product in case of warranty.
COUNTRY
PHONE NUMBER
COSTS
Haier Italy (IT)
199-100 912
Haier Spain (ES & PT)
902 509 123
Haier Germany (DE)
0180 5 39 39 99*
* 14 Ct/Min Landline /
max. 42 Ct/Min Mobile
Haier Austria (AT)
0820 001 205*
* 14,53 Ct/Min Landline /
max. 20 Ct/Min all others
Haier United Kingdom (UK)
0845 025 30 25
Haier France (FR)
0980 406 409
For other countries please refer to the service and support area of:
www.haier.com.
22 | English
Mode d'emploi HD70-A82-F
HD80-A82-F
Sèche-linge avec
pompe à chaleur
Manual del usuario HD70-A82
HD80-A82
Secadora con
bomba de calor
ÍNDICE DE CONTENIDO
Estimado cliente .............................................................................................3
elementos de suministro ............................................................................... 3
Uso previsto ....................................................................................................3
Instrucciones de seguridad ........................................................................... 4
Desembalaje ...................................................................................................6
Instalación .......................................................................................................6
Utilización del cesto ....................................................................................... 7
Vista frontal .....................................................................................................8
Vista posterior ................................................................................................9
Panel de control ...........................................................................................10
Programas .....................................................................................................12
Preparación de la secadora ......................................................................... 13
Preparación de la ropa ................................................................................. 13
Carga de la secadora ................................................................................... 14
Símbolos de lavado ...................................................................................... 14
Referencias de carga ................................................................................... 15
Selección del programa y puesta en marcha ............................................ 15
Finalización del ciclo de secado ................................................................. 16
Vaciado del depósito de agua ..................................................................... 16
..................................................................... 17
................................................................. 17
Tecnología de bomba de calor .................................................................... 18
Tabla de consumos ......................................................................................18
Limpieza y cuidado ...................................................................................... 19
Códigos de error ..........................................................................................19
Solución de problemas ................................................................................ 20
Esquema eléctrico ........................................................................................21
Servicio de atención al cliente .................................................................... 22
2 | Español
ESTIMADO CLIENTE
Las instrucciones con este
símbolo requieren que preste
especial atención para
garantizar la seguridad.
Gracias por haber adquirido un
producto Haier. Lea detenidamente
el manual y las instrucciones de
seguridad, guárdelos como referencia
para el futuro y entréguelos al nuevo
propietario en caso de traspasar
aparato.
ELEMENTOS DE SUMINISTRO
1
2
Compruebe que tenga los accesorios y
documentos indicados a continuación.
1 Manual del usuario
2 Cesto
USO PREVISTO
Esta secadora con bomba de calor
está diseñada exclusivamente para
uso doméstico. Únicamente debe
utilizarse para secar prendas lavadas
previamente en una solución acuosa
que sean aptas para secadora de
acuerdo con la etiqueta del fabricante.
No está prevista para uso comercial ni
en exteriores.
Haier no se hará responsable de los
daños derivados del uso u operación
incorrectos o inadecuados.
Esta secadora cumple las normas de
seguridad en vigor.
Español | 3
INSTRUCCIONES DE SEGURIDAD
t Solo se permite el uso de la secadora por parte de personas con limitaciones
físicas, psíquicas o sensoriales, o que no tengan la experiencia o los
conocimientos necesarios, bajo la supervisión de otra persona o si se les ha
enseñado cómo utilizarla con seguridad y conocen los peligros potenciales.
t Los menores de 8 años deben mantenerse alejados de la secadora siempre
que no estén bajo la supervisión directa de un adulto.
t Los niños mayores de 8 años solo deben utilizar, limpiar o mantener la
secadora sin vigilancia si se les ha enseñado cómo hacerlo con seguridad y
conocen los peligros potenciales.
t ¡La secadora no es un juguete! Para evitar posibles daños personales, no
permita que los niños jueguen con ella o cerca de ella, ni que toquen los mandos.
t Antes de instalar la secadora, compruebe que no presente daños visibles.
t No intente instalar ni utilizar una secadora deteriorada.
t Antes de conectar la secadora, asegúrese de que los datos de conexión
coincidan con los del suministro eléctrico. En caso de duda, consulte a un
electricista cualificado.
t La única manera de garantizar la seguridad eléctrica de la secadora es por
medio de una toma a tierra correcta.
t No utilice cables alargadores para conectar la secadora al suministro eléctrico.
t Si el cable de alimentación está deteriorado, su sustitución deberá encargarse al
fabricante, a un agente de servicio oficial o a otro técnico debidamente cualificado.
t Los componentes averiados deben sustituirse por repuestos originales.
t En caso de producirse un fallo y durante los trabajos de mantenimiento y
limpieza, la secadora deberá aislarse del suministro eléctrico.
t No instale la secadora en lugares con riesgo de escarcha. La temperatura
ambiente debe permanecer entre 5 °C y 35 °C.
t No instale la secadora detrás de una puerta con cerradura, corrediza o con
bisagras en dirección opuesta a la secadora, puesto que la puerta de la
secadora no podría abrirse completamente.
t Mantenga siempre la zona alrededor de la secadora limpia de polvo y pelusas.
Asegúrese también de que el lugar esté seco y bien ventilado.
t No está permitido utilizar la secadora en lugares que puedan moverse (p. ej.
en un barco).
t No realice modificaciones no autorizadas por Haier en la secadora.
t En los lugares con riesgo de infestación de cucarachas y otros insectos, preste
especial atención a que la secadora y sus alrededores estén siempre limpios.
t No utilice la secadora para secar ropa que no se haya lavado previamente.
t No supere la carga nominal.
t No intente secar prendas con restos de sustancias inflamables como aceite
de cocina, acetona, alcohol, bencina, gasolina, queroseno, quitamanchas,
aguarrás, ceras, quitaceras y otros productos químicos.
t Si fuera inevitable tener que secar prendas con restos de aceite vegetal,
aceite de cocina o productos cosméticos o capilares, lávelos previamente con
una cantidad adicional de detergente y a alta temperatura. En caso de duda,
realice varios lavados.
4 | Español
t No intente secar prendas con grandes cantidades de goma, gomaespuma (látex)
o materiales similares, como gorros de ducha, prendas impermeables, artículos
recubiertos de caucho o ropa y almohadas con relleno de gomaespuma.
t No intente secar prendas que se hayan limpiado previamente con productos
químicos, como, por ejemplo, productos profesionales de lavado en seco.
t No intente secar artículos deteriorados que contengan acolchados o rellenos
(como almohadas o chaquetas), ya que el relleno podría salirse e inflamarse
dentro de la secadora.
t Extraiga todos los objetos de los bolsillos, como por ejemplo mecheros y
cerillas.
t El final del ciclo de secado se desarrolla sin calor (enfriamiento) para asegurarse
de que las prendas no resulten dañadas y estén a una temperatura moderada.
t Advertencia: no apague la secadora antes de que termine el ciclo de secado.
Acto seguido, cuelgue o extienda la ropa para que se enfríe.
t Los suavizantes y productos similares deben utilizarse de acuerdo con las
indicaciones del envase del fabricante.
t No utilice la secadora sin los filtros de pelusas o si estos están deteriorados.
t Los filtros de pelusas deben limpiarse con regularidad.
t Cuando haya retirado la ropa de la secadora, cierre la puerta para evitar que
puedan entrar niños, animales u objetos a su interior.
t No se siente ni apoye en la puerta, ya que podría hacer volcar la secadora.
t El agua condensada no se puede beber, ya que puede provocar problemas de
salud tanto en personas como en animales.
Español | 5
DESEMBALAJE
1
2
3
4
1
2
Retire todo el material de embalaje,
incluida la base de poliestireno. Todo el
material de embalaje debe reciclarse.
1
2
3
4
Corte las cintas.
Levante la cubierta.
Retire los protectores.
Retire la base.
Asegúrese de que los plásticos,
bolsas, etc. permanezcan en todo
momento fuera del alcance de los bebés
y los niños pequeños. Peligro de asfixia.
INSTALACIÓN
1 Antes de utilizar el aparato, nivele las
cuatro patas.
2 Compruebe que la toma de corriente
cumpla con los requisitos especificados
y que esté conectada a tierra.
• No instale la secadora en un lugar donde pudiera formarse escarcha, puesto
que el agua congelada podría dañarla.
• Transporte la secadora de pie y en posición vertical.
Después de transportar la secadora, déjela reposar durante dos horas.
• Podría haber restos de agua en el interior de la secadora.
Si la secadora está inclinada, podría producirse una fuga de agua.
DATOS TÉCNICOS
Alimentación
220 - 240 V~ / 50 Hz
Carga nominal (kg)
HD70-A82
7
HD80-A82
8
Programas de secado
12
Máx. potencia (W)
900
Fusible (A)
Mín. 10
Temperatura ambiente (°C)
5 - 35
Dimensiones en mm (Al x Pr x An)
845 x 650 x 595
Peso neto (kg)
Aprox. 51,5
Nivel de protección contra el agua
IPX4
6 | Español
Consumo de potencia en modo encendido: 0.05 W
Consumo de potencia en modo apagado: 0.05 W
Para conocer el resto de información técnica, consulte la placa de características
del aparato.
No deseche los aparatos eléctricos como residuos urbanos sin clasificar, utilice las
instalaciones de recogida selectiva. Póngase en contacto con los representantes
gubernamentales de su municipio para obtener información en relación con los
sistemas de recogida disponibles. Si los aparatos eléctricos se desechan en
vertederos o basureros, las sustancias peligrosas se podrían filtrar en las aguas
subterráneas y llegar hasta la cadena alimenticia, lo que supondría un daño para
su salud y bienestar.Para la sustitución de aparatos antiguos por nuevos, el
vendedor está legalmente obligado a aceptar los aparatos viejos para encargarse
de su eliminación al menos y de forma gratuita.
UTILIZACIÓN DEL CESTO
CESTO
El cesto está diseñado para colocar prendas que no se pueden hacer girar
durante el secado, como zapatillas deportivas, jerséis o lencería.
CÓMO UTILIZAR EL CESTO
1. Abra la puerta de la secadora.
2. Compruebe que el tambor
esté vacío.
3. Coloque el cesto en el
tambor.
4. Asegúrese de que los
enganches estén
introducidos en el orificio
del filtro de pelusas y
fijados en el gancho.
Gancho del cesto
Aberturas
del tambor
Tambor
Cesto
Filtro de
pelusas
ATENCIÓN
• No utilice el cesto cuando haya otras prendas de ropa en el interior de
la secadora.
• Cuando coloque prendas en el cesto, asegúrese de que no exista
rotación del tambor.
• La secadora debe utilizarse con los programas “Temporizador”, “Lana”,
“Cesto” o “Aire fresco”.
• Peso máximo de las prendas mojadas: 1,5 kg.
Español | 7
VISTA FRONTAL
Las ilustraciones podrían diferir del aparato real debido a las mejoras
tecnológicas.
1
4
2
3
1 Depósito de agua
2 Puerta de la secadora
8 | Español
3 Puerta de mantenimiento
4 Panel de control
VISTA POSTERIOR
5
7
6
8
5 Cable de alimentación
6 Placa trasera
7 Salida de drenaje
8 Patas ajustables
Español | 9
PANEL DE CONTROL
1
2
3
4
5
6
7
Sintéticos Extra Seco
Inicio
diferido
M
L
Temp.
Para
plancha
Temporizador
-
H
Extra Seco Algodón
Para
guardar
Para Encendido
plancha
Para
guardar
+
Sport
Mixtos
Temporizador
Toallas
Ropa
de Bebé
Lana
Delicados
8
Antiarrugas
9
Cesto
10
Aire frío
11
1 Botón de temp
Inicio/Pausa
12
13
14
Permite ajustar la temp al nivel deseado.
2 Botón de inicio diferido
horas, en intervalos de 1 hora). El aparato debe
estar preparado. A continuación, pulse el botón
Inicio/Pausa para activar el inicio diferido.
3 Indicadores de limpieza
Consulte el apartado
pelusas o
manual.
4 Pantalla
del
En la pantalla se muestra el tiempo restante,
el tiempo de inicio diferido y otra información
relacionada.
Nota: el tiempo restante es un valor
selección de programas adicionales y de la
humedad de la ropa.
5 Indicador del bloqueo
infantil
Para activar la función de bloqueo infantil una vez
que haya comenzado un ciclo, pulse los botones
Cesto y Aire fresco durante 3 seg. hasta
que el indicador se ilumine. Para desactivarla,
mantenga pulsados de nuevo ambos botones
durante 3 segundos nuevamente.
Nota: esta función se desactiva
produce un corte en la alimentación eléctrica.
10 | Español
6 Botones del
temporizador
Los botones + y - del temporizador permiten
7 Indicador de vaciado
del depósito
Es necesario vaciar el depósito de agua.
Importante: vacíe el depósito de agua
después de cada ciclo de secado. Consulte
el apartado Vaciado del depósito de agua del
manual.
8 Botón de Delicados
delicadas
Utilice esta función para los tejidos delicados.
Reduce la temperatura y alarga la duración del
ciclo de secado para mejorar el cuidado de la
ropa.
9 Botón antiarrugas
Utilice esta función para alargar 60 minutos la
fase antiarrugas automática que se lleva a cabo
Nota: durante la fase antiarrugas, la ropa
puede quitarse en cualquier momento.
10 Botón del cesto
Presione el botón Cesto para utilizar el cesto en
un ciclo de secado.
11 Botón de aire frio
Utilice esta función con los tejidos que no puedan
secarse utilizando calor.
12 Botón Inicio/Pausa
Presione el botón Inicio/Pausa para activar
un ciclo de secado. Presiónelo de nuevo para
pausar el ciclo (el indicador parpadeará).
Presiónelo otra vez para reanudar el ciclo.
13 Rueda de programas
Utilice esta rueda para seleccionar uno de los 12
programas disponibles.
Se iluminará el indicador del programa
seleccionado. Para obtener más información,
consulte el apartado Programas del manual.
14 Botón de encendido
Presione el botón de encendido para encender/
apagar la secadora.
avisos sonoros
Puede usted escoger los avisos según sus
necesidades. Para activar la función de aviso
cuando haya seleccionado el ciclo de Aire frío,
pulse “Temp.” Y “Delicados” durante 5 segundos
hasta que la pantalla muestre “beep on”. Para
desactivarlo pulse ambos botones
simultáneamente durante 5 segundos hasta que
la pantalla muestre “beep off”.
Español | 11
ESPECIAL
SINTÉTICOS
ALGODÓN / HILO
PROGRAMAS
PROGRAMA
NIVEL DE
SECADO
RECOMENDADO
PARA
Extra seco
Extraseco
Algodón resistente,
sábanas, batas
8 kg
7 kg
Para
guardar *)
Listo para usar
Algodón, sábanas,
abrigos
8 kg
7 kg
Listo para
planchar
Húmedo
Algodón normal
8 kg
7 kg
Extraseco
Extraseco
Sintéticos resistentes
4 kg
4 kg
Listo para
guardar
Listo para usar
Sintéticos normales
4 kg
4 kg
Listo para
planchar
Listo para usar
Sintéticos normales
4 kg
4 kg
Sport
Listo para usar
Ropa deportiva
4 kg
4 kg
Toalla
Listo para usar
Toallas
8 kg
7 kg
Lana **)
Suave, pero no
seco
Ropa de lana
1 kg
1 kg
Ropa de
baby
Listo para usar
Ropa de bebés
4 kg
4 kg
Temporizador Listo para usar
Tejidos resistentes,
requiere secado
adicional
8 kg
7 kg
Mixtos
Tejidos resistentes,
requiere secado
adicional
4 kg
4 kg
Listo para usar
MÁX. CARGA
HD80 HD70
*) Programa de la prueba de EN 61121.
**) Programa especial para el tratamiento delicado de tejidos de lana con aire
caliente, después de haberse utilizado o de haber permanecido guardados
suave y agradable.
12 | Español
PREPARACIÓN DE LA SECADORA
1 Enchufe la secadora a una toma de
corriente.
2 Compruebe que el depósito de agua
esté vacío y montado correctamente.
3 Compruebe que el filtro de pelusas
esté limpio y montado correctamente.
4 Compruebe que el filtro condensador
esté limpio y montado correctamente.
PREPARACIÓN DE LA ROPA
1
2
3
4
1
2
1 Ordene las prendas según el tejido
(algodón, sintético, lana, etc.). Seque
únicamente ropa centrifugada.
2 Extraiga de los bolsillos todos los
objetos afilados e inflamables, como
llaves, encendedores o cerillas. Retire
los objetos decorativos duros, como
broches.
Siga las instrucciones de las etiquetas
de la ropa y seque únicamente
!
evitar que la ropa resulte dañada, no
seque tejidos de seda, plumón u otros
materiales delicados.
– Cierre las cremalleras y enganches,
compruebe que los botones estén
bien hilados y coloque los objetos
pequeños, como calcetines,
sujetadores, etc. en una bolsa de
lavado.
– Despliegue las prendas grandes, como
sábanas, manteles, etc.
Español | 13
CARGA DE LA SECADORA
1
1 Distribuya la ropa uniformemente en
el tambor teniendo mucho cuidado de
no sobrepasar la capacidad de carga
permitida.
2 Encienda la secadora con el botón de
Encendido.
2
Encendido
Los suavizantes y productos
similares deben utilizarse tal como se
explica en las indicaciones de empleo
del fabricante.
SÍMBOLOS DE LAVADO
Material resistente
Se puede usar
lejía en agua fría
No lavar en seco
Tejido delicado
No usar lejía
Secar extendido
Lavable
a 95 °C
Planchar a 200 °C
Secar extendido
en posición vertical
Lavable
a 60 °C
Planchar a 150 °C
Secar colgado
Lavable
a 40 °C
Planchar a 100 °C
secado
a temperatura
normal
Lavable
a 30 °C
No planchar
secado
a temperatura
reducida
Lavar a mano
Lavado en seco
(cualquier
disolvente)
No usar secadora
Sólo lavado en
seco
Lavado en seco
(percloruro)
Pura lana virgen
Lavado en seco
(combustible de
aviación)
14 | Español
REFERENCIAS DE CARGA
Sábana (una)
Algodón
Aprox. 800 g
Mezcla de prendas textiles
/
Aprox. 800 g
Chaquetas
Algodón
Aprox. 800 g
Vaqueros
/
Aprox. 800 g
Monos
Algodón
Aprox. 950 g
Pijamas
/
Aprox. 200 g
Camisas
/
Aprox. 300 g
Calcetines
Tejidos mixtos
Aprox.
Camisetas
Algodón
Aprox. 300 g
Ropa interior
Tejidos mixtos
Aprox.
SELECCIÓN DEL PROGRAMA Y
PUESTA EN MARCHA
1 Gire la rueda hasta la posición
correspondiente al programa que quiera
utilizar. Los botones Temporizador y
Tepm permiten modificar los parámetros
del programa seleccionado.
2 Seleccione las funciones
adicionales que necesite (Inicio
diferido, Delicados, Antiarrugas). A
continuación, presione el botón Inicio/
Pausa para iniciar el ciclo de secado.
1
50 g
70 g
2
Inicio/Pausa
CONSEJOS MEDIOAMBIENTALES
– Centrifugue la ropa tanto como pueda antes de ponerla en la secadora.
– No sobrecargue la secadora.
– Sacuda la ropa para soltarla antes de ponerla en la secadora.
– Seleccione un programa de secado adecuado. Tenga cuidado de que la ropa
no se seque durante más tiempo del necesario.
Español | 15
FINALIZACIÓN DEL CICLO DE
SECADO
1
Encendido
La secadora se detiene automáticamente
En la pantalla se muestra FIN. Abra
la puerta de la secadora y extraiga la
ropa. Si no quita la ropa, se activará
automáticamente el programa
antiarrugas.
3
1 Apague la secadora con el botón de
Encendido.
2 Desenchufe la secadora de la toma
de corriente.
3 Vacíe el depósito de agua después de
cada ciclo de secado.
4
cada ciclo de secado.
5
aproximadamente cada 20 ciclos de
secado.
5
VACIADO DEL DEPÓSITO DE AGUA
1
Durante el funcionamiento, el vapor se
condensa en agua, que se recoge en
un depósito. Vacíe el depósito de agua
después de cada ciclo de secado.
1 Extraiga el depósito de agua de su
alojamiento.
2 Vacíe el depósito de agua.
3 Vuelva a montar el depósito de agua
en la secadora.
Nota: no beba ni permita que el agua
entre en contacto con alimentos.
16 | Español
2
3
4
2
LIMPIEZA DEL FILTRO DE PELUSAS
1
2
3
4
1
2
3
4
5
6
"
cada ciclo de secado.
1
2
3
4
Extraiga el filtro de pelusas del tambor.
Abra el filtro de pelusas hacia arriba.
Retire las pelusas del filtro.
Una vez limpio, vuelva a montar el
filtro de pelusas en la secadora.
#
limpiarlo con agua corriente. Deje que
se seque completamente antes de
volver a utilizarlo.
LIMPIEZA DEL FILTRO
CONDENSADOR
aproximadamente cada 20 ciclos de
secado.
1 Abra la puerta de mantenimiento.
2 Abra las cuatro palancas del filtro
condensador.
3 Extraiga el filtro de su alojamiento.
4 Desmonte la pantalla trasera del filtro.
5 Limpie la suciedad del filtro
condensador.
6 Vuelva a montar el filtro trasero en el
filtro condensador.
Para volver a montar el filtro
condensador, lleve a cabo los pasos 3 a
1 anteriores en orden inverso.
#
limpiarlo con agua corriente. Deje que
se seque completamente antes de
volver a utilizarlo.
Español | 17
TECNOLOGÍA DE BOMBA DE CALOR
La secadora con intercambiador de calor tiene un consumo energético
excepcional.
Los valores indicados son de referencia y bajo condiciones normales.
Los sobrevoltajes y subvoltajes, el tipo de tejido, la composición de la ropa que
se quiere secar, el nivel de humedad residual en el tejido y el volumen de la
TABLA DE CONSUMOS
ALGODÓN / HILO
Programa
Vel. centrif. en
r.p.m.
(humedad residual)
Consumo
de energía
HD80 HD70
7kg
8kg
TIEMPO DE
SECADO
HD80
HD70
8 kg
7 kg
Extra seco
1000
(aprox. 60 %)
2.08 kwh 1.84kwh 2:50 h
2:28 h
Para guardar
1000
(aprox. 60 %)
1.95 kwh 1.73kwh 2:40 h
2:20 h
Para planchar
1000
(aprox. 60 %)
0.90 kwh 0.8kwh
1:15 h
1:06 h
18 | Español
LIMPIEZA Y CUIDADO
SECADORA
Limpie el exterior de la secadora y el panel de control con un paño húmedo. A
corrosivos.
TAMBOR
Con el tiempo, los productos de cuidado de los tejidos y la cal que contiene el
agua pueden formar una película casi invisible en el interior del tambor. Límpiela
Español | 19
SOLUCIÓN DE PROBLEMAS
Antes de llamar al servicio de atención al cliente, compruebe lo siguiente:
PROBLEMA
CAUSAS
La secadora no – Está mal conectada a la
funciona.
fuente de alimentación.
– Fallo en la alimentación
eléctrica.
– No se ha seleccionado
ningún programa de
secado.
– El dispositivo no está
encendido.
– El depósito de agua está
lleno.
– La puerta está mal cerrada.
SOLUCIÓN
▪
▪
Revise la conexión a la fuente
de alimentación.
Revise la fuente de alimentación.
▪
Seleccione un programa de
secado.
▪
Encienda el equipo.
▪
Vacíe el depósito de agua.
▪
Cierre la puerta correctamente.
La secadora no – La ropa ha alcanzado el
funciona y en
objetivo definido por el
la pantalla se
programa.
visualiza FIN. – El tambor está vacío.
▪
Compruebe que esté
seleccionado el programa
correcto.
Compruebe si hay ropa en el
tambor.
El tiempo de
secado es
excesivo y
los resultados
no son
satisfactorios.
– No se ha seleccionado el
programa correcto.
▪
– El filtro está obstruido.
– El evaporador está
bloqueado.
– La secadora contiene una
carga excesiva.
– La ropa está demasiado
mojada.
– El conducto de ventilación
está obstruido.
▪
El tiempo
restante de
la pantalla se
detiene o se
omite.
20 | Español
El tiempo restante se
ajusta de manera continua
en función de los factores
siguientes:
– Tipo de ropa.
– Volumen de carga.
– Nivel de humedad de la
ropa.
– Temperatura ambiente.
▪
▪
Compruebe que esté
seleccionado el programa
correcto.
Limpie la pantalla del filtro.
Limpie el evaporador.
▪
Reduzca la cantidad de ropa.
▪
Centrifugue bien la ropa antes
de secarla.
Revise el conducto de ventilación
y elimine la obstrucción.
▪
Este tipo de ajuste automático es
normal.
ESQUEMA ELÉCTRICO
K1
H
K2
NTC1
NTC2
NTC3
L
G
N
PCB
HP
K1
K2
H
NTC1
NTC2
NTC3
DP
L
Interruptor de la puerta
Interruptor del nivel de agua
Sensor de humedad
Sensor de temperatura
Sensor de temperatura
Sensor de temperatura
F
M
HP
DP
L
F
M
Bomba de calor
Bomba de drenaje
Indicador
Motor del ventilador
Motor
Español | 21
SERVICIO DE ATENCIÓN AL CLIENTE
Si tiene algún problema con el aparato, primero consulte el apartado Solución
de problemas del manual. Si no encuentra ahí la solución, póngase en contacto
con su distribuidor local o llame a uno de los números que se proporcionan a
continuación.
Antes de llamar al servicio de atención al cliente, asegúrese de que dispone
de la siguiente información. Estos datos se pueden consultar en la placa de
categoría:
MODELO
NÚMERO DE SERIE
Compruebe además la tarjeta de garantía que se suministra con el producto en
caso de que la necesite.
PAÍS
NÚMERO DE
TELÉFONO
Haier Italia (IT)
199-100 912
COSTES
Haier España (ES y PT) 902 509 123
Haier Alemania (DE)
0180 5 39 39 99* * 14 cénts./min. (teléfono fijo) /
máx. de 42 cénts./min (móvil)
Haier Austria (AT)
0820 001 205*
* 14,53 cénts./min. (teléfono fijo) /
máx. de 20 cénts/min. (todos los
demás)
Haier Reino Unido (UK) 0845 025 30 25
Haier Francia (FR)
0980 406 409
Para los demás países, consulte el área de servicios y asistencia técnica de:
www.haier.com.
22 | Español