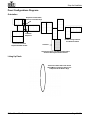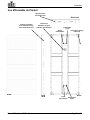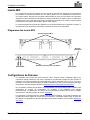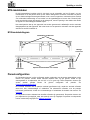
1
User Manual
Edition Notes
This User Manual includes a description of safety precautions, setup, installation, operation, and
maintenance for the CHAUVET® C6 video panel.
Trademarks
CHAUVET® is a registered trademark of Chauvet & Sons Inc. (d/b/a CHAUVET® or Chauvet). The
CHAUVET® logo in its entirety including the Chauvet name and the dotted triangle, and all other
trademarks on this manual pertaining to services, products, or marketing statements are owned or
licensed by Chauvet. Any other product names, logos, brands, company names, and other
trademarks featured or referred to within this document are the property of their respective
trademark holders.
Copyright Notice
Chauvet owns the content of this User Manual in its entirety, including but not limited to pictures,
logos, trademarks, and resources.
© Copyright 2014 Chauvet. All rights reserved.
Printed in P.R.C.
Electronically published by Chauvet in the United States of America.
Manual Use
Chauvet authorizes its customers to download and print this manual for professional information
purposes only. Chauvet expressly prohibits the usage, copy, storage, distribution, modification, or
printing of this manual or its content for any other purpose without its written consent.
Document Printing
For best results, print this document in color, on letter size paper (8.5 x 11 inches), double sided. If
using A4 paper (210 x 297 mm), configure your printer to scale the content accordingly.
Disclaimer
Chauvet believes that the information contained in this manual is accurate in all respects. However,
Chauvet assumes no responsibility for any error or omissions in this document. Chauvet reserves
the right to revise this document and to make changes from time to time in the content hereof
without obligation of Chauvet to notify any person or company of such revision or changes. This
does not constitute in any way a commitment by Chauvet to make such changes. Chauvet may
issue a revision of this manual or a new edition of it to incorporate such changes.
Document Revision
C6 User Manual, Rev. 2 is the second edition of this manual. Go to www.chauvetprofessional.com
for the latest version.
Author
Date
Editor
Date
L. Henry
08/22/14
A. Leon
09/17/14
Table Of Contents
1. Before You Begin ...................................................................................................... 7
What Is Included .......................................................................................................................... 7
Unpacking.................................................................................................................................... 7
Symbols ....................................................................................................................................... 7
Safety Notes ................................................................................................................................ 8
Expected LED Lifespan ............................................................................................................... 8
2. Introduction ............................................................................................................... 9
Product Description ..................................................................................................................... 9
Product Features ...................................................................................................................... 9
Required Accessories .............................................................................................................. 9
Optional Accessories ................................................................................................................ 9
Product Overview ...................................................................................................................... 10
Product Dimensions .................................................................................................................. 11
3. Setup And Installation ............................................................................................ 12
AC Power .................................................................................................................................. 12
AC Plug .................................................................................................................................. 12
Power Linking ............................................................................................................................ 13
Power Linking Diagram .......................................................................................................... 13
Signal Connection ..................................................................................................................... 14
Signal Connection Diagram .................................................................................................... 14
Mounting .................................................................................................................................... 15
PVP™ Rig Kit ............................................................................................................................ 15
PVP™ Rig Kit Diagram .......................................................................................................... 15
M12 Inserts ................................................................................................................................ 16
M12 Inserts Diagram .............................................................................................................. 16
Panel Configurations ................................................................................................................. 16
Panel Configurations Diagrams.............................................................................................. 17
Speego Bolts ............................................................................................................................. 18
Speego Bolt Diagram ............................................................................................................. 18
Installation Guidelines ............................................................................................................... 18
4. Configuration And Operation ................................................................................. 19
Testing The Panels ................................................................................................................... 19
LED Studio Software ................................................................................................................. 19
VIP™ Driver............................................................................................................................... 19
Video System Products Used With C6 ...................................................................................... 19
5. Technical Information............................................................................................. 20
Maintenance .............................................................................................................................. 20
Troubleshooting ......................................................................................................................... 20
6. Technical Specifications ........................................................................................ 21
Dimensions And Weight ............................................................................................................ 21
Electrical .................................................................................................................................... 21
Light Source .............................................................................................................................. 21
Photo Optic ................................................................................................................................ 21
Thermal ..................................................................................................................................... 21
Data Connections ...................................................................................................................... 21
Ordering ..................................................................................................................................... 21
Return Policy and Procedure ..................................................................................... 22
Contact Us ................................................................................................................... 23
1. Antes de Empezar ................................................................................................... 24
Qué va Incluido.......................................................................................................................... 24
Desembalaje.............................................................................................................................. 24
Símbolos .................................................................................................................................... 24
Notas de Seguridad ................................................................................................................... 25
Vida Útil Prevista del LED ......................................................................................................... 25
2. Introducción ............................................................................................................ 26
Descripción del Producto .......................................................................................................... 26
Características del Producto .................................................................................................. 26
Accesorios Necesarios ........................................................................................................... 26
Accesorios Opcionales ........................................................................................................... 26
Visión General del Producto...................................................................................................... 27
Dimensiones del Producto ........................................................................................................ 28
3. Montaje e Instalación.............................................................................................. 29
Corriente Alterna ....................................................................................................................... 29
Enchufe CA ............................................................................................................................ 29
Alimentación en Cadena ........................................................................................................... 30
Diagrama de Alimentación en Cadena .................................................................................. 30
Conexión de Señal .................................................................................................................... 31
Diagrama de Conexión de Señal ........................................................................................... 31
Montaje ...................................................................................................................................... 32
PVP™ Rig Kit ............................................................................................................................ 32
Diagrama del PVP™ Rig Kit ................................................................................................... 32
Inserciones M12 ........................................................................................................................ 33
Diagrama de Inserciones M12 ............................................................................................... 33
Configuraciones de los Paneles ................................................................................................ 33
Diagramas de Configuraciones de los Paneles ..................................................................... 34
Tornillos Speego........................................................................................................................ 35
Diagrama de Tornillo Speego ................................................................................................. 35
Pauta de Instalación .................................................................................................................. 35
4. Configuración y Funcionamiento .......................................................................... 36
Probar los Paneles .................................................................................................................... 36
Software LED Studio ................................................................................................................. 36
VIP™ Driver............................................................................................................................... 36
Productos de Sistema de Vídeo Usados con el C6 .................................................................. 36
5. Información Técnica ............................................................................................... 37
Mantenimiento ........................................................................................................................... 37
Resolución de Problemas ......................................................................................................... 37
6. Especificaciones Técnicas ..................................................................................... 38
Dimensiones y Peso .................................................................................................................. 38
Eléctricas ................................................................................................................................... 38
Fuente de luz ............................................................................................................................. 38
Óptica foto ................................................................................................................................. 38
Térmicas ....................................................................................................................................38
Conexiones de datos ................................................................................................................. 38
Pedidos ...................................................................................................................................... 38
Política y Procedimiento de Devoluciones ................................................................ 39
Contacto ...................................................................................................................... 40
1. Avant de Commencer ............................................................................................. 42
Contenu ..................................................................................................................................... 42
Déballage .................................................................................................................................. 42
Symboles ................................................................................................................................... 42
Consignes de Sécurité .............................................................................................................. 43
Durée de Vie des LEDs ............................................................................................................. 43
2. Introduction ............................................................................................................. 44
Description de l'Appareil ............................................................................................................ 44
Caractéristiques de l'Appareil ................................................................................................. 44
Accessoires Nécessaires ....................................................................................................... 44
Accessoires Optionnels .......................................................................................................... 44
Vue d'Ensemble du Produit ....................................................................................................... 45
Dimensions de l'Appareil ........................................................................................................... 46
3. Configuration et Installation................................................................................... 47
Alimentation CA ......................................................................................................................... 47
Prise CA ................................................................................................................................. 47
Chaînage Électrique .................................................................................................................. 48
Schéma de chaînage électrique ............................................................................................. 48
Connexion du Signal ................................................................................................................. 49
Schéma des Connexions de Signal ....................................................................................... 49
Installation ................................................................................................................................. 50
Kit d'Installation PVP™.............................................................................................................. 51
Diagramme du Kit d'Installation PVP™ .................................................................................. 51
Inserts M12 ................................................................................................................................ 52
Diagramme des Inserts M12 .................................................................................................. 52
Configurations du Panneau ....................................................................................................... 52
Diagrammes des Configurations de Panneaux ...................................................................... 53
Boulons Speego ........................................................................................................................ 54
Diagramme d'un Boulon Speego ........................................................................................... 54
Instructions pour l'installation .................................................................................................... 54
4. Configuration et Utilisation .................................................................................... 55
Test des Panneaux ................................................................................................................... 55
Logiciel LED Studio ................................................................................................................... 55
VIP™ Driver............................................................................................................................... 55
Appareils de Système Vidéo Utilisés avec le C6 ...................................................................... 55
5. Informations Techniques ....................................................................................... 56
Entretien .................................................................................................................................... 56
Dépannage ................................................................................................................................ 56
6. Spécifications Techniques ..................................................................................... 57
Dimensions et Poids .................................................................................................................. 57
Alimentation Électrique .............................................................................................................. 57
Source Lumineuse .................................................................................................................... 57
Optique Photo............................................................................................................................ 57
Thermique ................................................................................................................................. 57
Connections de Données .......................................................................................................... 57
Commande ................................................................................................................................ 57
Politique et Procédure de Retour ............................................................................... 58
Nous Contacter ........................................................................................................... 59
1. Voordat u begint ..................................................................................................... 61
Wat is er inbegrepen ................................................................................................................. 61
Uitpakken................................................................................................................................... 61
Symbolen................................................................................................................................... 61
Veiligheidsinstructies ................................................................................................................. 62
Verwachte levensduur van de LED-lamp .................................................................................. 62
2. Inleiding ................................................................................................................... 63
Productbeschrijving ................................................................................................................... 63
Producteigenschappen ........................................................................................................... 63
Vereiste accessoires .............................................................................................................. 63
Optionele accessoires ............................................................................................................ 63
Productoverzicht ........................................................................................................................ 64
Afmetingen van het product ...................................................................................................... 65
3. Opstelling en installatie .......................................................................................... 66
AC-stroom ................................................................................................................................. 66
AC-stekker .............................................................................................................................. 66
Power Linking ............................................................................................................................ 67
Power Linking-diagram ........................................................................................................... 67
Signaalverbinding ...................................................................................................................... 68
Signaalverbindingsdiagram .................................................................................................... 68
Montage ..................................................................................................................................... 69
PVP™-opbouwset ..................................................................................................................... 69
PVP™-opbouwsetdiagram ..................................................................................................... 70
M12-inzetstukken ...................................................................................................................... 71
M12-inzetstukdiagram ............................................................................................................ 71
Paneelconfiguraties ................................................................................................................... 71
Paneelconfiguratiediagrammen.............................................................................................. 72
Speego-bouten .......................................................................................................................... 73
Speego-bout diagram ............................................................................................................. 73
Installatierichtlijnen .................................................................................................................... 73
4. Configuratie en bediening ...................................................................................... 74
Testen van de panelen .............................................................................................................. 74
LED Studio-software ................................................................................................................. 74
VIP™ Driver............................................................................................................................... 74
Videosysteemproducten die worden gebruikt met C6............................................................... 74
5. Technische informatie ............................................................................................ 75
Onderhoud................................................................................................................................. 75
Problemen oplossen .................................................................................................................. 75
6. Technische Specificaties ....................................................................................... 76
Afmetingen en gewicht .............................................................................................................. 76
Elektrisch ................................................................................................................................... 76
Lichtbron .................................................................................................................................... 76
Foto-optisch ............................................................................................................................... 76
Thermisch .................................................................................................................................. 76
Gegegevensaansluitingen ......................................................................................................... 76
Bestellen .................................................................................................................................... 76
Retourbeleid en -procedure ........................................................................................ 77
Neem contact op ......................................................................................................... 78
Before You Begin
1. Before You Begin
What Is Included
·
·
·
·
·
·
4 C6 panels
1 Neutrik® powerCON® power cord
4 Neutrik® powerCON® power linking cords
4 Neutrik® etherCON® signal linking cords
Warranty card
User Manual
Unpacking
Carefully unpack the C6 panels and check that all the parts are in the package, and are in good
condition.
If the box, or any of the contents, appear damaged from shipping, or show signs of mishandling,
save all the packaging and file a claim with the carrier immediately, do not notify Chauvet. Failure to
report damage to the carrier immediately, or failure to have all the packaging available for
inspection, could invalidate the claim.
For other issues, such as missing components or parts, damage not related to shipping, or
concealed damage, file a claim with Chauvet within 7 days of delivery. For information on contacting
Chauvet, see Contact Us at the end of this manual.
Symbols
Symbols
Meaning
Critical installation, configuration, or operation information. Failure to comply with this
information may cause the product not to work, damage third-party equipment, or
cause harm to the operator.
Important installation or configuration information. Failure to comply with this
information may keep the product from working.
Useful information.
C6 User Manual Rev. 2
Page 7 of 80
Before You Begin
Safety Notes
Please read the following Safety Notes carefully before starting to work with the product. These
notes provide important safety information about the installation, usage, and maintenance.
· Always connect the product to a grounded circuit.
· Make sure the power cord is not crimped or damaged.
· Always connect this product to a power source with the proper voltage as listed on the
product sticker.
· Do not operate the product if you see damage on the housing, LED strips, or cables.
· This product is for indoor use only! It is rated IP40. Do not expose the product to rain or
moisture.
· Always disconnect the product form the power source before cleaning it.
· To eliminate unnecessary wear and improve its lifespan, during periods of non-use
completely disconnect the product from power via breaker or by unplugging it.
· Never disconnect the product from the power source by pulling or tugging on the cord.
· If mounting the product overhead, always secure it using a safety cable.
· Make sure there are no flammable materials close to the product when it is operating.
· CAUTION: When transferring product from extreme temperature environments, (e.g.
cold truck to warm humid ballroom) condensation may form on the internal electronics of
the product. To avoid causing a failure, allow product to fully acclimate to the
surrounding.
·
·
·
·
Never connect the product to a dimmer or a rheostat.
Always install the product in a location with adequate ventilation.
Do not operate the product in an ambient temperature higher than 104 °F (45 °C).
This product contains no user-serviceable parts. Any reference to servicing in this User
Manual will only apply to properly trained Chauvet certified technicians. Do not open the
housing or attempt any repairs.
· All applicable local codes and regulations apply for proper installation of this product.
· In the event of a serious operating problem, stop using the product immediately.
· Any damages caused by manual modifications are not subject to warranty. Chauvet will
not accept liability for damage caused by unauthorized modifications or not observing
the safety warnings and instructions in the manual.
If the product requires repair contact Chauvet. For more information, see Return Policy and
Procedure and Contact Us.
Expected LED Lifespan
LEDs gradually decline in brightness over time, primarily because of the heat of their operating
temperature and using. When LEDs are clustered, as they are in video panels, they generate higher
operating temperature than they do when not clustered. Using clustered LEDs at their fullest
intensity reduces the LEDs’ lifespan. The C6 panels have a thermal management system designed
to overcome this and provide the most brilliant image possible with the longest LED lifespan. The
C6 panel’s LED lifespan is 50,000 hours. However, the LED lifespan can be extended even further
by increasing the ventilation around the panels and keeping the ambient temperature to an optimal
operating range. In addition, limiting the overall projection intensity may also help to extend the
LEDs’ lifespan.
Page 8 of 80
C6 User Manual Rev. 2
Introduction
2. Introduction
Product Description
C6 is a 6.25 mm pixel pitch LED video panel designed specifically for permanent installation. It uses
black face SMD 3528 LEDs for superb contrast. It is quiet, lightweight, measures 1 x 0.5 m and is
modularly designed for easy installation and customization.
The C6 power and signal connections are compatible with the CHAUVET® VIP™ lines, so C6 video
walls and PVP™ video walls can be managed with the same control source.
C6 panels are operated with the VIP™ line of signal distribution and control products, and
configured with the CHAUVET® LED Studio software running on a PC. For more information about
the VIP™ line or LED Studio, download the User Manuals from the Chauvet website at
http://www.chauvetlighting.com/product-manuals-literature/.
Product Features
·
·
·
·
·
·
·
·
6.25 mm pixel pitch and a 140° viewing angle for a detailed and easily viewed image
Black face SMD 3528 LEDs for superb contrast
Tight LED binning for consistent color rendering across panels
Solid, lightweight, modular construction for flexible configuration
Compatibility with PVP™ Rig Kit for suspended mounting of up to 10 panels per Rig Kit
M12 threaded inserts for easy and secure permanent installation
Fanless operation for silent operation
Fully compatible with VIP™ Driver, VIP™ Signal Distributor, and VIP™ Media Server Pro
Required Accessories
· VIP™ Driver (required)
· LED Studio (required)
Optional Accessories
· VIP™ Signal Distributor (required for operating more than 24 panels)
· Signal cables (Neutrik® etherCON® Signal Extensions)
o
o
o
ETHERCON18IN
ETHERCON5FT
ETHERCON10FT
· Power cables (Neutrik® powerCON® Extension)
o
o
o
o
C6 User Manual Rev. 2
POWERCONEXT18IN
POWERCONEXT5FT
POWERCONEXT10FT
POWERCONEXT25FT
Page 9 of 80
Introduction
Product Overview
Female Speego
Connectors (x4)
Short Edge
Ventilation Slots
5 Per Long Edge
2 Per Short Edge
Test Button
Signal Indicator
Power Indicator
Signal
In/Out
Power In
Front
Page 10 of 80
Long
Edge
Male Speego
Connectors (x4)
Back
Power Out
Signal
In/Out
C6 User Manual Rev. 2
Introduction
Product Dimensions
C6 User Manual Rev. 2
Page 11 of 80
Setup And Installation
3. Setup And Installation
AC Power
Each C6 panel has an auto-ranging power supply that works with an input voltage range of
100 to 240 VAC, 50/60 Hz. To determine the power requirements for C6, refer to the label affixed to
the product or Technical Specifications.
The listed rating indicates the maximum current draw during normal operation. For more
information,
download
Sizing
Circuit
Breakers
from
the
Chauvet
website
at
www.chauvetprofessional.com.
·
·
·
Always connect this product to a properly grounded and protected circuit.
Never connect this product to a rheostat or dimmer.
To eliminate unnecessary wear and improve its lifespan, during periods of non-use
completely disconnect the product from power via breaker or by unplugging it.
AC Plug
The included power input cord has a Neutrik® powerCON® connector on one end to connect to the
C6, and an Edison plug at the other end to connect to power. Each C6 panel comes with a Neutrik®
powerCON® power-linking cord to connect power between panels.
Use the table below as a reference when wiring a new plug.
Page 12 of 80
Connection
Wire (U.S.)
Wire (Europe)
Screw Color
AC Live
Black
Brown
Yellow or Brass
AC Neutral
White
Blue
Silver
AC Ground
Green/Yellow
Green/Yellow
Green
C6 User Manual Rev. 2
Setup And Installation
Power Linking
The C6 panels have Neutrik® powerCON® Power In and Power Out sockets placed to make power
linking easy. Do not power link more than
· 12 panels at 120 V,
· 21 panels at 208 V, or
· 22 panels at 230 V.
Power Linking Diagram
Power Source
Additional
C6 Panels
C6 User Manual Rev. 2
Page 13 of 80
Setup And Installation
Signal Connection
The C6 panels receive video signal from the VIP™ Driver via a Neutrik® etherCON® cable, which
must be no more than 100 m long. The Neutrik® etherCON® cable goes from the U MAIN OUT
Neutrik® etherCON® port of the VIP™ Driver into one of the video panels. Neutrik® etherCON®
power-linking cords link the other panels together.
The signal cables must be run from panel to panel in the order in which they will be mapped in the
LED software. The Neutrik® etherCON® signal ports on the panels can be used as either input or
output ports, so signal can transmit in either direction.
After all the panels are connected, the last linked panel will have an empty signal port that can be
used to create a back-up signal infrastructure. To do this, run a Neutrik® etherCON® cable from the
empty Neutrik® etherCON® port of the last panel to the D BACK UP Neutrik® etherCON® port of
the VIP™ Driver.
Signal Connection Diagram
From VIP™ Driver
U MAIN OUT Port
To VIP™ Driver D BACK UP Port
·
Page 14 of 80
Signal transmission can be in either direction, so the first or the last panel in the
signal link can be connected to the VIP™ Driver.
C6 User Manual Rev. 2
Setup And Installation
Mounting
The C6 panels are constructed of aluminum alloy and stainless steel so each panel is stable and
lightweight. The C6 panels have open backs to provide better ventilation when permanently
installed in a venue, or built into a piece of scenery.
C6 panels can be mounted using the PVP™ Rig Kit, which is sold separately. For more information,
see the Chauvet website at http://www.chauvetlighting.com/pvp-rigging-kit.html.
C6 panels can also be mounted directly to any surface using M12 bolts into the inserts at each
corner of the panel.
Consider the following when designing an installation of the C6 panels:
· Airflow behind the panels
· Load capacity of the structures to which the panels will be attached
· Access to the power and signal cable connections
· Visibility of the signal and power indicators
· Ambient temperature of the location
See Technical Specifications for specific weight and temperature requirements.
Consult a structural engineer to determine safe load ratings based on your specific
application.
PVP™ Rig Kit
The CHAUVET® PVP™ Rig Kits attach to the top of both corners of the panels’ narrow ends, with
one Rig Kit joining adjacent panels at their adjoining corners. The PVP™ Rig Kit consists of a single
bracket with 2 male speego bolts on the bottom and an M12-size hole at the top.
The speego bolts fit into the female speego connectors on the C6 panel. At the top of the PVP™
Rig Kit is an M12-size hole, which can be used with an M12 bolt, to attach the PVP™ Rig Kit to a
clamp or to a structure. The speego bolts are placed so that the PVP™ Rig Kit spans 2 panels. To
hang a single panel use PVP™ Rig Kits on both ends of the panel.
The panels themselves can be connected to each other to create any number of shapes. See Panel
Configurations.
Each PVP™ Rig Kit can bear the weight of up to 10 panels hung vertically.
PVP™ Rig Kit Diagram
Male Speegos on the PVP™ Rig Kits
Go Into the Female Speegos On Top of the Panels
Tops of Panels
Side Speego Connectors Align Panels
PVP™ Rig Kit Ships
With A Removable
Clamp
C6 User Manual Rev. 2
PVP™ Rig Kit
Attaches To
A Structure
Page 15 of 80
Setup And Installation
M12 Inserts
The M12 inserts are at each corner on the back of the C6 panel, to provide a mechanism to mount
the panel directly onto a flat surface. When mounting the panel on a flat surface be sure to leave
enough room to allow adequate airflow and a way to see the signal indicator lights. Insert a
separator at each corner between the panel and the surface, with an opening in the center through
which the signal and power indicators remain visible.
The number of panels that can be mounted to any surface depend on the load bearing capacity of
the surface. It is optimal to connect the panel to the surface wherever there is an M12 insert.
M12 Inserts Diagram
M12 Bolt Inserts
Mounting
Structure
4
M12 Bolts
Optional Spacers For Ventilation
M12 Bolts
Panel Configurations
The C6 panels can be connected in any number of configurations using the speego connections on
the edges. However, the panels must all be oriented the same way because they are made up of 4
subpanels, each measuring 0.25 x 0.5 m. These subpanels cannot be mapped differently within the
larger configuration of panels. See Panel Configurations Diagrams.
The expected orientation has the panels vertically oriented because vertical orientation works with
any content manager or switcher. The alternate orientation, with the panels oriented horizontally
requires a content manager or switcher that can rotate images. See Orientation.
The C6 panels must all be mounted with the same orientation. The panels do not need to be aligned
by subpanel, but each row of pixels must be aligned. The panels and subpanels can be
mismatched. See Lining Up Pixels.
Page 16 of 80
C6 User Manual Rev. 2
Setup And Installation
Panel Configurations Diagrams
Orientation
Subpanels Can Be Offset;
However, Pixels Must Align
Individual
Subpanels
DO NOT ConfigurePanels
in a Mixed Orientation
Horizontal Orientation
Requires Rotated Content
One Panel
Vertical Orientation is the Expected Orientation
And Does Not Require Rotated Content
Lining Up Pixels
The Pixels on Either Side of the Panels
Should Meet at yhe Seam; However, the
Subpanels Do Not Need to Align
C6 User Manual Rev. 2
Page 17 of 80
Setup And Installation
Speego Bolts
Speego bolts are very strong steel posts with locking bars at the ends and power-spring tightening
mechanisms. They create a temporary attachment to allow for alignment of the LEDs, and then a
firm and precise connection so the pixels remain aligned properly and create a seamless image.
To attach a speego bolt, do the following:
1. Hold the spring knob and insert the locking bar into the inset.
2. Twist the spring knob counter-clockwise until the locking bar locks into place. This step holds the
panels in place to allow precise alignment of the panels.
3. Align the panels using the LEDs as a reference.
4. Twist the tightening knob clockwise to tighten the connection completely.
To detach a speego bolt, do the following:
1. Twist the tightening knob counter-clockwise to loosen the connection.
2. Twist the spring knob clockwise until the locking bar pops out of place.
Speego Bolt Diagram
Spring Knob
Tightening Knob
Locking Bar
Spring
Speego Inset
Installation Guidelines
· Check that all the parts are in the package.
· Make sure all the required and optional accessories for mounting and operation are available for
use.
· Power and test each panel. For more information, see Testing the Panels.
· When building a suspended installation, work from the top down.
· When building an installation mounted on a surface, align and tighten the panels before affixing
them to the surface.
Page 18 of 80
C6 User Manual Rev. 2
Configuration And Operation
4. Configuration And Operation
Configuration and operation of the C6 panels is done with the LED Studio software, and either the
VIP™ Media Server Pro and VIP™ Signal Processor, or the media server software of your choice.
The C6 panels require 1 VIP™ Driver for each 102 C6 panels.
Video systems vary in size and complexity. The C6 panels can be used in a simple system with a
media server and a VIP™ Driver to panels in a rectangular connection; or the panels can be part of
a complex system with multiple inputs to panels in a fragmented or rotated connection, as shown in
the Panel Configurations Diagrams.
Regardless of the panel connection or the system complexity, LED Studio and the VIP™ Driver are
required to configure and use the panels. For more information about LED Studio see the User
Manual available from the Chauvet website at http://www.chauvetlighting.com/product-manualsliterature/.
Testing The Panels
To test the C6 panel, press <TEST> the back of the panel. This test runs a program that checks the
C6 circuitry and all the LEDs.
LED Studio Software
LED Studio is an easy-to-use mapping tool. It runs on a PC and works seamlessly with the VIP™
Driver so that the content can be adjusted to display properly on any connection pattern of C6
panel. For more information about LED Studio, see the User Manual available from the Chauvet
website at http://www.chauvetlighting.com/product-manuals-literature/.
VIP™ Driver
VIP™ Driver is the hardware interface between LED Studio, or the video input source, and the C6
panels. For more information about the VIP™ Driver see the User Manual available from the
Chauvet website at http://www.chauvetlighting.com/product-manuals-literature/.
Video System Products Used With C6
Item
Description
Item Code
Item Number
VIP™ Driver (required)
Interface between LED Studio or signal
input and the C6 panels
99090575
VIPDRIVER
LED Studio (required)
Software that maps the C6 panels.
Requires a PC to operate.
VIP™ Signal Distributor
Signal booster for over 24 panels
99090576
VIPSIGDISTRO
PVP™ Rig Kit
Hardware for suspended mounting
20090598
PVP-RK
Neutrik®
etherCON® to etherCON®
etherCON® Signal Extension, 18 in
etherCON® Signal Extension, 5 ft
etherCON® Signal Extension, 10 ft
19090363
19090364
19090365
ETHERCONEXT18IN
ETHERCONEXT5FT
ETHERCONEXT10FT
Neutrik®
powerCON® to
powerCON®
powerCON® Extension, 18 in
powerCON® Extension, 5 ft
powerCON® Extension, 10 ft
powerCON® Extension, 25 ft
19110372
19110373
19110374
19110375
POWERCONEXT18IN
POWERCONEXT5FT
POWERCONEXT10FT
POWERCONEXT25FT
VIP™ Media System Pro
Video server with ArKaos MediaMaster
C6 User Manual Rev. 2
VIPCOMP2
Page 19 of 80
Technical Information
5. Technical Information
Maintenance
To maintain optimum performance and minimize wear, turn the C6 panels off when not actively
being used and completely disconnect from power. Keep the environment around them free of dust,
dirt, water, and extreme temperatures.
The C6 panels should be cleaned at least once a month. To prevent dust build-up from reducing
light output and overheating, follow these guidelines when cleaning the C6 panels:
1.
2.
3.
4.
Unplug the panel from power.
Wait until the panel is at room temperature.
Use a soft brush to remove dust collected on the external components.
Wipe the outside of the LED strips with a soft, lint-free cloth dampened with a solution of water
and detergent. Apply gentle pressure only.
5. Make sure all connections are thoroughly dry before reconnecting power and signal cables.
Always dry the external surfaces carefully after cleaning them.
Do not spin the cooling fans using compressed air because you could damage them.
Troubleshooting
Problem
All panel LEDs are blinking
Cause
Contact failure
Resolution
Fix the loose LEDs or try re-plugging
LEDs on a specific panel are not on Power cable not seated properly
Reseat power cable
All LEDs do not light
Find the incorrectly connected cables
and reconnect properly
Input cables connected incorrectly
No power
Does not power up
(LED power indicator does not
light during “self-test”)
Loose or damaged power cord
Faulty power connection inside the
C6
Contact Chauvet for repair
Faulty external power supply
C6 displays no images or spotted
images
Page 20 of 80
Loose or damaged signal cable
Disconnect and reconnect the signal
cable, or replace the cable
C6 User Manual Rev. 2
Technical Specifications
6. Technical Specifications
Dimensions And Weight
Length
Width
Height
Weight
39.4 in (1,000 mm)
19.7 in (500 mm)
2.5 in (63 mm)
23 lb (10.4 kg)
Electrical
Power Supply
Range
Voltage Selection
Switching (internal)
100–240 VAC, 50/60 Hz
Auto-ranging
Parameter
120 V, 60 Hz
208 V, 60 Hz
230 V, 50 Hz
Consumption and current
128 W; 1.06 A
131 W; 0.63 A
133 W; 0.60 A
Max. Output Current
13.6 A
Power linking
12 units
21 units
Power I/O
22 units
U.S./Canada
Worldwide
Power input connector
Neutrik® powerCON® A
Power output connector
Neutrik® powerCON® B
Power cord plug
Edison (U.S.)
Minimum wire gauge
Local plug
14 AWG
Light Source
Type
Lifespan
Color
Quantity/Pixels
LED
50,000 hours
SMD 3528 (tri-color RGB)
12,800
Red Wavelength
Green Wavelength
Blue Wavelength
620 to 625 nm
524 to 529 nm
467 to 470 nm
Pixels
Pixel Pitch
Pixel Density
80 x 160
6.25 mm
25,600/m
Photo Optic
2
Illuminance
Refresh Rate
Viewing Angle
Transparency
1,500 NITS
1,080 Hz
140°
0%
Thermal
Max. External Temperature
Cooling System
104 °F (40 °C)
Convection
Data Connections
I/O Connectors
Driver
Panels Per Driver
Neutrik® etherCON®
VIP™ Driver
102
Product Name
Item Code
UPC Number
C6X4
23090851
781462211998
Ordering
C6 User Manual Rev. 2
Page 21 of 80
Return Policy and Procedure
Return Policy and Procedure
Returns
You must send the product prepaid, in the original box, and with the original packing and
accessories. Chauvet will not issue call tags.
Call Chauvet and request a Return Merchandise Authorization (RMA) number before
shipping the product. Be prepared to provide the model number, serial number, and a
brief description of the cause(s) for the return.
Clearly label the package with an RMA number. Chauvet will refuse any product returned
without an RMA number.
DO NOT write the RMA number directly on the box. Instead, write it on a properly
affixed label.
Once you have received the RMA number, include the following information on a piece of
paper inside the box:
· Your name
· Your address
· Your phone number
· The RMA number
· A brief description of the problem(s)
Be sure to pack the product properly. Any shipping damage resulting from inadequate
packaging will be the customer’s responsibility. FedEx packing or double-boxing is
recommended.
Chauvet reserves the right to use its own discretion to repair or replace returned
product(s).
Page 22 of 80
C6 User Manual Rev. 2
C6 User Manual Rev. 1
WORLD HEADQUARTERS - Chauvet
Contact
Us
General Information
Technical Support
Address:5200 NW 108th Avenue
Voice: (954) 577-4455 (Press 4)
Sunrise, FL 33351
Fax:
(954) 756-8015
Voice: (954) 577-4455
Email: [email protected]
Fax:
(954) 929-5560
World Wide Web www.chauvetlighting.com
Toll free: (800) 762-1084
UNITED KINGDOM AND IRELAND - Chauvet Europe Ltd.
General Information
Address:Unit 1C
Brookhill Road Industrial Estate
Pinxton, Nottingham, UK
NG16 6NT
Voice: +44 (0)1773 511115
Fax:
+44 (0)1773 511110
MEXICO - Chauvet Mexico
Technical Support
Email: [email protected]
General Information
Address:Av. Santa Ana 30
Parque Industrial Lerma
Lerma, Mexico C.P. 52000
Voice: +52 (728) 285-5000
CHAUVET EUROPE - Chauvet Europe BVBA
Technical Support
Email: [email protected]
General Information
Address:Stokstraat 18
9770 Kruishoutem
Belgium
Voice: +32 9 388 93 97
World Wide Web www.chauvetlighting.co.uk
World Wide Web www.chauvet.com.mx
Technical Support
Email: [email protected]
World Wide Web www.chauvetlighting.eu
Outside the U.S., United Kingdom, Ireland, Mexico, or Benelux, contact your dealer. Follow
their instructions to request support or to return a product. Visit our website for contact details.
Notas de la Edición
Este manual de usuario incluye una descripción de las precauciones de seguridad, montaje,
instalación, funcionamiento y mantenimiento del panel de vídeo C6 de CHAUVET®.
Marcas Registradas
CHAUVET® es marca registrada de Chauvet & Sons Inc. (bajo el nombre de CHAUVET® o
Chauvet). El logotipo de CHAUVET® en su integridad, incluyendo el nombre Chauvet y el triángulo
entramado, y todas las demás marcas de este manual pertenecen a servicios, productos o
declaraciones comerciales son propiedad de o están autorizados por Chauvet. Cualquier otro
nombre de producto, logotipo, marca, nombre de empresa y otras marcas registradas incluidas o
aludidas dentro de este documento son propiedad de los respectivos titulares de la marca.
Aviso de Derechos de Autor
Chauvet es propietario del contenido de este Manual de usuario en su totalidad, incluyendo, sin
limitarse a ellos, ilustraciones, logotipos, marcas y recursos.
© Copyright 2014 Chauvet. Todos los derechos reservados.
Impreso en la R. P. China.
Publicado en formato electrónico por Chauvet en EE. UU.
Uso del Manual
Chauvet autoriza a sus clientes a descargar e imprimir este manual solo para propósitos de
información profesional. Chauvet prohíbe expresamente la utilización, copia, almacenamiento,
distribución, modificación o impresión de este manual o su contenido, con cualquier fin, sin
consentimiento por escrito.
Impresión del Documento
Para mejores resultados, imprima este documento en color, en papel tamaño carta (215,9 × 279,4
mm), a doble cara. Si usa papel A4 (210 x 297 mm), configure la impresora para escalar el
contenido proporcionalmente.
Exención de Responsabilidad
Chauvet cree que la información contenida en este manual es exacta en todos los aspectos. Sin
embargo, Chauvet no asume responsabilidad por cualquier error u omisión de este documento.
Chauvet se reserva el derecho a revisar y hacer cambios de vez en cuando en el contenido de este
documento sin obligación por parte de Chauvet de notificar a ningún individuo o empresa tales
revisiones o cambios. Esto no constituye compromiso de ninguna clase por parte de Chauvet de
que vaya hacer tales cambios. Chauvet puede publicar una revisión de este manual o una nueva
edición del mismo para incorporar dichos cambios.
Revisión del Documento
El Manual de usuario del C6 reemplaza todas las versiones anteriores de este manual. Visite
www.chauvetprofessional.com para obtener la última versión.
Autor
Fecha
Editor
Fecha
L. Henry
22/08/2014
A. Leon
17/09/2014
C6 Manual de Usuario Rev. 2
Página 23 de 80
Antes de Empezar
1. Antes de Empezar
Qué va Incluido
·
·
·
·
·
·
4 paneles C6
1 cable de alimentación Neutrik® powerCON®
4 cables de enlace de alimentación Neutrik® powerCON®
4 cables de enlace de señal Neutrik® etherCON®
Tarjeta de garantía
Manual de usuario
Desembalaje
Desembale los paneles con cuidado y compruebe que todas las piezas están en el paquete y en
buen estado.
Si la caja o alguno de los contenidos parecen dañados a causa del transporte, o muestran signos
de manipulación inadecuada, guarde todo el paquete y tramite una reclamación con el transportista
inmediatamente; no lo notifique a Chauvet. Si no informa al transportista del daño inmediatamente
o no dispone todo el paquete para inspección podría quedar anulada la reclamación.
Para otras incidencias, como componentes o piezas que falten, daños no relacionados con el
transporte o daños no evidentes, presente una reclamación a Chauvet en el plazo de 7 días desde
la entrega. Para información sobre cómo contactar con Chauvet, vea Contacto al final de este
manual.
Símbolos
Símbolos
Significado
Instalación, configuración o información crítica sobre el funcionamiento. El
incumplimiento de esta información puede causar que el producto no funcione, que se
averíe, u ocasionar daños al usuario.
Instalación o información de configuración importante. Hacer caso omiso de esta
información puede hacer que el producto no funcione.
Información útil.
Página 24 de 80
C6 Manual de Usuario Rev. 2
Antes de Empezar
Notas de Seguridad
Por favor, lea las siguientes Notas de seguridad con atención antes de empezar a trabajar con el
producto. Estas notas incluyen información de seguridad importante sobre la instalación, uso y
mantenimiento.
·
·
·
·
·
·
·
·
·
·
·
·
·
·
·
·
·
·
Conecte siempre el producto a un circuito con toma de tierra.
Asegúrese de que el cable de alimentación no está retorcido ni estropeado.
Conecte siempre este producto a una fuente de alimentación con la tensión adecuada, según se
indica en la pegatina del producto.
No haga funcionar este producto si aprecia daño en la carcasa, en las tiras LED o en los cables.
¡Este producto es para uso en interiores solamente! Está clasificado como IP40. No exponga el
producto a lluvia o humedad.
Desconecte siempre el producto de la toma de alimentación antes de limpiarlo.
Para evitar un desgaste innecesario y alargar su vida útil, desconecte completamente el producto
de la alimentación mediante el interruptor o desenchufándolo durante periodos en que no se use.
Nunca desconecte el producto de la fuente de alimentación agarrando o tirando del cable.
Si monta el producto en alto, asegúrelo siempre con un cable de seguridad.
Asegúrese de que no hay materiales inflamables cerca del producto cuando esté en
funcionamiento.
Cuidado: cuando transfiera el producto desde ambientes con temperatura extrema (p. ej., del
remolque frío de un camión a una sala de baile con calor y humedad), puede formarse
condensación en la electrónica interna del producto. Para evitar que se produzca una avería, deje
que el producto se aclimate completamente al ambiente antes de conectar la alimentación.
Nunca conecte el producto a un atenuador o reostato.
Instale siempre el producto en un lugar con ventilación adecuada.
No haga funcionar el producto a una temperatura ambiente superior a 104 °F (45 °C).
Este producto no contiene piezas reparables por el usuario. Cualquier referencia a la reparación
en este Manual de usuario se aplicará solamente a técnicos certificados, adecuadamente
instruidos por Chauvet. No abra la carcasa ni intente ninguna reparación.
Todos los códigos locales y regulaciones correspondientes se aplican a la instalación adecuada
de este producto.
En caso de un problema grave de funcionamiento, deje de usar el producto inmediatamente.
Cualquier avería causada por modificaciones manuales no está cubierta por la garantía. Chauvet
no aceptará responsabilidad por daños causados por modificaciones no autorizadas o por no
observar las advertencias de seguridad y las instrucciones de este manual.
Si el producto necesita reparación, póngase en contacto con Chauvet. Para más información
consulte Política y Procedimiento de Devoluciónes y Contacto.
Vida Útil Prevista del LED
Los LED van perdiendo brillo con el paso del tiempo, principalmente por el calor de su temperatura de
funcionamiento y por el uso. Cuando los LED están agrupados, como ocurre con los paneles de vídeo,
generan una temperatura de funcionamiento más alta que cuando no están agrupados. Usar LED
agrupados a su máxima intensidad reduce la vida del LED. Los C6 tienen un sistema de gestión térmica
diseñado para solucionar esto y proporcionar la imagen más brillante posible con la vida del LED más
larga. La vida útil prevista para el LED del panel C6 es de 50.000 horas. Sin embargo, la vida del LED se
puede prolongar incluso más aumentando la ventilación alrededor de los paneles y manteniendo la
temperatura ambiente en un rango operativo óptimo. Además, limitar la intensidad de proyección total
puede contribuir a alargar la vida del LED.
C6 Manual de Usuario Rev. 2
Página 25 de 80
Introducción
2. Introducción
Descripción del Producto
El C6 es un panel LED de vídeo con un tamaño de píxel de 6,25 mm diseñado específicamente
para instalaciones permanentes. Utiliza LED SMD 3528 de superficie negra para obtener un
contraste soberbio. Es silencioso, ligero, mide 1 x 0,5 m y está diseñado modularmente para una
fácil instalación y adaptación.
Las conexiones de señal y alimentación del C6 son compatibles con las líneas CHAUVET® VIP™,
con lo que los murales de vídeo C6 y los murales de vídeo PVP™ se pueden gestionar con la
misma fuente de control.
Los paneles C6 funcionan con los productos de control y línea de distribución de señal VIP™, y se
configuran con el software de CHAUVET® LED Studio para PC. Para más información sobre la
línea VIP™ o sobre LED Studio, descargue los manuales de usuario desde el sitio web de Chauvet
en http://www.chauvetlighting.com/product-manuals-literature/.
Características del Producto
· Tamaño de píxel de 6,25 mm y ángulo de visión de 140° para una imagen detallada y de fácil
visión
· LED SMD 3528 de superficie negra para obtener un contraste soberbio
· Gran ajuste entre LED para una representación del color consistente entre paneles
· Construcción modular, ligera y resistente, para una configuración flexible.
· Compatibilidad con PVP™ Rig Kit para montaje en suspensión de hasta 10 paneles por Rig Kit
· Inserciones con rosca M12 para instalar de forma fácil, segura y permanente
· Funciona sin ventilador, para un funcionamiento silencioso
· Totalmente compatible con VIP™ Driver, VIP™ Signal Distributor y VIP™ Media Server Pro
Accesorios Necesarios
· VIP™ Driver (necesario)
· LED Studio (necesario)
Accesorios Opcionales
· VIP™ Signal Distributor (necesario para hacer funcionar más de 24 paneles)
· Cables de señal (extensiones de señal Neutrik® etherCON®)
o
o
o
ETHERCON18IN
ETHERCON5FT
ETHERCON10FT
· Cables de alimentación (extensión Neutrik® powerCON®)
o
o
o
o
Página 26 de 80
POWERCONEXT18IN
POWERCONEXT5FT
POWERCONEXT10FT
POWERCONEXT25FT
C6 Manual de Usuario Rev. 2
Introducción
Visión General del Producto
Conectores speego
hembra (x4)
Ranuras de ventilación
5 por borde largo
2 por borde corto
Borde
corto
Botón de prueba
Indicador de señal
Indicador de alimentación
Entrada/salida de señal
Conectores speego
Entrada de alimentación
macho (x4)
Frontal
C6 Manual de Usuario Rev. 2
Borde
largo
Posterior
Salida de
alimentación
Entrada/salida
de señal
Página 27 de 80
Introducción
Dimensiones del Producto
, "
Página 28 de 80
, "
, "
, "
, "
, "
, "
, "
,
C6 Manual de Usuario Rev. 2
Montaje e Instalación
3. Montaje e Instalación
Corriente Alterna
Todos los paneles C6 tienen una fuente de alimentación con detección automática (auto-rango)
que funciona con un rango de tensión de entrada de 100 a 240 VCA, 50/60 Hz. Para determinar los
requisitos de alimentación para el C6, consulte la etiqueta fijada al producto o las Especificaciones
Técnicas.
La especificación indica el consumo de corriente máximo durante un funcionamiento normal. Para
más información, descargue Dimensionar Interruptores Automáticos del sitio web de Chauvet en
www.chauvetprofessional.com.
·
·
·
Conecte siempre este producto a un circuito con toma de tierra y protegido.
Nunca conecte este producto a un reostato o atenuador.
Para evitar un desgaste innecesario y alargar su vida útil, desconecte completamente el
producto de la alimentación mediante el interruptor o desenchufándolo durante periodos en
que no se use.
Enchufe CA
El cable de entrada de alimentación incluido tiene un conector Neutrik® powerCON® en un
extremo para conectar al C6 y un enchufe Edison al otro extremo para conectar a la alimentación.
Cada panel C6 viene con un cable de enlace Neutrik® powerCON® para conectar la alimentación
entre paneles.
Utilice la tabla de más abajo como referencia para cablear un enchufe nuevo.
Conexión
Cable (EE. UU.)
Cable (Europa)
Color del tornillo
CA cargado
Negro
Marrón
Amarillo o cobre
CA Neutro
Blanco
Azul
Plata
CA Tierra
Verde/Amarillo
Verde/Amarillo
Verde
C6 Manual de Usuario Rev. 2
Página 29 de 80
Montaje e Instalación
Alimentación en Cadena
Los paneles C6 tienen conectores Neutrik® powerCON® de entrada y salida de alimentación
situados para facilitar el enlace de alimentación. No enlace la alimentación de más de
· 12 paneles a 120 V,
· 21 paneles a 208 V o
· 22 paneles a 230 V.
Diagrama de Alimentación en Cadena
Fuente de
alimentación
Paneles C6
adicionales
Página 30 de 80
C6 Manual de Usuario Rev. 2
Montaje e Instalación
Conexión de Señal
Los paneles C6 reciben señal de vídeo del VIP™ Driver a través de un cable Neutrik® etherCON®,
que no debe ser de más de 100 m de longitud. El cable Neutrik® etherCON® va desde el puerto
U MAIN OUT Neutrik® etherCON® del VIP™ Driver hasta uno de los paneles de vídeo. Los cables
de alimentación en cadena Neutrik® etherCON® enlazan entre sí los otros paneles.
Los cables de señal deben ir de panel a panel en el orden en que tengan que mapearse en el
software del LED. Los puertos de señal Neutrik® etherCON® de los paneles se pueden usar como
puertos de entrada o de salida, con lo cual la señal se uede transmitir en cualquier dirección.
Después de conectar los paneles, el último panel enlazado tendrá un puerto de señal vacío que se
puede usar para crear una infraestructura de señal de respaldo. Para hacerlo, lleve un cable
Neutrik® etherCON® desde el puerto Neutrik® etherCON® vacío del último panel hasta el puerto
D BACK UP Neutrik® etherCON® del VIP™ Driver.
Diagrama de Conexión de Señal
Desde el puerto
U MAIN OUT del
VIP™ Driver
Al puerto D BACK UP del
VIP™ Driver
·
La transmisión de la señal puede ir en ambas direcciones, así que tanto el último
como el primer panel de enlace de señal se puede conectar al VIP™ Driver.
C6 Manual de Usuario Rev. 2
Página 31 de 80
Montaje e Instalación
Montaje
Los paneles C6 están fabricados en aleación de aluminio y acero inoxidable, de modo que cada
panel es estable y ligero. Los paneles C6 tienen la parte posterior abierta para proporcionar mejor
ventilación en una instalación permanente o se integran en un elemento escénico.
Los paneles C6 se pueden montar usando el PVP™ Rig Kit, que se vende por separado. Para más
información, visite el sitio web de Chauvet en http://www.chauvetlighting.com/pvp-rigging-kit.html.
Los paneles C6 se pueden montar también directamente en cualquier superficie usando tornillos
M12 en las inserciones de las esquinas del panel..
Tenga en cuenta lo siguiente cuando diseñe una instalación con paneles C6:
· Flujo de aire tras los paneles
· Capacidad de carga de la estructura a la que se van a acoplar los paneles
· Acceso a las conexiones de los cables de alimentación y señal
· Visibilidad de los indicadores de señal y alimentación
· Temperatura ambiente del sitio
Vea las Especificaciones Técnicas para información específica sobre los requisitos de
peso y temperatura.
Consulte con un ingeniero estructural para determinar una capacidad de carga segura
basada en su aplicación específica.
PVP™ Rig Kit
Los kits de aparejamiento PVP™ de CHAUVET® se acoplan a las esquinas superiores de los
extremos estrechos de los paneles, con un Rig Kit uniendo paneles adyacentes en las esquinas
colindantes. El PVP™ Rig Kit se compone de un soporte sencillo con 2 tornillos speego macho en
la parte inferior y un orificio de tamaño M12 en la parte superior.
Los tornillos speego se introducen en los conectores speego hembra del panel C6. En la parte
superior del PVP™ Rig Kit hay un agujero de tamaño M12, que se puede usar con un tornillo M12
para acoplar el PVP™ Rig Kit a una abrazadera o a una estructura. Los tornillos speego se colocan
de forma que el PVP™ Rig Kit abarque 2 paneles. Para colgar un solo panel, utilice PVP™ Rig Kits
en ambos extremos del panel. Los propios paneles se pueden conectar entre sí para crear
cualquier forma. Véase Configuraciones de los Paneles. Cada PVP™ Rig Kit puede soportar el
peso de hasta 10 paneles colgados en vertical.
Diagrama del PVP™ Rig Kit
Los speegos macho en los PVP™ Rig Kits
van a los speegos hembra en la parte superior de los paneles
Los conectores laterales speego alinean los paneles
El PVP™ Rig Kit viene
con una abrazadera
desmontable
Página 32 de 80
Partes
superiores de
los paneles
El PVP™ Rig Kit
se acopla a
una estructura
C6 Manual de Usuario Rev. 2
Montaje e Instalación
Inserciones M12
Las inserciones M12 están en todas las esquinas en la parte posterior del panal C6, para
proporcionar un mecanismo para montar el panel directamente a una superficie plana. Cuando
monte el panel en una superficie plana, asegúrese de dejar espacio suficiente para que circule el
aire adecuadamente y que se puedan ver las luces indicadoras de señal. Inserte un separador en
cada esquina entre el panel y la superficie, con una abertura en el centro a través de la cual sigan
siendo visibles los indicadores de señal y alimentación.
El número de paneles que se pueden montar en una superficie depende de la capacidad de carga
de la superficie. Lo óptimo es conectar el panel a la superficie donde haya una inserción M12.
Diagrama de Inserciones M12
Inserciones de tornillo M12
Estructura
de montaje
4
Tornillos M12
Espaciadores opcionales para ventilación
Tornillos M12
Configuraciones de los Paneles
Los paneles C6 se pueden conectar en cualquier número de configuraciones usando las
conexiones speego de los bordes. Sin embargo, los paneles se deben orientar todos de la misma
forma porque están formados por 4 subpaneles, cada uno de los cuales mide 0,25 x 0,5 m. Estos
subpaneles no se pueden mapear de forma diferente dentro de una configuración de paneles más
grande. Véase Diagramas de Configuraciones del los Paneles.
La orientación esperada es con los paneles en vertical porque la orientación vertical funciona con
cualquier gestor de contenido o conmutador. La orientación alternativa, con los paneles orientados
en horizontal, necesita un gestor de contenido o conmutador que pueda rotar las imágenes. Véase
Orientación.
Los paneles C6 deben montarse todos con la misma orientación. No es necesario alinear los
paneles por subpanel, pero se tiene que alinear cada fila de pixeles. Los paneles y subpaneles se
pueden desacoplar. Véase Alinear Píxeles.
C6 Manual de Usuario Rev. 2
Página 33 de 80
Montaje e Instalación
Diagramas de Configuraciones de los Paneles
Orientación
Los subpaneles pueden
estar desplazados, pero los
píxeles se deben alinear
Subpaneles
individuales
NO configure los paneles
mezclando orientaciones
Orientación horizontal
Es necesario rotar el contenido
Un panel
La orientación vertical es la orientación normal
y no necesita rotar el contenido
Alinear Píxeles
Los píxeles en cada lado de los paneles deben
coincidir en las uniones; sin embargo, los
subpaneles no necesitan alinearse
Página 34 de 80
C6 Manual de Usuario Rev. 2
Montaje e Instalación
Tornillos Speego
Los tornillos speego son vástagos de acero muy resistentes con barras de bloqueo en los extremos
y mecanismos de ajuste de resorte. Se acoplan de forma temporal para así poder alinear los LED y
luego conectan de forma firme y precisa para que los píxeles se queden correctamente alineados y
creen una imagen sin fisuras.
Para fijar un tornillo speego, haga lo siguiente:
1. Sujete el mando de resorte e inserte la barra de bloqueo en la inserción.
2. Gire el mando de resorte en sentido antihorario hasta que la barra de bloqueo encaje en su
sitio. Este paso hace que los paneles se mantengan en su sitio para permitir un alineamiento
preciso de los paneles.
3. Alinee los paneles tomando los LED como referencia.
4. Gire el mando de ajuste en sentido horario para apretar la conexión completamente.
Para quitar un tornillo speego, haga lo siguiente:
1. Gire el mando de ajuste en sentido antihorario para aflojar la conexión.
2. Gire el mando de resorte en sentido horario hasta que la barra de bloqueo salte de su sitio.
Diagrama de Tornillo Speego
Mando de resorte
Mando de ajuste
Barra de
bloqueo
Resorte
Inserción speego
Pauta de Instalación
· Compruebe que todas las piezas están en el paquete.
· Asegúrese de que los accesorios para el montaje y el manejo, necesarios y opcionales, están
disponibles.
· Encienda y pruebe cada panel. Para más información vea Probar los Paneles.
C6 Manual de Usuario Rev. 2
Página 35 de 80
Configuración y Funcionamiento
4. Configuración y Funcionamiento
La configuración y el manejo de los paneles C6 se hace con el software LED Studio, con VIP™
Media Server Pro y VIP™ Signal Processor, o con software de servidor de medios que usted
prefiera. Los paneles C6 necesitan 1 VIP™ Driver por cada 102 paneles C6. El tamaño y
complejidad de los sistemas de vídeo es variable. Los paneles C6 se pueden usar en un sistema
simple con un servidor de medios y un VIP™ Driver para paneles en una conexión rectangular, o
los paneles pueden formar parte de un sistema complejo con múltiples entradas para paneles en
una conexión girada o fragmentada, como se muestra en el Diagramas de Configuraciones de los
Paneles. Independientemente de la conexión del panel o de la complejidad del sistema, se necesita
LED Studio y VIP™ Driver para configurar los paneles. Para más información sobre LED Studio,
consulte
el
Manual
de
usuario
disponible
en
el
sitio
web
de
Chauvet
http://www.chauvetlighting.com/product-manuals-literature/.
Probar los Paneles
Para probar el panel C6, pulse <TEST> en la parte posterior del panel. Esta prueba ejecuta un
programa que comprueba los circuitos del C6 y todos los LED.
Software LED Studio
LED Studio es una herramienta de mapeo de fácil utilización. Funciona sobre PC y se adapta
perfectamente al VIP™ Driver, de modo que el contenido se puede ajustar para que se visualice
adecuadamente con cualquier patrón de conexión del panel C6. Para más información sobre LED
Studio, consulte el Manual de usuario disponible en el sitio web de Chauvet
http://www.chauvetlighting.com/product-manuals-literature/.
VIP™ Driver
El VIP™ Driver es la interfaz de hardware entre LED Studio o la fuente de entrada de vídeo y los
paneles C6. Para más información sobre el VIP™ Driver, consulte el Manual de usuario disponible
en el sitio web de Chauvet http://www.chauvetlighting.com/product-manuals-literature/.
Productos de Sistema de Vídeo Usados con el C6
Elemento
Descripción
Código de
artículo
Número de pieza
VIP™ Driver (necesario)
Interfaz entre LED Studio o la entrada de
señal y los paneles C6
99090575
VIPDRIVER
LED Studio (necesario)
Software que mapea los paneles C6.
Necesita un PC para funcionar.
VIP™ Signal Distributor
Amplificador de señal para más de 24 paneles
99090576
VIPSIGDISTRO
PVP™ Rig Kit
Material para montaje en suspensión
20090598
PVP-RK
Neutrik®
etherCON® a etherCON®
Extensión de señal etherCON®, 18 in
Extensión de señal etherCON®, 5 ft
Extensión de señal etherCON®, 10 ft
19090363
19090364
19090365
ETHERCONEXT18IN
ETHERCONEXT5FT
ETHERCONEXT10FT
Neutrik®
powerCON® a
powerCON®
Extensión powerCON®, 18 in
Extensión powerCON®, 5 ft
Extensión powerCON®, 10 ft
Extensión powerCON®, 25 ft
19110372
19110373
19110374
19110375
POWERCONEXT18IN
POWERCONEXT5FT
POWERCONEXT10FT
POWERCONEXT25FT
VIP™ Media System Pro
Servidor de vídeo con ArKaos MediaMaster
Página 36 de 80
VIPCOMP2
C6 Manual de Usuario Rev. 2
Información Técnica
5. Información Técnica
Mantenimiento
Para mantener un rendimiento óptimo y minimizar el desgaste, apague los paneles C6 cuando no
se estén usando y desconéctelos completamente de la alimentación. Mantenga el entorno libre de
polvo, suciedad, agua y temperaturas extremas.
Los paneles C6 se deben limpiar al menos una vez al mes. Para evitar el sobrecalentamiento y la
reducción la emisión de luz por acumulación de polvo, siga estas directrices cuando limpie los
paneles C6:
1.
2.
3.
4.
Desenchufe el panel de la alimentación.
Espere a que el panel esté a temperatura ambiente.
Use un cepillo suave para quitar el polvo depositado en los componentes externos.
Frote el exterior de las tiras LED con un paño suave que no deje pelusa empapado en una
solución de agua y detergente. Aplique solamente una ligera presión.
5. Asegúrese de que todas las conexiones están bien secas antes de volver a conectar los cables
de alimentación y de señal.
Seque siempre con cuidado las superficies externas después de limpiarlas.
No gire los ventiladores de refrigeración usando aire comprimido, ya que podría
estropearlos.
Resolución de Problemas
Problema
Todos los paneles LED están
parpadeando
Causa
Fallo de contacto
Los LED de un panel concreto no se El cable de alimentación no está
encienden
bien conectado
Todos los LED no lucen
Los cables de entrada no están
correctamente conectados
Solución
Arregle los LED flojos o intente volver
a conectar
Vuelva a conectar el cable de
alimentación
Localice los cables que no están
correctamente conectados y
vuélvalos a conectar adecuadamente
Sin alimentación
Cable de alimentación aflojado o
dañado
No se enciende
(el indicador de alimentación LED no Conexión de alimentación
luce durante la "autocomprobación") defectuosa dentro del C6
Póngase en contacto con Chauvet
para la reparación
Fuente de alimentación externa
defectuosa
El C6 no muestra imágenes o
imágenes granulosas
C6 Manual de Usuario Rev. 2
Cable de señal aflojado o dañado
Desconecte y vuelva a conectar el
cable de señal o sustituya el cable
Página 37 de 80
Especificaciones Técnicas
6. Especificaciones Técnicas
Dimensiones y Peso
Longitud
Anchura
Altura
Peso
39,4 in (1.000 mm)
19,7 in (500 mm)
2,5 in (63 mm)
23 lb (10,4 kg)
Eléctricas
Fuente de alimentación
Rango
Selección de tensión
Conmutación (interna)
100–240 VCA, 50/60 Hz
Detección automática (autorango)
Parámetro
120 V, 60 Hz
208 V, 60 Hz
230 V, 50 Hz
Consumo y corriente
128 W; 1,06 A
131 W; 0,63 A
133 W; 0,60 A
Máxima potencia de
corriente
13,6 A
Alimentación en cadena
12 unidades
E/S alimentación
21 unidades
22 unidades
EE. UU./Canadá
Resto del mundo
Conector de entrada de
alimentación
Neutrik® powerCON® A
Conector de salida de alimentación
Neutrik® powerCON® B
Enchufe de cable de alimentación
Edison (U.S.)
Enchufe local
Sección mínima del cable
14 AWG
Fuente de luz
Tipo
Duración
Color
Cantidad/Píxeles
LED
50.000 horas
SMD 3528 (tricolor RGB)
12.800
Longitud de onda rojo
Longitud de onda verde
Longitud de onda azul
620 a 625 nm
524 a 529 nm
467 a 470 nm
Píxeles
Tamaño de píxel
Densidad de píxel
80 x 160
6,25 mm
25.600/m
Óptica foto
2
Iluminancia
Tasa de refresco
Ángulo de visión
Transparencia
1.500 Nits
1.080 Hz
140°
0%
Térmicas
Máx. temperatura externa
Sistema de refrigeración
104 °F (40 °C)
Convección
Conexiones de datos
Conectores E/S
Driver
Paneles por Driver
Neutrik® etherCON®
VIP™ Driver
102
Nombre de producto
Código de artículo
Número UPC
C6X4
23090851
781462211998
Pedidos
Página 38 de 80
C6 Manual de Usuario Rev. 2
Política y Procedimiento de Devoluciones
Política y Procedimiento de Devoluciones
Devoluciones
Debe enviar el producto a portes pagados, en su caja original y con su embalaje y
accesorios originales. Chauvet no expedirá etiquetas de devolución.
Llame a Chauvet y pida un número de Autorización de Devolución de la Mercancía
(RMA) antes de enviar el producto. Esté preparado para proporcionar el número de
modelo, número de serie y una breve descripción de la(s) causa(s) de la devolución.
Etiquete el paquete claramente con un número de RMA. Chauvet rechazará cualquier
producto devuelto sin un número de RMA.
NO escriba el número de RMA directamente sobre la caja. En vez de eso, escríbalo
en una etiqueta convenientemente adherida.
Una vez que haya recibido el número de RMA, incluya la siguiente información en una
hoja de papel dentro de la caja:
· Su nombre
· Su dirección
· Su número de teléfono
· El número de RMA
· Una breve descripción de los problemas
Asegúrese de que empaqueta el producto adecuadamente. Cualquier daño en el
transporte que resulte de un empaquetado inadecuado será responsabilidad del cliente.
Se recomienda empaquetado FedEx o de doble caja.
Chauvet se reserva el derecho de usar su propio criterio para reparar o reemplazar
productos devueltos.
C6 Manual de Usuario Rev. 2
Página 39 de 80
Contacto
OFICINA CENTRAL - Chauvet
Información General
Dirección: 5200 NW 108th Avenue
Sunrise, FL 33351
Voz:
(954) 577-4455
Fax:
(954) 929-5560
Número
gratuito:
(800) 762-1084
REINO UNIDO E IRLANDA - Chauvet Europe Ltd.
Servicio Técnico
Voz:
(954) 577-4455 (Marque 4)
Fax:
(954) 756-8015
Email: [email protected]
Información General
Dirección: Unit 1C
Brookhill Road Industrial Estate
Pinxton, Nottingham, UK
NG16 6NT
Voz:
+44 (0)1773 511115
Fax:
+44 (0)1773 511110
MÉXICO - Chauvet México
Servicio Técnico
Email: [email protected]
Información General
Dirección: Av. Santa Ana 30
Parque Industrial Lerma
Lerma, México C.P. 52000
Voz:
+52 (728) 285-5000
CHAUVET EUROPA - Chauvet Europe BVBA
Servicio Técnico
Email: [email protected]
Información General
Dirección: Stokstraat 18
9770 Kruishoutem
Belgium
Voz:
+32 9 388 93 97
World Wide Web www.chauvetlighting.com
World Wide Web www.chauvetlighting.co.uk
World Wide Web www.chauvet.com.mx
Servicio Técnico
Email: [email protected]
World Wide Web www.chauvetlighting.eu
Fuera de EE.UU., Reino Unido, Irlanda, México o Benelux, póngase en contacto con su
proveedor. Siga sus instrucciones para pedir soporte o para devolver un producto. Visite
www.chauvetlighting.com para detalles de contacto.
Página 40 de 80
C6 Manual de Usuario Rev. 2
Notes d'Edition
Ce manuel d'utilisation comprend une description du panneau vidéo C6 de CHAUVET®, ainsi que
des informations sur les mesures de sécurité, la configuration, l'installation, l'utilisation et la
maintenance.
Marques
CHAUVET® est une marque déposée de Chauvet & Sons Inc. (d/b/a CHAUVET® ou Chauvet). Le
logo CHAUVET® dans son intégralité, y compris le nom Chauvet et le triangle en pointillé, ainsi que
toutes les autres marques de ce manuel se rapportant à des services, des produits ou des
déclarations de commercialisation sont la propriété ou sont sous licence de Chauvet. Tous les
autres noms de produits, logos, marques, noms de société et autres marques figurant ou
mentionnées dans ce document sont la propriété de leurs détenteurs respectifs.
Avis de Copyright
Chauvet possède le contenu de ce manuel d'utilisation dans son intégralité, y compris, mais sans
s'y limiter, les photos, les logos, les marques et les ressources.
© Copyright 2014 Chauvet. Tous droits réservés.
Imprimé en Chine.
Publié électroniquement par Chauvet aux États-Unis.
Utilisation du Manuel
Chauvet autorise ses clients à télécharger et à imprimer ce manuel uniquement à des fins
d'information professionnelle. Chauvet interdit expressément l'utilisation, la copie, le stockage, la
distribution, la modification ou l'impression de ce manuel ou de son contenu à d'autres fins sans son
consentement écrit.
Impression du Document
Pour obtenir les meilleurs résultats, imprimez ce document en couleur, sur du papier au format
lettre (8,5 x 11 pouces), recto-verso. Si vous utilisez du papier A4 (210 x 297 mm), configurez votre
imprimante afin que le contenu soit correctement mis à l'échelle.
Clause de non Responsabilité
Chauvet estime que les informations contenues dans ce manuel sont exactes à tous les égards.
Cependant, Chauvet n'assume aucune responsabilité pour toute erreur ou omission dans le présent
document. Chauvet se réserve le droit de réviser ce document et d'y apporter des modifications de
contenu de temps à autre sans obligation d'avertir quelque personne ou société que ce soit de
l'existence d'une révision ou de modifications. Pour autant, cela ne représente en aucune façon un
engagement de la part de Chauvet d'effectuer de tels changements. Chauvet peut publier une
révision ou une nouvelle édition de ce manuel pour intégrer ces changements.
Révision du Document
La révision 1 du manuel d'utilisation du C6 est la première édition de ce manuel. Veuillez consulter
le site internet www.chauvetprofessional.com pour la dernière version.
Auteur
Date
Éditeur
Date
L. Henry
22/08/2014
A. Leon
17/09/2014
Manuel d'Utilisation du C6 Rév. 2
Page 41 sur 80
Avant de Commencer
1. Avant de Commencer
Contenu
·
·
·
·
·
·
4 Panneaux C6
1 câble d'alimentation Neutrik® powerCON®
4 câbles de chaînage électrique Neutrik® powerCON®
4 câbles de chaînage de signal Neutrik® powerCON®
Fiche de garantie
Manuel d'utilisation
Déballage
Déballez avec précaution et sans attendre les panneaux et vérifiez que tous les éléments se
trouvent dans l'emballage et ne présentent aucun dommage.
Si l'emballage ou le contenu semblent avoir été endommagés pendant le transport, ou qu'ils
présentent des traces de mauvaise manipulation, gardez tous les matériaux d'emballage et envoyez
immédiatement une réclamation au transporteur. Ne contactez pas Chauvet. Si les dommages ne
sont pas signalés au transporteur immédiatement, ou si l'intégralité de l'emballage n'est pas
conservée pour inspection ultérieure, la réclamation peut être invalidée.
Pour tout autre problème comme la non livraison de pièces ou composants, des dommages non en
rapport avec la livraison ou des vices cachés, veuillez déposer votre réclamation auprès de
Chauvet dans les 7 jours suivant la livraison. Pour savoir comment prendre contact avec Chauvet,
veuillez consulter la section Nous Contacter à la fin de ce manuel.
Symboles
Symboles
Signification
Consignes importantes en matière d'installation, de configuration et de fonctionnement.
Le non-respect de ces consignes peut entraîner le non fonctionnement de l'appareil,
des dommages à des équipements tiers ou à l'opérateur.
Consignes importantes en matière d'installation ou de configuration. Le non respect de
ces consignes peut empêcher le bon fonctionnement de l'appareil.
Information utile.
Page 42 sur 80
Manuel d'Utilisation du C6 Rév. 2
Avant de Commencer
Consignes de Sécurité
Veuillez lire les consignes de sécurité qui suivent attentivement avant de commencer à travailler
avec l'appareil. Ces consignes fournissent des informations de sécurité importantes sur
l'installation, l'utilisation et la maintenance.
·
·
·
·
·
·
·
·
·
·
·
·
·
·
·
·
·
·
Connectez toujours l'appareil à un circuit relié à la terre.
Veillez à ce que le cordon d'alimentation ne soit jamais pincé ou endommagé.
Toujours connecter l'appareil à une source d'alimentation avec la tension appropriée indiquée sur l'étiquette
du produit.
NE PAS utiliser l'appareil si vous constatez que le boîtier, les bandes LED ou les câbles ont subit des
dommages.
Cet appareil doit uniquement être utilisé en intérieur ! Il répond aux exigences de la norme IP40. N'exposez
jamais l'appareil à la pluie ou à l'humidité.
Toujours débrancher l'appareil de la source d'alimentation avant de le nettoyer.
Durant les périodes de non-utilisation, pour éviter tout usure inutile et pour prolonger la durée de vie,
déconnectez entièrement l'appareil en le débranchant de l'alimentation électrique ou en coupant le
disjoncteur.
Ne débranchez jamais cet appareil en tirant sur le cordon d'alimentation.
En cas d'installation de l'appareil en hauteur, veillez à toujours le fixer à l'aide d'un câble de sécurité.
Veillez à ce qu'aucun matériel inflammable ne se trouve à proximité lorsqu'il est en fonctionnement.
ATTENTION: Lorsque l'appareil est transféré d'un environnement à température extrême à un autre
(par exemple d'un camion froid vers une salle de bal chaude et humide), de la condensation peut se
former sur les composants électriques internes. Pour éviter de causer des dommages, laissez
l'appareil s'acclimater entièrement au milieu environnant avant de le mettre sous tension.
Ne connectez jamais l'appareil à un variateur ou un rhéostat.
Installez toujours l'appareil dans un endroit bien ventilé.
Ne faites pas fonctionner l'appareil à une température ambiante de plus de 45°C (104°F).
Cet appareil ne contient aucune pièce réparable par l'utilisateur. Toute référence à des réparations dans ce
manuel d'utilisation ne s'applique qu'à des techniciens Chauvet certifiés ayant reçu une formation
adéquate. Ne pas ouvrir le boîtier ou essayer d'effectuer des réparations.
Tous les codes et règlements locaux en vigueur doivent être respectés pour une installation correcte de cet
appareil.
En cas de sérieux problèmes de fonctionnement, arrêtez l'appareil immédiatement.
Les dommages causés par les modifications manuelles ne sont pas couverts par la garantie. Chauvet
n'accepte aucune responsabilité pour les dommages causés par des modifications non autorisées ou ne
respectant pas les consignes de sécurité et les instructions de ce manuel.
Au cas où l'appareil nécessite une réparation, prenez contact avec Chauvet. Pour plus d'informations, veuillez
consulter les sections Politique et Procédure de Retour et Nous Contacter.
Durée de Vie des LEDs
La luminosité des LEDs décline avec le temps, principalement à cause de la chaleur de leur température
de fonctionnement et de l'utilisation. Lorsque les LEDs sont regroupées en cluster – ce qui est le cas
dans un panneau vidéo – elles génèrent une température de fonctionnement plus élevée que lorsqu'elle
sont isolées. L'utilisation de LEDs en cluster à leur intensité maximale réduit leur durée de vie. Les
panneaux C6 sont équipés d'un système de gestion de la température conçu pour régler ce problème et
délivrent l'image la plus éclatante possible tout en conservant la durée de vie la plus longue possible. La
durée de vie des LEDs du panneau C6 est de 50 000 heures. Cependant, la durée de vie des LEDs peut
être étendue davantage en améliorant la ventilation autour des panneaux et en gardant la température
ambiante dans une plage de fonctionnement optimale. En outre, limiter l'intensité globale de la projection
peut également aider à prolonger la durée de vie des LEDs.
Manuel d'Utilisation du C6 Rév. 2
Page 43 sur 80
Introduction
2. Introduction
Description de l'Appareil
Le C6 est un panneau vidéo LED avec un pas de pixel de 6,25 mm conçu spécialement pour une
installation permanente. Il utilise des LEDs SMD 3528 noir profond (black face) offrant un excellent
contraste. Silencieux, léger et mesurant 1 m sur 0,5 m, sa conception modulaire permet une
installation et une personnalisation en toute simplicité.
Les connexions d'alimentation et de signaux du C6 sont compatibles avec les gammes VIP™ de
CHAUVET®. Ainsi, les murs vidéo C6 et les murs vidéos PVP™ peuvent être gérés avec une seule
et même source de contrôle.
Les panneaux C6 sont contrôlés avec les appareils de distribution et de contrôle de signaux de la
gamme VIP™ et sont configurés avec le logiciel LED Studio de CHAUVET® installé sur un PC.
Pour plus d'informations sur la gamme VIP™ ou le logiciel LED Studio, téléchargez les manuels
d'utilisation sur le site Internet de Chauvet à l'adresse http://www.chauvetlighting.com/productmanuals-literature/.
Caractéristiques de l'Appareil
· Pas de pixel de 6,25 mm et angle de vision de 140° pour une image détaillée et facile à
regarder.
· LEDs SMD 3528 noir profond (black face) offrant un excellent contraste.
· Regroupement de pixels (binning) LED très serré pour un rendu fidèle des couleurs sur
l'ensemble des panneaux.
· Construction solide, légère et modulaire permettant une flexibilité de configuration.
· Compatibilité avec le kit de fixation PVP™ permettant l'installation suspendue pour jusqu'à 10
panneaux par kit de fixation.
· Inserts M12 filetés pour une installation permanente aisée et sécurisée.
· Fonctionnement sans ventilateur pour une utilisation en silence.
· Entièrement compatible avec les VIP™ Driver, VIP™ Signal Distributor et VIP™ Media Server
Pro.
Accessoires Nécessaires
· VIP™ Driver (nécessaire)
· LED Studio (nécessaire)
Accessoires Optionnels
· VIP™ Signal Distributor (nécessaire pour faire fonctionner plus de 24 panneaux)
· Câbles de signal (extensions de signal Neutrik® etherCON®)
o
o
o
ETHERCON18IN
ETHERCON5FT
ETHERCON10FT
· Câbles d'alimentation (extension Neutrik® powerCON®)
o
o
o
o
Page 44 sur 80
POWERCONEXT18IN
POWERCONEXT5FT
POWERCONEXT10FT
POWERCONEXT25FT
Manuel d'Utilisation du C6 Rév. 2
Introduction
Vue d'Ensemble du Produit
Speego femelle
Connecteurs (x4)
Bord court
Fentes de ventilation
5 sur chaque bord long
2 sur chaque bord court
Avant
Manuel d'Utilisation du C6 Rév. 2
Bouton test
Indicateur du signal
Indicateur d'alimentation
Long
bord
Entrée/sortie
signal
Entrée
Connecteurs Speego
d'alimentation
mâles (x4)
Arrièr
Sortie
Entrée/sortie
d'alimentation
signal
Page 45 sur 80
Introduction
Dimensions de l'Appareil
, po
, po
Page 46 sur 80
, po
, po
, po
, po
, po
, po
,
Manuel d'Utilisation du C6 Rév. 2
Configuration et Installation
3. Configuration et Installation
Alimentation CA
Chaque panneau C6 est doté d'une alimentation universelle qui peut prendre en charge n'importe
quelle tension d'entrée comprise entre 100 et 240 V CA, 50/60 Hz. Pour déterminer les besoins en
alimentation du C6, consultez l'étiquette apposée sur l'appareil ou la section Spécifications
Techniques.
L'ampérage affiché indique la consommation maximale de courant pendant le fonctionnement
normal. Pour plus d'informations, veuillez télécharger le manuel "Sizing Circuit Breakers"
(dimensionnement des disjoncteurs) sur le site internet de Chauvet à l'adresse
www.chauvetprofessional.com.
·
·
·
Cet appareil doit toujours être branché sur un circuit correctement relié à la terre et
protégé.
Ne connectez jamais cet appareil à un rhéostat ou un variateur.
Durant les périodes de non-utilisation, pour éviter tout usure inutile et pour prolonger la
durée de vie, déconnectez entièrement l'appareil en le débranchant de l'alimentation
électrique ou en coupant le disjoncteur.
Prise CA
Le cordon d'entrée d'alimentation inclus comporte un connecteur Neutrik powerCON® sur l'une des
extrémités pour la connexion au C6, et une fiche Edison sur l'autre extrémité pour le branchement
sur le secteur. Chaque panneau C6 est livré avec un cordon de chaînage électrique Neutrik®
powerCON® pour relier plusieurs panneaux entre eux.
Utilisez le tableau ci-dessous en tant que référence lorsque vous câblez une nouvelle prise.
Connexion
Câble (USA)
Câble (Europe)
Couleur de vis
Phase CA
Noir
Marron
Jaune ou laiton
Neutre CA
Blanc
Bleu
Argent
Terre CA
Vert/Jaune
Vert/Jaune
Vert
Manuel d'Utilisation du C6 Rév. 2
Page 47 sur 80
Configuration et Installation
Chaînage Électrique
Les panneaux C6 disposent de prises Neutrik® powerCON® d'entrée et de sortie d'alimentation
pour faciliter le chaînage électrique. Ne pas chaîner plus de
· 12 panneaux sur du 120 V,
· 21 panneaux sur du 208 V ou
· 22 panneaux sur du 230 V.
Schéma de chaînage électrique
Source
d'alimentation
Panneaux C6
additionnels
Page 48 sur 80
Manuel d'Utilisation du C6 Rév. 2
Configuration et Installation
Connexion du Signal
Les panneaux C6 reçoivent un signal vidéo à partir du VIP™ Driver via un câble Neutrik®
etherCON® qui ne doit pas dépasser une longueur de 100m. Le câble Neutrik® etherCON® part du
port Neutrik® etherCON® U MAIN OUT du VIP™ Driver pour aller dans l'un des panneaux vidéo.
Les cordons de chaînage électrique Neutrik® etherCON® relient les autres panneaux ensemble.
Les câbles de signal doivent être connectés d'un panneau vidéo à l'autre dans l'ordre avec lequel ils
seront mappés dans le logiciel de contrôle des LEDs. Les ports de signal Neutrik® etherCON®
situés sur les panneaux peuvent être utilisés soit en temps que ports de sortie ou ports d'entrée.
Les signaux peuvent donc transiter dans l'un ou l'autre sens. Une fois tous les panneaux connectés,
un port de signal inutilisé est disponible sur le dernier panneau relié et peut être utilisé pour mettre
en place une infrastructure de signal de secours. Pour cela, connectez un câble Neutrik®
etherCON® depuis le port Neutrik® etherCON® vide sur le dernier panneau au port Neutrik®
etherCON® D BACK UP du VIP™ Driver.
Schéma des Connexions de Signal
Depuis port U
MAIN OUT du
VIP™ Driver
Vers PORT D BACK UP
du VIP™ Driver
Étant donné que la transmission de signal peut se faire dans les deux sens, soit le premier
ou le dernier panneau dans la chaîne de signal peut être connecté au VIP™ Driver.
Manuel d'Utilisation du C6 Rév. 2
Page 49 sur 80
Configuration et Installation
Installation
De part leur fabrication en alliage d'aluminium et en acier inoxydable, les panneaux C6 sont stables
et légers. L'arrière des panneaux C6 est ouvert pour permettre une meilleure ventilation lorsqu'ils
sont installés de manière permanente dans une salle ou lorsqu'ils sont intégrés à une scène de
spectacle. Les panneaux C6 peuvent être installés à l'aide du kit de fixation PVP™ vendu
séparément. Pour plus d'informations, veuillez consulter le site internet de Chauvet à l'adresse
http://www.chauvetlighting.com/pvp-rigging-kit.html. Les panneaux C6 peuvent également être
installés directement sur n'importe quelle surface en utilisant des boulons de taille M12 dans les
inserts situés sur chaque coin du panneau.
Lors de la conception de l'installation des panneaux C6, prenez bien en considération
les éléments suivants :
· débit d'air derrière les panneaux
· capacité en charge des structures auxquelles les panneaux vont être attachés
· accès aux connexions d'alimentation et de signal
· visibilité des voyants d'indication de signal et d'alimentation
· température ambiante de l'endroit
Veuillez consulter la section Spécifications Techniques pour les besoins spécifiques en
poids et en température.
Veuillez consulter un ingénieur en structures afin de déterminer les capacités de charge
appropriées en fonction de votre besoin spécifique.
Page 50 sur 80
Manuel d'Utilisation du C6 Rév. 2
Configuration et Installation
Kit d'Installation PVP™
Les kits d'installation PVP™ de CHAUVET® sont conçus pour être fixés de chaque côté du bord
court des panneaux. Chaque kit se fixe sur deux panneaux adjacents en faisant se rejoindre leurs
bords accolés. Le kit d'installation PVP™ est constitué d'une seule plaque de fixation avec 2
boulons speego mâle sur le dessous et un trou de taille M12 sur le dessus. Les boulons speego
s'insèrent dans les connecteurs femelle speego du panneau C6. Sur le dessus du kit d'installation
PVP™ se trouve un trou de taille M12 qui peut être utilisé avec un boulon M12 pour fixer le kit
d'installation PVP™ à une pince ou une structure. Les boulons speego sont placés de manière à ce
que le kit d'installation PVP™ soit logé sur deux panneaux. Pour suspendre un seul panneau,
utilisez un kit d'installation sur chacune des extrémités du panneau. Les panneaux peuvent être
reliés les uns aux autres pour constituer une multitude de formes. Veuillez consulter la section
Configurations du Panneau. Chaque kit d'installation PVP™ peut supporter un poids pouvant aller
jusqu'à 10 panneaux suspendus verticalement.
Diagramme du Kit d'Installation PVP™
Les connecteurs speego mâle des kits d'installation PVP™ s’enfichent dans les
connecteurs speego femelle situés sur le dessus des panneaux
Les connecteurs speego situés sur le côté
permettent d'aligner les panneaux
Le kit d'installation PVP™
est livré avec une pince
amovible
Manuel d'Utilisation du C6 Rév. 2
Dessus des
panneaux
Le kit
d'installation
PVP™ se fixe
sur une
structure
Page 51 sur 80
Configuration et Installation
Inserts M12
Les inserts M12 sont situés à chaque coin de l'arrière du panneau C6, offrant ainsi un mécanisme
pour installer le panneau directement sur une surface plane. Lors de l'installation du panneau sur
une surface plane, assurez-vous de laisser suffisamment de place pour permettre une ventilation
appropriée et pour permettre de visualiser les voyants d'indication de signal. Insérez un séparateur
à chaque coin entre le panneau et la surface en laissant une ouverture au centre à travers laquelle
les indicateurs de signal et d'alimentation puisse rester visibles.
Le nombre de panneaux pouvant être installés sur une surface dépend de sa capacité en charge. Il
est optimal de relier le panneau à la surface à l'endroit où se trouve un insert M12.
Diagramme des Inserts M12
Inserts pour boulon M12
Structure
d’installation
4
Boulons M12
Entretoise optionnelle pour la ventilation
Boulons M12
Configurations du Panneau
Les panneaux C6 peuvent être reliés entre-eux dans n'importe quelle configuration grâce aux
connexions speego situées sur les bords. Cependant, les panneaux doivent tous être orientés à
l'identique car ils sont composés de 4 sous-panneaux, chacun mesurant 0,25 m x 0,5 m. Ces souspanneaux ne peuvent pas être mappés de manière différente au sein d'une configuration plus large
de panneaux. Veuillez consulter la section Diagrammes des Configurations de Panneaux.
Une orientation verticale des panneaux est recommandée car elle fonctionne avec n'importe quel
gestionnaire de contenu ou commutateur. En revanche, si les panneaux sont orientés
horizontalement, un gestionnaire de contenu ou un commutateur pouvant faire pivoter les images
est nécessaire. Veuillez consulter la section Orientation.
Les panneaux C6 doivent tous être installés avec la même orientation. Il n'est pas nécessaire que
les panneaux soient alignés au niveau des sous-panneaux, cependant chaque ligne de pixel doit
être alignée. Les panneaux et les sous-panneaux peuvent être décalés. Voir la section Alignement
des Pixels.
Page 52 sur 80
Manuel d'Utilisation du C6 Rév. 2
Configuration et Installation
Diagrammes des Configurations de Panneaux
Orientation
Les sous-panneaux peuvent être décalés,
cependant les pixels doivent rester alignés
Sous-panneaux
individuels
Orientation horizontale
Nécessite un contenu retourné
NE PAS configurer les
panneaux avec un mélange
d'orientation
Un panneau
L'orientation verticale est recommandée
et ne nécessite pas de contenu retourné
Alignement des Pixels
Les pixels situés de chaque côté des panneaux doivent
se rejoindre au niveau de la jointure. Cependant il n'est
pas nécessaire que les sous-panneaux soient alignés.
Manuel d'Utilisation du C6 Rév. 2
Page 53 sur 80
Configuration et Installation
Boulons Speego
Les boulons speego sont des tiges en acier très résistantes équipées de barres de verrouillage aux
extrémités et d'un mécanisme de serrage avec ressort de force. Elles permettent de créer une
fixation temporaire qui permet l'alignement des LEDs, ainsi qu'une connexion ferme et précise afin
que les pixels restent alignés correctement pour obtenir une image sans jointure apparente.
Pour attacher un boulon speego, effectuez les actions suivantes :
1. Maintenez le bouton du ressort et insérez la barre de verrouillage dans l'insert.
2. Tournez le bouton du ressort dans le sens inverse des aiguilles d'une montre jusqu'à ce que la
barre de verrouillage soit en position verrouillée. Cette étape permet de retenir les panneaux en
place afin de procéder à un alignement précis des panneaux.
3. Alignez les panneaux en utilisant les LEDs comme repère.
4. Tournez le bouton de serrage dans le sens des aiguilles d'une montre pour serrer entièrement la
connexion.
Pour détacher un boulon speego, effectuez les actions suivantes :
1. Tournez le bouton de serrage dans le sens inverse des aiguilles d'une montre pour déserrer la
connexion.
2. Tournez le bouton du ressort dans le sens des aiguilles d'une montre jusqu'à ce que la barre de
verrouillage se déloge.
Diagramme d'un Boulon Speego
Bouton du ressort
Bouton de serrage
Barre de
verrouillage
Ressort
Insert du speego
Instructions pour l'installation
· Vérifiez que toutes les pièces sont incluses dans le colis.
· Assurez-vous que tous les accessoires requis et optionnels pour l'installation et le
fonctionnement sont disponibles pour utilisation.
· Allumez et testez chaque panneau. Pour plus d'informations, consultez la section Test des
Panneaux.
· Lors de l'élaboration d'une installation suspendue, travaillez en commençant par le haut pour
finir par le bas.
· Lors de l'élaboration d'une installation montée sur une surface, alignez et serrez les panneaux
avant de les poser sur la surface.
Page 54 sur 80
Manuel d'Utilisation du C6 Rév. 2
Configuration et Utilisation
4. Configuration et Utilisation
La configuration et l'utilisation des panneaux C6 s'effectue avec le logiciel LED Studio, soit le VIP™
Media Server Pro et VIP™ Signal Processor ou bien le logiciel de serveur multimédia de votre
choix. Les panneaux C6 nécessitent un VIP™ Driver par groupe de 102 panneaux C6. Les
systèmes vidéo varient en taille et en complexité. Les panneaux C6 peuvent aussi bien être utilisés
dans un système simple avec un serveur multimédia et un VIP™ Driver relié à des panneaux
assemblés en rectangle que dans un système complexe avec une multitude d'entrées vers des
panneaux en assemblage fragmenté ou retourné, tel que montré dans la section Diagramme des
Configurations de Panneaux. Peu importe l'assemblage des panneaux ou la complexité du
système, le logiciel LED Studio et un VIP™ Driver sont nécessaires pour configurer et utiliser les
panneaux. Pour plus d'informations sur le logiciel LED Studio, téléchargez le manuel d'utilisation sur
le site Internet de Chauvet à l'adresse http://www.chauvetlighting.com/product-manuals-literature/.
Test des Panneaux
Pour tester le panneau C6, appuyez sur le bouton <TEST> situé à l'arrière du panneau. Ce test
exécute un programme qui vérifie les circuits du C6 et l'intégralité des LEDs.
Logiciel LED Studio
Le logiciel LED Studio est un outil de mappage facile d'utilisation. Il fonctionne sur PC et s'intègre
parfaitement avec le VIP™ Driver afin que le contenu puisse être correctement ajusté à l'affichage
peut importe la configuration d'assemblage des panneaux C6. Pour plus d'informations sur le
logiciel LED Studio, téléchargez le manuel d'utilisation sur le site Internet de Chauvet à l'adresse
http://www.chauvetlighting.com/product-manuals-literature/.
VIP™ Driver
Le VIP™ Driver est l'interface matérielle entre le logiciel LED Studio, ou la source d'entrée vidéo, et les
panneaux C6. Pour plus d'informations sur le VIP™ Driver, téléchargez le manuel d'utilisation sur le site
Internet de Chauvet à l'adresse http://www.chauvetlighting.com/product-manuals-literature/.
Appareils de Système Vidéo Utilisés avec le C6
Article
Description
Code de
l'article
Numéro article
VIP™ Driver (nécessaire)
Interface entre le logiciel LED Studio ou l'entrée
99090575
de signal et les panneaux C6.
LED Studio (nécessaire)
Logiciel qui permet d'effectuer le mappage des
panneaux C6. Un PC est requis pour l'utilisation.
VIP™ Signal Distributor
Amplificateur de signal pour jusqu'à 24
panneaux.
99090576
VIPSIGDISTRO
Kit d'installation PVP™
Matériel pour une installation suspendue.
20090598
PVP-RK
Neutrik®
etherCON® vers
etherCON®
Extension de signal etherCON®, 45,72 cm (18 po) 19090363 ETHERCONEXT18IN
Extension de signal etherCON®, 1,52 m (5 pi) 19090364 ETHERCONEXT5FT
Extension de signal etherCON®, 3,04 m (10 pi) 19090365 ETHERCONEXT10FT
Neutrik®
powerCON® vers
powerCON®
Extension powerCON®, 45,72 cm (18 po)
Extension powerCON®, 1,52 m (5 pi)
Extension powerCON®, 3,04 m (10 pi)
Extension powerCON®, 7,62 m (25 pi)
VIP™ Media System Pro
Serveur vidéo avec logiciel ArKaos MediaMaster
Manuel d'Utilisation du C6 Rév. 2
VIPDRIVER
19110372
19110373
19110374
19110375
POWERCONEXT18IN
POWERCONEXT5FT
POWERCONEXT10FT
POWERCONEXT25FT
VIPCOMP2
Page 55 sur 80
Informations Techniques
5. Informations Techniques
Entretien
Pour conserver des performances optimales et pour réduire l'usure, éteignez les panneaux C6
lorsqu'ils ne sont pas utilisés et déconnectez-les totalement de l'alimentation. Assurez-vous que
l'environnement autour des panneaux soit exempt de toute poussière, saleté et eau, et évitez les
températures extrêmes.
Les panneaux C6 doivent être nettoyés au moins une fois par mois. Pour empêcher que
l'accumulation de poussière réduise la production de lumière et provoque une surchauffe, suivez
ces recommandations lors du nettoyage des panneaux C6 :
1.
2.
3.
4.
Débranchez le panneau.
Attendez que le panneau soit à la température ambiante.
Utilisez une brosse douce pour enlever la poussière accumulée sur les composants externes.
Essuyez l'extérieur des bandes de LED avec un chiffon doux non pelucheux imbibé d'une
solution d'eau et de détergent. Appliquez uniquement par pressions légères.
5. Assurez-vous que toutes les connexions soient bien sèches avant de rebrancher les câbles
d'alimentation et de signal.
Assurez-vous de bien sécher toutes les surfaces externes après les avoir nettoyer.
Ne faites pas tourner les ventilateurs de refroidissement à l'aide d'air comprimé sous
risque de les endommager.
Dépannage
Problème
Cause
Solution
Tous les LEDs du panneau
clignotent
Faux-contact
Corriger les LEDs mal fixées ou
essayer de les rebrancher
Les LEDs d'un panneau en
particulier ne sont pas allumées
Le câble d'alimentation n'est pas
correctement inséré
Enfoncer correctement le câble
d'alimentation
Aucune LED ne s'allume
Câbles en entrée mal connectés
Trouver les câbles mal connectés et
les reconnecter correctement
Pas d'alimentation
Pas de mise sous tension
(l'indicateur d'alimentation LED ne
s'allume pas lors de l'auto-test)
Le cordon d'alimentation présente
du jeu ou est endommagé
Connexion d'alimentation
défectueuse à l'intérieur du C6
Contacter Chauvet pour les
réparations
Alimentation externe défectueuse
Le C6 n'affiche aucune image ou
des images tachetées
Page 56 sur 80
Câble de signal mal fixé ou
endommagé
Déconnecter et reconnecter le câble
de signal, ou remplacer le câble
Manuel d'Utilisation du C6 Rév. 2
Spécifications Techniques
6. Spécifications Techniques
Dimensions et Poids
Longueur
Largeur
Hauteur
Poids
1 000 mm (39,4 po)
500 mm (19,7 po)
63 mm (2,5 po)
10,4 kg (23 lb)
Alimentation Électrique
Source de courant
Plage
Sélection de tension
Commutation (interne)
Entre 100 et 240 VCA, 50/60 Hz
Universelle
Paramètre
120 V, 60 Hz
208 V, 60 Hz
230 V, 50 Hz
Consommation et courant
128 W; 1,06 A
131 W; 0,63 A
133 W; 0,60 A
Courant de sortie
maximum
13,6 A
Chaînage électrique
12 unités
E/S alimentation
21 unités
22 unités
États-unis/Canada
Connecteur d'entrée d'alimentation
Monde
Neutrik® powerCON® A
Connecteur de sortie d'alimentation
Neutrik® powerCON® B
Prise du cordon d'alimentation
Edison (USA)
Prise locale
Calibre de fil minimum
14 AWG
Source Lumineuse
Type
Durée de vie
Couleur
Quantité/pixels
LED
50 000 heures
SMD 3528 (RGB tricolore)
12 800
Longueur d'onde rouge
Longueur d'onde vert
Longueur d'onde bleu
620 à 625 nm
524 à 529 nm
467 à 470 nm
Pixels
Taille de pixel
Densité de pixel
80 x 160
6,25 mm
25 600/m
Optique Photo
2
Puissance d'éclairage
Taux de rafraichissement
Angle de vision
Transparence
1 500 NITS
1 080 Hz
140°
0%
Thermique
Température externe maximum
Système de refroidissement
40 °C (104 °F)
Convection
Connections de Données
Connecteurs E/S
Pilote
Panneaux par pilote
Neutrik® etherCON®
VIP™ Driver
102
Nom du produit
Code de l'article
Code UPC
C6X4
23090851
781462211998
Commande
Manuel d'Utilisation du C6 Rév. 2
Page 57 sur 80
Politique et Procédure de Retour
Politique et Procédure de Retour
Renvois
Vous devez nous retourner l'appareil en port prépayé, dans sa boîte et avec son
emballage d'origine ainsi que tous ses accessoires. Chauvet ne délivre pas d'étiquette de
renvoi.
Téléphonez à Chauvet et demandez un numéro d'autorisation de retour (NAR) avant de
nous réexpédier l'appareil. Pour l'obtenir, il vous sera demandé de fournir le numéro du
modèle, le numéro de série ainsi qu'une brève description de l'objet du retour.
Indiquez lisiblement le NAR sur une étiquette apposée sur le colis. Chauvet refusera la
réception de tout appareil pour lequel aucun NAR n'a été demandé.
N'écrivez PAS le NAR directement sur le colis. Écrivez le plutôt sur une étiquette
apposée de manière appropriée.
Lorsque vous avez reçu le NAR, inscrivez les informations qui suivent sur une feuille de
papier que vous placerez à l'intérieur du colis :
· Votre nom
· Votre adresse
· Votre numéro de téléphone
· Le NAR
· Une courte description du ou des problèmes
Veillez à emballer l'appareil de manière adéquate. Le client sera tenu responsable de
tout dommage survenant lors de l'expédition de retour et causée par un emballage
inapproprié. Nous vous recommandons d'utiliser un emballage double ou celui de FedEx.
Chauvet se réserve le droit, à sa convenance, de réparer ou remplacer tout
appareil qui lui est retourné.
Page 58 sur 80
Manuel d'Utilisation du C6 Rév. 2
C6 User Manual Rev. 1
Nous
Contacter
SIÈGE SOCIAL MONDIAL - Chauvet
Informations Générales th
Adresse : 5200 NW 108 Avenue
Sunrise, FL 33351
Téléphone: (954) 577-4455
Télécopie : (954) 929-5560
N° vert :
(800) 762-1084
Support Technique Téléphone :(954) 577-4455
(appuyer sur 4)
Télécopie : (954) 756-8015
E-mail :
[email protected]
Site Web
www.chauvetlighting.com
ROYAUME-UNI ET l'IRLANDE - Chauvet Europe Ltd.
Informations Générales
Support Technique
Adresse: Unit 1C
E-mail:
Brookhill Road Industrial Estate
[email protected]
Pinxton, Nottingham, UK
Site Web
NG16 6NT
Téléphone: +44 (0)1773 511115
www.chauvetlighting.co.uk
Télécopie: +44 (0)1773 511110
MEXIQUE - Chauvet Mexico
Informations Générales
Support Technique
Adresse: Av. Santa Ana 30
E-mail:
Parque Industrial Lerma
[email protected]
Lerma, Mexico C.P. 52000
Site Web www.chauvet.com.mx
Téléphone: +52 (728) 285-5000
CHAUVET EUROPE - Chauvet Europe BVBA
Informations Générales
Support Technique
Adresse: Stokstraat 18
E-mail:
9770 Kruishoutem
[email protected]
Belgium
Site Web www.chauvetlighting.eu
Téléphone: +52 (728) 285-5000
En dehors des États-Unis, du Royaume-Uni, de l'Irlande, du Mexique ou du Benelux, contactez votre
revendeur. Suivez leurs instructions pour accéder à l'assistance ou pour renvoyer un produit. Consultez
notre site web pour les coordonnées.
Opmerkingen bij deze editie
Deze gebruikershandleiding bevat een beschrijving van veiligheidsvoorschriften, opstelling,
installatie, bediening en onderhoud voor het CHAUVET® C6-videopaneel.
Handelsmerken
CHAUVET® is een geregistreerd handelsmerk van Chauvet & Sons Inc. (d/b/a CHAUVET® of
Chauvet). Het CHAUVET®-logo in zijn geheel, waaronder de naam Chauvet en de gestippelde
driehoek, en alle andere handelsmerken op deze handleiding die van toepassing zijn op diensten,
producten, of marketingstatements zijn eigendom of in licentie van Chauvet. Alle andere
productnamen, logo's, merken, bedrijfsnamen, en andere handelsmerken die voorkomen binnen dit
document of waar naar wordt verwezen, zijn het eigendom van hun betreffende
handelsmerkhouders.
Auteursrechtvermelding
De inhoud van deze gebruikershandleiding is volledig eigendom van Chauvet inclusief, maar niet
beperkt tot afbeeldingen, logo's, handelsmerken en hulpbronnen.
© Copyright 2014 Chauvet. Alle rechten voorbehouden.
Afgedrukt in P.R.C.
Elektronisch uitgegeven door Chauvet in de Verenigde Staten van Amerika.
Gebruik van de handleiding
Chauvet geen zijn klanten alleen de bevoegdheid om deze handleiding te downloaden en af te
drukken voor professionele informatiedoeleinden. Chauvet verbiedt uitdrukkelijk het gebruik,
kopiëren, opslaan, distribueren, wijzigen of het drukken van deze handleiding of de inhoud daarvan
voor andere doeleinden, zonder zijn schriftelijke toestemming.
Afdrukken van het document
Voor het beste resultaat moeten deze documenten in kleur, dubbelzijdig op briefpapier afgedrukt
worden. Als u A4-papier (210 x 297 mm) gebruikt moet u uw printer configureren om de content
overeenkomstig op te schalen.
Disclaimer
Chauvet gelooft dat de informatie in deze handleiding in alle aspecten accuraat is. Chauvet
aanvaardt echter geen verantwoordelijkheid voor fouten of nalatigheden in dit document. Chauvet
behoudt zich het recht voor om de inhoud van dit document van tijd tot tijd te herzien of te wijzigen,
zonder dat Chauvet de verplichting om heeft iemand of een bedrijf op de hoogte te stellen van deze
herzieningen of wijzigingen. Dit vormt op geen enkele wijze een verplichting van Chauvet om deze
wijzigingen te maken. Chauvet kan een herziening van deze gids of een nieuwe editie daarvan
uitgeven om deze wijzigingen op te nemen.
Herziening van het document
De C6 gebruikershandleiding, rev. 2, vervangt alle eerdere versies van deze handleiding. Verwijder
alle oudere versies van deze handleiding die u heeft, zowel in afgedrukte als elektronische vorm, en
vervang ze met deze versie. Ga naar www.chauvetprofessional.com voor de nieuwste versie.
Auteur
Datum
Redacteur
Datum
L. Henry
8/22/2014
A. Leon
9/17/2014
C6 Manual de Usuario Rev. 2
Página 60 de 80
Voordat u begint
1. Voordat u begint
Wat is er inbegrepen
·
·
·
·
·
·
4 C6-panelen
1 Neutrik® powerCON® stroomsnoer
4 Neutrik® powerCON® voedingskoppelingsnoeren
4 Neutrik® powerCON® signaalkoppelingsnoeren
Garantiekaart
Gebruikershandleiding
Uitpakken
Pak de -panelen zorgvuldig uit en controleer of alle onderdelen in de verpakking in goede staat zijn.
Als de doos, of een deel van de inhoud beschadigd lijkt te zijn door transport of andere tekenen van
verkeerd gebruik vertoont, bewaar dan al het verpakkingsmateriaal en dien onmiddellijk een
schadeclaim in bij de vervoerder, niet bij Chauvet. Het niet onmiddellijk rapporteren van schade bij
de vervoerder, dan wel het niet alle verpakkingen beschikbaar houden voor inspectie, kan de claim
ongeldig maken.
Voor andere problemen, zoals missende componenten of onderdelen, schade die niet is
veroorzaakt door de verzending, kunt u binnen 7 dagen na ontvangst een claim indienen bij
Chauvet. Voor informatie over contact met Chauvet, zie Contact opnemen met ons aan het einde
van deze handleiding.
Symbolen
Symbolen
Betekenis
Kritieke installatie-, configuratie- of bedieningsinformatie. Het niet opvolgen van deze
informatie kan ervoor zorgen dat het product niet werkt, schade veroorzaken aan
apparatuur van derden of letsel veroorzaken aan de gebruiker.
Belangrijke installatie- of configuratie-informatie. Het niet opvolgen van deze informatie
kan ertoe leiden dat het product niet functioneert.
Nuttige informatie.
C6 gebruikershandleiding, rev. 2
Pagina 61 van 80
Voordat u begint
Veiligheidsinstructies
Lees de volgende Veiligheidsvoorschirften zorgvuldig door voordat u met dit product gaat werken. Deze
voorschriften bieden belangrijke veiligheidsinformatie over de installatie, het gebruik en het onderhoud.
·
·
·
·
·
·
·
·
·
·
·
·
·
·
·
·
·
·
Sluit het product altijd aan op een geaard circuit.
Zorg ervoor dat de stroomkabel niet gesmolten of beschadigd is.
Sluit dit product altijd aan op een voedingsbron met de juiste spanning, zoals is vermeld op de
productsticker.
Gebruik het product niet als u schade ziet aan de behuizing, LED-stroken of kabels.
Het product is alleen voor gebruik binnenshuis! Het heeft een vermogen van IP40. Stel het
product niet bloot aan regen of vocht.
Ontkoppel het product vóór het schoonmaken altijd eerst van de voedingsbron.
Om onnodige slijtage te elimineren en zijn levensduur te verlengen, gedurende perioden
wanneer het product niet wordt gebruikt, moet u het product van de stroom afsluiten door een
aardlekschakelaar om te zetten of door het te ontkoppelen.
Maak het product nooit van het stopcontact los door aan het snoer te rukken of te trekken.
Als het product boven het hoofd wordt geplaatst, moet u altijd een veiligheidskabel gebruiken.
Zorg ervoor dat er geen brandbare materialen in de buurt van het product zijn wanneer het in
werking is.
LET OP: Bij het verplaatsen van het product uit extreme omgevingen, (bijv. koude vrachtwagen
naar warme, vochtige balzaal) kan er condensvorming optreden op de elektronica van het
product. Om storingen te vermijden moet het product volledig kunnen acclimatiseren aan de
omgeving voordat het op stroom wordt aangesloten.
Sluit het product nooit aan op een dimmer of een regelbare weerstand.
Installeer het product altijd op een plaats met voldoende ventilatie.
Gebruik het product niet in een omgevingstemperatuur hoger dan 45 °C.
Dit product bevat geen onderdelen die door de gebruiker te onderhouden zijn. Een verwijzing
naar onderhoud in deze gebruikershandleiding zal alleen van toepassing zijn op voldoende
opgeleide gecertificeerde technici van Chauvet. Open nooit de behuizing en probeer geen
reparaties uit te voeren.
Alle geldende plaatselijke normen en regelgeving zijn van toepassing voor juiste installatie van
dit product.
Stop direct met het gebruik van het product in geval van ernstige gebruiksproblemen.
Schades die worden veroorzaakt door handmatige aanpassingen vallen niet onder de garantie.
Chauvet aanvaardt geen verantwoordelijkheid voor schade die wordt veroorzaakt door
onbevoegde wijzigingen of het niet bekijken van veiligheidswaarschuwingen en instructies in
de handleiding.
Neem contact op met Chauvet als het product moet worden gerepareerd. Zie voor meer informatie
Retourbeleid en -procedure en Contact opnemen met ons.
Verwachte levensduur van de LED-lamp
LED-lampen worden over tijd minder helder, voornamelijk door de warmte van hun bedrijfstemperatuur
en hun gebruik. Wanneer LED's worden geclusterd, zoals bij videopanelen, genereren ze een hogere
bedrijfstemperatuur dan wanneer ze niet worden geclusterd. Het gebruik van geclusterde LED-lampen tot
maximale intensiteit verlaagt de levensduur van de LED-lampen. De C6-panelen hebben een
temperatuurbeheersysteem die is ontworpen om dit te overkomen en bieden het helderst mogelijke beeld
met de langste levensduur van de LED-lamp. De levensduur van de LED van het C6-paneel is 50.000
uur. De levensduur van de LED kan echter verder worden verlengd door de ventilatie rond de panelen te
verbeteren en de omgevingstemperatuur te verlagen naar een optimale gebruikstemperatuur. Daarnaast
kan het beperken van de algehele projectie-intensiteit de levensduur van de LED's verder helpen
verlengen.
Pagina 62 van 80
C6 gebruikershandleiding, rev. 2
Inleiding
2. Inleiding
Productbeschrijving
C6 is een LED-videopaneel met een pixelafstand van 6,25 mm, dat specifiek is ontworpen voor
permanente installatie. Het gebruikt SMD 3528 LED's met een zwart oppervlak, voor een
uitmuntend contrast. Het is stil, lichtgewicht, meet 1 x 0,5 m en is modulair ontworpen voor
eenvoudige installatie en aanpassing.
De stroom- en signaalaansluitingen van de C6 zijn compatibel met de CHAUVET® VIP™-lijnen,
waardoor de C6-videowanden en PVP™-videowanden met dezelfde stuurbron kunnen worden
beheerd.
C6-panelen worden bediend met de VIP™-serie signaaldistributie- en bedieningsproducten en
geconfigureerd met de CHAUVET® LED Studio-software die op een PC draait. Voor meer
informatie over de VIP™-serie of LED Studio, downloadt u de gebruikershandleidingen van de
website van Chauvet op http://www.chauvetlighting.com/product-manuals-literature/.
Producteigenschappen
·
·
·
·
·
6,25 mm pixelafstand en een 140° kijkhoek voor een gedetailleerd en goed zichtbaar beeld
SMD 3528 LED's met een zwart oppervlak, voor een uitmuntend contrast.
Nauwe LED-plaatsing zorgt voor consistente kleurenweergave over de panelen
Stevige, lichtgewicht, modulaire constructie voor flexibele configuratie
Compatibiliteit met PVP™-opbouwset voor hangende montage van tot 10 panelen per
opbouwset
· M12-inzetstukken met schroefdraad voor eenvoudige en stevige permanente installatie
· Ventilatorvrije werking voor stille werking
· Volledig compatibel met VIP™ Driver, VIP™ Signal Distributor en VIP™ Media Server Pro
Vereiste accessoires
· VIP™ Driver (vereist)
· LED Studio (vereist)
Optionele accessoires
· VIP™ Signal Distributor (vereist voor bediening van meer dan 24 panelen)
· Signaalkabels (Neutrik® etherCON® signaalverlengingen)
o
o
o
ETHERCON18IN
ETHERCON5FT
ETHERCON10FT
· Voedingskabels (Neutrik® powerCON® verlenging)
o
o
o
o
POWERCONEXT18IN
POWERCONEXT5FT
POWERCONEXT10FT
POWERCONEXT25FT
C6 gebruikershandleiding, rev. 2
Pagina 63 van 80
Inleiding
Productoverzicht
Vrouwelijke Speegoaansluitingen (x4)
Korte rand
Ventilatiesleuven
5 per lange rand
2 per korte rand
Testknop
Signaallampje
Stroomlampje
Signaal
Ingang/uitgang
Stroomingang
Voorzijde
Pagina 64 van 80
Lange
rand
Mannelijke
Speegoaansluitingen
(x4)
Achterzijde
Vermogensuitgang
Signaal
Ingang/uitgang
C6 gebruikershandleiding, rev. 2
Inleiding
Afmetingen van het product
,
C6 gebruikershandleiding, rev. 2
,
,
,
,
,
,
,
,
Pagina 65 van 80
Opstelling en installatie
3. Opstelling en installatie
AC-stroom
Elke C6-paneel heeft een voeding met automatisch bereik die werkt met een ingangsspanning van
100 tot 240 VAC, 50/60 Hz. Voor het bepalen van de vermogensvereisten voor C6, raadpleegt u het
etiket dat is bevestigd label op het product of de Technische specificaties.
Het gemelde vermogen geeft het maximale stroomverbruik aan gedurende normale werking. Voor
meer informatie downloadt u Maten aardlekschakelaars van de website van Chauvet
www.chauvetprofessional.com.
·
·
·
Sluit dit product altijd op een goed geaard en beveiligd stroomcircuit.
Sluit dit product nooit aan op een dimmer of een regelweerstand.
Om onnodige slijtage te elimineren en zijn levensduur te verlengen, gedurende perioden
wanneer het product niet wordt gebruikt, moet u het product van de stroom afsluiten door
een aardlekschakelaar om te zetten of door het te ontkoppelen.
AC-stekker
De meegeleverde voedingsstekker heeft een Neutrik® powerCON®-aansluiting op het ene einde,
voor aansluiting op de C6, en een Edison-stekker aan het andere einde om in het stopcontact te
steken. Elk C6-paneel wordt geleverd met een Neutrik® powerCON® powerlinking-snoer om de
stroom aan te sluiten tussen panelen.
Gebruik onderstaande tabel als een referentiediagram voor de bedrading van een nieuwe stekker.
Pagina 66 van 80
Aansluiting
Snoer (VS)
Snoer (Europa)
Schroefkleur
AC Live
Zwart
Bruin
Geel of messing
AC Neutraal
Wit
Blauw
Zilver
AC Aarde
Groen/geel
Groen/geel
Groen
C6 gebruikershandleiding, rev. 2
Opstelling en installatie
Power Linking
De C6-panelen hebben Neutrik® powerCON® Power In en Power Out-contacten om power linking
eenvoudig te maken. Nooit power link-koppelingen maken met meer dan
· 12 panelen bij 120 V,
· 21 panelen bij 208 V, of
· 22 panelen bij 230 V.
Power Linking-diagram
Stroombron
Extra C6panelen
C6 gebruikershandleiding, rev. 2
Pagina 67 van 80
Opstelling en installatie
Signaalverbinding
De C6-panelen ontvangen videosignalen van de VIP™ Driver via een Neutrik® etherCON®-kabel,
die niet langer mag zijn dan 100 m. De Neutrik® etherCON®-kabel gaat van de U MAIN OUT
Neutrik® etherCON®-poort van de VIP™ Driver in een van de videopanelen. Neutrik® etherCON®
power linking-snoeren koppelen de panelen aan elkaar.
De signaalkabels moeten van paneel tot paneel lopen in de volgorde waarin ze worden gemapt in
de LED-software. De Neutrik® etherCON®-signaalpoorten op de panelen kunnen worden gebruikt
als ingangs- of uitgangspoorten, zodat het signaal in elke richting kan worden verzonden.
Nadat alle panelen zijn verbonden, zal het laatst gekoppelde paneel een lege signaalpoort hebben
die kan worden gebruikt om een backupsignaal-infrastructuur te creëren. Om dit te doen, laat u een
Neutrik® etherCON®-kabel lopen van de lege Neutrik® etherCON®-poort van het laatste paneel
naar de D BACK UP Neutrik® etherCON®-poort van de VIP™ Driver.
Signaalverbindingsdiagram
Van VIP™ Driver U
MAIN OUT-poort
Naar VIP™ Driver D BACK UPpoort
·
Pagina 68 van 80
Signaaltransmissie kan in elke richting zijn, zodat zowel het eerste als het laatste
paneel in de signaalkoppeling kan worden verbonden met de VIP™ Driver.
C6 gebruikershandleiding, rev. 2
Opstelling en installatie
Montage
De C6-panelen zijn gemaakt van een aluminium legering en roestvrij staal, zodat elk paneel stabiel
en lichtgewicht is. De C6-panelen hebben open achterzijden voor betere ventilatie, indien ze
permanent in een gelegenheid worden geïnstalleerd of in een decorstuk worden geplaatst.
C6-panelen kunnen worden gemonteerd met de PVP™-opbouwset, die apart wordt verkocht. Zie
voor meer informatie de website van Chauvet op http://www.chauvetlighting.com/pvp-riggingkit.html.
C6-panelen kunnen ook direct op een oppervlak worden gemonteerd met M12-bouten in de
inzetstukken bij elke hoek van het paneel.
Bedenk het volgende bij het ontwerpen van een installatie van de C6-panelen:
· Luchtstroom achter de panelen
· Laadcapaciteit van de constructies waaraan de panelen worden bevestigd
· Toegang tot de stroom- en signaalkabelaansluitingen
· Zichtbaarheid van de signaal- en stroomlampjes
· Omgevingstemperatuur van de locatie
Zie Technische specificaties voor specifieke gewicht- en temperatuurvereisten.
Raadpleeg een constructie-ingenieur om het veilige maximale draagvermogen te
bepalen op basis van uw specifieke toepassing.
PVP™-opbouwset
De CHAUVET® PVP™-opbouwsets zijn te bevestigen aan de bovenzijde van de nauwe eindes van
de beide hoeken van de panelen, met een opbouwset die de aangrenzende panelen samenvoegt
bij hun aanliggende hoeken. De PVP™-opbouwset bestaat uit een enkele beugel met 2 mannelijke
speego-bouten op de onderzijde en een M12-gat op de bovenzijde.
De speego-bouten passen in de vrouwelijke speego-aansluitingen op het C6-paneel. Bovenaan de
PVP™-opbouwset is een M12-gat, die met een M12-bout kan worden gebruikt om de PVP™opbouwset te bevestigen aan een klem of aan een constructie. De speego-bouten zijn zó geplaatst
dat de PVP™-opbouwset 2 panelen overspant. Gebruik de PVP™-opbouwsets op beide einden van
het paneel om een enkel paneel op te hangen.
De panelen zelf kunnen aan elkaar worden verbonden om alle mogelijke vormen te creëren. Zie
Paneelconfiguraties.
Elke PVP™-opbouwset kan het gewicht dragen van tot 10 panelen die verticaal worden
opgehangen.
C6 gebruikershandleiding, rev. 2
Pagina 69 van 80
Opstelling en installatie
PVP™-opbouwsetdiagram
Mannelijke Speego's op de PVP™-opbouwsets
gaan in de vrouwelijke Speego's bovenop de panelen
Bovenzijden
Zijkant van de uitlijningspanelen van de
Speego-aansluitingen
PVP™-opbouwset
wordt verzonden
met een verwijderbare
klem
Pagina 70 van 80
PVP™opbouwset
bevestigt aan
een constructie
C6 gebruikershandleiding, rev. 2
Opstelling en installatie
M12-inzetstukken
De M12-inzetstukken bevinden zich bij elke hoek op de achterzijde van het C6-panel, om een
mechanisme te om het paneel direct op een vlakke ondergrond te monteren. Wanneer het paneel
op een vlakke ondergrond wordt gemonteerd, moet u ervoor zorgen dat u voldoende ruimte overlaat
voor voldoende luchtstroming en een manier om de signaallampjes te kunnen zien. Plaats bij elke
hoek een scheider tussen het paneel en de ondergrond, met een opening in het midden door welke
de signaal- en stroomlampjes zichtbaar blijven.
Het aantal panelen dat op een oppervlak kan worden gemonteerd is afhankelijk van de maximale
draagcapaciteit van dat oppervlak. Het is het beste om het paneel te verbonden met het oppervlak
wanneer er een M12-inzetstuk is.
M12-inzetstukdiagram
Inzetstukken van M12-bout
Montage
Constructie
4
M12-bouten
Optionele afstandsstukken voor ventilatie
M12-bouten
Paneelconfiguraties
De C6-panelen kunnen in elke configuratie worden verbonden met de speego-aansluitingen op de
randen. De panelen moeten achter allemaal dezelfde kant op zijn gericht, omdat ze zijn
samengesteld uit 4 subpanelen, die elk 0,25 x 0,5 m groot zijn. Deze subpanelen kunnen niet
anders
worden
gemapt
binnen
de
grotere
configuratie
van
panelen.
Zie
Paneelconfiguratiediagrammen.
De verwacht oriëntatie laat de panelen verticaal georiënteerd zijn, omdat de verticale oriëntatie
werkt met elke contentmanager of schakelaar. De alternatieve oriëntatie, met de panelen
horizontaal georiënteerd, vereist een contentmanager of schakelaar die beelden kan roteren. Zie
Oriëntatie.
De C6-panelen moeten allemaal met dezelfde oriëntatie zijn gemonteerd. De panelen hoeven niet
per subpaneel te zijn uitgelijnd, maar elke pixelvrij moet zijn uitgelijnd. De panelen en subpanelen
kunnen verkeerd zijn uitgelijnd. Zie Oplijnen van pixels.
C6 gebruikershandleiding, rev. 2
Pagina 71 van 80
Opstelling en installatie
Paneelconfiguratiediagrammen
Oriëntatie
Subpanelen mogen zijn
verplaatst; Maar pixels
moeten zijn uitgelijnd
Individuele
subpanelen
Horizontale oriëntatie
vereist geroteerde content
Configureer de panelen
NIET in een gemengde
oriëntatie
Een paneel
Verticale oriëntatie is de verwachte oriëntatie
en vereist geen geroteerde content
Lining Up Pixels
De pixels op elke zijde van de panelen moeten
bij de naad bij elkaar komen; De subpanelen
hoeven echter niet uitgelijnd te zijn
Pagina 72 van 80
C6 gebruikershandleiding, rev. 2
Opstelling en installatie
Speego-bouten
Speego-bouten zijn zeer sterke stalen pennen met vergrendelstaven aan het uiteinde en verende
bevestigingsmechanismen. Ze vormen een tijdelijke bevestiging om uitlijning van de LED's mogelijk
te maken en vormen daarna een stevige en precieze verbinding, zodat de pixels goed blijven
uitgelijnd en een naadloos beeld vormen.
Doe het volgende om een speego-bout te bevestigen:
1. Houd de veerknop ingedrukt en plaats de vergrendelstaaf in het uiteinde.
2. Draai de veerknop tegen de klok in totdat de vergrendelstaaf op zijn plek klikt. Deze stap houdt
de panelen op hun plek om precieze uitlijning van de panelen mogelijk te maken.
3. Lijn de panelen uit met de LED's als referentie.
4. Draai de schroefknop met de klok mee om de verbinding volledig vast te maken.
Doe het volgende om een speego-bout te ontkoppelen:
1. Draai de schroefknop tegen de klok in om de verbinding volledig los te maken.
2. Draai de veerknop met de klok mee totdat de vergrendelstaaf losklikt.
Speego-bout diagram
Veerknop
Schroefknop
Vergrendelstaa
f
Veer
Speego-uiteinde
Installatierichtlijnen
· Controleer of alle onderdelen in het pakket zitten.
· Controleer of alle vereiste en optionele accessoires voor montage en bediening beschikbaar zijn
voor gebruik.
· Sluit elk paneel aan en test het. Zie voor meer informatie het Testen van de panelen.
· Werk bij het bouwen van een hangende installatie van boven naar beneden.
· Bij het bouwen van een installatie die is gemonteerd op een oppervlak, lijnt u de panelen uit en
maakt u ze vast, voordat u ze aan het oppervlak bevestigt.
C6 gebruikershandleiding, rev. 2
Pagina 73 van 80
Configuratie en bediening
4. Configuratie en bediening
Configuratie en bediening van de C6-panelen wordt gedaan met de LED Studio-software en de
VIP™ Media Server Pro en VIP™ Signal Processor of de mediaserver-software van uw eigen
keuze.
De C6-panelen vereisen 1 VIP™ Driver voor elk van de 102 C6-panelen.
De videosystemen kunnen verschillen in omvang en complexiteit. De C6-panelen kunnen gebruikt
worden in een simpel systeem met een mediaserver en een VIP™ Driver aan panelen in een
rechthoekige verbinding; of de panelen kunnen onderdeel zijn van een complex systeem met
meerdere ingangen naar panelen in een gefragmenteerde of geroteerde verbinding, zoals is
afgebeeld in de Paneelconfiguratiediagrammen.
Ongeacht de paneelverbinding of de systeemcomplexiteit, zijn de LED Studio en de VIP™ Driver
vereist om de panelen te configureren en te gebruiken. Voor meer informatie over LED Studio,
raadpleegt
u
de
gebruikershandleiding
van
de
website
van
Chauvet
op
http://www.chauvetlighting.com/product-manuals-literature/.
Testen van de panelen
Druk om het C6-paneel te testen op <TEST>, op de achterzijde van het paneel. Deze test voert een
programma uit om de C6-circuits en alle LED's te testen.
LED Studio-software
LED Studio is een eenvoudig te gebruiken mappingmiddel. Het draait op een PC en werkt naadloos
met de VIP™ Driver zodat de content kan worden aangepast om goed te worden weergegeven op
een verbindingspatroon van het C6-paneel. Voor meer informatie over LED Studio, raadpleegt u de
gebruikershandleiding van de website van Chauvet op http://www.chauvetlighting.com/productmanuals-literature/.
VIP™ Driver
VIP™ Driver is de apparatuurinterface tussen LED Studio of de videoingangsbron en de C6panelen. Voor meer informatie over de VIP™ Driver, raadpleegt u de gebruikershandleiding van de
website van Chauvet op http://www.chauvetlighting.com/product-manuals-literature/.
Videosysteemproducten die worden gebruikt met C6
Item
Beschrijving
Artikelcode
Artikelnummer
VIP™ Driver (vereist)
Interface tussen LED Studio of signaalingang en
de C6-panelen
99090575
VIPDRIVER
LED Studio (vereist)
Software die de C6-panelen in kaart brengt.
Vereist een PC om te werken.
VIP™ Signal Distributor
Signaalbooster voor meer dan 24 panelen
99090576
VIPSIGDISTRO
PVP™-opbouwset
Apparatuur voor hangende montage
20090598
PVP-RK
Neutrik®
etherCON® tot etherCON®
etherCON® signaalverlenging, 18 in
etherCON® signaalverlenging, 5 ft
etherCON® signaalverlenging, 10 ft
19090363
19090364
19090365
ETHERCONEXT18IN
ETHERCONEXT5FT
ETHERCONEXT10FT
Neutrik®
powerCON® tot powerCON®
powerCON® verlenging, 18 in
powerCON® verlenging, 5 ft
powerCON® verlenging, 10 ft
powerCON® verlenging, 25 ft
19110372
19110373
19110374
19110375
POWERCONEXT18IN
POWERCONEXT5FT
POWERCONEXT10FT
POWERCONEXT25FT
VIP™ Media System Pro
Videoserver met ArKaos MediaMaster
Pagina 74 van 80
VIPCOMP2
C6 gebruikershandleiding, rev. 2
Technische informatie
5. Technische informatie
Onderhoud
Om optimale prestaties te behouden en slijtage te minimaliseren, schakelt u de C6 panelen uit
wanneer ze niet actief worden gebruikt en koppelt u ze volledig los van het spanningsnet. Houd de
omgeving rondom vrij van stof, vuil, water en extreme temperaturen.
De C6-panelen moeten elke maand worden gereinigd. Om te voorkomen dat opbouw van stof de
lichtopbrengst reduceert en oververhitting veroorzaakt, moeten bij het reinigen van de C6-panelen
de volgende richtlijnen gevolgd worden:
1. Haal het paneel van de stroom.
2. Wacht totdat het paneel op kamertemperatuur is.
3. Gebruik een zachte borstel om stof te verwijderen dat zich heeft opgehoopt op de externe
onderdelen.
4. Veeg de buitenzijde van de LED-stroken af met een zachte, pluisvrije doek die is bevochtigd
met een oplossing van water en reinigingsmiddel. Niet te hard drukken.
5. Controleer of alle verbinding goed zijn gedroogd voordat u de stroom- en signaalkabels weer
aansluit.
Droog de externe oppervlakken altijd zorgvuldig na het reinigen.
Draai de koelventilators niet rond met perslucht, omdat u ze dan kunt beschadigen.
Problemen oplossen
Probleem
Alle LED's op het paneel knipperen
Oorzaak
Contactstoring
LED's op een specifiek paneel staan De voedingskabel is niet goed
niet aan
geplaatst
Alle LED's branden niet
De ingangskabels zijn verkeerd
verbonden
Oplossing
Maak de losse LED's vast of probeer
de stekker opnieuw aan te sluiten
Plaats de voedingskabel goed
Zoek de onjuist verbonden kabels en
sluit ze goed aan
Geen stroom
Start niet op
(LED-stroomlampje gaat niet
branden tijdens “zelftest”)
Los of beschadigd stroomsnoer
Neem voor reparatie contact op met
Defecte stroomverbinding binnen de Chauvet
C6
Defecte externe stroomvoeding
C6 vertoont geen beelden of
vlekkerige beelden
C6 gebruikershandleiding, rev. 2
Losse of beschadigde signaalkabel
Ontkoppel de signaalkabel en sluit
het opnieuw aan of vervang de kabel
Pagina 75 van 80
Technische Specificaties
6. Technische Specificaties
Afmetingen en gewicht
Lengte
Breedte
Hoogte
Gewicht
1000 mm
500 mm
63 mm
10,4 kg
Elektrisch
Stroomvoeding
Bereik
Spanningsselectie
Schakeling (intern)
100–240 VAC, 50/60 Hz
Automatisch wisselend bereik
Parameter
120 V, 60 Hz
208 V, 60 Hz
230 V, 50 Hz
Verbruik en stroomsterkte
128 W; 1,06 A
131 W; 0,63 A
133 W; 0,60 A
Max.
uitgangsstroomsterkte
13,6 A
Power Linking
12 eenheden
Stroom I/O
21 eenheden
22 eenheden
VS/Canada
Stroomingangsstekker
Wereldwijd
Neutrik® powerCON® A
Stroomuitgangsstekker
Neutrik® powerCON® B
Stroomsnoerstekker
Edison (VS)
Lokale stekker
Minimale kabeldikte
14 AWG
Lichtbron
Type
Levensduur
Kleur
Aantal/pixels
LED
50.000 uur
SMD 3528 (driekleurige
RGB)
12.800
Rode golflengte
Groene golflengte
Blauwe golflengte
620 tot 625 nm
524 tot 529 nm
467 tot 470 nm
Pixels
Pixelpitch
Pixeldichtheid
80 x 160
6,25 mm
25.600/m
Foto-optisch
2
Verlichtingssterkte
Verversingssnelheid
Kijkhoek
Transparantie
1.500 NITS
1.080 Hz
140°
0%
Thermisch
Max. externe temperatuur
Koelsysteem
40 °C
Convectie
Gegegevensaansluitingen
I/O-stekkers
Driver
Panelen per driver
Neutrik® etherCON®
VIP™ Driver
102
Productnaam
Artikelcode
UPC Nummer
C6X4
23090851
781462211998
Bestellen
Pagina 76 van 80
C6 gebruikershandleiding, rev. 2
Retourbeleid en -procedure
Retourbeleid en -procedure
Retouren
U moet het product gefrankeerd, in de originele doos en met de originele verpakking en
accessoires opsturen. Chauvet geeft geen retourstickers af.
Bel Chauvet en vraag om een retouropdrachtformulier (RMA)-nummer vóór het
verzenden van het product. Zorg dat u het modelnummer, serienummer en een korte
beschrijving van de retouroorzaak bij de hand hebt.
Label het pakket duidelijk met een RMA-nummer. Chauvet weigert producten die worden
geretourneerd met een RMA-nummer.
Schrijf het RMA-nummer NIET direct op de doos. Schrijf het in plaats daarvan op
een goed bevestigd label.
Als u een RMA-nummer hebt gekregen, meld dan de volgende informatie op een stukje
papier binnen de doos:
· Uw naam:
· Uw adres:
· Uw telefoonnummer
· Het RMA-nummer
· Een korte beschrijving van het probleem
Zorg ervoor dat u het product voldoende inpakt. Alle verzendschade die resulteert uit
onvoldoende verpakking is de verantwoordelijkheid van de klant. FedEx-verpakking of
dubbele dozen worden aanbevolen.
Chauvet behoudt zich het recht voor om (het) geretourneerde product(en) naar
eigen inzicht te repareren of te vervangen.
C6 gebruikershandleiding, rev. 2
Pagina 77 van 80
Neem contact op
Neem
contact
op
WERELD HOOFDKWARTIER - Chauvet
Algemene Informatie
th
Adres:
5200 NW 108 Avenue
Sunrise, FL 33351
Bandopname:
(954) 577-4455
Fax:
(954) 929-5560
Toll free:
(800) 762-1084
Technische support
Bandopname:
(954) 577-4455
(druk op 4)
Fax:
(954) 756-8015
E-mail: [email protected]
World Wide Web
www.chauvetlighting.com
VERENIGD KONINKRIJK EN IERLAND - Chauvet Europe Ltd.
Algemene Informatie
Adres:
Unit 1C
Brookhill Road Industrial Estate
Pinxton, Nottingham, UK
NG16 6NT
Bandopname:
+44 (0)1773 511115
Fax:
+44 (0)1773 511110
Technische support
E-mail: [email protected]
World Wide Web
www.chauvetlighting.co.uk
MEXICO - Chauvet Mexico
Algemene Informatie
Adres:
Av. Santa Ana 30
Parque Industrial Lerma
Lerma, Mexico C.P. 52000
Bandopname:
+52 (728) 285-5000
Technische support
E-mail: [email protected]
World Wide Web
www.chauvet.com.mx
CHAUVET EUROPE - Chauvet Europe BVBA
Algemene Informatie
Adres:
Stokstraat 18
9770 Kruishoutem
België
Bandopname:
+32 9 388 93 97
Technische support
E-mail: [email protected]
World Wide Web
www.chauvetlighting.eu
Van buiten de VS, Verenigd Koninkrijk, Ierland, Mexico of Benelux kunt u contact opnemen met uw dealer.
Volg hun instructies om support aan te vragen of om een product te retourneren. Ga naar onze website voor
contactinformatie.
Pagina 78 van 80
C6 gebruikershandleiding, rev. 2