1
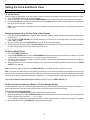
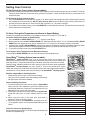
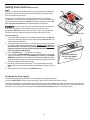
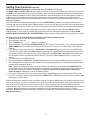
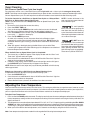
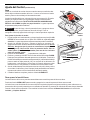
ELECTRONIC OVEN CONTROL
Control Pad Functions
Read the instructions carefully before using the oven. For satisfactory use of your oven, become familiar with the
various functions of the oven as described below. Note: The graphics on your timer may not look exactly like the one
shown. This doesn't change the way it operates.
Note: The oven function will not work if the time of day clock is not set.
Speed Bake Pad- Used
to enter the speed bake
mode temperature
(some models).
Speed Clean PadUsed to select the
speed clean cycle
(some models).
Bake Time PadUsed to enter
the length of the
baking time.
Feature indicator
lights- These
light show which
feature is in use.
Bake Pad
Used to enter
the normal
baking mode
temperature.
Broil Pad- Used
to select the
variable broil
function.
Keep Warm
Pad- Used to
set the Keep
Warm feature.
Up and Down arrow pads- Used along
with the function pads to select oven
temperature, cooking time, start time
(when programming an automatic start
time), time of day, clean time and minute
timer.
Speed Bake Oven
Bake
Speed
bake
Speed
clean
Bake
time
Broil
Keep
warm
Clean
Start
time
Clean Pad Used to select
the self-cleaning cycle.
Oven
Preheat
Door Locked
Clock
Oven
light
Timer
Clear
/Off
On/Off
Controls
Clock Pad- Used to
set the time of day.
Oven Interior Light
Pad- Used to turn
oven interior light ON
and OFF.
Clear Pad- Used to
clear any function
previously entered
except the time of
day and minute
timer. Push Clear
pad to stop cooking.
Timer Pad- Used to set or cancel the minute timer. The
minute timer does not start or stop cooking.
Oven, Preheat & Lock lights- The "oven" light indicates that the
Start Time Pad- Used to set the desired
oven is functioning. The "Preheat" light will glow when the oven
start time for baking. Can be used with
is first set to operate, or if the desired temperature is reset
BAKE TIME to program a delayed bake cycle.
higher than the actual oven temperature. The "Door Locked"
light will flash until the door locks when the self-clean cycle is in
use. It glows constantly after the door locks (some models).
The oven can be programmed to:
Bake normally, Speed Bake, Keep warm, Time Bake, Delay Start (delayed bake), Broil, Clean and Speed Clean.
Note: Push buttons or pads may be shaped differently.
For a silent control panel:
When choosing a function, a beep will be heard each time a pad is pushed. If desired, the controls can be programmed for silent
operation.
To tell if your oven is set for normal or silent operation push and hold START TIME pad for 7 seconds. "- -" or "SP" appears in
the display. Within 5 seconds, press the UP or DOWN ARROW pad to switch between normal sound operation and silent
operation mode. The display will show either "- -" or "SP". Wait 5 seconds to return to normal operating mode.
Note: If "SP" appears, the control will operate with normal sounds and beeps. If "- -"
appears, the control is in the silent operation mode.
Versión en español
Temperature Conversion (Fahrenheit / Celsius)
The electronic oven control is set to operate in °F (Fahrenheit) when shipped from the
factory. The oven can be programmed for any temperature from 170°F to 550°F (77°C to
288°C).
To change the temperature to °C (Celsius) or from °C to °F (control should not be
in a Bake or Clean mode):
1. Press and hold BROIL pad for 7 seconds until °F or °C appears in the display.
2. Press the UP or DOWN ARROW pad to change °F to °C or °C to °F.
3. Wait 5 seconds to accept the changes or press CLEAR/OFF pad to accept the
changes.
1
Printed in United States
Si desea obtener una copia en
español de este Manual del
Usuario, sírvase escribir a la
dirección que se incluye a
continuación. Solicite la P/N
318200185E.
Spanish Owner's Guides
Frigidaire Company
P. O. Box 9061
Dublin, Ohio 43017-0961
318200185 (0502) Rev. A
Setting the Clock and Minute Timer
Note: The time of day must first be set in order to operate the oven.
To set the Clock
When the range is first plugged in, or when the power supply to the appliance has been interrupted, the display will flash "12:00".
1. Press the CLOCK pad once (do not hold pad down).
2. Within 5 seconds, push and hold the UP or DOWN ARROW pad until the correct time of day appears in the display.
3. Press the CLOCK pad to accept the new time of day. If the CLOCK pad is not pressed, the timer will return automatically
to the new time of day after 7 seconds.
Note: The clock cannot be changed during any bake, timed bake, delayed time bake, clean cycle, speed clean or delayed
clean cycle.
Changing between 12 or 24 Hour Time of Day Display
1. Press and hold the CLOCK pad for 7 seconds. After 7 seconds, "12Hr" or "24Hr" will appear in the display and the control
will beep once.
2. Press the UP or DOWN ARROW pad to switch between the 12 and 24 hour time of day display. The display will show
either "12Hr" or "24Hr".
3. Wait 5 seconds or press the CLEAR/OFF pad to return to the time of day display.
4. Reset the correct time as described in To set the Clock above. Please note that if the 24 hour time of day mode was chosen,
the clock will now display time from 0:00 through 23:59 hours.
To Set the Minute Timer
1. Press the TIMER ON/OFF pad.
2. Press the UP ARROW pad to increase or DOWN ARROW pad to decrease the time in one minute increments. The timer
can be set for any amount of time from 1 minute to 11 hours and 59 minutes.
3. The display shows the timer count down in minutes if more than 1 hour remains. When less than 1 hour remains, the display
will count down in seconds.
4. When the set time has run out, the timer will beep 3 times. It will continue to beep 3 times every 8 seconds until the TIMER
ON/OFF pad is pressed.
Note: The indicator light located above the TIMER ON/OFF pad will glow while the minute timer is active.
Note: The minute timer does not start or stop cooking. It serves as an extra timer in the kitchen that will beep when the set time
has run out. The minute timer can be used alone or during any of the other oven functions. When the minute timer is in use with
any other mode, the minute timer will be shown in the display. To view other functions, press the function pad for that mode.
To Cancel the Minute Timer before the set time has run out: Press the TIMER ON/OFF pad.
To Set Control for Continuous Bake or 12 Hour Energy Saving:
The oven control has a built-in 12 Hour Energy Saving feature that will shut off the oven if the control is left on for more than 11
hours and 59 minutes. The oven can be programmed to override this feature for continuous baking.
To set control for continuous baking:
1. Press and hold the TIMER ON/OFF pad for 7 seconds until a tone is heard.
2. Within 5 seconds, press the UP or DOWN ARROW pad to switch between Continuous Bake and 12 Hour Energy Saving
mode. The display will show either "— — hr" or "12hr".
If "- - hr" appears, the oven will be set to continuous baking. If "12hr " appears, the oven is set to 12 hour energy saving mode.
3. Wait 5 seconds or press the CLEAR/OFF pad to accept the changes.
2
Setting Oven Controls
To Set Control for Oven Lockout (some models):
The control can be programmed to lock the oven door (some models) and/or lock the oven control pads (all models). The Oven
Lockout feature prevents the oven from being accidentally turned on. It does not disable the clock, minute timer or the
interior oven light.
To Set Control for Oven Lockout feature:
1. Press the CLEAR/OFF pad and hold for 3 seconds. The "Door Locked" indicator light will flash and the motor driven door
lock will begin to close automatically. DO NOT open the oven door while the indicator light is flashing. Allow about 15
seconds for the oven door to lock. Once the oven door is locked, "Loc " will appear in display.
2. To cancel the Oven lockout feature, press the CLEAR/OFF pad and hold for 3 seconds. The control will unlock the oven
door and resume normal operation.
To Set or Change the Temperature for Normal or Speed Baking
The oven can be programmed to bake at any temperature from 170°F to 550°F (77°C to 288°C).
To Set the Controls for Normal or Speed Baking:
1. Press the BAKE or SPEED BAKE pad."— — —°" appears in the display.
2. Within 5 seconds, Press the UP or DOWN ARROW pad. The display will show "350°F (177°C)." By holding the UP or DOWN
ARROW pad, the temperature can then be adjusted in 5°F (1°C if control is set to display Celsius) increments.
3. 8 seconds after the UP or DOWN ARROW pad is released, the oven will begin heating to the selected temperature. When
the displayed temperature reaches the desired baking temperature, the preheat indicator light will turn OFF.
4. To cancel the baking function, press the CLEAR/OFF pad.
To Change the Oven Temperature after Baking has Started:
Press the UP or DOWN ARROW pad to increase or decrease the set temperature.
Speed BakeTM Cooking System (some models)
Speed BakeTM Cooking System uses a fan to circulate the oven’s heat uniformly and
continuously around the oven. This improved heat distribution allows for fast, even cooking and
browning results. It also gives better baking results when using two racks at the same time.
Heated air flows around the food from all sides, sealing in juices and flavors. Meats cooked with
Speed BakeTM Cooking System are juicer. Poultry is crisp on the outside while staying
tender and moist on the inside. Breads and pastry brown more evenly. Most foods baked in a
standard oven can be cooked faster and more evenly with Speed BakeTM Cooking System.
Benefits of Speed BakeTM Cooking System:
- Foods cook up to 30% faster, saving time and energy.
- Two racks can be used with more even cooking and browning.
- No special pans or bakeware needed.
General Cooking Instructions:
1. To convert baking times from normal recipes to Speed Bake
times, start with a 30% reduction in time and increase the time
until desired doneness is obtained. Time reductions will vary
depending on the amount and type of food.
2. Preheating is not necessary when cooking with Speed Bake,
except with items such as cakes, cookies, biscuits, breads,
etc.
3. When using two racks at the same time, place them in
positions 1 and 3 for the best results.
4. When baking cakes with Speed Bake, set temperature 25°F
(13°C) degrees lower than the recommended setting for best
results.
To Set the Control for Speed Baking:
See Instructions above under "To Set or Change the Temperature
for Normal or Speed Baking".
3
4
3
2
1
Recommended Foods for
Speed BakeTM Cooking System
Food Item
Casseroles
Meats
Poultry
Frozen Foods
Decrease Cook Time by:
25%
15% (or 5 mins/pound)
30% (or 10 mins/pound)
20%
Refrigerator Cookies or Biscuits 25% (or 2 to 5 min.)
Rolls/Breads/Pizza
25% (or 5 min.)
Vegetables
25%
Baked potatoes
25%
Pies/Pastries
30%
Setting Oven Controls (continued)
Broil
Broiling is a method of cooking tender cuts of meat by direct heat under the
broil element of the oven. Be sure you center the broiler pan directly under
the broil element for best results.
Grid
Arrange oven rack while oven is still cool. Position the rack as needed.
The broiler pan and its insert allow dripping grease to drain and be kept away
from the high heat of the broiler. DO NOT use the pan without its insert. DO
NOT cover the insert with foil. The exposed grease could ignite.
Should an oven fire occur, close the oven door and turn off the
oven. If the fire continues, throw baking soda on the fire or use a fire
extinguisher. DO NOT put water or flour on the fire. Flour may be explosive
and water can cause a grease fire to spread and cause personal injury.
Broiler Pan
To set for broiling:
1. Place the insert on the broiler pan, then place the food on the insert. DO NOT
use the pan without the insert or cover the insert with aluminum foil. The
exposed grease could ignite.
2. Arrange the oven rack while oven is still cool. Be sure to center the broiler
pan directly under the broiler element/burner. Electric Oven: Make sure
the oven door is in the broil stop position (see Figure 2). Gas Oven:
Close the oven door. For optimum browning, preheat broil burner for
3-4 minutes before adding food.
3. Press the BROIL pad. "- -" will appear in the display.
4. Press the UP or DOWN ARROW pad until the desired broil setting level
appears in the display. Press the UP ARROW pad for HI broil or the DOWN
ARROW pad for LO broil. Most foods may be broiled at the HI broil setting.
Select the LO broil setting to avoid excess browning or drying of foods that
should be cooked to the well-done stage.
5. Broil on one side until food is browned. Turn and broil food on 2nd side.
Note: Always pull the rack out to the stop position before turning or removing
food.
6. When broiling is finished, press the CLEAR/OFF pad.
Figure 1
Broil Stop Position for
Electric Oven Models
Only - Figure 2
To Operate the Oven Light(s)
The interior oven light(s) will automatically turn ON when the oven door is opened.
Press the OVEN LIGHT pad to turn the interior light(s) ON and OFF whenever the door is closed.
The interior oven light(s) is (are) located at the upper left (and right, some models) rear wall of the oven interior and is covered
with a glass shield held by a wire holder. The glass shield must be in place whenever the oven is in use. To change the interior
oven light(s), see changing the Oven Light in the General Care & Cleaning section in the Owner's Guide.
4
Setting Oven Controls (continued)
To Set the Timed Bake and Delay Start Features
The BAKE TIME and START TIME pads operate the features that will turn the oven ON and OFF at the times you select in
advance. The oven can be programmed to start immediately and shut off automatically (Timed Bake) or to begin baking at a later
time with a delayed start time (Delay Start).
Note: During Timed Bake the preheat indicator light will function during the preheat operation.
To Program the Oven to Begin Baking Immediately and To Shut Off Automatically (Timed Bake):
1. Be sure that the clock shows the correct time of day.
2. Place the food in the oven.
3. Press the BAKE pad. "— — —°" appears in the display.
4. Within 5 seconds, press the UP or DOWN ARROW pad. The display will show "350°F (177°C)". By holding the UP or DOWN
ARROW pad, the temperature can then be adjusted in 5°F increments (1° if the control is set to display Celsius).
5. Wait 8 seconds to accept the temperature.
6. Press the BAKE TIME pad. "0:00" will flash in the display (MIN:SEC) and (HR:MIN) if programmed for more than 60 minutes.
7. Press the UP or DOWN ARROW pad until the desired baking time appears in the display.
8. The oven will turn ON and begin heating.
Note: When the control is set for this function the oven temperature will be displayed. To see the cook time remaining press
the BAKE TIME pad and to see the time of day press the CLOCK pad.
To Program Oven for a Delayed Start Time and to Shut-Off Automatically (Delayed Start Bake):
1. Be sure that the clock shows the correct time of day.
2. Place the food in the oven.
3. Press the BAKE pad. "— — —°" appears in the display.
4. Within 5 seconds, press the UP or DOWN ARROW pad. The display will show "350°F (177°C)." By holding the UP or DOWN
ARROW pad, the temperature can then be adjusted in 5°F increments (1° if the control is set to display Celsius).
5. Wait 8 seconds to accept the temperature.
6. Press the BAKE TIME pad. "0:00" will flash in the display (MIN:SEC) and (HR:MIN) if programmed for more than 60 minutes.
7. Press the UP or DOWN ARROW pad until the desired baking time appears.
8. Wait 5 seconds for the control to accept the time.
9. Press the START TIME pad. The earliest possible start time will appear in the display.
10. Press the UP or DOWN ARROW pad until the desired start time appears in the display and wait 7 seconds to accept.
11. Once the controls are set, the control calculates the time when baking will start and stop.
12. The oven will turn ON at the delayed start time and begin heating.
Note: When the control is set for a delayed time bake the time of day is displayed until the delayed time bake is reached.
When the oven will turn on, the oven temperature will be displayed. To see the cook time remaining press the BAKE
TIME pad and to see the time of day press the CLOCK pad.
When the Set Bake Time Runs Out:
1. "END" will appear in the display window and the oven will shut off automatically.
2. The control will beep 3 times every 25 seconds until the CLEAR/OFF pad is pressed.
To Change the Oven Temperature or Bake Time after Baking has Started:
1. Press the function pad you want to change.
2. Press the UP or DOWN ARROW pad to adjust the setting.
Use caution with the Timed Bake and Delayed Start features. Foods that can easily spoil such as milk, eggs,
fish, meat or poultry, should be chilled in the refrigerator first. Even when chilled, they should not stand in the oven for more than
1 hour before cooking begins, and should be removed promptly when cooking is completed.
5
Setting Oven Controls (continued)
Setting the Keep Warm Feature
The KEEP WARM pad turns ON the Keep Warm feature and will maintain an oven temperature of 170° F (77°C). The Keep
Warm feature will keep oven baked foods warm for serving up to 3 hours after cooking has finished. After 3 hours the Keep
Warm feature will shut the oven OFF automatically. The Keep Warm feature may be used without any other cooking operations
or can be used after cooking has finished using BAKE TIME or DELAYED TIMED BAKE.
To set Keep Warm:
1. Arrange the interior oven racks and place baked food in the oven.
2. Press the KEEP WARM pad. "- -" will appear in the display and the Keep Warm indicator light above the pad will turn ON.
Note: If no further pads are touched within 6 seconds the request to turn ON Keep Warm will be cleared.
3. Press the UP or DOWN ARROW pad to start. "Hld" will be displayed.
4. To turn Keep Warm OFF at any time press the CLEAR/OFF or KEEP WARM pad. The Keep Warm indicator light above
the pad will turn OFF.
To set Keep Warm to turn ON automatically:
1. Arrange the interior oven racks and place food in the oven. Set the oven properly for Timed Bake or Delayed Timed Bake.
2. Press the KEEP WARM pad. "- -" will appear in the display and the Keep Warm indicator light above the pad will turn ON.
3. Press the UP or DOWN ARROW pad to start. Keep Warm is set to turn ON automatically after Timed Bake or Delayed
Start Bake has finished.
4. To turn Keep Warm OFF at any time press the CLEAR/OFF pad. The Keep Warm indicator light above the pad will turn
OFF.
6
Setting Oven Controls (continued)
To Set the Sabbath Feature (for use on the Jewish Sabbath & Holidays)
The BAKE TIME and START TIME pads are used to set the Sabbath feature. The Sabbath feature may only be used with
the BAKE pad. The oven temperature may be set higher or lower after setting the Sabbath feature (the oven temperature
adjustment feature should be used only during Jewish Holidays), however the display will not visibly show or provide any
audible tones indicating whether the change occurred correctly. Once the oven is properly set using Bake with the
Sabbath feature active, the oven will remain continuously ON until cancelled. This will override the factory preset 12-Hour
Energy Saving feature.
If the oven light will be needed during the Sabbath, press the OVEN LIGHT pad before activating the Sabbath feature.
Once the oven light is turned ON and the Sabbath feature is active, the oven light will remain ON until the Sabbath feature
is turned OFF. If the oven light needs to be OFF, be sure to turn the oven light OFF before activating the Sabbath feature.
IMPORTANT NOTES: It is not advised to attempt to activate any other program feature other than BAKE while the
Sabbath feature is active. ONLY the following key pads will function after setting the Sabbath feature; UP or DOWN
ARROW, BAKE & CLEAR/OFF. ALL OTHER KEYPADS will not function once the Sabbath feature is properly activated.
To
1.
2.
3.
4.
5.
6.
7.
8.
Program the Oven to Begin Baking Immediately & activate the Sabbath feature:
Be sure that the clock is set with the correct time of day.
Place the food in the oven.
Press the BAKE pad. " — — — ° " appears in the display.
Within 5 seconds, press the UP or DOWN ARROW pad. The display will show "350°F (177°C)." By holding the UP or
DOWN ARROW pad, the temperature can then be adjusted in 5°F increments (1°C if the control is set to display
Celsius).
If you desire to set the oven control for a Timed Bake or a Delayed Start do so at this time. If not, skip this step
and continue to step 6. Refer to the Bake Time (complete steps 6-7) / Start Time (complete steps 6-10) section for
complete instructions. Remember the oven will shut down after using Bake Time or Start Time and therefore may
only be used once during the Sabbath/Jewish Holidays. The maximum Start Time Bake time is 11 hours & 59
minutes.
The oven will turn ON and begin heating.
Press and hold both the Bake Time and Start Time pads for at least 3 seconds. SAb will appear in the display.
Once SAb appears in the display the oven control will no longer beep or display any further changes and the oven is
properly set for the Sabbath feature.
Note: You may change the oven temperature once baking has started by pressing the UP or DOWN ARROW (for
Jewish Holidays only). The oven temperature will be adjusted in 5°F increments with each press of these pads (1°C if
the control is set to display Celsius). Remember that the oven control will no longer beep or display any
further changes once the oven is set for the Sabbath feature.
The oven may be turned OFF at any time by first pressing the Clear/Off pad (this will turn the oven OFF only). To
turn OFF the Sabbath feature press and hold both the Bake Time and Start Time pads for at least 3 seconds. SAb
will disappear from the display.
Should you experience a power failure or interruption, the oven will shut off. When power is returned the oven will not turn
back on automatically. The oven will remember that it is set for the Sabbath and the food may be safely removed from the
oven while still in the Sabbath feature, however the oven cannot be turned back on until after the Sabbath. After the
Sabbath observance turn OFF the Sabbath feature. Press and hold both the Bake Time and Start Time pads for at least
3 seconds. SAb will disappear from the display and the oven may be used with all normal functions. For further
assistance, guidelines for proper usage, and a complete list of models with the Sabbath feature, please visit the web at
http:\\www.star-k.org.
7
Oven Cleaning
Self-Clean or Speed Clean Cycle time length
For satisfactory results, use a 2 hour Self-Clean cycle for light soils and a 3 hour cycle for average or heavy soils.
NOTE: The kitchen area should be well ventilated using an open window, ventilation fan or exhaust hood during the SelfClean or Speed Clean cycle. This will help eliminate the normal odors associated with the Self-Cleaning cycles.
To Set the Controls for a Self-Clean or Speed Clean Cycle or a Delayed Start
Self-Clean or Delayed Start Speed Clean Cycle:
(Note: If you do not want to start a Delayed Self-Clean or Speed Clean Cycle, skips
steps 2 & 3.)
1. Be sure the clock shows the correct time of day.
2. Press the START TIME pad.
3. Press and hold the UP ARROW pad to scroll to the time to start the delayed
Self-Clean cycle. Release the pad when the desired time is displayed.
4. Press the CLEAN pad (for a 3 hour cycle) or the SPEED CLEAN pad (for a 2
hour cycle). "- -" appears in the display.
5. Press the UP ARROW pad once.
As soon as the controls are set, the motor driven lock will begin to close
automatically and the “Door Locked” indicator light will flash. DO NOT open the
oven door while the light is flashing (it takes about 15 seconds for the oven door
to lock).
6. "CLn" will appear in the display during the Self-Clean cycle and the "Door
Locked" light will glow until the Self-Cleaning cycle is complete or cancelled and
the oven temperature has cooled.
When the Self-Clean or Speed Clean Cycle is Completed:
1. The time of day or "End" will appear in the display window and the “Clean” and
"Door Lock" light will continue to glow.
2. Once the oven has cooled down for about 1 HOUR and the "Door Lock" light has
gone out, the oven door can be opened.
3. If “End” is in the display and the Select Clean indicator light remains ON, press
the CLEAR/OFF pad. The time of day will appear in the display.
NOTE: When the oven is cool, wipe away any residue or powdered ash with a damp
cloth or paper towel.
NOTE: A smoke eliminator in the
oven vent converts most of the soil
into a colorless vapor.
To avoid possible
burns use care when opening the
oven door after the Self-Cleaning
cycle. Stand to the side of the oven
when opening the door to allow hot
air or steam to escape.
DO NOT force the
oven door open. This can damage
the automatic door locking system.
Use caution and avoid possible burns
when opening the door after the
Self-Cleaning cycle has completed.
The oven may still be VERY HOT.
Stopping or Interrupting a Self-Cleaning or Speed Cleaning Cycle
If it becomes necessary to stop or interrupt a Self-Cleaning cycle:
1. Press the CLEAR/OFF pad.
2. Once the oven has cooled down for about 1 HOUR and the "Door Lock" light has
gone out, the oven door can be opened.
3. Restart the Self-Clean cycle once all conditions have been corrected.
Adjusting the Oven Temperature
Your oven thermostat has been precisely set at the factory. This setting may differ from your previous oven, however, so your
recipe times may not give you the results you expect. If you think that the oven is cooking too hot or cool for your recipe times,
you can adjust the thermostat so that the oven cooks hotter or cooler than the temperature displayed.
To Adjust Oven Temperature:
1. Press and hold the BAKE pad for 8 seconds. The display now indicates the amount of degrees offset between the original
factory temperature setting and the current temperature setting. If the oven control has the original factory calibration, the
display will read “0”.
2. The temperature can now be adjusted up or down 35°F or 19°C, in 1°F or 1°C steps by pushing and holding the UP or DOWN
ARROW pad. Adjust until the desired amount of degrees offset appears in the display. When lowering the oven temperature,
a minus sign (-) will appear before the number to indicate that the oven will be cooler by the displayed amount of degrees.
3. When you have made the desired adjustment, wait 5 seconds and the display will go back to the time of day.
Note: Oven temperature adjustment made will not change the Self-Cleaning feature temperature.
8
CONTROL ELECTRONICO DEL HORNO
Funciones del Control
Lea cuidadosamente las instrucciones antes de utilizar su horno Para uso satisfactorio de su horno, hay familiarizarse
con las diversas funciones del horno. Nota: Los botones o teclas pueden tener una forma diferente, esto no cambia la forma
en la que operan.
Importante: El control electrónico no puede operar hasta que el reloj se ajuste con la hora correcta del día.
Botón Hornear a
velocidad- Se utiliza
para entrar un modo de
horneado a velocidad
(algunos modelos)
Indicador
luminoso de
funciones-Estos
indicadores
muestran cual de
las funciones están
en uso.
Botón HornearSe utiliza para
activar el modo de
Hornear
Botón de
Asado-Se utiliza
para activar el
modo de asado
Botón Mantener
caliente- Se utiliza
para ajustar la
característica de
mantener caliente los
alimentos.
Botón Limpieza a
Velocidad-Se utiliza
para seleccionar el
ciclo de limpieza a
velocidad (algunos
modelos)
Botón Tiempo
de HorneadoSe utiliza para
ingresar el tiempo
que durara el
ciclo de horneado
Flecha hacia arriba y hacia abajo-Se usan
junto con las teclas de funciones para
seleccionar la temperatura del horno, el
Contador automático y las opciones de
horneado diferido, la hora del día y el
contador de minutos.
Speed Bake Oven
Bake
Speed
bake
Speed
clean
Bake
time
Broil
Keep
warm
Clean
Start
time
Oven
Preheat
Door Locked
Botón de Limpieza-Se
utiliza para seleccionar un
ciclo de auto-limpieza
Botón para comenzar el tiempo-Se utiliza
para ajustar el tiempo en el que se desea se
comience el horneado. Puede ser usado con
el botón BAKE TIME para programar un ciclo
diferido.
Clock
Oven
light
Timer
Clear
/Off
On/Off
Controls
Botón del Reloj-Se
utiliza para ajustar la
hora del día
Botón para la luz
interior- Se utiliza
para apagar y prender
la luz del horno.
Botón Cancelar -Se
utiliza para borrar
cualquier función
previamente ajustada
a excepción de la
hora del día y el
contador de minutos.
Presione la tecla OFF/
CANCEL para dejar
de cocina.
Botón del Contador- Se utiliza para ajustar o cancelar el
contador de minutos. El contador de minutos no comienza o para
un ciclo de horneado.
Indicadores luminosos- El indicador luminosos indica que una
función esta en operación. El indicador de precalentamiento brillara
cuando el horno se ajuste para operar o que la temperatura deseada es
mas alta que la que actualmente el horno tiene. El indicador de puerta
bloqueada brillara cuando la puerta esta bloqueada durante un ciclo de
auto-limpieza.
El horno puede ser programado para:
Hornear, Hornear a velocidad (algunos modelos), Mantener caliente, Comienzo diferido, Hornear, Asar, Limpieza y
limpieza a velocidad, Asar, Auto-limpieza
Para un panel de control silencioso:
Cuando escoja una función, un timbre se escuchara cada vez que se presione el botón. Si se desea, el control puede ser
programado para una operación silenciosa:
Oprima y sostenga el botón START TIME. Después de 7 segundos, “- - “ o “SP” aparecerán en la pantalla. Espere 5 segundos,
presione las flechas UP o DOWN para escoger el tipo de operación deseado. El indicador mostrara “- -”o “SP”. Espere 5
segundos para regresar al modo de operación regular.
Nota: “SP” indica que el control operará con timbres normales. “- -”indica que el panel operará de manera silenciosa.
Conversión de la Temperatura (Fahrenheit/Celsius) (algunos modelos)
El control electrónico viene ajustado de fábrica para operar en °F (Fahrenheit). Para cambiar la temperatura a °C (Celsius)
o de °C a ° F. El horno puede ser programado para cualquier temperatura entre 170°F a 550°F (77°C a 288°C).
Para cambiar la temperatura a °C (Celsius) o de °C a °F
(el control no deberá en modo de horneado o limpieza)
1. Presione y sostenga el botón BROIL por 7 segundos hasta que °C o °F aparezcan en el indicador.
2. Presione las flechas UP o DOWN para cambiar °F a °C o °C a °F en el indicador
3. Espere 5 segundos para aceptar los cambios o presione CLEAR/OFF para aceptar los cambios.
Impreso en Estado Unidos
1
318200185SP (0502) Rev. A
Ajustando el Reloj y el Contador
NOTA: La hora del día debe de ser ajustador en primera instancia para poder operar el horno.
Para ajustar el Reloj
Cuando la estufa es conectada por primera vez, o bien después de una interrupción de corriente eléctrica hacia
electrodoméstico, el indicador parpadeara “12:00”
1. Presione el botón CLOCK.
2. Después de 5 segundos presione y sostenga el botón con la flechas hacia arriba UP o hacia abajo DOWN hasta que la
hora correcta del día aparezca en el indicador.
3. Presione el botón CLOCK para aceptar la nueva hora del día. Si el botón CLOCK no se presiona, el contador regresará
automáticamente al nuevo registro de la hora después de 7 segundos.
Note: The clock cannot be changed during any bake, timed bake, delayed time bake, clean cycle, speed clean or delayed
clean cycle.
Cambiando el indicador de la hora del día de 12 o 24 horas
1. Presione y sostenga el botón CLOCK por 7 segundos. El indicador luminoso del reloj localizado en el botón parpadeara
indicando que el control se encuentra en modo de programación. El indicador mostrara ya sea "12Hr" (para un reloj a 12
horas) o "24Hr" (para un reloj a 24 horas).
2. Presione los botones con las flechas UP o DOWN para cambiar el indicador de la hora del día de 12 a 24 horas.
3. Espere 5 segundos para aceptar el cambio o presiones el botón CLEAR/OFF para regresar a la hora del día.
4. Reajuste la hora del día tal y como se describe en el párrafo anterior. Nota: Si el modo de 24 horas fue elegido el reloj
indicara la hora del día de 0:00 a 23:59.
Para ajustar el Contador
1. Presione el botón TIMER ON/OFF.
2. Para ajustar el contador, presione los botones con las flechas UP o DOWN para incrementar o disminuir el tiempo en
incrementos de un minuto. El contador de tiempo puede ser ajustado desde una hora hasta 11 horas y 59 minutos.
3. Cuando el tiempo ajustado haya terminado. El reloj timbrara con 3 timbres cada 8 segundos hasta que el botón TIMER
ON/OFF sea presionado.
Nota: La luz indicador localizada por arriba del botón TIMER ON/OFF brillara cuando el contador este activo.
Nota: El contador de minutos no comienza o termina la función de cocinado y no se puede activar durante el ciclo de autolimpieza. Simplemente sirve como un extra contador de minutos en la cocina que comenzara a timbrar cuando el tiempo
ajustado haya pasado. El contador de minutos puede utilizarse independientemente durante cualquiera de las funciones de
horneado o asado. El contador puede ser ajustado con cualquier tiempo entre 5 segundos y 9 horas con 55 minutos.
Para cancelar el Contador de Minutos antes de que el tiempo ajustado haya pasado: Presione y sostenga el botón
TIMER ON/OFF.
Horneado Continuo o 12-horas de Ahorro de Energía
El control del horno trae integrado la función de ahorro de energía que apagará el horno si el control es dejado en operación
por más de 11 horas y 59 minutos. El control puede ser programado para ignorar esta función de manera de poder hornear
de manera continua.
To set control for continuous baking:
1. Presione y sostenga el botón TIMER ON/OFF por 7 segundos.
2. Presione los botones con las flechas UP o DOWN para cambiar el indicador entre 12 horas o 24 horas para un cocinado
continuo. El indicador mostrara ya sea "12hr" (para un máximo ciclo de cocinado de 12 horas) o "— — hr" (para cocinado
continuo).
3. Espere 5 segundos para aceptar el cambio o presiones el botón CLEAR/OFF para aceptar los cambios.
2
Ajuste del Control
Para ajustar la característica de Oven Lockout (algunos modelos)
El control puede ser programado para bloquear la puerta del horno (algunos modelos) y/o bloquear las botones del control
(todos los modelos) Esta característica previene a que el horno de encienda accidentalmente. Esta función no inhabilita
las funciones del reloj, contador de minutos o la luz del interior del horno.
Para activar la característica Oven Lockout:
1. Presione y sostenga el botón CLEAR/OFF por 3 segundos. El indicador luminoso se encenderá y el motor de la puerta
del horno comenzara a cerrarse automáticamente. No abra la puerta del horno mientras que el indicador luminoso este
parpadeando. Permita 15 segundos para que la puerta se bloquee. El icono LOC aparecerá en el indicador.
2. Para cancelar esta característica presione y sostenga el botó CLEAR/OFF por 3 w3gundos. El control desbloqueara la
puerta del horno y regresar a su operación normal.
Para ajustar o cambiar la temperatura de horneado normal o a velocidad
El horno esta programado para hornear a cualquier temperatura entre 170°F/77°C a 550°F/288°C.
Para ajustar la temperatura de horneado normal o a velocidad:
1. Presione el botón BAKE o SPEED BAKE. “_ _ _°” brillara en el indicador.
2. Después de 5 segundos presione el botón con la flechas arriba UP o abajo DOWN. “350°F/177°C” aparecerá en el
indicador. Use las flechas hacia arriba o hacia abajo para aumentar o disminuir la temperatura deseada para hornear,
la temperatura aumenta en °5F/°1C.
3. 8 segundos después de haber presionado los botones con las flechas, el horno empezara a calentar. El indicador
mostrara la temperatura actual en el horno aumentando al ajuste seleccionado. Si se necesita precalentar, espere a
que la temperatura seleccionada aparezca en el indicador.
4. Para cancelar la función de horneado, presione el botón CLEAR/OFF.
Para cambiar la temperatura después de que la función horneado haya comenzado, repita el paso 2
mencionado en el párrafo anterior.
Sistema de Horneado a Velocidad (algunos modelos)
Speed BakeTM Cooking system utiliza un ventilador para circular uniformemente y
continuamente el calor alrededor del horno. Esto mejora la distribución del calor y los
resultados de horneado. Además esta característica dará mejores resultados de horneado
cuando se empleen dos parrillas de horno al mismo tiempo. El aire caliente fluye alrededor
de los alimentos, sellando los jugos y sabores. Las carnes cocinadas con esta
característica son más jugosas. El pollo o pavo estarán ligeramente dorados en su exterior
mientras en su interior estarán tiernos y jugosos. Los pasteles y galletas tomaran un color
café mas rápido. La mayoría de los alimentos que se cocinen en un horno convencional
pueden se horneados más rápido y uniforme con este sistema.
Beneficios del Horneado a Velocidad:
- Los alimentos se cocinan has 30% mas rápido, ahorrando tiempo y energía.
- Dos parillas de horno se pueden usar con un horneado uniforme.
- No se necesitan moldeas para hornear específicos.
Instrucciones de Horneado Generales:
1. Para convertir tiempos de horneado de recetas normales a un
tiempo de horneado a velocidad, empiece con una disminución de
30% en el tiempo estipulado e incremente el tiempo si es necesario
hasta que se obtengan los resultados deseados. La reducción del
tiempo depende en la cantidad y tipo de alimentos.
2. Pre-calentar no es necesario cuando se cocine con esta
características a excepción de los pasteles galletas, panques etc.
3. Cuando se usen dos parrillas al mismo tiempo, acomódelas en la
posición 1 y 3 para los obtener los mejores resultados.
4. Cuando se usen dos parrillas al mismo tiempo, acomódelas en la
posición 1 y 3 para los obtener los mejores resultados.
Para ajustar el Control para Horneado a Velocidad
Refiérase a las instrucciones, Para ajustar o cambiar la temperatura
de horneado normal o a velocidad.
3
4
3
2
1
Alimentos recomendados para
Speed BakeTM Cooking System
Disminuir el tiempo en:
Alimento
25%
Cacerolas
15% (o 5 minutos/libra)
Carnes
30% (o 10 minutos/libra)
Aves
20%
Alimentos congelados
25% (o de 2 a 5 mins.)
Galletas refrigeradas
25% (o 5 mins.)
Pan/Pizza
25%
Verduras
25%
Papas
30%
Tartas
Ajuste del Control (continuación)
Asar
Asado es un método de cocinar tiernos cortes de carne por medio de calor
directo bajo un elemento asador del horno. La carne se coloca en el sartén
asador y éste se coloca debajo del elemento de asado.
Rejilla
Arregle las parrillas del horno mientras el horno se encuentre frió. El sartén
asador y su rejilla permiten que la grasa pase al sartén manteniéndola
alejada del calor del asador. NO UTILICE EL SARTEN ASADOR SIN SU
REJILLA. NO CUBRA la rejilla con papel aluminio. La grasa expuesta a
temperaturas altas puede incendiarse.
ATENCIÓN En caso de fuego, cierre la puerta del horno y apague su horno.
Si el fuego continúa, arroje bicarbonato de sodio al fuego o use un
extinguidor. NO arroje agua o harina al fuego. La harina puede ser explosiva.
Para ajustar la función de asado:
1. Ponga la rejilla en el sartén asador y coloque los alimentos en la rejilla. NO
UTILICE el sarten asador sin su rejilla. NO CUBRA la rejilla con papel
aluminio. La grasa expuesta a temperaturas altas puede incendiarse.
2. Arregle las parrillas del horno mientras el horno se encuentre frió.
Asegúrese de centrar el sartén directamente debajo del elemento. Horno
Eléctrico: Asegúrese que la puerta se encuentre en la posición de
asado (Figura 2). Horno a Gas: Cierre la puerta del horno. Para un
asado optimo, precaliente el quemador para asar de 3 a 4 minutes
antes de empezar a asar.
3. Presione el botón BROIL “_ _ _” parpadeara en el indicador.
4. Presione y sostenga el botón con la flechas arriba UP o abajo DOWN.
Hasta que la temperatura deseada aparezca en el indicador. Presione la
flecha hacia arriba para un asado en alta potencia (HI) o la flecha hacia abajo
para un asado en baja potencia (LO). La mayoría de los alimentos se
pueden asar a alta potencia. Selecciones la potencia baja para evitar
alimentos secos o muy dorados, o alimentos con término bien cocido.
5. Ase de un lado hasta que los alimentos tomen un color café; voltee y cocine
el otro lado. Condimente y sirva. Siempre jale la parrilla del horno hasta el
tope antes de voltear o retirar los alimentos del sartén asador.
6. Cuando el asado se complete, presione el botón CLEAR/OFF.
Figura 1
Sarten
asador
Posición Tope de Asar a la
Parrilla, Horno Eléctrico
solamente - Figura 2
Para operar la luz del Horno
La luz del interior del honro se prendera automáticamente cuando la puerta del horno se abra.
Presione el botón OVEN LIGHT para encender y apagar la luz cuando la puerta del horno este cerrada
La luz del horno este localizada en el extremo superior izquierdo (derecho en algunos modelos) y esta cubierta con un
protector de vidrio (escudo) sostenido por un retenedor de alambre. El protector de vidrio debe de estar siempre instalado
cuando el horno esté en operación. Para cambiar la luz del horno refiérase al Manual del Usuario en la sección de
Cuidado y Limpieza General.
4
Ajuste del Control (continuación)
Para Ajustar el Contador automático y las opciones de horneado diferido
Los botones BAKE/TIME y START TIME controlan la operación de la función Tiempo de Horneado. El contador automático
prendera y apagara el horno en las horas que han sido previamente seleccionadas. El horno puede ser programado para operar
inmediatamente y apagarse automáticamente o comenzar a hornear mas tarde y apagarse automáticamente.
Nota: Durante el Horneado el indicador luminoso brillará durante el precalentado.
Para comenzar a calentar inmediatamente y apagar automáticamente (Timed Bake):
1. Asegúrese que el reloj indique la hora correcta.
2. Ponga los alimentos en el horno.
3. Presione el botón BAKE “_ _ _ _°” brillara en el indicador.
4. Después de 5 segundos presione el botón con la flechas arriba UP o abajo DOWN. Hasta que la temperatura deseada
aparezca en el indicador. La temperatura puede ser ajustada en incrementos de 5°F (1°C si el control esta ajustado para
la operación con grados Celsius).
5. Espere 8 segundos para aceptar la temperatura.
6. Presione el botón BAKE TIME “0:00” brillara en el indicador (MIN:SEC) y (HR:MN) si se programa por mas e 60 minutos.
7. Presione y sostenga el botón con la flecha UP (arriba) o DOWN (abajo) hasta que el tiempo deseado aparezca en el
indicador.
8. El horno se prendera y comenzara a calentar.
Nota: Cuando el control este ajustado para esta función la temperatura del horno será indicada. Para verificar el tiempo restante
de horneado presione el botón BAKE TIME y para ver la hora del día el botón CLOCK
Para un comienzo retardado y apagado automático (Delayed Start Baked):
1. Asegúrese que el reloj indique la hora correcta.
2. Ponga los alimentos en el horno.
3. Presione el botón BAKE “_ _ _ _°” brillara en el indicador.
4. Después de 5 segundos presione el botón con la flechas arriba UP o abajo DOWN. Hasta que la temperatura deseada
aparezca en el indicador. La temperatura puede ser ajustada en incrementos de 5°F (1°C si el control esta ajustado para
la operación con grados Celsius).
5. Espere 8 segundos para aceptar la temperatura.
6. Presione el botón BAKE TIME “0:00” brillara en el indicador (MIN:SEC) y (HR:MN) si se programa por mas e 60 minutos.
7. Presione y sostenga el botón con la flecha UP (arriba) o DOWN (abajo) hasta que el tiempo deseado aparezca en el
indicador.
8. Espere 5 segundos para que el control acepte el tiempo.
9. Presione el botón START TIME. La hora mas temprana en la que se podrá comenzar a hornear aparecerá en el indicador.
10. Presione y sostenga el botón con la flecha UP (arriba) o DOWN (abajo) hasta que el tiempo deseado para comenzar el
horneado aparezca en el indicador.
11. Una vez que los controles estén ajustados, el control calculará la hora en la que comenzara y terminara de hornear.
12. El horno se prendera a la hora ajustada y comenzara a calentar.
Nota: Cuando el control fue ajustado para un comenzar de manera diferida, la hora del día aparecerá en el indicador hasta que
la hora de hornear comience. Cuando el horno se encienda la temperatura aparecerá en el indicador. Si usted desea ver el tiempo
restante presione el boton BAKE TIME y para ver la hora del día presione el boton CLOCK.
Cuando el tiempo ajustado BAKE/COOK TIME termine:
1. “END” aparecerá en el indicador y el horno se apagara automáticamente.
2. El control timbrara 3 veces. El control continuara a timbrar una vez cada 25 segundos hasta que se presione el botón
CLEAR/OFF.
Para Ajustar o Cambiar la Temperatura para Hornear o el Tiempo una vez que la función haya comenzado:
1. Presion el botón de la función que se desea cambiar.
2. Presione y sostenga el botón con la flecha UP (arriba) o DOWN (abajo) para ajustar.
ATENCIÓN Tome sus precauciones cuando utilice el contador automático. Use el contador automático cuando cocine
alimentos curados o guisados congelados y la mayoría de frutas y vegetales. Alimentos perecederos tales como leche,
huevos, pescado, carne o aves, deberán de enfriarse en el refrigerador. Aun cuando estos estén fríos, no deben de dejarse
por más de una hora antes de que la cocción comience, y deben de ser removidos rápidamente.
5
Ajuste del Control (continuación)
Ajustando la característica mantener caliente
El botón KEEP WARM enciende esta característica y mantendrá la temperatura del horno a 170°F (77°C). Esta
característica mantendrá los alimentos horneados calientes y listos para seviche hasta 3 horas después de que e;
horneado haya acabado. Después de 3 horas esta función apagara automáticamente el horno. Esta función puede ser
usada sin ninguna otra operación de horneado o puede ser usada después del uso de las funciones BAKE TIME o
DELAYED TIMED BAKE.
Para ajustar la función Keep Warm:
1. Arregle las parrillas en el interior del horno y ponga los alimentos horneados en el horno.
2. Presione el botón KEEP WARM, “- -”aparecerá en el indicador y el indicador luminoso sobre este botón brillara.
Nota: Si no se presiona cualquier otro botón en los siguientes 6 segundos la operación se cancelará.
3. Presione y sostenga el botón con la flecha UP (arriba) o DOWN (abajo) para comenzar. “Hld” aparecerá en el
indicador.
4. Para apagar esta función en cualquier momento, presiones el botón CLEAR/OFF o KEEP WARM. El indicador
luminoso se apagara.
Para ajustar el encendido de la función KEEP WARM automáticamente:
1. Arregle las parrillas en el interior del horno y ponga los alimentos horneados en el horno. Ajuste adecuadamente las
funciones TIMED BAKE o DELAYED TIMED BAKE.
2. Presione el botón KEEP WARM, “- -”aparecerá en el indicador y el indicador luminoso sobre este botón brillara.
3. Presione y sostenga el botón con la flecha UP (arriba) o DOWN (abajo) para comenzar. La función esta ajustada para
encenderse automáticamente después de las funciones BAKE TIME o DELAYED TIMED BAKE terminen.
4. Para apagar esta función en cualquier momento, presiones el botón CLEAR/OFF o KEEP WARM. El indicador luminoso
se apagara.
6
Ajuste del Control (continuación)
Para ajustar la característica Sabbath (Para usarse en el Sabbath Judío & Días de Fiesta)
Los botones BAKE/TIME y START TIME controlan la operación de la función Sabbath. La función Sabbath nada mas
puede ser usada con el botón BAKE. La temperatura del horno puede ajustarse mas alta o baja después del ajuste de la
función Sabbath (El ajuste de la temperatura del horno debe de usarse solamente durante los días de fiesta Judíos), sin
embargo el indicador no será visible o proveerá ningún timbre indicando que el cambio se realizo. Una vez que el horno ha
sido debidamente ajustado en el modo de operación Sabbath, el horno permanecerá encendido hasta que se cancele.
Esto invalidara el ajuste de fábrica 12-horas de Ahorro de Energía.
Si la luz del horno se necesitará durante el Sabbath, presione el botón OVEN LIGHT antes de activar la función Sabbath.
Una vez que la luz del horno este iluminada y la función Sabbath activada, la luz del horno permanecerá prendida hasta
que la función del Sabbath se apague. Si la luz necesita estar apagada, asegúrese que apagar la luz del horno antes de
ajustar la función.
NOTAS IMPORTANTES: Se recomienda no activar cualquier otra función que la de horneado mientras que la función
Sabbath esté activada. SOLAMENTE los siguientes botones funcionaran después del ajuste del Sabbath. Las flechas UP
o DOWN, BAKE & CLEAR/OFF. Todas los otros botones no funcionaran una vez que la función Sabbath hay sido
debidamente activada.
Para comenzar a calentar inmediatamente y activar la función Sabbath:
1. Asegúrese que el reloj indique la hora correcta.
2. Ponga los alimentos en el horno.
3. Presione el botón BAKE “_ _ _ _°” brillara en el indicador.
4. Después de 5 segundos presione el botón con la flecha arriba UP o abajo DOWN. Hasta que la temperatura
deseada aparezca en el indicador. La temperatura puede ser ajustada en incrementos de 5°F (1°C si el control esta
ajustado para la operación con grados Celsius).
5. Si usted desea ajustar el control para una función Timed Bake o Delayed Start hágalo en este momento. Si no,
salte éste paso y continúe al paso 6. Refiérase a las instrucciones Bake Time (pasos del 6 - 7)/ Start time (pasos
del 6 -10). Recuerde que el horno se apagara después del uso de las funciones Bake Time o Start Time de ahí que
deberán ser usadas una sola vez durante el Sabbath. El tiempo tope para hornear en la función Start Time es horas
y 59 minutos.
6. El horno se prenderá y comenzara a calentar.
7. Presione el botón BAKE TIME y START TIME al mismo tiempo por 3 segundos. El indicador mostrara la palabra
SAb. Una vez que SAb aparezca en el indicador el control del horno no timbrara o mostrara cualquier cambio, de
esta manera el horno ha sido debidamente ajustado para la función del Sabbath.
Nota: La temperatura del horno puede ajustarse mas alta o más baja después del ajuste de la función Sabbath (El
ajuste de la temperatura del horno debe de usarse solamente durante los días de fiesta Judíos), sin embargo el
indicador no será visible o proveerá ningún timbre indicando que el cambio se realizo. Presione el botón con la flecha
arriba UP o abajo DOWN. Hasta que la temperatura deseada aparezca en el indicador. La temperatura puede ser
ajustada en incrementos de 5°F (1°C si el control esta ajustado para la operación con grados Celsius).
8. El horno puede apagarse en cualquier momento presionando el botón CLEAR/OFF (esto apagara solamente el
horno). Para apagar el modo Sabbath presione y sostenga los botones BAKE TIME y START TIME al mismo tiempo
por 3 segundos. La palabra SAb desaparecerá del indicador.
Si se llegara a experimentar un corte de electricidad u interrupción de la alimentación de electricidad a su
electrodoméstico, el horno se apagara. Cuando la alimentación de electricidad se restablezca y el horno no se prendera
automáticamente. El horno recordara que fue ajustado para una operación Sabbath y los alimentos podrán ser removidos
del horno mientras éste se encuentre en el modo Sabbath, sin embargo el horno no se podrá prender hasta que la
función del Sabbath termine. Para apagar el modo Sabbath presione y sostenga los botones BAKE TIME y START TIME
al mismo tiempo por 3 segundos. La palabra SAb desaparecerá del indicador y el horno puede ser usado normalmente.
Para mayor asistencia y guía de uso, lista de modelos con la función Sabbath, por favor visite nuestro sitio
http:\\www.star-k.org.
7
Limpieza del Horno
Para comenzar el Ciclo de Auto-limpieza
Le recomendamos un ciclo de auto-limpieza de 2 horas para suciedad ligera, un ciclo de 3 horas para suciedad
moderada, y un ciclo de 4 horas para suciedad difícil de remover. NOTA: El área de la cocina debe de estar bien
ventilada teniendo una ventana abierta durante la operación, un ventilador y una campana durante el ciclo de autolimpieza o un ciclo de limpieza a velocidad. Esto ayudara a eliminar el olor normal asociado con los ciclos de auto
limpieza.
Para ajustar los controles para el ciclo de Auto-limpieza o Ciclo de Limpieza
a Velocidad, con un comienzo inmediato o diferido:
(Nota: Si usted no quiere comenzar las funciones diferidas salte los pasos 2 y 3)
1. Asegúrese que el reloj indique la hora correcta.
2. Presione el botón START TIME.
3. Presione y sostenga el botón con la flecha UP arriba o abajo DOWN para ajustar
la hora en la que se desea comenzar el ciclo de limpieza.
4. Presione y sostenga el botón CLEAN para un ciclo de 3 HORAS o el botón
SPEED CLEAN para un ciclo de 2 HORAS “—”aparecerá en el indicador.
5. Presione y sostenga el botón con la flecha UP arriba. Una vez que control este
ajustado, el motor bloqueara la puerta y el indicador luminoso “Door Locked”
parpadeara. NO abra la puerta mientras que el indicador este parpadeando (se
toma aproximadamente 15 segundos el bloquear la puerta).
6. La palabra "CLn" aparecerá en el indicador durante el ciclo de auto limpieza. El
indicador de “Door Locked” brillara hasta que el ciclo de auto-limpieza este
completo o bien se cancele y la temperatura del horno se haya enfriado.
Cuando el Ciclo de Auto-limpieza haya finalizado:
1. La hora del día aparecerá en el indicador y la palabra “End” podrá verse en el
indicador. Los indicadores luminosos “Clean” y “Door Lock” continuaran a brillar.
2. Una vez que el horno se haya enfriado, aproximadamente una hora, la palabra
“Door Lock” desperecerá y la puerta del horno se podrá abrir.
3. Si la palabra “End” sigue brillando en el indicador y al indicador de limpieza
permanece prendido, presione el botón CLEAR/OFF. La hora del día aparecerá.
NOTA: Cuando el horno este frió, limpie cualquier residuo o ceniza con un trapo
o toalla húmeda.
NOTA: Un eliminador de humo en
la ventilación del horno convierte
la mayoría del la suciedad en un
vapor incoloro,
ATENCIÓN Para evitar posibles
quemaduras sea cuidadoso al
abrir la puerta del horno después
de un ciclo de auto limpieza.
Párese a un costado del horno
cuando se abra la puerta y
permita al aire caliente y vapor
escapar del horno.
ATENCIÓN NO forcé la puerta del
horno. Esto puede dañar el
sistema automático de seguro.
Sea precavido al abrir la puerta
del horno después de un ciclo de
auto-limpieza. El horno podrá
estar aun MUY CALIENTE.
Para parar o Interrumpir un Ciclo de Auto-limpieza
Si es necesario parar o interrumpir un ciclo de auto-limpieza debido a exceso de
humo o fuego:
1. Presione el botón CLEAR/OFF.
2. Una vez que el horno se haya enfriado y la palabra “Door LOCK” no aparezca en
el indicador, la puerta del horno podrá ser abierta.
3. Recomience el ciclo una vez que todas las condiciones hayan sido corregidas.
Ajustando la Temperatura del Horno
Cuando se utilice el horno por primera vez, asegúrese de seguir el tiempo y temperatura indicado en las recetas. Si usted
cree que su horno esta muy caliente o muy frió, la temperatura puede ser ajustada. Antes de ajustar la temperatura de
su horno, pruebe una receta ajustado la temperatura más alta o baja de la recomendada. Los resultados le ayudaran a
decidir cual es el ajuste que se necesita.
Para Ajustar la temperatura del horno:
1. Presione el botón BAKE por 8 segundos siguientes. El indicador ahora muestra la diferencia en grados entre el ajuste
de fábrica del control y el ajuste actual. Si el horno tiene su calibración original el indicador marcara “0”.
2. La temperatura puede ser ahora ajustada hacia arriba o hacia abajo 35°F/17°C, en incrementos de 5°F/1°C presionando
los botones con las flechas hacia arriba UP y abajo DOWN. Ajuste hasta que la cantidad de grados aparezca en el
indicador. El signo de menos (-) aparecerá al principio del numero para indicar que el horno será mas frió al valor de los
grados mostrados en el indicador.
3. Cuando usted hay terminado con los ajustes, espere 5 segundos para regresar a la hora del día.
Nota: Los ajustes de temperatura del horno realizados con esta función no afectaran la temperatura del ciclo de autolimpieza.
8