1
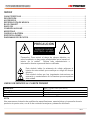
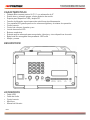
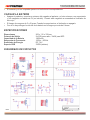
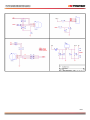
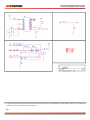
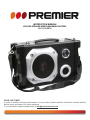
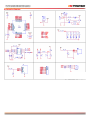
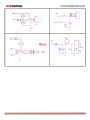
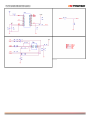
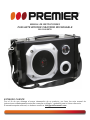
MANUAL DE INSTRUCCIONES
PARLANTE WOOFER C/BATERÍA RECARGABLE
BB-5254USBTB
ESTIMADO CLIENTE
Con el fin de que obtenga el mayor desempeño de su producto, por favor lea este manual de
instrucciones cuidadosamente antes de comenzar a utilizarlo, y guárdelo para su futura referencia.
Si necesita soporte adicional, no dude en escribir a: [email protected]
ÍNDICE
CARACTERÍSTICAS ................................................................................................................................. 2 DESCRIPCIÓN .......................................................................................................................................... 2 ACCESORIOS ........................................................................................................................................... 2 REPRODUCCIÓN DE MÚSICA ................................................................................................................. 3 BLUE-CONNECT ....................................................................................................................................... 3 RADIO FM.................................................................................................................................................. 3 CONEXIÓN AUXILIAR .............................................................................................................................. 3 MICRÓFONO ............................................................................................................................................. 3 CARGAR LA BATERÍA ............................................................................................................................. 4 ESPECIFICACIONES ................................................................................................................................ 4 DIAGRAMAS DE CIRCUITOS .................................................................................................................. 4 PRECAUCIÓN
RIESGO DE CHOQUE
ELÉCTRICO , NO ABRA
Precaución: Para reducir el riesgo de choque eléctrico, no
retire la cubierta, no hay partes manipulables por el usuario al
interior de la unidad.
Refiera todo mantenimiento o
intervención técnica a personal técnico calificado.
Este símbolo indica la existencia de voltaje peligroso al
interior de esta unidad, que constituye un riesgo de choque
eléctrico.
Este símbolo indica que hay importantes instrucciones de
operación y mantenimiento en la literatura que acompaña a
esta unidad.
LÍNEAS DE SERVICIO AL CLIENTE PREMIER
Venezuela:
Panamá:
Sitio Web:
E-mail:
0800 – ELECTRIC (353-2874)
300-5185
www.premiermundo.com
[email protected]
NOTA
Nos reservamos el derecho de modificar las especificaciones, características y/u operación de este
producto sin previo aviso, con el fin de continuar las mejoras y desarrollo del mismo.
P-1
CARACTERÍSTICAS
•
•
•
•
•
•
•
•
•
•
•
•
Parlante Blue-connect pasivo Hi-Fi 2.1 con subwoofer de 6”.
Sonido claro y potentes graves; efecto dinámico de sonido.
Soporte para dispositivo USB y tarjeta SD.
Función de Karaoke; soporte para dos micrófonos simultáneamente.
Con pantalla LED grande para ver los números digitales y el estatus de operación.
Control remoto.
Control de volumen, karaoke y eco.
Luz de decoración LED.
Botones numéricos.
Entrada auxiliar adecuada para computador, televisor y otros dispositivos de audio.
Batería de litio recargable incorporada de 1800 mAh.
Manija y correa.
DESCRIPCIÓN
ACCESORIOS
•
•
•
•
•
Cable USB
Cable de Audio
Control remoto
Micrófono
Manual del Usuario
P-2
REPRODUCCIÓN DE MÚSICA
1. Encienda la unidad. La pantalla LED se encenderá y mostrará la palabra NULL.
2. Inserte el dispositivo USB o la tarjeta SD en la ranura correspondiente. Los archivos de Audio se
reproducirán automáticamente.
3. En el modo de reproducción presione los botones Anterior y Siguiente para seleccionar las
canciones, o presione los números en el control remoto.
4. Presione los botones Anterior y Siguiente de manera larga para adelantar y retroceder a alta
velocidad.
5. Presione el botón de ecualización para seleccionar la ecualización que desee.
6. Utilice los botones de volumen y graves para hacer los ajustes que desee.
7. Presione Play/Pause para iniciar y pausar la reproducción.
8. Para conectar otros dispositivos de MP3 o MP4 utilice el cable de audio.
9. Recuerde apagar la unidad con la esté utilizando.
BLUE-CONNECT
1. Encienda la unidad. La pantalla LED mostrará las letras “bt” y emitirá 2 bips.
2. Active la función Blue-connect en el teléfono celular y busque la unidad “BB-5247YSBTB” y luego
haga la conexión. Las letras “bt” dejarán de parpadear en la pantalla y se emitirán 3 bips cuando la
conexión sea exitosa.
3. Reproduzca la música desde su teléfono celular y escúchela en el parlante.
4. Presione los botones anterior y siguiente en el parlante o en el teléfono celular o unidad exterior para
cambiar las pistas.
5. Presione el botón play/pausa en el parlante o en el teléfono celular o unidad exterior para pausar y
reanudar la reproducción.
6. Utilice el botón de volumen para ajustar el nivel deseado.
7. Utilice el botón de graves para ajustar el nivel deseado.
RADIO FM
1. En el modo de radio FM el cable de audio que se proporciona funciona como antena. Inserte este
cable de audio para obtener la mejor señal de FM.
2. Encienda la unidad y presione el botón Modo para ir a Radio FM.
3. Utilice el botón Play/Pausa para hacer una búsqueda automática de las estaciones radiales y
guardarlas en la memoria.
4. Utilice los botones Anterior y Siguiente para cambiar las estaciones radiales.
CONEXIÓN AUXILIAR
Si desea conectar otros dispositivos de audio MP3 o MP4, utilice el cable de audio. Un extremo del
cable se conecta a la salida de audio del dispositivo exterior y el otro extremo a la entrada de audio del
parlante. Presione el botón Modo para ubicar la función Entrada Auxiliar. Las funciones de control de
reproducción se manejan desde el dispositivo exterior.
MICRÓFONO
•
•
La unidad tiene dos entradas de micrófono. En el modo “Null” conecte el micrófono de 6.5mm y
úselo normalmente.
En el modo de reproducción se puede utilizar como karaoke.
P-3
•
El volumen y el eco se puede ajustar con los botones correspondientes.
CARGAR LA BATERÍA
•
•
•
Apague el parlante y conecte un extremo del cargador al parlante y el otro extremo a un computador
y otro cargador con salida de 5V (no incluido). Cuando esté cargando se encenderá el indicador de
color rojo.
El tiempo de carga es de 3 a 5 horas. Cuando la carga termine, el indicador se apagará.
Con el fin de prolongar la vida útil de la batería no la cargue por más de 8 horas.
ESPECIFICACIONES
Dimensiones
Potencia de Salida
Capacidad de la Batería
Respuesta de Frecuencia
Suministro de Energía
Soporte USB
205 x 115 x 335 mm
2x2.2W para radio / 2x6W para MP3
1800mAh
100Hz – 20KHz
DC 7.4V
32GB (máximo)
DIAGRAMAS DE CIRCUITOS
P-4
P-5
•
Las personas y/o Marcas registradas en este manual de instrucciones no están afiliadas a Premier Electric Japan Corp. y aparecen en
este Manual con propósitos ilustrativos únicamente.
P-6
INSTRUCTION MANUAL
WOOFER SPEAKER W/RECHARGEABLE BATTERY
BB-5254USBTB
DEAR CUSTOMER
In order to achieve the best performance of your product, please read this instruction manual carefully
before using, and keep it for future reference.
If you need extra support, please write to [email protected]
CAUTION
RISK OF ELECTRIC
SHOCK, DO NOT
OPEN
Caution: To reduce the risk of electric shock do not open this
device, there are not serviceable parts for customers. Please
refer any maintenance or repair to qualified personnel.
This sign means the existence of dangerous voltage at the
inside of the unit, which states a risk of electric shock.
This sign means that there are important instructions of
operation and handling in the manual that comes with this
device.
PREMIER CUSTOMER SERVICE
Venezuela:
Panama:
Website
E-mail:
0800 – ELECTRIC (353-2874)
300-5185
www.premiermundo.com
[email protected]
NOTE
This unit may be submitted to changes in specifications, characteristics and/or operation without prior
notice to the user, in order to continue improving and developing its technology.
For correctly operating, please read this manual carefully before using. Any content revise of the
manual won’t declare again. And we are no responsible for consequence caused by fault or oversight of
this manual.
(With Subwoofer)
Features
1.1 outdoor Passive HIFI Karaoke Speaker with 6 inch subwoofer;
Output very clear sound and heavy bass, dynamic sound effect;
With USB and micro SD card supporting;
With FM radio;
Karaoke function,support two microphones simultaneously
With big LED display, can show the digital number& working status
With remote controller, operate more easily
Knob control for volume ,karaoke and Echo
With LED decoration light
With number keypad to choose the desired FM channel and song more convenient
With AUX-IN function,suitable for PC,MID,TV and other audio device.
Built-in lithium rechargeable battery 1800mAh
With handle & strap, easy to take out.
Specification:
Product size:205(L)*115(W)*335(H)mm
Output power : 2*2.2W for radio
2*6W for MP3
Battery Capacity: 1800mAh
Frequency Response:100Hz-20Khz
Power supply: DC7.4V
USB supporting: MAXIMUM 32GB
Accessories:
Charger with cable, audio cable, remote controller, user manual, microphone
Appearance of control pannel:
Music playing:
1. Turn the Power button to “ON”, the LED Screen will light and display NULL.
2. Insert SD/MMC card or USB flash disk into slot,Audio files play automatically.
3. Under playing mode, short PREV or NEXT to select songs you like, or press the number of remote
control to get desired music.
4. Long press PREV for rewind, Long press NEXT for fast forward,
5. Press EQ button to get desired EQ.
6. Spin VOL knob to adjust the volume up or down.
7. Spin Bass-vol knob to adjust the bass volume
8. Press PLAY/PAUSE to play or pause.
9. For other compatible music devices or your MP3/MP4 players, use the supplied audio line
cable to connect from the device’s “Line Out” to the “Aux In” of this devices. When using an external
device, all functions will be controlled by the external devise.
10. Please turn the Power button to “OFF” while without use.
Use Blue Connect function:
1.Turn the power button to “ON”, The LED light turn blue and twinkle quickly and beep twice.
2.Activate Bluetooth of mobile phone and search for device name “BB-5254USBTB” then connect it.
The blue LED light twinkle slowly and and beep third times once connected successful.
3. Play the music from your mobile phone and enjoy.
4. Press PREV or NEXT button on the devices or on Mobile phones to select songs you like. Long
press PREV for rewind, Long press NEXT for fast forward.
5. Press Play/pause button on the devices or on Mobile phones to play/stop the music
6. Use the “Volume “to adjust volume up and down. Or adjust the mobile phones’volume.
Use FM Radio:
1. Turn the power button to “ON” without SD or USB Card inserted. Then press the “MODE” button
to switch to FM.(The order of the mode is USB,SD,FM and AUX-IN)
2. Under playing mode, short press “Play/pause” button to auto search the FM Channel and store it
automatically.
3. Press PREV or NEXT button to change the stored FM channel.
4. Press the number keypad of remote control to get your desired FM channel. For example, if you
would like to listen the FM radio of 105.7MHZ, just press 1,0,5,7 of remote then it will switch to
this Channel directly.
AUX-IN:
For other compatible music devices or your MP3/MP4 players, use the supplied audio
line cable to connect from the device’s “Line Out” to the “Aux In” of this devices. Then press the
“MODE” button to switch to AUX-IN state. Enjoy…
When using an external device, all functions will be controlled by the external devise except the
“Play/pause” button.
USE MICPHONE:
This product with two Microphone input.Under the “NULL” mode, just plug the 6.5MM microphone into
the Mic hole then you can use.
Under playing mode, it can be used as Karaoke also.
The volume and Echo can be adjusted by the knobs of “MIC-Vol” & “MIC-ECHO”..
Remarks:
1. Line-in is prior, in the “MUSIC” mode, Line-in function is prior to SD/MMC card or U flash disk.
2. All the functions mentioned above can be operated by remote control. When use remote control,
please aim at the infrared receiving window which located in the front panel.
3. Turn the power button to “off” to cut off the power supply while without use.
How to charge:
1. Power off the unit, put the provided charge cable into the charge slot of unit, connect the other end
to PC or other charger with 9V output ,the charging indicator beside the LED screen will keep
lighting.
2. Charge time should be 6—8 hours. When charging full, the indicator light will switch off.
3. In order to prolong the life of battery, please do not charge more than 8 hours.
Schematic diagram