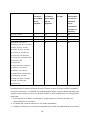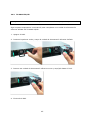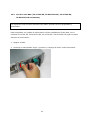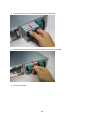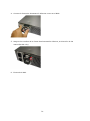
1
Turbo NAS de QNAP Manual del usuario de hardware © 2013. QNAP Systems, Inc. All Rights Reserved. ¡Gracias por escoger los productos QNAP! Este manual del usuario suministra una descripció n del hardware del Turbo NAS y directrices relevantes de ciertas funciones. Por favor lea detenidamente y siga estrictamente las instrucciones del manual. Este manual del usuario se aplica a los siguientes modelos del Turbo NAS: TS-112, TS-212, TS-412, TS-412U, TS-119P II, TS-219P II, TS-419P II, TS-419U II, TS-120, TS-220, TS-420, TS-420U, TS-121, TS-221, TS-421, TS-421U, TS-459 Pro II, TS-879 Pro, TS-1079 Pro, TS-879U-RP, TS-1279U-RP, TS-EC879U-RP, TS-EC1279U-RP, TS-1679U-RP, TS-EC1679U-RP, TS-269 Pro, TS-469 Pro, TS-569 Pro, TS-669 Pro, TS-869 Pro, TS-469U-RP/SP, TS-869U-RP, TS-1269U-RP, TS-269L, TS-469L, TS-569L, TS-669L, TS-869L, TS-870U-RP, TS-1270U-RP. AVISO El “Turbo NAS” de aquí en adelante se llamará “NAS”. El producto que ha adquirido puede que no sea compatible con ciertas funciones específicas para ciertos modelos. Todas las características, funcionalidad y otras especificaciones del producto, está n sujetas a cambios sin previo aviso ni obligaciones. Este manual está sujeto a cambios sin previo aviso. Ninguna parte de esta publicació n se puede reproducir, almacenar en ningú n sistema de recuperació n ni transmitir de ninguna forma o medio, ya sea mecánico, electró nico, fotocopia, grabació n o cualquier otro, sin el permiso escrito de QNAP Systems, Inc. QNAP y el logo de QNAP son marcas registradas de QNAP Systems, Inc. Los nombres de otros productos y de la compañ ía mencionados aquí pueden ser marcas registradas de sus respectivas compañ ías. 2 EXENCIÓ N DE RESPONSABILIDAD Bajo ningú n evento, la responsabilidad de QNAP Systems, Inc. (QNAP), debe exceder el precio pagado por el producto debido a dañ os directos, indirectos, especiales, fortuitos o consecuentes, que se generen por el uso del producto, su software acompañ ante o su documentació n. QNAP no ofrece garantía o representació n, expresa, implícita o regulatoria con respecto a sus productos o contenidos o uso de esta documentació n y todo el software adjunto y específicamente hace exenció n de responsabilidad por su calidad, desempeñ o, comerciabilidad o idoneidad para cualquier propó sito particular. QNAP se reserva el derecho de revisar o actualizar sus productos, software o documentació n sin tener obligació n de notificar a ningú n individuo o entidad. Nota: 1. Haga copias de seguridad de su sistema perió dicamente, para evitar cualquier pérdida de datos. QNAP renuncia a cualquier responsabilidad por pé rdida de datos o recuperació n. 2. Si necesita devolver componentes del paquete del NAS para reintegro o mantenimiento, verifique que los haya empacado bien. Cualquier dañ o debido a empaques deficientes, no se compensará . 3 Declaració n regulatoria Declaració n de FCC El QNAP NAS cumple con diferentes clases de regulaciones de FCC. Consulte el apéndice para obtener detalles. Una vez que la clase del dispositivo se haya determinado, consulte la siguiente declaración correspondiente. ============================================================================= Declaració n de clase A de FCC Este dispositivo cumple con la parte 15 de las regulaciones de FCC. La operación está sujeta a las siguientes dos condiciones: 1. Este dispositivo puede que no cause interferencia nociva 2. Este dispositivo debe aceptar cualquier interferencia recibida, incluyendo la interferencia que pueda causar la operación no deseada. Nota: Este equipo ha sido probado y se ha determinado que satisface los límites establecidos para un dispositivo digital de Clase A, de conformidad con el Apartado 15 de la normativa FCC. Estos límites están diseñados para suministrar protección razonable contra interferencia nociva cuando el equipo se opere en un entorno comercial. Este equipo genera, utiliza y puede irradiar energía de radiofrecuencia y, si no se instala y se utiliza de acuerdo con las instrucciones, puede causar interferencias perjudiciales para las comunicaciones por radio. La operación de este equipo en un área residencial puede causar interferencia nociva, en cuyo caso el usuario deberá corregir la interferencia asumiendo los costos. Modificaciones: Cualquier modificación hecha a este dispositivo que no esté aprobada por QNAP Systems, Inc, puede anular la autoridad otorgada al usuario por FCC para usar este equipo. 4 Declaració n de clase B de FCC Este dispositivo cumple con la parte 15 de las regulaciones de FCC. La operación está sujeta a las siguientes dos condiciones: 1. Este dispositivo puede que no cause interferencia nociva 2. Este dispositivo debe aceptar cualquier interferencia recibida, incluyendo la interferencia que pueda causar la operación no deseada. Nota: Este equipo ha sido probado y se ha determinado que satisface los límites establecidos para un dispositivo digital de Clase B, de conformidad con el Apartado 15 de la normativa FCC. Dichos límites han sido diseñ ados para proporcionar una protecció n razonable frente a interferencias perjudiciales en una instalació n residencial. Este equipo genera, utiliza y puede irradiar energía de radiofrecuencia y, si no se instala y se utiliza de acuerdo con las instrucciones, puede causar interferencias perjudiciales para las comunicaciones por radio. No es posible, no obstante, garantizar que no se produzcan interferencias en una instalació n particular. Si este equipo causa interferencias perjudiciales para la recepció n de ondas de radio o televisió n, lo cual puede determinarse apagando y encendiendo el equipo, se recomienda al usuario intentar corregir dichas interferencias poniendo en prá ctica una o má s de las siguientes medidas: Cambiar la orientació n o la ubicació n de la antena receptora. Aumentar la separació n entre el equipo y el receptor. Conectar el equipo a una toma de suministro eléctrico perteneciente a un circuito diferente de aquel al que está conectado el receptor. Solicitar ayuda a un distribuidor o un té cnico especializado en radio o televisió n. Modificaciones: Cualquier modificación hecha a este dispositivo que no esté aprobada por QNAP Systems, Inc, puede anular la autoridad otorgada al usuario por FCC para usar este equipo. Declaració n DE CE El QNAP NAS cumple con diferentes clases de regulaciones de CE. Consulte el apéndice para obtener detalles. 5 Símbolos que aparecen en este documento Este icono indica que las instrucciones a las que acompañ a deben Advertencia respetarse rigurosamente. De no hacerlo así, podrían producirse lesiones al cuerpo humano o muertes. Este icono indica que la acció n a la que acompañ a podría provocar Precaució n la eliminació n de los datos almacenados en el disco, o que las instrucciones a las que acompañ a deben respetarse a fin de no causar dañ os a los datos, el disco o el producto. 6 Tabla de contenido TABLA DE CONTENIDO.............................................................................................................................. 7 AVISOS DE SEGURIDAD ........................................................................................................................... 8 CAPÍTULO 1. ESPECIFICACIONES DE MEMORIA Y CPU ................................................... 10 CAPÍTULO 2. COMPORTAMIENTO DE LOS BOTONES ENCENDIDO Y RESTABLECER 22 CAPÍTULO 3. COPIAR USB DE UN TOQUE ................................................................................. 24 CAPÍTULO 4. ESPECIFICACIONES DEL LED Y DE LA ALARMA ...................................... 25 CAPÍTULO 5. ACTUALIZACIÓ N DE LA MEMORIA DEL TURBO NAS QNAP (INSTALACIÓ N DE LOS MÓ DULOS DE MEMORIA RAM) ....................................................... 29 5.1 SERIE TS-X59 PRO II (4/5/6 BAHÍAS), SERIE TS-X69 (2/4/5/6/8 BAHÍAS) .............................................. 29 5.2 SERIE TS-X69U-RP/SP (4/8/12 BAHÍAS) ............................................................................................... 32 5.3 TS-879U-RP, TS-1279U-RP, TS-EC879U-RP, TS-EC1279U-RP, TS-1679U-RP, TS-EC1679U-RP, TS-870U-RP, TS-1270U-RP ............................................................................................................................. 35 CAPÍTULO 6. INSTALACIÓ N DE LA TARJETA DE EXPANSIÓ N DE RED..................... 38 6.1 TS-879 PRO, TS-1079 PRO .................................................................................................................... 38 6.2 TS-1679U-RP, TS-EC1679U-RP .......................................................................................................... 43 6.3 TS-870U-RP, TS-1270U-RP ................................................................................................................. 48 CAPÍTULO 7. CAMBIO DE DISCOS DUROS EN CALIENTE ................................................ 51 CAPÍTULO 8. RECUPERACIÓ N RAID ............................................................................................ 54 CAPÍTULO 9. USAR EL PANEL LCD ................................................................................................ 56 CAPÍTULO 10. INSTALACIÓ N DE LA UNIDAD DE ALIMENTACIÓ N ELÉ CTRICA .. 63 10.1 1U TURBO NAS..................................................................................................................................... 63 10.2 TS-469U-RP/SP .................................................................................................................................... 65 10.3 2U/3U TURBO NAS (TS-1279U-RP, TS-EC1279U-RP, TS-1679U-RP, TS-EC1679U-RP SOLAMENTE) 67 10.4 2U TURBO NAS (EXCEPTO TS-1279U-RP Y TS-EC1279U-RP) ........................................................... 69 AYUDA TÉ CNICA ......................................................................................................................................... 73 GNU GENERAL PUBLIC LICENSE ....................................................................................................... 74 APÉ NDICE A: CLASE DE CUMPLIMIENTO DEL PRODUCTO ................................................. 87 7 Avisos de Seguridad 1. El NAS puede operarse normalmente en una temperatura de entre 0º-40ºC y una humedad relativa de entre 0%-95%. Por favor, asegú rese de que el ambiente esté bien ventilado. 2. El cable de alimentació n y los dispositivos conectados al NAS deben proporcionar un voltaje correcto (100W, 90-264V). 3. No coloque el NAS bajo luz solar directa o cerca de productos químicos. Asegú rese de que la temperatura y humedad ambientes está n dentro del rango ó ptimo. 4. Desenchufe el cable de alimentació n y todos los cables conectados antes de limpiarlo. Limpie el NAS con una toalla seca. No utilice aerosoles o productos químicos para limpiar el NAS. 5. No coloque ningú n objeto encima del NAS para asegurar la operació n normal del servidor y para evitar sobrecalentamiento. 6. Use los tornillos de cabeza plana incluidos en el embalaje para asegurar el disco duro en el NAS al instalar el disco duro para un funcionamiento adecuado. 7. No coloque el NAS cerca de ningú n líquido. 8. No coloque el NAS sobre una superficie desigual para evitar que caiga y se dañ e. 9. Asegú rese de que el voltaje en su área es correcto al usar el NAS. Si no está seguro, por favor, pó ngase en contacto con el distribuidor o la compañ ía local de suministro energético. 10. No coloque ningú n objeto sobre el cable de alimentació n. 11. No intente reparar su NAS en ningú n momento. Un desmontaje incorrecto del producto puede exponerle a una descarga eléctrica u otros riesgos. Para cualquier pregunta, por favor, pó ngase en contacto con el distribuidor. 12. Los modelos de NAS de chasis solamente deben instalarse en el saló n del servidor y recibir mantenimiento del gerente autorizado para servidores o del administrador de TI. El saló n de servidores está asegurado y la clave de acceso la tiene solamente personal certificado. 8 Advertencia: La sustitució n incorrecta de la batería podría constituir un peligro de explosió n. Sustituya la batería ú nicamente por otra similar o de tipo equivalente recomendada por el fabricante. Elimine las baterías usadas de acuerdo con las instrucciones proporcionadas por el fabricante. NO toque el ventilador de la parte interna del sistema para evitar lesiones graves. 9 Capítulo 1. Especificaciones de memoria y CPU Precaució n: Si modifica el hardware, software o firmware de sus productos QNAP la garantía se perderá . QNAP no se responsabiliza por cualquier dañ o o pé rdida de datos debido a las modificaciones de los productos QNAP. Usted debe asumir los riesgos de posible pérdida de datos o inestabilidad del sistema debido a cambios de las partes de hardware, modificaciones del firmware predeterminado del sistema o instalació n de aplicaciones de terceros en los productos QNAP. Sistema TS-112 TS-212 CPU Marvell 1,2GHz Marvell 1,2GHz Memoria DDR2 de 256MB DDR2 de 256MB Flash 16MB 16MB CPU reemplazable No No Memoria reemplazable No No Nú mero de ranuras SODIMM 0 Nú mero de ranuras para 0 1 2 Sistema TS-412 TS-412U CPU Marvell 1,2GHz Marvell 1,2GHz Memoria DDR2 de 256MB DDR2 de 256MB Flash 16MB 16MB CPU reemplazable No No Memoria reemplazable No No discos duros Nú mero de ranuras SODIMM 0 Nú mero de ranuras para discos duros 0 4 4 10 TS-419P II, Sistema TS-119P II TS-219P II CPU Marvell 2,0GHz Marvell 2,0GHz Marvell 2,0GHz Memoria 512MB DDR3 512MB DDR3 512MB DDR3 Flash 16MB 16MB 16MB CPU reemplazable No No No No No No 0 0 0 1 2 4 Memoria reemplazable Nú mero de ranuras SODIMM Nú mero de ranuras para discos duros 11 TS-419U II Sistema TS-459 Pro II CPU Dual core Intel Atom processor (1.80 GHz) 1GB DDR3 (Memoria RAM expansible hasta 3GB Memoria como máximo) Flash 512MB (USB DOM) CPU reemplazable No Memoria reemplazable Compatible con DDR3 800 DRAM Nú mero de ranuras SODIMM 2 Nú mero de ranuras para discos duros 4 12 Sistema TS-120 TS-220 TS-420 CPU Marvell 1.6GHz Marvell 1.6GHz Marvell 1.6GHz Memoria 512MB DDR3 512MB DDR3 512MB DDR3 Flash 16MB 16MB 16MB CPU reemplazable No No No No No No 0 0 0 1 2 4 Memoria reemplazable Nú mero de ranuras SODIMM Nú mero de ranuras para discos duros 13 Sistema TS-121 TS-221 TS-421 CPU Marvell 2.0GHz Marvell 2.0GHz Marvell 2.0GHz Memoria 1GB DDR3 1GB DDR3 1GB DDR3 Flash 16MB 16MB 16MB CPU reemplazable No No No No No No 0 0 0 1 2 4 Memoria reemplazable Nú mero de ranuras SODIMM Nú mero de ranuras para discos duros 14 Sistema TS-420U TS-421U CPU Marvell 1.6 GHz Marvell 2.0 GHz Memoria DDR3 de 1GB DDR3 de 1GB Flash 16MB 16MB CPU reemplazable No No Memoria reemplazable No No Nú mero de ranuras SODIMM 0 Nú mero de ranuras para discos duros 0 4 4 15 Sistema CPU TS-879 Pro TS-1079 Pro TS-879U-RP Intel Core i3 Dual Core Intel Core i3 Dual Core Intel Core i3 Dual Core (3.30 GHz) (3.30 GHz) (3.30 GHz) Memoria RAM DDR3 de 2GB RAM DDR3 de 2GB RAM DDR3 de 4GB Flash 512MB (USB DOM) 512MB (USB DOM) 512MB (USB DOM) CPU reemplazable No No No No No Sí 2 2 4 8 10 8 1 1 2 TS-1279U-RP TS-EC879U-RP TS-EC1279U-RP Memoria reemplazable Nú mero de ranuras DIMM LARGAS Nú mero de ranuras para discos duros Nú mero de ranuras de expansió n Sistema Intel Core i3 Dual Core Intel Xeon Quad Core Intel Xeon Quad Core (3.30 GHz) (3.20 GHz) (3.20 GHz) Memoria RAM DDR3 de 4GB RAM DDR3 ECC de 4GB RAM DDR3 ECC de 4GB Flash 512MB (USB DOM) 512MB (USB DOM) 512MB (USB DOM) CPU reemplazable No No No Sí Sí Sí 4 4 4 12 8 12 2 2 2 CPU Memoria reemplazable Nú mero de ranuras DIMM LARGAS Nú mero de ranuras para discos duros Nú mero de ranuras de expansió n 16 Sistema TS-1679U-RP TS-EC1679U-RP CPU Intel Core i3 Dual Core (3.30 GHz) Intel Xeon Quad Core (3.20GHz) Memoria RAM DDR3 de 4GB RAM DDR3 de 4GB Flash 512MB (USB DOM) 512MB (USB DOM) CPU reemplazable No No Sí Sí 4 4 16 16 2 2 Memoria reemplazable Nú mero de ranuras DIMM LARGAS Nú mero de ranuras para discos duros Nú mero de ranuras de expansió n 17 Sistema TS-269 Pro TS-469 Pro TS-569 Pro Procesador Intel Atom Procesador Intel Atom Procesador Intel Atom de doble nú cleo (2,13 de doble nú cleo (2,13 de doble nú cleo (2,13 GHz) GHz) GHz) DDR3 de 1GB (RAM DDR3 de 1GB (RAM DDR3 de 1GB (RAM expansible hasta expansible hasta expansible hasta máximo 3GB) máximo 3GB) máximo 3GB) Flash 512MB (USB DOM) 512MB (USB DOM) 512MB (USB DOM) CPU reemplazable No No No Memoria Compatible con DDR3 Compatible con DDR3 Compatible con DDR3 reemplazable 1066 DRAM 1066 DRAM 1066 DRAM 2 2 2 2 4 5 CPU Memoria Nú mero de ranuras SODIMM Nú mero de ranuras para discos duros Sistema CPU TS-669 Pro TS-869 Pro Procesador Intel Atom de doble Procesador Intel Atom de doble nú cleo (2,13 GHz) nú cleo (2,13 GHz) DDR3 de 1GB (RAM expansible DDR3 de 1GB (RAM expansible hasta máximo 3GB) hasta máximo 3GB) Flash 512MB (USB DOM) 512MB (USB DOM) CPU reemplazable No No Compatible con DDR3 1066 Compatible con DDR3 1066 DRAM DRAM Memoria Memoria reemplazable Nú mero de ranuras SODIMM 2 Nú mero de ranuras para discos duros 2 6 8 18 Sistema TS-469U-RP/SP TS-869U-RP TS-1269U-RP Procesador Intel Atom Procesador Intel Atom Procesador Intel Atom de doble nú cleo (2,13 de doble nú cleo (2,13 de doble nú cleo (2,13 GHz) GHz) GHz) DDR3 de 1GB (RAM DDR3 de 2GB (RAM DDR3 de 2GB (RAM expansible hasta expansible hasta expansible hasta máximo 3GB) máximo 4GB) máximo 4GB) Flash 512MB (USB DOM) 512MB (USB DOM) 512MB (USB DOM) CPU reemplazable No No No Memoria Compatible con DDR3 Compatible con DDR3 Compatible con DDR3 reemplazable 1066 DRAM 1066 DRAM 1066 DRAM 2 2 2 4 8 12 CPU Memoria Nú mero de ranuras SODIMM Nú mero de ranuras para discos duros 19 Sistema TS-269L TS-469L TS-569L Procesador Intel Atom Procesador Intel Atom Procesador Intel Atom de doble nú cleo (1,86 de doble nú cleo (2,13 de doble nú cleo (2,13 GHz) GHz) GHz) DDR3 de 1GB (RAM DDR3 de 1GB (RAM DDR3 de 1GB (RAM expansible hasta expansible hasta expansible hasta máximo 3GB) máximo 3GB) máximo 3GB) Flash 512MB (USB DOM) 512MB (USB DOM) 512MB (USB DOM) CPU reemplazable No No No Memoria Compatible con DDR3 Compatible con DDR3 Compatible con DDR3 reemplazable 1066 DRAM 1066 DRAM 1066 DRAM 2 2 2 2 4 5 CPU Memoria Nú mero de ranuras SODIMM Nú mero de ranuras para discos duros Sistema CPU TS-669L TS-869L Procesador Intel Atom de doble Procesador Intel Atom de doble nú cleo (2,13 GHz) nú cleo (2,13 GHz) DDR3 de 1GB (RAM expansible DDR3 de 1GB (RAM expansible hasta máximo 3GB) hasta máximo 3GB) Flash 512MB (USB DOM) 512MB (USB DOM) CPU reemplazable No No Compatible con DDR3 1066 Compatible con DDR3 1066 DRAM DRAM Memoria Memoria reemplazable Nú mero de ranuras SODIMM 2 Nú mero de ranuras para discos duros 2 6 8 20 Sistema CPU TS-870U-RP TS-1270U-RP Intel® Celeron® Processor 2.10 Intel® Celeron® Processor 2.10 GHz GHz Memoria DDR3 de 4GB DDR3 de 4GB Flash 512MB 512MB CPU reemplazable No No Memoria reemplazable Sí Sí Nú mero de ranuras SODIMM 4 Nú mero de ranuras para discos duros 4 8 12 21 Capítulo 2. Comportamiento de los botones Encendido y Restablecer Botó n de encendido: Presione para apagar o encender. Botó n de Sistema encendido (encender) Todos los modelos Presione una vez Botó n de Botó n de encendido encendido (desactivar el (forzar el hardware) apagado) 1,5 seg 5 seg Botó n restablecer: Presione para restablecer la configuració n del sistema. Sistema Todos los modelos Restablecer la Restablecer la configuració n bá sica configuració n avanzada del sistema (1 bip) del sistema (2 bips) 3 seg 10 seg 22 Restablecer la configuració n bá sica del sistema (3 segundos) Cuando presiona el botó n restaurar durante 3 segundos, se escucha un sonido bip. La siguiente configuració n se restablece de forma predeterminada: Contraseñ a de administració n del sistema: admin Configuració n TCP/IP: Obtener automá ticamente la configuració n de la direcció n IP a través de DHCP Configuració n TCP/IP: Desactivar la trama Jumbo Configuració n TCP/IP: Si la interconexió n de puertos está activa (solamente para los modelos LAN duales), el modo de interconexión de puertos se restablecerá a “Copia de seguridad (migración tras fallas)”. Puerto del sistema: 8080 (puerto de servicio del sistema) Nivel de seguridad: Bajo (permitir todas las conexiones) Contraseñ a del panel LCD: (vacío)* VLAN se deshabilitará *Esta característica solamente existe en los modelos del NAS con paneles LCD. Visite http://www.qnap.com para má s detalles. Restablecer la configuració n avanzada del sistema (10 segundos) Cuando presiona y mantiene presionado el botó n reiniciar durante 10 segundos, escuchará dos sonidos: uno a los 3 segundos y el otro a los 10 segundos. El NAS tomará todos los valores de configuración al restaurar el sistema basado en la Web en “Administración” > “Restaurar los valores de fábrica de forma predeterminada” excepto todos los datos reservados. Las especificaciones de usuarios, grupos de usuarios y carpetas compartidas en red que usted creó , se eliminará n. Para recuperar los datos antiguos después de la restauració n avanzada del sistema, puede crear las mismas carpetas compartidas de red en el NAS, para que los datos estén disponibles nuevamente. 23 Capítulo 3. Copiar USB de un toque Sistema Todos los modelos NAS Nú mero de segundos (presione el botó n de copiar con un toque para empezar a copiar los datos) 0,5 seg Copia de datos desde el puerto USB del frente El NAS permite hacer copia de seguridad de copia de datos instantá neamente desde el dispositivo USB externo al NAS o al contrario usando el botó n de copia de un solo toque ubicado en la parte frontal. Para usar esta funció n, siga estos pasos: 1. Verifique de que tenga un disco duro instalado y formateado en el NAS. Se crea el QUSB o USB de recurso compartido de red de forma predeterminada. 2. Encienda el NAS. 3. Configure el funcionamiento del botón Copiar en la página “Copia de seguridad” > “Copiar con un solo toque USB”. 4. Conecte el dispositivo de almacenamiento USB en el puerto frontal del NAS. 5. Presione el botó n Copiar. El LED USB empieza a destellar. Los datos se copiará n desde o hacia el dispositivo USB, de acuerdo a la configuració n del NAS. Nota: Esta funció n adopta la copia de seguridad incremental. Despué s de hacer la primera copia de seguridad de datos, el NAS solamente copia los ficheros que han cambiado desde la ú ltima copia de seguridad. 24 Capítulo 4. Especificaciones del LED y de la alarma Los LED del NAS muestran el estado y la informació n del sistema de forma fá cil. Cuando el NAS esté encendido, compruebe los siguientes elementos para garantizar que el estado sea normal. Note que la informació n del LED siguiente solamente se aplica cuando tenga un disco duro instalado apropiadamente y tenga el NAS conectado a la red y a la fuente de alimentació n eléctrica. Indicador LED Color Estado del indicador LED Descripció n 1. 2. 3. Parpadea alternativamente en verde y rojo cada 0,5 segundos 4. 5. 6. 1. 2. Estado del sistema 3. Rojo/ Verde 4. 5. Rojo 6. 7. 8. Parpadea en rojo cada 0,5 segundos 25 Se está formateando el disco duro del NAS. Se está inicializando el NAS. Se está actualizando el firmware del sistema. Se está llevando a cabo una reconstrucció n RAID. Se está llevando a cabo una expansió n de la capacidad RAID en línea. Se está llevando a cabo una migració n de nivel RAID en línea. El disco duro no es válido. El volumen de disco ha alcanzado su máxima capacidad. El volumen de disco está pró ximo a encontrarse lleno. El ventilador del sistema no funcion.a Se ha producido un error al acceder a los datos del disco (lectura / escritura). Se ha detectado un sector defectuoso en el disco duro. El NAS está funcionando en modo de só lo lectura degradado (fallo de 2 unidades en una configuració n RAID 5 o RAID 6, aú n es posible leer los datos del disco). (Error en la prueba automática de hardware). El NAS está funcionando en modo degradado (fallo de una unidad en una configuració n RAID 1, RAID 5 o RAID 6). Parpadea en verde cada 0,5 segundos Verde Desactivado Naranja LAN Naranja Parpadea en naranja Verde 10 GbE1 Verde Apagado Parpadea en rojo HDD Rojo/ Verde Rojo Parpadea en verde Verde 1. 2. 3. El NAS se está iniciando. El NAS no está configurado. El disco duro no está formateado. El NAS está listo. Todos los discos duros del NAS se encuentran en suspensió n. Los datos del disco se están usando desde la red y un error de lectura y escritura se presenta durante el proceso. Se está accediendo al NAS desde la red. La tarjeta de expansió n de red 10GbE está instalada. La tarjeta de expansió n de red 10GbE no está instalada. Se está accediendo a los datos de la unidad de disco duro y se ha producido un error de lectura / escritura durante el proceso. Se ha producido un error de lectura / escritura en la unidad de disco duro. Se está accediendo a los datos del disco duro. Es posible acceder al disco duro. 1. Se ha detectado un dispositivo USB conectado al puerto USB frontal. 2. Se ha quitado del NAS, un dispositivo USB conectado al puerto USB frontal. Parpadea en azul cada 0,5 segundos 3. El dispositivo USB conectado al puerto USB frontal del NAS se está USB Azul usando. 4. Los datos se están copiando hacia o desde el dispositivo USB/eSATA externo. Se ha detectado un dispositivo en el puerto Azul USB frontal (después de instalar el dispositivo). 1 La funció n de expansió n de red 10 GbE solamente la admiten TS-879 Pro, TS-1079 Pro, TS-879U-RP, TS-1279U-RP, TS-EC879U-RP, TS-EC1279U-RP, TS-1679U-RP, TS-EC1679U-RP, TS-870U-RP y TS-1270U-RP. 26 1. eSATA2 2 No se ha detectado ningú n dispositivo USB. El NAS ha terminado de copiar los datos hacia o desde el dispositivo USB conectado al puerto USB frontal. Desactivado 2. Parpadeando Se está accediendo al dispositivo eSATA. Desactivado No se ha detectado ningú n dispositivo eSATA. Naranja Los modelos TS-219, TS-212 no disponen de puerto eSATA. 27 Zumbador de alarma: Todos los modelos NAS El zumbador de alarma se puede deshabilitar a través de “Herramientas de Sistema” > “Configuraciones de Hardware”. Sonido Sonido corto (0,5 segundos) N.º de veces 1 Descripció n 1. 2. 3. 4. Sonido corto (0,5 segundos) Sonido corto (0,5 segundos), sonido largo (1,5 segundos) Sonido largo (1,5 segundos) 3 3, cada 5 minutos 2 El usuario ha intentado copiar datos del NAS en un dispositivo de almacenamiento externo a travé s del puerto USB frontal, pero los datos no se pueden copiar. El ventilador del sistema no funciona. 1. 2. 3. 4. 1 El NAS se está iniciando. El NAS se está apagando (apagado software). El usuario ha pulsado el botó n de restablecimiento para restablecer el NAS. Se ha actualizado el firmware del sistema. 1. 2. 28 El volumen de disco está pró ximo a encontrarse lleno. El volumen de disco ha alcanzado su má xima capacidad. Los discos duros del NAS se encuentran en modo degradado. El usuario ha iniciado el proceso de reconstrucció n de HDD. Se ha forzado el apagado del NAS (apagado hardware). El NAS se ha encendido con éxito y está listo. Capítulo 5. Actualizació n de la memoria del Turbo NAS QNAP (instalació n de los mó dulos de memoria RAM) Advertencia: Las siguientes acciones solamente las deben ejecutar té cnicos preparados y autorizados. Siga estrictamente las instrucciones para instalar los mó dulos de RAM en el NAS. Si no lo hace, se pueden presentar lesiones graves o incluso la muerte. QNAP suministra un mó dulo RAM DDR3 de 1GB/2GB (compra opcional) para que actualice la memoria del Turbo NAS. Siga los pasos descritos má s adelante para instalar mó dulos de memoria extra en el NAS para actualizar la memoria. 5.1 Serie TS-x59 Pro II (4/5/6 bahías), Serie TS-x69 (2/4/5/6/8 bahías) Siga los pasos descritos má s adelante para instalar mó dulos de memoria RAM en el NAS. 1. Apague el NAS. Desconecte el adaptador de corriente, los cables de red y cualquier otro cable o conector del NAS. 2. Antes de instalar el mó dulo de memoria, pó ngase la pulsera antiestá tica para evitar descargas electroestá ticas. El conector cocodrilo debe conectarse a tierra. 3. Suelte los tres tornillos de la parte posterior del NAS. 29 4. Quite suavemente la tapa de la carcasa del NAS. 5. Levante la hoja Mylar. Busque la ranura de memoria. Verifique que la ranura esté vacía. 6. Tome el mó dulo de memoria por uno de los bordes. Alinee la muesca del borde dorado del mó dulo con la muesca de la ranura de memoria. Deslice el mó dulo de memoria en la ranura con un ángulo de 45 grados (aproximadamente). 7. Presione suavemente el mó dulo de memoria en la ranura hasta que se inserte completamente. 30 8. Gire el mó dulo de memoria hacia la placa base hasta que los clips queden bien asegurados. 9. Cierre la tapa de la carcasa y asegure los tornillos. Conecte el adaptador de corriente y los cables en el NAS. 10. Para verificar de que el NAS reconozca el mó dulo de memoria, encienda el NAS e inicie sesió n en la interfaz Web como administrador. Vaya a "Estado del sistema" > "Informació n del sistema" y verifique el total de memoria en "Informació n de hardware". 31 5.2 Serie TS-x69U-RP/SP (4/8/12 bahías) Siga los pasos expuestos a continuació n para instalar los mó dulos de RAM en el NAS. 1. Apague el NAS. Desconecte del NAS, el adaptador de corriente, los cables de red y cualquier otro conector. 2. Antes de instalar el mó dulo de memoria, pó ngase en la muñ eca una correa antiestá tica para evitar descargas electrostá ticas. El clip cocodrilo debe conectarse a tierra. 3. Abra el NAS. a. TS-469U-RP/SP: Afloje los seis tornillos de la parte superior del NAS. b. TS-869U-RP y TS-1269U-RP: Afloje los dos tornillos de la parte posterior del NAS. 32 4. Abra el NAS. 5. Deslice el mó dulo de memoria en la ranura con un ángulo de 45 grados (aproximadamente). 33 6. Presione el mó dulo de memoria hacia abajo mientras sujeta los clips abiertos. 7. Asegú rese de que el mó dulo de memoria quede bien insertado con los clips en el sitio correspondiente. 8. Cierre la tapa del NAS y apriete los tornillos. 34 5.3 TS-879U-RP, TS-1279U-RP, TS-EC879U-RP, TS-EC1279U-RP, TS-1679U-RP, TS-EC1679U-RP, TS-870U-RP, TS-1270U-RP QNAP suministra un mó dulo de RAM DDR3 de 4GB* y otro DDR3 ECC de 4GB** (compra opcional) para que actualice la memoria del NAS. Puede insertar un mó dulo RAM extra en la placa base del NAS para actualizar la memoria. El total de memoria se mostrará en "Informació n del sistema" de la pá gina de administració n. * Modelos que aplican: TS-879U-RP, TS-1279U-RP, TS-1679U-RP, TS-870U-RP, TS-1270U-RP. ** Modelos que aplican: TS-EC879U-RP, TS-EC1279U-RP, TS-EC1679U-RP. 1. Suelte los 2 tornillos de la parte posterior del NAS como se muestra en la ilustració n. 35 2. Sostenga la muesca por el borde de la tapa superior. Quite la tapa superior con las dos manos. 3. Suelte los ganchos del eyector suavemente al halarlos de los lados de la ranura de la memoria RAM. 36 4. Tome el lado del mó dulo de la memoria RAM. Alinee la muesca del borde dorado del mó dulo de RAM con la muesca de la ranura de memoria RAM. Inserte el mó dulo de memoria RAM en la ranura de RAM hasta que ya no pueda insertarse má s. 37 Capítulo 6. Instalació n de la tarjeta de expansió n de red Advertencia: Las siguientes acciones solamente las deben ejecutar té cnicos preparados y autorizados. Siga estrictamente las instrucciones para instalar una "Tarjeta de expansió n de red" en el NAS. Si no lo hace, se pueden presentar lesiones graves o incluso la muerte. La serie TS-x79 suministra ranuras de expansió n para la expansió n de la red. Puede insertar una tarjeta de expansió n adicional (se compra opcionalmente) a la tarjeta principal del NAS para aumentar el ancho de banda de la red. 6.1 TS-879 Pro, TS-1079 Pro Consulte la tabla de compatibilidad siguiente y reemplace un soporte apropiado por la tarjeta de expansió n de su red. Soporte A Soporte B 38 Soporte C Compatibilidad de la tarjeta de expansió n de red Soporte A (X520-T2) Intel® Ethernet Server Adapter X520-T2 (E10G42B) Soporte B 9. Intel® Ethernet Server Adapter X520-SR2 (E10G42BFSR) (X520-SR2/X520-DA2) 10. Intel® Ethernet Server Adapter X520-DA2 (E10G42BTDA) Soporte C (Emulex) 1. Emulex OneConnect 10GbE Network Adapters, SFP+ Direct attach copper (OCe11102-NX) 2. Emulex OneConnect 10GbE Network Adapters, Short reach optical (OCe11102-NM) 3. Emulex OneConnect 10GbE Network Adapters, SFP+ Direct attach copper (OCe11102-IX) 4. Emulex OneConnect 10GbE Network Adapters, Short reach optical (OCe11102-IM) 39 1. Apague el NAS. Desconecte el adaptador de corriente, los cables de red y cualquier otro cable o conector del NAS. 2. Antes de instalar la tarjeta de expansió n de la red, pó ngase la pulsera antiestá tica para evitar descargas electroestá ticas. El clip cocodrilo debe conectarse a tierra. 3. Suelte los tres tornillos de la parte posterior del NAS. 4. Quite suavemente la tapa de la carcasa del NAS. 40 5. Afloje los tornillos y quite la tapa de la ranura de expansió n. 6. Tome el lado de la tarjeta de expansió n de la red. Alinee la muesca en el borde dorado de la tarjeta con la muesca de la ranura PCIe. Inserte la tarjeta de expansió n en la ranura PCIe hasta que ya no pueda insertarse má s. 41 7. Apriete los tornillos. 8. Cierre la tapa de la carcasa y asegure los tornillos. Conecte el adaptador de corriente y los cables del NAS. 9. Para verificar de que el NAS reconozca la expansió n de la red, encienda el NAS e inicie sesió n en la interfaz Web como administrador. Vaya a "System Administration" (Administració n del sistema) > "Network" (Red) > "TCP/IP" y compruebe el nú mero total de interfaces. 42 6.2 1. TS-1679U-RP, TS-EC1679U-RP Apague el NAS. Desconecte el adaptador de corriente, los cables de red y cualquier otro cable o conector del NAS. 2. 2. Antes de instalar la tarjeta de expansion de la red, pongase la pulsera antiestatica para evitar descargas electroestaticas. El clip cocodrilo debe conectarse a tierra. 3. Afloje los 2 tornillos de la parte posterior del NAS, como se muestra en la ilustracion. 4. Sostenga la muesca por el borde de la tapa superior. Quite la tapa superior con las dos manos. 43 5. Afloje los 4 tornillos, como se muestra en la ilustracion. 6. Agarre el borde metalico del modulo de la tarjeta de expansion. Quite el modulo suavemente. 44 7. Afloje el tornillo y saque la tapa de la ranura de expansion. 8. Inserte la tarjeta de expansion de la red en la ranura PCIe hasta que ya no se pueda introducir mas. Luego apriete el tornillo. 45 9. Agarre el borde metalico del modulo de la tarjeta de expansion. Alinee la muesca del borde dorado de la tarjeta de expansion con la muesca de la ranura PCIe. Inserte la tarjeta de expansion de la red en la ranura PCIe hasta que ya no se pueda introducir mas. 10. Apriete los tornillos. Cierre la tapa de la carcasa y apriete los tornillos.Apriete los tornillos. Cierre la tapa de la carcasa y apriete los tornillos. 11. Conecte el adaptador de corriente y los cables del NAS. 46 12. Para verificar de que el NAS reconozca la expansió n de la red, encienda el NAS e inicie sesió n en la interfaz Web como administrador. Vaya a "System Administration" (Administració n del sistema) > "Network" (Red) > "TCP/IP" y compruebe el nú mero total de interfaces. 47 6.3 1. TS-870U-RP, TS-1270U-RP Apague el NAS. Desconecte del NAS, el adaptador de corriente, los cables de red y cualquier otro conector. 2. Antes de instalar el mó dulo de memoria, pó ngase en la muñ eca una correa antiestá tica para evitar descargas electrostá ticas. El clip cocodrilo debe conectarse a tierra. 3. Afloje los dos tornillos de la parte posterior del NAS. 4. Sostenga la muesca por el borde de la tapa superior. Quite la tapa superior con las dos manos. 48 5. Afloje los tornillos y quite la tapa de la ranura de expansió n. 6. Tome el lado de la tarjeta de expansió n de la red. Alinee la muesca en el borde dorado de la tarjeta con la muesca de la ranura PCIe. Inserte la tarjeta de expansió n en la ranura PCIe hasta que ya no pueda insertarse má s. 7. Apriete los tornillos. 49 8. Cierre la tapa de la carcasa y asegure los tornillos. Conecte el adaptador de corriente y los cables del NAS. 9. Para verificar de que el NAS reconozca la expansió n de la red, encienda el NAS e inicie sesió n en la interfaz Web como administrador. Vaya a "System Administration" (Administració n del sistema) > "Network" (Red) > "TCP/IP" y compruebe el nú mero total de interfaces. 50 Capítulo 7. Cambio de discos duros en caliente El QNAP NAS es compatible con disco duros SATA de 2,5 pulgadas y 3,5 pulgadas de los principales fabricantes de discos duros. Para conocer la lista actualizada de compatibilidad de discos duros, visite http://www.qnap.com. Precaució n: QNAP no asume ninguna responsabilidad por dañ os de productos o pérdida de datos debido al mal uso o instalació n de los discos duros en cualquier momento y por cualquier razó n. Tenga en cuenta que si va a instalar un disco duro (nuevo o usado) que no se ha instalado previamente en el NAS, el disco duro será formateado y particionado automá ticamente y por lo tanto todos los datos se eliminará n. 51 Sistema Compatible Compatible Compatible Permite con discos con discos con SSD intercambio duros SATA duros SATA en caliente DE 3,5 DE 2,5 de discos pulgadas pulgadas duros (solamente en RAID 1 o superior) TS-112, TS-212 Sí No No No TS-119P II, TS-120, TS-121 Sí Sí Sí No TS-219 Sí No No Sí TS-219P II, TS-419P II, Sí Sí Sí Sí TS-419U II, TS-412, TS-412U, TS-220, TS-221, TS-420, TS-420U, TS-421, TS-421U, TS-459 Pro II, TS-879 Pro, TS-1079 Pro, TS-879U-RP, TS-1279U-RP, TS-EC879U-RP, TS-EC1279U-RP, TS-1679U-RP, TS-EC1679U-RP, TS-269 Pro, TS-469 Pro, TS-569 Pro, TS-669 Pro, TS-869 Pro, TS-469U-RP/SP, TS-869U-RP, TS-1269U-RP, TS-269L, TS-469L, TS-569L, TS-669L, TS-869L, TS-870U-RP, TS-1270U-RP El NAS permite el cambio de discos duros en caliente cuando un disco miembro de RAID 1, los discos miembros 1–2 de RAID 5 o RAID 6 también fallan. Siga los pasos descritos má s adelante para cambiar un disco en caliente cuando un disco miembro de una configuració n RAID falle. 1. Inicie sesió n en el NAS y compruebe la configuració n del volumen del disco en “Administración de volumen”. 2. El estado del volumen debería ser "En modo degradado". 3. Prepare un disco duro nuevo para reemplazar al que falló . La capacidad del nuevo disco 52 debe ser la misma o superior a la del disco dañ ado. 4. Saque el disco duro dañ ado del NAS. Espere unos 20 segundos o hasta que el servidor emita dos bips. 5. Quite el disco dañ ado de la bandeja. 6. Instale el nuevo disco duro en la bandeja. Insértela en el NAS. 7. El servidor suena 1,5 segundos, dos veces. 8. Compruebe el estado del volumen en la pá gina de administració n Web. El volumen se debería estar reconstruyendo. Advertencia: Se recomienda de manera especial apagar el servidor antes de cambiar el disco duro, para reducir el riesgo de descargas eléctricas. 53 Capítulo 8. Recuperació n RAID El QNAP NAS admite la tecnología exclusiva de recuperació n RAID para recuperar discos de RAID dañ ados debido a desconexiones involuntarias o al quitar los discos duros del sistema. Al usar la recuperació n RAID, puede recuperar volú menes inactivos RAID 1, RAID 5 o RAID 6 al modo degradado o RAID 0 inactivo y la configuració n JBOD a normal. Volumen de Admite recuperació n RAID disco Má ximo nú mero permitido de discos que se pueden quitar Sencillo No - JBOD Sí 1 o má s RAID 0 Sí 1 o má s RAID 1 Sí 1o2 RAID 5 Sí 2 o má s RAID 6 Sí 3 o má s RAID 10 No - Si el estado del volumen es no activo, puede instalar los mismos discos en las mismas ranuras del NAS. Luego haga clic en “RECUPERAR” en la página “Administración de discos” > “Administración de volumen”. Espere durante 60 segundos para que el proceso termine. Cuando termine, puede tener acceso a los datos nuevamente. Nota: Después de la recuperació n del volumen del disco RAID 1, RAID 5 o RAID 6 desde un modo degradado no activo usando recuperació n RAID, puede leer y escribir al volumen de forma normal. El estado del volumen se recuperará al estado normal despué s de la sincronizació n. Si el miembro de la unidad desconecta está dañ ado, la funció n de recuperació n RAID no será efectiva. 54 RAID 5 QNAP RAID 5 está ndar RAID 6 QNAP RAID 6 está ndar Modo degradado N-1 N-1 N-1 & N-2 N-1 & N-2 Protecció n de sólo N/A N-1, se N/A N-2, se lectura (para copia encontraron encontraron de seguridad bloques bloques inmediata de los defectuosos en defectuosos en datos & cambio de las unidades las unidades Disco Duro) subsistentes subsistentes del arreglo. del arreglo. Recuperació n N/A Si se N/A Si se RAID re-insertan re-insertan (Estado del RAID: todos los todos los No activo) discos duros discos duros originales en el originales en el NAS y ellos NAS y ellos pueden girar, pueden girar, se pueden se pueden identificar y identificar y accesar, el accesar, el superbloque superbloque del Disco Duro del Disco Duro no está no está dañ ado. dañ ado). Fallo del RAID N-2 N-2 El Disco N-3 N-3 y ninguno Duro ha fallado de los DD y ninguno de restantes se los DD pueden girar/ restantes se identificar/ ni pueden girar/ accesar. identificar/ ni accesar. N = Nú mero del discos duros del arreglo. 55 Capítulo 9. Usar el Panel LCD Esta característica solamente existe en los modelos del NAS con paneles LCD. Visite http://www.qnap.com para má s detalles. El NAS dispone de un có modo panel LCD para permitirle realizar la configuració n de discos y visualizar la informació n del sistema. Al iniciarse el NAS, podrá ver el nombre del servidor y la direcció n IP: N A S 5 F 4 D E 3 1 9 . 2 5 4 . 1 6 0 0 . 1 0 0 Durante la primera instalació n, el panel LCD muestra el nú mero de discos duros detectados y la direcció n IP. Puede seleccionar configurar los discos duros. Nú mero de Configuració n discos duros por defecto del detectados disco 1 Ú nico Ú nico 2 RAID 1 Ú nico -> JBOD ->RAID 0 -> RAID 1 3 RAID 5 Ú nico -> JBOD ->RAID 0 -> RAID 5 4 o superior RAID 5 Opciones disponibles de configuració n del disco Ú nico ->JBOD -> RAID 0 -> RAID 5 -> RAID 6 Pulse el botón “Seleccionar” (Select) para elegir la opción. Pulse el botón “Intro” (Enter) para confirmar. 56 Por ejemplo, cuando encienda el NAS con 5 discos duros instalados, el panel LCD muestra: C o n f i g → R A I D 5 . D i s k s ? Puede pulsar el botón “Seleccionar” (Select) para mostrar más opciones, como RAID 6. Pulse el botón “Intro” (Enter) y aparecerá el siguiente mensaje. Pulse el botón “Seleccionar” (Select) para seleccionar “Sí” (Yes). Pulse de nuevo el botón “Intro” (Enter) para confirmar. C h o o → Y e s s e R A I D 5 ? N o Cuando usted configura RAID 1, RAID 5, o RAID 6, el sistema inicializará los discos duros, crear el dispositivo RAID, formatear el dispositivo RAID y montarlo como un volumen del NAS. El progreso del proceso se mostrará en el panel LCD. Cuando alcance el 100%, ya puede tener acceso al volumen RAID, por ejemplo, crear carpetas compartidas y subir ficheros a las carpetas del NAS. Al mismo tiempo, para verificar que los segmentos y bloques de todos los dispositivos componentes RAID está n listos, el NAS ejecutará la sincronización RAID y el progreso se mostrará en la página “Administración de Discos” > “Administración de Volumen”. La velocidad de sincronizació n es de 30-60 MB/s aproximadamente (dependiendo de los modelos de los discos duros, del uso de los recursos del sistema, entre otras razones). Nota: Si una unidad miembro de la configuració n RAID se pierde durante la sincronizació n, el dispositivo RAID entrará en el modo degradado. Los datos del volumen aú n será n accesibles. Si usted agrega un nuevo miembro al dispositivo, este empezará a reconstruirse. Puede verificar el estado en la página “Administración de Volumen”. 57 Para encriptar el volumen de disco*, seleccione “Yes” cuando en el panel LCD aparezca <Encrypt Volume?>. La contraseña de encriptado por defecto es “admin”. Para cambiar la contraseñ a, por favor, inicie sesió n en la interfaz de administració n basada en Web como administrador y cambie las configuraciones en “Configuración del Dispositivo” > “Administración de Encriptado del Volumen de Disco”. E n c r → Y e s y p t V o l u m e ? N o Cuando la configuració n haya finalizado aparecerá n el nombre del servidor y la direcció n IP. Si el NAS no puede crear el volumen de disco aparecerá el siguiente mensaje. C r e a t R A I D 5 i n g . . . F a i l e d *Esta funció n no es compatible con los modelos TS-219, TS-119P II, TS-219P II, TS-419P II, TS-419U II, TS-112, TS-212, TS-412, TS-412U. Las funciones de cifrado pueden no estar disponibles de acuerdo a las restricciones legislativas de algunos países. 58 Ver la informació n del sistema usando el panel LCD Cuando el panel LCD muestre el nombre del servidor y la direcció n IP, puede pulsar el botó n “Intro” (Enter) para entrar en el Main Menu. El Main Menu se compone de los siguientes elementos: 1. TCP/IP 2. Physical disk 3. Volume 4. System 5. Shut down 6. Reboot 7. Password 8. Back 1. TCP/IP En TCP/IP podrá ver las siguientes opciones: LAN IP Address LAN Subnet Mask LAN Gateway LAN PRI. DNS LAN SEC. DNS Enter Network Settings Network Settings – DHCP Network Settings – Static IP* Network Settings – BACK Back to Main Menu * En Network Settings – Static IP, puede configurar la direcció n IP, la mascara de subred, el puerto de enlace y la DNS de LAN 1 y LAN 2. 2. Physical disk En Physical disk podrá ver las siguientes opciones: Disk Info Back to Main Menu La informació n del disco muestra la temperatura y la capacidad del disco duro. D i s k : S i z e : 1 2 T e m p 3 2 G 59 : B 5 0 ° C 3. Volume Esta secció n muestra la configuració n de disco del NAS. La primera línea muestra la configuració n RAID y la capacidad de almacenamiento, la segunda línea muestra el nú mero de la unidad miembro de la configuració n. R A I D 5 D r i v e 7 1 2 3 5 0 G B 4 Si hay más de un volumen, pulse el botón “Seleccionar” (Select) para ver la informació n. En la siguiente tabla se indica la descripció n de los mensajes LCD para la configuració n RAID1. 4. Pantalla LCD Configuració n de la Unidad RAID5+S RAID5+reserva RAID5 (D) RAID 5 modo degradado RAID 5 (B) RAID 5 reconstrucció n RAID 5 (S) RAID 5 resincronizació n RAID 5 (U) RAID está desmontado RAID 5 (X) RAID 5 no activo System Esta selecció n muestra la temperatura del sistema y la velocidad de rotació n del ventilador del sistema. 5. C P U T e m p : 5 0 ° C S y s T e m p : 5 5 ° C S y s F a n 8 5 R P M : 6 Shut down Use esta opción para apagar el NAS. Pulse el botón “Seleccionar” (Select) para seleccionar “Sí” (Yes). Luego pulse el botón “Intro” (Enter) para confirmar. 6. Reboot Use esta opció n para reiniciar el NAS. Pulse el botón “Seleccionar” (Select) para seleccionar “Sí” (Yes). Luego pulse el botón “Intro” (Enter) para confirmar. 60 7. Password La contraseñ a por defecto del panel LCD está en blanco. Entre en esta opció n para cambiar la contraseña. Seleccione “Sí” (Yes) para continuar. C h a n g e Y P e s a s s w o r d → N o Puede introducir una contraseñ a con un má ximo de 8 caracteres numé ricos (0-9). Cuando el cursor se desplaza a “Aceptar” (OK), pulse el botón “Intro” (Enter). Verifique la contraseñ a para confirmar los cambios. N e w P a s s w o r d : O K 8. Back Seleccione esta opció n para volver al menú principal. 61 Mensajes del Sistema Cuando el NAS encuentra un error del sistema, aparecerá un mensaje de error en el panel LCD. Pulse el botó n “Intro” (Enter) para ver el mensaje. Pulse el botón “Intro” (Enter) para ver el siguiente mensaje. S y s t P l s . e m C h E r r e c k o Mensaje del Sistema r ! L o g s Descripció n Sys. Fan Failed Error en el ventilador del sistema Sys. Overheat El sistema se sobrecalienta HDD Overheat El Disco Duro se sobrecalienta CPU Overheat La CPU se sobrecalienta Network Lost Tanto el LAN 1 como el LAN 2 está n desconectados en modo Error o Equilibrio de Carga LAN1 Lost LAN 1 está desconectado LAN2 Lost LAN 2 está desconectado HDD Failure Error en el Disco Duro Vol1 Full El volumen está lleno HDD Ejected El disco duro ha sido extraído Vol1 Degraded El volumen está en modo degradado Vol1 Unmounted El volumen está desmontado Vol1 Nonactivate El volumen no está activado 62 Capítulo 10. Instalació n de la unidad de alimentació n elé ctrica Esta secció n aplica solamente a los modelos NAS de montura en bastidor. Las unidades de alimentació n eléctrica de TS-879U-RP, TS-EC879U-RP, TS-469U-RP/SP, TS-869U-RP, TS-1269U-RP solamente las debe reemplazar un té cnico preparado y autorizado. 10.1 1U Turbo NAS Las siguientes instrucciones solamente las deben ejecutar té cnicos preparados y autorizados. Para instalar la unidad alimentació n eléctrica redundante a 1U Turbo NAS, siga estos pasos: 1. Apague el NAS. 2. Quite los tornillos y la placa provisional. 3. Inserte la unidad de alimentació n eléctrica y empú jela hasta el final. 63 4. Asegure muy bien los tornillos. 5. Encienda el NAS. Nota: Para reemplazar la unidad de alimentación eléctrica dañ ada, apague el NAS. Luego quite la unidad dañ ado con precaució n y repita los pasos 3-5 anteriores para instalar la unidad de alimentació n eléctrica nueva. 64 10.2 TS-469U-RP/SP Las siguientes instrucciones está n dirigidas solamente a técnicos preparados y autorizados. Siga los pasos expuestos a continuació n para reemplazar una unidad de alimentació n eléctrica dañ ada del TS-469U-RP/SP. 1. Apague el NAS. 2. Presione la palanca verde y saque la unidad de alimentació n eléctrica dañ ada. 3. Inserte una unidad de alimentació n eléctrica nueva y empú jela hasta el final. 4. Encienda el NAS. 65 Advertencia: El NAS admite reemplazar la unidad de alimentació n eléctrica redundante sin necesidad de apagar el servidor cuando el modo de alimentació n eléctrica redundante está activo. Sin embargo, se recomienda de manera especial apagar el NAS, antes de cambiar la unidad de alimentació n eléctrica para reducir el riesgo de descargas eléctricas. Si está usando un modelo de NAS de montura en bastidor de energía ú nica (SP), puede instalar una segunda unidad de alimentació n eléctrica en el NAS para actualizar el modelo SP a un modelo de alimentació n eléctrica redundante (RP). 66 10.3 2U/3U Turbo NAS (TS-1279U-RP, TS-EC1279U-RP, TS-1679U-RP, TS-EC1679U-RP solamente) Las siguientes instrucciones solamente las deben ejecutar té cnicos preparados y autorizados. Para reemplazar una unidad de alimentació n eléctrica dañ ada del Turbo NAS, en los modelos TS-1279U-RP, TS-EC1279U-RP, TS-1679U-RP o TS-EC1679U-RP, siga los pasos descritos a continuació n. 1. Apague el NAS. 2. Sostenga el manipulador negro y presione y sostenga el botó n verde firmemente. 67 3. Desconecte la fuente de alimentació n eléctrica dañ ada. 4. Conecte una nueva fuente de alimentació n eléctrica en el NAS. 5. Encienda el NAS. 68 10.4 2U Turbo NAS (Excepto TS-1279U-RP y TS-EC1279U-RP) Las siguientes instrucciones solamente las deben ejecutar té cnicos preparados y autorizados. Para instalar la unidad de alimentació n eléctrica dañ ada en un Turbo NAS 2U, siga estos pasos: 1. Apague el NAS. 2. Quite los tornillos de la unidad alimentació n eléctrica dañ ada en direcció n contraria a las manecillas del reloj. 3. Desconecte la fuente de alimentació n eléctrica dañ ada. 69 4. Conecte la fuente de alimentació n eléctrica nueva en el NAS. 5. Asegure los tornillos de la fuente de alimentación eléctrica, en direcció n de las manecillas del reloj. 6. Encienda el NAS. 70 Active la alerta de advertencia para la alimentació n elé ctrica redundante en la interfaz basada en la Web: Si ha instalado dos unidades de alimentació n eléctrica (PSU) en el NAS y las ha conectado a las tomas eléctricas, las dos PSU suministrará n la energía al NAS (aplica para los modelos 1U y 2U). Puede activar el modo de alimentación eléctrica redundante en “Administración del sistema” > “Hardware” para recibir la alerta de advertencia de la alimentación eléctrica redundante. El NAS sonará y registrará los mensajes de error en “Registros del sistema” cuando la PSU se desconecte o presente algú n error. Si ha instalado solamente una PSU en el NAS, se le sugiere NO activar esta opció n. * Esta funció n se desactiva de forma predeterminada. 71 La siguiente descripció n aplica solamente a los modelos del NAS 1U. (1) Indicadores de la alimentació n eléctrica: Indicador de energía verde (izquierda): Indica que la unidad de alimentació n eléctrica está en el estado normal. Indicador de energía rojo (derecha): Indica que la unidad de alimentación eléctrica está en el estado anormal. (2) Silencie el botó n de alarma de energía: Cuando se presenta un error en la unidad de alimentació n eléctrica, el sistema suena para alertar al administrador. Puede presionar este botó n para desactivar la alarma. Indicadores de alimentació n eléctrica: Silenciar el botó n de alarma de energía: ADVERTENCIA: RIESGO DE DESCARGA ELÉ CTRICA Los conectores del panel posterior (partes encerradas abajo) contienen voltaje alto. NO toque estas partes para evitar el riesgo de descarga eléctrica en el operador de mantenimiento. 72 Ayuda té cnica Para cualquier pregunta técnica, por favor, consulte el manual de usuario. QNAP también proporciona Soporte En-línea dedicado y servicio al cliente a través del Instant Messenger. Ayuda en línea: http://www.qnap.com MSN: [email protected] Skype: qnapskype Foro: http://forum.qnap.com Soporte Té cnico en EE.UU y Canadá : Correo-e: [email protected] TEL: +1-909-595-2782 Direcció n: 168 University Parkway, Pomona CA 91768 Horario de atenció n: 08:00–17:00 (GMT- 08:00 hora del pacífico, de lunes a viernes) 73 GNU GENERAL PUBLIC LICENSE Version 3, 29 June 2007 Copyright © 2007 Free Software Foundation, Inc. <http://fsf.org/> Everyone is permitted to copy and distribute verbatim copies of this license document, but changing it is not allowed. Preamble The GNU General Public License is a free, copyleft license for software and other kinds of works. The licenses for most software and other practical works are designed to take away your freedom to share and change the works. By contrast, the GNU General Public License is intended to guarantee your freedom to share and change all versions of a program--to make sure it remains free software for all its users. We, the Free Software Foundation, use the GNU General Public License for most of our software; it applies also to any other work released this way by its authors. You can apply it to your programs, too. When we speak of free software, we are referring to freedom, not price. Our General Public Licenses are designed to make sure that you have the freedom to distribute copies of free software (and charge for them if you wish), that you receive source code or can get it if you want it, that you can change the software or use pieces of it in new free programs, and that you know you can do these things. To protect your rights, we need to prevent others from denying you these rights or asking you to surrender the rights. Therefore, you have certain responsibilities if you distribute copies of the software, or if you modify it: responsibilities to respect the freedom of others. For example, if you distribute copies of such a program, whether gratis or for a fee, you must pass on to the recipients the same freedoms that you received. You must make sure that they, too, receive or can get the source code. And you must show them these terms so they know their rights. Developers that use the GNU GPL protect your rights with two steps: (1) assert copyright on the software, and (2) offer you this License giving you legal permission to copy, 74 distribute and/or modify it. For the developers' and authors' protection, the GPL clearly explains that there is no warranty for this free software. For both users' and authors' sake, the GPL requires that modified versions be marked as changed, so that their problems will not be attributed erroneously to authors of previous versions. Some devices are designed to deny users access to install or run modified versions of the software inside them, although the manufacturer can do so. This is fundamentally incompatible with the aim of protecting users' freedom to change the software. The systematic pattern of such abuse occurs in the area of products for individuals to use, which is precisely where it is most unacceptable. Therefore, we have designed this version of the GPL to prohibit the practice for those products. If such problems arise substantially in other domains, we stand ready to extend this provision to those domains in future versions of the GPL, as needed to protect the freedom of users. Finally, every program is threatened constantly by software patents. States should not allow patents to restrict development and use of software on general-purpose computers, but in those that do, we wish to avoid the special danger that patents applied to a free program could make it effectively proprietary. To prevent this, the GPL assures that patents cannot be used to render the program non-free. The precise terms and conditions for copying, distribution and modification follow. TERMS AND CONDITIONS 0. Definitions. “This License” refers to version 3 of the GNU General Public License. “Copyright” also means copyright-like laws that apply to other kinds of works, such as semiconductor masks. “The Program” refers to any copyrightable work licensed under this License. Each licensee is addressed as “you”. “Licensees” and “recipients” may be individuals or organizations. To “modify” a work means to copy from or adapt all or part of the work in a fashion requiring copyright permission, other than the making of an exact copy. The resulting work is called a “modified version” of the earlier work or a work “based on” the earlier work. 75 A “covered work” means either the unmodified Program or a work based on the Program. To “propagate” a work means to do anything with it that, without permission, would make you directly or secondarily liable for infringement under applicable copyright law, except executing it on a computer or modifying a private copy. Propagation includes copying, distribution (with or without modification), making available to the public, and in some countries other activities as well. To “convey” a work means any kind of propagation that enables other parties to make or receive copies. Mere interaction with a user through a computer network, with no transfer of a copy, is not conveying. An interactive user interface displays “Appropriate Legal Notices” to the extent that it includes a convenient and prominently visible feature that (1) displays an appropriate copyright notice, and (2) tells the user that there is no warranty for the work (except to the extent that warranties are provided), that licensees may convey the work under this License, and how to view a copy of this License. If the interface presents a list of user commands or options, such as a menu, a prominent item in the list meets this criterion. 1. Source Code. The “source code” for a work means the preferred form of the work for making modifications to it. “Object code” means any non-source form of a work. A “Standard Interface” means an interface that either is an official standard defined by a recognized standards body, or, in the case of interfaces specified for a particular programming language, one that is widely used among developers working in that language. The “System Libraries” of an executable work include anything, other than the work as a whole, that (a) is included in the normal form of packaging a Major Component, but which is not part of that Major Component, and (b) serves only to enable use of the work with that Major Component, or to implement a Standard Interface for which an implementation is available to the public in source code form. A “Major Component”, in this context, means a major essential component (kernel, window system, and so on) of the specific operating system (if any) on which the executable work runs, or a compiler used to produce the work, or an object code interpreter used to run it. The “Corresponding Source” for a work in object code form means all the source code 76 needed to generate, install, and (for an executable work) run the object code and to modify the work, including scripts to control those activities. However, it does not include the work's System Libraries, or general-purpose tools or generally available free programs which are used unmodified in performing those activities but which are not part of the work. For example, Corresponding Source includes interface definition files associated with source files for the work, and the source code for shared libraries and dynamically linked subprograms that the work is specifically designed to require, such as by intimate data communication or control flow between those subprograms and other parts of the work. The Corresponding Source need not include anything that users can regenerate automatically from other parts of the Corresponding Source. The Corresponding Source for a work in source code form is that same work. 2. Basic Permissions. All rights granted under this License are granted for the term of copyright on the Program, and are irrevocable provided the stated conditions are met. This License explicitly affirms your unlimited permission to run the unmodified Program. The output from running a covered work is covered by this License only if the output, given its content, constitutes a covered work. This License acknowledges your rights of fair use or other equivalent, as provided by copyright law. You may make, run and propagate covered works that you do not convey, without conditions so long as your license otherwise remains in force. You may convey covered works to others for the sole purpose of having them make modifications exclusively for you, or provide you with facilities for running those works, provided that you comply with the terms of this License in conveying all material for which you do not control copyright. Those thus making or running the covered works for you must do so exclusively on your behalf, under your direction and control, on terms that prohibit them from making any copies of your copyrighted material outside their relationship with you. Conveying under any other circumstances is permitted solely under the conditions stated below. Sublicensing is not allowed; section 10 makes it unnecessary. 3. Protecting Users' Legal Rights From Anti-Circumvention Law. No covered work shall be deemed part of an effective technological measure under any applicable law fulfilling obligations under article 11 of the WIPO copyright treaty adopted on 20 December 1996, or similar laws prohibiting or restricting circumvention of such 77 measures. When you convey a covered work, you waive any legal power to forbid circumvention of technological measures to the extent such circumvention is effected by exercising rights under this License with respect to the covered work, and you disclaim any intention to limit operation or modification of the work as a means of enforcing, against the work's users, your or third parties' legal rights to forbid circumvention of technological measures. 4. Conveying Verbatim Copies. You may convey verbatim copies of the Program's source code as you receive it, in any medium, provided that you conspicuously and appropriately publish on each copy an appropriate copyright notice; keep intact all notices stating that this License and any non-permissive terms added in accord with section 7 apply to the code; keep intact all notices of the absence of any warranty; and give all recipients a copy of this License along with the Program. You may charge any price or no price for each copy that you convey, and you may offer support or warranty protection for a fee. 5. Conveying Modified Source Versions. You may convey a work based on the Program, or the modifications to produce it from the Program, in the form of source code under the terms of section 4, provided that you also meet all of these conditions: a) The work must carry prominent notices stating that you modified it, and giving a relevant date. b) The work must carry prominent notices stating that it is released under this License and any conditions added under section 7. This requirement modifies the requirement in section 4 to “keep intact all notices”. c) You must license the entire work, as a whole, under this License to anyone who comes into possession of a copy. This License will therefore apply, along with any applicable section 7 additional terms, to the whole of the work, and all its parts, regardless of how they are packaged. This License gives no permission to license the work in any other way, but it does not invalidate such permission if you have separately received it. d) If the work has interactive user interfaces, each must display Appropriate Legal Notices; however, if the Program has interactive interfaces that do not display Appropriate Legal Notices, your work need not make them do so. A compilation of a covered work with other separate and independent works, which are not 78 by their nature extensions of the covered work, and which are not combined with it such as to form a larger program, in or on a volume of a storage or distribution medium, is called an “aggregate” if the compilation and its resulting copyright are not used to limit the access or legal rights of the compilation's users beyond what the individual works permit. Inclusion of a covered work in an aggregate does not cause this License to apply to the other parts of the aggregate. 6. Conveying Non-Source Forms. You may convey a covered work in object code form under the terms of sections 4 and 5, provided that you also convey the machine-readable Corresponding Source under the terms of this License, in one of these ways: a) Convey the object code in, or embodied in, a physical product (including a physical distribution medium), accompanied by the Corresponding Source fixed on a durable physical medium customarily used for software interchange. b) Convey the object code in, or embodied in, a physical product (including a physical distribution medium), accompanied by a written offer, valid for at least three years and valid for as long as you offer spare parts or customer support for that product model, to give anyone who possesses the object code either (1) a copy of the Corresponding Source for all the software in the product that is covered by this License, on a durable physical medium customarily used for software interchange, for a price no more than your reasonable cost of physically performing this conveying of source, or (2) access to copy the Corresponding Source from a network server at no charge. c) Convey individual copies of the object code with a copy of the written offer to provide the Corresponding Source. This alternative is allowed only occasionally and noncommercially, and only if you received the object code with such an offer, in accord with subsection 6b. d) Convey the object code by offering access from a designated place (gratis or for a charge), and offer equivalent access to the Corresponding Source in the same way through the same place at no further charge. You need not require recipients to copy the Corresponding Source along with the object code. If the place to copy the object code is a network server, the Corresponding Source may be on a different server (operated by you or a third party) that supports equivalent copying facilities, provided you maintain clear directions next to the object code saying where to find the Corresponding Source. Regardless of what server hosts the Corresponding Source, you remain obligated to ensure that it is available for as long as needed to satisfy these requirements. e) Convey the object code using peer-to-peer transmission, provided you inform other peers where the object code and Corresponding Source of the work are being offered to the general public at no charge under subsection 6d. 79 A separable portion of the object code, whose source code is excluded from the Corresponding Source as a System Library, need not be included in conveying the object code work. A “User Product” is either (1) a “consumer product”, which means any tangible personal property which is normally used for personal, family, or household purposes, or (2) anything designed or sold for incorporation into a dwelling. In determining whether a product is a consumer product, doubtful cases shall be resolved in favor of coverage. For a particular product received by a particular user, “normally used” refers to a typical or common use of that class of product, regardless of the status of the particular user or of the way in which the particular user actually uses, or expects or is expected to use, the product. A product is a consumer product regardless of whether the product has substantial commercial, industrial or non-consumer uses, unless such uses represent the only significant mode of use of the product. “Installation Information” for a User Product means any methods, procedures, authorization keys, or other information required to install and execute modified versions of a covered work in that User Product from a modified version of its Corresponding Source. The information must suffice to ensure that the continued functioning of the modified object code is in no case prevented or interfered with solely because modification has been made. If you convey an object code work under this section in, or with, or specifically for use in, a User Product, and the conveying occurs as part of a transaction in which the right of possession and use of the User Product is transferred to the recipient in perpetuity or for a fixed term (regardless of how the transaction is characterized), the Corresponding Source conveyed under this section must be accompanied by the Installation Information. But this requirement does not apply if neither you nor any third party retains the ability to install modified object code on the User Product (for example, the work has been installed in ROM). The requirement to provide Installation Information does not include a requirement to continue to provide support service, warranty, or updates for a work that has been modified or installed by the recipient, or for the User Product in which it has been modified or installed. Access to a network may be denied when the modification itself materially and adversely affects the operation of the network or violates the rules and protocols for communication across the network. 80 Corresponding Source conveyed, and Installation Information provided, in accord with this section must be in a format that is publicly documented (and with an implementation available to the public in source code form), and must require no special password or key for unpacking, reading or copying. 7. Additional Terms. “Additional permissions” are terms that supplement the terms of this License by making exceptions from one or more of its conditions. Additional permissions that are applicable to the entire Program shall be treated as though they were included in this License, to the extent that they are valid under applicable law. If additional permissions apply only to part of the Program, that part may be used separately under those permissions, but the entire Program remains governed by this License without regard to the additional permissions. When you convey a copy of a covered work, you may at your option remove any additional permissions from that copy, or from any part of it. (Additional permissions may be written to require their own removal in certain cases when you modify the work.) You may place additional permissions on material, added by you to a covered work, for which you have or can give appropriate copyright permission. Notwithstanding any other provision of this License, for material you add to a covered work, you may (if authorized by the copyright holders of that material) supplement the terms of this License with terms: a) Disclaiming warranty or limiting liability differently from the terms of sections 15 and 16 of this License; or b) Requiring preservation of specified reasonable legal notices or author attributions in that material or in the Appropriate Legal Notices displayed by works containing it; or c) Prohibiting misrepresentation of the origin of that material, or requiring that modified versions of such material be marked in reasonable ways as different from the original version; or d) Limiting the use for publicity purposes of names of licensors or authors of the material; or e) Declining to grant rights under trademark law for use of some trade names, trademarks, or service marks; or f) Requiring indemnification of licensors and authors of that material by anyone who conveys the material (or modified versions of it) with contractual assumptions of liability to the recipient, for any liability that these contractual assumptions directly impose on those licensors and authors. 81 All other non-permissive additional terms are considered “further restrictions” within the meaning of section 10. If the Program as you received it, or any part of it, contains a notice stating that it is governed by this License along with a term that is a further restriction, you may remove that term. If a license document contains a further restriction but permits relicensing or conveying under this License, you may add to a covered work material governed by the terms of that license document, provided that the further restriction does not survive such relicensing or conveying. If you add terms to a covered work in accord with this section, you must place, in the relevant source files, a statement of the additional terms that apply to those files, or a notice indicating where to find the applicable terms. Additional terms, permissive or non-permissive, may be stated in the form of a separately written license, or stated as exceptions; the above requirements apply either way. 8. Termination. You may not propagate or modify a covered work except as expressly provided under this License. Any attempt otherwise to propagate or modify it is void, and will automatically terminate your rights under this License (including any patent licenses granted under the third paragraph of section 11). However, if you cease all violation of this License, then your license from a particular copyright holder is reinstated (a) provisionally, unless and until the copyright holder explicitly and finally terminates your license, and (b) permanently, if the copyright holder fails to notify you of the violation by some reasonable means prior to 60 days after the cessation. Moreover, your license from a particular copyright holder is reinstated permanently if the copyright holder notifies you of the violation by some reasonable means, this is the first time you have received notice of violation of this License (for any work) from that copyright holder, and you cure the violation prior to 30 days after your receipt of the notice. Termination of your rights under this section does not terminate the licenses of parties who have received copies or rights from you under this License. If your rights have been terminated and not permanently reinstated, you do not qualify to receive new licenses for the same material under section 10. 9. Acceptance Not Required for Having Copies. 82 You are not required to accept this License in order to receive or run a copy of the Program. Ancillary propagation of a covered work occurring solely as a consequence of using peer-to-peer transmission to receive a copy likewise does not require acceptance. However, nothing other than this License grants you permission to propagate or modify any covered work. These actions infringe copyright if you do not accept this License. Therefore, by modifying or propagating a covered work, you indicate your acceptance of this License to do so. 10. Automatic Licensing of Downstream Recipients. Each time you convey a covered work, the recipient automatically receives a license from the original licensors, to run, modify and propagate that work, subject to this License. You are not responsible for enforcing compliance by third parties with this License. An “entity transaction” is a transaction transferring control of an organization, or substantially all assets of one, or subdividing an organization, or merging organizations. If propagation of a covered work results from an entity transaction, each party to that transaction who receives a copy of the work also receives whatever licenses to the work the party's predecessor in interest had or could give under the previous paragraph, plus a right to possession of the Corresponding Source of the work from the predecessor in interest, if the predecessor has it or can get it with reasonable efforts. You may not impose any further restrictions on the exercise of the rights granted or affirmed under this License. For example, you may not impose a license fee, royalty, or other charge for exercise of rights granted under this License, and you may not initiate litigation (including a cross-claim or counterclaim in a lawsuit) alleging that any patent claim is infringed by making, using, selling, offering for sale, or importing the Program or any portion of it. 11. Patents. A “contributor” is a copyright holder who authorizes use under this License of the Program or a work on which the Program is based. The work thus licensed is called the contributor's “contributor version”. A contributor's “essential patent claims” are all patent claims owned or controlled by the contributor, whether already acquired or hereafter acquired, that would be infringed by some manner, permitted by this License, of making, using, or selling its contributor version, but do not include claims that would be infringed only as a consequence of further modification of the contributor version. For purposes of this definition, “control” includes 83 the right to grant patent sublicenses in a manner consistent with the requirements of this License. Each contributor grants you a non-exclusive, worldwide, royalty-free patent license under the contributor's essential patent claims, to make, use, sell, offer for sale, import and otherwise run, modify and propagate the contents of its contributor version. In the following three paragraphs, a “patent license” is any express agreement or commitment, however denominated, not to enforce a patent (such as an express permission to practice a patent or covenant not to sue for patent infringement). To “grant” such a patent license to a party means to make such an agreement or commitment not to enforce a patent against the party. If you convey a covered work, knowingly relying on a patent license, and the Corresponding Source of the work is not available for anyone to copy, free of charge and under the terms of this License, through a publicly available network server or other readily accessible means, then you must either (1) cause the Corresponding Source to be so available, or (2) arrange to deprive yourself of the benefit of the patent license for this particular work, or (3) arrange, in a manner consistent with the requirements of this License, to extend the patent license to downstream recipients. “Knowingly relying” means you have actual knowledge that, but for the patent license, your conveying the covered work in a country, or your recipient's use of the covered work in a country, would infringe one or more identifiable patents in that country that you have reason to believe are valid. If, pursuant to or in connection with a single transaction or arrangement, you convey, or propagate by procuring conveyance of, a covered work, and grant a patent license to some of the parties receiving the covered work authorizing them to use, propagate, modify or convey a specific copy of the covered work, then the patent license you grant is automatically extended to all recipients of the covered work and works based on it. A patent license is “discriminatory” if it does not include within the scope of its coverage, prohibits the exercise of, or is conditioned on the non-exercise of one or more of the rights that are specifically granted under this License. You may not convey a covered work if you are a party to an arrangement with a third party that is in the business of distributing software, under which you make payment to the third party based on the extent of your activity of conveying the work, and under which the third party grants, to any of the parties who would receive the covered work from you, a discriminatory patent license (a) in connection with copies of the covered work conveyed by you (or copies made from those 84 copies), or (b) primarily for and in connection with specific products or compilations that contain the covered work, unless you entered into that arrangement, or that patent license was granted, prior to 28 March 2007. Nothing in this License shall be construed as excluding or limiting any implied license or other defenses to infringement that may otherwise be available to you under applicable patent law. 12. No Surrender of Others' Freedom. If conditions are imposed on you (whether by court order, agreement or otherwise) that contradict the conditions of this License, they do not excuse you from the conditions of this License. If you cannot convey a covered work so as to satisfy simultaneously your obligations under this License and any other pertinent obligations, then as a consequence you may not convey it at all. For example, if you agree to terms that obligate you to collect a royalty for further conveying from those to whom you convey the Program, the only way you could satisfy both those terms and this License would be to refrain entirely from conveying the Program. 13. Use with the GNU Affero General Public License. Notwithstanding any other provision of this License, you have permission to link or combine any covered work with a work licensed under version 3 of the GNU Affero General Public License into a single combined work, and to convey the resulting work. The terms of this License will continue to apply to the part which is the covered work, but the special requirements of the GNU Affero General Public License, section 13, concerning interaction through a network will apply to the combination as such. 14. Revised Versions of this License. The Free Software Foundation may publish revised and/or new versions of the GNU General Public License from time to time. Such new versions will be similar in spirit to the present version, but may differ in detail to address new problems or concerns. Each version is given a distinguishing version number. If the Program specifies that a certain numbered version of the GNU General Public License “or any later version” applies to it, you have the option of following the terms and conditions either of that numbered version or of any later version published by the Free Software Foundation. If the Program does not specify a version number of the GNU General Public License, you may choose any version ever published by the Free Software Foundation. 85 If the Program specifies that a proxy can decide which future versions of the GNU General Public License can be used, that proxy's public statement of acceptance of a version permanently authorizes you to choose that version for the Program. Later license versions may give you additional or different permissions. However, no additional obligations are imposed on any author or copyright holder as a result of your choosing to follow a later version. 15. Disclaimer of Warranty. THERE IS NO WARRANTY FOR THE PROGRAM, TO THE EXTENT PERMITTED BY APPLICABLE LAW. EXCEPT WHEN OTHERWISE STATED IN WRITING THE COPYRIGHT HOLDERS AND/OR OTHER PARTIES PROVIDE THE PROGRAM “AS IS” WITHOUT WARRANTY OF ANY KIND, EITHER EXPRESSED OR IMPLIED, INCLUDING, BUT NOT LIMITED TO, THE IMPLIED WARRANTIES OF MERCHANTABILITY AND FITNESS FOR A PARTICULAR PURPOSE. THE ENTIRE RISK AS TO THE QUALITY AND PERFORMANCE OF THE PROGRAM IS WITH YOU. SHOULD THE PROGRAM PROVE DEFECTIVE, YOU ASSUME THE COST OF ALL NECESSARY SERVICING, REPAIR OR CORRECTION. 16. Limitation of Liability. IN NO EVENT UNLESS REQUIRED BY APPLICABLE LAW OR AGREED TO IN WRITING WILL ANY COPYRIGHT HOLDER, OR ANY OTHER PARTY WHO MODIFIES AND/OR CONVEYS THE PROGRAM AS PERMITTED ABOVE, BE LIABLE TO YOU FOR DAMAGES, INCLUDING ANY GENERAL, SPECIAL, INCIDENTAL OR CONSEQUENTIAL DAMAGES ARISING OUT OF THE USE OR INABILITY TO USE THE PROGRAM (INCLUDING BUT NOT LIMITED TO LOSS OF DATA OR DATA BEING RENDERED INACCURATE OR LOSSES SUSTAINED BY YOU OR THIRD PARTIES OR A FAILURE OF THE PROGRAM TO OPERATE WITH ANY OTHER PROGRAMS), EVEN IF SUCH HOLDER OR OTHER PARTY HAS BEEN ADVISED OF THE POSSIBILITY OF SUCH DAMAGES. 17. Interpretation of Sections 15 and 16. If the disclaimer of warranty and limitation of liability provided above cannot be given local legal effect according to their terms, reviewing courts shall apply local law that most closely approximates an absolute waiver of all civil liability in connection with the Program, unless a warranty or assumption of liability accompanies a copy of the Program in return for a fee. END OF TERMS AND CONDITIONS 86 Apé ndice A: Clase de cumplimiento del producto Modelos del NAS FCC CE TS-EC1679U-RP Clase A Clase A TS-EC1279U-RP Clase A Clase A TS-EC879U-RP Clase A Clase A TS-1679U-RP Clase A Clase A TS-1279U-RP Clase A Clase A TS-879U-RP Clase A Clase A TS-1270U-RP Clase A Clase A TS-879U-RP Clase A Clase A TS-1269U-RP Clase A Clase A TS-869U-RP Clase A Clase A TS-469U-RP/SP Clase A Clase A TS-421U Clase A Clase A TS-420U Clase A Clase A TS-419U II Clase A Clase A TS-412U Clase A Clase A TS-1079 Pro Clase A Clase A TS-879 Pro Clase A Clase A TS-869 Pro Clase B Clase B TS-669 Pro Clase B Clase B TS-569 Pro Clase B Clase B TS-469 Pro Clase B Clase B TS-269 Pro Clase B Clase B TS-869L Clase B Clase B TS-669L Clase B Clase B TS-569L Clase B Clase B TS-469L Clase B Clase B TS-269L Clase B Clase B TS-421 Clase B Clase B TS-221 Clase B Clase B TS-121 Clase B Clase B TS-420 Clase B Clase B TS-220 Clase B Clase B TS-120 Clase B Clase B TS-419P II Clase B Clase B 87 TS-219P II Clase B Clase B TS-119P II Clase B Clase B TS-412P Clase B Clase B TS-212P Clase B Clase B TS-112P Clase B Clase B 88