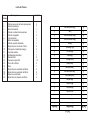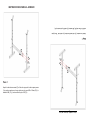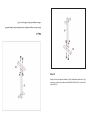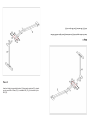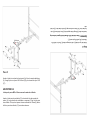
1
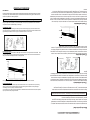
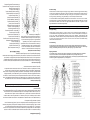
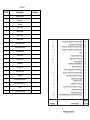
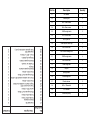
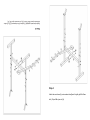
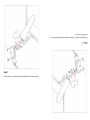
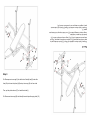
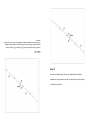
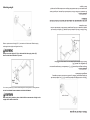
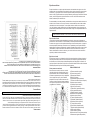
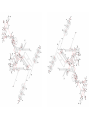
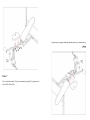
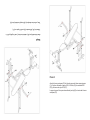
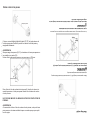
MODEL:
GM95697
WEIGHT BENCH WITH 70 LBS.
WEIGHT SET
INSTRUCTION MANUAL
MANUAL DEL USUARIO
BANCO PARA EJERCICIOS
CON 70 LBS. DE PESO INCLUIDO
MODELO:
GM95697
FUNDAMENTOS DEL EJERCICIO
Rutina de ejercicios ideal
Una investigación científica a fondo demuestra que tanto el ejercicio cardiovascular (aeróbico) y
el ejercicio de esfuerzo son componentes importantes de cualquier programa de mantenimiento
de salud y de condición física. Toda rutina de ejercicios ideal debe consistir de tres grupos de
ejercicios, que deben llevarse a cabo según la siguiente
secuencia:OF EXERCISE
PRINCIPALS
Ideal Workout
Calentamiento, Rutina ejercicios y Enfriamiento. No omita ninguna de estas fases.
Extensive scientific research supports
that both cardiovascular
training(aerobic) and strength training are important
PRINCIPALS
OF EXERCISE
components in any health and fitness program. And ideal workout consists of three groups of exercises, which
Ideal
Workout
be completed
in the following
sequence.
El uso de su bancoshould
de ejercicios
le ofrecerá
diversos
beneficios, mejorará su condición física,
tonificará sus
músculos,
y junto
conresearch
una dieta
bajathat
enboth
calorías,
le ayudará
a perder and
peso.
Extensive
scientific
supports
cardiovascular
training(aerobic)
strength training are important
Warm-up,
and Cool-down.
Do not
skip any
of these
components in any
health andWorkout
fitness program.
And ideal workout
consists
of three
groups stages.
of exercises, which
should be completed in the following sequence.
Using your weight bench will provide you with several benefits, it will improve your physical fitness, tone muscle and in
1. Fase de calentamiento
conjunction with calorie
diet help
weight.
Warm-up,
Workout
andyou
Cool-down.
not skipfuncionen
any of these
Esta fase permite que
la sangre fluya
acontrolled
través
del
cuerpo
ylose
que
los Do
músculos
destages.
manera adecuada. También reduce el riesgo de que se produzca un calambre y daños musculares. Es
1.The
Warm
Up
Phase
Using your
weight
bench
will provide you with several benefits, it will improve your physical fitness, tone muscle and in
recomendable llevar
a stage
cabohelps
unos
cuantos
de
tal muscles
como se
muestra
en las
This
get
thecontrolled
bloodejercicios
flowing
around
the weight.
body and the
working
properly.
It will also reduce the risk of
conjunction
with
calorie
diet help
you estiramiento
lose
figuras más abajo.cramp
Cadaand
ejercicio
estiramiento
durante
aproximadamente
30stretch should be held for
muscle de
injury.
It is advisabledebe
to do mantenerse
a few stretching
exercises
as shown below. Each
1.The
Warm
Upseconds,
Phase do durante
approximately
30
not force or
your musclesSiinto
a stretch
– if itDETENGA
hurts, STOP.el
segundos. No fuerce
ni exija
sus
músculos
el jerk
estiramiento.
siente
dolor,
This stage helps get the blood flowing around the body and the muscles working properly. It will also reduce the risk of
ejercicio.
This stage is to let your Cardio-vascular System and muscles wind down. This is a repeat of the warm up exercise e.g.
reduce your tempo, continue for approximately 5 minutes. The stretching exercises should now be repeated, again
remembering not to force or jerk your muscles into the stretch.
As you get fitter you may need to train longer and harder. It is advisable to train at least three times a week, and if possible
space your workouts evenly throughout the week.
3.The Cool Down Phase
This stage should last for a minimum of 12mihutes though most people start at about 15-20 minutes.
cramp and muscle injury. It is advisable to do a few stretching exercises as shown below. Each stretch should be held for
approximately 30 Estiramiento
seconds, do not
force
or jerk your muscles into a stretch – if it hurts, STOP.
hacia
adelante
Muslo interno
Estiramiento lateral
Muslo externo
Pantorrilla / Talón
2. Fase de ejercicios
2.The Exercise Phase
Esta es la fase enThis
donde
elput
esfuerzo.
de cierto
periodo
dein uso,
los will
músis theusted
stage pondrá
where you
the effort Después
in. After regular
use, use
muscles
your legs
become more flexible. Work
culos de sus piernas
se own
volverán
más
Lleve
a cabo alos
ejercicios
según su The
propio
2.The
Exercise
Phase
to
your
pace but
it isflexibles.
very important
to maintain
steady
tempo throughout.
rate ritmo,
of work should be sufficient to
This
the heart
stage beat
whereinto
you
puttarget
the effort
After regular
use
muscles
in your legs
will become
the
zone
shown
on theuse,
graph
below.
teniendo en menteraise
queisyour
es
importante
mantener
unin.ritmo
constante
todo
el tiempo.
El ritmo
del more flexible. Work
to your own pace but it is very important to maintain a steady tempo throughout. The rate of work should be sufficient to
ejercicio debe ser lo
suficientemente adecuado como para elevar su ritmo cardíaco y colocarlo
raise your heart beat into the target zone shown on the graph below.
dentro de la zona objetivo tal como se muestra en el gráfico de más abajo.
This is the stage where you put the effort in. After regular use, use muscles in your legs will become more flexible. Work
to your own pace but it is very important to maintain a steady tempo throughout. The rate of work should be sufficient to
raise your heart beat into the target zone shown on the graph below.
2.The Exercise Phase
This stage helps get the blood flowing around the body and the muscles working properly. It will also reduce the risk of
cramp and muscle injury. It is advisable to do a few stretching exercises as shown below. Each stretch should be held for
approximately 30 seconds, do not force or jerk your muscles into a stretch – if it hurts, STOP.
1.The Warm Up Phase
This stage should last for a minimum of 12mihutes though most people start at about 15-20 minutes.
This stage should last for a minimum of 12mihutes though most people start at about 15-20 minutes.
3. Fase de enfriamiento
3.The Cool Down Phase
PRINCIPALS OF EXERCISE
3.The
Down
Phase
Esta fase permite This
que
suCool
sistema
cardiovascular
y sus
músculos
se enfríen.
Esta
es una
stage
is to
let your
Cardio-vascular
System
and muscles
wind down.
Thisfase
is a repeat
of the warm up exercise e.g.
Thisde
stage
is to let your Cardio-vascular
andel
muscles
This isLleve
a repeat
of the warm
repetición de la fase
calentamiento
que permiteSystem
reducir
ritmowind
del down.
ejercicio.
a cabo
estaup exercise e.g.
reduce
your
tempo,
continue
for
approximately
5
minutes.
The
stretching
exercises
should
now
be
repeated,
again
reduce your tempo, continue for approximately 5 minutes. The stretching exercises should now be repeated, again
fase durante aproximadamente
Los
ejercicios
de the
estiramiento
deben repetirse, nuevaremembering not5tominutos.
force or jerk
your
muscles into
stretch.
remembering not to force or jerk your muscles into the stretch.
you
fitter
you
mayneed
need
train
longer
and
harder.
is advisable
to train
at
three
a week,
and if possible
mente teniendo enAs
mente
noyou
forzar
ni exigir
sus
músculos
aIt la
hora
detoefectuar
el least
estiramiento.
As
you get
getde
fitter
may
tototrain
longer
and
harder.
isItadvisable
train
at least
three
times times
a week,
and if possible
space
workouts
evenly
throughout
week.llevar a cabo sus ejercicios durante
space your
your
workouts
evenly
throughout
thethe
week.
Conforme su condición
física
mejore,
puede
ser necesario
más tiempo y con mayor dificultad. Es recomendable efectuar sus ejercicios por lo menos tres
veces a la semana, y si fuera posible, espaciar sus rutinas de manera pareja a través de la
semana.
Using your weight bench will provide you with several benefits, it will improve your physical fitness, tone muscle and in
conjunction with calorie controlled diet help you lose weight.
Warm-up, Workout and Cool-down. Do not skip any of these stages.
Extensive scientific research supports that both cardiovascular training(aerobic) and strength training are important
components in any health and fitness program. And ideal workout consists of three groups of exercises, which
should be completed in the following sequence.
Ideal Workout
\
Ejercicios aeróbicos
El ejercicio aeróbico es un tipo de ejercicios durante la cual el suministro de oxígeno es lo suficientemente alto como para satisfacer la necesidad de oxígeno de los músculos que se encuentren
funcionando, y cuyo objetivo es el de continuar el ejercicio durante periodos prolongados (20
minutos o más). El ejercicio aeróbico es aquel que utiliza los grandes grupos de músculos de forma
rítmica y continua. Ejemplos de ejercicios aeróbicos son correr, nadar, subir escaleras, montar
bicicleta, caminatas a paso acelerado, etc.
Es recomendable que un adulto promedio y saludable lleve a cabo ejercicios aeróbicos durante un
mínimo de 20 a 30 minutos, tres veces por semana, a una intensidad que eleve el ritmo cardiaco
colocándolo dentro de la zona objetivo. La zona objetivo de ritmo cardiaco se encuentra entre
70% y 85% del ritmo cardiaco máximo según una edad predeterminada. Como regla general, se
puede calcular aproximadamente el ritmo cardiaco máximo según una edad predeterminada de la
siguiente manera:
RITMO CARDIACO MÁXIMO = 220 LATIDOS POR MINUTOS MENOS EDAD
Aerobic Training
Aerobic
exercisede
is exercise
during which the oxygen supply is sufficient to meet the oxygen demand of working
Ejercicios
esfuerzo
muscles, with the objective being the ability to continue the exercise for prolonged periods of time(20 minutes or
Los ejercicios
de esfuerzo
implican
la habilidad
de ungroups
músculo
de un grupo
de músculos
de
more).
Aerobic exercises
are those
which utilize
large muscle
in a orhythmical
and continuous
nature.
generarswimming,
fuerza contra
resistencia.
recomendable
el adulto
promedio
saludable lleve a cabo
Running,
stair climbing,
cycling, Es
brisk
walking, etc. are que
all examples
of aerobic
exercise.
un mínimo de un grupo de 8 a 20 repeticiones hasta lograr cierto cansancio para los 12 grupos de
It is recommended that the average healthy adult perform aerobic exercise for a minimum of 20 to 30 minutes,
músculos
principales
músculos
de larate
corva,
pantorrillas,
pecho,
/ laterales,
three
times per
week, at an(cuádriceps,
intensity that elevates
the heart
to within
the Target Heart
Rateespalda
Zone. The
Target
espalda
/ trapecios,
espalda
/ romboides,
espalda
inferior,
hombros,
Heart
Rate superior
Zone is between
70% and
85% ofmedia
the Age-Predicted
Maximum
Heart
Rate. As
a generaltríceps,
rule, thebíceps
Age-Predicted
Maximum
Heart Ratede
is approximately.
y abdominales).
El ejercicio
esfuerzo debe llevarse a cabo como mínimo de dos veces por
semana, descansando un mínimo de 48 horas, pero no más de 96 horas entre las sesiones de
Max Heart Rate=220beats per minute minus age
ejercicios que utilicen los mismos músculos.
Strength Training
Staying motivated
For motivation, keep a record of each workout. List the date, the exercises performed, the resistance
used, and the numbers of sets and repetitions completed. Record your weight and key body
measurements at the end of every month. Remember, the key to achieving the greatest results is to make
exercise a regular and enjoyable part of your everyday life.
Circuit training is a time effective method of exercise, during which the individual performs a series of
specified muscle group exercises with as little rest as possible between each muscle group. Like strength
training, circuit training should only be done every other day to give your muscles a rest.
Circuit Training
Strength training involves the ability of a muscle or muscle group to generate force against resistance. It is
recommended that the average healthy adult perform a minimum of one set of 8-20 repetitions to near fatigue for
the 12 major muscle groups(Quadriceps, Hamstrings, Calves, Chest, Back/Lats, Upper Back/Traps, Mid
Back/Rhomboids, Lower Back, Shoulders, Triceps, Biceps and Abdominals). Strength training should be performed
a minimum of two times per week. Rest a minimum of 48 hours, but no more than 96 hours between training
sessions that use the same muscles.
Strength Training
Max Heart Rate=220beats per minute minus age
It is recommended that the average healthy adult perform aerobic exercise for a minimum of 20 to 30 minutes,
three times per week, at an intensity that elevates the heart rate to within the Target Heart Rate Zone. The Target
Heart Rate Zone is between 70% and 85% of the Age-Predicted Maximum Heart Rate. As a general rule, the
Age-Predicted Maximum Heart Rate is approximately.
Aerobic exercise is exercise during which the oxygen supply is sufficient to meet the oxygen demand of working
muscles, with the objective being the ability to continue the exercise for prolonged periods of time(20 minutes or
more). Aerobic exercises are those which utilize large muscle groups in a rhythmical and continuous nature.
Running, swimming, stair climbing, cycling, brisk walking, etc. are all examples of aerobic exercise.
Aerobic Training
Ejercicio en circuito
Strength training involves the ability of a muscle or muscle group to generate force against resistance. It is
El ejerciciothat
en the
circuito
eshealthy
un sistema
de ejercicio
aprovechamiento
de totiempo,
durante
el
recommended
average
adult perform
a minimumde
of one
set of 8-20 repetitions
near fatigue
for
the
12 una
major
muscle lleva
groups(Quadriceps,
Calves, Chest,
Back/Lats, a
Upper
Back/Traps,
Mid
cual
persona
a cabo una Hamstrings,
serie de ejercicios
con respecto
grupos
determinados
Back/Rhomboids,
Shoulders,
Triceps,
and Abdominals).
Strength
training
should
performed Al
de músculos Lower
con elBack,
mínimo
tiempo
de Biceps
descanso
posible entre
cada
grupo
debemúsculos.
a minimum of two times per week. Rest a minimum of 48 hours, but no more than 96 hours between training
igual que
el ejercicio
de esfuerzo, el ejercicio en circuito sólo debe llevarse a cabo de manera
sessions
that use
the same muscles.
interdiaria para permitir que los músculos puedan descansar.
TABLA DE MÚSCULOS
Circuit Training
Cómo
permanecer
motivado
Circuit
training
is a time effective
method of exercise, during which the individual performs a series of
specified
muscle group
exercises with
as little
rest as possible
between each muscle group. Like strength
Para mantener
su motivación,
lleve
un control
de
A. Esterno mastoideo (cuello)
training,
circuitde
training
should Detalle
only be done
everytipo
other
cada rutina
ejercicios.
la fecha,
deday to give your muscles a rest.
B. Pectoral mayor (pecho)
ejercicios llevado a cabo, la resistencia utilizada y
Staying
motivated
el número
de repeticiones que se haya completado. C. Bíceps (brazo anterior)
For
motivation,
keep de
a record
of each
List the date, the
performed,
D.exercises
Oblicuos
(cintura)the resistance
Lleve
un registro
su peso
y deworkout.
las medidas
used, and the numbers of sets and repetitions completed. Record your weight and key body
Supinadores
largos
(antebrazo)
principales de
al final
de cada
mes. Remeasurements
at su
thecuerpo
end of every
month.
Remember,
the key E.
to achieving
the greatest
results
is to make
F. Flexores de la carrera (muslo superior)
exercise
regular
and enjoyable
partóptimos
of your everyday
life.
cuerdeaque
la clave
para lograr
resultados
G. Abductor (muslo externo)
es incorporar los ejercicios como una parte normal
y agradable de su vida diaria.
H. Cuádriceps (muslo anterior)
I. Sartorio (muslo anterior)
J. Tibial anterior (pantorrilla anterior)
K. Sóleo (pantorrilla anterior)
L. Deltoides anterior (hombro)
M. Abdominal recto (estómago)
N. Abductor (muslo interno)
O. Trapecio (espalda superior)
P. Romboide (espalda superior)
Q. Deltoides posterior (hombro)
R. Tríceps (brazo posterior)
S. Dorsal ancho (espalda media)
T. Espinal lumbar (espalda inferior)
U. Glúteo medio (cadera)
V. Glúteo máximo (glúteos)
W. Músculos de la corva (pierna posterior)
X. Gastrocnemio (pantorrilla posterior)
\
PRECAUCIONES IMPORTANTES
ADVERTENCIA
Con el fin de reducir el riesgo de que se produzca una lesión, lea las siguientes precauciones importantes antes de utilizar el banco para pesas.
1. Lea todas las instrucciones en este manual y todas las advertencias ubicadas en el
banco para pesas antes de utilizar el equipo. Utilice el equipo tal como se describe en
este manual.
2. Es responsabilidad del usuario asegurarse de que todas las personas que utilicen
este equipo se encuentren adecuadamente informadas con respecto a todas las precauciones.
3. Este banco para pesas ha sido diseñado sólo para uso doméstico. No utilice el equipo
para fines comerciales, de negocios o institucionales.
4. Mantenga el equipo en interiores lejos de la humedad y el polvo. Coloque el equipo
sobre una superficie nivelada utilizando un protector por debajo de éste para preservar
el piso o alfombra. Asegúrese de que haya suficiente espacio alrededor del equipo a la
hora de armarlo, desarmando y de utilizarlo.
5. Verifique y asegure bien todas las piezas con regularidad. Remplace cualquier pieza
desgastada inmediatamente.
6. Mantenga a los niños menores de 12 años así como a las mascotas lejos del equipo
en todo momento.
7. Mantenga sus manos y pies lejos de las partes en movimiento.
8. Siempre utilice el calzado apropiado para deportes para proteger sus pies durante el
ejercicio.
9. El equipo ha sido diseñado para soportar un peso máximo del usuario de 200 libras,
y un peso máximo total de 300 libras. No coloque un peso mayor a 100 libras, incluyendo la barra para pesas y las pesas, sobre los apoyos para pesas. No coloque un peso
mayor a 50 libras sobre el sistema de contracción para piernas.
10. No utilice una barra para pesas que tenga una longitud mayor a cinco pies con este
equipo.
11. Asegúrese de que siempre exista una cantidad igual de peso en ambos lados de la
barra para pesas al momento de utilizarla. Al añadir o retirar pesas, siempre mantenga
cierto peso en ambos extremos de la barra para evitar que se incline o se caiga.
12. Al momento de utilizar el ejercitador para piernas, coloque la barra para pesas con la
misma cantidad de peso sobre los apoyos para pesas para equilibrar el equipo.
13. Al momento de utilizar el respaldar en posición inclinada u horizontal, asegúrese de
que la varilla de soporte quede insertada completamente a través del tubo de apoyo de
la barra para pesas y que se encuentre girada hacia la posición de aseguramiento.
14. Si sintiera dolor o mareo en cualquier momento durante el ejercicio, detenga el ejercicio inmediatamente e inicie la fase de enfriamiento.
15. Siempre cuente con una persona como observadora o de apoyo, alguien que le
pueda ayudar a levantar la barra para pesas si le resultara difícil volver a colocar la barra
sobre los apoyos para pesas.
ADVERTENCIA
Antes de comenzar con este o con cualquier tipo de programa de ejercicios, consulte con su
médico. Esto es particularmente importante para aquellas personas mayores de 35 años o
personas con problemas de salud preexistentes. Lea todas las instrucciones antes de utilizar
el equipo. Este producto no asume ningún tipo de responsabilidad debido a lesiones personales o daños a la propiedad ocasionados por el uso de este producto.
Before beginning this or any exercise program, consult your physician. This is especially important for
persons over the age of 35 or persons with pre-existing health problems. Read all instructions before
using. This product assumes no responsibility for personal injury or property damage sustained by or
through the use of this product.
15. Always use a safety spotter. Someone to help life the barbell if it becomes difficult for the user to lift
barbell to the weight rest.
14. If you feel pain or dizziness at any time while exercising, stop immediately and begin cooling down.
13. When using the backrest in an inclined or level position, make sure that the support rod is inserted
completely through the barbell rest tube and turned to the locked position.
12. When you are using the leg developer, place a barbell with the same amount of weight on the weight
rests to balance the bench.
11. Always make sure there is an equal amount of weight on each side of your barbell when you are using
it. When adding or removing weights, always keep some weight on both ends of barbell to prevent the
barbell from tipping
10. Do not use a barbell that is longer than five feet with this weight bench.
9. The weight bench is designed to support a maximum user weight of 200 pounds, and a maximum total
weight of 300 pounds. Do not place more than 100pound, including a barbell and weights, on the weight
rests. Do not place more than 50 pounds on the leg extension.
8. Always wear athletic shoes to protect your feet while exercising.
7. Keep hands and feet away from moving parts.
6. Keep children under the age of 12 and pets away from the weight bench at all times.
5. Inspect and properly tighten all parts regularly. Replace any worn parts immediately.
4. Keep the weight bench indoors, away from moisture and dust. Place the weight bench on a level
surface, with a mat beneath it to protect the floor or carpet. Make sure that there is enough clearance
around the weight bench to mount, dismount, and use the weight bench.
3. The weight bench is intended for home use only. Do not use the weight bench in any commercial,
rental, or institutional setting.
2. It is the responsibility of the owner to ensure that all users of the weight bench ar adequately informed
of all precautions.
1. Read all instructions in this manual and all warnings on the weight bench before using the weight
bench. Use the weight bench only as described in this manual.
To reduce the risk of serious injury, read the following important precautions before using the
weight bench.
IMPORTANT PRECAUTION
3
Crossbar
1
4
Leg curl tube
1
5
Backrest tube
2
6
Back cushion
1
7
Back rest bar
1
8
Front support tube
1
9
19mm round inner cap
8
10
Foam tube(Long)
2
11
Seat cushion
1
12
Front stabilizer
1
13
M8 washer
8
14
M8 nylon nut
10
15
M8 x 55mm bolt
2
16
Stopper
1
17
38mm square inner cap
4
18
30mm square inner cap
9
19
Foam
6
20
25mm round inner cap
5
Lista de Piezas
1
Main frame
Cantidad
2
2
Descripción Barbell rest tube
No. de
la Pieza
1
2
1
1
1
2
1
1
1
8
2
1
1
8
10
2
1
4
9
6
5
Quantity
Tubo de apoyo de la barra para pesas
Armazón principal Barra transversal
Tubo de contracción de piernas
Tubo de respaldar
Cojín posterior
Barra de respaldar
Tubo de soporte delantero
Tapón interno circular de 19mm
Tubo para el acolchado (largo)
Cojín del asiento
Estabilizador delantero
Arandela M8
Tuerca de nylon M8
Perno M8 x 55mm
Tope Tapón interno cuadrado de 38mm
Tapón interno cuadrado de 30mm
Espuma o acolchado
Tapón interno redondo de 25mm
Description
1
2
3
4
5
6
7
8
9
10
11
12
13
14
15
16
17
18
19
20
Part No.
Part List
Part No.
Description
Quantity
21
M6 washer
4
22
Butterfly bar
2
23
M6 x 15mm screw
2
24
M6 x 40mm screw
4
25
15LBS weight stack
2
26
M10 x 60mm bolt
1
27
M10 nylon nut
3
28
25mm square inner cap
4
29
M8 x 50mm bolt
4
30
M8 x 40mm carriage bolt
2
31
10LBS weight stack
4
32
M8 x 40mm bolt
2
33
Outer weight bar
1
34
Roll pin
2
35
Spring collars
5
36
Inner weight bar
1
37
Plastic sleeves
2
38
M10 x 120mm bolt
2
39
M10 washer
2
40
Foam tube(Short)
2
No. de la Pieza
21
22
23
24
25
26
27
28
29
30
31
32
33
34
35
36
37
38
39
40
Descripción Arandela M6
Barra mariposa Tornillo M6 x 15mm
Tornillo M6 x 40mm
Pila de pesas de 15 libras perno M10 x 60mm
Tuerca de nylon M10
Tapón interno cuadrado de 25mm
Perno M8 x 50mm
Perno de cabeza redonda M8 x 40mm
Pila de pesas de 10 libras Perno M8 x 40mm Barra de pesas externa
Clavija Presilla con resorte Barra de pesas interna Mangas de plástico
Perno M10 x 120mm
Arandela M10
Tubo para el acolchado (corto)
Cantidad
4
2
2
4
2
1
1
4
4
2
4
2
1
2
5
1
2
2
2
2
INSTRUCCIONES PARA EL ARMADO
Assembly Instruction
with M8 x 50mm bolt(29), M8 washer(13), and M8 nylon locknuts(14).
Attach the crossbar (3) to the barbell rest tube(1) on both side. Then tighten
Step 1
Paso
Step 11
Acople
la barra
transversal
(3) al tubo
de apoyo
de laside.
barra
para
pesas
Attach the
crossbar
(3) to the barbell
rest tube(1)
on both
Then
tighten
(1) en ambos extremos. Luego ajuste con el perno M8 x 50mm (29), la
arandela
(13)
y las tuercas
de nylonand
M8M8
(14).
with M8 x M8
50mm
bolt(29),
M8 washer(13),
nylon locknuts(14).
Assembly Instruction
x40mm carriage bolt (30) and M8 nylon nut(14)
Attach the front support tube(8) to front stabilizer(12) and tighten with M8
Step 2
Paso 2
Acople el tubo de soporte delantero (8) al estabilizador delantero (12) y
Step
2 con el perno de cabeza redonda M8 x 40mm (30) y la tuerca de
ajuste
nylon M8 (14).
Attach the front support tube(8) to front stabilizer(12) and tighten with M8
x40mm carriage bolt (30) and M8 nylon nut(14)
bolt (32), M8 washer(13) an M8 nylon nut(14)
Insert the front support tube(8) to main frame(2) and tighten with M8 x40mm
Step 3
Step 3
Paso 3
Insert the front support tube(8) to main frame(2) and tighten with M8 x40mm
Inserte el tubo de soporte delantero (8) al armazón principal (2) y ajuste
con el perno M8 x 40mm (32), la arandela M8 (13) y la tuerca de nylon
bolt
M8(32),
(14).M8 washer(13) an M8 nylon nut(14)
bolt (15) and M8 nylon nut(14).
Attach the main frame (2) onto crossbar tube(3)and fix tightly by M8 x55mm
Step 4
Step
4 4
Paso
Attach the main frame (2) onto crossbar tube(3)and fix tightly by M8 x55mm
Acople el armazón principal (2) sobre el tubo transversal (13) y fije bien
utilizando el perno M8 x 55mm (15) y la tuerca de nylon M8 (14).
bolt (15) and M8 nylon nut(14).
Lubrique
the foam tube. Put 19mm round inner caps (9) into the foam tube (10) on both
side.
Insert foam tube(10) through front support tube(4), then, slide foams(19) onto
Please lubricate M10 x 60mm bolt with grease before using
Attach the leg curl tube(4) to the front support tube(8). Then fix it with M10 x
60mm bolt (26) and M10 nylon nuts (27)
Step 5
Paso
Step
55
Attach the leg curl tube(4) to the front support tube(8). Then fix it with M10 x
Acople el tubo de contracción de piernas (4) al tubo de soporte delantero
60mm
bolt (26)
andcon
M10elnylon
(8). Luego
fíjelo
pernonuts
M8(27)
x 60mm (28) y las tuercas de nylon M10
(27).
Please lubricate M10 x 60mm bolt with grease before using
Insert foam tube(10) through front support tube(4), then, slide foams(19) onto
ADVERTENCIA
the foam tube. Put 19mm round inner caps (9) into the foam tube (10) on both
Lubrique el perno M10 x 60mm con aceite antes de utilizarlo.
side.
Inserte el tubo para el acolchado (10) a través del tubo de soporte delantero (4). Luego deslice los acolchados o espumas (19) por el tubo para
el acolchado. Coloque los tapones internos redondos de 19mm (9) dentro
del tubo para el acolchado (10) en ambos extremos.
40mm(24) and M6 washer(21). Then put 25mm square inner cap(28) into the
both side of backrest tube(5)
Attach the backrest tube(5) to the beck cushion(6) and tighten with M6 x
Put backrest tubes (5) through the welded steel bar.
tube and lock with lock pin.
Put the backrest bar (7) to the proper position on the both side of barbell rest
Step 6
Barra de acero soldada
Paso 6
Step 6
Coloque la barra del respaldar
(7) en
la posición
enbarbell
ambosrest
exPut
the
backrest
bar
(7)
to the proper
position
on theadecuada
both side of
tremos
del tubo
tube
and lock
with de
lockapoyo
pin. de la barra para pesas y asegure con la clavija.
Coloque los tubos del respaldar (5) a través de la barra de acero solPut
backrest tubes (5) through the welded steel bar.
dada.
Acople
tubo deltube(5)
respaldar
(5)beck
al cojín
posterior
(6)tighten
y ajuste
con
Attach
theelbackrest
to the
cushion(6)
and
with
M6elx
tornillo M6
x 40mm
(24) y la arandela
(21).
Luegoinner
coloque
el tapón
40mm(24)
and
M6 washer(21).
Then put M6
25mm
square
cap(28)
into the
interno cuadrado de 25mm (28) dentro de ambos extremos del tubo del
both side of backrest tube(5)
respaldar (5).
Fix seat cushion (11) on main frame(2) and tighten with M6 x 15mm screw(23)
Step 7
Step 7
Paso 7
Fix seat cushion (11) on main frame(2) and tighten with M6 x 15mm screw(23)
Fije el cojín del asiento (11) sobre el armazón principal (2) y ajuste con el
tornillo M6 x 15mm (23).
Then, put the foam tube(short) (40) through the butterfly bar (22)
120mm bolt (38), M10 washer (39), and M10 nylon nut (27).
Attach the butterfly bar (22) to barbell rest tube (1) and fix tightly by M10 x
Step 8
Paso
Step
8 8
Acople
barra mariposa
al tubo
de apoyo
defixlatightly
barraby
para
Attach
thela
butterfly
bar (22) to(22)
barbell
rest tube
(1) and
M10piezas
x
(1) y fije bien utilizando el perno M10 x 120mm (38), la arandela M10
(39) y la tuerca de nylon M10 (27).
120mm
(38), M10
washer
and M10 nylon
nut(40)
(27).a través de la barra
Luegobolt
coloque
el tubo
para(39),
el acolchado
(corto)
mariposa (22).
Then, put the foam tube(short) (40) through the butterfly bar (22)
Put 25mm round inner cap(20) into butterfly bar and clips with spring collar (32)
Then, put the plastic sleeve (37) on barbell rest tube(1).
foam(19) onto foam tube (short) (40) and put inner cap(19) into foam tube
Put 30mm square inner cap(18) into both side of butterfly bar(22) and slide
Step 9
Paso 9
Step 9
Coloque el tapón interno cuadrado de 30mm (18) dentro de ambos extrePut
30mm
cap(18)
into
both side
butterfly bar(22)
and slide
mos
de lasquare
barra inner
mariposa
(22)
y deslice
elofacolchado
o espuma
(19) en el
tubo para el acolchado (corto) (40) y luego coloque el tapón interno (19)
foam(19)
onto
foam
tube
(40) and put inner cap(19) into foam tube
dentro del
tubo
para
el(short)
acolchado.
Luego coloque la manga plástica (37) en el tubo de apoyo de la barra para
pesas (1).
Then, put the plastic sleeve (37) on barbell rest tube(1).
Coloque el tapón interno redondo de 25mm (20) dentro de la barra mariposa y enganche o asegure con la presilla con resorte (32).
Put 25mm round inner cap(20) into butterfly bar and clips with spring collar (32)
are flush with the outer bar
indicated holes. Using a hammer, tap the 2 roll pins(34) into the holes until they
Insert the inner weight bar(36) into the outer weight bar(33) and align the
Step 10
Paso
Step 10
10
Inserte
la barra de pesas interna (36) a la barra (33) y alinee los aguInsert the inner weight bar(36) into the outer weight bar(33) and align the
jeros indicados. Utilizando un martillo, golpee y encaje las dos clavijas
(34) dentro de los agujeros hasta que queden al ras del nivel de la barra
indicated holes. Using a hammer, tap the 2 roll pins(34) into the holes until they
externa.
are flush with the outer bar
Cómo colocar
Attaching
weight las pesas
weight rests to balance the bench.
When using the leg extension, place a barbell with the same amount of weight on the
Barra para pesas
DO NOT PLACE MORE THAN 50 POUNDS ON THE LEG EXTENSION
To use the Leg extension (4), slide the desired weights onto the weight tube on the leg extension.
Coloque una cantidad equivalente de peso (25, 31) en cada extremo de
la barra
para
pesas.
Deslice
la presilla
contra
lasthe
pesas
Slide
an equal
amount
of weight
(25, 31)
onto eachcon
endresorte
of the barbell.
Slide
springy
asegúrelas
collar
against thetotalmente.
weights and tighten them fully.
ADVERTENCIA
Siempre asegure las pesas (25,
31)barbell
colocadas
enspring
la barra
para
pesas
Always
secure
the
weights
(25,
31)
on the
with the
collars
(35).
las presillas
con resorte
(35).
Never
use the barbell
with more
70 pounds.
con
Nunca utilice la barra para pesas con un peso mayor a 70 libras.
Always secure the weights (25, 31) on the barbell with the spring collars (35).
Never use the barbell with more 70 pounds.
collar against the weights and tighten them fully.
Slide an equal amount of weight (25, 31) onto each end of the barbell. Slide the spring
Tubo para pesas
Pesa
To use the Leg extension (4), slide the desired weights onto the weight tube on the leg extension.
Para utilizar el tubo de contracción de piernas (4), deslice el número deDO NOT PLACE MORE THAN 50 POUNDS ON THE LEG EXTENSION
seado de pesas en el tubo para pesas ubicado en el sistema de contracción de piernas.
When using the leg extension, place a barbell with the same amount of weight on the
NO COLOQUE MÁS DE 50 LIBRAS EN ELTUBO DE CONTACCIÓN DE
PIERNAS.
weight rests to balance the bench.
ADVERTENCIA
Al momento de utilizar el tubo de contracción de piernas, coloque la barra
para pesas con la misma cantidad de peso en ambos apoyos para equilibrar el equipo.
Attaching weight
MODEL:
GM95697
MANUAL DEL USUARIO
BANCO PARA EJERCICIOS
CON 70 LBS. DE PESO INCLUIDO
MODELO:
GM95697
WEIGHT BENCH WITH 70 LBS.
WEIGHT SET
INSTRUCTION MANUAL
FUNDAMENTOS DEL EJERCICIO
Rutina de ejercicios ideal
Una investigación científica a fondo demuestra que tanto el ejercicio cardiovascular (aeróbico) y
el ejercicio de esfuerzo son componentes importantes de cualquier programa de mantenimiento
de salud y de condición física. Toda rutina de ejercicios ideal debe consistir de tres grupos de
ejercicios, que deben llevarse a cabo según la siguiente
secuencia:OF EXERCISE
PRINCIPALS
Ideal Workout
Calentamiento, Rutina ejercicios y Enfriamiento. No omita ninguna de estas fases.
1. Fase de calentamiento
Esta fase permite que la sangre fluya a través del cuerpo y que los músculos funcionen de manera adecuada. También
reduce
el
de que se produzca un calambre y daños musculares. Es
1.The
Warm
Upriesgo
Phase
Using your
weight
bench
will provide you with several benefits, it will improve your physical fitness, tone muscle and in
recomendable llevar
a stage
cabohelps
unos
cuantos
de
tal muscles
como se
muestra
en las
This
get
thecontrolled
bloodejercicios
flowing
around
the weight.
body and the
working
properly.
It will also reduce the risk of
conjunction
with
calorie
diet help
you estiramiento
lose
figuras más abajo.cramp
Cadaand
ejercicio
estiramiento
durante
aproximadamente
30stretch should be held for
muscle de
injury.
It is advisabledebe
to do mantenerse
a few stretching
exercises
as shown below. Each
1.The
Warm
Upseconds,
Phase do durante
approximately
30
not force or
your musclesSiinto
a stretch
– if itDETENGA
hurts, STOP.el
segundos. No fuerce
ni exija
sus
músculos
el jerk
estiramiento.
siente
dolor,
This stage helps get the blood flowing around the body and the muscles working properly. It will also reduce the risk of
ejercicio.
This stage should last for a minimum of 12mihutes though most people start at about 15-20 minutes.
Warm-up,
and Cool-down.
Do not
skip any
of these
components in any
health andWorkout
fitness program.
And ideal workout
consists
of three
groups stages.
of exercises, which
should be completed in the following sequence.
Using your weight bench will provide you with several benefits, it will improve your physical fitness, tone muscle and in
conjunction with calorie
controlled
diet help
lose weight.
Warm-up,
Workout
andyou
Cool-down.
Do not skip any of these stages.
3.The Cool Down Phase
tonificará sus músculos,
y junto
conresearch
una dieta
bajathat
enboth
calorías,
le ayudará
a perder and
peso.
Extensive
scientific
supports
cardiovascular
training(aerobic)
strength training are important
This stage is to let your Cardio-vascular System and muscles wind down. This is a repeat of the warm up exercise e.g.
reduce your tempo, continue for approximately 5 minutes. The stretching exercises should now be repeated, again
remembering not to force or jerk your muscles into the stretch.
As you get fitter you may need to train longer and harder. It is advisable to train at least three times a week, and if possible
space your workouts evenly throughout the week.
Extensive scientific research supports
that both cardiovascular
training(aerobic) and strength training are important
PRINCIPALS
OF EXERCISE
components in any health and fitness program. And ideal workout consists of three groups of exercises, which
Ideal
Workout
be completed
in the following
sequence.
El uso de su bancoshould
de ejercicios
le ofrecerá
diversos
beneficios, mejorará su condición física,
cramp and muscle injury. It is advisable to do a few stretching exercises as shown below. Each stretch should be held for
approximately 30 Estiramiento
seconds, do not
force
or jerk your muscles into a stretch – if it hurts, STOP.
hacia
adelante
Muslo interno
Pantorrilla / Talón
2. Fase de ejercicios
2.The Exercise Phase
Esta es la fase enThis
donde
elput
esfuerzo.
de cierto
periodo
dein uso,
los will
músis theusted
stage pondrá
where you
the effort Después
in. After regular
use, use
muscles
your legs
become more flexible. Work
culos de sus piernas
se own
volverán
más
Lleve
a cabo alos
ejercicios
según su The
propio
2.The
Exercise
Phase
to
your
pace but
it isflexibles.
very important
to maintain
steady
tempo throughout.
rate ritmo,
of work should be sufficient to
This
the heart
stage beat
whereinto
you
puttarget
the effort
After regular
use
muscles
in your legs
will become
the
zone
shown
on theuse,
graph
below.
teniendo en menteraise
queisyour
es
importante
mantener
unin.ritmo
constante
todo
el tiempo.
El ritmo
del more flexible. Work
to your own pace but it is very important to maintain a steady tempo throughout. The rate of work should be sufficient to
ejercicio debe ser lo
suficientemente adecuado como para elevar su ritmo cardíaco y colocarlo
raise your heart beat into the target zone shown on the graph below.
dentro de la zona objetivo tal como se muestra en el gráfico de más abajo.
2.The Exercise Phase
Muslo externo
This is the stage where you put the effort in. After regular use, use muscles in your legs will become more flexible. Work
to your own pace but it is very important to maintain a steady tempo throughout. The rate of work should be sufficient to
raise your heart beat into the target zone shown on the graph below.
Estiramiento lateral
This stage helps get the blood flowing around the body and the muscles working properly. It will also reduce the risk of
cramp and muscle injury. It is advisable to do a few stretching exercises as shown below. Each stretch should be held for
approximately 30 seconds, do not force or jerk your muscles into a stretch – if it hurts, STOP.
1.The Warm Up Phase
Extensive scientific research supports that both cardiovascular training(aerobic) and strength training are important
components in any health and fitness program. And ideal workout consists of three groups of exercises, which
should be completed in the following sequence.
Ideal Workout
PRINCIPALS OF EXERCISE
3.The
Down
Phase
Esta fase permite This
que
suCool
sistema
cardiovascular
y sus
músculos
se enfríen.
Esta
es una
stage
is to
let your
Cardio-vascular
System
and muscles
wind down.
Thisfase
is a repeat
of the warm up exercise e.g.
Thisde
stage
is to let your Cardio-vascular
System
andel
muscles
wind
down.
This isLleve
a repeat cabo
of the warm
up exercise e.g.
repetición de la fase
calentamiento
quefor
permite
reducir
ritmoThe
delstretching
ejercicio.
estabe
reduce
your tempo, continue
approximately
5 minutes.
exercisesashould
now
repeated, again
reduce your tempo, continue for approximately 5 minutes. The stretching exercises should now be repeated, again
fase durante aproximadamente
Los
ejercicios
de
estiramiento
deben
repetirse,
nuevaremembering not5tominutos.
force or jerk
your
muscles into
the
stretch.
remembering not to force or jerk your muscles into the stretch.
As
you
get
fitter
you
may
need
to
train
longer
and
harder.
It
is
advisable
to
train
at
least
three
times
a
and if possible
mente teniendo enAsmente
noyouforzar
ni exigir
músculos
hora detoefectuar
el three
estiramiento.
you getde
fitter
may need
to trainsus
longer
and harder.aIt la
is advisable
train at least
times a week, week,
and if possible
space
workouts
evenly
throughout
week.llevar a cabo sus ejercicios durante
space your
your
workouts
evenly
throughout
thethe
week.
Conforme su condición
física
mejore,
puede
ser necesario
más tiempo y con mayor dificultad. Es recomendable efectuar sus ejercicios por lo menos tres
veces a la semana, y si fuera posible, espaciar sus rutinas de manera pareja a través de la
semana.
Warm-up, Workout and Cool-down. Do not skip any of these stages.
This stage should last for a minimum of 12mihutes though most people start at about 15-20 minutes.
Using your weight bench will provide you with several benefits, it will improve your physical fitness, tone muscle and in
conjunction with calorie controlled diet help you lose weight.
This stage should last for a minimum of 12mihutes though most people start at about 15-20 minutes.
3. Fase de enfriamiento
3.The Cool Down Phase
Ejercicios aeróbicos
El ejercicio aeróbico es un tipo de ejercicios durante la cual el suministro de oxígeno es lo suficientemente alto como para satisfacer la necesidad de oxígeno de los músculos que se encuentren
funcionando, y cuyo objetivo es el de continuar el ejercicio durante periodos prolongados (20
minutos o más). El ejercicio aeróbico es aquel que utiliza los grandes grupos de músculos de forma
rítmica y continua. Ejemplos de ejercicios aeróbicos son correr, nadar, subir escaleras, montar
bicicleta, caminatas a paso acelerado, etc.
Es recomendable que un adulto promedio y saludable lleve a cabo ejercicios aeróbicos durante un
mínimo de 20 a 30 minutos, tres veces por semana, a una intensidad que eleve el ritmo cardiaco
colocándolo dentro de la zona objetivo. La zona objetivo de ritmo cardiaco se encuentra entre
70% y 85% del ritmo cardiaco máximo según una edad predeterminada. Como regla general, se
puede calcular aproximadamente el ritmo cardiaco máximo según una edad predeterminada de la
siguiente manera:
\
RITMO CARDIACO MÁXIMO = 220 LATIDOS POR MINUTOS MENOS EDAD
Aerobic Training
Aerobic
exercisede
is exercise
during which the oxygen supply is sufficient to meet the oxygen demand of working
Ejercicios
esfuerzo
muscles, with the objective being the ability to continue the exercise for prolonged periods of time(20 minutes or
Los ejercicios
de esfuerzo
implican
la habilidad
de ungroups
músculo
de un grupo
de músculos
de
more).
Aerobic exercises
are those
which utilize
large muscle
in a orhythmical
and continuous
nature.
generarswimming,
fuerza contra
resistencia.
recomendable
el adulto
promedio
saludable lleve a cabo
Running,
stair climbing,
cycling, Es
brisk
walking, etc. are que
all examples
of aerobic
exercise.
un mínimo de un grupo de 8 a 20 repeticiones hasta lograr cierto cansancio para los 12 grupos de
It is recommended that the average healthy adult perform aerobic exercise for a minimum of 20 to 30 minutes,
músculos
principales
músculos
de larate
corva,
pantorrillas,
pecho,
/ laterales,
three
times per
week, at an(cuádriceps,
intensity that elevates
the heart
to within
the Target Heart
Rateespalda
Zone. The
Target
espalda
/ trapecios,
espalda
/ romboides,
espalda
inferior,
hombros,
Heart
Rate superior
Zone is between
70% and
85% ofmedia
the Age-Predicted
Maximum
Heart
Rate. As
a generaltríceps,
rule, thebíceps
Age-Predicted
Maximum
Heart Ratede
is approximately.
y abdominales).
El ejercicio
esfuerzo debe llevarse a cabo como mínimo de dos veces por
semana, descansando un mínimo de 48 horas, pero no más de 96 horas entre las sesiones de
Max Heart Rate=220beats per minute minus age
ejercicios que utilicen los mismos músculos.
Strength Training
Ejercicio en circuito
Strength training involves the ability of a muscle or muscle group to generate force against resistance. It is
El ejerciciothat
en the
circuito
eshealthy
un sistema
de ejercicio
aprovechamiento
de totiempo,
durante
el
recommended
average
adult perform
a minimumde
of one
set of 8-20 repetitions
near fatigue
for
the
12 una
major
muscle lleva
groups(Quadriceps,
Calves, Chest,
Back/Lats, a
Upper
Back/Traps,
Mid
cual
persona
a cabo una Hamstrings,
serie de ejercicios
con respecto
grupos
determinados
Back/Rhomboids,
Shoulders,
Triceps,
and Abdominals).
Strength
training
should
performed Al
de músculos Lower
con elBack,
mínimo
tiempo
de Biceps
descanso
posible entre
cada
grupo
debemúsculos.
a minimum of two times per week. Rest a minimum of 48 hours, but no more than 96 hours between training
igual que
el ejercicio
de esfuerzo, el ejercicio en circuito sólo debe llevarse a cabo de manera
sessions
that use
the same muscles.
interdiaria para permitir que los músculos puedan descansar.
TABLA DE MÚSCULOS
Cómo
permanecer
motivado
Circuit
training
is a time effective
method of exercise, during which the individual performs a series of
Circuit Training
specified
muscle group
exercises with
as little
rest as possible
between each muscle group. Like strength
Para mantener
su motivación,
lleve
un control
de
A. Esterno mastoideo (cuello)
training,
circuitde
training
should Detalle
only be done
everytipo
other
cada rutina
ejercicios.
la fecha,
deday to give your muscles a rest.
ejercicios llevado a cabo, la resistencia utilizada y
B. Pectoral mayor (pecho)
Staying
motivated
el número
de repeticiones que se haya completado. C. Bíceps (brazo anterior)
For
motivation,
keep de
a record
of each
List the date, the
performed,
D.exercises
Oblicuos
(cintura)the resistance
Lleve
un
registro
su peso
y deworkout.
las medidas
used, and the numbers of sets and repetitions completed. Record your weight and key body
Supinadores
largos
(antebrazo)
principales de
al final
de cada
mes. Remeasurements
at su
thecuerpo
end of every
month.
Remember,
the key E.
to achieving
the greatest
results
is to make
F. Flexores de la carrera (muslo superior)
exercise
regular
and enjoyable
partóptimos
of your everyday
life.
cuerdeaque
la clave
para lograr
resultados
es incorporar los ejercicios como una parte normal
y agradable de su vida diaria.
G. Abductor (muslo externo)
H. Cuádriceps (muslo anterior)
I. Sartorio (muslo anterior)
J. Tibial anterior (pantorrilla anterior)
K. Sóleo (pantorrilla anterior)
L. Deltoides anterior (hombro)
M. Abdominal recto (estómago)
N. Abductor (muslo interno)
O. Trapecio (espalda superior)
P. Romboide (espalda superior)
Q. Deltoides posterior (hombro)
R. Tríceps (brazo posterior)
S. Dorsal ancho (espalda media)
T. Espinal lumbar (espalda inferior)
U. Glúteo medio (cadera)
V. Glúteo máximo (glúteos)
W. Músculos de la corva (pierna posterior)
X. Gastrocnemio (pantorrilla posterior)
\
Staying motivated
For motivation, keep a record of each workout. List the date, the exercises performed, the resistance
used, and the numbers of sets and repetitions completed. Record your weight and key body
measurements at the end of every month. Remember, the key to achieving the greatest results is to make
exercise a regular and enjoyable part of your everyday life.
Circuit training is a time effective method of exercise, during which the individual performs a series of
specified muscle group exercises with as little rest as possible between each muscle group. Like strength
training, circuit training should only be done every other day to give your muscles a rest.
Circuit Training
Strength training involves the ability of a muscle or muscle group to generate force against resistance. It is
recommended that the average healthy adult perform a minimum of one set of 8-20 repetitions to near fatigue for
the 12 major muscle groups(Quadriceps, Hamstrings, Calves, Chest, Back/Lats, Upper Back/Traps, Mid
Back/Rhomboids, Lower Back, Shoulders, Triceps, Biceps and Abdominals). Strength training should be performed
a minimum of two times per week. Rest a minimum of 48 hours, but no more than 96 hours between training
sessions that use the same muscles.
Strength Training
Max Heart Rate=220beats per minute minus age
It is recommended that the average healthy adult perform aerobic exercise for a minimum of 20 to 30 minutes,
three times per week, at an intensity that elevates the heart rate to within the Target Heart Rate Zone. The Target
Heart Rate Zone is between 70% and 85% of the Age-Predicted Maximum Heart Rate. As a general rule, the
Age-Predicted Maximum Heart Rate is approximately.
Aerobic exercise is exercise during which the oxygen supply is sufficient to meet the oxygen demand of working
muscles, with the objective being the ability to continue the exercise for prolonged periods of time(20 minutes or
more). Aerobic exercises are those which utilize large muscle groups in a rhythmical and continuous nature.
Running, swimming, stair climbing, cycling, brisk walking, etc. are all examples of aerobic exercise.
Aerobic Training
PRECAUCIONES IMPORTANTES
ADVERTENCIA
Con el fin de reducir el riesgo de que se produzca una lesión, lea las siguientes precauciones importantes antes de utilizar el banco para pesas.
14. If you feel pain or dizziness at any time while exercising, stop immediately and begin cooling down.
13. When using the backrest in an inclined or level position, make sure that the support rod is inserted
completely through the barbell rest tube and turned to the locked position.
12. When you are using the leg developer, place a barbell with the same amount of weight on the weight
rests to balance the bench.
11. Always make sure there is an equal amount of weight on each side of your barbell when you are using
it. When adding or removing weights, always keep some weight on both ends of barbell to prevent the
barbell from tipping
10. Do not use a barbell that is longer than five feet with this weight bench.
9. The weight bench is designed to support a maximum user weight of 200 pounds, and a maximum total
weight of 300 pounds. Do not place more than 100pound, including a barbell and weights, on the weight
rests. Do not place more than 50 pounds on the leg extension.
8. Always wear athletic shoes to protect your feet while exercising.
7. Keep hands and feet away from moving parts.
6. Keep children under the age of 12 and pets away from the weight bench at all times.
5. Inspect and properly tighten all parts regularly. Replace any worn parts immediately.
4. Keep the weight bench indoors, away from moisture and dust. Place the weight bench on a level
surface, with a mat beneath it to protect the floor or carpet. Make sure that there is enough clearance
around the weight bench to mount, dismount, and use the weight bench.
3. The weight bench is intended for home use only. Do not use the weight bench in any commercial,
rental, or institutional setting.
2. It is the responsibility of the owner to ensure that all users of the weight bench ar adequately informed
of all precautions.
1. Read all instructions in this manual and all warnings on the weight bench before using the weight
bench. Use the weight bench only as described in this manual.
To reduce the risk of serious injury, read the following important precautions before using the
weight bench.
IMPORTANT PRECAUTION
Antes de comenzar con este o con cualquier tipo de programa de ejercicios, consulte con su
médico. Esto es particularmente importante para aquellas personas mayores de 35 años o
personas con problemas de salud preexistentes. Lea todas las instrucciones antes de utilizar
el equipo. Este producto no asume ningún tipo de responsabilidad debido a lesiones personales o daños a la propiedad ocasionados por el uso de este producto.
15. Always use a safety spotter. Someone to help life the barbell if it becomes difficult for the user to lift
barbell to the weight rest.
ADVERTENCIA
Before beginning this or any exercise program, consult your physician. This is especially important for
persons over the age of 35 or persons with pre-existing health problems. Read all instructions before
using. This product assumes no responsibility for personal injury or property damage sustained by or
through the use of this product.
1. Lea todas las instrucciones en este manual y todas las advertencias ubicadas en el
banco para pesas antes de utilizar el equipo. Utilice el equipo tal como se describe en
este manual.
2. Es responsabilidad del usuario asegurarse de que todas las personas que utilicen
este equipo se encuentren adecuadamente informadas con respecto a todas las precauciones.
3. Este banco para pesas ha sido diseñado sólo para uso doméstico. No utilice el equipo
para fines comerciales, de negocios o institucionales.
4. Mantenga el equipo en interiores lejos de la humedad y el polvo. Coloque el equipo
sobre una superficie nivelada utilizando un protector por debajo de éste para preservar
el piso o alfombra. Asegúrese de que haya suficiente espacio alrededor del equipo a la
hora de armarlo, desarmando y de utilizarlo.
5. Verifique y asegure bien todas las piezas con regularidad. Remplace cualquier pieza
desgastada inmediatamente.
6. Mantenga a los niños menores de 12 años así como a las mascotas lejos del equipo
en todo momento.
7. Mantenga sus manos y pies lejos de las partes en movimiento.
8. Siempre utilice el calzado apropiado para deportes para proteger sus pies durante el
ejercicio.
9. El equipo ha sido diseñado para soportar un peso máximo del usuario de 200 libras,
y un peso máximo total de 300 libras. No coloque un peso mayor a 100 libras, incluyendo la barra para pesas y las pesas, sobre los apoyos para pesas. No coloque un peso
mayor a 50 libras sobre el sistema de contracción para piernas.
10. No utilice una barra para pesas que tenga una longitud mayor a cinco pies con este
equipo.
11. Asegúrese de que siempre exista una cantidad igual de peso en ambos lados de la
barra para pesas al momento de utilizarla. Al añadir o retirar pesas, siempre mantenga
cierto peso en ambos extremos de la barra para evitar que se incline o se caiga.
12. Al momento de utilizar el ejercitador para piernas, coloque la barra para pesas con la
misma cantidad de peso sobre los apoyos para pesas para equilibrar el equipo.
13. Al momento de utilizar el respaldar en posición inclinada u horizontal, asegúrese de
que la varilla de soporte quede insertada completamente a través del tubo de apoyo de
la barra para pesas y que se encuentre girada hacia la posición de aseguramiento.
14. Si sintiera dolor o mareo en cualquier momento durante el ejercicio, detenga el ejercicio inmediatamente e inicie la fase de enfriamiento.
15. Siempre cuente con una persona como observadora o de apoyo, alguien que le
pueda ayudar a levantar la barra para pesas si le resultara difícil volver a colocar la barra
sobre los apoyos para pesas.
30mm square inner cap
18
38mm square inner cap
17
Stopper
16
M8 x 55mm bolt
15
M8 nylon nut
14
M8 washer
13
Front stabilizer
12
Seat cushion
11
Foam tube(Long)
10
19mm round inner cap
9
Front support tube
8
Back rest bar
7
Back cushion
6
Backrest tube
5
Leg curl tube
4
Crossbar
3
Main frame
2
Barbell rest tube
1
Description
Part No.
Part List
6
9
4
1
2
10
8
1
1
2
8
1
1
1
2
1
1
1
2
Quantity
2
1
1
1
2
1
1
1
8
2
1
1
8
10
2
1
4
9
6
5
Foam
Tubo de apoyo de la barra para pesas
Armazón principal Barra transversal
Tubo de contracción de piernas
Tubo de respaldar
Cojín posterior
Barra de respaldar
Tubo de soporte delantero
Tapón interno circular de 19mm
Tubo para el acolchado (largo)
Cojín del asiento
Estabilizador delantero
Arandela M8
Tuerca de nylon M8
Perno M8 x 55mm
Tope Tapón interno cuadrado de 38mm
Tapón interno cuadrado de 30mm
Espuma o acolchado
Tapón interno redondo de 25mm
Cantidad
19
5
1
2
3
4
5
6
7
8
9
10
11
12
13
14
15
16
17
18
19
20
Descripción 25mm round inner cap
No. de
la Pieza
Lista de Piezas
20
No. de la Pieza
21
22
23
24
25
26
27
28
29
30
31
32
33
34
35
36
37
38
39
40
Descripción Arandela M6
Barra mariposa Tornillo M6 x 15mm
Tornillo M6 x 40mm
Pila de pesas de 15 libras perno M10 x 60mm
Tuerca de nylon M10
Tapón interno cuadrado de 25mm
Perno M8 x 50mm
Perno de cabeza redonda M8 x 40mm
Pila de pesas de 10 libras Perno M8 x 40mm Barra de pesas externa
Clavija Presilla con resorte Barra de pesas interna Mangas de plástico
Perno M10 x 120mm
Arandela M10
Tubo para el acolchado (corto)
Cantidad
4
2
2
4
2
1
1
4
4
2
4
2
1
2
5
1
2
2
2
2
Foam tube(Short)
40
M10 washer
39
M10 x 120mm bolt
38
Plastic sleeves
37
Inner weight bar
36
Spring collars
35
Roll pin
34
Outer weight bar
33
M8 x 40mm bolt
32
10LBS weight stack
31
M8 x 40mm carriage bolt
30
M8 x 50mm bolt
29
25mm square inner cap
28
M10 nylon nut
27
M10 x 60mm bolt
26
15LBS weight stack
25
M6 x 40mm screw
24
M6 x 15mm screw
23
Butterfly bar
22
M6 washer
21
Description
Part No.
2
2
2
2
1
5
2
1
2
4
2
4
4
3
1
2
4
2
2
4
Quantity
INSTRUCCIONES PARA EL ARMADO
Assembly Instruction
with M8 x 50mm bolt(29), M8 washer(13), and M8 nylon locknuts(14).
Attach the crossbar (3) to the barbell rest tube(1) on both side. Then tighten
Step 1
Paso
Step 11
Acople
la barra
transversal
(3) al tubo
de apoyo
de laside.
barra
para
pesas
Attach the
crossbar
(3) to the barbell
rest tube(1)
on both
Then
tighten
(1) en ambos extremos. Luego ajuste con el perno M8 x 50mm (29), la
arandela
(13)
y las tuercas
de nylonand
M8M8
(14).
with M8 x M8
50mm
bolt(29),
M8 washer(13),
nylon locknuts(14).
Assembly Instruction
x40mm carriage bolt (30) and M8 nylon nut(14)
Attach the front support tube(8) to front stabilizer(12) and tighten with M8
Step 2
Paso 2
Acople el tubo de soporte delantero (8) al estabilizador delantero (12) y
Step
2 con el perno de cabeza redonda M8 x 40mm (30) y la tuerca de
ajuste
nylon M8 (14).
Attach the front support tube(8) to front stabilizer(12) and tighten with M8
x40mm carriage bolt (30) and M8 nylon nut(14)
bolt (32), M8 washer(13) an M8 nylon nut(14)
Insert the front support tube(8) to main frame(2) and tighten with M8 x40mm
Step 3
Step 3
Paso 3
Insert the front support tube(8) to main frame(2) and tighten with M8 x40mm
Inserte el tubo de soporte delantero (8) al armazón principal (2) y ajuste
con el perno M8 x 40mm (32), la arandela M8 (13) y la tuerca de nylon
bolt
M8(32),
(14).M8 washer(13) an M8 nylon nut(14)
bolt (15) and M8 nylon nut(14).
Attach the main frame (2) onto crossbar tube(3)and fix tightly by M8 x55mm
Step 4
Step
4 4
Paso
Attach the main frame (2) onto crossbar tube(3)and fix tightly by M8 x55mm
Acople el armazón principal (2) sobre el tubo transversal (13) y fije bien
utilizando el perno M8 x 55mm (15) y la tuerca de nylon M8 (14).
bolt (15) and M8 nylon nut(14).
the foam tube. Put 19mm round inner caps (9) into the foam tube (10) on both
side.
Insert foam tube(10) through front support tube(4), then, slide foams(19) onto
Please lubricate M10 x 60mm bolt with grease before using
Attach the leg curl tube(4) to the front support tube(8). Then fix it with M10 x
60mm bolt (26) and M10 nylon nuts (27)
Lubrique
Step 5
Paso
Step
55
Attach the leg curl tube(4) to the front support tube(8). Then fix it with M10 x
Acople el tubo de contracción de piernas (4) al tubo de soporte delantero
60mm
bolt (26)
andcon
M10elnylon
(8). Luego
fíjelo
pernonuts
M8(27)
x 60mm (28) y las tuercas de nylon M10
(27).
Please lubricate M10 x 60mm bolt with grease before using
Insert foam tube(10) through front support tube(4), then, slide foams(19) onto
ADVERTENCIA
the foam tube. Put 19mm round inner caps (9) into the foam tube (10) on both
Lubrique el perno M10 x 60mm con aceite antes de utilizarlo.
side.
Inserte el tubo para el acolchado (10) a través del tubo de soporte delantero (4). Luego deslice los acolchados o espumas (19) por el tubo para
el acolchado. Coloque los tapones internos redondos de 19mm (9) dentro
del tubo para el acolchado (10) en ambos extremos.
40mm(24) and M6 washer(21). Then put 25mm square inner cap(28) into the
both side of backrest tube(5)
Attach the backrest tube(5) to the beck cushion(6) and tighten with M6 x
Put backrest tubes (5) through the welded steel bar.
tube and lock with lock pin.
Put the backrest bar (7) to the proper position on the both side of barbell rest
Step 6
Barra de acero soldada
Paso 6
Step 6
Coloque
la barra
(7) en
la posición
enbarbell
ambosrest
exPut
the backrest
bardel
(7)respaldar
to the proper
position
on theadecuada
both side of
tremos
del
tubo
de
apoyo
de
la
barra
para
pesas
y
asegure
con
la
clavija.
tube and lock with lock pin.
Coloque los tubos del respaldar (5) a través de la barra de acero solPut
backrest tubes (5) through the welded steel bar.
dada.
Acople
tubo deltube(5)
respaldar
(5)beck
al cojín
posterior
(6)tighten
y ajuste
con
Attach
theelbackrest
to the
cushion(6)
and
with
M6elx
tornillo
M6
x
40mm
(24)
y
la
arandela
M6
(21).
Luego
coloque
el
40mm(24) and M6 washer(21). Then put 25mm square inner cap(28)tapón
into the
interno cuadrado de 25mm (28) dentro de ambos extremos del tubo del
both side of backrest tube(5)
respaldar (5).
Fix seat cushion (11) on main frame(2) and tighten with M6 x 15mm screw(23)
Step 7
Step 7
Paso 7
Fix seat cushion (11) on main frame(2) and tighten with M6 x 15mm screw(23)
Fije el cojín del asiento (11) sobre el armazón principal (2) y ajuste con el
tornillo M6 x 15mm (23).
Then, put the foam tube(short) (40) through the butterfly bar (22)
120mm bolt (38), M10 washer (39), and M10 nylon nut (27).
Attach the butterfly bar (22) to barbell rest tube (1) and fix tightly by M10 x
Step 8
Paso
Step
8 8
Acople
barra mariposa
al tubo
de apoyo
defixlatightly
barraby
para
Attach
thela
butterfly
bar (22) to(22)
barbell
rest tube
(1) and
M10piezas
x
(1) y fije bien utilizando el perno M10 x 120mm (38), la arandela M10
(39) y la tuerca de nylon M10 (27).
120mm
(38), M10
washer
and M10 nylon
nut(40)
(27).a través de la barra
Luegobolt
coloque
el tubo
para(39),
el acolchado
(corto)
mariposa (22).
Then, put the foam tube(short) (40) through the butterfly bar (22)
Put 25mm round inner cap(20) into butterfly bar and clips with spring collar (32)
Then, put the plastic sleeve (37) on barbell rest tube(1).
foam(19) onto foam tube (short) (40) and put inner cap(19) into foam tube
Put 30mm square inner cap(18) into both side of butterfly bar(22) and slide
Step 9
Paso 9
Step 9
Coloque el tapón interno cuadrado de 30mm (18) dentro de ambos extre-
Put
30mm
cap(18)
into
both side
butterfly bar(22)
and slide
mos
de lasquare
barra inner
mariposa
(22)
y deslice
elofacolchado
o espuma
(19) en el
tubo para el acolchado (corto) (40) y luego coloque el tapón interno (19)
foam(19)
onto
foam
tube
(40) and put inner cap(19) into foam tube
dentro del
tubo
para
el(short)
acolchado.
Luego coloque la manga plástica (37) en el tubo de apoyo de la barra para
pesas (1).
Then, put the plastic sleeve (37) on barbell rest tube(1).
Coloque el tapón interno redondo de 25mm (20) dentro de la barra mariposa y enganche o asegure con la presilla con resorte (32).
Put 25mm round inner cap(20) into butterfly bar and clips with spring collar (32)
are flush with the outer bar
indicated holes. Using a hammer, tap the 2 roll pins(34) into the holes until they
Insert the inner weight bar(36) into the outer weight bar(33) and align the
Step 10
Paso
Step 10
10
Inserte
la barra de pesas interna (36) a la barra (33) y alinee los aguInsert the inner weight bar(36) into the outer weight bar(33) and align the
jeros indicados. Utilizando un martillo, golpee y encaje las dos clavijas
(34) dentro de los agujeros hasta que queden al ras del nivel de la barra
indicated holes. Using a hammer, tap the 2 roll pins(34) into the holes until they
externa.
are flush with the outer bar
Cómo colocar
Attaching
weight las pesas
weight rests to balance the bench.
When using the leg extension, place a barbell with the same amount of weight on the
Barra para pesas
DO NOT PLACE MORE THAN 50 POUNDS ON THE LEG EXTENSION
To use the Leg extension (4), slide the desired weights onto the weight tube on the leg extension.
Coloque una cantidad equivalente de peso (25, 31) en cada extremo de
la barra
para
pesas.
Deslice
la presilla
contra
lasthe
pesas
Slide
an equal
amount
of weight
(25, 31)
onto eachcon
endresorte
of the barbell.
Slide
springy
asegúrelas
collar
against thetotalmente.
weights and tighten them fully.
ADVERTENCIA
Siempre
asegure
las pesas
31)barbell
colocadas
enspring
la barra
para
pesas con
Always
secure
the weights
(25, 31)(25,
on the
with the
collars
(35).
las
presillas
con
resorte
(35).
Never use the barbell with more 70 pounds.
Nunca utilice la barra para pesas con un peso mayor a 70 libras.
Always secure the weights (25, 31) on the barbell with the spring collars (35).
Never use the barbell with more 70 pounds.
collar against the weights and tighten them fully.
Slide an equal amount of weight (25, 31) onto each end of the barbell. Slide the spring
Tubo para pesas
Pesa
To use the Leg extension (4), slide the desired weights onto the weight tube on the leg extension.
Para utilizar el tubo de contracción de piernas (4), deslice el número deseado de pesas en el tubo para pesas ubicado en el sistema de contracción de piernas.
DO NOT PLACE MORE THAN 50 POUNDS ON THE LEG EXTENSION
When using the leg extension, place a barbell with the same amount of weight on the
NO COLOQUE MÁS DE 50 LIBRAS EN ELTUBO DE CONTACCIÓN DE
PIERNAS.
weight rests to balance the bench.
Attaching weight
ADVERTENCIA
Al momento de utilizar el tubo de contracción de piernas, coloque la barra
para pesas con la misma cantidad de peso en ambos apoyos para equilibrar el equipo.