1
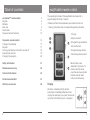
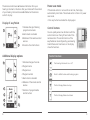
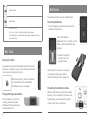
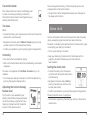
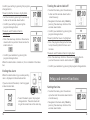
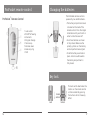
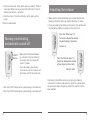
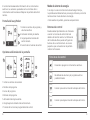
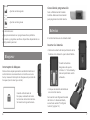
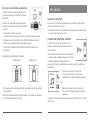
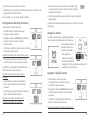
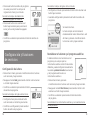
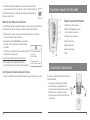
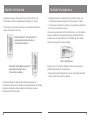
ProPocket™
easyPocket™
Remote Control
User Guide
usa.siemens.com/hearing
Life sounds brilliant.
Congratulations!
Dear Customer,
Your hearing instruments are equipped with technology that
allows them to be controlled by your remote control.
These instructions describe how to operate your remote
control quickly and easily.
It also provides you with important information on how to
handle your instruments.
Your Hearing Care Professional can answer any further questions
about instructions and proper use.
Enhance your Siemens experience.
Learn about your hearing aids and accessories you may find
helpful, access the latest information about hearing health, and
receive promotional offers by joining the Siemens hearing health
community at*:
http://hearing.siemens.com/us/en/services/subscription/subscribe.html
*We respect your privacy. We will not sell, rent, or give your name or e-mail address to anyone.
At any time, you can select a link at the bottom of every email to unsubscribe or update profile.
Table of contents
easyPocket remote control
easyPocket™ remote control3
Key lock 6
Batteries7
Daily use
8
Alarm clock 11
Setup and service functions
13
Propocket™ remote control16
Changing the batteries
17
Key lock 17
Turning your hearing instruments on and off
18
Adjusting the volume
19
Changing the program 20
Safety information
21
Maintenance and care
24
Technical information
25
Performance checklist
27
Warranty and service
28
The operating distance of the easyPocket remote control is
approximately 40 inches (1 meter).
• Make sure the distance between your remote control and
hearing instrument does not exceed the operating distance.
1 Display
2 Key lock switch
1
2
4
3 Programming connection
4 Control buttons
3
5 Program change button
5
6
6 Volume up/down buttons
More functions are
available in the menu. To
enter or exit the menu,
press the volume up button
and the volume down
button simultaneously.
Display
All actions initiated with the remote
control are immediately reflected on the
display. For example, if you press the volume
up button, the following icon is displayed.
2
3
The remote control does not receive information from your
hearing instruments. All actions that you initiate with the controls
of your hearing instruments are not reflected on the remote
control’s display.
Power save mode
If the remote control is not used for some time, the display
automatically turns black. The remote control is then in its power
&RQWUROEXWWRQV
RQWUROEXWWRQV
&
save
mode.
<RXFDQTXLFNO\DFFHVVWZR
<RXFDQTXLFNO\DFFHVVWZR
•IXQFWLRQVZLWKWKHFRQWURO
Press any button to activate the display again.
IXQFWLRQVZLWKWKHFRQWURO
Display of easyPocket
1 Indicates change of hearing
program and volume
1
2 Alarm clock is activated
2
4
3 Batteries of the remote control
are low
3
4 Function of control buttons
Additional display options
3
3
4
5
4
6
VKRZWKHIXQFWLRQV
Control functions
%DVLFIXQFWLRQV
%DVLFIXQFWLRQV
7XUQKHDULQJLQVWUXPHQWVRQRURII
7XUQKHDULQJLQVWUXPHQWVRQRURII
7XUQKHDULQJLQVWUXPHQWVRQRURII
Turn hearing instruments on or off.
7
4
4 Program number
5
6
5 Alarm clock is activated
7 Function of programmable
control buttons
7
show the functions.
5HVHWWRGHIDXOWYROXPHDQGKHDULQJSURJUDP
6 Batteries of the remote control
are low
2
<RXFDQTXLFNO\DFFHVVWZR
IXQFWLRQVZLWKWKHFRQWURO
7KHFRQWUROEXWWRQVRIWKH
7KHFRQWUROEXWWRQVRIWKH
EXWWRQVRQWKHULJKWKDQG
You
can
quickly
access
two
functions
with the
HDV\3RFNHWDGYDQFHG
HDV\3RFNHWDGYDQFHG
VLGHRIWKHUHPRWHFRQWURO
control
buttons
on
the
right
hand
side of the
FDQEHFRQÀJXUHGE\\RXU
FDQEHFRQÀJXUHGE\\RXU
7KHFRQWUROEXWWRQVRIWKH
HDV\3RFNHWDGYDQFHG
+HDULQJ&DUH3URIHVVLRQDO
+HDULQJ&DUH3URIHVVLRQDO
remote
control. The control buttons
of the
FDQEHFRQÀJXUHGE\\RXU
6PDOOLFRQVRQWKHGLVSOD\
6PDOOLFRQVRQWKHGLVSOD\
easyPocket
can be configured by
your Hearing
+HDULQJ&DUH3URIHVVLRQDO
VKRZWKHIXQFWLRQV
VKRZWKHIXQFWLRQV
6PDOOLFRQVRQWKHGLVSOD\
Care
Professional. Small icons on
the display
2 Program name
3 Program icon
&RQWUROEXWWRQV
%DVLFIXQFWLRQV
2 1 Indicates change of volume
1
EXWWRQVRQWKHULJKWKDQG
EXWWRQVRQWKHULJKWKDQG
VLGHRIWKHUHPRWHFRQWURO
VLGHRIWKHUHPRWHFRQWURO
Control
buttons
5HVHWWRGHIDXOWYROXPHDQGKHDULQJSURJUDP
5HVHWWRGHIDXOWYROXPHDQGKHDULQJSURJUDP
Reset to default volume and hearing program
$GYDQFHGIXQFWLRQVIRUHDV\3RFNHWDGYDQFHGRQO\
$GYDQFHGIXQFWLRQVIRUHDV\3RFNHWDGYDQFHGRQO\
7LQQLWXVQRLVHUOHYHOXS
<RXUUHPRWHFRQWURO
7LQQLWXVQRLVHUOHYHOXS
Tinnitus therapy feature level up.
7LQQLWXVQRLVHUOHYHOGRZQ
<RXUUHPRWHFRQWURO
7LQQLWXVQRLVHUOHYHOGRZQ
<RXUUHPRWHFRQWURO
Tinnitus therapy feature level down
$GMXVWWUHEOH
$GMXVWWUHEOH
$GMXVWEDVV
$GMXVWEDVV
5
$GMXVWWUHEOH
$GMXVWWUHEOH
Adjust treble
,QVHUWLQJEDWWHULHV
Batteries 7KHUHPRWHFRQWUROXVHVWZR$$$EDWWHULHV
X6OLGHWKHEDWWHU\FRPSDUWPHQWFRYHU
LQWKHGLUHFWLRQRIWKHDUURZ
$GMXVWEDVV
$GMXVWEDVV
,QVHUWLQJEDWWHULHV
6OLGHWKHEDWWHU\FRPSDUWPHQWFRYHU
The remote control X
uses
two AAA batteries.
LQWKHGLUHFWLRQRIWKHDUURZ
Adjust bass
Inserting batteries
$OORWKHULFRQV
$OORWKHULFRQV
.H\ORFNVZLWFK
All other icons:
6KRUWFXWWRVHOHFWDSUHIHUUHGKHDULQJSURJUDP
6KRUWFXWWRVHOHFWDSUHIHUUHGKHDULQJSURJUDP
7KHDYDLODEOHLFRQVDQGKHDULQJSURJUDPVGHSHQGRQ\RXU
X7RSUHYHQWDQ\DFFLGHQWDORSHUDWLRQZKLOH
Shortcut to select a preferred hearing program.
7KHDYDLODEOHLFRQVDQGKHDULQJSURJUDPVGHSHQGRQ\RXU
SHUVRQDOVHWXS
SHUVRQDOVHWXS
• Slide the battery compartment cover in the
direction of the arrow.
WKHUHPRWHFRQWUROLVLQSRFNHWVRUEDJV
The available icons and hearing programs depend on your
X,QVHUWWKHEDWWHULHV
personal setup.
PRYHWKHNH\ORFNVZLWFKWRORFNSRVLWLRQ
0DNHVXUHWKHV\PEROVRQWKH
UHGFRORUYLVLEOH
Insert the batteries.
Make sure the “+” symbols on the
battery
and compartment are
X,QVHUWWKHEDWWHULHV
aligned.
0DNHVXUHWKHV\PEROVRQWKH
EDWWHU\DQGFRPSDUWPHQWDUHDOLJQHG
Key lock
HUDWLRQZKLOH
HWVRUEDJV
RFNSRVLWLRQ
LV
Batteries
7KHUHPRWHFRQWUROXVHVWZR$$$EDWWHULHV
.H\ORFNVZLWFK <RXUUHPRWHFRQWURO
<RXUUHPRWHFRQWURO
EDWWHU\DQGFRPSDUWPHQWDUHDOLJQHG
X$WWDFKWKHFRYHU
• Attach the
cover by
E\VOLGLQJLW
sliding it RQWRWKHUHPRWH
onto the
FRQWURO
remote control.
Key lockX
switch
7RSUHYHQWDQ\DFFLGHQWDORSHUDWLRQZKLOH
WKHUHPRWHFRQWUROLVLQSRFNHWVRUEDJV
To prevent any
accidental operation while the remote
PRYHWKHNH\ORFNVZLWFKWRORFNSRVLWLRQ
control:KHQWKHNH\ORFNLVDFWLYHDOO
is in pockets
or bags, move the key lock switch
UHGFRORUYLVLEOH
to lockEXWWRQVRQWKHUHPRWHFRQWURO
position (red color visible).
DUHGLVDEOHG7KHIROORZLQJLFRQLV
GLVSOD\HG
When the key lock is active, all buttons
on the remote control are disabled.
The following icon is displayed.
3URJUDPPLQJFRQQHFWLRQ
:KHQWKHNH\ORFNLVDFWLYHDOO
Programming
connection
7KLVFRQQHFWLRQLVRQO\WR
EXWWRQVRQWKHUHPRWHFRQWURO
This connection is only to be
EHXVHGE\\RXU+HDULQJ
DUHGLVDEOHG7KHIROORZLQJLFRQLV
used by your Hearing Care
&DUH3URIHVVLRQDOIRU
GLVSOD\HG
Professional for programming
SURJUDPPLQJWKHUHPRWH
the remote control.
FRQWURO
6
3URJUDPPLQJFRQQHFWLRQ
The current time setting is displayed.
If you want to change it, refer to
section “Setting the time” (page 13).
%DWWHULHV
&KHFNLQJWKHEDWWHU\VWDWXV
7KHFXUUHQWWLPHVHWWLQJLVGLVSOD\HG,I\RXZDQWWR
FKDQJHLWUHIHUWRVHFWLRQ6HWWLQJWKHWLPH%DWWHULHV
:KHQWKHEDWWHULHVRIWKHUHPRWH
Checking
the battery status
FRQWURODUHORZWKLVLVLQGLFDWHGLQ
When theWKHVWDWXVEDU
batteries of the remote control
are low, this is indicated in the status bar.
$GGLWLRQDOO\\RXFDQFKHFNWKH
Additionally,
you can check the battery
EDWWHU\VWDWXVDWDQ\WLPHLQWKH
status at PHQX
any time in the menu.
X7RHQWHUWKHPHQXSUHVVWKHYROXPHXSEXWWRQDQG 7
WKHYROXPHGRZQEXWWRQVLPXOWDQHRXVO\
X
X
7RHQWHUWKHPHQXSUHVVWKHYROXPHXSEXWWRQDQG
7RHQWHUWKHPHQXSUHVVWKHYROXPHXSEXWWRQDQG
HDV\3RFNHWEDVLF
WKHYROXPHGRZQEXWWRQVLPXOWDQHRXVO\
WKHYROXPHGRZQEXWWRQVLPXOWDQHRXVO\
• To enter the menu, press the volume up button and the volume
Changing
the hearing program
X3UHVVWKHSURJUDPFKDQJHEXWWRQ
X
X
1DYLJDWHWRWKHPHQXHQWU\,QIRE\SUHVVLQJWKH
1DYLJDWHWRWKHPHQXHQWU\,QIRE\SUHVVLQJWKH
down
button
simultaneously.
WRVZLWFKWRWKHQH[W
If you are wearing two hearing
YROXPHXSEXWWRQRUWKHYROXPHGRZQEXWWRQ
YROXPHXSEXWWRQRUWKHYROXPHGRZQEXWWRQ
• Navigate to the menu entry Info by pressing the volume up
KHDULQJSURJUDP
instruments,
the hearing program
X
X
&RQÀUP\RXUVHOHFWLRQE\SUHVVLQJWKHSURJUDP
&RQÀUP\RXUVHOHFWLRQE\SUHVVLQJWKHSURJUDP
button
or the volume down button.
will be changed on both instruments.
FKDQJHEXWWRQ
FKDQJHEXWWRQ
HDV\3RFNHWDGYDQFHG
• Confirm your selection by pressing the
program change button.
• Press the program change button to switch
7KHEDWWHU\VWDWXVLVGLVSOD\HG
7KHEDWWHU\VWDWXVLVGLVSOD\HG
to the next hearing program.
The battery status is displayed:
X3UHVVWKHSURJUDPFKDQJHEXWWRQUHSHDWHGO\XQWLOWKH
EDWWHU\IXOO
EDWWHU\IXOO
EDWWHU\HPSW\
EDWWHU\HPSW\
LFRQRIWKHGHVLUHGKHDULQJSURJUDPLVGLVSOD\HG
Your Hearing Care Professional may
configure your easyPocket to show specific situations.
RU
X3UHVVWKHFRQWUROEXWWRQQH[WWRWKH
LFRQLQGLFDWLQJWKHGHVLUHGKHDULQJ
SURJUDP
•Press the program change button
repeatedly until the icon of the desired
hearing program is displayed.
or
7KHFRQWUROEXWWRQVKDYHWREH
•Press the control button next to the
FRQÀJXUHGE\\RXU+HDULQJ&DUH
FKDQJHEXWWRQ
FKDQJHEXWWRQ
icon indicating the desired hearing
'DLO\XVH
3URIHVVLRQDO
• To return to the standard display, press the
program
program.
5HPRYHHPSW\EDWWHULHVLPPHGLDWHO\DQGGLVSRVHRIWKHP
5HPRYHHPSW\EDWWHULHVLPPHGLDWHO\DQGGLVSRVHRIWKHP
change
button.
7XUQLQJRQDQGRIIPXWH
DFFRUGLQJWRORFDOUHJXODWLRQV
DFFRUGLQJWRORFDOUHJXODWLRQV
The
control
buttons
have
to
be configured by your
Remove empty batteries immediately and dispose of them
<RXKDYHVHYHUDORSWLRQVWRWXUQ\RXUKHDULQJLQVWUXPHQWV
Hearing Care
Professional.
according to local regulations.
RQDQGRIIZLWK\RXUUHPRWHFRQWURO
%DWWHULHV
%DWWHULHV %RWKKHDULQJLQVWUXPHQWVDUH
MutingVLPXOWDQHRXVO\WXUQHGRQRURII
You have several options to mute your
:KHQ\RXWXUQ\RXUKHDULQJ
hearing instruments with your remote
LQVWUXPHQWVRIIYLDUHPRWHFRQWURO
control. Both hearing instruments are
WKHIROORZLQJLFRQLVGLVSOD\HG,WLV
simultaneously muted.
GLVSOD\HGXQWLO\RXWXUQ\RXUKHDULQJ
When you
mute your hearing instruments via remote control, the
LQVWUXPHQWVEDFNRQ
Adjusting the volume
following icon is displayed. It is displayed until you unmute your
$GGLWLRQDOO\DOOEXWWRQVDUHGLVDEOHG7KHRQO\DYDLODEOH
If you are wearing two hearing instruments, the volume will be
hearing instruments.
adjusted on both instruments at the same time.
IXQFWLRQLVWRWXUQWKHKHDULQJLQVWUXPHQWVEDFNRQ
Additionally, all buttons are disabled. The only available function
• Press the volume up button or the volume down button to
$IWHUWXUQLQJRQWKHSUHYLRXVO\XVHGYROXPHDQGKHDULQJ
is to unmute
the hearing instruments.
adjust the volume by one step.
SURJUDPDUHVHW
After unmuting, the previously used volume and hearing program
are set. 9LDFRQWUROEXWWRQ
X3UHVVWKHFRQWUROEXWWRQQH[WWRWKHIROORZLQJ
8
9
LFRQWRWXUQ\RXUKHDULQJLQVWUXPHQWVRQRURII
'DLO\XVH
battery full battery empty
X
X
7RUHWXUQWRWKHVWDQGDUGGLVSOD\SUHVVWKHSURJUDP
7RUHWXUQWRWKHVWDQGDUGGLVSOD\SUHVVWKHSURJUDP
Daily use
$IWHUWXUQLQJRQWKHSUHYLRXVO\XVHGYROXPHDQGKHDULQJ
SURJUDPDUHVHW
Via control
button
9LDFRQWUROEXWWRQ
Press the
control
button next to the following icon
X
3UHVVWKHFRQWUROEXWWRQQH[WWRWKHIROORZLQJ
to mute orLFRQWRWXUQ\RXUKHDULQJLQVWUXPHQWVRQRURII
unmute your hearing instruments.
The control buttons have to be configured by your
7KHFRQWUROEXWWRQVKDYHWREHFRQÀJXUHGE\
Hearing Care Professional.
\RXU+HDULQJ&DUH3URIHVVLRQDO
Via menu
Mute:
• To enter the menu, press the volume up button and the volume
down button simultaneously.
• Navigate to the menu entry HI Mute / Unmute by pressing the
volume up button or the volume down button.
• Confirm
selection by pressing the program change button.
your
'DLO\XVH
Unmuting:
• Press any button to activate the display.
• Wait until the information about the muted hearing instruments
disappears.
The menu is displayed and the HI Mute / Unmute entry is still
selected.
• To unmute your hearing instruments, confirm the selection by
$GMXVWLQJWKHWLQQLWXVQRLVHUOHYHO
pressing
the program change button.
7KLVIXQFWLRQLVRQO\DYDLODEOHLI\RXU+HDULQJ&DUH
Adjusting
the tinnitus therapy
3URIHVVLRQDOKDVFRQÀJXUHGWKH
feature
level
WLQQLWXVQRLVHUIRUERWK\RXUKHDULQJ
LQVWUXPHQWVDQGIRUWKHFRQWURO
This function
is only available if your
EXWWRQVRIWKHUHPRWHFRQWURO
Hearing
Care Professional has configured
the tinnitus
therapy signal for both your
<RXFDQUHFRJQL]HWKHVHWWLQJLIWKH
hearing
instruments
and for the control
FRUUHVSRQGLQJLFRQVDUHGLVSOD\HG
buttons of the remote control.
QH[WWRWKHFRQWUROEXWWRQV
10
X7RDGMXVWWKHQRLVHUOHYHOSUHVVWKHXSSHURUWKHORZHU
FRQWUROEXWWRQ
Alarm clock
You can recognize the setting, if the corresponding icons are
displayed
next to the control buttons.
<RXFDQVHWDQDODUPFORFNUHPLQGLQJ\RXDWWKHVDPH
WLPHHYHU\GD\E\DUHSHDWLQJVLJQDOWRQHDQGE\DQDODUP
• To adjust
the tinnitus therapy feature level, press the upper or
the lower
control button.
FORFNLFRQ
7KHDODUPLVLQLWLDWHGE\WKHUHPRWHFRQWUROEXW
WKHDFRXVWLFVLJQDOLVHPLWWHGE\\RXUKHDULQJ
LQVWUXPHQWV
Alarm clock
X7XUQRQ\RXUKHDULQJLQVWUXPHQWV
X
.HHS\RXUKHDULQJLQVWUXPHQWVZLWKLQWKH
You can set an
alarm
clock to remind you at the same time every
UHPRWHFRQWURO·VRSHUDWLQJGLVWDQFH
day by a repeating
signal tone and by an alarm clock icon.
2WKHUZLVH\RXZLOOQRWEHDEOHWRKHDUWKHDODUP
The alarm is initiated
by the remote control but the acoustic signal
is emitted
by your hearing instruments.
6HWWLQJWKHDODUPFORFN
• Turn on your hearing instruments.
X7RHQWHUWKHPHQXSUHVVWKHYROXPHXSEXWWRQDQG
• Keep your
hearing instruments within the remote control’s
WKHYROXPHGRZQEXWWRQVLPXOWDQHRXVO\
operating distance. Otherwise you will not be able to
X1DYLJDWHWRWKHPHQXHQWU\$ODUPE\SUHVVLQJWKH
hear the
alarm.
YROXPHXSEXWWRQRUWKHYROXPHGRZQEXWWRQ
Setting
the alarm clock
X&RQÀUP\RXUVHOHFWLRQE\SUHVVLQJ
• To enterWKHSURJUDPFKDQJHEXWWRQ
the menu, press the volume
up button and the volume down button
7KHHQWU\ÀHOGIRUKRXUVLV
simultaneously.
KLJKOLJKWHG
• Navigate to the menu entry Alarm by
X6HWWKHKRXUVE\SUHVVLQJ
pressing
the volume up button or the
volume WKHYROXPHXSEXWWRQRUWKH
down button.
YROXPHGRZQEXWWRQ
• Confirm your selection by pressing the program change button.
The entry field for hours is highlighted.
• Set the hours by pressing the volume up button or the volume
down button.
$ODUPFORFN 11
WKHSURJUDPFKDQJHEXWWRQ
ConfirmX
your
setting by pressing the program
&RQÀUP\RXUVHWWLQJE\SUHVVLQJ
7KHHQWU\ÀHOGIRUPLQXWHVLV
X
&RQÀUP\RXUVHWWLQJE\SUHVVLQJ
X
&RQÀUP\RXUVHWWLQJE\SUHVVLQJ
change button.
WKHSURJUDPFKDQJHEXWWRQ
KLJKOLJKWHG
WKHSURJUDPFKDQJHEXWWRQ
WKHSURJUDPFKDQJHEXWWRQ
The entry
field
for minutes is highlighted.
7KHHQWU\ÀHOGIRUPLQXWHVLV
X6HWWKHPLQXWHVE\SUHVVLQJ
7KHHQWU\ÀHOGIRUPLQXWHVLV
7KHHQWU\ÀHOGIRUPLQXWHVLV
KLJKOLJKWHG
• Set the minutes
by pressing the volume up
WKHYROXPHXSEXWWRQRUWKH
KLJKOLJKWHG
KLJKOLJKWHG
buttonX
or
the volume down button.
YROXPHGRZQEXWWRQ
6HWWKHPLQXWHVE\SUHVVLQJ
X6HWWKHPLQXWHVE\SUHVVLQJ
X
6HWWKHPLQXWHVE\SUHVVLQJ
X
&RQÀUP\RXUVHWWLQJE\SUHVVLQJ
• Confirm
your
setting by pressing the
WKHYROXPHXSEXWWRQRUWKH
WKHYROXPHXSEXWWRQRUWKH
WKHYROXPHXSEXWWRQRUWKH
programWKHSURJUDPFKDQJHEXWWRQ
change
button.
YROXPHGRZQEXWWRQ
YROXPHGRZQEXWWRQ
YROXPHGRZQEXWWRQ
X
&RQÀUP\RXUVHWWLQJE\SUHVVLQJ
The alarm
on/off
selection
field is
7KHDODUPRQRIIVHOHFWLRQÀHOGLV
X&RQÀUP\RXUVHWWLQJE\SUHVVLQJ
X
&RQÀUP\RXUVHWWLQJE\SUHVVLQJ
highlighted.
WKHSURJUDPFKDQJHEXWWRQ
KLJKOLJKWHG
WKHSURJUDPFKDQJHEXWWRQ
WKHSURJUDPFKDQJHEXWWRQ
• PressX
the
volume up button or the volume
7KHDODUPRQRIIVHOHFWLRQÀHOGLV
3UHVVWKHYROXPHXSEXWWRQRUWKH
7KHDODUPRQRIIVHOHFWLRQÀHOGLV
7KHDODUPRQRIIVHOHFWLRQÀHOGLV
down button
to position the cursor next to
KLJKOLJKWHG
YROXPHGRZQEXWWRQWRSRVLWLRQ
KLJKOLJKWHG
KLJKOLJKWHG
alarm clock
on:
WKHFXUVRUQH[WWRDODUPFORFNRQ
X
X3UHVVWKHYROXPHXSEXWWRQRUWKH
3UHVVWKHYROXPHXSEXWWRQRUWKH
X
3UHVVWKHYROXPHXSEXWWRQRUWKH
YROXPHGRZQEXWWRQWRSRVLWLRQ
YROXPHGRZQEXWWRQWRSRVLWLRQ
YROXPHGRZQEXWWRQWRSRVLWLRQ
WKHFXUVRUQH[WWRDODUPFORFNRQ
WKHFXUVRUQH[WWRDODUPFORFNRQ
X&RQÀUP\RXUVHOHFWLRQE\SUHVVLQJWKHSURJUDP
• Confirm
your
selection by pressing the
WKHFXUVRUQH[WWRDODUPFORFNRQ
programFKDQJHEXWWRQ
change button.
When the
alarm
clock is turned on, this is indicated in the status
X
&RQÀUP\RXUVHOHFWLRQE\SUHVVLQJWKHSURJUDP
:KHQWKHDODUPFORFNLVWXUQHGRQ
X
&RQÀUP\RXUVHOHFWLRQE\SUHVVLQJWKHSURJUDP
X
&RQÀUP\RXUVHOHFWLRQE\SUHVVLQJWKHSURJUDP
bar. WKLVLVLQGLFDWHGLQWKHVWDWXVEDU
FKDQJHEXWWRQ
FKDQJHEXWWRQ
FKDQJHEXWWRQ
:KHQWKHDODUPFORFNLVWXUQHGRQ
:KHQWKHDODUPFORFNLVWXUQHGRQ
Ending
the
alarm
:KHQWKHDODUPFORFNLVWXUQHGRQ
WKLVLVLQGLFDWHGLQWKHVWDWXVEDU
WKLVLVLQGLFDWHGLQWKHVWDWXVEDU
WKLVLVLQGLFDWHGLQWKHVWDWXVEDU
When the
alarm clock rings, a corresponding
icon is displayed on the remote control.
If you do not end the alarm, it will ring again
a few minutes later.
RQWKH
HV
$ODUPFORFN
• To end the alarm, press the program
$ODUPFORFN change button. The alarm clock will
$ODUPFORFN
$ODUPFORFN ring at the same time on the next day.
URJUDPFKDQJHEXWWRQ
12
DPHWLPHRQWKHQH[W
X1DYLJDWHWRWKHPHQXHQWU\$ODUPE\SUHVVLQJWKH
X1DYLJDWHWRWKHPHQXHQWU
YROXPHXSEXWWRQRUWKHYROXPHGRZQEXWWRQ
YROXPHXSEXWWRQRUWKHY
Turning
the alarm clock off
X&RQÀUP\RXUVHOHFWLRQE\SUHVVLQJ
X&RQÀUP\RXUVHOHFWLRQE\
• To enterWKHSURJUDPFKDQJHEXWWRQ
the menu, press the volume up
WKHSURJUDPFKDQJHEXWWR
button and
the volume down button
7KHHQWU\ÀHOGIRUKRXUVLV
simultaneously.
7KHHQWU\ÀHOGIRUKRXUVLV
KLJKOLJKWHG
KLJKOLJKWHG
• Navigate to the menu entry Alarm by
pressing the volume up button or the
volume down button.
X3UHVVWKHSURJUDPFKDQJHEXWWRQ
• ConfirmWZLFHWRVNLSWKHHQWU\ÀHOGVIRU
your selection by pressing the X3UHVVWKHSURJUDPFKDQJH
programKRXUVDQGPLQXWHV
change button.
WZLFHWRVNLSWKHHQWU\ÀHOG
KRXUVDQGPLQXWHV
The entry field for hours is highlighted.
7KHDODUPRQRIIVHOHFWLRQÀHOGLV
• Press theKLJKOLJKWHG
program change button twice
7KHDODUPRQRIIVHOHFWLRQ
to skip the entry fields for hours and
KLJKOLJKWHG
X
3UHVVWKHYROXPHXSEXWWRQRUWKH
Setup
and service functions
minutes.
YROXPHGRZQEXWWRQWRSRVLWLRQX3UHVVWKHYROXPHXSEXWWR
The alarm on/off selection field is highlighted.YROXPHGRZQEXWWRQWRSR
WKHFXUVRUQH[WWRDODUPFORFNRII
• Press 6the
volume up button or the volume down
button to
WKHFXUVRUQH[WWRDODUPFO
HWWLQJWKHWLPH
position the cursor next to alarm clock off:
X&RQÀUP\RXUVHOHFWLRQE\SUHVVLQJWKHSURJUDP
7RHQWHUWKHPHQXSUHVVWKHYROXPHXSEXWWRQDQG
X&RQÀUP\RXUVHOHFWLRQE\
WKHYROXPHGRZQEXWWRQVLPXOWDQHRXVO\
• ConfirmFKDQJHEXWWRQ
your selection by pressing the program
change button.
FKDQJHEXWWRQ
X1DYLJDWHWRWKHPHQXHQWU\&ORFNE\SUHVVLQJWKH
YROXPHXSEXWWRQRUWKHYROXPHGRZQEXWWRQ
X&RQÀUP\RXUVHOHFWLRQE\SUHVVLQJWKHSURJUDP
Setup
and service functions
FKDQJHEXWWRQ
$ODUPFORFN
7KHHQWU\ÀHOGIRUKRXUVLVKLJKOLJKWHG
$ODUPFORFN
Setting the time
X6HWWKHKRXUVE\SUHVVLQJ
• To enterWKHYROXPHXSEXWWRQRUWKH
the menu, press the volume
up button
and the volume down button
YROXPHGRZQEXWWRQ
simultaneously.
X&RQÀUP\RXUVHWWLQJE\SUHVVLQJ
• Navigate to the menu entry Clock by
WKHSURJUDPFKDQJHEXWWRQ
pressing the volume up button or the
7KHHQWU\ÀHOGIRUPLQXWHVLV
volume down
button.
KLJKOLJKWHG
X6HWWKHPLQXWHVE\SUHVVLQJWKHYROXPHXSEXWWRQRU
13
• Confirm your selection by pressing the program change button.
The entry field for hours is highlighted.
• Set the hours by pressing the volume up
button or the volume down button.
• Confirm your setting by pressing the program change button.
The entry field for minutes is highlighted.
• Set the minutes by pressing the volume up button or the volume
down button.
• Save the settings by pressing the program change button.
QWKHKHDGHURIWKHPHQX
HVV
H
The time is displayed.
The time is always displayed in the header
5HVHWWLQJYROXPHDQGKHDULQJSURJUDP
of the menu. To enter or exit the menu,
,I\RXKDYHPDGHFKDQJHVWRYROXPHRUSURJUDPDQGGR
press the volume up button and the
QRWNQRZZK\WKHKHDULQJLQVWUXPHQWVDUHDFWLQJWKHZD\
volume down button simultaneously.
WKH\DUH\RXFDQPDQXDOO\VHWWKHGHIDXOWYROXPHDQG
KHDULQJSURJUDPIRU\RXUKHDULQJLQVWUXPHQWV
X7RHQWHUWKHPHQXSUHVVWKHYROXPHXSEXWWRQDQG
Resetting
volume and hearing program
WKHYROXPHGRZQEXWWRQVLPXOWDQHRXVO\
If you have made changes to volume or program and do not know
X
1DYLJDWHWRWKHPHQXHQWU\+,5HVWRUHE\SUHVVLQJWKH
why the
hearing
instruments are acting the way they are, you can
manually YROXPHXSEXWWRQRUWKHYROXPHGRZQEXWWRQ
set the default volume and hearing program for your
hearingX
instruments.
&RQÀUP\RXUVHOHFWLRQE\SUHVVLQJ
• To enterWKHSURJUDPFKDQJHEXWWRQ
the menu, press the volume
up button
and the volume down button
7KHKHDULQJLQVWUXPHQWVDUH
simultaneously.
UHVHWDQGDFRUUHVSRQGLQJLFRQLV
UHVHWDQGDFRUUHVSRQGLQJLFRQLV
GLVSOD\HG
The hearing instruments are reset and a corresponding
icon is displayed.
• You can alsoX
reset
the hearing instruments by pressing
<RXFDQDOVRUHVHWWKHKHDULQJ
the control button
next to the following icon.
LQVWUXPHQWVE\SUHVVLQJWKHFRQWURO
'LVSOD\LQJFRQWDFWGDWD
The control buttons
have to be configured by your
EXWWRQQH[WWRWKHIROORZLQJLFRQ
Hearing ,I\RXU+HDULQJ&DUH3URIHVVLRQDOKDVVDYHGKLVRUKHU
Care Professional.
7KHFRQWUROEXWWRQVKDYHWREHFRQÀJXUHGE\
FRQWDFWGDWDRQWKHUHPRWHFRQWURO\RXFDQYLHZWKLV
\RXU+HDULQJ&DUH3URIHVVLRQDO
LQIRUPDWLRQ
Displaying
contact data
X7RHQWHUWKHPHQXSUHVVWKHYROXPHXSEXWWRQDQG
If your Hearing
Care Professional has saved his or her contact data
WKHYROXPHGRZQEXWWRQVLPXOWDQHRXVO\
on the remote
control, you can view this information:
X
1DYLJDWHWRWKHPHQXHQWU\&RQWDFWE\SUHVVLQJWKH
• To enter
the
menu, press the volume up button
YROXPHXSEXWWRQRUWKHYROXPHGRZQEXWWRQ
and the volume
down button
simultaneously.
X&RQÀUP\RXUVHOHFWLRQE\SUHVVLQJ
• Navigate WKHSURJUDPFKDQJHEXWWRQ
to the menu entry Contact
by
6HWXSDQGVHUYLFHIXQFWLRQV
pressing the
volume
up
button
or
the
7KHFRQWDFWGDWDLVGLVSOD\HG
volume down button.
• Confirm your selection by pressing the
program change button.
The contact data is displayed.
X7RUHWXUQWRWKHVWDQGDUGGLVSOD\SUHVVWKHSURJUDP
• To return to the standard display, press the program
FKDQJHEXWWRQ
change button.
Setting the language of the menu
6HWWLQJWKHODQJXDJHRIWKHPHQX
• Ask your Hearing Care Professional.
X$VN\RXU+HDULQJ&DUH3URIHVVLRQDO
• NavigateGLVSOD\HG
to the menu entry HI Restore
by pressing the volume up button or the
volume down button.
X
<RXFDQDOVRUHVHWWKHKHDULQJ
• Confirm your
selection
by pressing the program change button.
LQVWUXPHQWVE\SUHVVLQJWKHFRQWURO
EXWWRQQH[WWRWKHIROORZLQJLFRQ
14
7KHFRQWUROEXWWRQVKDYHWREHFRQÀJXUHGE\
6HWXSDQGVHUYLFHIXQFWLRQV
15
ProPocket remote control
Changing the batteries
The ProPocket remote control is
powered by two AAAA batteries.
ProPocket™ Remote Control
• The battery compartment cover
is located on the back of the
remote control. Press the ridged
indentation with your thumb in
order to slide the cover off.
1 Lock switch
2 On/Off of hearing
instruments
3 Program change
4 Volume up
5 Volume down
6 Accessory ring
7 LED
• Insert two batteries as shown
in the picture. Make sure the
polarity symbols on the battery
and compartment are aligned
• Slide the battery cover back in
place. A click is audible when
the battery compartment is
fully closed.
Key lock
The lock switch deactivates the
buttons on the remote control
so that accidentally pressing
the buttons will not have any
effect.
Green
section
Lock
16
Unlock
17
• Slide the control over so the green section is covered. The lock
is activated. When pressing a button the LED blinks 3 times to
indicate that the lock is activated.
• Slide the control in the other direction so the green section
shows.
The lock is deactivated.
Adjusting the volume
•M
ake sure the distance between your remote control and
hearing instrument does not exceed 40 inches (1 meter).
• If you are wearing two hearing instruments, the volume will
be changed on both instruments at the same time.
Press the “Volume up” (+)
button to increase the volume
of your hearing instruments.
Turning your hearing
instruments on and off
On/Off
Button
• Make sure the distance between
your remote control and hearing
instrument does not exceed 40
inches (1 meter).
• If you are wearing two hearing
instruments, both instruments will
be turned on/off at the same time.
• Press the On/Off button to turn your hearing instruments on
• Press the On/Off button to turn your hearing instruments off
18
Volume up
Press the “Volume down” (-)
button to decrease the volume
of your hearing instruments.
Volume down
Your Hearing Care Professional can program your hearing
instruments so that you hear acoustic signals to indicate when
the volume has been changed and when the volume limit has
been reached.
19
Changing the program
• Make sure the distance between your remote control and
hearing instrument does not exceed 40 inches (1 meter).
• If you are wearing two hearing instruments, the program will be
changed on both instruments at the same time.
Each time you press the program button, your hearing
instruments switch to the next program, confirming each change
with an acoustic signal (if programmed this way by your Hearing
Care Professional).
Safety information
WARNING
Wireless systems may interfere with measuring devices and
electronic equipment.
• Do not use remote control in hospitals or airplanes.
• Have the key lock activated in hospitals or airplanes.
• Have the ePen tip closed in hospitals or airplanes.
WARNING
Program button
Example: The hearing instruments are in program 1. You want to
change to program 2.
• Press the program button once. You will hear an acoustic signal.
You are now in program 2.
Pacemaker compatibility
Siemens remote control devices have been tested and found
not to cause interference with cardiac pacemakers that are
manufactured and operated in compliance with applicable safety
standards, provided a minimum distance of 12 inches (30cm) is
maintained between the remote control and the pacemaker. To
accommodate this provision:
• Do not activate the remote within 12 inches of the pacemaker.
• Do not carry the remote in your breast pocket.
• Do not wear the remote with a lanyard around your neck.
l
• Do not place remote directly on the skin over the implanted
pacemaker.
Following these precautions, Siemens remote controls can be
operated safely by, or within the vicinity of, individuals fitted with
these pacemakers.
• For all active implants or life supporting systems other than a
pacemaker: prior to use, have the electromagnetic compatibility
verified.
20
21
WARNING
WARNING
Choking hazard posed by small parts.
Risk of explosion!
• Keep hearing instruments, batteries and accessories out of
children‘s reach.
• Do not use your remote control in explosive atmospheres
(e. g. in mining areas).
• If swallowed, consult a physician or hospital immediately.
• If infants, small children or mentally disabled persons need to
wear hearing instruments, ensure adequate supervision.
Battery tips
CAUTION! Batteries can be harmful if swallowed.
• If a battery is accidentally swallowed, seek medical attention
immediately, or call The National Button Battery Hotline
collect at (202) 625-3333.
• Always use the battery size recommended on your warranty
card or by your Hearing Care Professional for your model for
best performance.
• Remove the battery from your instrument when not in use. This
prevents possible damage from expansion or leakage of the
battery, if the instrument is not fully turned off.
• Always carry spare batteries in the event that your current
battery goes dead. Place each spare battery in an individual,
non-metallic container to prevent contact with other batteries or
metal objects, such as keys or coins.
NOTICE
Your hearing instruments are designed to comply with
international standards on electromagnetic compatibility but
interference with nearby electronic devices could occur. In this
case, move away from the source of interference.
NOTICE
For instruments with wireless connectivity: When the telecoil
program is active, the remote control may cause a pulsing noise.
• Use the remote control with a distance greater than 4 inches
(10 cm).
NOTICE
• Your remote control is programmed to exclusively communicate
with your hearing instruments. If you experience problems with
another person’s remote control, consult your Hearing Care
Professional.
• Follow your local recycling rules for battery disposal.
Note: D
o not throw used batteries into household trash. Return
them to your Hearing Care Professional for environmentally
correct disposal.
22
23
Maintenance and care
Protection
Use the “cover” to protect against accidental drips or splashes
when you go near water such as a sink.
Do not let
your hearing
instrument
get wet.
Cleaning
Note: D
o NOT put your remote control in water! The cover does
NOT make your remote control waterproof. Do NOT clean
your remote control with alcohol or benzine.
• Clean the remote control as necessary with a soft tissue.
• Avoid abrasive cleaning liquids with additives such as citric aids,
ammonia, etc.
Note:The remote control is sensitive to extreme heat, high
humidity, and mechanical stress. Do not expose the remote
control to extreme temperature or high humidity. Do not
leave it in direct sunlight. Do not immerse it in water. Do
not dry it off in a microwave oven.
Do not expose the remote control to strong radiation, e.g.
X-Ray or MRI examinations. Weaker radiation, e.g. from
airport security or radio equipment will not damage the
device.
Technical Information
24
Technical information
Wireless technology provides synchronization between two
hearing instruments. If you change the program or volume on
one instrument, the other is automatically changed. In addition,
wireless technology automatically adjusts the system to change
both hearing instruments simultaneously to adapt to different
listening situations.
Operating frequencies ProPocket: Fc=3.28 MHz
CE, FCC and IC compliance information can be found inside the
battery compartment.
Changes or modifications not expressly approved by the party
eesponsible for compliance could void the user’s authority to
operate the equipment.
Siemens easyPocket
FCC: SGI‑WL700
IC: 267AB‑WL700
ProPocket remote control
FCC: SGI-WL101
IC: 267AB-W101
This Class B digital apparatus II radiocommunication device
complies with Part 15 of the FCC rules and Industry Canada
Standard RSS-210. Operation is subject to the following two
conditions:
(1) this device may not cause interference.
(2) this device must accept any interference, including
interference that may cause undesired operation of the device.
This equipment has been tested and found to comply with
the limits for a Class B digital device, pursuant to Part 15 of
the FCC rules and Industry Canada Standard RSS-210. These
25
limits are designed to provide reasonable protection against
harmful interference in a residential installation. This equipment
generates, uses and can radiate radio frequency energy and, if not
installed and used in accordance with
the instructions, may cause harmful interference to radio
communications. However, there is no guarantee that
interference will not occur in a particular installation. If this
equipment does cause harmful interference to radio or television
reception, which can be determined by turning the equipment off
and on, the user is encouraged to try to correct the interference
by one or more of the following measures:
• Reorient or relocate the receiving antenna.
• Increase the separation between the equipment and receiver.
• Connect the equipment into an outlet on a circuit different from
that to which the receiver is connected.
• Consult the dealer or an experienced radio/TV technician
for help.
26
Performance Checklist
Problem
Possible Solution
• Check if the key lock is locked.
Unlock it.
The remote
control does
not work
Another remote
control affects
your hearing
instruments
• Check if batteries are empty.
Change the batteries.
• Move away from the electro-magnetic noise sources.
•Return remote control and hearing
instruments to your Hearing Care
Professional.
If you still encounter problems after trying these suggestions
consult your Hearing Care Professional.
27
Warranty and service
Your remote control has a one-year warranty that covers
defects in material and workmanship from the original date of
purchase. There is no loss and damage coverage for the remote
control. Remotes received for warranty service at an authorized
Siemens Service Center will be repaired or replaced with new
or reconditioned components, without charge, to meet the
performance specifications of the product.
Warranty service must only be performed by an authorized
Siemens Service Center. Service performed by unauthorized
service entities voids this warranty; and repairs so necessitated
will be done on a parts and labor cost basis.
This warranty does not cover malfunctions due to unusual wear
and tear or mistreatment of the product such as physical shock or
tampering with the product, any of which voids all warranties.
In case of malfunction or loss, take your Siemens remote control
and proof of purchase to the Hearing Care Professional from
whom the unit was purchased. If factory service or replacement is
needed, your Hearing Care Professional will forward the unit to an
authorized Siemens Service Center.
IMPORTANT
Record your remote control serial number and date of
purchase here for future reference.
28
Serial number
_______________________________
Date of purchase
_______________________________
The serial number is located inside the battery compartment.
SerNo AG12345
The year of manufacture is incorporated into the serial number.
The warranty is based upon the date of purchase, not the date of
manufacture.
The serial number may look similar to this sample: AG12345.
The second letter of this serial number refers to the year of
manufacture of the remote control. The letters D, E, and F indicate
2013 year of manufacture, while G and H indicate 2014. Your
Hearing Care Professional can answer any questions you may have
about the identifying code on your remote control.
(2nd Digit)
Code
Year
Y, A
B, C
D, E, F
G, H
2011
2012
2013
2014
29
ProPocket™
ePen®
Control remoto
Manual del usuario
usa.siemens.com/hearing
Life sounds brilliant.
¡Felicitaciones!
Estimado cliente:
Sus instrumentos auditivos están equipados con tecnología que
permite controlarlos mediante su control remoto.
Estas instrucciones describen cómo operar su control remoto
rápida y fácilmente.
También le proporciona información importante sobre cómo
manejar sus instrumentos.
Su Profesional del Cuidado Auditivo puede responder cualquier
pregunta adicional acerca de las instrucciones y el uso adecuado.
Mejore su experiencia Siemens.
Aprenda acerca de las ayudas auditivas y accesorios que pueden
ser de utilidad; acceda a información actualizada sobre la salud
auditiva, y reciba ofertas promocionales al suscribirse a la
comunidad de salud auditiva de Siemens en*:
http://hearing.siemens.com/us/en/services/subscription/subscribe.html
*Nosotros respetamos su privacidad. No venderemos, alquilaremos o daremos su nombre o
dirección de e-mail a nadie. En cualquier momento, usted podrá seleccionar el enlace de abajo,
para cancelar su suscripción o actualizar su perfil.
Contenido
Control remoto easyPocket
Control remoto easyPocket™3
Bloquear 6
Baterías7
Uso diario
9
Reloj de alarma 11
Configuración y funciones de servicios
14
Control remoto ProPocket 17
Cambiar baterías
17
Bloquear18
Encender y apagar sus instrumentos auditivos
19
Ajustar el volumen
20
Cambiar el programa 21
™
Información de seguridad
22
Mantenimiento y cuidado
25
Información técnica
26
Lista de verificación de funcionamiento
28
Garantía y servicio
28
La distancia de operación del control remoto easyPocket es de
aproximadamente 40 pulgadas (1 metro).
• Asegúrese de que la distancia entre su control remoto y el
instrumento auditivo no exceda la distancia de operación.
1 Pantalla
1
2
2 Interruptor de bloqueo
4
3
3 Conexión para
programación
4 Botones para control
5
5 Botón para cambiar
programas
6 Botones subir/bajar
volumen
6
El menú tiene más funciones
disponibles. Para entrar o
salir del menú, presione
simultáneamente los botones
subir y bajar volumen.
Pantalla
Todas las acciones que se realicen con el
control remoto se reflejan inmediatamente
en la pantalla. Por ejemplo, si presiona
el botón subir volumen, se mostrará
brevemente el siguiente icono.
2
3
El control remoto no recibe información de los instrumentos
auditivos. Las acciones que realice con los controles de los
instrumentos auditivos no se reflejan en la pantalla del control
remoto.
Modo de ahorro de energía
Pantalla del easyPocket
•EXWWRQVRQWKHULJKWKDQG
Para reactivar la pantalla, presione cualquier botón.
1 Indica los cambios de programa y
volumen auditivo
1
4
2
2 Activación del reloj de alarma
3 Carga baja de las baterías del
control remoto
3
4 Función de los botones de control
Opciones adicionales de la pantalla
1
2
IXQFWLRQVZLWKWKHFRQWURO
EXWWRQVRQWKHULJKWKDQG
VLGHRIWKHUHPRWHFRQWURO
Botones
de control
7KHFRQWUROEXWWRQVRIWKH
1 Indica los cambios de volumen
2 Nombre del programa
5 Activación del reloj de alarma
6 Carga baja de las baterías del control remoto
7 Función de los botones programables del control
de control%DVLFIXQFWLRQV
7XUQKHDULQJLQVWUXPHQWVRQRURII
7XUQKHDULQJLQVWUXPHQWVRQRURII
Encender o apagar los instrumentos auditivos.
7
5HVHWWRGHIDXOWYROXPHDQGKHDULQJSURJUDP
5HVHWWRGHIDXOWYROXPHDQGKHDULQJSURJUDP
6
Restablecer el volumen y el programa auditivo
predeterminados
$GYDQFHGIXQFWLRQVIRUHDV\3RFNHWDGYDQFHGRQO\
$GYDQFHGIXQFWLRQVIRUHDV\3RFNHWDGYDQFHGRQO\
7LQQLWXVQRLVHUOHYHOXS <RXUUHPRWHFRQWURO
7LQQLWXVQRLVHUOHYHOXS
Función para subir el nivel de la terapia de tinnitus.
3 Icono del programa
4 Número del programa
<RXFDQTXLFNO\DFFHVVWZR
VKRZWKHIXQFWLRQV
pequeños que se muestran en
la pantalla
indican las funciones.
4
5
&RQWUROEXWWRQV
7KHFRQWUROEXWWRQVRIWKH
IXQFWLRQVZLWKWKHFRQWURO
Puede
acceder rápidamente aEXWWRQVRQWKHULJKWKDQG
dos funciones
HDV\3RFNHWDGYDQFHG
VLGHRIWKHUHPRWHFRQWURO
usando
los botones de control
del lado
FDQEHFRQÀJXUHGE\\RXU
7KHFRQWUROEXWWRQVRIWKH
derecho
del control remoto. Su
Profesional
+HDULQJ&DUH3URIHVVLRQDO
HDV\3RFNHWDGYDQFHG
FDQEHFRQÀJXUHGE\\RXU
6PDOOLFRQVRQWKHGLVSOD\
del
Cuidado Auditivo puede configurar
los
+HDULQJ&DUH3URIHVVLRQDO
VKRZWKHIXQFWLRQV
botones
de su control remoto.6PDOOLFRQVRQWKHGLVSOD\
Los iconos
Funciones
%DVLFIXQFWLRQV
Música
3
Si se deja sin usar el control remoto durante algún tiempo,
&RQWUROEXWWRQV
la pantalla
automáticamente se pone negra. Entonces, el control
<RXFDQTXLFNO\DFFHVVWZR
remoto
está en modo de ahorro de energía.
7LQQLWXVQRLVHUOHYHOGRZQ
7LQQLWXVQRLVHUOHYHOGRZQ
<RXUUHPRWHFRQWURO
Función para bajar el nivel de la terapia de tinnitus.
$GMXVWWUHEOH
$GMXVWWUHEOH
4
5
$GMXVWEDVV
$GMXVWEDVV
$GMXVWWUHEOH
$GMXVWWUHEOH
Ajustar sonidos agudos
$GMXVWEDVV
$GMXVWEDVV
Ajustar sonidos graves
$OORWKHULFRQV
$OORWKHULFRQV
Los
demás iconos:
6KRUWFXWWRVHOHFWDSUHIHUUHGKHDULQJSURJUDP
6KRUWFXWWRVHOHFWDSUHIHUUHGKHDULQJSURJUDP
Batteries
3URJUDPPLQJFRQQHFWLRQ
Conexión de programación
7KLVFRQQHFWLRQLVRQO\WR
Solo su Profesional del Cuidado
EHXVHGE\\RXU+HDULQJ
Auditivo debe
usar esta conexión
7KHUHPRWHFRQWUROXVHVWZR$$$EDWWHULHV
&DUH3URIHVVLRQDOIRU
para programar
el control remoto.
SURJUDPPLQJWKHUHPRWH
,QVHUWLQJEDWWHULHV
FRQWURO
Batteries
X6OLGHWKHEDWWHU\FRPSDUWPHQWFRYHU
LQWKHGLUHFWLRQRIWKHDUURZ
7KHDYDLODEOHLFRQVDQGKHDULQJSURJUDPVGHSHQGRQ\RXU
7KHDYDLODEOHLFRQVDQGKHDULQJSURJUDPVGHSHQGRQ\RXU
Atajo
para seleccionar un programa auditivo preferido.
SHUVRQDOVHWXS
SHUVRQDOVHWXS
Los iconos y programas auditivos disponibles dependen de su
configuración personal.
Baterías
7KHUHPRWHFRQWUROXVHVWZR$$$EDWWHULHV
,QVHUWLQJEDWWHULHV
<RXUUHPRWHFRQWURO
El control
remoto
usa dos baterías AAA.
X6OLGHWKHEDWWHU\FRPSDUWPHQWFRYHU
LQWKHGLUHFWLRQRIWKHDUURZ
Insertar las baterías
• Deslice la cubierta del compartimento de las
DWLRQZKLOH
baterías en la dirección que indica la flecha.
VRUEDJV
X,QVHUWWKHEDWWHULHV
FNSRVLWLRQ
.H\ORFNVZLWFK
0DNHVXUHWKHV\PEROVRQWKH
<RXUUHPRWHFRQWURO
Inserte las baterías.
EDWWHU\DQGFRPSDUWPHQWDUHDOLJQHG
<RXUUHPRWHFRQWURO
X7RSUHYHQWDQ\DFFLGHQWDORSHUDWLRQZKLOH
Interruptor
de
bloqueo
Asegúrese de que los
WKHUHPRWHFRQWUROLVLQSRFNHWVRUEDJV
símbolos “+” de la batería y
Para evitar
cualquier operación accidental mientras el
PRYHWKHNH\ORFNVZLWFKWRORFNSRVLWLRQ
X,QVHUWWKHEDWWHULHV
del compartimento estén
control remoto
se
encuentra
en
un
bolsillo
o
en
una
UHGFRORUYLVLEOH
0DNHVXUHWKHV\PEROVRQWKH
alineados.
bolsa, mueva el interruptor de bloqueo a la posición de
X$WWDFKWKHFRYHU
EDWWHU\DQGFRPSDUWPHQWDUHDOLJQHG
E\VOLGLQJLW
bloqueo (con el color rojo visible).
Bloquear
RQWRWKHUHPRWH
FRQWURO
Cuando está activado el
bloqueo, se desactivan todos
los botones del control remoto.
:KHQWKHNH\ORFNLVDFWLYHDOO
Se muestra el siguiente icono.
EXWWRQVRQWKHUHPRWHFRQWURO
V
DUHGLVDEOHG7KHIROORZLQJLFRQLV
GLVSOD\HG
6
• Coloque la cubierta deslizándola
en el control remoto.
Se muestra la configuración actual
de la hora. Si desea cambiarla,
consulte
la sección
%DWWHULHV
“Configurar
la hora” (página 14).
7KHFXUUHQWWLPHVHWWLQJLVGLVSOD\HG,I\RXZDQWWR
FKDQJHLWUHIHUWRVHFWLRQ6HWWLQJWKHWLPH
7
&KHFNLQJWKHEDWWHU\VWDWXV
&&KHFNLQJWKHEDWWHU\VWDWXV
KHFNLQJWKHEDWWHU\VWDWXV
Revisar:KHQWKHEDWWHULHVRIWKHUHPRWH
el estado de las baterías
:KHQWKHEDWWHULHVRIWKHUHPRWH
:KHQWKHEDWWHULHVRIWKHUHPRWH
FRQWURODUHORZWKLVLVLQGLFDWHGLQ
CuandoFRQWURODUHORZWKLVLVLQGLFDWHGLQ
las
baterías del control remoto
FRQWURODUHORZWKLVLVLQGLFDWHGLQ
WKHVWDWXVEDU
tienen poca
carga, se indica en la barra
WKHVWDWXVEDU
WKHVWDWXVEDU
$GGLWLRQDOO\\RXFDQFKHFNWKH
de estado.
$GGLWLRQDOO\\RXFDQFKHFNWKH
$GGLWLRQDOO\\RXFDQFKHFNWKH
EDWWHU\VWDWXVDWDQ\WLPHLQWKH
Además,EDWWHU\VWDWXVDWDQ\WLPHLQWKH
en cualquier momento puede
EDWWHU\VWDWXVDWDQ\WLPHLQWKH
PHQX
revisar el estado de las baterías utilizando
PHQX
PHQX
el menú.
• Para entrar
al menú, presione
X7RHQWHUWKHPHQXSUHVVWKHYROXPHXSEXWWRQDQG
simultáneamente
los botones subir volumen y bajar volumen.
X
X
7RHQWHUWKHPHQXSUHVVWKHYROXPHXSEXWWRQDQG
7RHQWHUWKHPHQXSUHVVWKHYROXPHXSEXWWRQDQG
WKHYROXPHGRZQEXWWRQVLPXOWDQHRXVO\
WKHYROXPHGRZQEXWWRQVLPXOWDQHRXVO\
WKHYROXPHGRZQEXWWRQVLPXOWDQHRXVO\
• Navegue
al1DYLJDWHWRWKHPHQXHQWU\,QIRE\SUHVVLQJWKH
menú de ingreso de información presionando el
X
botónX
subir
volumen o el botón bajar volumen.
X
1DYLJDWHWRWKHPHQXHQWU\,QIRE\SUHVVLQJWKH
1DYLJDWHWRWKHPHQXHQWU\,QIRE\SUHVVLQJWKH
YROXPHXSEXWWRQRUWKHYROXPHGRZQEXWWRQ
YROXPHXSEXWWRQRUWKHYROXPHGRZQEXWWRQ
YROXPHXSEXWWRQRUWKHYROXPHGRZQEXWWRQ
• Confirme
su
selección presionando el botón de cambio de
X&RQÀUP\RXUVHOHFWLRQE\SUHVVLQJWKHSURJUDP
programa.
X
X
&RQÀUP\RXUVHOHFWLRQE\SUHVVLQJWKHSURJUDP
&RQÀUP\RXUVHOHFWLRQE\SUHVVLQJWKHSURJUDP
FKDQJHEXWWRQ
X3UHVVWKHYROXPHXSEXWWRQRUWKHYROXPHGRZQ
EXWWRQWRDGMXVWWKHYROXPHE\RQHVWHS
Uso diario
&KDQJLQJWKHKHDULQJSURJUDP
Ajustar el volumen
,I\RXDUHZHDULQJWZRKHDULQJLQVWUXPHQWVWKHKHDULQJ
Si utilizaSURJUDPZLOOEHFKDQJHGRQERWKLQVWUXPHQWV7KH
dos instrumentos auditivos, el volumen se ajustará en
ambos instrumentos
a Ia vez.
SURFHGXUHIRUFKDQJLQJWKHKHDULQJSURJUDPGLIIHUVIRU
• Presione
el botón subir volumen o el botón bajar volumen para
HDV\3RFNHWEDVLFDQGHDV\3RFNHWDGYDQFHG
ajustar el volumen en un paso.
HDV\3RFNHWEDVLF
Cambio
del programa auditivo
X3UHVVWKHSURJUDPFKDQJHEXWWRQ
WRVZLWFKWRWKHQH[W
Si utiliza dos
instrumentos auditivos, el
programa KHDULQJSURJUDP
auditivo se cambiará en ambos
instrumentos.
• Presione el botón de cambio de programa
FKDQJHEXWWRQ
Se muestraFKDQJHEXWWRQ
el
estado de las baterías: HDV\3RFNHWDGYDQFHG
7KHEDWWHU\VWDWXVLVGLVSOD\HG
para pasar al siguiente programa auditivo.
7KHEDWWHU\VWDWXVLVGLVSOD\HG
7KHEDWWHU\VWDWXVLVGLVSOD\HG
EDWWHU\IXOO
EDWWHU\HPSW\
X3UHVVWKHSURJUDPFKDQJHEXWWRQUHSHDWHGO\XQWLOWKH
Batería
llena Batería
vacía
Su Profesional del Cuidado Auditivo
EDWWHU\IXOO
EDWWHU\IXOO
EDWWHU\HPSW\
EDWWHU\HPSW\
LFRQRIWKHGHVLUHGKHDULQJSURJUDPLVGLVSOD\HG
puede configurar su easyPocket para que muestre situaciones
específicas.
RU
• Presione el botón de cambio de
X3UHVVWKHFRQWUROEXWWRQQH[WWRWKH
Música
programa varias veces hasta que
LFRQLQGLFDWLQJWKHGHVLUHGKHDULQJ
aparezca el programa auditivo deseado.
SURJUDP
X7RUHWXUQWRWKHVWDQGDUGGLVSOD\SUHVVWKHSURJUDP
7KHFRQWUROEXWWRQVKDYHWREH
o
X
X
7RUHWXUQWRWKHVWDQGDUGGLVSOD\SUHVVWKHSURJUDP
7RUHWXUQWRWKHVWDQGDUGGLVSOD\SUHVVWKHSURJUDP
FKDQJHEXWWRQ
FRQÀJXUHGE\\RXU+HDULQJ&DUH
'DLO\XVH
• Presione el botón de control junto al
FKDQJHEXWWRQ
FKDQJHEXWWRQ
• Para regresar
a la pantalla estándar, presione
el botón de cambio
3URIHVVLRQDO
5HPRYHHPSW\EDWWHULHVLPPHGLDWHO\DQGGLVSRVHRIWKHP
icono que indica el programa auditivo
de programa.
5HPRYHHPSW\EDWWHULHVLPPHGLDWHO\DQGGLVSRVHRIWKHP
5HPRYHHPSW\EDWWHULHVLPPHGLDWHO\DQGGLVSRVHRIWKHP
DFFRUGLQJWRORFDOUHJXODWLRQV
deseado.
Saque inmediatamente
las baterías vacías y elimínelas de acuerdo
DFFRUGLQJWRORFDOUHJXODWLRQV
DFFRUGLQJWRORFDOUHJXODWLRQV
Su
Profesional
del
Cuidado
Auditivo puede configurar los botones
con las reglamentaciones locales.
%DWWHULHV de
control.
%DWWHULHV
%DWWHULHV 8
9
Silenciar
7XUQLQJRQDQGRIIPXWH
Activar el sonido:
Tiene varias
opciones para silenciar sus instrumentos auditivos
7XUQLQJRQDQGRIIPXWH
<RXKDYHVHYHUDORSWLRQVWRWXUQ\RXUKHDULQJLQVWUXPHQWV
con su control
remoto. Ambos instrumentos auditivos se silencian
RQDQGRIIZLWK\RXUUHPRWHFRQWURO
<RXKDYHVHYHUDORSWLRQVWRWXUQ\RXUKHDULQJLQVWUXPHQWV
simultáneamente.
%RWKKHDULQJLQVWUXPHQWVDUH
RQDQGRIIZLWK\RXUUHPRWHFRQWURO
CuandoVLPXOWDQHRXVO\WXUQHGRQRURII
silencia sus instrumentos auditivos
%RWKKHDULQJLQVWUXPHQWVDUH
por medio
del control remoto, se muestra
VLPXOWDQHRXVO\WXUQHGRQRURII
:KHQ\RXWXUQ\RXUKHDULQJ
el siguiente icono. Se muestra hasta que
LQVWUXPHQWVRIIYLDUHPRWHFRQWURO
active el:KHQ\RXWXUQ\RXUKHDULQJ
sonido de sus instrumentos
WKHIROORZLQJLFRQLVGLVSOD\HG,WLV
LQVWUXPHQWVRIIYLDUHPRWHFRQWURO
auditivos.
GLVSOD\HGXQWLO\RXWXUQ\RXUKHDULQJ
WKHIROORZLQJLFRQLVGLVSOD\HG,WLV
Además,LQVWUXPHQWVEDFNRQ
se desactivan todos los botones.
GLVSOD\HGXQWLO\RXWXUQ\RXUKHDULQJ
La única función disponible es la que activa
LQVWUXPHQWVEDFNRQ
$GGLWLRQDOO\DOOEXWWRQVDUHGLVDEOHG7KHRQO\DYDLODEOH
el sonido
de los instrumentos auditivos.
IXQFWLRQLVWRWXUQWKHKHDULQJLQVWUXPHQWVEDFNRQ
$GGLWLRQDOO\DOOEXWWRQVDUHGLVDEOHG7KHRQO\DYDLODEOH
Al desactivar
el silenciador, se establece el volumen y el programa
IXQFWLRQLVWRWXUQWKHKHDULQJLQVWUXPHQWVEDFNRQ
auditivo$IWHUWXUQLQJRQWKHSUHYLRXVO\XVHGYROXPHDQGKHDULQJ
que tenía en uso anteriormente.
SURJUDPDUHVHW
$IWHUWXUQLQJRQWKHSUHYLRXVO\XVHGYROXPHDQGKHDULQJ
• Para activar la pantalla presione cualquier botón.
Por medio
del botón de control
SURJUDPDUHVHW
9
LDFRQWUROEXWWRQ
PresioneX
botón de control que se encuentra junto al 3UHVVWKHFRQWUROEXWWRQQH[WWRWKHIROORZLQJ
9el
LDFRQWUROEXWWRQ
siguiente icono
para silenciar o activar el sonido de sus
LFRQWRWXUQ\RXUKHDULQJLQVWUXPHQWVRQRURII
X3UHVVWKHFRQWUROEXWWRQQH[WWRWKHIROORZLQJ
instrumentos auditivos. Su Profesional del Cuidado
LFRQWRWXUQ\RXUKHDULQJLQVWUXPHQWVRQRURII
7KHFRQWUROEXWWRQVKDYHWREHFRQÀJXUHGE\
Auditivo puede configurar los botones de control.
\RXU+HDULQJ&DUH3URIHVVLRQDO
7KHFRQWUROEXWWRQVKDYHWREHFRQÀJXUHGE\
\RXU+HDULQJ&DUH3URIHVVLRQDO
Por medio
del menú
• Espere hasta que la información de los instrumentos auditivos
silenciados desaparezca.
Se muestra el menú y la entrada HI Silenciar/activar sonido
continúa seleccionada.
• Para activar el sonido de sus instrumentos auditivos, confirme la
selección presionando el botón de cambio de programa.
$GMXVWLQJWKHWLQQLWXVQRLVHUOHYHO
Ajustar
el nivel de la función
de la terapia
de tinnitus
7KLVIXQFWLRQLVRQO\DYDLODEOHLI\RXU+HDULQJ&DUH
3URIHVVLRQDOKDVFRQÀJXUHGWKH
Esta función
estará disponible solo si su
WLQQLWXVQRLVHUIRUERWK\RXUKHDULQJ
profesional
de cuidado auditivo configura la
LQVWUXPHQWVDQGIRUWKHFRQWURO
señal para
sus dos instrumentos auditivos y de
los botones
de control de su control remoto.
EXWWRQVRIWKHUHPRWHFRQWURO
Privacidad
Puede reconocer
la configuración si se
<RXFDQUHFRJQL]HWKHVHWWLQJLIWKH
muestran
los iconos correspondientes,
FRUUHVSRQGLQJLFRQVDUHGLVSOD\HG
junto a los
botones de control.
QH[WWRWKHFRQWUROEXWWRQV
• Para ajustar
el nivel de la función de la terapia
X7RDGMXVWWKHQRLVHUOHYHOSUHVVWKHXSSHURUWKHORZHU
de tinnitus, presione el botón de control superior o inferior.
FRQWUROEXWWRQ
Silenciar:
• Para entrar al menú, presione simultáneamente los botones
subir volumen y bajar volumen.
• Navegue al menú de ingreso Silenciar/desactivar el silenciador
presionando el botón subir volumen o el botón bajar volumen.
• Confirme
selección presionando el botón de cambio de
su'DLO\XVH
programa.
'DLO\XVH
10
Reloj de alarma
Puede configurar un reloj de alarma como recordatorio para que
se active todos los días a la misma hora y emita un tono repetitivo
o por el icono de reloj de alarma.
El reloj de alarma se inicia por el control remoto pero la señal
acústica es emitida por sus instrumentos auditivos.
11
UHPRWHFRQWURO·VRSHUDWLQJGLVWDQFH
2WKHUZLVH\RXZLOOQRWEHDEOHWRKHDUWKHDODUP
• Encienda sus instrumentos auditivos.
• Mantenga
sus instrumentos auditivos dentro de la distancia de
6HWWLQJWKHDODUPFORFN
operación del control remoto.
X7RHQWHUWKHPHQXSUHVVWKHYROXPHXSEXWWRQDQG
De lo contrario,
no podrá escuchar la alarma.
WKHYROXPHGRZQEXWWRQVLPXOWDQHRXVO\
X1DYLJDWHWRWKHPHQXHQWU\$ODUPE\SUHVVLQJWKH
Configuración
del reloj de alarma
X&RQÀUP\RXUVHWWLQJE\SUHVVLQJ
YROXPHGRZQEX
WKHSURJUDPFKDQJHEXWWRQ
WKHFXUVRUQH[WW
• Presione el7KHDODUPRQRIIVHOHFWLRQÀHOGLV
botón subir volumen o el botón bajar
volumen para posicionar el cursor junto a el reloj
KLJKOLJKWHG
X&RQÀUP\RXUVHO
de alarma encendido:
X3UHVVWKHYROXPHXSEXWWRQRUWKH
FKDQJHEXWWRQ
• Confirme su selección presionando el botón de cambio
YROXPHGRZQEXWWRQWRSRVLWLRQ
de programa.
:KHQWKHDODUPFOR
WKHFXUVRUQH[WWRDODUPFORFNRQ
Cuando se enciende el reloj de alarma, se indica en WKLVLVLQGLFDWHGLQW
la barra
de estado.
X&RQÀUP\RXUVHOHFWLRQE\SUHVVLQJWKHSURJUDP
Apagar laFKDQJHEXWWRQ
alarma
YROXPHXSEXWWRQRUWKHYROXPHGRZQEXWWRQ
• Para entrar al menú, presione
X&RQÀUP\RXUVHOHFWLRQE\SUHVVLQJ
simultáneamente los botones subir
WKHSURJUDPFKDQJHEXWWRQ
volumen y bajar volumen.
Cuando suena
el reloj de alarma, aparece un
:KHQWKHDODUPFORFNLVWXUQHGRQ
• Navegue7KHHQWU\ÀHOGIRUKRXUVLV
al menú de Alarma presionando
icono correspondiente
en el control remoto.
WKLVLVLQGLFDWHGLQWKHVWDWXVEDU
el botónKLJKOLJKWHG
subir volumen o el botón
(QGLQJWKHDODUP
bajar X
volumen.
S
i no apaga la alarma,
6HWWKHKRXUVE\SUHVVLQJ
volverá
a sonar unos
:KHQWKHDODUPFORFNULQJVD
WKHYROXPHXSEXWWRQRUWKH
• Confirme su selección presionando el botón
minutos más tarde.
FRUUHVSRQGLQJLFRQLVGLVSOD\HGRQWKH
YROXPHGRZQEXWWRQ
de cambio
de programa.
$ODUPFORFN
UHPRWHFRQWURO
• Para apagar la
Se resalta
el
campo
de
ingreso
de
las
horas.
X&RQÀUP\RXUVHWWLQJE\SUHVVLQJ
alarma, presione el
X&RQÀUP\RXUVHWWLQJE\SUHVVLQJ
,I\RXGRQRWHQGWKHDODUPLWLV
• Configure
la hora presionando el botón
WKHSURJUDPFKDQJHEXWWRQ
7
XUQLQJWKHDODUPFORFNRII
botón de cambio de
WKHSURJUDPFKDQJHEXWWRQ
UHSHDWHGZLWKLQWKHQH[WPLQXWHV
subir volumen o el botón bajar volumen.
programa. El reloj de alarma sonará al día
7KHHQWU\ÀHOGIRUPLQXWHVLV
X7RHQWHUWKHPHQXSUHVVWKHYROXPHXSEXWWRQDQG
$ODUPFORFN Confirme 7KHHQWU\ÀHOGIRUPLQXWHVLV
su configuración presionando el
siguiente a la misma hora.
KLJKOLJKWHG
WKHYROXPHGRZQEXWWRQVLPXOWDQHRXVO\
KLJKOLJKWHG
$ODUPFORFN
botón de cambio
de programa.
X7RHQGWKHDODUPSUHVVWKHSURJUDPFKDQJHEXWWRQ
X6HWWKHPLQXWHVE\SUHVVLQJ
X1DYLJDWHWRWKHPHQXHQWU\$ODUPE\SUHVVLQJWKH
Apagar
el reloj de alarma
X6HWWKHPLQXWHVE\SUHVVLQJ
Se resalta
el campo de ingreso de los
WKHYROXPHXSEXWWRQRUWKH
7KHDODUPFORFNZLOOULQJDWWKHVDPHWLPHRQWKHQH[W
YROXPHXSEXWWRQRUWKHYROXPHGRZQEXWWRQ
minutos. WKHYROXPHXSEXWWRQRUWKH
YROXPHGRZQEXWWRQ
GD\
• Para entrar
al menú, presione
X&RQÀUP\RXUVHOHFWLRQE\SUHVVLQJ
YROXPHGRZQEXWWRQ
• Configure
los minutos presionando el
X&RQÀUP\RXUVHWWLQJE\SUHVVLQJ
simultáneamente
los botones subir
WKHSURJUDPFKDQJHEXWWRQ
&RQÀUP\RXUVHWWLQJE\SUHVVLQJ
botónX
subir
volumen o el botón bajar
volumen y bajar volumen.
WKHSURJUDPFKDQJHEXWWRQ
WKHSURJUDPFKDQJHEXWWRQ
volumen.
7KHHQWU\ÀHOGIRUKRXUVLV
• Navegue al menú de Alarma presionando
7KHDODUPRQRIIVHOHFWLRQÀHOGLV
KLJKOLJKWHG
• Confirme
su configuración presionando el
7KHDODUPRQRIIVHOHFWLRQÀHOGLV
el botón subir volumen o el botón bajar
KLJKOLJKWHG
botón deKLJKOLJKWHG
cambio de programa.
volumen.
X3UHVVWKHYROXPHXSEXWWRQRUWKH
Se resalta
el campo de selección de
X3UHVVWKHYROXPHXSEXWWRQRUWKH
• Confirme su selección presionando el
YROXPHGRZQEXWWRQWRSRVLWLRQ
encendido/apagado
de la alarma.
YROXPHGRZQEXWWRQWRSRVLWLRQ
botónX
de3UHVVWKHSURJUDPFKDQJHEXWWRQ
cambio de programa.
WKHFXUVRUQH[WWRDODUPFORFNRQ
WZLFHWRVNLSWKHHQWU\ÀHOGVIRU
WKHFXUVRUQH[WWRDODUPFORFNRQ
Se resalta el campo de ingreso de las horas.
KRXUVDQGPLQXWHV
X&RQÀUP\RXUVHOHFWLRQE\SUHVVLQJWKHSURJUDP
7KHDODUPRQRIIVHOHFWLRQÀHOGLV
12
13
X&RQÀUP\RXUVHOHFWLRQE\SUHVVLQJWKHSURJUDP
FKDQJHEXWWRQ
KLJKOLJKWHG
FKDQJHEXWWRQ
X
• P3UHVVWKHSURJUDPFKDQJHEXWWRQ
resione
el botón de cambio de programa
X3UHVVWKHSURJUDPFKDQJHEXWWRQ
Se resalta el campo de ingreso de los minutos.
WZLFHWRVNLSWKHHQWU\ÀHOGVIRU
dos
veces
para omitir los campos de
• Configure los minutos presionando el botón subir volumen o el
WZLFHWRVNLSWKHHQWU\ÀHOGVIRU
KRXUVDQGPLQXWHV
ingreso
de las horas y los minutos.
botón bajar volumen.
KRXUVDQGPLQXWHV
Se7KHDODUPRQRIIVHOHFWLRQÀHOGLV
resalta el campo de selección de
• Guarde la configuración presionando el botón de cambio de
7KHDODUPRQRIIVHOHFWLRQÀHOGLV
KLJKOLJKWHG
encendido/apagado
de la alarma.
programa.
7KHWLPHLVDOZD\VGLVSOD\HGLQWKHKHDGHURIWKHPHQX
KLJKOLJKWHG
• P3UHVVWKHYROXPHXSEXWWRQRUWKH
resione el botón subir volumen o el 7RHQWHURUH[LWWKHPHQXSUHVV
X
X
3UHVVWKHYROXPHXSEXWWRQRUWKH
5HVHWWLQJYROXPHDQGKHDULQJSURJUDP
botón
bajar
volumen para posicionar WKHYROXPHXSEXWWRQDQGWKH
el
YROXPHGRZQEXWWRQWRSRVLWLRQ
Se muestra la hora.
YROXPHGRZQEXWWRQWRSRVLWLRQ
cursor
junto
a
reloj
de
alarma
apagado:
WKHFXUVRUQH[WWRDODUPFORFNRII YROXPHGRZQEXWWRQ
,I\RXKDYHPDGHFKDQJHVWRYROXPHRUSURJUDPDQGGR
La hora siempre se mostrará en el
WKHFXUVRUQH[WWRDODUPFORFNRII
VLPXOWDQHRXVO\
Salir
QRWNQRZZK\WKHKHDULQJLQVWUXPHQWVDUHDFWLQJWKHZD\
encabezado del menú. Para entrar o salir
WKH\DUH\RXFDQPDQXDOO\VHWWKHGHIDXOWYROXPHDQG
del menú, presione simultáneamente
• C&RQÀUP\RXUVHOHFWLRQE\SUHVVLQJWKHSURJUDP
onfirme su selección presionando el botón de cambio de
X
Restablecer
KHDULQJSURJUDPIRU\RXUKHDULQJLQVWUXPHQWV
X&RQÀUP\RXUVHOHFWLRQE\SUHVVLQJWKHSURJUDP
los botones subir y bajar volumen.
programa.
FKDQJHEXWWRQ
Silenciar/actiFKDQJHEXWWRQ
X
var7RHQWHUWKHPHQXSUHVVWKHYROXPHXSEXWWRQDQG
sonido
Setup and service functions
WKHYROXPHGRZQEXWWRQVLPXOWDQHRXVO\
Configuración
y funciones
6HWWLQJWKHWLPH
$ODUPFORFN
de servicios
$ODUPFORFN
X7RHQWHUWKHPHQXSUHVVWKHYROXPHXSEXWWRQDQG
WKHYROXPHGRZQEXWWRQVLPXOWDQHRXVO\
Configuración
de la hora
X1DYLJDWHWRWKHPHQXHQWU\&ORFNE\SUHVVLQJWKH
YROXPHXSEXWWRQRUWKHYROXPHGRZQEXWWRQ
• Para entrar
al menú, presione simultáneamente los botones
subir X
volumen
y bajar volumen.
&RQÀUP\RXUVHOHFWLRQE\SUHVVLQJWKHSURJUDP
• NavegueFKDQJHEXWWRQ
al menú Reloj presionando el botón subir volumen
o el botón bajar volumen.
7KHHQWU\ÀHOGIRUKRXUVLVKLJKOLJKWHG
• Confirme
su selección presionando el botón
X6HWWKHKRXUVE\SUHVVLQJ
de cambio
de programa.
WKHYROXPHXSEXWWRQRUWKH
Se resalta YROXPHGRZQEXWWRQ
el campo de ingreso de las horas.
• Configure
la hora presionando el botón
X&RQÀUP\RXUVHWWLQJE\SUHVVLQJ
subir volumen
o el botón bajar volumen.
WKHSURJUDPFKDQJHEXWWRQ
X6HWWKHPLQXWHVE\SUHVVLQJWKHYROXPHXSEXWWRQRU
WKHYROXPHGRZQEXWWRQ
YROXPHXSEXWWRQRUWKHYROXPHGRZQEXWWRQ
Si realiza cambios en el volumen o en el
X&RQÀUP\RXUVHOHFWLRQE\SUHVVLQJ
programa y no sabe por qué los
WKHSURJUDPFKDQJHEXWWRQ
instrumentos auditivos están funcionando
diferente,7KHKHDULQJLQVWUXPHQWVDUH
puede configurar manualmente
UHVHWDQGDFRUUHVSRQGLQJLFRQLV
los valores
predeterminados de volumen
y del programa
auditivo de sus
GLVSOD\HG
instrumentos auditivos.
• Para entrar al menú, presione
X<RXFDQDOVRUHVHWWKHKHDULQJ
simultáneamente
los botones subir volumen y bajar volumen.
LQVWUXPHQWVE\SUHVVLQJWKHFRQWURO
• Navegue al menú HI Restablecer presionando el botón subir
EXWWRQQH[WWRWKHIROORZLQJLFRQ
volumen o el botón
bajar volumen.
7KHFRQWUROEXWWRQVKDYHWREHFRQÀJXUHGE\
• Confirme su selección presionando el botón de cambio
\RXU+HDULQJ&DUH3URIHVVLRQDO
de programa.
Se restablecen los instrumentos auditivos y se muestra el icono
correspondiente.
• Confirme7KHHQWU\ÀHOGIRUPLQXWHVLV
su configuración presionando el botón deKLJKOLJKWHG
cambio de programa.
14
X1DYLJDWHWRWKHPHQXHQWU\+,5HVWRUHE\SUHVVLQJWKH
Restablecer
el volumen y el programa auditivo
6HWXSDQGVHUYLFHIXQFWLRQV
15
GLVSOD\HG
• También puede restablecer los instrumentos auditivos
presionandoX
el <RXFDQDOVRUHVHWWKHKHDULQJ
botón de control junto al siguiente icono.
LQVWUXPHQWVE\SUHVVLQJWKHFRQWURO
Su Profesional del Cuidado Auditivo puede configurar los
EXWWRQQH[WWRWKHIROORZLQJLFRQ
botones
de control.
'LVSOD\LQJFRQWDFWGDWD
7KHFRQWUROEXWWRQVKDYHWREHFRQÀJXUHGE\
,I\RXU+HDULQJ&DUH3URIHVVLRQDOKDVVDYHGKLVRUKHU
Mostrar los\RXU+HDULQJ&DUH3URIHVVLRQDO
datos de contacto
FRQWDFWGDWDRQWKHUHPRWHFRQWURO\RXFDQYLHZWKLV
Si su Profesional
del Cuidado Auditivo o guardó su información de
LQIRUPDWLRQ
contacto en el control remoto, podrá ver esta información:
X7RHQWHUWKHPHQXSUHVVWKHYROXPHXSEXWWRQDQG
• Para entrar
al menú, presione simultáneamente los botones
WKHYROXPHGRZQEXWWRQVLPXOWDQHRXVO\
subir volumen y bajar volumen.
X1DYLJDWHWRWKHPHQXHQWU\&RQWDFWE\SUHVVLQJWKH
• Navegue al menú Contacto presionando
YROXPHXSEXWWRQRUWKHYROXPHGRZQEXWWRQ
el botón subir volumen o el botón bajar
X
&RQÀUP\RXUVHOHFWLRQE\SUHVVLQJ
6HWXSDQGVHUYLFHIXQFWLRQV volumen.
WKHSURJUDPFKDQJHEXWWRQ
• Confirme su selección presionando el botón Centro para la Audición
John Smith
7KHFRQWDFWGDWDLVGLVSOD\HG
de cambio
de programa.
Se muestra la información de contacto.
• Para regresar a la pantalla estándar,
presione el botón de cambio de programa.
X$VN\RXU+HDULQJ&DUH3URIHVVLRQDO
16
6HWXSDQGVHUYLFHIXQFWLRQV
1 Interruptor de bloqueo
2 Encendido/apagado de los
instrumentos auditivos
3 Cambio de programa
4 Subir volumen
5 Bajar volumen
6 Anillo accesorio
7 LED
Cualquier calle 123
12345 Cualquier ciudad
• Pida a su Profesional del Cuidado Auditivo que la haga por usted.
6HWWLQJWKHODQJXDJHRIWKHPHQX
Control remoto ProPocket™
01234/5678-90
X7RUHWXUQWRWKHVWDQGDUGGLVSOD\SUHVVWKHSURJUDP
Configuración
del idioma del menú
FKDQJHEXWWRQ
Control remoto ProPocket
Cambiar las baterías
El control remote ProPocket utilize dos
baterías AAAA.
• La cubierta del compartimiento
de la batería se encuentra en la
parte posterior del control remoto.
Presione con su dedo pulgar la
hendidura con aristas para deslizar
la cubierta.
17
• Inserte dos baterías como se muestra en la ilustración.
Asegúrese de que los símbolos de polaridad en la batería y en el
compartimiento estén alineados.
• Deslice de nuevo a su lugar la cubierta de la batería.
Se escucha un clic cuando el compartimiento de la batería está
completamente cerrado.
Encender y apagar sus
instrumentos auditivos
• Asegúrese de que la distancia entre su control remoto y el
instrumento auditivo no exceda de 40 pulgadas (1 metro).
• Si utiliza dos instrumentos auditivos, ambos instrumentos se
encenderán/apagarán a la vez.
Bloquear
El interruptor de bloqueo desactiva los botones en el control
remoto de modo que si se presionan accidentalmente los botones,
no tendrá ningún efecto.
Botón encendido/apagado
Sección
verde
Bloquear
Desbloquear
• Deslice el control de modo que la sección verde quede cubierta.
El bloqueo queda activado. Al presionar un botón el LED
parpadea 3 veces para indicar que el bloqueo está activado.
• Presione el botón encendido/apagado para encender sus
instrumentos auditivos.
• Presione el botón encendido/apagado para apagar sus
instrumentos auditivos.
• Deslice el control hacia la otra dirección, de manera que se vea
la sección verde. El bloqueo queda desactivado.
18
19
Ajustar el volumen
•Asegúrese de que la distancia entre su control remoto y el
instrumento auditivo no exceda de 40 pulgadas (1 metro).
• Si utiliza dos instrumentos auditivos, el volumen cambiará en
ambos instrumentos a la vez.
Presione el botón “Subir volumen” (+)
para aumentar el volumen de sus
instrumentos auditivos.
Cambiar el programa
• Asegúrese de que la distancia entre su control remoto y el
instrumento auditivo no exceda de 40 pulgadas (1 metro).
• Si utiliza dos instrumentos auditivos, el programa se cambiará
en ambos instrumentos a la vez.
Cada vez que presiona el botón de Programas, sus instrumentos
auditivos cambian al siguiente programa, confirmando cada
cambio con una señal acústica (si su Profesional del Cuidado
Auditivo lo programó de esta manera).
Botón de Programas
Presione el botón “Bajar volumen” (-)
para bajar el volumen de sus
instrumentos auditivos.
Ejemplo: Los instrumentos auditivos están en el programa 1.
Usted desea cambiarlos al programa 2.
• Presione el botón de Programas una vez. Escuchará una señal
acústica. Ahora está en el programa.
Su Profesional del Cuidado Auditivo puede programar sus
instrumentos auditivos de manera que pueda escuchar las señales
acústicas cuando el volumen haya sido cambiado y cuando
alcance el límite de volumen.
20
21
Información de seguridad
ADVERTENCIA
Los sistemas inalámbricos pueden interferir con dispositivos de
medición y equipo electrónico.
• No utilice el control remoto mientras se encuentre en hospitales
o en aviones.
• Active el bloqueo en hospitales o aviones.
• Cierre la punta del ePen en hospitales o aviones.
ADVERTENCIA
Compatibilidad con marcapasos
Los dispositivos de control remoto de Siemens han sido
probados y no se ha demostrado que ocasionen interferencia
con marcapasos cardiacos los cuales son fabricados y operados
cumpliendo con las normas de seguridad aplicables, siempre que
se mantenga una distancia mínima de 12 pulgadas (30 cm) entre
el control remoto y el marcapasos. Para cumplir con esta cláusula:
• No active el control remoto a menos de 12 pulgadas del
marcapasos.
• No lleve el control remoto en su bolsillo interior del saco.
• No utilice el control remoto con un cordón alrededor de
su cuello.
• No coloque el control remoto directamente en su piel sobre el
marcapasos implantado.
Si se siguen estas precauciones, los controles remotos de Siemens
los pueden operar de manera segura las personas, o alrededor de
ellas, que tienen adaptados estos marcapasos.
22
• En caso de implantes activos o sistemas de soporte vital que
no sean marcapasos: antes de su uso, se debe verificar la
compatibilidad electromagnética.
ADVERTENCIA
Las partes pequeñas representan riesgo de asfixia.
• Mantenga los instrumentos auditivos, las baterías y los
accesorios fuera del alcance de los niños.
• Si se traga, consulte de inmediato a un médico u hospital.
• Si es necesario que infantes, niños pequeños o personas
con discapacidades mentales usen instrumentos auditivos,
asegúrese de que cuentan con una supervisión adecuada.
Sugerencias para la batería
¡PRECAUCIÓN! Las baterías pueden ser dañinas si se tragan.
• Si accidentalmente se traga una batería, busque atención
médica de inmediato, o llame por cobrar a The National
Button Battery Hotline (Línea directa nacional de baterías
tipo botón) (202) 625-3333.
• Para tener un funcionamiento óptimo, siempre use el tamaño de
batería que recomienda su tarjeta de garantía o su Profesional
del Cuidado Auditivo.
• Saque la batería de su instrumento cuando no lo tenga en uso.
Esto evita posibles daños ocasionados por la expansión o fuga
de la batería, si el instrumento no está completamente apagado.
• Siempre lleve baterías de repuesto en caso de que la batería
que tiene en uso deje de funcionar. Coloque cada batería de
repuesto en un recipiente individual no metálico para prevenir
el contacto con otras baterías u objetos metálicos, tales como
llaves y monedas.
23
• Siga las normas locales de reciclaje al desechar las baterías.
Nota: No
tire las baterías usadas en la basura doméstica.
Devuélvalas a su Profesional del Cuidado Auditivo para que
las deseche en forma ambientalmente correcta.
ADVERTENCIA
¡Riesgo de explosión!
• No utilice su control remoto en ambientes explosivos
(por ejemplo, áreas mineras).
AVISO
Sus instrumentos auditivos están diseñados para cumplir con las
normas internacionales de compatibilidad electromagnética, pero
pueden producir interferencia con dispositivos electrónicos que se
encuentren en las cercanías. En este caso, aléjese de la fuente de
interferencia.
AVISO
Para los instrumentos con conectividad inalámbrica: Cuando está
activo el programa telecoil, el control remoto puede provocar un
ruido pulsante.
• Utilice el control remoto a una distancia mayor de 4 pulgadas
(10 cm).
AVISO
• Su control remoto está programado para comunicarse
exclusivamente con sus instrumentos auditivos. Si tiene
problemas con el control remoto de otra persona, consulte a su
profesional de cuidado auditivo.
24
Cuidado y mantenimiento
Protección
Utilice la “cubierta” como
protección contra gotas o
salpicaduras cuando esté
cerca del agua, como un
lavamanos.
No permita que
se moje su
instrumento
auditivo.
Limpieza
Nota: ¡NO moje su control remoto! La cubierta NO protege su
control remoto contra el agua. NO limpie su control remoto
con agua o gasolina.
• Limpie el control remoto con un paño suave, cuando sea
necesario.
• Evite líquidos limpiadores abrasivos con aditivos como ácidos
cítricos, amoniaco, etc.
Nota: El control remoto es sensible al calor extremo, mucha
humedad y esfuerzo mecánico. No exponga el control
remoto a temperaturas extremas ni a mucha humedad. No
lo exponga a la luz directa del sol. No lo sumerja en agua.
No seque su dispositivo en un horno de microondas.
No exponga el control remoto a radiación fuerte,
por ejemplo, rayos X o exploraciones por resonancia
magnética. La radiación más débil, por ejemplo, de la
seguridad de los aeropuertos o de equipos de radio, no
daña el dispositivo.
25
Información técnica
Tecnología inalámbrica
La tecnología inalámbrica proporciona sincronización entre dos
instrumentos auditivos. Si cambia el programa o el volumen
de un instrumento, el otro cambia automáticamente. Además,
la tecnología inalámbrica automáticamente ajusta el sistema para
cambiar ambos instrumentos auditivos de forma simultánea, al
adaptarse a situaciones auditivas diferentes.
Las frecuencias de funcionamiento para ProPocket: Fc = 3,28 MHz
Puede encontrar la información de cumplimiento con CE, FCC e IC
dentro del compartimiento de la batería.
Los cambios o las modificaciones que no estén expresamente
aprobados para el cumplimiento por la parte responsable podrían
anular la autoridad del usuario de hacer funcionar el equipo.
Siemens easyPocket
FCC: SGI‑WL700
IC: 267AB‑WL700
Control remoto ProPocket
FCC: SGI-WL101
IC: 267AB-W101
Este dispositivo de radiocomunicación con aparato digital II de Clase
B cumple con la parte 15 de los reglamentos de FCC y la norma RSS210 de Canadá. El funcionamiento está sujeto a las siguientes dos
condiciones:
26
(1) este dispositivo no puede ocasionar interferencia.
(2) este dispositivo debe aceptar cualquier interferencia recibida,
incluyendo interferencia que pueda causar funcionamiento no
deseado del dispositivo.
Este equipo se ha sometido a pruebas y se determinó que cumple
con los límites para un dispositivo digital clase B, de conformidad
con la Parte 15 de los Reglamentos de FCC y la Industry Canada
Standard RSS-210. Estos límites están diseñados para proporcionar
protección razonable contra interferencia perjudicial en una
instalación residencial. Este equipo genera, utiliza y puede irradiar
energía de radiofrecuencia y si no se instala o utiliza de acuerdo
con las instrucciones, puede causar interferencia dañina a las
comunicaciones de radio. Sin embargo, no existe garantía de que
la interferencia no ocurrirá en una ubicación en particular. Si este
equipo ocasiona interferencia perjudicial a la recepción de radio
o televisión, lo que se puede determinar al apagar el equipo y
encenderlo, el usuario debe intentar corregir la interferencia con uno
o más de los métodos siguientes:
• Cambie la orientación o ubicación de la antena de recepción.
• Aumente la separación entre el equipo y el receptor.
• Conecte el equipo a un tomacorriente en un circuito distinto al que
está conectado el receptor.
• Consulte con el distribuidor o con un técnico experimentado de
radio/televisión para obtener ayuda.
27
Lista de verificación de desempeño
Problema
El control remoto
no funciona
Otro control remoto
afecta sus sistemas
auditivos
Posible solución
• Revise si el bloqueo está puesto. Desbloquéelo.
• Revise si las baterías todavía funcionan. Cambie las baterías.
•Aléjese de fuentes de ruido electromagnético.
•Devuelva su control remoto y los instrumentos auditivos a
su audiólogo o profesional de cuidado auditivo.
Si aún tiene problemas después de intentar estas sugerencias,
consulte a su Profesional del Cuidado Auditivo.
Garantía y servicio
Su control remoto tiene un año de garantía que cubre defectos en
materiales y mano de obra a partir de la fecha original de compra.
No existe cobertura contra pérdida ni daño para el control remoto.
Los controles remotos que se reciben para servicio por garantía
en un Centro de servicio autorizado de Siemens se repararán o
reemplazarán con componentes nuevos o reacondicionados, sin
cargo, para cumplir con las especificaciones de funcionamiento del
producto.
harán en base a partes y costos laborales.
Esta garantía no cubre mal funcionamiento debido a un uso poco
usual o maltrato del producto, tal como un impacto o manipular el
producto; cualquiera de ellos anula todas las garantías.
En caso de mal funcionamiento o pérdida, lleve su control remoto
Siemens y comprobante de compra al Profesional del Cuidado
Auditivo donde compró la unidad. Si fuera necesario un servicio de
fábrica o un reemplazo, su Profesional del Cuidado Auditivo enviará
la unidad a un Centro de servicio autorizado por Siemens.
IMPORTANTE
Anote aquí el número de serie de su control remoto y la fecha de
compra, para futuras referencias.
Número de serie
_______________________________
Fecha de compra
_______________________________
El servicio de garantía solo debe ser realizado por un Servicio
Autorizado de Siemens. El servicio realizado por entidades de
servicio no autorizadas anula la garantía, y las reparaciones
solicitadas se harán en base a partes y costos laborales. El servicio
de garantía debe realizarse sólo por Centros de Servicio Autorizado
por Siemens, El servicio realizado por entidades de servicio no
autorizadas anula la garantía, y las reparaciones solicitadas se
28
29
El número de serie se encuentra dentro del compartimiento de la
batería.
SerNo AE12345
Número de serie
El año de fabricación está incorporado en el número de serie.
La garantía se basa en la fecha de compra, no en la fecha de
fabricación.
El número de serie puede ser similar a este ejemplo: AG12345. La
segunda letra de este número de serie, se refiere al año de fabricación
del control remoto. Las letras D, E, y F indican que el 2013 es el
año de fabricación, mientras que G y H indican que es el 2014. Su
audiólogo o profesional de cuidado auditivo pueden responder a
cualquier pregunta que tenga sobre cómo identificar el código en
su control remoto.
30
Código
(2.° dígito)
Año
A, A
B, C
D, E, F
G, H
2011
2012
2013
2014
Information in this brochure is subject to change
without notice. Copyright © 2015 Siemens AG.
All rights reserved.
La información que contiene este folleto está
sujeta a cambios sin aviso. Copyright © 2015
Siemens AG. Todos los derechos reservados.
BTE and RIC Hearing Instruments made in
Singapore.
Los instrumentos audífonos BTE y RIC son
fabricados en Singapur.
Manufactured by
Sivantos GmbH
Henri-Dunant-Strasse 100
91058 Erlangen
Germany
under Trademark License of Siemens AG
Part #10425507
11/14 6.1 22B771 3K SHI/15395-15
usa.siemens.com /hearing
Local Contact
Sivantos, Inc.
10 Constitution Ave.
Piscataway, NJ 08854