1
Televisor a color
MANUAL DEL USUARIO
Por favor, lea detenidamente este manual antes de poner en
funcionamiento su televisor.
Conserve el manual para futuras consultas.
Anote el número de modelo y serie del aparato. Anote la
información de la etiqueta ubicada en el panel posterior, su
distribuidor se la pedirá en caso de cualquier solicitud de
servicio.
Internet Home Page : http://www.lge.com
P/N : MFL42505209 (CW81A/B, 0810 - REV06)
PRECAUCIONES DE SEGURIDAD
ADVERTENCIA : PARA REDUCIR EL RIESGO DE CHOQUE ELECTRICO, NO EXPONGA ESTE
PRODUCTO A LA LLUVIA O LA HUMEDAD.
PRECAUCION : PARA REDUCIR EL RIESGO DE CHOQUE ELECTRICO, NO RETIRE LA
CUBIERTA POSTERIOR. NO REEMPLACE PARTES DENTRO DEL TV.
REFIERASE AL PERSONAL DE SERVICIO CAPACITADO.
Limpieza
Desconecte el cordón de alimentación del
tomacorriente antes de limpiar el televisor. No
utilice limpiadores líquidos o aerosoles. Utilice un
paño apenas húmedo para limpiarlo.
No utilice accesorios que no hayan sido
recomendados por el fabricante del televisor ya
que pueden resultar peligrosos.
Fuente de Alimentación
Esta unidad está diseñada para operar sólo con la
alimentación o corriente indicada. Si usted no está
seguro del voltaje que hay en su hogar, consulte a
su distribuidor o a la compañía de electricidad.
DESCONECTAR EL DISPOSITIVO DE LA RED
ELÉCTRICA
El enchufe eléctrico sirve para desconectar el
producto. El enchufe debe estar siempre accesible.
Instalación
No utilice esta unidad cerca del agua, tina de
baño, lavamanos, fregador, tina de lavar, en un
sótano húmedo o cerca de una piscina, etc.
No coloque la unidad sobre una mesa rodante
aunque esté fija. La unidad puede caerse,
causando serios daños a niños o adultos y a la
misma unidad.
Coloque la unidad en un mueble recomendado
por el fabricante o vendido con el receptor de
televisión. Siga las instrucciones del fabricante
para aquellos televisores que se colocan en la
pared o en los anaqueles y utilice el soporte
aprobado por el fabricante.
Las ranuras en la parte superior, atrás y abajo del
televisor son para ventilación y aseguran un buen
funcionamiento del aparato, evitando que se
sobrecaliente.
Estas ranuras no deben ser bloqueadas o
cubiertas. Las ranuras nunca deben ser
bloqueadas colocando la unidad en una cama,
sofa, alfombra o superficie similar. Esta unidad no
debe colocarse en un mueble cerrado como una
biblioteca a menos que el mismo tenga la
ventilación apropiada.
Se recomienda que no se opere esta unidad
cerca de bocinas o muebles metálicos grandes
para evitar que el magnetismo de estos influya
sobre la pureza (uniformidad) de los colores en la
pantalla.
Sitios con humedad:
Este aparato no debe ser expuesto a goteras,
escurrimientos o salpicaduras y no deben
colocarse sobre de el objetos con liquido tales
como vasos o floreros.
Uso
No permita que nada esté encima del cordón de
alimentación. No coloque el televisor donde el
cordón de alimentación pueda ser pisado.
No sobrecargue los tomacorrientes y cordones de
alimentación, ya que pueden causar un incendio o
una descarga eléctrica. Nunca meta objetos de
ninguna clase en el televisor a través de las
ranuras ya que pueden tocar puntos de voltajes
peligrosos los cuales pueden causar un incendio,
un corto circuito o una descarga eléctrica.
Nunca derrame líquidos de ninguna clase encima
del televisor.
Servicio
No intente darle servicio usted mismo al televisor
ya que al abrir la cubierta de éste usted se
expondría a voltaje peligroso o a cualquier otro
peligro. Refiérase siempre que sea necesario al
técnico de servicio calificado.
Escriba los Números de Modelo y Serie
Fecha de Compra
Distribuidor
Dirección
Teléfono
No. de Modelo
No. de Serie
Los números de modelo y serie se encuentran en
la parte de atrás de la unidad. El número de serie
es único en esta unidad. Debe registrar la
información solicitada y retener esta guía como un
registro permanente de su compra. Favor guardar
su recibo como prueba de su compra.
TABLA DE CONTENIDO
DESCRIPCION DE LOS CONTROLES...3 - 4
Pantalla de Menús....................................5
FUNCIONAMIENTO BASICO DEL
TELEVISOR.......................................................... 6
FUNCIONES VARIAS...............................7
CONTROL DE LA IMAGEN......................8
CONTROL DE SONIDO............................8
FUNCION DE SUBTITULAJE (algunos
modelos).................................................9
CONEXIONES DE LA ANTENA.............10
CONEXIÓN DE EQUIPOS EXTERNOS
(algunos modelos).........................10 - 11
CONEXIONES al DVD (algunos modelos)...11
PROBLEMAS CON LA TV
2
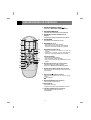
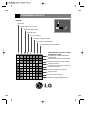
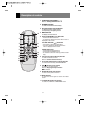
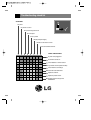
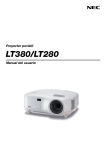
DESCRIPCION DE LOS CONTROLES
1. BOTÓN ENCENDIDO ( POWER
)
Refierase al "Encendido / Apagado del TV".
2. BOTONES NUMERADOS
Para seleccionar directamente el canal deseado.
3. BOTÓN APC (Control Automático de la
Imagen)
Para ajustar la imagen establecida por la fábrica.
1
10
5. BOTONES CH (D / E)
• Para seleccionar el canal deseado.
• Para seleccionar el punto del menú deseado
cuando el menú está exhibido en la pantalla.
2
3
11
4
12
5
6
7
8
16
15
4. BOTÓN MENU
Para exhibir en la pantalla los menús.
13
14
9
BOTONES VOLUMEN (F / G)
• Para incrementar o disminuir el nivel del
volumen.
• Para entrar o ajustar el menú seleccionado
cuando el menú está exhibido en la pantalla.
BOTÓN ENTER (A)
• Para salir del Menú exhibido.
• Para memorizar el Menú ajustado.
• Para volver al modo de TV.(Solamente por control
remoto)
6. BOTÓN FCR (Revisión de Canal Favorito)
Para seleccionar sus canales favoritos.
Refierase a "Memoria de canales favoritos".
7. BOTÓN AUTO PRG./A.PROG (Auto program)
Para memorizar los canales por medio de la autoprogramación
8. BOTÓN EYE/ (algunos modelos)
Para activar o desactivar la función de Ojo
Mágico.
: No funciona.
9. BOTÓN REVIEW (algunos modelos)
Para retornar al canal anterior.
10. BOTÓN MUTE
Para pausar el sonido.
Presione nuevamente para restablecer el sonido.
11. BOTÓN TV/VIDEO (algunos modelos)
Para seleccionar el modo TV, VIDEO o
COMPONENT.
3
1
13
7
3
2
POWER TV/VIDEO
SLEEP
APC
A.PROG MEMORY/ERASE CAPTION
1
2
3
4
5
6
7
8
9
10
11
14
12
CH
5
VOL
ENTER
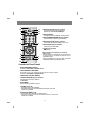
17.
VOL
MENU
REVIEW
MTS
PICTURE
(algunos modelos)
No funciona.
Nota: Colocación de las baterías a la unidad de
control remoto
CH
9
4
16
15. BOTÓN PICTURE (algunos modelos)
Para exhibir los modos de imagen uno por uno.
16. BOTÓN MTS (algunos modelos)
Para escuchar sonido MTS.
FCR
MUTE
13. BOTÓN SLEEP
Para fijar el tiempo de apagado, si desea dormir.
14. BOTÓN MEMORY/ERASE (algunos modelos)
Para memorizar o borrar el canal deseado.
6
0
12. BOTÓN CAPTION (algunos modelos)
Para seleccionar el modo de Subtítulos.
Refiera a la "Función de Subtitulaje".
EYE/
8
17
• Abra la tapa del compartimiento de las baterías en
la parte posterior e instale las baterías con la
polaridad correcta.
• Utilice dos baterías de 1,5Vcc tipo AAA. No mezcle
las baterías usadas con la baterías nuevas.
15
Conexión del Panel Frontal
-
BOTÓN ENCENDIDO (ON/OFF)
Refierase al "Encendido / Apagado del TV".
-
INDICADOR MODO DE ESPERA
Se ilumina en color rojo cuando el televisor esta en modo de espera.
Refierase al "Encendido / Apagado del TV".
-
SENSOR DEL CONTROL REMOTO
-
BOTÓN TV/VIDEO (A) (algunos modelos)
Para seleccionar el modo TV, VIDEO o
COMPONENT.
-
BOTÓN MENU
Para exhibir en la pantalla los menús.
-
BOTONES CH (D / E)
• Para seleccionar el canal deseado.
• Para seleccionar el item del menú deseado cuando el menú está
exhibido en la pantalla.
BOTONES VOLUMEN (F / G)
• Para incrementar o disminuir el nivel del volumen.
• Para entrar o ajustar el menú seleccionado cuando el menú está
exhibido en la pantalla.
4
Pantalla de Menús
El dialogo entre tu y tu equipo toma lugar en la
pantalla con un menú de operacion. Los pasos que
se requieren para la activacion de los botones se
describen a continuación.
2.Presione el botón G y luego el botón D / E
hasta seleccionar el menú.
3.Presione el botón de G en la pantalla del submenú o el de jalar hacia abajo.
4.Cambia la presentacion y selecciona menú con
F / G o D / E.Usted puede mover hasta el
nivel mas alto presionando ENTER (A) o F
para ir al nivel mas bajo presione el botón G .
Seleccion del Menú
1. Presione el botón MENU y enseguida presione
el botón D / E para desplegar cada menú.
Canal
CH.
Prg. manual
Prg. auto
Prg.+manual
Prg. manual
Favorito++
Selecc.
{
{
{
Canal
Canal
Memoria
Sint. fina
Ajustar
Entrada{ Volver}
Selecc.
{ TV
{
{
{
3
Entrada{ Volver}
Imagen
CH.
++{ {
APC
XD
{
Contraste
{
Brillo
{
Color
{
Nitidez+++++++ +{
Tinte
{
Canal
Nítida
Optima
Suave
Usuario
CH.
Prg. auto
Prg. manual
Favorito++
Favorito
++++++
Selecc.
Entrada{ Volver}
Selecc.
{
{
{
CATV +95
_____
_____
_____
_____
_____
_____
_____
Entrada{ Volver}
Sonido
CH.
DASP
Turbo+Snd.
AVL
Balance
Agudos
Graves
Selecc.
++{ {
{
{
{
{
{
Plana
Música
Películas
Deportes
Usuario
Entrada{ Volver}
Temporizador
CH.
Clock
Reloj
Timer off
Timer on
Auto+_off+
Selecc.
{
{
{
{
{
__:__+AM
__
AM
Entrada{ Volver}
Especial
CH.
Idioma
Entrada
Bloqueado
Caption+
Game+
Auto+demo
Selecc.
Selecc.
{
{
{
{
{
{
On
Off
Notes:
Notes:
La La
función
“Caption”
estará
desabilitada
para
la entrada
Component.
función
“Caption”
estará
desabilitada
para
la entrada
Component.
La La
función
“Game”
aplica
solo
para
modelos
concon
Juego.
función
“Game”
aplica
solo
para
modelos
Juego.
La La
función
“Auto
demo”
es es
mencionada
en en
página
7. 7.
función
“Auto
demo”
mencionada
página
Entrada{
Entrada{ Volver}
Volver}
5
FUNCIONAMIENTO BASICO DEL TELEVISOR
Antes de poner a funcionar su televisor,
asegúrese que las siguientes instrucciones se han
cumplido.
• Su TV ha sido conectado a un sistema de
antena o cable.
• Su TV ha sido conectado a un tomacorriente.
• En este manual tal vez los menús desplegados
puedan ser diferentes a los de su TV debido a
que esto es solo un ejemplo para ayudar en la
operación de su TV.
Utilizando el botón AUTO PRG./A.PROG
Usted puede convenientemente realizar una
PROGRAMACION AUTOMATICA utilizando el
botón AUTO PRG./A.PROG en el control remoto.
1. Presione el botón AUTO PRG./A.PROG.
2. Presione el botón AUTO PRG./A.PROG o G.
La PROGRAMACION AUTOMATICA empieza
inmediatamente.
Si quiere detener la programación automática,
presione el botón ENTER (■).
Notas :• Si la señal programada es de baja
calidad, memorice nuevamente en la Prg. auto.
•La PROGRAMACION AUTOMATICA salva todos
los canales admisibles sin importar la recepción de
la señal (RF, cable).
•Si los canales generales de TV y los de cable TV
son duplicados presione los botones de números
(0~9) para cambiar a .
Encendido / Apagado del TV
Presione el botón POWER(ON/OFF) en el TV;
esto regresa al modo de espera. El TV cambia al
modo de espera (Stand by) y el indicador del
modo se enciende en rojo.
Para encender el TV desde el modo de espera,
presione el botón TV/VIDEO, CH D/E en el
equipo, o los botones POWER, TV/VIDEO, CH
D/E, ENUMERADO del control remoto.
El número del canal se exhibirá en la pantalla. La
exhibición en la pantalla desaparecerá luego de
algunos segundos.
Presione el botón POWER en el control remoto;
esto hace regresar al modo de espera
Para apagar el TV presione el botón
POWER(ON/OFF) en el Televisor.
canales generales
de TV
canales de
cableTV
Utilizando el botón MENU
1. Presione el botón MENU y luego el botón D / E
para seleccionar el menú canal.
2. Presione el botón G y luego el botón D / E para
selecionar Prg. auto.
3. Presione el botón G para entrar al modo Prg. auto.
4. La Programación empezará.
Memorización de los canales por medio
de la PROGRAMACION MANUAL
Seleccionando el idioma en
pantalla.
Utilización del botón MEMORY/ERASE
1. Presione el botón MENU y luego el botón D / E
para seleccionar el menú Especial.
2. Presione el botón G y luego el botón D / E para
seleccionar Idioma.
3. Presione el botón G y luego el botón D / E para
seleccionar el idioma deseado.
De aquí en adelante la exhibición en pantalla
aparecerá en el idioma seleccionado.
4. Presione el botón MENU para salir.
Usted puede realizar convenientemente la
PROGRAMACION MANUAL utilizando el botón
de MEMORY/ERASE en el control remoto.
1. Presione el botón D / E o el botón Enumerado
para seleccionar el canal deseado.
2. Presione MEMORY/ERASE para seleccionar
Memoria o Borrar.
Selección de canales
Memorización de canales
Presione el botón D / E para seleccionar
convenientemente el canal de arriba o de abajo
en vez del canal que se está viendo o presione el
botón ENUMERADO directamente para
seleccionar el canal deseado.
Esta es la función para memorizar todos los
canales activos en su área antes de utilizar el TV.
Hay dos maneras de memorizar los canales.
Usted puede utilizar cualquiera.
Una es la PROGRAMACION AUTOMATICA y la
otra es la PROGRAMACION MANUAL.
En la PROGRAMACION AUTOMATICA, el
televisor memorizará los canales en orden
ascendente.
Si hay canales adicionales que quiera añadir o
borrar, puede agregarlos o borrarlos manualmente.
Ajuste del volumen
Presione el botón G para aumentar el nivel del
volumen o presione el botón F para disminuir el
nivel del volumen.
Para pausar al sonido, presione el botón MUTE.
La parabra Mute aparece en la pantalla.
Resulta conveniente cuando el teléfono suena.
Para restablecer el sonido, Presione el botón
MUTE o VOL F / G.
Memorizando los canales por medio de
la PROGRAMACION AUTOMATICA
La PROGRAMACION AUTOMATICA busca
y memoriza todos los canales activos en su área y
usted puede entonces seleccionar los canales por
medio de el botón D /E.
6
FUNCIONES VARIAS
Fijación de la hora
2. Presione el botón G y luego el botón D /E para
seleccionar Auto off.
3. Presione el botón G y luego el botón D /E para
seleccionar On o Off.
4. Presione el botón MENU para salir.
Antes de fijar el encendido y apagado del
temporizador, primero tiene que fijar la hora
actual.
Fijación del temporizador de
apagado
JUEGO (algunos modelos)
Usted puede disfrutar de un video juego en su TV.
Programa su televisor para cambiar al modo Stand
by de transcurrido el tiempo programado.
Notas: •Si se ajusta la hora de encendido igual a la
de apagado, solamente funcionará el apagado.
Bloqueo de teclado
El televisor puede ser programado para que solo
pueda ser operado por el control remoto. Esta
caraterística puede ser utilizada para evitar que
personal no autorizado lo utilice.
Fijación del temporizador de encendido
Esta función automáticamente enciende el televisor
a una hora prefijada.
Notas: •Con la función de bloqueo activado,
aparecerá Bloqueado en la pantalla si cualquier
botón del panel frontal del TV es presionado
aunque este viendo el TV.
•Esta función permanece activa aun al desconectar
la TV.
Notas: •Programa su televisor para encenderse a
la hora prefijada. Luego de dos horas de
permanecer encendido sin la activación de ningún
botón el TV pasará al modo de Stand by o se
apagará automáticamente.
•Esta función trabaja solamente en modo de espera.
Demostración automática
(algunos modelos)
Fijación del temporizador para dormir
La demostración automática le permite revisar
todos los menus programados en el televisor.
Con estas funciones usted no tendrá que
preocuparse por activar el modo de espera
(standby) en su televisor antes de quedarse
dormido.La función Sleep Timer automáticamente
apagará el televisor, después de que haya
transcurrido el intervalo de tiempo prefijado.
Presione el botón de SLEEP para seleccionar la
hora de dormir.
Cada vez que presione este botón, usted podrá
ver la secuencia de tiempos como se muestra
abajo y seleccionar el tiempo deseado.
El temporizador empieza a contar disminuyendo
desde la cantidad de minutos seleccionada.
--- →10 →20→30 →60 →90 →120→180→240
Memorización de los canales
favoritos
La memorización de los canales favoritos es una
característica conveniente que le permite explorar
rápidamente hasta 8 canales de su elección sin
que tenga que esperar que el TV explore los que
están en medio.
Para seleccionar el canal favorito, presione
repetidamente el botón de FCR (Revisión de
Canal Favorito). Los canales programados
aparecen en la pantalla uno por uno.
Ajuste de Sintonía Fina
Esta función es para ajustar la imagen a la
condición estable cuando la imagen es pobre, por
ejemplo, las rayas horizontales, imagen
distorsionada o sin color durante la transmisión.
Notas: •En pocos segundos, el tiempo de dormir
seleccionado desaparecerá y funcionará
automáticamente.
•Para ver el tiempo de dormir que queda,
presione una vez el botón de SLEEP y podrá
verlo en la pantalla.
•Para borrar la hora de dormir, presione el botón
SLEEP continuamente hasta que SLEEP --- se
exhiba.
Notas: •Para liberar el ajuste de sintonía fina
memorizado, programe nuevamente el canal
mediante la PROGRAM AUTO o PROGRAM
MANUAL.
•Cuando se memoriza el ajuste de sintonía fina, el
color del número y Stereo/SAP del canal cambia
a amarillo.
Apagado automático
Luego de 10 minutos de no recibir señal el televisor
cambiará a modo standby automáticamente.
1. Presione el botón MENU y luego el botón D / E
para seleccionar el menú Temporizador.
7
CONTROL DE LA IMAGEN
mágico (algunos modelos), Nítida, Optima,
Suave o Usuario.
Disfrutando de la función OJO
(algunos modelos)
3. Presione el botón ENTER (■) para salir.
El televisor ajustará automáticamente la imagen
de acuerdo a las condiciones de iluminación
circundante cuando está Ojo mágico.
1. Presione el botón EYE/ en el control remoto.
La pantalla Ojo mágico aparecerá y la imagen
será ajustada.
2. Presione el botón EYE/ nuevamente para
activar la función de OJO.
Ajuste de la Imagen
Esta es la función para ajustar manualmente la
imagen a los niveles deseados ( Contraste,
Brillo, Color, Nitidez, Tinte ) de la pantalla
como usted quiera. Si la imagen que seleccionó
no es satisfactoria, usted puede seleccionar el
preajuste de fábrica. En el sistema de transmisión
PAL M/N el ajuste para Tinte no aparecerá.
Control automático de la Imagen
XD (algunos modelos)
Puede seleccionar la imagen programada de
fábrica como prefiera.
XD es la exclusiva tecnología de mejora de
imágenes de LG Electronics, que logra mostrar
una fuente HD real a través de un avanzado
algoritmo de procesamiento de señal digital.
Utilización del botón APC
1. Presione el botón APC en el control remoto.
2. Presione el botón APC para seleccionar Ojo
CONTROL DE SONIDO
más acentuado y amplificado que el normal.
Disfrute de la transmisión
ESTEREO / SAP (algunos modelos)
X-WAVE (algunos modelos)
Su TV puede recibir programas MTS Estéreo y
SAP que acompañen la programación, como
sistemas que transmitirán una señal de audio
adicional de igual calidad que la original. La
función MTS no opera en el modo de Video.
1. Presione el botón MENU y luego botón D / E
para seleccionar el menú Sonido.
2. Presione el botón G y luego botón D / E para
seleccionar X-WAVE.
3. Presione el botón G y luego botón D / E para
seleccionar Ajs. Frc..
4. Presione el botón G para sintonizar una
frecuencia en el menú de X-wave.
5. Utilice los números del 0 al 9 o presione el
botón F / G a fin de hacer coincidir la frecuencia
de la TV con la del receptor de FM.
Notas:
1. En caso de una mala recepción, o débil,
seleccione otra frecuencia.
2. A fin de lograr los mejores resultados, no
debería existir una separación superior a los
5m(16.4 pies) entre la TV y el receptor de FM.
3. En ciertas áreas, la capacidad del transmisor
de FM puede verse reducida, por ejemplo en
caso de cercanía a una torre de radiodifusión.
4. La sensibilidad de recepción puede depender
del tipo de receptor (radio FM).
Utilizando el botón MTS
1. Presione el botón MTS para seleccionar el modo
MTS deseado. Cada vez que presione este
botón, MONO, ESTEREO o SAP apareceran.
2. Presione el botón ENTER (■) para salir.
Notas: •Estéreo o SAP pueden ser reproducidas
solamente cuando la estación de TV transmita
esta señal aunque usted haya seleccionado
STEREO o SAP.
•El sonido mono es reproducido automáticamente
en caso de transmisión mono aún cuando
STEREO o SAP haya sido seleccionado.
•Seleccione MONO si desea escuchar el sonido
mono durante una transmision Estéreo / SAP.
Control Automático de Sonido
Usted puede disfrutar de un magnífico sonido sin la
necesidad de ajustes. Este TV automáticamente
ajusta el sonido apropiado al tipo de programa que
esta viendo.
1. Presione el botón MENU y luego botón D / E
para seleccionar el menú Sonido.
2. Presione el botón G y luego botón D / E para
seleccionar DASP.
3. Presione el botón G y luego botón D / E para
seleccionar Plana, Música, Películas,
Deportes o Usuario.
4. Presione el botón MENU para salir.
AVL (Nivelador Automático de
Volumen)
El AVL automaticámente mantiene un nivel de
volumen aunque usted cambie de canal.
Ajustando los AGUDOS
(algunos modelos)
Esta característica incrementa o atenúa los
sonidos agudos.
Ajustando los GRAVES (algunos
modelos)
Turbo Sonido (algunos modelos)
Esta característica incrementa o atenúa los sonidos
graves.
Cuando se activa esta función, el sonido resultará
8
FUNCION DE SUBTITULAJE (algunos modelos)
El subtitulaje es un proceso que convierte la
porción de audio de un programa de televisión en
palabras escritas, las cuales aparecen en la
pantalla del televisor en una forma similar a los
subtítulos. El subtitulaje permite al televidente leer
el diálogo y narración de los programas de
televisión.
Operación del subtitulaje
Utilizando el botón CAPTION
1. Presione el botón CAPTION.
2. Presione el botón F / G o CAPTION para
seleccionar Off, MODO 1, MODO 2, TEXTO 1 o
TEXTO 2.
3. Presione el botón ENTER (A) para salir.
Uso de subtitulaje
Las leyendas son los subtítulos del diálogo y
narración de los programas de televisión. Para
programas pregrabados, el diálogo del programa
puede prepararse anticipadamente con subtítulos.
Es posible subtitular un programa en vivo usando
un proceso llamado "subtitulaje de tiempo real", el
cual crea subtitulajes instantáneamente. El
subtitulaje de tiempo real es normalmente
efectuado por reporteros profesionales que usan
un sistema de taquigrafía a máquina y una
computadora para traducir al inglés.
El subtitulaje es un sistema efectivo para
personas con incapacidad auditiva, y también
puede ayudar en la enseñanza de idiomas.
• La imagen a la derecha muestra un subtítulaje
típico.
Utilizando el botón MENU
1. Presione el botón MENU y luego D / E hasta
que el menú aparezca como se muestra a la
derecha.
2. Presione el botón G y luego D / E para
seleccionar Caption.
3. Presione el botón G y luego D / E para
seleccionar Off, MODO 1, MODO 2, TEXTO 1 o
TEXTO 2.
4. Presione el botón MENU para salir.
Nota: El televisor está programado para recordar
cuál fue la última modalidad que se fijó, aún
cuando haya apagado el televisor.
Consejos para el subtitulaje
• No todas las transmisiones de TV incluyen
señales de subtitulaje.
• Algunas veces las estaciones de Televisión
transmiten dos señales de subtitulaje diferentes
en el mismo canal. Seleccionando MODO 1 o
MODO 2 , puede seleccionar cuál señal
visualizar. MODO 1 es la señal usual con los
subtitulajes, mientras que MODO 2 puede
mostrar la información de demostración o
programación.
• El televisor puede no recibir señales de
subtitulaje en las situaciones siguientes:
Uso de función de texto
Los servicios de Texto proporcionan una extensa
variedad de información sobre toda clase de
temas (por ejemplo, listas de programas
subtitulados, pronóstico de tiempo, tópicos del
mercado de valores, noticias para personas con
incapacidad auditiva ...) a través de la pantalla de
televisión.
Pero no todas las estaciones ofrecen servicios de
texto, aunque pudieran ofrecer subtítulaje.
Nota: En el caso de recibir una señal débil, un
cuadro negro sin imagen puede aparecer y
desaparecer en la pantalla, aún cuando la
modalidad de texto se seleccione. Esta es una
función normal en este caso.
9
CONEXIONES DE LA ANTENA
Cable Coaxial de 75 Ohm
ANTENA EXTERNA
1. Conecte el cable coaxial de 75 ohm
directamente al conector de la antena de 75
ohm.
Para mejor recepción, recomendamos que utilice
una antena externa. El mal tiempo y los cables de
antena pueden reducir la calidad de la señal.
Antes de conectar el aparato de televisión, revise
la antena y cables. En cualquier centro de servicio
le pueden explicar sobre los diversos tipos de
antenas exteriores disponibles.
Telecable (CATV)
Si se suscribe al sistema de telecable (CATV),
cambie la conexión de la antena tal como se
describe a continuación:
1. Quite el adaptador de 300 a 75 ohm o el cable
de antena de 75 ohm del aparato.
2. Conecte el cable de telecable CATV (cable
coaxial de 75 ohm) al conector de la antena de
75 ohm.
Cable Plano de 300 Ohm
1. Conecte el cable plano de 300 ohm a los
tornillos en el adaptador de 300 a 75 ohm.
2. Inserte el adaptador de 300 a 75 ohm en el
conector de la antena de 75 ohm.
Conexión de equipos externos (algunos modelos)
Usted puede conectar equipos adicionales, como
una VHS, Cámara de video,etc. a su TV.
3. Presione el botón PLAY del VCR.
En video será visible en la pantalla.
1. IN 1 JACKS : Conecte las salidas del equipo
(VCR, DVD, Videocámara) a estas entradas.
Presione el botón TV/VIDEO para seleccionar
VIDEO 1 o VIDEO.
2. IN 2 JACKS : Conecte las salidas del equipo
(VCR, DVD, Videocámara) a estas entradas.
Presione el botón TV/VIDEO para seleccionar
VIDEO 2 o S-VIDEO.
3.OUT JACKS (Salida de conectores): Conecte
las entradas de un equipo externo (VCR,
Amplificador de Audio ) a estas salidas para
grabar o monitorear el programa deseado.
4.§/ Audífono (algunos modelos) : En algunos
modelos éste se encuentra localizado al frente o
lateral del TV.
Nota: En caso de una video grabadora MONO,
conecte la salida del VCR a la entrada
AUDIO L/MONO IN del TV. Así que el sonido
podrá ser escuchado por ambas bocinas. Si usted
lo conecta a la entrada AUDIO R IN del TV, el
sonido se escuchará en la bocina derecha.
Salida de Monitor
Nota: Si conecta la entrada VIDEO IN, mientras
el modo COMPONENT es desplegado, en el
segundo TV o monitor mostrara la función AV IN.
Nota: El televisor está programado para recordar
cuál fue la última modalidad que se fijó, aún
cuando haya apagado el Televisor.
Conectando las entradas AUDIO/VIDEO
1. Conecte las salidas de AUDIO/VIDEO del VCR
a la entrada (A/V) IN, IN 1 o IN 2.
2. Presione el botón TV/VIDEO para seleccionar
VIDEO 1 o VIDEO.
Nota: En algunos modelos si usted conecta la
salida de audio/video del VCR a la entrada IN
2(A/V) en la parte frontal o lateral del TV,
seleccione VIDEO-2.
10
Nota: En algunos modelos mono, cuando en los
conectores de entrada en el panel delantero y el
panel trasero se conectan equipos externos al
mismo tiempo, los conectores de entrada en el
panel delantero tienen prioridad sobre aquellos
del panel trasero del televisor.
VCR Grabando (algunos modelos)
1. Conecte las entradas de audio/video del VCR a
las salidas (A/V) de su TV.
2. Seleccione el canal en su televisor.
3. Fije el VCR para grabar.
Conectando la video grabadora
S-VHS (algunos modelos)
Grabando un programa de otro
equipo (algunos modelos)
1. Conecte la salida S-VHS del VCR a la entrada
S-VHS en la parte trasera o lateral.
2. Conecte las salidas audio/video del VCR al jack
IN 2 (A/V) en la parte lateral o frente del TV.
3. Presione el botón TV/VIDEO para seleccionar
S-VIDEO.
4. Presione el botón PLAY del VCR.
La reproducción de video es visible en la
pantalla del TV.
1. Conecte las salida del VCR reproductor en la
entrada IN 1 de su TV.
2. Conecte las entradas del VCR de grabado a las
salidas (A/V) del TV.
3. Presione TV/VIDEO para seleccionar VIDEO 1
o VIDEO.
Si conecta a la entrada IN 2, VIDEO-2.
4. Presione el botón PLAY en el VCR reproductor
y fije el VCR para grabar.
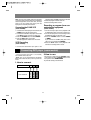
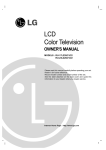
CONEXIONES al DVD (algunos modelos)
• Conecte las entradas compuestas de Video Y, Pb, Pr
(480 entrelazado) y las entradas de audio R y L.
2.Cómo Usar
• Encienda la unidad y presione la tecla
TV/VIDEO en el control remoto o la tecla
TV/VIDEO en el panel frontal del TV para
seleccionar el COMPONENT.
• Intente esto después de encender el DVD.
• Nota: El televisor está programado para
recordar cuál fue la última modalidad que se fijó,
aún cuando lo haya apagado.
1.Cómo conectar
TV INPUT
Y
DV D OUTPUT
Y
Y
Y
Y
PB
PR
Cb Cr
B -Y R -Y
Pb Pr
PB PR
11
PROBLEMAS CON LA TV
SINTOMA
No enciende
No hay imagen o no hay sonido
Sonido bien, imagen pobre
Recepción pobre
Líneas en la imagen
Fantasmas (Imagenes múltiples)
No funciona el Control Remoto.
No puede sintonizar el canal deseado
VERIFIQUE ESTOS PASOS Y TRATE
DE HACER EL AJUSTE
Asegúrese que el cable de alimentación
está enchufado
Asegúrese que el televisor está encendido
Verifique las baterías del Control Remoto.
Intente otra estación
(Problemas de transmisión) Verifique la
conexión de la antena
Puede ser interferencia a nivel local
Ajuste la antena
Ajuste el control de imagen
Memorice los canales por PROG. AUTO
Color Television
OWNER'S MANUAL
Please read this manual carefully before operating your set.
Retain it for future reference.
Record model number and serial number of the set.
See the label attached on the back cover and quote this
information to your dealer when you require service.
Safety Precautions
WARNING : TO REDUCE THE RISK OF FIRE OR ELECTRIC SHOCK, DO NOT EXPOSE THIS
PRODUCT TO RAIN OR MOISTURE.
CAUTION : TO REDUCE THE RISK OF ELECTRIC SHOCK, DO NOT REMOVE COVER(OR
BACK). NO USER-SERVICEABLE PARTS INSIDE. REFER SERVICING TO QUALIFIED
SERVICE PERSONNEL.
Cleaning
Unplug this television receiver from the wall outlet
before cleaning. Do not use liquid cleaners or
aerosol cleaners. Use a damp cloth for cleaning.
Do not use attachments not recommended by the
television receiver manufacturer as they may
cause hazards.
Power Supply
This television receiver should be operated only
from the type of power source indicated on the
marking label. If you are not sure of the type of
power supplied to your home, consult your
television dealer or local power company.
DISCONNECTING DEVICE FROM MAINS
Mains plug is the disconnecting device. The plug
must remain readily operable.
Installation
Do not use this television receiver near water, for
example, near a bathtub, washbowl, kitchen sink,
or laundry tub, in a wet basement, or near a swimming pool, etc.
Do not place this television receiver on an
unstable cart, stand, or table. The television
receiver may fall, causing serious injury to a child
or an adult, and serious damage to the appliance.
Use only with a cart or stand recommended by the
manufacturer, or sold with the television receiver.
Wall or shelf mounting should follow the manufacturer's instructions and should use a mounting
kit approved by the manufacturer.
Slots and openings in the cabinet and the back or
bottom are provided for ventilation, and to insure
reliable operation of the television receiver, and to
protect it from overheating. These openings must
not be blocked or covered. The openings should
never be blocked by placing the television receiver
on a bed, sofa, rug, or other similar surface. This
television receiver should not be placed in a builtin installation such as a bookcase unless proper
ventilation is provided.
It is recommended not to operate this unit near
speakers or big metallic furnitures in order to keep
their magnetism from disturbing colors purity
(uniformity) on the screen.
Wet Location Marking:
Apparatus shall not be exposed to dripping or
splashing and no objects filled with liquids, such
as vases, shall be placed on the apparatus.
Use
Do not allow anything to rest on the power cord.
Do not locate this television receiver where the
cord will be abused by persons walking on it.
Do not overload wall outlets and extension cords
as this can result in fire or electric shock.
Never push objects of any kind into this television
receiver through cabinet slots as they may touch
dangerous voltage points or short out parts that
could result in a fire or electric shock.
Never spill liquid of any kind on the television
receiver.
Service
Do not attempt to service this television yourself
as opening or removing covers may expose you
to dangerous voltage or other hazards. Refer all
servicing to qualified personnel.
Writing Model And Serial Numbers
Date of Purchase
Dealer Purchased from
Dealer Address
Dealer Phone No.
Model No.
Serial No.
The serial number and model number are found
on the back of this unit. The serial number is
unique to this unit. You should record requested
information here and retain this guide as a
permanent record of your purchase. Please retain
your purchase receipt as your proof of purchase.
CONTENTS
Closed caption function (some models)......9
Antenna Connections............................10
Connection of external equipment
(some models)................................10 - 11
Connecting DVD player (some models).....11
Troubleshooting check list.....Back cover
Description of controls .....................3 - 4
On screen menus ....................................5
Basic TV operation...................................6
Various function ......................................7
Picture control .........................................8
Sound control...........................................8
2
Description of controls
1. POWER BUTTON (POWER or
Refer to "Turning on/off the TV".
)
2. NUMBER BUTTONS
To select the desired channel directly.
3. APC (Auto Picture Control) BUTTON
To adjust the factory preset pictures
corresponding to the lighting around.
1
10 4. MENU BUTTON
To display on screen menus.
5. CH(or PR) UP/DOWN (D / E) BUTTONS
• To select the desired channel.
• To select the desired menu item when menu is
displayed on the screen.
2
3
11
4
12
5
6
7
8
16
15
VOLUME UP/DOWN (F / G) BUTTONS
• To increase or decrease volume level.
• To enter or adjust the selected menu when
menu is displayed on the screen.
ENTER (A) BUTTON
• To exit from the displayed menu.
• To memorize the adjusted menu.
• To recall the current TV mode (by remote control
only).
13
14
9 6. FCR (Favorite Channel Review) BUTTON
To select the favorite channel.
Refer to "Favorite channel memory".
7. AUTO PRG./A.PROG (Auto program) BUTTON
To memorize channels by AUTO PROGRAM.
8. EYE/ BUTTON (some models)
To switch on or off eye picture.
Refer to "Enjoying the Eye Function".
: No function.
9. REVIEW BUTTON (some models)
To return to the previous channel.
10. MUTE BUTTON
To mute the sound. Again to restore the muted
sound.
11. TV/VIDEO BUTTON (some models)
To select TV, VIDEO or COMPONENT mode.
3
1
13
7
3
2
POWER TV/VIDEO
SLEEP
APC
A.PROG MEMORY/ERASE CAPTION
1
2
3
4
5
6
7
8
9
10
11
14
12
CH
5
VOL
ENTER
17.
VOL
CH
9
4
16
MENU
REVIEW
MTS
PICTURE
15. PICTURE BUTTON
To display picture modes one by one.
16. MTS BUTTON (some models)
To listen to the MTS sound.
FCR
MUTE
13. SLEEP BUTTON
To set the desired sleep time.
14. MEMORY/ERASE BUTTON (some models)
To memorize or erase the desired channel.
6
0
12. CAPTION BUTTON (some models)
To select the CAPTION mode.
Refer to "Closed caption function".
EYE/
8
17
(some models)
No function.
Note: Fitting Batteries in the Remote Control Unit
• Open the battery compartment cover on the back
side and insert the batteries with correct polarity.
• Apply two 1.5V batteries of AAA type. Don’t mix the
used batteries with new batteries
15
Front Panel Information
-
POWER BUTTON (or ON/OFF)
Refer to "Turning on/off the TV".
-
STAND BY INDICATOR
Illuminates red when the TV is in standby mode. Refer to
"Turning on/off the TV".
-
REMOTE CONTROL SENSOR
- TV/VIDEO ( A ) BUTTON
To select TV, VIDEO or COMPONENT mode.
-
MENU BUTTON
To display on-screen.
- CHANNEL UP/DOWN (D / E) BUTTONS
• To select the desired channel.
• To select the desired menu item when menu
is displayed on the screen.
VOLUME UP/DOWN (F / G) BUTTONS
• To increase or decrease volume level.
• To enter or adjust the selected menu when
menu is displayed on the screen.
4
On screen menus
The dialogue between you and your set takes place
on screen with an operator menu .The buttons
required for the operating steps are also displayed.
button to select a menu item.
3.Press the G button to display the sub menu or
the pull-down menu.
4.Change the setting of an item in the sub or pulldown menu with F / G or D / E. You can move
to the higher level menu with ENTER (A) or F
button and to move to the lower level menu
press the G button.
Menu selection
1.Press the MENU button and then use the D / E
button to display each menu.
2.Press the G button and then use the D / E
Channel
CH.
Manual
Auto+prog.
Manual
Manual
Favorite++
{
{{
{
Channel
Channel
Memory
Fine
To+set
Move++Next { Back}
+
+
{
{
{
TV
3
Move++Next { Back}
+
+
Picture
CH.
Channel
APC
APC
XD
Contrast
Brightness
Color
Sharpness
Tint
++++++
+++{ {
{
{
{
{
{
{
Clear
Optimum
Soft
User
CH.
Auto+prog.
{
Manual
{
Favorite+channel+{{
Favorite
Move++Next { Back}
+
CATV++95
_____
_____
_____
_____
_____
_____
_____
+
Move++Next { Back}
+
+
Sound
CH.
DASP
DASP
Turbo+Snd.
AVL
Balance
Treble
Bass
+
+++{ {
{
{
{
{
{
Flat
Music
Movie
Sport
User
Move++Next { Back}
+
+
Timer
CH.
Clock
Clock
Off_timer
On+_timer
Auto+_off+
{
{
{
{
{
__:__+AM
__
AM
Move++Next { Back}
+
+
Special
CH.
Language
Input
Key+lock
Caption+
Game+
Auto+demo
{
{
{
{
{
{
On
Off
Notes:
The function “Caption” will be disabled for Component input.
The function “Game” applies for only some models.
The function “Auto demo” is mentioned on page 7.
Move++Next+{+Back}
5
Basic TV operation
Before operating your TV, make sure the following
instructions have been completed.
• Your TV has been connected to an antenna or a
cable system.
• Your TV has been plugged in a power outlet.
• In this manual, the OSD (On Screen Display)
may be different from your TV’s because it is
just an example to help you with the TV
operation.
1. Press the AUTO PRG./A.PROG button.
2. Press the G or AUTO PRG./A.PROG button.
The AUTO PROGRAM starts now.
If you want to stop auto programming, press the
ENTER (A) button.
Only the channels searched up to that time are
memorized.
Notes: •If the programmed signal has poor
quality, memorize again in the Auto prog.
•AUTO PROGRAM stores all receivable channels
regardless of receiving signal (RF, Cable).
•If channels of general wireless TV and cable TV
are duplicated, press the number buttons (0 ~ 9) to
change as .
Turning on/off the TV
Press the POWER (or ON/OFF) button on the set.
At this time, the set switches to standby mode and
the standby indicator lights up in red.
To switch the TV on from standby mode, press
the TV/VIDEO, CH D / E button on the set or
POWER, TV/VIDEO, CH D /E or number button
on the remote control.
A channel number will be displayed on the screen.
The on-screen display will disappear after a few
seconds.
Press the POWER button on the remote control. It
reverts to standby mode.
To switch the TV off, press the POWER(ON/OFF)
button on the set.
Channels of general
wireless TV
Channels of
Cable TV
Using the MENU button
1. Press the MENU button and then use the D / E
button to select the Channel menu.
2. Press the G and then use the D / E button to
select Auto prog..
3. Press the G button to enter the Auto prog.
mode.
4. The AUTO PROGRAM starts now.
Selecting the on screen language
Memorizing the Channels by
MANUAL PROGRAM
1. Press the MENU button and then use the D / E
button to select the Special menu.
2. Press the G and then use the D / E button to
select Language.
3. Press the G and then use the D / E button to
select the desired language.
From this point on, the on-screen display will be
presented in the language of your choice.
4. Repeatedly press the MENU button to exit.
Using the MEMORY/ERASE button
You can conveniently perform MANUAL
PROGRAM using the MEMORY / ERASE button
on the remote control.
1. Press the D / E or NUMBER buttons to select
the channel number you want to memorize or
erase.
2. Press the MEMORY/ERASE button to select
Memory or Erase.
Memorizing Channels
This is the function to memorize all the active
channels in your area before you can use the TV.
There are two ways of memorizing channels. You
can use either.One is called AUTO PROGRAM
and the other is called MANUAL PROGRAM.
In AUTO PROGRAM the TV will memorize the
channels in ascending order. If there are
additional channels you want to add or delete, you
can manually add or delete those channels.
Selecting the Channel
Press the D / E button to conveniently select the
upper or lower channel then the channel being
viewed, or NUMBER buttons to directly select the
desired channel.
Adjusting the Volume
Press the G button to increase the volume level or
F button to decrease the volume level.
To mute the sound, Press the MUTE button.
The word Mute is displayed.
It's convenient when you get the telephone calls.
To restore the muted sound, press the MUTE
button again or VOL F / G button.
Memorizing the Channels by
AUTO PROGRAM
AUTO PROGRAM searches and memorizes all
the active channels in your area then you can
select the desired channel with the D / E buttons.
Using the AUTO PRG./A.PROG button
You can conveniently perform AUTO PROGRAM
using the AUTO PRG./A.PROG button on the
remote control.
6
Various function
Setting the Clock
4. Repeatedly press the MENU button to exit.
Before setting the on/off timer, first you should set
the current time.
Game (some models)
You can enjoy the TV game with this set.
Setting the Off Timer
Key Lock
This is the function to automatically switch the TV
to standby mode at a preset time.
The TV can be set so that the remote control is
needed to control it.
This feature can be used to prevent unauthorized
viewing.
Note: If the same time is set for the on time and
off time, only the off time operates.
Setting the On Timer
Notes: •With the key lock on, the display Key
Lock appears on the screen if any button on the
front panel is pressed while viewing the TV.
•This programmed to remember which option it
was last set to even if you switch the TV from
standby mode.
This is the function to automatically turn the TV on
at a preset time and channel.
Notes: •If you don’t press any button within 2 hours
after turning on the TV set by ON TIMER function, the
set will be automatically switched back to standby mode.
•TV must be in standby mode for the On timer to work.
Auto Demonstration (some models)
Setting the Sleep Time
Auto demonstration allows you to review all the
menus programmed in the TV set.
You don't have to remember to switch the TV to
standby mode before you go to sleep. The sleep
timer automatically turns the TV off after the
preset time elapses.
Press the SLEEP button to select the desired
sleep time.
Each time you press this button, the sleep time is
displayed one by one as shown below. The timer
begins to count down from the number of minutes
selected.
--- →10 →20→30 →60 →90 →120→180→240
Favorite channel memory
Favorite channel memory is a convenient feature
that lets you quickly scan up to eight channels of
your choice without having to wait for the TV to
scan through all the in-between channels.
To select the favorite channel, repeatedly press
the FCR (Favorite Channel Review) button. Eight
channels programmed appear on the screen one
by one.
Notes: •After a few seconds, the desired sleep
time will disappear and be operated automatically.
•To view the remaining sleep time, press the
SLEEP button once and the remaining sleep time
will be displayed.
•To cancel the sleep time, select the SLEEP --mode by using the SLEEP button.
Adjusting the Fine
This function is to adjust the picture to stable
condition when it is poor, for example, a horizontal
stripe, twisted picture or no color in broad-casting.
Notes: •To release the memorized fine tuning,
program again the fine-tuned channel by AUTO
PROGRAM or MANUAL PROGRAM.
•If the finely tuned channel is memorized, the color
of the channel number changes to yellow.
Auto Off
If there is no input signal, the TV is switched to
standby mode automatically in 10 minutes.
1. Press the MENU button and then use the D / E
button to select the Timer menu.
2. Press the G and then use the D / E button to
select Auto off.
3. Press the G and then use the D / E button to
select On or Off.
7
Picture control
models), Clear, Optimum, Soft or User.
3. Press the ENTER(A) button to exit.
Enjoying the Eye Function
(some models)
The set will automatically adjust the picture
according to the surrounding conditions with the
display Magic eye.
1. Press the EYE/ button on the remote control.
The display Magic eye appears and the
picture is adjusted.
2. Press the EYE/ button again to switch the
Eye function off.
Adjusting the Picture
Auto Picture Control
XD (some models)
Using the APC button
XD is LG Electronic’s unique picture improving
technology to display a real HD source through an
advanced digital signal processing algorithm.
Note: When selecting APC options, XD is
automatically change to Off.
This is the function to manually adjust the desired
picture levels (Contrast, Brightness, Color,
Sharpness, Tint) of the screen as you like. If the
picture you set is not satisfactory, you can select a
factory preset picture. In the broadcasting system
PAL-M/N, the picture item Tint is not displayed.
You can select picture modes programmed at
factory as you prefer.
1. Press the APC button.
2. Press the APC button to select Magic eye (some
Sound control
Enjoying the Stereo/SAP
Broadcast(some models)
Turbo Sound (some models)
With this function sound will be more
emphasized and amplified than normal sound.
You can enjoy the Turbo sound so much better
than normal sound.
This TV set can receive MTS stereo programs and
any SAP (Secondary Audio Program) that
accompanies the stereo program, as the system to
be transmitted one additional sound signal as well
as the original one. MTS function doesn't operate in
the video mode.
X-wave (Wireless Sound) (some models)
You can also listen to the sound through the FM receiver.
1. Press the MENU button and then use the D / E
button the until the menu is displayed as shown
right.
2. Press the G and then use the D / E button to
select X-WAVE.
3. Press the G and then use the D / E button to
select Set Freq..
4. Press the G button to tune in a frequency on the
X-wave menu.
5. Use the number 0 to 9 or press the F / G button
to match the TV’s frequency and the FM
receiver’s.
Note:
1. If the reception is poor or weak, select a
different frequency.
2. For best results, there should be no more that
5m(16.4ft) between the TV and FM Receiver.
3. In certain areas, the FM transmitter ability may
be weak, such as near a broadcast tower.
4. The reception sensitivity may depend on the
kinds of receiver (FM radio).
Using the MTS Button
1. Press the MTS button to select your desired
MTS mode.
Each time you press this button, the MONO,
STEREO or SAP mode appears in turn.
2. Press the ENTER (A) button to exit.
Notes:
• Stereo or SAP can only be received if the TV
station transmits those signals, even though you
have selected STEREO or SAP.
• Mono sound is automatically received if the
broadcast is only in Mono; even though STEREO
or SAP has been selected.
• Select MONO if you want to listen to mono
sound in remote fringe areas during stereo/SAP
broadcasting.
Auto Sound Control
You can enjoy the best sound without any special
adjustment because this TV set automatically
adjusts the sound appropriate to viewing program
character by self-intelligence.
1. Press the MENU button and then use the D / E
button to select the Sound menu.
2. Press the G and then use the D / E button to
select DASP.
3. Press the G and then use the D / E button to
select Flat, Music, Movie, Sports or User.
4. Repeatedly press the MENU button to exit.
AVL (Auto Volume Leveler)
AVL automatically keeps on an equal volume level
even if you change channels.
Adjusting the treble (some models)
This function is to increase or decrease treble.
Adjusting the bass (some models)
This function is to increase or decrease bass.
8
Closed caption function (some models)
Closed captioning is a process which converts the
audio portion of a television program into written
words, which then appear on the television screen
in a form similar to subtitles. Closed captions allow
viewers to read the dialogue and narration of
television programs.
Operating the Caption and Text
Using the CAPTION button
1. Press the CAPTION button.
2. Press the CAPTION button to select OFF ,
Mode 1, Mode 2, Text 1 or Text 2.
3. Press the ENTER (A) button to exit.
Using Closed Captions
Captions are the subtitles of the dialogue and
narration of television programs. For prerecorded
programs, program dialogue can be arranged into
captions in advance. It's possible to caption a live
program by using a process called “real-time
captioning, which creates captions instantly.
Real-time captioning is normally done by
professional reporters using a machine shorthand
system and computer for translation into
English. Captioning is an effective system for the
hearing-impaired, and it can also aid in teaching
language skills.
Using the MENU button
1. Press the MENU button and then use the D / E
button to select the Special menu.
2. Press the G and then use the D / E button to
select Caption.
3. Press the G button and then use the D / E
button to select Off,
Mode 1, Mode 2, Text 1 or Text 2.
4. Repeatedly press the MENU button to exit.
Note: This TV is programmed to remember which
mode it was last set to, even if you turn the TV off.
Caption Tips
• Not all TV broadcasts include closed caption
signals.
• Sometimes TV stations broadcast two different
caption signals on the same channel. By
selecting MODE 1 or MODE 2, you can choose
which signal you view. MODE 1 is usually the
signal with the captions, while MODE 2 might
show demonstration or programming information.
• Your TV might not receive caption signals
normally in the following situations.
Using the Text Function
Text services give a wide variety of information on
all kind of subjects (ex. captioned program lists,
weather forecasts, stock exchange topics, news
for hearing-impaired---) through the full TV screen.
But not all stations offer text services, even though
they might offer captioning.
Note: In the event you receive a poor signal, an
empty black box may appear and disappear, even
when the text mode is selected. This is normal
function in such an event.
9
Antenna Connections
into 75 ohm antenna jack.
75 Ohm Coaxial Cable
1. Connect the 75 ohm coaxial cable directly to
the antenna jack.
Connecting an Outdoor Antenna
For the best reception, we recommend you use an
outdoor antenna.
Severely weathered antennas and antenna cables
can reduce the signal quality. Before connecting it,
necessarily inspect them. Any service center can
explain the various outdoor antennas available to
you.
300 Ohm Flat Wire
1. Connect the 300 ohm flat wire to screws on the
300 ohm to 75 ohm adapter.
2. Push the end of 300 ohm to 75 ohm adapter
Connecting a CATV Cable
If you subscribe to a CATV system, change the
antenna connection as described below.
1. Remove the 300 to 75 ohm adapter or the
cable from the set if attached.
2. Connect the CATV cable (75 ohm coaxial
cable) to the 75 ohm antenna jack.
Connection of external equipment (some models)
jacks on the front or side of TV, select VIDEO2.
You can connect additional equipment, such as
VCRs, camcorders etc. to your set.
1. IN 1 JACKS: Connect external equipment
outputs (VCR, LASER DISC, CAMCORDER) to
these inputs. Press the TV/VIDEO button to
select VIDEO1 or VIDEO.
2. IN 2 JACKS: Connect external equipment
outputs (VCR, LASER DISC, CAMCORDER) to
these inputs. Press the TV/VIDEO button to
select VIDEO2 or S-VIDEO.
3. OUT JACKS: Connect external equipment
inputs (VCR, Audio amplifier) to these outputs
for recording or monitoring the selected
program.
4. §/ EARPHONE JACK (some models): In
some models, this jack is located on the front or
side of TV.
3. Press the PLAY button on the VCR.
The video playback is on the TV screen.
Note: In case of MONO VCR, connect the output
jack of VCR to the AUDIO L/MONO IN jack of TV
so that the sound can be heard from both speakers.
If you connect it to the AUDIO R IN jack of TV the
sound is heard only from right speaker.
Monitor Out
Note: If you connect VIDEO IN jack to the TV that is
displayed COMPONENT mode, the second TV or
the monitor displays AV IN mode.
Note: This TV is programmed to remember which
mode it was last set to, even if you turn the TV off.
Connecting AUDIO/VIDEO IN Jacks
1. Connect the audio/video output jacks of the VCR to
IN 1(A/V) jacks on the side or back of TV.
2. Press the TV/VIDEO button to select VIDEO1 or
VIDEO.
Note: In some stereo models, if you connect the
audio/video output jacks of the VCR to the IN 2 (A/V)
10
recording VCR to the OUT (A/V) jacks on the back.
2. Select the program number on the TV.
3. Set the recording VCR to record.
Note: In some mono models, when the input jacks
on the front panel and back panel are connected to
external equipments at the same time, the input
jacks on the front panel have priority over the
input jacks on the back panel of the TV.
Connecting the S-VHS VCR
Recording a program from connecked other equipment
(some models)
(some models)
1. Connect the S-VHS output jack of the VCR to the
S-VIDEO jack on the side or back of TV.
2. Connect the audio/video output jacks of the VCR
to the IN 2(A/V) jacks on the front or side of TV.
3. Press the TV/VIDEO button to select S-VIDEO.
4. Press the PLAY button on the VCR.
The video playback is visible on the TV screen.
1. Connect the output jacks of the playback VCR
to the IN 1(A/V) jacks on the side or back of TV.
2. Connect the input jacks of the recording VCR to
the OUT (A/V) jacks on the back of TV.
3. Press the TV/VIDEO button to select VIDEO1
or VIDEO.
If you connect it to the IN 2 (A/V) jacks on the
side of TV, you should select VIDEO2.
4. Press the PLAY button on the playback VCR
and set the recording VCR to record.
VCR Recording
(some models)
1. Connect the audio/video input jacks of the
Connecting DVD player (some models)
• Connect component DVD inputs to Y, PB, PR(480i)
and audio IN to audio(L/R) ports.
2.How to use
• Turn the set on and press the TV/VIDEO button
on the remote control or TV/VIDEO button on the
front panel to select COMPONENT.
•Try this after turning on the DVD set.
• Note: This TV is programmed to remember
which mode it was last set to, even if you turn the
TV off.
1.How to connect
TV INPUT
Y
DV D OUTPUT
Y
Y
Y
Y
PB
PR
Cb Cr
B -Y R -Y
Pb Pr
PB PR
11
Troubleshooting check list
SYMPTOMS
No power
No picture or sound
Poor picture but good sound
Poor reception
Lines in picture
Ghosts (multiple images)
Remote control does not work.
Cannot tune desired channel.
CHECK THESE THINGS
Is power cord plugged in?
Is television turned on?
Check batteries in remote control.
Try another channel (station trouble).
Check antenna connectings.
Check for local interference.
Adjust the antenna.
Adjust the picture control.
Program channel using AUTO
PROGRAM.