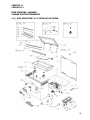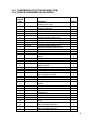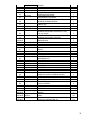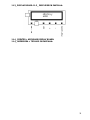
1
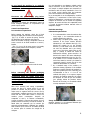
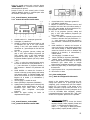
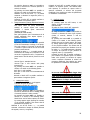
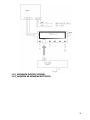
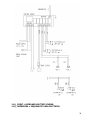
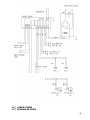
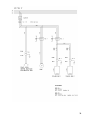
CHAMBER VACUUM PACKAGING MACHINE
TOP AND FREE STANDING MODELS
Cámara de vacío para empaque Modelos de Rango alto y
Modelos sobre ruedas.
TOP RANGE
ALTO RANGO
AUSTER EOS MISTRAL GHIBLI BLIZZARD
ALYSEE TORNADO MONSOON
USE AND MAINTENANCE MANUAL
ORIGINAL INSTRUCTIONS
MANUAL DE USO O DE OPERACIÓN Y MANTENIMIENTO, INSTRUCCIONES ORIGINALES
Besser Vacuum Srl
Via Casarsa, 57 - 33030 Dignano (UD)
Tel. 0432/953097 Fax 0432/953591
[email protected] www.besservacuum.com
1
Warning!
This appliance is not suitable to be used by people (children included) with reduced
physical or mental capabilities or with lack of experience and knowledge,
otherwise they have been instructed by someone responsible of their safety.
Este aparato electrodoméstico no es recomendable para ser usado por personas (incluyendo niños), con
reducidas facultades mentales, o con falta de experiencia, y conocimiento, de otra manera deberá ser
capacitado por alguna persona responsable de la seguridad del manejo del mismo.
Children must be controlled in order they do not play with the appliance.
Los niños deberán ser controlados, con el objeto de que no jueguen con este electrodoméstico.
DANGER - ATTENTION!
¡PELIGO-ATENCIÓN!
The sealing bar may reach high temperatures during and after the usage process.
It is recommended to watch out and avoid direct contact until the cooling process is over.
La barra de sellado alcanza altas temperaturas durante y después de ser usado el quipo en proceso. Es recomedable
mantener las manos lejos de esta barra, hasta que el proceso haya terminado totalmente.
DANGER – ATTENTION!
¡PELIGRO ATENCIÓN!
The machine is to be used in inner environments.
Este equipo electrodoméstico debe usarse solo en interiores
DANGER - ATTENTION!
¡PELIGRO-ATENCIÇON!
The device cannot be opened by the end user.
Should the power wire be damaged,
or should there be any electric repairs, they must be replaced by
the manufacturer or by authorized personnel only, in order to avoid any risk.
THE MACHINE IS SUPPLIED WITH GROUND PROTECTION WIRE.
Este electrodoméstico se suministra con el cable con conexión a tierra
2
The ground protection system is identified by the proper symbol.
La protección del sistema a tierra se identifica por este símbolo
CHAPTER 1
Capítulo 1
IDENTIFICATION
MANUAL”
OF
THE
“USER
Identificación del “manual del usuario”
The instructions handbook is a document issued by
the manufacturing company and is an integral part
of the machine. This document is adequately
identified for easy tracing and/or subsequent
references.
Las instrucciones de este manual es editado por la
compañía que manufactura integralmente este
electrodoméstico. Este manual es adecuadamente
identificado fácilmente para sus futuras preferencias.
All rights relating to the reproduction and disclosure
of the information contained in this handbook and
the documentation quoted and/or attached are
reserved.
Todos los derechos relatives a la reproducción y
distribución de la información contenida en este
manual, y su documentación son derechos
reservados.
Aim of the document
Propósito de este document
This handbook contains the information necessary to
the customer and assigned personnel for the correct
installation, use and maintenance of the machine at
good conditions and at maximum safety.
Este manual contiene la información necesaria para
que el cliente o usuario o personal asignado pueda
llevar a cabo una correcta instalación del
electrodoméstico, uso y mantenimiento, para
mantenerlo en óptimas condiciones y con su máxima
seguridad.
Safety precautions and manufacturer’s
responsibility limits.
Precauciones de seguridad y las limitadas
responsabilidades del fabricante.
Every operator-machine interaction relating to the
intended use of the machine and its overall life cycle
has been carefully and thoroughly analysed by the
manufacturing company during the design phase,
construction phase and the drafting of the
instructions handbook.
Cada operador del electrodoméstico, deberá tener
una interacción con el equipo y de cada ciclo,
teniendo cuidado y atravéz del análisis del fabricante
del equipo, bosquejado en el manual de
instrucciones.
It is nevertheless understood that experience,
adequate training and “common sense” of the
personnel operating on the machine are of primary
importance. These requirements are therefore
considered indispensable during all machine
operating phases and consultation of this handbook.
The non-observance of the safety precautions or
specific warnings indicated in this handbook, the use
of the machine by unauthorized personnel, violate all
safety standards regarding the design, construction,
and intended use of the machine and relieve the
manufacturer from every liability in the case of
damage to persons or property.
Sin embargo de debe entender que la experiencia es
adecuada vía un entrenamiento “con sentido común”
del personal que opere el electrodoméstico será de
primera importancia. Estos requisitos serán
considerados indispensables durante la operación del
equipo consultando siempre el manual de
instrucciones. La no observación de las indicaciones
de seguridad o las específicas advertencias indicadas
en el manual, u el uso no autorizado de personal,
violaría todos los estándares de acuerdo al diseño,
construcción, al intento de uso en caso de daño a la
persona o sus propiedades.
The manufacturing company is therefore in no way
responsible for the non-observance on the part of
the user of the safety precautions listed in this
handbook.
La compañía manufacturera es por lo tanto no es de
su responsabilidad, por la no observancia en la parte
de su responsabilidad de que el usuario cumpla con
las observaciones de seguridad listadas en el
manual.
Regulatory references
Referencias regulatorias.
The
to:
following
definitions
are
used
according
3
Las siguientes definiciones serán usadas conforme a:
-
-
Attachment “I” to the directive 89/392/CEE and
subsequent issues;
Anexo “I” de la directive 89/392/CEE, y
subsecuentes ediciones de revisión;
“Machines Directive” 2006/42/CE replacing
98/37/CE.
“Directiva de Electrodomésticos” 2006/42/CE
remplazado por 98/37/CE
Waste of the machine after its usage cycle
Desecho del electrodoméstico después del ciclo de
uso.
Electric and electronic appliances contain dangerous
substances with effects potentially harmful for health
people and environment. It is recommended to
waste it properly, it means in the authorized garbage
dump.
Los electrodomésticos eléctricos o electrónicos,
contienen sustancias con efectos potencialmente
dañidos si no son desechados propiamente, esto
quiere decir que sean desechados en lugares
específicos para su confinamiento.
CHAPTER 2
Capítulo 2
HOW TO CONSULT AND USE
INSTRUCTIONS HANDBOOK
Como consultar y uso de este manual.
THE
This document is an integral part of the machine.
Preserve a copy of this instructions handbook for the
entire working life of the machine even if transferred
or sold to third parties. Requests for further copies
of this document must be made by means of
purchase order addressed to the manufacturing
company.
Este
documento
es
parte
integral
del
electrodoméstico. Preserve esta copia con las
instrucciones de este manual, durante su vida útil, y
aun cuando se venda terceras personas. Solicite
copias adicionales de este manual a la dirección del
fabricante
To maintain the instructions handbook in good
conditions:
Para mantener en buenas condiciones este manual:
-
-
-
-
-
Use the instructions handbook taking care not to
damage its contents. In particular, do not leave
the instructions handbook around during use
and remember to return it to its proper place
immediately after consultation.
Las instrucciones de uso de este manual hay
que cuidarlas, para no dañar su contenido, no
deje su manual en cualquier parte, y una vez
que lo use déjelo en un lugar propiamente
reservado para futuras consultas.
Do not remove, rip out or rewrite parts of the
instructions handbook. Any changes required
must be referred to and subsequently supplied
by the manufacturing company.
No remueva, rompa o sobrescriba en las
instrucciones de este manual. Cualquier cambio
requerido será subsecuente provisto por la
compañía manufacturera.
Keep the instructions handbook in a safe place,
away from damp, heat and other environmental
elements which could damage it.
Mantenga este manual en un lugar seguro, lejos
de la humedad o del fuego, o de la intemperie, o
bien de otros elementos que lo puedan dañar.
Definitions
Deficiones
The following definitions are used according
to
the “Machine Directive” CEE 89/392 and
subsequent issues:
Las siguientes definiciones serán usadas de acuerdo
a la “Directiva Electrodoméstica” CEE 89/392 y las
subsecuentes ediciones:
4
-
-
-
Operator: person or persons assigned to
machine operation, adjustment, routine
maintenance or cleaning
Operador: Persona o personas asignadas
para operar la máquina, para ajustarla, y
con la rutina de mantenimiento o limpieza.
User: body or person responsible for and/or
owner of the machine.
Usuario: el equipo de personal o persona
responsable ante el propietario o dueño de
la máquina.
Machine manufacturer identification data and
positioning of the “CE MARKING” plate.
Datos de identificación del fabricante del
equipo y el posicionamiento de la placa
"marca CE".
Identification of the manufacturing company as
producer of the machine takes place in accordance
with the legislation in force by means of the
following documents:
Identificación de la empresa de fabricación de
productor de la máquina se lleva a cabo de
conformidad con la legislación vigente por medio de
los siguientes documentos:
-
Declaration of conformity;
CE marking;
Instructions Handbook
A special plate applied to the machine is
marked permanently with the following data
concerning CE MARKING.
- Declaración de la conformidad;
- El marcado CE;
- Instrucciones Manual
- Una placa especial que se aplica al equipo que
está permanentemente marcado con los siguientes
datos relativos al marcado CE.
CHAPTER 3
Capítulo 3
WARRANTY
Garantía
The manufacturing company engages, for 12
(twelve) months from the date of shipment and
direct delivery of the goods, to assure the customer
or concessionaire the integrity and the good working
of the components regarding the above mentioned
machine.
La empresa de fabricación está contratada, por 12
(doce) meses a partir de la fecha de envío y la
entrega directa de los bienes, esto para asegurar
que el cliente o concesionario de la integridad y el
buen funcionamiento de los componentes con
respecto a la máquina mencionada.
All machine components normally subject to wear,
that is to say components in which use causes a
constant wear and tear, are not included in the
warranty:
Todos los componentes sujetos a desgaste normal
del equipo, es decir los componentes en los que su
uso provoca un continuo deterioro, no están
incluidos en la garantía:
1. Electrical resistances – Teflon – Rubber gaskets
– Chamber opening pistons – Sealing
diaphragms – Air filters – Oil filters – Oil change
– Pump blades 1. Resistencias eléctricas - Teflon
- juntas de goma - Cámara pistones de apertura
- diafragmas de sellado - Filtros de aire - Filtros
de aceite - Cambio de aceite - hojas de bomba
2. If the vacuum pump of a machine under
warranty is sent to the manufacturing company
because of aspiration problems and malfunction,
the manufacturing company has the right to
check whether any foreign bodies have been
aspirated (liquids, solids, sauces, etc..). If this
should be the case, the repair (materials and the
labour) will be duly charged, since the problem
is not due to manufacturing defects, but to
customer negligence during use. 2. Si la bomba
de vacío del equipo está en garantía se envía a
la empresa de fabricación debido a problemas
de aspiración y un mal funcionamiento, la
empresa fabricante se reserva el derecho de
comprobar si los cuerpos extraños se han
aspirado (líquidos, sólidos, salsas, etc.). Si este
fuera el caso, la reparación (materiales y la
mano de obra) será debidamente cargada, ya
que el problema no se debe a defectos de
fabricación, sino a la negligencia del cliente
durante el uso.
3. Possible problems linked to the electronic panel
cards of the circuit will have to be examined by
the manufacturing company before sending the
part which has to be replaced under warranty. A
sudden change in voltage, an electrical
overfeeding, a disturbance in the external
current network, could cause damages which
are not to be attributed to the manufacturing
company. 3. Posibles problemas vinculados a las
tarjetas de paneles electrónicos del circuito
tendrán que ser examinadas por la empresa de
fabricación antes de enviar la parte que tiene
que ser reemplazado por la garantía. Un cambio
repentino en el voltaje, una sobrealimentación
eléctrica, una perturbación en la red de corriente
externa, podría causar daños que no han de ser
atribuido a la empresa de fabricación.
4. Possible problems with pneumatic, structural,
mechanical parts will be duly solved as per
warranty terms without any charge. 4. Posibles
problemas con piezas neumáticas, estructurales,
mecánicas serán debidamente resueltos de
acuerdo con los términos de garantía sin cargo
alguno.
5
5. During the warranty period, for interventions
under warranty, the replaced materials will not
be charged, while the labour will be duly
charged. During the warranty period, for
interventions not included in the warranty for
various reasons, both the materials replaced and
the labour will be duly charged. 5. Durante el
periodo de garantía, las intervenciones en
garantía, no se le cobrará los materiales
sustituidos, mientras que la mano de obra será
debidamente cargada. Durante el periodo de
garantía, las intervenciones no incluidas en la
garantía por diversas razones, tanto los
materiales reemplazados y la mano de obra será
debidamente cargadas.
6. During the warranty period, should any external
intervention of our technicians be requested, the
travel costs (to and from) will be fully charged
independently of the reason behind the
intervention. 6. Durante el período de garantía,
se debe solicitar la intervención externa de
nuestros técnicos, los gastos de viaje (desde y
hasta) se cargan completamente en forma
independiente de la razón detrás de la
intervención.
7. Any interventions on the machines are to be
carried out at the manufacturer’s premises both
during the warranty period and after the
warranty period; we point out that no transport
costs (to and/or from) will be refunded.
7.Cualquier intervención en los equipos se
llevarán a cabo en las instalaciones del
fabricante, tanto durante el período de garantía
y después del periodo de garantía, señalamos
que no hay costos de transporte (hacia y / o
desde) serán reembolsados.
8. The transport for any materials sent to the
manufacturing company, both during the
warranty period and after the warranty period,
must compulsorily take place in ex works. Any
materials sent to the manufacturing company
with transport charges will be automatically
refused. 8. El transporte de los materiales
enviados a la empresa fabricante, tanto durante
el período de garantía y después del periodo de
garantía, debe obligatoriamente tener lugar en
la fábrica anterior. Todos los materiales enviados
a la empresa fabricante, con los gastos de
transporte serán rechazados automáticamente.
9. Any components considered defective (pump,
electronic panel card, etc..) and mishandled by
the
customer during the warranty period will
not be considered under warranty. The
manufacturing company has the task of carrying
out this function in a strict manner. 9.Cualquiera
de los componentes considerados defectuosos
(bomba, tarjeta de panel electrónico, etc.) Y mal
manejado por el cliente durante el período de
garantía no serán considerados por la garantía.
La empresa de fabricación tiene la tarea de
llevar a cabo esta función de una manera
estricta.
Do not remove the CE MARKING plate and/or
replace it with a different one. Should the CE
MARKING plate be accidentally damaged,
detached
from
the
machine
or
the
manufacturer’s seal removed, the customer
must compulsorily and immediately inform
the manufacturing company.
The plate is placed on the external side of the
machine
No retire la placa de marcado CE y / o no sustituir la
misma por otra diferente. En caso de que la placa de
marcado CE se dañe accidentalmente, o sea
separada del equipo o el sello del fabricante sea
retirado, el cliente debe obligatoriamente y de
inmediato informar a la compañía de fabricación.
La placa se coloca en el lado externo del equipo.
User obligations
Obligaciones del usuario
The user must inform the manufacturing company
immediately of any safety system defect and/or
malfunction and of any presumed danger
encountered. It is strictly forbidden to the user
and/or third parties (excluding duly authorized
personnel of the manufacturing company) to make
modifications of any kind or extent to the machine
and its functions or to this technical publication. In
case of malfunctions or danger due to the nonobservance of the above, the manufacturing
company cannot be held responsible for the
consequences. It is advisable to request any
modifications directly to the manufacturing
company. El usuario debe informar a la empresa de
fabricación de inmediato de cualquier defecto en el
sistema de seguridad y / o mal funcionamiento y de
cualquier presunto peligro encontrado. Queda
terminantemente prohibido para el usuario y / o
terceros (excluyendo el personal debidamente
autorizado de la empresa de fabricación) para hacer
modificaciones de cualquier tipo o grado del equipo
y sus funciones o con esta publicación técnica. En
caso de mal funcionamiento o peligro debido a no
haber leído lo anterior, la empresa fabricante no se
hace responsable de las consecuencias. Es
aconsejable pedir las modificaciones directamente a
la empresa fabricante.
CHAPTER 4
Capítulo 4
GENERAL SAFETY PRECAUTIONS
PRECAUCIONES GENERALES DE SEGURIDAD
6
It is recommended to comply strictly with the
following safety precautions: Se recomienda cumplir
estrictamente con las siguientes medidas de
seguridad:
1. never touch the metal parts of the machine with
wet or damp hands; 1. nunca toque las partes
metálicas de la máquina con las manos mojadas
o húmedas;
2. do not pull the supply cable or the machine itself
to disconnect the plug from the current outlet
(ref.page 1); 2. no tire del cable de alimentación
o al equipo para desconectar el enchufe de la
toma de corriente (ref.page 1);
3. children or unqualified personnel are not allowed
to use the machine without supervision; 3. niños
o personal no calificado, no se les permite usar
la máquina sin supervisión;
4. electrical safety of the machine is ensured by its
correct connection to an effective earthing as in
accordance with the electrical safety standards
in force; it is necessary to check this
fundamental requirement and, if in doubt, ask
for a thorough check by professionally qualified
personnel. The manufacturing company cannot
be held responsible for possible damages caused
by the lack of a plant earthing; 4. La seguridad
eléctrica del equipo está garantizada por su
conexión correcta a una toma de tierra eficaz de
conformidad con las normas de seguridad
eléctrica en vigor, es necesario verificar este
requisito fundamental y, en caso de duda, pedir
un control minucioso por parte de personal
calificado. La empresa fabricante no se hace
responsable de los posibles daños y perjuicios
causados por la falta de una puesta a tierra de
la planta;
5. in the case of a possible damage to the safety
earthing, disconnect the machine in order to
prevent its activation; 5. en el caso de un
posible daño a la puesta a tierra de seguridad,
desconecte el equipo con el fin de prevenir su
activación;
6. always use fuses complying with safety
standards in force, with the correct value and
with the proper mechanical characteristics;
6.Use siempre un fusible que cumplan las
normas de seguridad vigentes, con el valor
correcto y con las características mecánicas
adecuadas;
7. do not make use of repaired fuses and avoid
causing short circuits between the terminals
located on the fuse holder; 7. no hacer uso de
fusibles reparados y evitar causar corto circuitos
entre los terminales ubicados en la caja de
fusibles;
8. the user of the machine must not replace its
supply cable; in the case the supply cable is
damaged or needs replacing, refer only to the
manufacturing company of the machine for its
replacement; 8. el usuario de la máquina no
debe sustituir el cable de alimentación, en el
caso de que el cable de alimentación este
dañado o necesite ser reemplazado, se deben
dirigir únicamente a la empresa fabricante del
equipo para su reemplazo;
9. keep the cable away from hot parts; 9.mantenga
el cable alejado de las superficies calientes;
10. always switch off and disconnect the machine
from the power supply before beginning any
general cleaning or washing operation;
10.siempre apague y desconecte la máquina de
la red eléctrica antes de iniciar cualquier
operación de lavado o limpieza general;
11. clean machine coating, panels and controls
using soft and dry cloths, or cloths slightly
soaked in mild alcohol or detergent solution.
11.Limpie el revestimiento del equipo, paneles y
controles utilizando paños suaves y secos, o
paños ligeramente empapado en alcohol
isopropílico o una solución de detergente.
Obligations in the case of malfunction and/or
potential danger Obligaciones en caso de mal
funcionamiento y / o peligro potencial
Operators are obliged to signal any deficiency and/or
potentially dangerous situation immediately to a
direct superior.
Los operadores están obligados a señalar cualquier
deficiencia y / o situación potencialmente peligrosa
inmediatamente a un superior directo.
CHAPTER 5
Capítulo 5
INSTALLATION
INSTALACIÓN
Remove the packaging and check that the machine
is undamaged. In particular, look for any possible
damages caused by transport. If in doubt, do not
use the machine and refer to the manufacturing
company.
Retire el embalaje y compruebe que el equipo se
encuentra en buen estado. En particular, buscar
posibles daños causados por el transporte. En caso
de duda, no utilice el equipo y comuníquese a la
empresa fabricante.
Place
Ubicación
Position the machine horizontally in a place with low
humidity percentage and far from heat sources.
Coloque la máquina en posición horizontal en un
lugar con un porcentaje de humedad baja y lejos de
fuentes de calor.
7
Do not install the machine in an explosive
atmosphere. No instale la máquina en una
atmósfera explosiva.
Disconnect the power supply plug before
starting any checking operation which may
require parts.
Desconecte el enchufe de alimentación antes de
iniciar cualquier operación de comprobación que
puede requerir partes.
It is not advisable to use adapters, multiple outlets
and/or extensions. If this should be the case, use
only simple or multiple adapters and extensions in
accordance with the safety standards in force. Do
not exceed current capacity limit and maximum
power level marked on the multiple adapter.
No es aconsejable el uso de adaptadores, enchufes
múltiples y / o extensiones. Si este fuera el caso,
utilizar los adaptadores y extensiones sólo simples o
múltiples de acuerdo con las normas de seguridad
vigentes. No exceda el límite de la capacidad actual
y el nivel de potencia máxima marcado sobre el
adaptador múltiple.
Controls and inspections
Los controles e inspecciones
Particular warnings
advertencias particulares
Before starting the machine, check the oil level
through the sight glass located on the motor/pump.
(Fig. 5.1). In order to access the pump, unscrew
the back panel of the machine and remove it.
Antes de encender el equipo, comprobar el nivel de
aceite a través de la mirilla situada en el motor /
bomba.
(Fig. 5.1). Con el fin de tener acceso a la bomba,
retire el panel posterior de la máquina y retírela.
Image 5.1. Pump oil level indicators
Imagen 5.1. Bomba indicadores de nivel de aceite
Before connecting the vacuum packaging
machine, make sure that the plate data
corresponds whith the supply mains data.
Antes de conectar el equipo de envasado al
vacío, asegúrese de que los datos de la placa
corresponden con los datos de red de
abastecimiento.
After level checking and casing re-installation,
connect the plug to a current outlet. If it is not
possible to connect the plug and the outlet, the
outlet must be replaced with the correct one by
professionally qualified personnel who should also
check that the outlet cable section is correct for
machine
power
consumption.
Después
de
comprobar el nivel y la cubierta re-instalación,
conecte el enchufe a una toma de corriente. Si no es
posible conectar el enchufe y la toma de corriente, la
salida debe ser sustituida por la correcta por
personal profesionalmente cualificado que también
debe verificar que la sección de los cables de salida
es correcta para el consumo de energía de la
máquina.
1. It is recommended to reset the machine after
every usage. 1. Se recomienda reiniciar la
máquina después de cada uso.
2. When using a tri-phase power supply, pay
attention to the motor rotation direction
indicated by a red adhesive label (fig. 5.2).
Should the rotation be on the opposite
direction (a loud metal noise will be heard
out and the chamber won’t get closed),
invert two of the three supply wires on the
plug. 2. Cuando se utiliza una fuente de
alimentación trifásica, preste atención a la
dirección de rotación del motor indicada por
una etiqueta adhesiva de color rojo (fig. 5.2).
Si la rotación es en el sentido contrario (un
ruido fuerte metal se escuchó y la cámara no
conseguirá cerrado), invertir dos de los tres
cables de alimentación en el enchufe.
3. By a standard usage of the machine, no
particular cleaning operation of the chamber
machine is required. Should it be needed (i.e.
bags inner product pours out of the bag), it is
recommended to use a r 3. Por un uso
estándar del equipo, no se requiere ninguna
operación de limpieza particular del equipo
de campana. En caso de que sea necesario
(por ejemplo, bolsas de producto interno
derrame de la bolsa), se recomienda utilizar
un trapo empapado con alcohol.
Image 5.2. Adhesive labels indicating the rotation
direction. Imagen 5.2. Las etiquetas adhesivas que
indican la dirección de rotación.
8
The earthing (yellow-green) must not be
moved or disconnected. In the case of power
3P + N ie in the presence of the neutral wire
(blue) must not be moved or dissected.
La puesta a tierra (amarillo-verde) no debe
ser movido o desconectado. En el caso de la
energía 3P + N es decir, en la presencia del
cable neutro (azul) no debe ser movido o
diseccionado.
Before cleaning the machine, disconnect the
plug.
Antes de limpiar la máquina, desconecte el
enchufe.
CHAPTER 6
Capítulo 6
5. Two or three removable food polyethylene
shelves are positioned inside the vacuum
chamber to level the product thickness
according to the sealing bar. The polyethylene
shelves can be removed or left inside the
vacuum chamber depending on necessity.
5.Dos o tres niveladores de polietileno se
colocan dentro de la cámara de vacío para
nivelar el espesor del producto de acuerdo a la
barra de sellado. Los niveladores de polietileno
se pueden quitar o dejan dentro de la cámara de
vacío en función de la necesidad.
6. Lower the bell-lid and press adequately on it
until it remains closed, thus permitting the work
cycle to begin. 6. Baje la campana tapa y
presione adecuadamente en él hasta que
permanece cerrado, permitiendo de este modo
el ciclo de trabajo para comenzar.
7. The different cycle phases are automatic and
after a time preset by the manufacturer the belllid opens thus enabling the subsequent cycles to
begin. 7.Las diferentes fases del ciclo son
automáticas y después de un tiempo
preestablecido por el fabricante de la campana
con tapa abre permitiendo así a los ciclos
posteriores, para empezar.
USAGE OF THE PACKAGING MACHINE
USO DE LA MÁQUINA DE ENVASADO
Vacuum packaging
El envasado al vacío
1. Connect the bipolar plug, if 230 V, or the threepole plug, if 380 V, to the current outlet
1.Conecte el enchufe bipolar, si 230 V, o el
enchufe de tres polos, si 380 V, a la toma de
corriente
2. Press the line main switch and the ON/OFF
button thus connecting the electric circuit which
supplies the modul 2. Pulse el interruptor de la
línea principal y el botón ON / OFF de este modo
conectar el circuito eléctrico que suministra la
tarjeta modular para las fases del ciclo
automático.
3. Set the vacuum time (or percentage) required,
the sealing time and the gas injection time (if
the machine is equipped with such a system).
3.Establezca el tiempo de vacío (o porcentaje)
se requiere, el tiempo de sellado y el tiempo de
inyección de gas (si la máquina está equipada
con un sistema de este tipo)
4. Position the bag (or bags) inside the vacuum
chamber; put the bag opening perfectly flat on
the sealing bar. Put the exceeding part of the
bag, if any, in the fissure between the chamber
and the sealing bar (image 6.1). 4. Coloque la
bolsa (o bolsas) dentro de la cámara de vacío,
poner la abertura de la bolsa perfectamente
plano en la barra de sellado. Ponga la parte
superior de la bolsa, en su caso, en la fisura
entre la cámara y la barra de sellado (imagen
6.1).
Image 6.1. Bag correct placement inside the
chamber. Imagen 6.1. Colocación correcta de la
bolsa dentro de la cámara.
Vacuum-packaging with inert gas injection
OPTIONAL (ref. tab 1)
Envasado al vacío con opción de inyección de gas
inerte (pestaña ref. 1)
1. Set the work cycle with inert gas injection on the
control panel by pre-selecting the relative time.
1. Ajuste el ciclo de trabajo con la inyección de
gas inerte en el panel de control mediante la
preselección de la hora relativa.
2. Connect the hose coming from the gas cylinder
to the hose connection positioned on the
side/rear of the vacuum packaging machine by
means of the relevant clamp, then set the gas
cylinder gauge at a pressure value of 1 ATA. .
9
2.Conectar la manguera que sale desde el
cilindro de gas a la conexión de la manguera
situado en el lado / trasera de la máquina de
envasado al vacío por medio de la abrazadera
correspondiente, a continuación, establecer el
indicador de cilindro de gas a un valor de
presión de 1 ATA.
3. Position the bag containing the product inside
the vacuum chamber, fitting the gas nozzle
inside the bag opening (image 6.2); make sure
that there are no folds obstructing the gas flow.
3. Coloque la bolsa que contiene el producto
dentro de la cámara de vacío, colocar la boquilla
de gas en el interior de la abertura de la bolsa
(imagen 6.2), asegúrese de que no hay pliegues
que obstruyen el flujo de gas.
Image 6.2. Positioning of the bag with gas option
active.
Vacuum packaging of liquid or semiliquid
products
By means of the chamber vacuum packaging
machines of our range it is possible to vacuum
package liquid or semi-liquid products (soups,
sauces, etc..) thus increasing their duration time and
keeping hygiene and taste unaltered.
1. Vacuum cycles are set as described in the
chapter Vacuum packaging.
2. The SOFT-VACUUM option allows the packaging
of liquid products.
3. All the vacuum packages can be stored in a
Sacchetto
refrigerated cabin.
Tab 1. EXAMPLES OF PACKAGING WITH PROTECTIVE ATHMOSPHERE
Tab 1. EJEMPLOS DE ENVASES CON ATMÓSFERA MODIFICADA
PRODUCT
Sliced salami /Salami.
Roast meat /Carne asada.
Beer/can drinks-?
Biscuits and oven products /Galletas y productos
de horno.
Coffee/ Café.
Fresh meat / carne fresca.
De hydrated meat and spices/ carnes
deshidratadas y especias.
Minced meat / carne picada.
Chocolate/ Chocolate.
Fresh cheese / Mozzarella/ Queso frescomozarrella.
Mature cheese / Cream / Butter /Margarine/
quesos maduros, crema, mantequilla.
Fresh salad / parsley /Ensalada fresca, perejil.
Yogurt / Puff pastry / Yogurt, hojaldre.
OXYGEN
% (O2)
80
-
CARBON DIOXYDE
% (CO2)
20
20
100
NITROGEN
% (N2)
80
-
-
100
100
70/80
100
30/20
100
-/-
-
-
100
-
100
100
-
-/-
20/-
80/100
-
-
100
-
50
100
50
-
10
Powdered milk / leche en polvo
Baking powder/ levadura en polvo.
Apples/ Manzanas.
Sliced bacon/ Tocino en rebanadas.
Sandwich loaf / Bread/ Pan de molde, pan.
French toast / Toasted bread/ Pan francés y pan
tostado.
Pasta/ Pastas
Fresh pasta / tortellini / Lasagne/ Pasta Fresca,
tortellini, lasagna.
Potatoes / French fries / Snacks / Hop / Patatas
fritas / Botana seca /
2
-
30
100
1
35
100
70
100
97
65
-
-
80
20
-
-
100
-
70/100
30
Anchovies, sardines… / boquerones, sardinas.
Fish/ pescado.
Pizza/Pizza.
Poultry/ Aves de corral.
Tomatoes/ Tomates
Pre-cooked food /Comida pre-cocida
Sausages/ Embutidos
Escalopes/ Escalopes
Fruit juices/ Jugos de frutas
Trouts / Fish-breeding/ Truchas Fish-breeding?
Wine / Oil/ vino, aceite.
30
4
70
-
+
60
40
30
75
4
80
20
20
-
40
30
70
25
92
20
80
10
100
-
100
-
-
-
100
0
-
100
For the packaging of food with protective athmosphere, ensure to be using food certified gases, not
explosive ones.
Para el envasado de alimentos con atmósfera modificada, garantizar que se utilicen gases certificados de
alimentos, no los explosivos.
CHAPTER 7
Capítulo 7
OPERATION
Operación
7.1_VACUUM CYCLE DESCRIPTION
LCD.DISPLAY
7.1-DESCRIPCION SISTEMA DE EMPAQUE AL
VACIO
PANTALLA LCD.
The cycle starts when you close the chamber (lid),
by activating the suction of the pump. VAC writing
will appear on the display together with the
countdown (in seconds) of vacuum time up to 0
(zero). Should the gas option be active, the GAS
writing will appear during the cycle, as it will be
injected inside the chamber. Afterward, sealing will
start as the SEAL writing appears on the display. At
the end of this process, the cooling of the resistance
starts, indicated by the COOLING writing. As it
disappears, the OPENING writing will appear on the
display and the lid will open automatically. El ciclo se
inicia cuando se cierra la cámara (tapa), mediante la
activación de la succión de la bomba. Aparecerá en
la pantalla VAC junto con la cuenta atrás (en
segundos) del tiempo hasta vacío a 0 (cero). En
caso de que la opción de gas activa, aparecerá la
escritura GAS durante el ciclo, ya que se inyecta
dentro de la cámara. Después, el sellado se iniciará
como aparece la escritura SELLO en la pantalla. Al
final de este proceso, el enfriamiento de la
resistencia comienza, indicado-refrigeración. Como
desaparece, refrigeración de apertura aparecerán en
la pantalla y la tapa se abrirá automáticamente.
NOTE: Should it be needed to interrupt the cycle in
advance for any reason, press ON/OFF for 3
seconds. The machine automatically allows the air to
enter again and let the lid open. NOTA: En caso de
que sea necesario interrumpir el ciclo de antemano
por cualquier razón, pulse el botón ON / OFF
durante 3 segundos. La máquina permite
automáticamente el aire para entrar de nuevo y
dejar la tapa abierta.
11
During the normal vacuum cycle, press the button
“PUMP GASTRO“ for 3 seconds to seal in advance
and anticipate the process.
Durante el ciclo de vacío normal, pulse el botón
"GASTRO BOMBA" durante 3 segundos para sellar
de antemano y anticipar el proceso.
7.1.1_Control buttons_Version 220V
7.1.1_Control de botones Versión 220V
1.
2.
3.
General switch O-I 1. Interruptor general O-I
LCD display 2. pantalla LCD
ON/OFF: to switch the electronic board on and
to anticipate the end of the cycle without
sealing. 3. ON / OFF: para cambiar la tarjeta
electrónica en y para anticipar el final del ciclo
sin sellar.
4. SET: to set programs (vacuum, sealing and
gas). 4. SET: para establecer programas (de
vacío, sellado y gas). 4. SET: para establecer
programas (de vacío, sellado y gas). 4. SET:
Programas establecer párrafo (de Vacío, Sellado
y gas).
5. + and -: to select the required program and to
increase or decrease the cycle parameters. 5. +
Y -: para seleccionar el programa deseado y
para aumentar o disminuir los parámetros del
ciclo.
6. PUMP GASTRO: to activate the functions of
vacuum in GN trays, pump cleaning and heating
and manual sealing. 6. GASTRO BOMBA: para
activar las funciones de vacío en bandejas GN,
limpieza de la bomba y el calentamiento y
sellado manual.
7. Vacuum gauge 7. medidor de vacío
8. Printer (OPTION) 8. Impresora (OPCIONAL)
9. Lighting button (indicating power electricity ON)
to replace printer thermopaper 9. Botón de
iluminación (que indica sobre la energía
eléctrica)
para
reemplazar
termo-papel
impresora
10. Button for paper scrolling 10. Botón de
desplazamiento de papel
1. General switch O-I1. Interruptor general O-I
2. LCD display. Pantalla LCD.
3. ON/OFF: to switch the electronic board on and
to anticipate the end of the cycle without sealing. 3.
ON / OFF: para cambiar la tarjeta electrónica en y
para anticipar el final del ciclo sin sellar.
4. SET: to set programs (vacuum, sealing and
gas). 4. SET: para establecer programas (de
vacío, sellado y gas).
5. + and -: to select the required program and to
increase or decrease the cycle parameters. 5. +
Y -: para seleccionar el programa deseado y
para aumentar o disminuir los parámetros del
ciclo.
6. PUMP GASTRO: to activate the functions of
vacuum in GN trays, pump cleaning and heating
and manual sealing. 6. GASTRO BOMBA: para
activar las funciones de vacío en bandejas GN,
limpieza de la bomba y el calentamiento y
sellado manual.
7.
Vacuum gauge 7. medidor de vacío
8.
Printer (OPTION) 8. Impresora (OPCIONAL)
9.
Lighting button (indicating power electricity
ON) to replace printer thermopaper 9. Botón de
iluminación (que indica sobre la energía
eléctrica) para reemplazar termopapel impresora
10. Button for paper rolling 10. Botón para el papel
de laminación
11. Light for power ON 11. Luz para la alimentación
12. Bar selector 12. Barra
7.1.3_User setting menu
7.1.3_ Menú de configuración del usuario
Switch on the machine before entering the user
setting menu (switch O-I or power light must be
enlighted), press contemporarily SET and ON/OFF
buttons for a few seconds. It will appear on the
display: Encienda el equipo antes de entrar en el
menú de configuración de usuario (interruptor de OI
o luz de encendido debe enlighted), presione
contemporáneamente los botones SET y ON / OFF
durante unos segundos. Aparecerá en la pantalla:
1.
7.1.2_Control buttons_version 380V
7.1.2._Control de botones-versión 380V
Language setting (Lang)
Use + and – buttons to choose the desired
language: English, Italian, Spanish, German and
French. 1. Configuración de idioma (Lang)
Utilice + y - para elegir el idioma que desee:
Inglés, italiano, español, alemán y francés.
12
By pressing the SET button it is possible to
confirm and pass to the following option.
Pulsando el botón SET es posible confirmar y
pasar a la siguiente opción.
2.
3.
Vacuum sensor setting (Vac Type)
By using this option (VACUUM SENSOR), it is
possible to select the percentage of vacuum
desired within the chamber:
0: time in seconds
1: vacuum percentage 2. Ajuste del sensor de
vacío (VAC Tipo)
Mediante el uso de esta opción (sensor de
vacío), es posible seleccionar el porcentaje de
vacío deseado dentro de la cámara:
0: Tiempo en segundos Porcentaje de vacío: 1
By pressing the SET button it is possible to
confirm and pass to the following option.
Pulsando el botón SET es posible confirmar y
pasar a la siguiente opción.
Display setting (Display)
It is possible to set the display mode (PRINTER
OPTION 3. Configuración de pantalla (Display)
Es posible ajustar el modo de visualización
(opción de la impresora):
0: fixed: hour/date0: fijo: hora / fecha
1: intermittence: hour/date – machine setting
By pressing the SET button it is possible to
confirm and pass to the following option.
1: la intermitencia: hora / fecha - ajuste de la
Máquina.
Pulsando el botón SET es posible confirmar y
pasar a la siguiente opción.
5. Configuración Nombre de usuario Mediante el
uso de las teclas + y - es posible aumentar o
disminuir los segundos (entre 0 y 99) de vacío.
Es posible insertar el nombre de usuario
siguiendo dos métodos:
- Presionando + y - para seleccionar caracteres
y luego SET para pasar a la siguiente opción
- Mediante el uso del teclado (KEYBOARD
OPCIÓN USB).
By pressing the SET button, it is possible to
pass over the empty positions and then confirm
the set parameters to close this menu.
Afterward the stand-by writing will appear.
Al presionar el botón SET, es posible pasar por
encima de las posiciones vacías y confirme los
parámetros establecidos para cerrar este menú.
Luego aparecerá el stand-by por escrito.
7.1.4_Program setting
7.1.4_Programa de ajuste
Switch the machine on by pressing the button
ON/OFF. It will appear appear the stand-by writing:
Encienda la máquina pulsando el botón ON / OFF.
Aparecerá aparece el stand-by de escritura:
The number “ 1 ” indicates which program is being
used. By pushing the buttons + and – it is possible
to change to the following program (20 programs)
El número "1" indica que se está utilizando el
programa. Pulsando los botones + y - es posible
cambiar al programa siguiente (20 programas)
1.
4.
5.
Time/date setting
It is possible to set time and date by using the
buttons + and –, by pressing the SET button,
the cursor passes to the following value (Time
is set in 24h format and date as DD/MM/YY i.e.
07th September 2013 appears as 07/09/13).
By pressing the SET button it is possible to
confirm and pass to the following option.
4. Ajuste de la hora / fecha
Es posible ajustar la hora y la fecha con los
botones + y -, al presionar el botón SET, el
cursor pasa al siguiente valor (Hora se
encuentra en formato de 24 horas y la
fecha, DD / MM / YY es decir, 07 de
septiembre 2013 se presenta como
07.09.13).
Pulsando el botón SET es posible confirmar
y pasar a la siguiente opción.
User name setting
It is possible to insert the user name by
following two methods:
- by pressing + and – buttons to choose
characters and then SET to pass to the
following option
- by using the keyboard (USB KEYBOARD
OPTION).
2.
Vacuum time setting
By pressing the button SET for some seconds in
each program, it will appear:
1. Ajuste del tiempo de vacío
Pulsando el botón SET durante unos segundos
en cada programa, aparecerá:
By using the buttons + and – it is possible to
increase or decrease the seconds (between 0
and 99) of vacuum.
By pressing the button SET it is possible to
confirm or to switch to the following option.
Mediante el uso de las teclas + y - es posible
aumentar o disminuir los segundos (entre 0 y
99) de vacío.
Pulsando el botón SET es posible confirmar o
para cambiar a la siguiente opción.
Vacuum percentage setting
(VACUUM SENSOR OPTION)
By pressing the button SET for some seconds in
each program, it will appear:
2. Ajuste de porcentaje de vacío
(OPCIONAL sensor de vacío)
Pulsando el botón SET durante unos segundos
en cada programa, aparecerá:
13
3.
By using the buttons + and – it is possible to
increase or decrease the seconds (between 0
and 99) of vacuum.
By pressing the button SET it is possible to
confirm or to switch to the following option.
Mediante el uso de las teclas + y - es posible
aumentar o disminuir los segundos (entre 0 y
99) de vacío.
Pulsando el botón SET es posible confirmar o
para cambiar a la siguiente opción.
Pump intermittence setting (liquids and creams)
(SOFT VACUUM OPTION)
This option allows the pump intermittance
working to vacuum liquids and creamy
products. 3. Bomba ajuste intermitencia
(líquidos y cremas)
(OPCION DE VACÍO SUAVE)
Esta opción permite que la intermitencia de la
bomba trabajando para aspirar líquidos y
productos cremosos.
by pressing the buttons + and – it is possible
to set the intermittence working of the pump.
The cycle consists of 3 seconds of vacuum and
7 seconds of pause until the end of the whole
process to total vacuum.
Pulsando las teclas + y - es posible ajustar la
intermitencia de trabajo de la bomba. El ciclo
consta de 3 segundos de vacío y 7 segundos de
pausa hasta el final de todo el proceso de vacío
total.
Vacuum Type 0: standard vacuum
Vacuum Type 1: soft vacuum with pump
intermittence
By pressing the button SET it is possible to
confirm or to switch to the following option.
Vacío Tipo 0: vacío estándar
Vacío Tipo 1: vacío suave con la intermitencia de
la bomba
Pulsando el botón SET es posible confirmar o
para cambiar a la siguiente opción.
4. Sealing time setting
By pressing the SET button, it will appear:
4. Sellado de ajuste de la hora
Al presionar el botón SET, aparecerá:
By using the buttons + and – it is possible to
increase or decrease the time of sealing (tenths
of seconds, between 0 and 4 seconds).
By pressing the button SET it is possible to
confirm or to switch to the following option.
Should there not be further options, the standby writing appears again showing the number
of the program modified. This means that all
parameters are properly set.
Mediante el uso de las teclas + y - es posible
aumentar o disminuir el tiempo de sellado (décimas
de segundo, entre 0 y 4 segundos).
Pulsando el botón SET es posible confirmar o para
cambiar a la siguiente opción. ¿No debería haber
más opciones, la escritura de espera vuelve a
aparecer mostrando el número del programa
modificado. Esto significa que todos los parámetros
se establecen correctamente.
5. Gas flush setting
(GAS OPTION)
By pressing again the SET button, it will
appear: 5. Ajuste a ras de gas
(OPCION GAS)
Al pulsar de nuevo el botón SET, aparecerá:
By using the buttons + and – it is possible to
increase or decrease the time of gas injection
(tenths of seconds, between 0 and 9.9
seconds).
By pressing the button SET it is possible to
confirm or to switch to the following option.
Should there not be further options, the standby writing appears again showing the number
of the program modified. This means that all
parameters are properly set. Mediante el uso de
las teclas + y - es posible aumentar o disminuir
el tiempo de inyección de gas (décimas de
segundo, entre 0 y 9,9 segundos).
Pulsando el botón SET es posible confirmar o
para cambiar a la siguiente opción. No debería
haber más opciones, la escritura de espera
vuelve a aparecer mostrando el número del
programa modificado. Esto significa que todos
los parámetros se establecen correctamente.
Do not set time of gas flush longer than
vacuum time, otherwise the lid would
open again by anticipating the end of the
cycle.
No establezca el tiempo de inyección de
gas más largo que el tiempo de vacío, de
lo contrario la tapa podría abrir de nuevo
mediante la previsión de la final del ciclo.
Make sure that the gas pressure entering
the chamber is not higher than 1 – 1.5 bar
Asegúrese de que la presión del gas que
entra en la cámara no es superior a 1-1,5
bar
14
6. Food preservation time setting
(PRINTER OPTION)
By pressing the SET button, it will appear:
6. Ajuste del tiempo de conservación de los
alimentos
(Opción de la impresora)
Al presionar el botón SET, aparecerá:
By using the buttons + e – it is possible to set
the first number, indicating the number of
sticky labels to be printed (between 1 and 9).
NB: by setting 0, the printer will not print any
labels.
Mediante el uso de los botones + e - es posible
establecer el primer número, que indica el
número de etiquetas adhesivas para ser
impresos (entre 1 y 9).
NB: estableciendo 0, la impresora no imprime
ninguna etiqueta.
By pressing the button SET the cursor moves to
the second number, indicating the number of
preservation days needed before expiry date.
(between 1 and 183). NB: estableciendo 0, La
Impresora no imprime Ninguna Etiqueta.
Pulsando el botón SET el cursor se mueve al
segundo número, que indica el número de días
de conservación necesarias antes de la fecha de
caducidad. (entre 1 y 183).
NB: beyond the number of preservation days
previously set, the machine will print both the
packaging and expiry date.
By pressing the button SET it is possible to
confirm or to switch to the following option.
NB: más allá del número de días de
conservación establecidos anteriormente, el
equipo imprimirá tanto el envase y la fecha de
caducidad.
Pulsando el botón SET es posible confirmar o
sirve también para cambiar a la siguiente
opción.
Should there not be further options, the standby writing appears again showing the number
of the program modified. This means that all
parameters are properly set.
No debe haber más opciones, la escritura de
espera vuelve a aparecer mostrando el número
del programa modificado. Esto significa que
todos
los
parámetros
se
establecen
correctamente.
7. Product name and ingredients setting
(PRINTER WITH KEYBOARD + USB KIT)
By pressing again the SET button, there will be
an empty line on the display:
7. Nombre del producto y los ingredientes de
ajuste
(IMPRESORA CON TECLADO + KIT USB)
Al pulsar de nuevo el botón SET, habrá una
línea en blanco en la pantalla:
By using the keyboard, it is possible to insert a
text of up to 15 lines to be printed on the labels
(i.e. food name, ingredients…).
Al utilizar el teclado, es posible insertar un texto
de un máximo de 15 líneas para ser impresas
en las etiquetas (es decir, nombres de
alimentos, ingredientes ...).
7.2_VACUUM IN GASTRO TRAYS
7.2_VACIO EN GASTRO BANDEJAS
In order to vacuum in GN trays, keep the lid open
and connect the suction pipe to the nozzle in the
chamber, placed in front of the sealing bar (image
7.1), together with the lid of the container.
Con el fin de aspirar en bandejas GN, mantener la
tapa abierta y conectar el tubo de aspiración a la
boquilla en la cámara, colocado en frente de la barra
de sellado (imagen 7.1), junto con la tapa del
recipiente.
Image 7.1 Suction nozzle
Imagen de la boquilla de aspiración 7.1
After having checked that the manual valve of the
pipe is closed (direction: toward above), press the
“PUMP GASTRO“ button to make the suction cycle
start. Once the vacuum level is desired within the
tray (check the vacuum gauge), press the ”PUMP
GASTRO“ button again to stop the cycle.
Después de haber comprobado que la válvula
manual del tubo está cerrado (dirección: hacia
arriba), presione el botón "PUMP GASTRO" para
hacer el inicio del ciclo de aspiración. Una vez que el
nivel de vacío se desea dentro de la bandeja (revisar
la válvula de vacío), presione el botón "PUMP
GASTRO" de nuevo para detener el ciclo.
During this cycle the display shows the message
Empty gastro with the LCD model.
Finally, disconnect the hose from the container by
lowering the manual vent valve.
Durante este ciclo, la pantalla muestra el mensaje
gastro vacío con el modelo LCD.
Por último, desconecte la manguera del recipiente
mediante la reducción de la válvula de ventilación
manual.
15
7.3_ MANUAL WELDING
7.3_ SOLDADURA MANUAL
Warning of the pump cleaning cycle
Advertencia del ciclo de limpieza de la bomba
During normal processing cycle by holding
down the "PUMP GASTRO" for 3 seconds you
can make the welding advance compared to
the end of its preset vacuum.
Durante el ciclo de procesamiento normal
manteniendo pulsado el botón "GASTRO
BOMBA" durante 3 segundos se puede hacer
avanzar la soldadura en comparación con el
final de su vacío preestablecido.
Every 10000 cycles on the machine display appears
“OIL”, instead of the program number: this shows
that it's necessary to do the pump service.
To enter the pump service mode, push the PUMP
GASTRO button lowing the lida t the same time. on
the display it will appear Pump cleaning.
Once the cycle is finished, “OIL” will disappear and
the program number will appear on the display.
In order to stop the cleaning cycle any time, keep
the ON/OFF button pressed for some seconds.
Cada 10.000 ciclos en la pantalla de la máquina
aparece "OIL", en lugar del número de programa:
esto demuestra que es necesario hacer el servicio de
la bomba.
Una vez que el ciclo ha terminado, "OIL"
desaparecerá y el número del programa aparecerá
en la pantalla.
Con el fin de detener el ciclo de limpieza en
cualquier momento, mantenga presionado durante
algunos segundos el botón ON / OFF.
CHAPTER 8
Capítulo 8
MAINTENANCE AND PRECAUTION
MANTENIMIENTO Y PRECAUCIONES
Pump heating
La bomba de calor
During winter time or with cold weather, it is
advisable to pre-heat the pump in the morning in
order to liquefy the oil before it circulates
throughout the machine.
Durante el tiempo de invierno o con tiempo frío, es
aconsejable pre-calentar la bomba en la mañana con
el fin de licuar el aceite antes de que circule a través
de la máquina.
When the chamber lid is open press the
button “ PUMP GASTRO “ for 3 seconds and let
the pump work for about 15/20 seconds, and
after that, press again the button to stop the
pump.
Cuando la tapa de la cámara es
abierta
presione el botón "GASTRO BOMBA" durante 3
segundos y deje el trabajo de la bomba
durante unos 15/20 segundos y, después,
vuelva a pulsar el botón para detener la
bomba.
Ordinary pump cleaning cycle
Ciclo ordinario de limpieza de la bomba
In order to make the ordinary pump cleaning press
on the button “PUMP GASTRO”, and while
pressing, lower the chamber lid. The writing Pump
cleaning will appear on the display.
Con el fin de hacer la limpieza de la bomba
ordinaria, presionar el botón "GASTRO BOMBA", y
mientras se presiona, baje la tapa de la cámara. La
limpieza de la bomba de escritura aparecerá en la
pantalla.
During this cycle, lasting around 10 minutes, the
pump will work with intermittance.
NOTE: To end at any moment the cleaning cycle,
pushing for some seconds SET.
Durante este ciclo, que dura alrededor de 10
minutos, la bomba funciona con intermitencia.
NOTA: Para terminar en cualquier momento del ciclo
de limpieza, presione por algunos segundos SET.
The pump maintenance is not strictly linked to
the 1000 cycles, but to the preserved product
(i.e. when using it with flour products, oil
check must be done monthly). Furthermore,
for an often usage of the machine, pump
cleaning must be done every 6 months.
El mantenimiento de la bomba no está
estrictamente vinculada a los 1000 ciclos,
pero el producto se conserva (es decir, cuando
se utiliza con productos de harina, el control
de aceite debe hacerse mensualmente). Por
otra parte, para un uso a menudo del equipo,
la limpieza de la bomba debe hacerse cada 6
meses
The working of the machine and the pump
must not be continued, as the pump is not
suitable to be used continuously.
El trabajo del equipo y la bomba no debe
continuar ya la bomba no esta preparada para
ser utilizada de forma continua.
16
Internal components
Componentes internos
Access to the machine internal components is
permitted to the manufacturer’s qualified personnel
only. In case unauthorized personnel entering the
machine of his/her own will, the manufacturing
company cannot be considered responsible for
possible accidents and damages to persons or
things.
El acceso a los componentes internos de la máquina
está permitido únicamente a personal especializado
del fabricante. En caso de que el personal no
autorizado entra en la máquina de su / su propia
voluntad, la empresa fabricante no puede ser
considerado responsable de los posibles accidentes y
daños a personas u objetos.
All electric components are protected inside
the machine body and it is necessary to
remove the relevant safety casing (which is
fastened with screws) to reach them. Before
entering the machine body, disconnect the
current plug from the electric supply panel.
Todos los componentes eléctricos están
protegidos en el interior del cuerpo del equipo
y es necesario retirar la carcasa de seguridad
correspondiente (que se sujeta con tornillos)
para llegar a ellos. Antes de entrar en el
cuerpo del equipo, desconecte el enchufe de
corriente del panel de suministro eléctrico.
Image 8.2. Syilicon bar placed on the lid
Imagen 8.2. Barra de Silicón colocado en la tapa
2. Replacement of the sylicon bar on the lid (Image
8.2)
2. Reemplazo de la barra de silicón en la tapa
(Imagen 8.2)
3. Replacement of electric resistances, sealing bar
teflon (Image 8.3) and the gasket on the lid
(Figura 8.4) almost every 200 working hours.
3. La sustitución de las resistencias eléctricas,
sellado barra de teflón (Imagen 8.3) y la junta
de la tapa (Figura 8.4) casi cada 200 horas de
trabajo.
Inner chamber maintenance and cleaning
Mantenimiento cámara interior y limpieza
It is possible to maintain a correct hygiene of the
machine, by following a few simple steps.
Es posible mantener una correcta higiene de la
máquina, siguiendo unos sencillos pasos.
image 8.3. Sealing bar teflon
imagen 8.3. Barra soldadora de teflón
1. Clean the sealing bars (Image 8.1) and the
sylicon bar on the lid (Image 8.2) every 15 days
with alcohol.
1. Limpiar las barras de sellado (Imagen 8.1) y
la barra de silicón en la tapa (Imagen 8.2) cada
15 días con el alcohol.
Image 8.4. Gasket on the lid
Imagen 8.4. Junta de la tapa
Image 8.1. Sealing bar within the chamber
Imagen 8.1. Sellado de la barra dentro de la
cámara
17
door to check the possible intervention of
the motor magneto-thermo overload.
In case of electric shocks causing a bad
working of the keyboard and/or the electronic
board, take the USB device out and connect it
again after a few seconds, in order to start it
again properly.
En caso de descargas eléctricas que provocan
un mal funcionamiento del teclado y / o la
tarjeta electrónica, lleve el dispositivo USB y
vuelva a conectarlo después de unos
segundos, con el fin de comenzar de nuevo
correctamente.
In order to grant a proper working of the
keyboard, it is recommended to use the
equipment supplied by the manufacturer
company only.
Con el fin de otorgar un buen funcionamiento
del teclado, se recomienda el uso de los
equipos suministrados por sólo la empresa
fabricante.
? THE MACHINE STOPS
WHILE IT IS RUNNING
1. Check that the rear micro-switch is correctly
energized.
2. Check the safety fuses that are on the
electronic board that is in the machine and
near the general switch ( In the machines
with the wiring in a box, the fuses are in the
box).
3. Verify that there is voltage in the line.
? THE MACHINE WORKS PROPERLY BUT THE
BAG IS NOT SEALED OR IS NOT SEALED
CORRECTLY AT LID OPENING
4. Lift the sealing bar to check that the 2
cables are well fixed to the sealing bar itself
5. Verify that between the welding bar and the
gasket of the lid there is a distance of at
least 4-5 mm
6. Verify that the welding time is suitable for
the bag thickness
7. Verify that the area in which the welding is
8. made, isn’t wet or has got some creases.
9. Verify that the silicone of the lid is not
damaged.
The check of pump, filters and electrovalves
must be done every 2000 working hours by
authorized personnel only.
La comprobación de la bomba, filtros y
electroválvulas debe hacerse cada 2000 horas
de trabajo por personal autorizado.
Funzionamento:
Nelle macchine con orologio si alterna la scritta della
data/ora con il numero programma.
? THE MACHINE DOES NOT ATTAIN THE
OPTIMUM VACUUM
1.
CHAPTER 9
Capítulo 9
PROBLEMS SOLVING
? AFTER SWITCHING ON, THE MACHINE
DOES NOT START
1. Check that the plug is correctly inserted
into the current outlet and in case check
the contacts inside the plug itself.
2. Check that the micro-switch, positioned at
the back under the left hinge , is correctly
energized when the bell-lid is lowered.
3. Check the safety fuses that are on the
electronic board that is in the machine
and near the general switch ( In the
machines with the wiring in a box, the
fuses are in the box).
4. If a three-phase motor is installed,
disconnect the machine and open the rear
UNEXPECTEDLY
Close the bell and when you reach the
pressure of about 70/cmHg off the line,
checking if the pointer of thevacuum gauge
stays in place or if recedes. In the first case
we are diagnosing losses, so the problem is
due to other source (vane pump, oil change,
cleaning pump). In the second case it is in the
presence of air infiltration in bell then:
- Check the integrity of the seal on the lid;
Thus
requiring
replacement
mentioned above, you can
manufacturer
of
parts
ask the
2.
Check that the bag during the vacuum cycle
does not swell. If this happens:
- Check the correct positioning of the bag
- Check the correct positioning of the sealing
bar in its housing
- Check there is the correct distance between
the sealing bar and against the bar (4-5 mm)
3.
Verify that the weld is uniform and without
breaks that could seep air
18
4.
Check that the setting of the vacuum is
adequate for the product you are crafting
? DO NOT LIFT THE LID ON OR RAISE A
LITTLE
1. Verify the proper operation of the pistons
placed inside the machine.
CHAPTER 10
Capítulo 10
TOP CHAMBER
TOP DE CÁMARA
10.1_ EXPLODED VIEW
10.1_ EXPLOSION DE PARTES
19
20
10.2_ LIST OF COMPONENTS OF THE EXPLODED VIEW
10.2_ LISTA DE COMPONENTES DE LAS PIEZAS
Rif. esploded
1
2
2
2
2
Mod. machine
All
models/Todos
los modelos
All models
All models
Mistral Ghibli
All models
Auster Eos
3
Mistral Ghibli
3
3
3
3
3
3
4
4
Auster Eos
Mistral Ghibli
Mistral Ghibli
Auster Eos
Mistral Ghibli
All models
All models
Mistral Ghibli
4
All models
4
5
5
5
5
6
6
6
6
7
7
7
7
8
8
8
8
9
10
10
10
Auster
Eos
Mistral
Ghibli
Auster
Eos
Mistral
Ghibli
Auster
Eos
Mistral
Ghibli
Auster
Eos
Mistral
Ghibli
Auster
Eos
Mistral
Ghibli
All models
10
All models
11
All models
12
Description
SWITCH O-I
INTERRUPTOR 0-1
ADHESIVE LEXAN LCD1
ADHESIVO LEXAN LCD1
ADHESIVE LEXAN LCD2
ADHESIVE LEXAN LCD2 PRINT
ADHESIVE LEXAN 7SEGMENTI
FRONT PANEL CONTROLS LCD1
CONTROLES DEL PANEL FRONTAL LCD1
FRONT PANEL CONTROLS LCD1
CONTROLES DEL PANEL FRONTAL LCD1
FRONT PANEL CONTROLS LCD2
FRONT PANEL CONTROLS LCD2
FRONT PANEL CONTROLS LCD2 PRINT
FRONT PANEL CONTROLS 7 SEGMENTI
FRONT PANEL CONTROLS 7 SEGMENTI
ELECTRONIC BOARD COMPLET LCD1
TARJETA ELECTRÓNICA COMPLETA LCD1
ELECTRONIC BOARD COMPLET LCD2
ELECTRONIC BOARD COMPLET LCD2
PRINT
ELECTRONIC BOARD COMPLET 7
SEGMENTI
TARJETA ELECTRÓNICA COMPLETA 7
CARTER
CARTER
CARTER
CARTER
BASE CARTER
BASE DEL CARTER
BASE CARTER
BASE CARTER
BASE CARTER
BACK CARTER
BACK CARTER
BACK CARTER
BACK CARTER
CHAMBER
CÁMARA
CHAMBER
CHAMBER
CHAMBER
LIP STOP
LIP PARADA
LIP STOP
LIP STOP
LIP STOP
SUPPORT
SOPORTE
POWER CABLE
CABLE DE ALIMENTACIÓN
STOP POWER CABLE CABLE DE
ALIMENTACIÓN PARADA
Quantity
1
1
1
1
1
1
1
1
1
1
1
1
1
1
1
1
1
1
1
1
1
1
1
1
1
1
1
1
1
1
1
1
1
1
1
1
4
1
1
21
13
13
13
14
15
16
17
17
17
17
Auster Eos
Mistral
Ghibli
All models
All models
All models
Auster
Eos
Mistral
Ghibli
All models
18
All models
19
Auster
20
20
20
20
21
21
21
21
22
22
22
22
23
23
23
23
24
24
24
24
Eos
Mistral
Ghibli
Auster
Eos
Mistral
Ghibli
Auster
Eos
Mistral
Ghibli
Auster
Eos
Mistral
Ghibli
Auster
Eos
Mistral
Ghibli
All models
25
Mistral Ghibli
26
Mistral Ghibli
27
Mistral Ghibli
28
29
30
31
32
33
33
Eos Mistral
Ghibli
Eos Mistral
Ghibli
Eos Mistral
Ghibli
Eos Mistral
Ghibli
Auster
Eos
TRASFORMER150
TRASFORMER200
TRASFORMER400
ELETTROVALVE 6212
ELETRO VÁLVULA
ELETTROVALVE 9942
CONNECTOR AIR SYSTEM
SISTEMA DE AIRE CONECTOR
PUMP6
PUMP8
PUMP21
PUMP25
SWITCH
INTERRUPTOR
NOZZLE IN
BOQUILLA EN
PISTONS SPRING 1_370N
PISTONES PRIMAVERA 1_370N
PISTONS SPRING 1_400N
PISTONS SPRING 2_500N
PISTONS SPRING 2_750N
SILICON RED BAR
BARRA DE SILICON ROJO
SILICON RED BAR
SILICON RED BAR
SILICON RED BAR
COUNTER SEALING BAR
CONTADOR SELLADO DE BARRA
COUNTER SEALING BAR
COUNTER SEALING BAR
COUNTER SEALING BAR
LIP GASKET
JUNTA DE LIP
LIP GASKET
LIP GASKET
LIP GASKET
LIP
LIP
LIP
LIP
MANOMETER
MANOMETRO
PRINT
IMPRIMIR
POWER SUPPLY PRINTER
IMPRESORA DE ALIMENTACIÓN
KEYBOARD
TECLADO
NOZZLE GAS IN
BOQUILLA DE GAS EN
ELETTROVALVE GAS 6610
ELECTROVÀLVULA DE GAS 6610
NOZZLE GAS
BOQUILLA DE GAS
STOPPING BAG GAS
PARADA DE BOLSA DE GAS
SHELF
ESTANTE
SHELF
1
1
1
1
1
1
1
1
1
1
1
1
1
1
2
2
1
1
1
1
1
1
1
1
1
1
1
1
1
1
1
1
1
1
1
1
1
1
2
2
2
2
22
33
33
Mistral
Ghibli
All models
34
All models
35
Auster
DETAIL
DETAIL
DETAIL
DETAIL
A
A
A
A
A1
A1
A1
A1
A2
A2
A2
A2
A3
A3
A3
A3
A4
A4
A4
A4
A5
A5
A5
A5
DETAIL B
DETAIL B
DETAIL B
Eos
Mistral
Ghibli
Auster
Eos
Mistral
Ghibli
Auster
Eos
Mistral
Ghibli
Auster
Eos
Mistral
Ghibli
Auster
Eos
Mistral
Ghibli
Auster
Eos
Mistral
Ghibli
Auster Eos
Mistral
Ghibli
Auster
DETAIL C
DETAIL C
Eos Mistral
Ghibli
SHELF
SHELF
TIME SWITCH
TIEMPO DE INTERRUPTOR
FUSE HOLDER WITH FUSE
PORTAFUSIBLE CON FUSIBLE
COMPLET SEALING BAR
SELLADO DE BARRA COMPLETADO
COMPLET SEALING BAR
COMPLET SEALING BAR
COMPLET SEALING BAR
TEFLON
TEFLON
TEFLON
TEFLON
TEFLON
RESISTANCE Ni Cr
RESISTENCIA Ni Cr
RESISTANCE Ni Cr
RESISTANCE Ni Cr
RESISTANCE Ni Cr
BACHELITE
BAQUEILTA
BACHELITE
BACHELITE
BACHELITE
PLASTIC SEALING BAR BODY
CUERPO DE PLÁSTICO DE LA BARA DE
SELLADO
PLASTIC SEALING BAR BODY
PLASTIC SEALING BAR BODY
PLASTIC SEALING BAR BODY
SIDE PLATES
PLACAS LATERALES
SIDE PLATES
SIDE PLATES
SIDE PLATES
HINGE
BISAGRA
HINGE
HINGE
SEALING BAR PISTONS UP
BARRA SELLADO DE PISTONES
SEALING BAR PISTONS UP
2
2
1
1
1
1
1
1
1
1
1
1
1
1
1
1
1
1
1
1
1
1
1
1
2
2
2
2
2
2
2
2
2
10.3_ DISPLAY BOARD: 10.3_ PANTALLA:
23
10.4_ PRINTER + KEYBOARD DISPLAY BOARD:
10.4_ IMPRESORA + TECLADO EN PANTALLA:
10.5_ STANDARD ELECTRONIC SCHEME:
10.5_ ESQUEMA ELECTRÓNICO ESTÁNDAR:
24
10.6_ PRINTER + KEYBOARD ELECTRONIC SCHEME:
10.6_ ESQUEMA: IMPRESORA + TECLADO ELECTRÓNICO:
25
10.7_ POWER SCHEME
10.7_ ESQUEMA DE PODER
26
27
CHAPTER 11
CAPITULO 11
FREE STANDING CHAMBER
CAMARA GRATIS PERMANENTE
11.1_ EXPLODED VIEW/ 11.1 VISTA DE LAS PIEZAS
28
11.2_ COMPONENTS LIST OF THE EXPLODED VIEW
11.2_LISTA DE COMPONENTES DE LAS PIEZAS
Rif.
esploded
view
Mod. machine
All Models
1
All Models
2
2
2
2
3
3
3
3
3
4
4
4
4
5
5
5
5
6
6
6
6
7
7
7
7
8
8
8
8
9
9
9
9
All
All
All
All
Models
Models
Models
Models
All
All
All
All
All
Models
Models
Models
Models
Models
All Models
All Models
All Models
Blizzard
Alysee
Tornado
Monsoon
Blizzard
Alysee
Tornado
Monsoon
Blizzard
Alysee
Tornado
Monsoon
Blizzard
Alysee
Tornado
Monsoon
Blizzard
Alysee
Tornado
Monsoon
All Models
10
Blizzard
11
All Models
11
12
All Models
Description
SWITCH O-I 380V
INTERRUPTOR O-I 380V
ADHESIVE LEXAN LCD1
ADHESIVO LEXAN LCD1
ADHESIVE LEXAN LCD2
ADHESIVE LEXAN LCD2 PRINT
ADHESIVE LEXAN 7SEGMENTI
FRONT PANEL CONTROLS LCD1
CONTROL DE PANEL FRONTAL LCD1
FRONT PANEL CONTROLS LCD2
FRONT PANEL CONTROLS LCD2 PRINT
FRONT PANEL CONTROLS 7 SEGMENTI
FRONT PANEL CONTROLS 7 SEGMENTI
ELECTRONIC BOARD COMPLET LCD1
TARJERA ELECTRONICA COMPLETA LCD1
ELECTRONIC BOARD COMPLET LCD2
ELECTRONIC BOARD COMPLET LCD2 PRINT
ELECTRONIC BOARD COMPLET 7 SEGMENTI
CARTER
CARTER
CARTER
CARTER
CARTER
BASE CARTER
BASE DEL CARTER
BASE CARTER
BASE CARTER
BASE CARTER
BACK CARTER
PARTE TRASERA DEL CARTER
BACK CARTER
BACK CARTER
BACK CARTER
CHAMBER
CAMARA
CHAMBER
CHAMBER
CHAMBER
LIP STOP
PARADA DE LIP
LIP STOP
LIP STOP
LIP STOP
WHEEL
RUEDA
POWER CABLE 220V
CABLE DE ALIMENTACION 220 V
POWER CABLE 380V
CABLE DE ALIMENTACION 380 V
STOP POWER CABLE
Quantity
1
1
1
1
1
1
1
1
1
1
1
1
1
1
1
1
1
1
1
1
1
1
1
1
1
1
1
1
1
1
1
1
1
1
4
1
1
1
29
All Models
TRASFORMER400VA
TRANSFORMADOR 400 VA
13
13
14
15
1/2
Alysee Tornado
Monsoon
All Models
All Models
All Models
16
Blizzard
17
17
17
17
Alysee
Tornado
Monsoon
All Models
18
All Models
19
Blizzard
20
20
20
20
21
21
21
21
22
22
22
22
23
23
23
23
24
24
24
24
Alysee
Tornado
Monsoon
Blizzard
Alysee
Tornado
Monsoon
Blizzard
Alysee
Tornado
Monsoon
Blizzard
Alysee
Tornado
Monsoon
Blizzard
Alysee
Tornado
Monsoon
All Models
25
All Models
TRASFORMER600VA
ELETTROVALVE 6212 in
ELECTROVALVULA 6212 EN
ELETTROVALVE 9942/8414/8415 out
CONNECTOR AIR SYSTEM
SISTEMA CONECTOR DE AIRE
PUMP25
BOMBA 25
PUMP40
PUMP63
PUMP100
PROXIMETER + MAGNET
PROXIMETER + IMAN
NOZZLE IN
BOQUILLA EN
PISTONS SPRING 2_75
PISTONES PRIMAVERA 2_75
PISTONS SPRING 2_110110/3_858585
PISTONS SPRING 3_856085 3_958595 3_859585
PISTONS SPRING 3_110110110 3_11095110
SILICON RED BAR
BARRA DE SILICON ROJO
SILICON RED BAR
SILICON RED BAR
SILICON RED BAR
COUNTER SEALING BAR
CONTADOR DE BARRA SELLADO
COUNTER SEALING BAR
COUNTER SEALING BAR
COUNTER SEALING BAR
LIP GASKET
LIP-JUNTA
LIP GASKET
LIP GASKET
LIP GASKET
LIP
LIP
LIP
LIP
MANOMETER
MANOMETRO
PRINT
IMPRESO
26
27
All Models
28
All Models
29
All Models
32
33
1
1
1
1
1
1
1
1
1
2
2/3
3
3
1
1
1
1
1
1
1
1
1
1
1
1
1
1
1
1
1
1
All Models
30
31
1/2
All Models
All Models
Blizzard
POWER SUPPLY PRINT
FUENTE DE ALIMENTACIÓN DE IMPRESIÓN
KEYBOARD
TECLADO
NOZZLE IN GAS
BOQUILLA DE GAS
ELETTROVALVE GAS 6610
ELECTRO VALVULA GAS 6610
NOZZLE GAS
STOPPING BAG GAS
PARADA BOLSA DE GAS
SHELF
1
1
1
1
2
2
2
30
33
33
33
Alysee
Tornado
Monsoon
All Models
34
All Models
35
All Models
36
All Models
37
38
39
All Models
All Models
All Models
40
Blizzard
(1)
Blizzard
DETAIL
DETAIL
DETAIL
DETAIL
A
A
A
A
A1
A1
A1
A1
A2
A2
A2
A2
A3
A3
A3
A3
A4
A4
A4
A4
A5
A5
A5
A5
Alysee
Tornado
Monsoon
Blizzard
Alysee
Tornado
Monsoon
Blizzard
Alysee
Tornado
Monsoon
Blizzard
Alysee
Tornado
Monsoon
Blizzard
Alysee
Tornado
Monsoon
Blizzard
Alysee
Tornado
Monsoon
Blizzard
DETAIL B
DETAIL B
DETAIL C
Alysee Tornado
Monsoon
All Models
ESTANTE
SHELF
SHELF
SHELF
TIME SWITCH
INTERRUPTOR DE TIEMPO
FUSE HOLDER WITH FUSE
PORTAFUSIBLE CON FUSIBLE
SEALING BAR SELECTOR
SELECTOR DE BARRA SELLADO
LIGHT LINE
LINEA DE LUZ
TLR
RELE'
ELECTRICAL PANEL
INTERRUPTOR DE PANEL ELECTRICO O-I 220V
(ref. espl. Pag15)
SWITCH O-I 220V (rif. espl. pag15)
INTERRUPTOR DE PANEL ELECTRICO
COMPLET SEALING BAR
BARRA SELLADA
COMPLET SEALING BAR
COMPLET SEALING BAR
COMPLET SEALING BAR
TEFLON
TEFLON
TEFLON
TEFLON
TEFLON
RESISTENCE Ni Cr
RESISTENCIA Ni Cr
RESISTENCE Ni Cr
RESISTENCE Ni Cr
RESISTENCE Ni Cr
BACHELITE
BACHELITE
BACHELITE
BACHELITE
PLASTIC SEALING BAR BODY
CUERPO DE PLASTICO DE BARRA SELLADO
PLASTIC SEALING BAR BODY
PLASTIC SEALING BAR BODY
PLASTIC SEALING BAR BODY
SIDE PLATES
PLACAS LATERALES
SIDE PLATES
SIDE PLATES
SIDE PLATES
HINGE
BISAGRA
HINGE
SEALING BAR PISTONS UP
SELLADO DE PISTONES BAR 2/3
2
2
2
1
1
1
1
2
1
1
1
1
1
1
1
1
1
1
1
1
1
1
1
1
1
1
1
1
1
1
1
2
2
2
2
2
2/3
2/3
31
11.3_ DISPLAY BOARD: 11.3_ DESPLIEGE EN PANTALLA:
11.4_ PRINTER + KEYBOARD DISPLAY BOARD:
11.4_ IMPRESORA + TECLADO EN PANTALLA:
32
11.5_ STANDARD ELECTRIC SCHEME:
11.5_ ESQUEMA DE ESTANDAR ELECTRICO:
33
11.6_ PRINT + KEYBOARD ELECTRIC SCHEME:
11.6_ IMPRESORA + ESQUEMA TECLADO ELECTRICO:
34
11.7_ POWER SCHEME
11.7_ ESQUEMA DE PODER
35
36
Besser Vacuum Srl
Via Casarsa, 57
Dignano (UD) - Italy
Tel. +39 0432 953097
Fax +39 0432 953591
[email protected]
www.besservacuum.com
Dichiarazione di conformità * Declaration of conformity * Déclaration de conformité
Konformitätserklärung * Declaración de conformidad
I Il sottoscritto, legale rappresentante della Ditta costruttrice, dichiara che il prodotto sotto elencato è conforme, per
quanto ad esso applicabile, alle seguenti direttive e alle seguenti normative:
GB The undersigned legal representative of the manufacturing company declares that the below listed product is in
compliance, as far as applicable, with the following directives and regulations:
F Le représentant légal soussigné de la maison constructrice, déclare que le produit mentionné ci dessous est
conforme, dans la mesure où elles s'appliquent au produit, aux directives et normes suivants :
D Der unterzeichnende gesetzliche Vertreter der Herstellerfirma erklärt, dass das nachstehnde aufgeführte Produkt,
sofern auf dieses anwendbar, mit den folgenden Richtlinien und Normen übereinstimmt:
E El infrascrito, representante legal de la Empresa fabricante, declara que el producto enumerado más adelante
cumple, en cuanto sea aplicable, con las siguientes directivas y normativas:
Modello/Model/Modale/Modell/Modelo
Matricola/Serial n°/Numéro de matricule /
Seriennummer /Número de serie
Anno di costruzione
Manufactured
Année de fabrication
Baujahr
Año de fabricación
2013
Reference/Referencia
Directive 2004/108/EC
of 15 December 2004
Directiva 2004/108/CE
de 15 de diciembre 2004
Directive 2006/95/EC
of 12 December 2006
Directiva 2006/95/CE
de 12 de diciembre 2006
Title/ Cargo-Posición-Título
On the approximation of the laws of the Member States relating to electromagnetic
compatibility and repealing Directive 89/336/EEC
En la aproximación de las legislaciones de los Estados miembros en materia de
compatibilidad electromagnética y se deroga la Directiva 89/336/CEE
On the harmonisation of the laws of Member States relating to electrical equipment
designed for use within certain voltage limits
Sobre la armonización de las legislaciones de los Estados miembros sobre el
material eléctrico destinado a utilizarse con determinados límites de tensión
and it has been applied the following rules and/or technical specifications (completely or partially) used for this declaration
of conformity:
y se ha aplicado las siguientes normas y / o especificaciones técnicas (total o parcialmente) utilizados para esta declaración
de conformidad:
Harmonised standards/Normas armonizadas
N°
CEI EN 55014-1
Edition/
Edición
08/2007
CEI EN 55014-2
+A1
+IS
+A2
10/1998
08/2002
10/2007
08/2009
CEI EN 61000-3-2
02/2007
CEI EN 61000-3-3
09/2009
Title/ Cargo-Posición-Título
Electromagnetic compatibility - Requirements for household
appliances, electric tools and similar apparatus - Part 1: Emission
Compatibilidad electromagnética - Requisitos para el hogar
electrodomésticos, herramientas eléctricas y aparatos análogos - Parte 1: Emisión
Electromagnetic compatibility - Requirements for household
appliances, electric tools and similar apparatus - Part 2: Immunity
Compatibilidad electromagnética - Requisitos para el hogar
electrodomésticos, herramientas eléctricas y aparatos análogos - Parte 2:
Inmunidad
Limits for harmonic current emissions (equipment input current up to and including 16 A per
phase)
Límites para las emisiones de corriente armónica (corriente de entrada del equipo
hasta 16 A por fase)
Limitation of voltage changes, voltage fluctuations and flicker in public low-voltage supply
systems, for equipment with rated current <= 16 A per phase and not subject to conditional
connection
37
Limitación de las variaciones de tensión, fluctuaciones de tensión y flicker en las
redes de suministro público en baja tensión, para equipos con corriente de entrada
<= 16 A por fase y no sujetos a una conexión condicional
CEI EN 60335-1
07/2008
Household and similar electrical appliances – Safety - Part 1: General requirements
Aparatos electrodomésticos y análogos del hogar - Seguridad - Parte 1: Requisitos
generales
Il Presidente
38