1
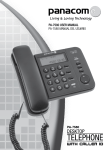
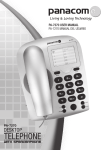
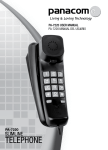
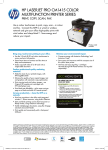
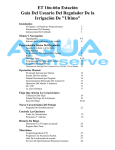
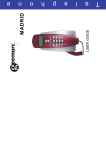
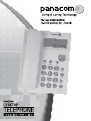
Pg. 1
PA-7600 - USER MANUAL
Thanks for purchasing Panacom Telephone PA-7600. Please read this
manual carefully before using this Telephone, which is the best guideline offering best service.
Features
- FSK/DTMF dual systems compatible
- 10 outgoing call memory with 18 digts and converstion time
- 30 incoming call memory with 12 digits and date&time
- 5 digits local area code filter for incoming calls
- 1digit PBX-code
- 32 digits predialing and edit
- Pulse/Tone switchable
- Autoredial function
- Alarm setting
- Block of Long Distance Calls
Preparing your phone before use
The Instruction for users briefly describes the installation procedures
and all built-in features.
Installation
1) Place the telephone in a dry,ventilation and non-erode gas place.
2) Apply the caller ID service from your local telecom or on this function. It is a multi-function telephone even no caller ID function.
3) Connect one end of the coiled cord to handset and connect the
other end to handset jack.
4) Connect one end of the line cord to the jack on the base unit, and
the other end to wall outlet for telephone.
5) Pick up the handset and you will hear the echo from the exchanger
or PABX. That means the telephone is ready for use.
Menu Setting
On hook, press the SET button to enter the setting status,the
LCD displays “SET 1 DATE”, press UP OR DN button to review
other settings,press SET again to start this setting. After finishing
Pg. 3
setting,press SET to save it and go to next setting.
Regarding all the following menu setting,press SET to enter and save, press
UP OR DN to change the setting values,press the button DEL to exit.
Setting date&time
Press SET button to enter into the menu
The LCD will show: SET 1 DATE
Press SET again the LCD dispay the flashing year ”2003”.
Use UP or DN button to adjust the correct Year / Month /Day/Hour/
Minute.
Then press SET button to confirm and save the correct date&time..
Setting local area code
After Setting the date&time, LCD will show “SET 2 CODE”
Press SET to enter into the menu.
The LCD will show: CODE - - - - Use UP or DN button to set the area code digits
Then press SET button to confirm and set the area code.
Setting PABX code
After setting the local area code,the LCD will show “SET 3 PCODE”
Press SET to enter into the menu
The LCD will show: PCODE --,
Use UP or DN button go to set the PABX code.
Then press SET button to confirm and go to next setting..
Note: After setting the PCODE,when calling back the incoming
calls, the phone will dial out the numbers with the PABX Code automatically.
Setting AUTO IP
After setting PABX Code,the LCD will show “SET 4 AUTO IP”
Press SET to enter into the menu
The LCD will show: AUTO IP OFF -,
Use UP or DN button to turn on the setting.
Press SET button and the LCD will display: INPUT CODE.
Input the IP NO or IP Card No and its password.
Then press SET button to confirm and go to next setting.
Pg. 4
Note: After setting auto IP function, when calling back or predialing,if
the first digit of the number is “0”,the phone will dial out the IP No
first automatically.
Setting Pulse/Tone dialing mode
After setting AUTO IP,the LCD will show “SET 5 P-T”
Press SET to enter into the menu
The LCD will show: TONE -,
Use UP or DN button to change the setting to pulse dialing mode.
Then press SET button to confirm and go to next setting.
Setting alarm
After setting P-T dialing mode,the LCD will show “SET 6 ALARM”
Press SET to enter into the menu
The LCD will show: ALARM OFF,
Use UP or DN button to trun on/off the alarm setting.
Press the SET to confirm and go to set up next setting.
Setting alert time
After setting alarm,the LCD will show “SET 7 ALERT”
Press SET to enter into the menu
The LCD will show: 1 00-00 OFF (First alarm,HH-MM,off/on),
Use UP or DN button to choose the first/second/third alarm press
SET to enter the setting. Press UP or DN to adjust the alarm time.
Press the SET to confirm and go to next setting.
Note: When the alarm is on,it will keep on ringing for 1 minute,press
any button to stop ringing.
The first and second alarm is one-off setting.the third one is permanent.
Setting LCD
After setting the alarm,the LCD will show ”SET 8 LCD”.
Press SET to enter into the menu.
The LCD will show: LCd 3
Use UP or DN button to change the LCD brightness.
Press SET to confirm and press DEL to exit.
Total: 5 levels
Pg. 5
Normal Operation
Review caller list
In on hook or off hook, press button UP OR DN to view the calls
backwards/ forward.
When it is up to the last record,it will show “---- END----”.
When new incoming call comes ,the LCD will display “NEW” icon, when the
incoming call is a repeated number,the LCD will display “REP” icon.
Review the outgoing calls
In on-hook or off-hook,
Press OUT button continually to view the outgoing callls list.
To make a call from the calls memory.
In on-hook,press UP or DN/OUT buttons to select the number
Press SPK button or pick up the handset to dial out the number.
VIP function
When reviewing incoming calls or outgoing calls,press VIP to save it as
a VIP number.
And the VIP icon will come out,indicating the number is the VIP number.
Press VIP button again to cancel its VIP icon.
Note:VIP number cannot be deleted.
To make a call from the calls memory
In on-hook,press UP or DN/OUT buttons to select the number
Press SPK button or REDIAL or pick up the handset to dial out the number.
Predialing
In on-hook enter the phone number to be called, then press the
REDIAL button to dial out the number.
Press the DEL to delete the current wrong number.
Delete numbers
In on-hook or off-hook
Press UP or DN or OUT buttons to select the number to be deleted
Press the DEL button and then it will be deleted.
Press the DEL and hold it for 3 seconds to delete all the incoming
call or outgoing call numbers.
Pg. 6
One Touch memory --M1
STORE:
On hook,input number or review incoming calls,press SET button and the
LCD will display “STORE IN”,press M1 button to save it.
Make a call:
On hook or off hook,press M1 buttom and dial out the number automatically.
Auto Redial
In speaker mode if the line is busy, press REDIAL button to Autoredial the number..The phone will ring when the line is free.
The interval time is 6 seconds,press any button to stop the autoredialing.
The phone will keep on autoredialing until it is connected.
After seventh rings,the phone will be cut off automatically.
Automatic timer
On conversation, the LCD displays “00-00”.The timer will start when
the line is not busy. The LCD will keep displaying the conversation
time for 3sec after the call ends.
HOLD function
During conversation, press HOLD button and the phone will play
music to other side.And you can put away the handset
Pick up the handset or press SPK to resume conversation.
Pulse/Tone dialing mode switch
Slide the switch at PULSE or TONE position to choose the pulse or
tone dialing mode.
Ringer volume switch
Silde the switch at HIGH or LOW position to adjust the ringer vome
higher or low.
Key lock
Open:When the Arrow points at Red point,it is open for all calls.
Close:When the Arrow points at Green point, all calls cannot be dialed out
Pg. 7
Pg. 8
PA-7600 - Manual del Usuario
Gracias por la compra de su Teléfono de Mesa/Pared PANACOM PA7600. Por favor lea este manual cuidadosamente antes de utilizar
este Teléfono, para seguir las mejores pautas tendientes a ofrecer
el mejor servicio.
Características
- 10 memorias de llamadas saliente con 18 digitos y hora
- 30 memorias de llamadas entrantes con 12 dígitos y fecha y hora
- Filtro de código de área local de 5 dígitos para las llamadas
- 8 ringtones seleccionable para las llamadas entrantes
- PBX-código 1digit entrantes / Función de Autoredial
- Pulso/tono cambiable
- Ajuste de alarma
Preparando su teléfono antes de usar
La instrucción para los usuarios describe brevemente los procedimientos de instalación y todas las características del built-in.
Instalación
1) Coloque el teléfono en un seco, una ventilación y no-erosione el
lugar del gas.
2) Aplique el servicio de la identificación de llamador de su telecomunicación local o en esta función. Es un teléfono de múltiples funciones
incluso ninguna función de la identificación de llamador.
3) Conecte un extremo de la cuerda en espiral para fijar a mano y para
conectar el otro extremo con el conector del auricular.
4) Conecte el un extremo de la línea cuerda con el conector en la unidad baja, y el otro extremo con el enchufe de pared para el teléfono.
5) Tome el auricular y usted oirá el eco del cambiador o del PABX. Eso
significa que el teléfono esta listo para usar.
Ajuste del menú
Colgado, presione el botón SYSTEM para incorporar el estado de
configuracion, los displays del LCD “FIJAN 1: FECHA”,presione HACIA ARRIBA O HACIA ABAJO el botón para repasar otros ajustes,
presionar FIJADA otra vez para comenzar este ajuste.
Pg. 9
Después de finalizar el ajuste, presione SYSTEM para guardar y para
ir al ajuste siguiente.
En relación con todo el ajuste siguiente del menú, presione SYSTEM
para entrar y excepto, presione HACIA ARRIBA O HACIA ABAJO para
cambiar los valores de ajuste, presione el botón DEL para salir.
Ajuste de Fecha y Hora
En el menú El LCD visualizará : FIJE 1 FECHA Presione SYSTEM otra
vez hasta que el display LCD destellará ” 2003” (para comenzar a
setear el año).
Utilice hacia arriba o hacia abajo el botón para ajustar el año correcto/
mes /Dia/Hora/Minuto. Entonces presione el botón SET para confirmar y para guardar la fecha correcta y hora. Configuración de código
de área local Después de fijar el date& el tiempo, LCD visualizará que
“FIJE EL CÓDIGO 2” Presione SYSTEM para entrar en el menú. El
LCD visualizará : CÓDIGO - - - - Utilice hacia arriba o hacia abajo el botón para fijar los dígitos del
código de área Entonces presione el botón SET para confirmar y para
fijar el código de área.
Ajuste del Código PABX
Después de fijar el código de área local, el LCD visualizará que “FIJE 3
PCODE” Presione SYSTEM para entrar en el menú El LCD visualizará
: PCODE --, El uso hacia arriba o hacia abajo abotona va a fijar el código del PABX. Entonces presione el botón SET para confirmar y para
ir al ajuste siguiente. Nota: Después de fijar el PCODE, al llamar detrás
las llamadas entrantes, el teléfono marcará hacia fuera los números
con el código del PABX automáticamente.
Configuracion de IP
Después del ajuste del código del PABX, el LCD visualizará que “4:
FIJAR IP AUTO”
Presione SYSTEM para entrar en el menú El LCD visualizará: IP AUTO
APAGADO.
Utilice hacia arriba o hacia abajo el botón para girar el ajuste.
Presione el botón SET y el LCD exhibirá: ENTER CODE (Ingrese código).
Entre No. del IP de la tarjeta de Nr del IP y su contraseña.
Entonces presione el botón SET para confirmar y para ir al ajuste siguiente.
Nota: Después de la función auto del IP del ajuste, al llamar detrás
Pg. 10
o predialing, si el primer dígito del número es “0”, el teléfono marcará
hacia fuera el IP ningún primer automáticamente.
Ajuste de Modo del P-T (Pulso-Tono)
Después del IP AUTO del ajuste, el LCD visualizará que “FIJE 5 P-T”
Presione SYSTEM para entrar en el menú El LCD visualizará : TONO.
Utilice hacia arriba o hacia abajo el botón para cambiar el ajuste al
modo de marca del pulso. Entonces presione el botón SET para confirmar y para ir al ajuste siguiente
Modo de marcado y ajuste (Pulso Tono)
Del ajuste Después del IP AUTO del ajuste, el LCD visualizará que
“FIJE 5 P-T”
Presione SYSTEM para entrar en el menú El LCD visualizará : TONO.
Utilice hacia arriba o hacia abajo el botón para cambiar el ajuste al
modo de marca del pulso. Entonces presione el botón SET para confirmar y para ir al ajuste siguiente.
Ajuste de Alarma
Después de modo de marca de la pinta del ajuste, el LCD visualizará
que “6 SET THE ALARM (FIJE LA ALARMA) ” Presione SYSTEM para
entrar en el menú El LCD visualizará : ALAR OFF (apagado), Utilice
hacia arriba o hacia abajo el botón para el ajuste de alarma. Presione
SYSTEM para confirmar y para ir a fijar el ajuste siguiente.
Configuración de tiempo alerta
Después del ajuste de alarma, el LCD visualizará “FIJE LA ALARMA 7”
Presione SYSTEM para entrar en el menú El LCD visualizará : 1 00-00
APAGADO (primera alarma, HH-MM, off/on),
Utilice hacia arriba o hacia abajo el botón para elegir el primer/el segundo/tercero alarma y luego SYSTEM , presionar para incorporar el ajuste.
Presione hacia arriba o hacia abajo para ajustar el tiempo de la alarma. Presione SYSTEM para confirmar y para ir al ajuste siguiente.
Nota: Cuando la alarma está encendida, sonará durante 1 minuto,
presione cualquier botón para parar el sonar. La primera y segunda
alarma es intermitente, solo la tercera es permanente.
Pg. 11
Configurando LCD
Luego de configurar la alarma el display mostrará
”SET 8 LCD”.
Presione SET para entrar al menú
El LCD mostrará: LCD 3
Use UP o DN para cambiar el brillo y contraste del display LCD.
Presione SET para confirmar y presione DEL para salir.
Total: 5 niveles
Función VIP
Cuando revise llamadas entrants o salientes, presione VIP para guardarlas como número VIP, y el icono VIP aparecerá indicando que es un
número VIP.
Presione el boton VIP de Nuevo para cancelar el icono VIP.
Nota:el número VIP no puede ser borrado.
Memoria Rápida Función M1
GUARDAR:
Con el teléfono colgado, ingrese el número o revise llamadas entrantes, presione botón SET y el LCD mostrará “STORE IN”,presione botón M1 para guardar.
Hacer una llamada:
Con el auricular colgado o descolgado, presione el botón M1 y el número
se marcará automáticamente.
Abierto: Cuando la flecha apunta al color rojo, esta abierto a discar
todo tipo de llamadas.
Cerrado: Cuando la flecha apunta al color verde, está bloqueado para
discar todo tipo de llamadas
Operación normal
Lista de remitentes en el Caller ID
Con el teléfono colgado, pulse el botón HACIA ARRIBA O HACIA
ABAJO para ver las llamadas y los remitentes. Cuando haya llegado
al limite, visualizará “----END (Fin)----”. Cuando viene la nueva llamada
entrante, el LCD exhibirá el icono “New (nuevo)” icono, cuando la llamada entrante es un número repetido, el LCD exhibirá el icono del “rep”.
Pg. 12
Repase las llamadas salientes
Con su equipo colgado o descolgado,
Extraiga el botón continuamente para ver la lista saliente de los calls.
Para hacer una llamada de la memoria de las llamadas
Colgada, presione hacia arriba o hacia abajo los botones de OUT para
seleccionar el número Presione el botón de SPK o tome el auricular
para marcar hacia fuera el número.
Prediscado con el telefono colgado
Incorpore el número de teléfono que se llamará, después presione el
botón CALLBACK para marcar hacia fuera el número. Presione el DEL
para suprimir el número incorrecto actual.
Configuración de los timbres
Con el auricular colgado, el botón del ASIMIENTO de la presionar
(TIMBRE) y el LCD exhibe el timbre actual, presionar hacia arriba o
hacia abajo para seleccionar el timbre que usted quiere.
Eliminando o Cancelando Números
Con el auricular colgado o descolgado
Presione hacia arriba o hacia abajo o HACIA FUERA abotona para
seleccionar el número para ser suprimido Presione al DEL button y
entonces será suprimido. Presione el DEL y sosténgalo por 3 segundos para suprimir todos los números de la llamada entrante o de llamada saliente.
Autorediscado
En modo del altavoz, si la línea está ocupada, presione el botón “redial” para volver a marcar el número. El teléfono sonará cuando la
línea está libre. El tiempo del intervalo es 6 segundos, presiona cualquier botón para parar el autorediscado. El teléfono guardará en autorediscado hasta que esté conectado. Después del séptimo timbre, el
teléfono será cortado automáticamente.
Contador de tiempo automático
En la conversación, el LCD exhibe “00-00”. El contador de tiempo comenzará cuando la línea no está ocupada. El LCD guardará el exhibir de
la época de la conversación para 3sec después de finalizada la llamada.
Pg. 13
Pg. 14
INTERNATIONAL WARRANTY
Terms and Conditions
1. PANACOM warrants the operation of this product to be free from
any manufacturing and/or material defect for a period of 12 months
from the date of purchase by the user.
2. This warranty is limited to the repair and/or replacement of this
product, according to our own criterion, free of charge within the
stipulated term and it does not extend to consequential or incidental
damages to other products that may be used with this unit.
3. The warranty shall be voided in the following cases: a) repair or
attempt to repair by third parties not authorized by the company. b)
in case of performing any type of cut in connection cables, plugs,
connectors, or other adapters different from the original ones provided by the company.
4. To make this warranty effective, you shall contact the Authorized
Service Center of your country and they shall carry out the pertinent procedure; said information is available at www.panacom.com.
In order to start the necessary procedure to get said warranty, you
shall hand in the Original Purchase Invoice where the purchase date,
dealer name and product identification shall be stated clearly.
5. Transportation, freight, stay and/or insurance expenses, if any, are
not covered by this warranty.
MODEL...................................................................................
SOLD BY.................................................................................
DATE.......................................................................................
PURCHASED BY....................................................................
ADDRESS...............................................................................
STATE..........................................zip code...........................
Pg. 15
Authorized Service Centers:
Argentina
Elese Telefonía
Av. Santa Fé 2393 C1123AAF, C.A.B.A
Phone: (54 11) 45 82 66 38
Fax: (54 11) 45 82 76 96
E-mail: [email protected]
Spain
Infotronics S.L.
Calle del Pozo nº 121 - Valencia
Phone: (34) 96-1309045
Fax: (34) 96-1394267
E -mail: [email protected]
Bolivia
Microtek S.A.
Av. Piraí 1320 – La Paz
Phone: (591-3) 35158244
Fax: (591-3) 3145491
E-mail: [email protected]
Mexico
Artizen S.A.
AV. Francisco J. Clavijero 448 Ed. I Desp.
103, Transito - C.P06820 , Cuauhtemoc, DF
Phone:(55) 4202-7433 Fax:(55) 4202-7498
E-mail: [email protected]
Brazil
Alzyon Sistemas Ltda.
Alameda Itapecuru, 1245, S. 829 - Sao Paulo
Phone: (55) 4195-3232 Fax: (55) 4195-3280
E -mail: [email protected]
Peru
Distribuciones Americanas S.A.
Av. Alejandro Tirado 537 - Santa Beatriz - Lima
Phone:(51) 332-4821 Fax:(51) 332-4878
E-mail: [email protected]
Canada
Smart Electronics
A150 Ferrier Street- Markham, Ontario
L3R 2Z5
Phone: (1) 905-480-0443
Fax: (1) 905-946-9722
E -mail: [email protected]
Uruguay
Sammel S.A.
Arturo Lezama 2061 C.P. 11.800 - Montevideo
Phone: (598 2) 929 0000
Fax:(598 2) 929 0010
E-mail: [email protected]
Chile
Importaciones y Exportaciones X-Tech Ltda.
San Alfono 637, Santiago de Chile
Phone/Fax: (56 2) 689-1721
E -mail: [email protected]
Pg. 16
USA
Amaury International Corp
7286-90 NW 70th Street - Miami, FL 33166
Phone: 1(305) 887-7100
Fax: 1 (305) 887-9177
E -mail: [email protected]
GARANTIA INTERNACIONAL
Términos y Condiciones
1. PANACOM garantiza el funcionamiento de este producto ante cualquier defecto de fabricación y/o vicio de material por el término de 12
meses contado a partir de la fecha de compra por parte del usuario.
2. Esta garantía se limita a la reparación y/o reemplazo de este producto, a nuestro criterio, sin cargo alguno dentro del plazo de vigencia y no se extiende a daños concecuentes o incidentales hacia
otros productos que fueran utilizados con esta unidad.
3. La garantía queda anulada ante: a) reparación o intento de reparación por terceros no autorizados por la compañía. b) en el caso de
realizar cualquier tipo de corte de los cables de conexión, fichas, conectores, u otros adaptadores distintos de los originales de fábrica.
4. Para hacer valer esta garantía se deberá remitir al centro de servicios autorizado de su país quienes gestionarán la misma, dicha
información se encuentra www.panacom.com. Para gestionar dicha
garantía deberá presentar la Factura Original de compra en la cual
deberá constar claramente la fecha de compra, nombre del comercio e indentificación del producto.
5. No quedan cubiertos por esta garantía gastos de traslado, flete,
estadía, y/o seguro si los hubiera.
MODELO..................................................................................
VENDIDO POR........................................................................
FECHA.....................................................................................
COMPRADO POR...................................................................
DOMICILIO..............................................................................
LOCALIDAD............................................CP............................
Pg. 17
Centro de Servicios Autorizado:
Argentina
Elese Telefonía
Av. Santa Fé 2393 C1123AAF, C.A.B.A Phone:
(54 11) 45 82 66 38
Fax: (54 11) 45 82 76 96
E-mail: [email protected]
Spain
Infotronics S.L.
Calle del Pozo nº 121 - Valencia
Phone: (34) 96-1309045
Fax: (34) 96-1394267
E -mail: [email protected]
Bolivia
Microtek S.A.
Av. Piraí 1320 – La Paz
Phone: (591-3) 35158244
Fax: (591-3) 3145491
E-mail: [email protected]
Mexico
Artizen S.A.
AV. Francisco J. Clavijero 448 Ed. I Desp.
103, Transito - C.P06820 , Cuauhtemoc, DF
Phone:(55) 4202-7433 Fax:(55) 4202-7498
E-mail: [email protected]
Brazil
Alzyon Sistemas Ltda.
Alameda Itapecuru, 1245, S. 829 - Sao Paulo
Phone: (55) 4195-3232 Fax: (55) 4195-3280
E -mail: [email protected]
Peru
Distribuciones Americanas S.A.
Av. Alejandro Tirado 537 - Santa Beatriz - Lima
Phone:(51) 332-4821 Fax:(51) 332-4878
E-mail: [email protected]
Canada
Smart Electronics
A150 Ferrier Street- Markham, Ontario L3R 2Z5
Phone: (1) 905-480-0443
Fax: (1) 905-946-9722
E -mail: [email protected]
Uruguay
Sammel S.A.
Arturo Lezama 2061 C.P. 11.800 - Montevideo
Phone: (598 2) 929 0000
Fax:(598 2) 929 0010
E-mail: [email protected]
Chile
Importaciones y Exportaciones X-Tech Ltda.
San Alfono 637, Santiago de Chile
Phone/Fax: (56 2) 689-1721
E -mail: [email protected]
USA
Amaury International Corp
7286-90 NW 70th Street - Miami, FL 33166
Phone: 1(305) 887-7100
Fax: 1 (305) 887-9177
E -mail: [email protected]
Pg. 18
Pg. 20