1
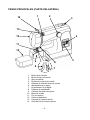
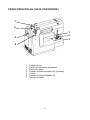
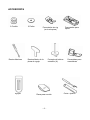
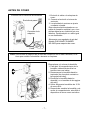
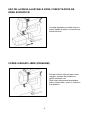
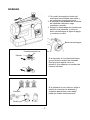
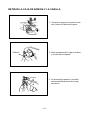
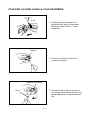
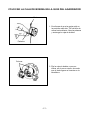
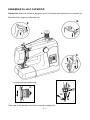
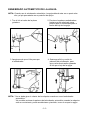
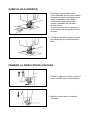
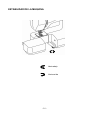
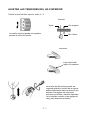
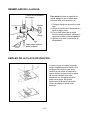
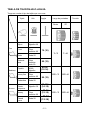
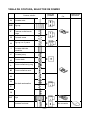
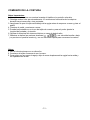
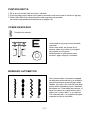
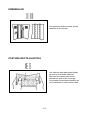
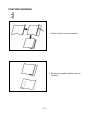
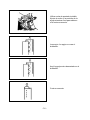
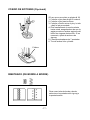
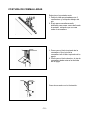
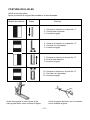
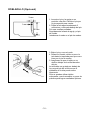
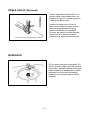
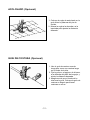
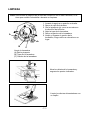
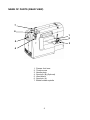
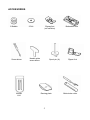
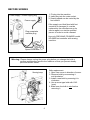
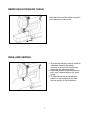
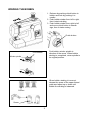
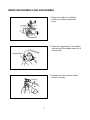
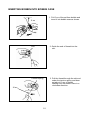
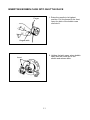
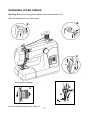
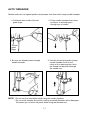
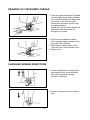
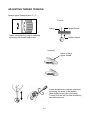
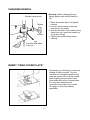
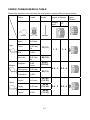
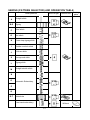
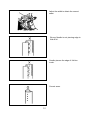
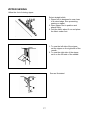
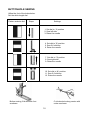
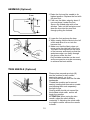
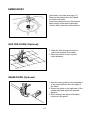
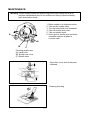
Manual del Usuario
Modelo: 23011Y
Por favor lea atentamente las instrucciones del manual del usuario para
asegurar un correcto funcionamiento de la unidad y consérvelo para
futuras consultas.
Instrucciones importantes de seguridad
Cuando utilice un aparato eléctrico, se deben respetar siempre ciertas precauciones básicas de seguridad,
incluyendo las siguientes :
Lea todas las instrucciones antes de utilizar esta maquina de coser
PELIGRO- Para reducir el riesgo de descargas eléctricas :
Nunca se debe dejar desatendido un aparato que este enchufado a la corriente eléctrica. Desenchufe siempre
este aparato de la toma eléctrica inmediatamente después de su utilización y antes de limpiarlo.
ADVERTENCIA- Para reducir el riesgo de quemaduras, incendios, descargas eléctricas, o lesiones
personales :
1- No permita que sea utilizado como un juguete. Cuando este aparato es utilizado por, o cerca de, niños, es
necesario prestar especial atención.
2- Utilice este aparato solo para el uso al que se la destina, tal como se describe en este manual. Utilice
únicamente los accesorios recomendados por el fabricante que se incluyen en este manual.
3- No utilice nunca este aparato si el cable o el enchufe están dañados, si no funciona correctamente, si se
ha dejado caer o ha sufrido algún daño, o si ha sido sumergido en agua. Devuelva el aparato al servicio
técnico autorizado mas cercano para que sea examinado, reparado o ajustado mecánica o eléctricamente.
4- No utilice nunca el aparato si los orificios de ventilación están bloqueados. Mantenga los orificios de
ventilación de la maquina de coser y del pedal de control sin acumulaciones de hilo, polvo y fragmentos de
tela.
5- Nunca deje caer o introduzca ningún objeto en ninguna abertura.
6- No lo utilice al aire libre.
7- No utilice nunca este aparato en lugares donde se estén utilizando productos en aerosol (spray) o donde
se este administrando oxigeno.
8- Para desconectarlo, apague todos los controles (posición “O”) y después desconecte el enchufe de la
toma de corriente.
9- No desenchufe el aparato tirando del cable. Para desenchufar, tire del enchufe, no del cable.
10- " Si el cable de alimentación esta dañado, debe ser reemplazado por el fabricante, su agente de servicio o
persona calificada para evitar peligros."
11- " No utilizar al aire libre."
12- " Este aparato no está pensado para ser utilizado por personas (incluidos niños) con capacidades físicas,
sensoriales o mentales disminuidas, a menos que reciban instrucciones por una persona responsable de
su seguridad."
13- " Utilice únicamente los accesorios recomendados por el fabricante, que se incluyen en este manual."
PELIGRO
1- Desenchufe siempre el aparato antes de cambiar la bombilla. Reemplace la bombilla con una del mismo
tipo, homologada para 15 watt.
2- No intente tomar un aparato que haya caído al agua. Desenchúfelo inmediatamente.
3- No coloque o guarde el aparato en un lugar donde pueda caerse o ser empujado dentro de una bañera o
lavabo. No ponga o deje gotear agua u otro liquido sobre el aparato.
4- El cable de alimentación no puede ser reemplazado. Si se daña, el aparato debe ser desechado.
5- Este aparato no esta pensado para ser utilizado por personas (incluidos niños) con capacidades físicas,
sensoriales o mentales reducidas, falta de experiencia o conocimiento, a menos que sean supervisados o
instruidos acerca del uso por una persona responsable.
6- Apague o desenchufe el aparato cuando no lo utilice.
ADVERTENCIA
1- Mantenga los dedos alejados de las piezas en movimiento. Se debe prestar especial atención en las
proximidades de la aguja.
2- Utilice siempre una palca de aguja adecuada. Una placa incorrecta puede causar la ruptura de la aguja.
3- No utilice agujas dobladas.
4- No tire de la tela o la empuje mientras cosa a maquina. Puede desviar la aguja y romperla.
5- Apague (“O”) la maquina de coser del toma eléctrico cuando retire las cubiertas, lubrique el aparato, o
cuando realice cualquier otro ajuste mencionado en el manual de instrucciones.
6- No utilice nunca el aparato sobre una superficie blanda, tal como un sofá, donde los orificios de ventilación
queden bloqueados.
-1-
Indicaciones de seguridad
Advertencia contra daños
personales y materiales:
Con una máquina de coser pueden sufrirse
heridas e incluso peligro de muerte como con
cualquier otro aparato eléctrico.Para evitarlo y para
trabajar de forma segura:
La ley le hace a Ud., como usuario de aparatos
eléctricos, corresponsable de prevenir posibles
accidentes mediante un comportamiento
consciente de la seguridad:
• Lea cuidadosamente estas instrucciones de uso
antes de la primera puesta en funcionamiento de
su máquina de coser.
• Mantenga siempre ordenada su zona de trabajo.
El desorden en la zona de trabajo puede ser
causa de accidentes.
• Guarde las instrucciones de uso en un lugar
adecuado, cerca del aparato. Entregue estas
instrucciones de uso al traspasar el aparato
terceros.
• Durante el trabajo procure una buena
ventilación.
• Extraiga siempre la clavija de red, cuando deje
sola la máquina.De este modo evitará accidentes
debido a la conexión imprevista.
• No lleve ropa suelta ni joyasya que podrían ser
atrapadas por piezas móviles. Por ello
también, si tiene el cabello largo, utilice una
redecilla para el pelo.
• Desenchufe primero el conector de red, antes de
cambiar la lámpara incandescente o de realizar
trabajos de mantenimiento en la máquina. De este
modo evitará el peligro de muerte por
electrocución.
• Evite mantener una postura corporal forzada.
Mantenga siempre una posición segura y un
buen equilibrio.
• ¡Tenga precaución!Preste atención a lo que haga.
Guíese siempre por el sentido común durante el
trabajo. No utilice nunca la máquina de coser si no
está concentrado o no se encuentra bien.
• No desenchufe el conector de red de la base de
enchufe tirando del cable. Para desenchufar tire
del conector, no del cable.
El fabricante no asume ninguna responsabilidad por
los accidentes que puedan producirse debido a falta
de precaución al manejar el aparato o por no
tenerse en cuenta las instrucciones de seguridad
del manual.
• Utilice siempre la máquina de coser sólo en
espacios secos.
• Si existen daños visibles en la máquina de coser
o en interruptor de pedal: Haga que los repare el
Servicio al cliente antes de utilizar de nuevo la
máquina de coser.
Si la cuerda de suministro que está fijado con el
regulador del pie está dañado, será reponido por el
fabricante o por su agencia de servicio o por una
persona cualificada similar para evitar el peligro.
• No permita que manejen la máquina niños o
personas delicadas sin supervisión – estas
personas no pueden valorar siempre
correctamente los posibles peligros. Mantenga
siempre los aparatos eléctricos fuera del alcance
de los niños.
• Nunca accione la máquina con los orificios de
ventilación bloqueados. Mantenga los orificios de
ventilación de la máquina, así como el interruptor
de pedal, libre de hilos, polvo y restos de tejido.
• Esta aparato no está destinado el uso por las
personas (incluido niños) que estan a escasez de
capacidades físicales, sensoriales o mentales, o
falta de experiencia y conocimiento, a menos que
ellos recibieron una super intendencia or
instrucción relacionada al uso del aparato de la
persona que él se responsabiliza de sus
seguridades.
• Niños deben ser vigilado para asegurar que ellos
no esten jugaando la aparato.
-2-
CONTENIDO
Piezas principales ..................................................................................... 4-5
Accesorios...................................................................................................... 6
Antes de coser ............................................................................................... 7
Uso de la mesa ajustable para coser tejidos de gran superficie ................... 8
Coser a brazo libre (freearm) ......................................................................... 8
Bobinar...........................................................................................................9
Retirar la caja de bobina y la canilla ............................................................ 10
Colocar la canilla en la caja de bobina ........................................................ 11
Colocar la caja de bobina en la guía del agarrador..................................... 12
Enhebrar el hilo superior.............................................................................. 13
Enhebrado automatico de la aguja .............................................................. 14
Subir el hilo inferior ...................................................................................... 15
Cambiar la dirección de costura .................................................................. 15
Estabilidad de la máquina............................................................................ 16
Ajustar las tensiones del hilo Inferior ........................................................... 17
Reemplazo de la aguja ................................................................................ 18
Empleo de la placa de zurcido..................................................................... 18
Tabla de tejidos-hilo-aguja........................................................................... 19
Tabla de costura, selector de diseño........................................................... 20
Comienzo de la costura ............................................................................... 21
Remate de la costura................................................................................... 22
Puntada recta............................................................................................... 23
Coser en zig-zag.......................................................................................... 23
Bordado automatico..................................................................................... 23
Sobrehilar.....................................................................................................24
Costura recta elástica .................................................................................. 24
Costura invisible......................................................................................25-26
Cosido de botones ....................................................................................... 27
Ribeteado (de borde a borde)......................................................................27
Costura de cremalleras................................................................................ 28
Costura de ojales ......................................................................................... 29
Dobladillo ..................................................................................................... 30
Doble aguja .................................................................................................. 31
Bordados......................................................................................................31
Acolchado .................................................................................................... 32
Guía de costura ........................................................................................... 32
Limpieza.......................................................................................................33
Posibles problemas de funcionamiento y soluciones ..................................34
-3-
PIEZAS PRINCIPALES (PARTE DELANTERA)
1
14
2
3
13
12
4
11
10
9
6
8
7
1.
2.
3.
4.
5.
6.
7.
8.
9.
10.
11.
12.
13.
14.
Botón de la tensión
Botón de tipo de cosido
Stop de canilla
Rueda de longitud de cosido
Palanca de marcha atrás de cosido
Abrazadera de la aguja
Enehebrador de la aguja
Palanca de enhebrado
Cubierta del brazo de ajuste
Base de cosido
Pie de costura
Cubierta delantera
Palanca de compensación
Guía de hilo de rosca superior
-4-
5
PIEZAS PRINCIPALES (VISTA POSTERIORE)
7
6
1
2
5
3
4
1.
2.
3.
4.
5.
6.
7.
Palanca del pie
Tornillo que afianza la abrazadera
Placa de la aguja
Portador de bobina extraíble (B) (Opcional)
Volante
Portador de bobina extraíble (A)
Huso de la bobina
-5-
ACCESORIOS
2 Canilla
Destornilladores
Agujas
2 Fieltro
Prensatelas ziz zig
(en la máquina)
Destornillador de la
placa de aguja
Portador de bobina
extraíble (A)
Placa para zurcido
-6-
Prensatelas para
ojales
Prensatelas para
cremalleras
Corta - ojales
ANTES DE COSER
1. Enchufe el cable a la máquina de
coser.
2. Conecte el enchufe a la toma de
corriente.
3. La velocidad de costura se ajusta
mediante el pedal.
Esta máquina está equipada con un
cable de conexión especial, que, si se
dañara debería ser sustituido por otro
idéntico. Podrá adquirir un cable igual
en su distribuidor.
Conexión de la fuente de alimentación
Enchufe de pared
Conexión de la
máquina
Solamente usa regulador de pie del
Modelo ZHEJIANG FOUNDER
KD-2902 para maquina de coser.
Pedal
Nota: Desconecte la máquina de la toma de corriente si no se está utilizando, si se
tiene que sustituir la bombilla o durante su limpieza.
Reemplazar y/o colocar la bombilla.
1. Para abrir el compartimiento de la
bombilla, deberá destornillar los
tornillos como se indica.
2. Desenrosque la bombilla hacia la
izquierda (en el sentido contrario a
las agujas del reloj).
3. Enrosque la bombilla hacia la
derecha ( en el sentido de las agujas
del reloj).
4. Utilice solamente bombillas de 15 W
de rosca E14.
5. Después de cambiar la bombilla y de
cerrar el compartimiento, atornillar el
dispositivo de cierre como se indica.
-7-
USO DE LA MESA AJUSTABLE PARA COSER TEJIDOS DE
GRAN SUPERFICIE
La mesa ajustable se puede colocar o
retirar tirando de ella en el sentido que
indica la flecha.
COSER A BRAZO LIBRE (FREEARM)
El brazo libre es indicado para coser
mangas, costuras de pantalones,
tejidos tubulares, etc.
Para coser tales piezas desplácelas
sobre el brazo libre, como se indica en
la ilustración.
-8-
BOBINAR
1. Por medio de empujar el botón del
embrague hacia bobina para soltar y
por empujarlo a aguja pra cerrar.
2. Al empujar la devanadera de la bobina
de izquierda a derecha, luego
comienza a enrollar.
3. Empuje la devanadera de la bobina de
derecho a la izquierda, y mover el
botón del embrague al signo de aguja,
y comienza a coser.
Botón del embrague
5 centímetros de hilo
Carrete
A la izquierda, en la cubierta del brazo
se encuentra la tensión de bobinado.
Ésta se puede ajustar como se
describe, si la máquina no enrollara de
manera uniforme.
Si el bobinado no es uniforme, afloje el
tornillo de la tensión de bobinado y
colóquelo para arriba o para abajo
hasta que bobine uniformemente.
Correcto
Tornillo
-9-
RETIRAR LA CAJA DE BOBINA Y LA CANILLA
1. Coloque la aguja en la posición más
alta y abra la cubierta del ajuste.
Palanca
2. Abra la palanca de la caja de bobina
y retírelo de la máquina.
3. Si usted deja la palanca, la canilla
caerá automáticamente de la caja
de bobina.
- 10 -
COLOCAR LA CANILLA EN LA CAJA DE BOBINA
5 cm
1. Cuando coloque la canilla en la
caja de bobina, deje 5 centímetros
de hilo de rosca de más. ( Véase
ilustración).
Ranura
2. Conduzca el extremo del hilo de
rosca por la ranura.
Resorte de tensión
3. Tire del hilo de rosca por la ranura y
por debajo del muelle de tensión y tire
aproximadamente 10 centímetros de
hilo.
10 cm
- 11 -
COLOCAR LA CAJA DE BOBINA EN LA GUÍA DEL AGARRADOR
Dedo
1. Cerciórese de que la aguja esté en
la posición más alta. Tire del hilo de
rosca hacia delante. Abra la palanca
y sostenga la caja de bobina.
Palanca
Colocar
2. Fije la caja de bobina, como se
indica, en el perno medio, de modo
que el dedo agarre al insertar en la
hendidura.
- 12 -
ENHEBRAR EL HILO SUPERIOR
Precaucion: Antes de enhebrar, asegurar que el interruptor principal este en la posicion (o).
Enhebre el hilo según se indica de A-H.
B
E
A
B
C
E
D
D
H
F
G
La aguja melliza enhebrando.
F
C
H
G
Para usar el enhebrador automático consulte la página 14.
- 13 -
ENHEBRADO AUTOMATICO DE LA AGUJA
NOTA: Cuando use el enhebrador automático, la aguja deberá estar en su punto más
alto y el pie prensatelas en su posición de apoyo.
2. Presione la palanca enhebradora
hasta su punto más bajo, para
permitir que el enhebrador pase a
través del ojo de la aguja.
1. Tire el hilo a través de la placa
guiadora.
Placa guia
hilo
3. Asegúrese de que el hilo pasa por
el enhebrador.
4. Sostenga el hilo y suelte la
palanca del enhebrador, para
que vuelva hacia arriba pasando
el hilo por el ojo de la aguja.
NOTA: * No se debe girar el volante de la máquina cuando se usa el enhebrador
automático.
* No se debe accionar la palanca del enhebrador automático cuando la máquina
está en movimiento, puede accidentarse y también, torcer ó romper la aguja.
- 14 -
SUBIR EL HILO INFERIOR
1. Sostenga el hilo superior con la
mano izquierda, gire la rueda volante
lentamente hacia usted hasta que la
aguja se desplace hacia abajo y
nuevamente hacia arriba. Pare
cuando el donador de hilo esté
situado arriba.
Tire suavemente del hilo superior y
el hilo inferior se recogerá en forma
de lazo.
2. Tire de los dos hilos y guíelos juntos
por debajo del pie de costura hacia
atrás.
CAMBIAR LA DIRECCIÓN DE COSTURA
1. Pinche la aguja en el tejido y eleve el
pie de costura. Dé la vuelta al tejido.
2. Baje el pie de costura y continúe
cosiendo.
- 15 -
ESTABILIDAD DE LA MÁQUINA
Hacia abajo
Hacia arriba
- 16 -
AJUSTAR LAS TENSIONES DEL HILO INFERIOR
Tensión normal del hilo superior: entre 3 – 5
Correcto
Tejido
Hilo superior
La tensión máxima puede ser regulada
girando el botón de tensión.
Hilo inferior
Incorrecto
Lado interior del
tejido, hilo superior
La tensión del hilo inferior puede ser
regulada girando el tornillo de la caja de
bobina ligeramente hacia la derecha (en
sentido a las agujas del reloj) para
aumentar la tensión y hacia la izquierda
(en el sentido contrario a las agujas del
reloj) para disminuir la tensión.
- 17 -
REEMPLAZO DE LA AGUJA
Tornillo de abrazadera
de la aguja
Precaucion: Antes de cambiar la
aguja, asegurar que el interruptor
principal este en la posicion (o).
1. Ponga la aguja en la posición más
alta.
2. Afloje el tornillo de la abrazadera y
quite la aguja vieja.
3. Con el lado plano de la aguja
hacia la parte posterior, coloque la
aguja tan arriba como sea posible.
4. Apriete muy bien el tornillo de la
abrazadera.
Apretar
Aflojar
Lado plano hacia la
parte posterior
EMPLEO DE LA PLACA DE ZURCIDO
A veces lo que se quiere es poder
dirigir completamente el tejido. Gire
la aguja a la posición más alta y
levante el pie sobre la placa de la
aguja, donde los pernos de la placa
de zurcido tendrán que estar
alineados con los agujeros de la
placa de la aguja. Así podrá
determinar la dirección del tejido.
Véase la página 27 para coser
botones.
- 18 -
TABLA DE TEJIDOS-HILO-AGUJA
Tenga en cuenta el tipo de tejido que va a usar.
Tejido
Hilo
Aguja
Largo de puntadas
Recto
ZZ
Elección de puntada
Fino
Nylon
Algodón 80
Tricot
Fibra
sintética 60
Seda
Seda 50
Seda de
lana
Fibra
sintética.
seda 50
Popelín
60-80
Algodón
Jersey fino
Fibra
sintética 60
Gabardina
Seda 50
Denim,
vaqueros
Algodón 50
Jersey
Fibra
sintética 50
Tweed
Lana
Seda 50
Mediano
Grueso
70 (10)
1-3
1-4
0.5 - 3
0.5 - 4
0.5 - 3
0.5 - 4
80 (12)
80-90
(12-14)
80 (12)
90-100
(14-16)
80-90
(12-14)
80-90
(12-14)
- 19 -
Tensión
TABLA DE COSTURA, SELECTOR DE DISEÑO
Largo de
puntada
Costura, diseño
A
B-E
Pie
Puntada recta
Zig-zag
F
Costura oculta borde
ciego
G
Puntada roma
H
Zig-zag con 3 pasos
I
Puntada doble de
sobrehilar
J
Puntada jersey
K
Costura batin
L
Costura elástica zig-zag
M
Costura elástica recta
N
O
Bordado automatico
P
Q
R-T
Ojal
Bordado freehand
No necesario
- 20 -
Piastrina per
rammendi
COMIENZO DE LA COSTURA
Notas importantes:
1. Al empezar o terminar una costura levantar el tirahilos a la posición más alta.
2. Retenga ambos hilos aproximadamente 10 centímetros hacia atrás de la máquina
durante las primeras dos o tres puntadas.
3. Asegúrese de que el tejido está debajo de la aguja antes de empezar a coser y pisar el
pedal.
4. Presione el pedal y comience a coser.
5 Pruebe las puntadas en un trozo de tejido de muestra, para así poder ajustar la
longitud de puntada y la tensión.
6. Separar la máquina del sistema eléctrico en caso de dejarla sóla.
7. Mientras se hacne las costuras elasticas (
), use velocidad media o baja
(no presione el pedal al maximo) y no use velocidad rapida para comenzar la costura.
Notas:
1. Gire el volante siempre en su dirección.
2. Conduzca el tejido suavemente con la mano.
3. Para evitar que se rompa la aguja, deje de coser desplazando la aguja hacia arriba y
no dejándola en la tela.
- 21 -
REMATE DE LA COSTURA
1. Cosa hasta el extremo de la costura.
2. Presione el botón de marcha atrás
(reserva) y cosa de 3 a 4 centímetros
hacia atrás.
3. Eleve la aguja a la posición más alta.
4. Levante el pie prensatela y desplace
la tela hacia la parte posterior de la
máquina.
Cortahilos montado en la
máquina de coser
5. Corte los hilos con el cortahilos.
- 22 -
PUNTADA RECTA
1. Es el tipo de cosido más frecuente y utilizado.
2. El pie zig-zag puede usarse tanto para la puntada recta como para el cosido en zig-zag.
3. Para coser telas finas utilice tamaños más pequeños de puntada.
(la elección apropiada está ilustrada en la página 19).
COSER EN ZIG-ZAG
Posición del selector
La puntada en zig-zag es una puntada
universal.
Para coser satén, los puntos de la
costura están muy juntos y la longitud
de puntada es muy corta.
Normalmente se utiliza para coser
iniciales, siglas, dibujos o similares.
BORDADO AUTOMATICO
N
O
P
Las costuras traen una amplia variedad
de aplicaiones decorativas y de utilidad y
son particulamente practicas para telas
hiladas. La costura en onda (N) ees ideal
para cuellos ribeteados punos, manteles,
servilletas etc. Para todas las costuras, el
largo de costura se puede reducir para
lograr una ”costura satin” si se requiere.
Con costuras satin, un respaldo de pepel
mejorara mucho el resultado.
Q
- 23 -
SOBREHILAR
Con estas puntadas se evita que se
deshilen de los bordes.
COSTURA RECTA ELÁSTICA
Use esta puntada para telas tejidas,
de tricot y otras telas elásticas.
Este tipo de costura permite ser
estirada sin que el hilo se rompa.
La puntada recta elástica también es
muy resistente en una costura recta.
- 24 -
COSTURA INVISIBLE
1. Doble el tejido como se muestra.
2. Ejecute la puntada invisible como se
muestra.
- 25 -
Utilice suela de puntada invisible.
Ajuste el ancho y la posición de la
aguja mientras cosa para obtener
una costura correcta.
Incorrecto: La aguja no cose el
dobladillo.
Aquí la aguja entra demasiado en el
dobladillo.
Costura correcta.
- 26 -
COSIDO DE BOTONES (Opcional)
(El uso que zurce plato ve página # 18)
1. Coloque el pie para dirigir la costura.
2. Coloque el pie para botones.
3. Coloque el botón entre el pie y la tela
y baje el pie prensatela.
4. Gire manualmente la rueda volante
hacia usted, asegurándose de que la
aguja penetre en ambos agujeros del
botón sin ninguna obstrucción. Si es
necesario, ajuste la anchura de
zig-zag.
5. Cosa aproximadamente 7 puntadas.
6. Tire de ambos hilos y átelos.
Fósforo
RIBETEADO (DE BORDE A BORDE)
Para coser telas de borde a borde,
seleccione la puntada multi zig-zag o
la puntada smok.
- 27 -
COSTURA DE CREMALLERAS
Seleccione la puntada recta.
1. Doble la tela aproximadamente 2
centímetros y colóquela debajo del
pie.
2. El pie para cremalleras está
diseñado para coser cerca del borde
levantado, evitando que se cosa
sobre la cremallera.
1. Para coser el lado izquierdo de la
cremallera, fije el pie de la
cremallera en el lado izquierdo de la
aguja.
2. Para coser el lado derecho, el pie de
cremallera debe estar a la derecha
de la aguja.
Cosa de acuerdo con la ilustración.
- 28 -
COSTURA DE OJALES
Utilice el pie para ojales.
Ajuste el selector de longitud de puntada en el área deseada.
Modelo del selector
Pasos
Posición
1. Coloque el selector en la posición “1”
2. Cosa el lado izquierdo
3. Levante la aguja
4. Coloque el selector en la posición “2”
5. Cosa de 5 a 6 puntadas
6. Levante la aguja
7. Coloque el selector en la posición “3”
8. Cosa el lado derecho
9. Levante la aguja
10. Coloque el selector en la posición ”4”
11. Cosa de 5 a 6 puntadas
12. Levante la aguja
Corte el agujero del botón con el cortador,
como muestra la figura.
Antes de empezar a coser ajuste el pie
para ojal del botón como muestra la figura.
- 29 -
DOBLADILLO (Opcional)
3 mm
1. Levante el pie y la aguja en su
posición más alta. Cambie el pie por
el pie especial para ruedos.
2. Doble la tela aproximadamente 3
milímetros y colóquela debajo del pie.
Dé unas cuantas puntadas.
Seguidamente levante la aguja y el pie
de cosido.
Introduzca el ruedo en el pie de ruedos.
1 mm
20 mm
3. Baje el pie y cosa el ruedo.
4. Durante el cosido, doble un poco la
tela hacia la izquierda para que corra
bien por el pie de ruedos.
5. Asegúrese de que el tejido no se
deslice debajo de la mitad derecha
del pie.
La tela debe ser guiada por debajo de
la curva del pie de tal forma que el
dobladillo de la tela pueda correr
libremente.
Sólo se pueden utilizar tejidos
adecuados y será necesario un poco de
práctica para lograr resultados óptimos.
- 30 -
DOBLE AGUJA (Opcional)
Colocar segundo portahilos (B) en la
posicion para costura doble como en
la pagina 5, figura 4. colocar aguja con
el lado plano hacia atras.
Enhebre la aguja como si fuera a
coser normal, para ello pase ambos
hilos por las guías hasta la aguja
donde se enhebran por separado.
El ancho de costura no debe exceder
dos tercios de la anchura máxima,
puesto que la aguja podría romperse.
BORDADOS
(El uso que zurce plato ve página # 18)
Aleje el pie de cosido y coloque la placa
de zurcido y bordado. Mueva la tela que
está tensada en el bastidor de bordado
lentamente en la dirección deseada
hasta que se consiga bordar el efecto
deseado.
- 31 -
ACOLCHADO (Opcional)
1. Coloque la regla de acolchado en la
guía sobre la palanca del pie de
cosido.
2. Mueva la regla a la derecha o a la
izquierda para ajustar la distancia
deseada.
GUÍA DE COSTURA (Opcional)
1. Use el guía de costura cuando
tenga que coser una costura larga
en el borde de la tela.
2. Fije la guía en el agujero de la base,
a la derecha del plato de la aguja, y
ajuste la distancia deseada.
3. Asegúrese de que el borde de la
tela toca la guía. Coloque la guía de
costura en ángulo para hacer
costuras en curva.
- 32 -
LIMPIEZA
Nota: Desconecte la máquina de la toma de corriente si no se está utilizando, si se
tiene que sustituir la bombilla o durante su limpieza.
1. Levante la aguja a su posición más alta.
2. Saque la caja de la bobina.
3. Gire el picaporte (a) como se muestra en
la dirección de la flecha.
4. Aleje la tapa de la lanzadera.
5. Saque el gancho de la lanzadera.
6. Limpie y engrase el gancho de la
lanzadera, luego vuelva a colocarla en su
lugar.
A
A
B
C
Limpie la lanzadera
(A) Botón picaporte
(B) Tapa de la lanzadera
(C) Gancho de la lanzadera
Abra la cubierta de la lanzadera y
engrase los puntos indicados.
Limpie los dientes alimentadores con
un cepillo.
- 33 -
POSIBLES PROBLEMAS DE FUNCIONAMIENTO Y SOLUCIONES
Disturbio
Probable causa
- La máquina no cose, sólo el
volante rueda
La tela no se - El selector de largo de puntada
mueve
está en la posición “0”
Solución
- Tire del botón de embrague
- Mueva el selector de 1-4
- Colocación incorrecta de la aguja
- La aguja está doblada
- Hala de la tela
- Uso incorrecto de aguja, hilo y tela
- Coloque la aguja de nuevo
- Cambie la aguja
- No hale de la tela
- Uso correcto de aguja, hilo y tela
- Posición incorrecta del selector de
ancho de zig-zag
- Enhebrado incorrecto
- Demasiada tensión del hilo
superior
- Aguja doblada
- Hendiduras y raspaduras en la
lanzadera
- Mueva el selector a la posición
correcta
- Vuelva a enhebrar correctamente
- Afloje la tensión del hilo superior
- Demasiada tensión del hilo e la
bobina
- Colocación incorrecta de la aguja
- Enhebrado incorrecto
- Polvo e hilo en la lanzadera
- Afloje la tensión del hilo de bobina
Rotura del
hilo de la
bobina
La tela se
ondula
- La tensión es demasiado alta
- La presión del pie de costura es
excesiva
- Uso incorrecto de aguja, hilo y tela
- Vuelva a ajustar la tensión
- Regule la presión del pie de
costura
- Uso correcto de la aguja, hilo y
tela
Rotura de la
aguja
Rotura del
hilo superior
Puckering
- Cambie la aguja
- Cambie la lanzadera o lime las
raspaduras
- Coloque la aguja de nuevo
- Enhebre correctamente
- Limpie la lanzadera
- La tensión demasiado ajustada
- Reset
- La tela incorrecta, aguja y enhebra - La tela correcta, aguja y enhebra
- 34 -
- 35 -
INSTRUCTION BOOK
Model: 23011Y
Safety instructions
Warning against injuries
and material damages:
Like any other electrical device, a sewing machine
can cause serious, even life-threatening injuries.To
avoid this, and in order to work safely:
According to legislation, you as the user of an
electrical appliance are responsible for
preventing possible accidents through
safety-conscious behaviour:
• Before initial use of your sewing machine, read
these operating instructions thoroughly.
• Keep your work space tidy. An untidy workplace
can lead to accidents.
• Keep the operating instructions in a suitable place
near the machine. When passing the appliance on
to others, always enclose the operating instructions.
• Provide adequate lighting when working!
• Always disconnect the power supply when leaving
the machine unattended. This will prevent the risk
of accidents if the machine is switched on
accidentally.
• Do not wear loose clothing or jewellery,as these
can be caught in the moving parts. You should
also wear a hair net if you have long hair.
• Avoid abnormal posture. Remain steady and in
a well-balanced position at all times.
• First pull the power plug before changing the bulb or
performing maintenance work on the machine.
This will prevent possibly life-threatening electric
shocks.
• Be alert! Pay attention to what you are doing.
Always take a rational approach to your work.
Never work with the sewing machine if you are
unable to concentrate or if you are feeling
unwell!
• Do not remove the plug from the socket by pulling
on the cable. Always grip the plug and not the cable
when pulling out the power plug.
If accidents occur as a result of handling the
machine with insufficient care, or failure to follow
the safety instructions in this manual, then the
manufacturer cannot accept liability.
• Only use the sewing machine in dry rooms.
Don’t use the machine in wet condition and location.
• In case of any visible damage on the machine, the
foot switch or the power cable: Have the damage
repaired by Customer Service before using the
sewing machine again.
If the supply cord that fixed with foot controller is
damaged, it must be replaced by the
manufacturer or its service agent or a similar
qualified person in order to avoid a hazard.
• Never let children or elderly persons handle the
machine unsupervised because they may not
properly appreciate the possible dangers. Keep
electrical appliances outside the reach of children.
• Never use the machine when the ventilation
apertures are blocked. Keep the ventilation
apertures of the machine and the foot switch free
from fluff, dust and waste material.
• Don’t let children play with sewing machine.
• Never use the machines if the air went are blocked
keep the air wends free form dust, fusel and
leftovers.
• Never place anything on the foot controller.
• This appliance is not intended for use by persons
(including children) with reduced physical, sensory
or mental capabilities, or lack of experience and
knowledge, unless they have been given
supervision or instruction concerning use of the
appliance by a person responsible for their safety.
• Children should be supervised to ensure that they
do not play with the appliance.
1
CONTENTS
Name of parts .............................................................................................3-4
Accessories.................................................................................................... 5
Before sewing (Power supply and sewing lamp)........................................... 6
Removing extension table.............................................................................. 7
Free-arm sewing ............................................................................................ 7
Winding the bobbin ........................................................................................8
Removing bobbin case and bobbin ...............................................................9
Inserting bobbin into bobbin case ................................................................10
Inserting bobbin case into shuttle race ........................................................ 11
Threading upper thread & Twin needle threading ....................................... 12
Auto threader ............................................................................................... 13
Drawing up the bobbin thread......................................................................14
Changing sewing directions......................................................................... 14
Levelling the machine .................................................................................. 15
Adjusting thread tension .............................................................................. 16
Changing needle.......................................................................................... 17
Insert “feed cover plate“ ............................................................................... 17
Fabric-Thread-Needle-table......................................................................... 18
Sewing (pattern selector) and operation table............................................. 19
To start sewing............................................................................................. 20
How to finish stitches ................................................................................... 21
Straight stitch ............................................................................................... 22
Zigzag sewing .............................................................................................. 22
Automatic embroidery .................................................................................. 22
Overcasting .................................................................................................. 23
Straight and zigzag stretch stitches ............................................................. 23
Blind stitch...............................................................................................24-25
Button sewing .............................................................................................. 26
Binding ......................................................................................................... 26
Zipper sewing............................................................................................... 27
Buttonhole sewing........................................................................................ 28
Hemming...................................................................................................... 29
Twin needle.................................................................................................. 29
Embroidery................................................................................................... 30
Quilter guide................................................................................................. 30
Seam guide .................................................................................................. 30
Maintenance (Cleaning and oiling) .............................................................. 31
Checking performance problems-Troubleshooting .................................... 32
2
NAME OF PARTS (FRONT VIEW)
1
14
2
3
13
12
4
11
10
9
6
8
7
1.
2.
3.
4.
5.
6.
7.
8.
9.
10.
11.
12.
13.
14.
Thread tension dial
Pattern selector dial
Bobbin winder stopper
Stitch length dial
Reverse button
Thread guide and needle clamp
Needle threader
Threading lever
Shuttle cover
Extension table
Presser foot
Face cover
Take up lever
Upper thread guide
3
5
NAME OF PARTS (REAR VIEW)
7
6
1
2
5
3
4
1.
2.
3.
4.
5.
6.
7.
Presser foot lever
Thumb screw
Needle plate
Spool pin (B) (Optional)
Hand wheel
Spool pin (A)
Bobbin winder spindle
4
ACCESSORIES
2 Bobbin
Screw driver
Needle
#14
2 Felt
Zigzag foot
(on machine)
Needle plate
screw driver
Spool pin (A)
Darning plate
5
Buttonhole foot
Zipper foot
Buttonhole cutter
BEFORE SEWING
1. Fit plug into the machine.
2. Insert plug into the main socket.
3. Sewing speed can be varied by the
foot control.
Power supply / Power supply plug
Power supply
If the supply cord that fixed with foot
controller is damaged, it must be
replaced by the manufacturer or its
service agent or a similar qualified
person in order to avoid a hazard.
Plug receptacle
machine plug
Use only ZHEJIANG FOUNDER model
KD-2902 foot controller with sewing
machine.
Speed Controller
Warning: Please always unplug the power plug before you change the bulb or
perform maintenance work to the machine so that you prevent deadly
peril and electric shock.
Bulb replacement:
1. Open face cover in direction of arrow.
2. Remove bulb by unscrewing it
anti-clockwise.
3. Install a new bulb by screwing it in
clockwise.
4. Use a screw type bulb with 15W.
(max)
5. Make sure the bulb is cold before
removing it.
Sewing lamp
6
REMOVING EXTENSION TABLE
Hold the left end of the table and pull it
out in direction of the arrow.
FREE-ARM SEWING
1. This sewing machine can be used as
a flat bed machine but easily
converts to a free arm machine by
removing the extension table.
2. Especially useful for sewing sleeves,
pant, legs, tubular fabrics etc. more
easily.
3. To sew tubular items just slip the
sleeve or leg of pants on the free
arm as shown on the illustration.
7
WINDING THE BOBBIN
1. Release by pushing clutch button to
bobbin and lock by pushing it to
needle.
2. Push bobbin winder from left to right,
then it starts winding.
3. Push bobbin winder from right to left
and move clutch button to needle
sign, then it starts sewing.
Clutch button
Push bobbin winder spindle in
direction of the arrow. When bobbin
winding is completed, return spindle to
its original position.
5 cm thread
Winder spindle
When bobbin winding is incorrect,
release the screw of the upper thread
guide and adjust up or down until
bobbin the winding is balanced.
Correct
Screw
8
REMOVING BOBBIN CASE AND BOBBIN
1. Raise the needle to its highest
position and open shuttle race
cover.
.
2. Open the hinged latch of the bobbin
case and pull the bobbin case out of
the machine.
Hinged latch
3. Release the latch and the bobbin
will fall out easily.
9
INSERTING BOBBIN INTO BOBBIN CASE
1. Pull 5 cm of thread from bobbin and
insert it into bobbin case as shown.
5 cm
Slot
2. Guide the end of thread into the
slot.
Tension spring
3. Pull the thread through the slot and
under the tension spring and draw
out about 10 cm of thread.
Making sure the bobbin turns in a
clockwise direction.
10 cm
10
INSERTING BOBBIN CASE INTO SHUTTLE RACE
1. Raise the needle to its highest
position. Pull the thread to the front,
open the latch of the bobbin case
and hold it.
Finger
Hinged latch
2. Holding the latch open, place bobbin
case onto the centre pin in the
shuttle and release latch.
Insert
11
THREADING UPPER THREAD
Warning: Before contriving please adjust main control switch to (O).
Pass the thread from A to H as shown.
B
E
A
B
C
E
D
D
H
F
G
Twin needle threading.
F
C
H
G
For auto threaded system see Page 13.
12
AUTO THREADER
Needle must be in its highest position and presser foot down while using needle threader.
2. Press needle threader lever down
to bottom so threader goes
through eye of needle.
1. Pull thread from inside of thread
guide finger.
Thread
guide
finger
3. Be sure the thread passes through
needle threader.
4. Hold the thread and gently release
needle threader lever to let it
return to the upper position, then
the thread can be pulled through
the needle eye.
NOTE: * Do not turn the hand wheel while using the needle threader.
* Do not touch threader lever while, sewing as needle threader will be damaged.
We advise you to switch off power while using the threader unit.
13
DRAWING UP THE BOBBIN THREAD
1. Hold the upper thread with left hand,
turn the hand wheel slowly towards
you until the needle goes down and
comes up. Then stop the hand
wheel when the take up lever is at
its highest position.
Lightly draw up the upper thread, by
which the lower thread will be
brought up in a loop.
2. Pull out both threads and place
them together under presser foot to
the rear of the machine.
3. Place fabric under pressure foot
from the front, lower pressure foot.
4. Start to sew.
CHANGING SEWING DIRECTIONS
1. Lower needle down into fabric and
raise presser foot, pivot the fabric
around the needle to change
direction as desired.
2. Lower the presser foot and start to
sew.
14
LEVELLING THE MACHINE
Down
Up
15
ADJUSTING THREAD TENSION
Normal upper thread tension: 3 – 5
Correct
Fabric
Upper thread tension may be adjusted
by turning the thread tension dial.
Upper thread
Bobbin thread
Incorrect
Inside of fabric
Upper thread
Lower thread tension can be increased
by turning the screw of the bobbin
case slightly to the right (clockwise).
Turning it to the left (counter-clockwise)
decreases tension.
16
CHANGING NEEDLE
Warning: Before changing the pin
please adjust main control switch to
(O).
Needle clamp screw
1. Raise the needle bar to its highest
position.
2. Loosen needle clamp screw and
remove the old needle.
3. With the flat side of the needle facing
away from you, insert the needle as
far up as it will go.
4. Tighten the needle clamp screw
securely.
Tighten
Loosen
Flat face side away
from you
INSERT “FEED COVER PLATE“
Sometimes you will want to control the
feeding of fabric yourself. Turn the
needle bar to its highest position and
raise the presser foot over the needle
plate, aligning two pins of the feed
cover plate with holes of needle plate.
You may then determine the
movement of the fabric by yourself.
See page 26 for button sewing
application.
17
FABRIC-THREAD-NEEDLE-TABLE
Please pay attention to the following list as a guide for sewing different types of fabric.
Fabric
Thread
Needle
Length of Stitches
Straight
ZZ
stitch
Stitch Length Dial
Light
Nylon
80 Cotton
Tricot
60 S Fiber
silk
70 (10)
Silk
50 Silk
Wool silk
50 S Fiber
silk
Gingham
60-80
Cotton
Thin Jersey
60 S Fiber
Gabardine
50 Silk
Denim
50 Cotton
90-100
(14-16)
Jersey
50 S Fiber
80-90
(12-14)
Tweed
50 Silk
80-90
(12-14)
Medium
1-3
1-4
0.5 - 3
0.5 - 4
0.5 - 3
0.5 - 4
80 (12)
80-90
(12-14)
80 (12)
Heavy
18
Indication of
Upper
Tension
SEWING (PATTERN SELECTOR) AND OPERATION TABLE
Stitch patterns
A
B-E
Stitch length
Presser foot
Straight stitch
Zigzag
F
Blind stitch
G
Box stitch
H
Three step zigzag stitch
I
Double overlock stitch
J
Pullover stitch
K
Honeycomb stitch
L
Zigzag stitch
M
Straight stretch stitch
N
O
Automatic Embroidery
P
Q
R-T
Buttonhole
Free-hand embroidery
Without
19
Darning
plate
TO START SEWING
Important hints:
1. Raise the take-up lever to its highest position before starting and after stopping sewing.
2. Hold both threads about 10 cms to the rear of the machine for the first two or three
stitches.
3. Sufficient fabric should be placed under needle before lowering the presser foot.
4. Depress foot/speed control and start to sew.
5. Test the machine stitches on a scrap of fabric you plan to use, adjusting the machine
for the length of the stitch and tension suitable to your fabric.
6. Separate the machine from the power system if you leave it unsupervised.
7. When sewing the stretch stitches (
), please use slow to medium speed
(do not press the foot controller to the bottom) & do not use fast speed to sew enabling
can get a good sewing result of stretch stitches.
Attention:
1. When turning the hand wheel manually, always turn it toward you.
2. Guide the cloth gently with your hand.
3. To prevent breaking needles, always raise the needle out of the fabric when you stop
sewing.
20
HOW TO FINISH STITCHES
1. Sew to the edge of seam.
2. Push the reverse button and sew in
reverse for about 3-4 cms.
3. Raise needle into its highest position.
4. Lift the presser foot and pull the fabric
out of the back of the machine.
5. Cut threads as shown on the thread
cutter.
Cutting thread slot
21
STRAIGHT STITCH
1. This type of stitching is used most frequently.
2. The zigzag presser foot can be used for both straight and zigzag sewing.
3. For sewing light fabric, use a smaller stitch size. (Refer to page 18 for dial setting).
ZIGZAG SEWING
Pattern selector position
Satin stitching can be used for sewing
initials, patterns, appliqué, etc.
The zigzag stitch is a universal stitch.
The satin stitch pattern has short tense
stitches which can be used for sewing.
AUTOMATIC EMBROIDERY
N
O
P
These stitches have a wide range of
decorative and utility applications and
are particularly suitable for woven
fabrics.
The Scallop stitch (N) is ideal for
edging collars, cuffs, tablecloths,
serviettes etc. For all the stitches, the
stitch length can be reduced to
achieve a close “satin stitch” if
required.
With satin stitch a paper backing, will
improve the result.
Q
22
OVERCASTING
Use these stitches for oversewing
rough edges.
STRAIGHT AND ZIGZAG STRETCH STITCHES
Use this stitch with knitted, tricot or
other stretchy fabrics.
The stitch enables your seam to
stretch without breaking the thread.
23
BLIND STITCH
1. Fold fabric as shown.
2. Finish the seam as shown.
24
Adjust the width to obtain the correct
seam.
Wrong: Needle is not piercing edge to
fold at all.
Needle pierces the edge of fold too
much.
Correct seam.
25
BUTTON SEWING (Optional)
Utilise the foot of sewing of buttons.
(Use feed cover plate see page 17)
1. Place the feed cover plate properly.
2. Place button presser foot in position
and attach it firmly.
3. Place the button between presser
foot and fabric and lower the presser
foot.
4. Manually turn hand wheel towards
you, ensuring that the needle enters
into both holes of button without
obstruction. (Increase or decrease
width setting).
5. Sew about 7 stitches.
6. Pull both threads to the underside
and tie them together.
Match
BINDING
To sew fabrics edge select the
multi-zigzag stitch.
26
ZIPPER SEWING
Utilise the foot of closing zipper.
Select straight stitch.
1. Zipper foot is designed to sew close
to a raised edge, thus preventing
sewing on zipper.
2. Place zipper foot in position and
attach firmly.
3. Fold the fabric about 2 cm and place
the fabric under foot.
1. To sew the left side of the zipper,
set the zipper on the right side of the
needle.
2. To sew the right side of the zipper,
set it on the left side of the needle.
Sew as illustrated.
27
BUTTONHOLE SEWING
Utilise the foot of the buttonholes.
Set the stitch length dial.
Pattern selector dial
Steps
Settings
1. Set dial to “1“ position
2. Sew left side
3. Raise the needle
4. Set dial to “2“ position
5. Sew 5-6 stitches
6. Raise the needle
7. Set dial to “3“ position
8. Sew right side
9. Raise the needle
10. Set dial to “4“ position
11. Sew 5-6 stitches
12. Raise the needle
Before sewing, fit buttonhole foot
as shown.
Cut buttonhole along centre with
cutter as shown.
28
HEMMING (Optional)
1. Raise the foot and the needle to its
highest position. Replace the foot with
the picot foot.
2. Fold over the fabric edge by about 3
mm and place it under the foot.
Secure the folded edge with a few
stitches. Take out the workpiece and
draw the hem into the picot foot
through pulling the threads.
3 mm
1 mm
20 mm
3. Lower the foot and sew the hem.
4. While sewing fold the fabric to the left
a little and allow it to run into the
hemmer foot.
5. Make sure that the fabric does not
move under the right half of the foot.
The fabric must be fed into the scroll
of the hemmer sufficiently so that the
workpiece edge runs freely through
the groove under the foot.
Only suitable materials can be used
and some practice may be necessary
to achieve the best results.
TWIN NEEDLE (Optional)
Please place second spool pin (B)
into the position for twin needle
sewing as page 4, no. 4 pic.
Put in the twin needle with the flat side
backwards.
Thread the machine as for normal
sewing, leading both threads to needle
and passing their ends separately
through its eye.
Sewing width should not exceed the
third widest stitch width, as this will
break the needles.
ATTENTION: When using the twin
needle, adjust the stitch width to
maximally 3. Adjusting the stitch width
to a higher number causes the needle
to break.
29
EMBROIDERY
(Use feed cover plate see page 17)
Remove the presser foot and attach
the feed cover plate.
Lower feed dog and move the hooped
fabric slowly in the desired direction
until the fabric has been embroidered.
QUILTER GUIDE (Optional)
1. Slide the arm through the hole on
top of the pressure foot holder.
2. Move the quilter to the required
stitch distance.
SEAM GUIDE (Optional)
1. Use the seam guide to sew long seams
of an equal distance from the edge of
the fabric.
2. Screw the guide on the right side of the
needle plate and adjust the desired
distance.
3. While sewing, the edge of the fabric
must touch the guide.
30
MAINTENANCE
Warning: Please always unplug the power plug before you change the bulb or
perform maintenance work to the machine so that you prevent deadly
peril and electric shock.
1. Raise needle to its highest position.
2. Take out the bobbin case.
3. Turn the latch knob A as illustrated.
4. Take off shuttle race cover.
5. Take out shuttle hook.
6. Clean and oil shuttle race and hook,
thereafter replace all parts in
reverse order.
A
A
B
C
Cleaning shuttle race
(A) Latch knob
(B) Shuttle race cover
(C) Shuttle hook
Open face cover and oil the parts
indicated.
Cleaning feed dog.
31
CHECKING PERFORMANCE PROBLEMS – TROUBLESHOOTING
Problem
Probable cause
What to do
Fabric does not
move
- Feed dog down
- Stitch length dial in “0“ position
- Raise feed dog
- Set dial between 1 and 4
Breaking needle
- Incorrect insertion of needle
- Bent needle
- Fabric is being pulled
- Needle, thread and fabric do
not match
- Re-insert needle
- Replace needle
- Do not pull fabric
- Use correct needle and thread
Breaking upper
thread
- Faulty adjustment of zigzag
width
- Improper threading
- Tight upper thread tension
- Bent needle
- Scratches or nicks on bobbin
case
Breaking bobbin
thread
- Tied bobbin thread tension
- Incorrect insertion of needle
- Improper threading
- Lint or thread in bobbin case
- Reduce bobbin thread tension
- Re-insert needle
- Rethread machine
- Clean bobbin case
- Excessive tension
- Needle, thread and fabric do
not match
- No oil
- Re-adjust tensio
- Choose proper needle and
thread according to type of
fabric
- Need oil
- Tension too tight
- Incorrect fabric, needle,
and thread
- Reset
- Use correct fabric, needle
and thread
Machine
jamming
Puckering
32
- Re-adjust zigzag width
- Re-thread machine
- Reduce upper thread tension
- Replace needle
- Polish or replace bobbin case
33
221401006
A
11.06.08