1
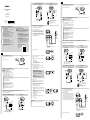
Optical output jack supported device Français Other devices Rear of the unit 1 Rear of the unit Raccorder l’appareil à une prise secteur Utilisez l’adaptateur secteur USB* (fourni) et le câble micro-USB (fourni). * Il existe 2 types d’adaptateur secteur USB. For example, a PCM recorder Headphone Amplifier PHA-3AC Other devices Right edge position Second position from the right Start Guide Guide de démarrage Startanleitung Right edge position Câble micro-USB (fourni) 2 Be sure to connect the headphones to the (headphones) NORMAL jack on the front of the unit. In this case, the balanced connection is not available. Digital optical cable (optional) 4 Manuals supplied/Manuels fournis/Mitgelieferte Handbücher The 3 following manuals are included./Les 3 manuels suivants sont fournis./Die 3 folgenden Handbücher werden mitgeliefert. Start Guide (this document) Provides you with instructions on how to connect the unit with devices and basic operations. Guide de démarrage (le présent document) Fournit les instructions relatives à la connexion de l’appareil aux périphériques et vous renseigne sur les opérations de base. Startanleitung (dieses Dokument) Enthält Anweisungen zum Verbinden des Geräts mit anderen Geräten und Erläuterungen zu den Grundfunktionen. Reference Guide (exhibit document) Provides you with precautions and product specifications. Guide de référence (document joint) Précise les précautions à suivre et les spécifications du produit. Referenzhandbuch (weiteres Dokument) Enthält die Sicherheitshinweise und die technischen Daten zum Gerät. Help Guide (Operating Instructions) Read the Help Guide on your computer or smartphone, when you want to know how to use the unit in greater detail. The Help Guide also contains a troubleshooting guide which provides you with remedies for the problems you might encounter. Manuel d’aide (Mode d’emploi) Lisez le Manuel d’aide sur votre ordinateur ou votre smartphone pour connaître en détails la manière d’utiliser l’appareil. Le Manuel d’aide contient également un guide de dépannage qui fournit des solutions aux problèmes que vous pourriez rencontrer. •Téléchargez et installez le pilote pour Windows « Sony USB Device Driver » sur un ordinateur Windows. •En cas de lecture de données au format Audio haute résolution sur votre ordinateur à l’aide de cet appareil, installez « Hi-Res Audio Player ». Listening to music with the headphones To listen to music with a device such as an active speaker, connected to the AUDIO IN/LINE OUT jack, refer to the Help Guide. Connect the headphones to the unit. Pour télécharger le pilote et « Hi-Res Audio Player » Visitez le site Web ci-dessous et téléchargez le pilote. http://www.sony.eu/support/dna Pour plus d’informations sur l’installation, reportez-vous au site Web. Front of the unit The sound of the AUDIO IN/LINE OUT (analogue input) is not output from the (headphones) BALANCED L/R jack. Make sure to connect standard stereo headphones to the (headphones) NORMAL jack. L’appareil doit être connecté à un point particulier de votre ordinateur Windows pendant l’installation du pilote. Dans le cas présent, connectez l’ordinateur Windows au port de connexion Xperia/WALKMAN/PC (USB AUDIO) de l’appareil en utilisant le Câble micro-USB (fourni). Pour plus de détails concernant la connexion, reportez-vous à l’illustration « WALKMAN®/Xperia, ordinateur prenant en charge la sortie numérique » à l’étape 3. If you connect the headphones which has the L-shaped stereo mini plug to the (headphones) NORMAL jack, position it so that its cable is on the right side of the jack, avoiding the ridge on the left of the jack, and ensure the plug is fully inserted. Hilfe (Bedienungsanleitung) Wenn Sie nähere Erläuterungen zur Verwendung des Geräts wünschen, können Sie diese Hilfe am Computer oder Smartphone lesen. Darüber hinaus enthält die Hilfe eine Anleitung zur Fehlerbehebung sowie Abhilfemaßnahmen zu Problemen, die eventuell auftreten könnten. 3 Plug L Régler le sélecteur INPUT de l’appareil et connecter le périphérique audio à l’appareil À l’aide du sélecteur INPUT, sélectionnez le port du périphérique audio que vous connectez en choisissant parmi les quatre types de ports disponibles. Plug R To connect the headphones that support balanced connection URL: http://rd1.sony.net/help/mdr/pha-3/h_ce/ Two-dimensional code: Code à deux dimensions : QR-Code: Mettre sous tension le périphérique audio à connecter Ordinateur : Lorsque vous connectez l’appareil à un ordinateur, installez le pilote et le lecteur. (Dans le cas d’un Mac, il n’est pas nécessaire d’installer un pilote.) Stereo mini cable (supplied) 4-547-087-23(1) ©2014 Sony Corporation Printed in China WALKMAN®/Xperia, ordinateur prenant en charge la sortie numérique To connect the headphones with a standard 3-pole stereo mini plug English Arrière de l’appareil iPhone iPad iPod Rotate the power/volume knob clockwise to turn on the unit. Use the USB AC adaptor* (supplied) and the micro-USB cable (supplied). * There are 2 types of USB AC adaptor. Rear of the unit USB AC adaptor The indicator lights up when the unit is being input with; •the linear PCM digital signal of sampling frequencies above 48 kHz •the DSD digital signal of the High-Resolution Audio format WALKMAN® : Câble numérique pour WALKMAN® (fourni) Xperia : Câble numérique pour Xperia (fourni) Ordinateur : Câble micro-USB (fourni) Autres périphériques Arrière de l’appareil Arrière de l’appareil Par exemple, un enregistreur PCM Autres périphériques Front of the unit Deuxième position à partir de la droite The indicator lights up when the unit is being input with the DSD signal of the High-Resolution Audio format. Visit the following website, and download the driver software. http://www.sony.eu/support/dna For details on installing, refer to the website. Position sur le bord droit Position sur le bord droit Adjust the volume. Adjust the volume by the power/volume knob. Depending on the headphones, the volume may remain low, even if you turn the knob to the maximum setting. The unit needs to be connected to your Windows computer at a certain point while installing the driver software. In this case, connect the Windows computer to the Xperia/ WALKMAN/PC (USB AUDIO) connecting port of the unit using the micro-USB cable (supplied). For details concerning connection, refer to the illustration of “Digital output supported WALKMAN®/Xperia, Computer” in step 3. Mini-câble stéréo (fourni) N’oubliez-pas de connecter le casque à la prise (casque) NORMAL située à l’avant de l’appareil. Dans ce cas, this case, la connexion équilibrée n’est pas disponible. Câble optique numérique (en option) When using balanced connection with headphones that have low impedance (less than 16 ohms), the limiter prevents excessive output, which may cause the sound to be cut off. In this case, turn down the volume of the unit. Set the INPUT switch on the unit and connect the audio device to the unit Select the port position of the connecting audio device from among the four types input ports with the INPUT switch. Digital output supported WALKMAN®/Xperia, Computer iPhone/iPad/iPod Rear of the unit Rear of the unit iPhone iPad iPod Second position from the left •When the volume is low: turn off the unit, set the GAIN select switch to HIGH, then turn on the unit. In normal use, the setting should be NORMAL. •About DSEE HX: If you set the DSEE HX switch to ON, compressed file sources such as MP3 are upgrade to a high resolution than CDs and provide a dynamic sound. The DSEE HX is not activated in the following cases; •when inputting optical •when inputting analogue •when inputting linear PCM digital of sampling frequencies more than 88.2 kHz •when inputting DSD digital 4 Écoute de la musique à l’aide du casque Pour écouter la musique alors qu’un appareil, notamment un haut-parleur actif, est connecté à la prise AUDIO IN/LINE OUT, reportez-vous au Manuel d’aide. Front of the unit Side of the unit Connectez le casque à l’appareil. Avant de l’appareil Le son provenant de AUDIO IN/LINE OUT (entrée analogique) n’est pas reproduit par la prise (casque) BALANCED L/R. Veillez à raccorder un casque d’écoute stéréo standard à la prise (casque) NORMAL. Si vous raccordez le casque équipé de la mini-fiche stéréo en L à la prise (casque) NORMAL, positionnez-le de façon à ce que son câble se trouve sur le côté droit de la prise, évitant ainsi l’arête située sur la gauche de la prise, et veillez à ce que la fiche soit insérée à fond. After using the unit Rotate the power/volume knob counterclockwise until it clicks to turn off the unit. Front of the unit Fiche L Fiche R Pour connecter un casque qui prend en charge une connexion équilibrée For details on how to use the silicon belt and the protection sheet, refer to the Help Guide. WALKMAN®: Digital cable for WALKMAN® (supplied) Xperia: Digital cable for Xperia (supplied) Computer: Micro-USB cable (supplied) Câble USB fourni avec l’iPhone/iPad/iPod Périphérique prenant en charge la prise de sortie optique DSD indicator To download the driver software and “Hi-Res Audio Player” Computer Front of the unit Hi-Fs (High Sampling Frequency) indicator •Download and install the driver software for Windows “Sony USB Device Driver” onto a Windows computer. •When playing High-Resolution Audio format data on your computer with the unit, install “Hi-Res Audio Player.” WALKMAN® Xperia Notes When playing High-Resolution Audio format data on your computer with the unit, use “Hi-Res Audio Player.” For details on installing “Hi-Res Audio Player,” visit the following site at http://www.sony.eu/support/dna Turn on the connecting audio device Left edge position Deuxième position à partir de la gauche WALKMAN® Xperia Play back the connected audio device. Computer : When connecting the unit to a computer, install the driver software and player. (For Mac, there is no need to install a driver.) 3 Ordinateur Rotate it more to adjust the volume. In the following cases, the relay in the internal circuit will make a sound. •When the unit is turned on •When the OUTPUT switch is moved •When the INPUT switch is moved to/from the position of the AUDIO IN/LINE OUT jack (right edge position) Micro-USB cable (supplied) 2 Position sur le bord gauche Rear of the unit Connect the unit to an AC outlet iPhone/iPad/iPod Arrière de l’appareil Set the OUTPUT switch to “”. 1 Arrière de l’appareil Adaptateur secteur USB Pour connecter un casque avec mini-fiche stéréo à 3 pôles standard USB cable supplied with iPhone/iPad/iPod Réglez le commutateur OUTPUT sur « ». Arrière de l’appareil 3 Tournez le bouton d’alimentation/volume dans le sens des aiguilles d’une montre pour mettre l’appareil sous tension. Tournez-le davantage encore pour régler le volume. Stellen Sie an diesem Gerät ein, mit welchem Anschluss das Audiogerät verbunden ist, indem Sie den Schalter INPUT an eine der vier Positionen für die vier möglichen Anschlusstypen schieben. Remarques Dans les cas suivants, le relais du circuit interne émet un son. •Lors de la mise sous tension de l’appareil •Lors de l’actionnement du commutateur OUTPUT •Lorsque le sélecteur INPUT est déplacé de/vers la position de la prise AUDIO IN/LINE OUT (position sur le bord droit) Stellen Sie den Schalter INPUT an diesem Gerät ein und schließen Sie das Audiogerät an dieses Gerät an Avant de l’appareil WALKMAN®/Xperia oder Computer mit Digitalausgang Verringern Sie in diesem Fall die Lautstärke am Gerät. Rückseite dieses Geräts iPhone iPad iPod En cas de lecture de données au format Audio haute résolution sur votre ordinateur à l’aide de cet appareil, utilisez « Hi-Res Audio Player ». Pour plus d’informations sur l’installation de « Hi-Res Audio Player », visitez le site Web suivant à l’adresse http://www.sony.eu/support/dna Position ganz links Témoin Hi-Fs (fréquence élevée d’échantillonnage) Le témoin s’allume lorsque l’appareil reçoit : •le signal numérique PCM linéaire des fréquences d’échantillonnage dépassant 48 kHz •le signal numérique DSD du format Audio haute résolution Computer Zweite Position von links WALKMAN® Xperia Avant de l’appareil Le témoin s’allume lorsque l’appareil reçoit le signal DSD du format Audio haute résolution. WALKMAN®: Digitalkabel für WALKMAN® (mitgeliefert) Xperia: Digitalkabel für Xperia (mitgeliefert) Computer: Micro-USB-Kabel (mitgeliefert) Réglez le volume. Réglez le volume à l’aide du bouton d’alimentation/volume. Selon le casque, le volume peut rester faible, même si vous tournez le bouton au maximum. Zweite Position von rechts Avant de l’appareil Côté de l’appareil 4 Position ganz rechts Schließen Sie die Kopfhörer unbedingt an die Buchse (Kopfhörer) NORMAL vorn am Gerät an. In diesem Fall steht keine symmetrische Verbindung zur Verfügung. Musikhören mit den Kopfhörern Informationen zur Musikwiedergabe mit dem an die Buchse AUDIO IN/ LINE OUT angeschlossenen Gerät, wie einem Aktivlautsprecher, finden Sie in der Hilfe. Pour plus d’informations sur l’utilisation de la courroie en silicone et de la feuille de protection, reportez-vous au Manuel d’aide. Schließen Sie die Kopfhörer an das Gerät an. Vorderseite dieses Geräts Der Ton von AUDIO IN/LINE OUT (analoger Eingang) wird über die Buchse (Kopfhörer) BALANCED L/R nicht ausgegeben. Schließen Sie unbedingt normale Stereokopfhörer an die Buchse (Kopfhörer) NORMAL an. Deutsch Schließen Sie das Gerät an eine Netzsteckdose an Rückseite dieses Geräts USB-Netzteil * Es gibt 2 Typen von USB-Netzteilen. Wenn Sie Kopfhörer mit einem Stereoministecker in L-Form an die Buchse (Kopfhörer) NORMAL anschließen, richten Sie sie so aus, dass sich das Kabel an der rechten Seite der Buchse befindet und nicht an der Kante auf der linken Seite, und stellen Sie sicher, dass der Stecker ganz eingesteckt ist. Stecker L Micro-USB-Kabel (mitgeliefert) Stecker R Zum Anschließen von Kopfhörern, die eine symmetrische Verbindung unterstützen Schalten Sie das anzuschließende Audiogerät ein Zum Anschließen von Kopfhörern mit einem standardmäßigen 3-poligen Stereoministecker Computer Stellen Sie den Schalter OUTPUT auf „“. •Laden Sie die Treibersoftware „Sony USB Device Driver“ für Windows herunter und installieren Sie sie auf einem Windows-Computer. •Wenn Sie mit dem Gerät hochauflösende Audiodaten auf dem Computer wiedergeben wollen, installieren Sie „Hi-Res Audio Player“. Das Gerät muss beim Installieren der Treibersoftware zu einem bestimmten Zeitpunkt mit einem Windows-Computer verbunden werden. Schließen Sie in diesem Fall den Windows-Computer über das Micro-USB-Kabel (mitgeliefert) an den Verbindungsanschluss Xperia/ WALKMAN/PC (USB AUDIO) des Geräts an. Einzelheiten zur Verbindung entnehmen Sie der Abbildung unter „WALKMAN®/Xperia oder Computer mit Digitalausgang“ in Schritt 3. Position ganz rechts Stereominikabel (mitgeliefert) Optisches Digitalkabel (optional) Avant de l’appareil Rufen Sie folgende Website auf und laden Sie die Treibersoftware herunter. http://www.sony.eu/support/dna Erläuterungen zur Installation finden Sie auf der Website. Vorderseite dieses Geräts Rückseite dieses Geräts Sonstige Geräte Tournez le bouton d’alimentation/volume dans le sens inverse des aiguilles d’une montre jusqu’à ce qu’il émette un déclic qui confirme la mise hors tension de l’appareil. So laden Sie die Treibersoftware und „Hi-Res Audio Player“ herunter Sonstige Geräte Zum Beispiel PCM-Recorder Après utilisation de l’appareil : Beim Anschließen des Geräts an einen Computer installieren Sie die Treibersoftware und den Player. (Bei einem Mac brauchen Sie keine Treiber zu installieren.) Drehen Sie den Ein-/Aus-/Lautstärkeregler gegen den Uhrzeigersinn, bis ein Klicken zu hören ist, um das Gerät auszuschalten. Einzelheiten zur Verwendung von Silikonband und Schutzfolie finden Sie in der Hilfe. Dans ce cas, diminuez le volume de l’appareil. 2 Wenn Sie das Gerät nicht länger verwenden wollen Rückseite dieses Geräts Verwenden Sie dazu das USB-Netzteil* (mitgeliefert) und das Micro-USB-Kabel (mitgeliefert). Vorderseite dieses Geräts Seite dieses Geräts Mit iPhone/iPad/iPod geliefertes USB-Kabel Geräte mit optischem Ausgang Lorsque vous utilisez une connexion équilibrée avec un casque à faible impédance (moins de 16 ohms), le limiteur évite d’atteindre un niveau de sortie excessif, ce qui peut entraîner la coupure du son. 1 •Wenn die Lautstärke gering bleibt: Schalten Sie das Gerät aus, stellen Sie den Wahlschalter GAIN auf HIGH und schalten Sie das Gerät dann wieder ein. Unter normalen Umständen sollte der Schalter auf NORMAL gestellt werden. •Hinweis zu DSEE HX: Wenn Sie den Schalter DSEE HX auf ON stellen, werden komprimierte Audiodateien wie zum Beispiel MP3-Dateien mit einer höheren Auflösung als CDs und dynamischem Klang wiedergegeben. DSEE HX wird in den folgenden Fällen nicht aktiviert: •bei optischen Eingangssignalen •bei analogen Eingangssignalen •bei digitalen, linearen PCM-Eingangssignalen mit Abtastfrequenzen von über 88,2 kHz •bei digitalen DSD-Eingangssignalen Témoin DSD DSEE HX n’est pas activé dans les cas suivants : •en présence d’une entrée optique •en présence d’une entrée analogique •en présence d’une entrée numérique PCM linéaire dont les fréquences d’échantillonnage sont supérieures à 88,2 kHz •en présence d’une entrée numérique DSD Stellen Sie die Lautstärke am Ein-/Aus-/Lautstärkeregler ein. Je nach Kopfhörer bleibt die Lautstärke unter Umständen gering, selbst wenn Sie den Regler in die Maximalposition drehen. Bei einer symmetrischen Verbindung mit Kopfhörern mit niedriger Impedanz (weniger als 16 Ohm) verhindert der Begrenzer eine übermäßig hohe Ausgabeleistung, so dass es möglicherweise zu Tonaussetzern kommt. iPhone/iPad/iPod Rückseite dieses Geräts Écoutez le son du périphérique audio connecté. •Quand le volume est faible : mettez l’appareil hors tension, réglez le sélecteur GAIN sur HIGH, puis remettez l’appareil sous tension. Le réglage NORMAL correspond à une utilisation normale. •À propos de DSEE HX : si vous réglez le commutateur DSEE HX sur ON, les sources de fichiers compressés telles que MP3 sont mises à niveau vers une résolution supérieure à celle des CD et offrent ainsi un son dynamique. Stellen Sie die Lautstärke ein. Rückseite dieses Geräts Drehen Sie den Ein-/Aus-/Lautstärkeregler im Uhrzeigersinn, um das Gerät einzuschalten. An diesem Regler können Sie auch die Lautstärke einstellen. Hinweise In den folgenden Fällen ist vom Relais im internen Schaltkreis ein Geräusch zu hören. •Wenn das Gerät eingeschaltet wird •Wenn der Schalter OUTPUT verschoben wird •Wenn der Schalter INPUT in die Position für die Buchse AUDIO IN/ LINE OUT (Position ganz rechts) oder aus dieser in eine andere Position verschoben wird Vorderseite dieses Geräts Starten Sie die Wiedergabe am angeschlossenen Audiogerät. Wenn Sie mit dem Gerät hochauflösende Audiodaten auf dem Computer wiedergeben wollen, verwenden Sie „Hi-Res Audio Player“. Erläuterungen zur Installation von „Hi-Res Audio Player“ finden Sie auf der Website http://www.sony.eu/support/dna Anzeige Hi-Fs (hohe Abtastfrequenz) Die Anzeige leuchtet, wenn folgende Signale in das Gerät eingespeist werden: •digitale lineare PCM-Signale mit Abtastfrequenzen über 48 kHz •digitale DSD-Signale im Format für hochauflösendes Audio Anzeige DSD Die Anzeige leuchtet, wenn am Gerät DSD-Signale im Format für hochauflösendes Audio eingespeist werden. Vorderseite dieses Geräts