1
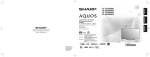
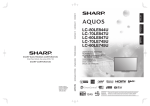
LC-70UD27U
LC-60UD27U
LIQUID CRYSTAL TELEVISION
TÉLÉVISEUR À CRISTAUX
LIQUIDES
TELEVISOR DE CRISTAL
LÍQUIDO
OPERATION MANUAL
MODE D’EMPLOI
MANUAL DEL USUARIO
>> Contents
<< 1. Part Names
1-1. TV
1-2. Remote Control Unit
2. Watching TV
2-1. Displaying an External Equipment Image
2-2. Initial Installation
3. Direct Button Operation
3-1. Changing Channels
3-2. Changing Volume
3-3. MUTE/3D Surround
3-4. FREEZE
3-5. FLASHBACK
3-6. SmartCentral
3-7. NETFLIX
3-8. AUDIO
3-9. Sleep Timer
3-10. AV MODE
3-12. Closed Captions and Digital Closed Captions
3-14. VIEW MODE
4. On-Screen Display Menu
4-1. Introduction
4-3. On-Screen Display Menu Operation
4-4. Menu Operation Buttons
4-5. Picture Settings
4-11. Audio Settings
4-13. Setup
4-22. Smart TV
4-27. System Options
4-32. Information
5. Enjoying Photo/Music/Video Playback
5-1. Preparation
5-2. Selecting the Folders to Play Back
5-4. Playing Back Files on a USB Memory Device/SD
Memory Card/Home Network Server
5-13. Playing Back Files from a Portable Device or PC
5-14. Presetting Remote Control Function
5-17. Operating the Connected Equipment
6. Using AQUOS LINK
6-1. Controlling HDMI Equipment Using AQUOS LINK
6-4. Link Operation Menu
6-6. Using a Smartphone with the TV
10. Appendix
10-1. Removing the Stand
10-2. Setting the TV on the Wall
10-6. Troubleshooting
10-8. Troubleshooting - Error Message
10-9. Information on the Software License for This
Product
11. Specifications
11-1. TV
11-2. Wireless LAN
11-3. Bluetooth
12-1. Trademarks
7. Using a PC
7-1. Setting Audio Input
7-2. Control of the TV
7-8. PC Compatibility Chart
8. Using the Internet
8-1. Connecting to the Internet
8-2. Internet Setup
8-5. Entering Text (Software Keyboard)
8-6. Using the Browser
8-10. Using Keyboard and Mouse
8-11. Using Applications via the Internet
8-14. Notes
9. Using the Bluetooth /Miracast devices
9-1. Bluetooth devices
9-1. Miracast devices
ENG Contents
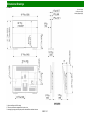
13. Dimensional Drawings
>>
<<
ENG Important1
>>
<<
ENG Important2
>>
<<
ENG Important3
>>
<<
ENG Important4
>>
<<
ENG Important5
>>
<<
ENG Important6
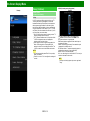
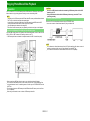
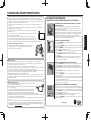
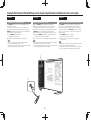
>> Part Names
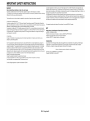
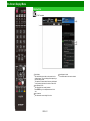
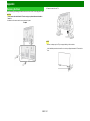
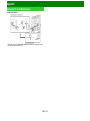
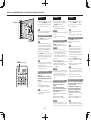
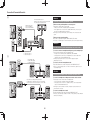
<< TV
(Rear)
(Front)
*1 See page 4-6.
*2 See page 4-31.
(Side)
* See pages 2-1, 4-4 and 4-31 for button operations.
*1 See the Setup Guide.
And see page 6-1 for external equipment connection.
*2 See page 7-1 for details on the Audio Select function.
*3 Use HDMI IN 1 to connect ARC-compatible equipment.
*4 Connect 4K signals (HDCP2.2) to the HDMI IN 4 terminal.
HDMI IN3 is suitable for 4K(2160p, 4:4:4) signal.
If there is a problem viewing a signal through the HDMI IN 3 video input,
please use either HDMI IN 1, 2 or 4 video input.
HDMI IN1: 4K60P 4:2:0
HDMI IN2: 4K60P 4:2:0
HDMI IN3: 4K60P 4:4:4
HDMI IN4: 4K60P 4:2:0
*5 See page 6-6.
*6 See page 4-19 for details on the COMPONENT/VIDEO select function.
*7 See page 5-1.
The illustrations and on-screen displays in this operation manual are for explanation purposes
and may vary slightly from the actual operations.
ENG 1-1
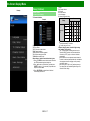
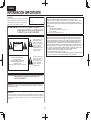
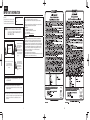
>> Part Names
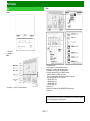
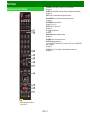
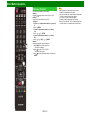
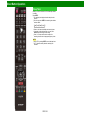
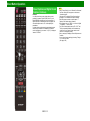
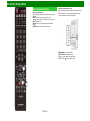
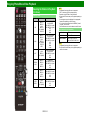
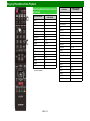
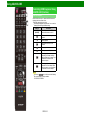
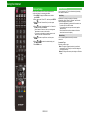
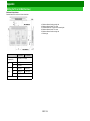
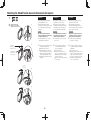
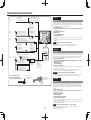
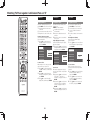
<< Remote Control Unit
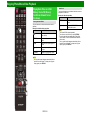
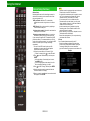
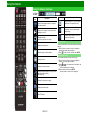
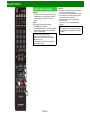
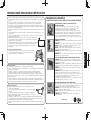
1 POWER: Switch the TV power on or enter standby.
2 TV, STB, DVD•VCR, AUDIO: Switches the remote control for TV, STB, BD, DVD, VCR and
AUDIO operation.
(See pages 5-14 to 5-17 for details.)
* To enter the code registration mode, you need to press an appropriate button (STB, DVD•VCR
or AUDIO) and DISPLAY at the same time.
3 External equipment operational buttons: Operate the external equipment.
4 DISPLAY: Display the channel information.
5 OPTION: Display the Link Operation Menu screen. This button will function only when AQUOS
LINK is used.
(See pages 6-1 to 6-5 for details.)
6 SLEEP: Set the sleep timer.
(See page 3-9.)
7 0–9: Set the channel.
(See pages 3-1 and 5-17.)
8 • (DOT): Set the channel.
(See pages 3-1 and 5-17.)
9 CC: Display captions from a closed-caption source.
(See page 3-12 to 3-13)
10 AV MODE: Select an audio or video setting.
(See page 3-10.)
11 MUTE: Mute the sound.
(See page 3-3.)
12 VOL+/-: Set the volume.
(See page 3-2.)
13 MENU: Display the menu screen.
(See page 4-1.)
14 2D/3D: Set the 3D Surround.
(See page 3-3.)
15 / / / , ENTER: Select a desired item on the screen.
16 EXIT: Turn off the menu screen.
17 FAVORITE CH: Set the favorite channels.
(See page 4-15.)
18 A, B, C, D: Select 4 preset favorite channels in 4 different categories.
(See page 4-15.)
While watching, you can toggle the selected channels by pressing A, B, C and D.
19 MANUAL: Display the operation manual.
20 POWER (SOURCE): Turns the power of the external equipment on and off.
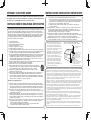
NOTE
When using the remote control unit,
point it at the TV.
ENG 1-2
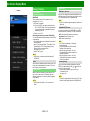
>> Part Names
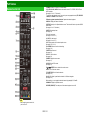
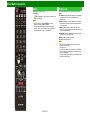
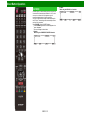
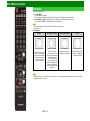
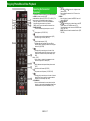
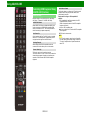
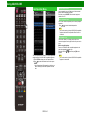
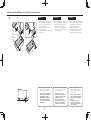
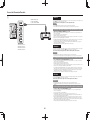
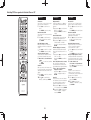
<< Remote Control Unit (Continue)
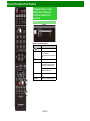
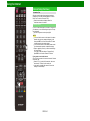
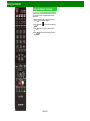
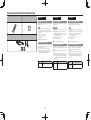
21 FREEZE: Set the still image. Press again to return to normal screen.
(See page 3-4.)
22 AUDIO: Selects the MTS/SAP or the audio mode during multichannel audio broadcasts.
(See page 3-8.)
23 ENT: Jumps to a channel after selecting with the 0–9 buttons.
24 FLASHBACK: Return to the previous channel or external input mode.
(See page 3-5.)
25 VIEW MODE: Select the screen size.
(See pages 3-14 to 3-16.)
26 INPUT: Select a TV input source.
(See page 2-1.)
27 CH / : Select the channel.
(See page 3-1.)
28 SmartCentral: Display the application window.
(See page 3-6.)
29 RETURN: Return to the previous menu screen.
30 NETFLIX: Display the Netflix screen.
If you press the NETFLIX button when the TV is turned off, the TV turns on and the NETFLIX
screen is displayed.
(See page 3-7.)
31 FAV APP 1, 2, 3: You can assign your favorite applications to these buttons.
(See page 8-11.)
NOTE
When using the remote control unit,
point it at the TV.
ENG 1-3
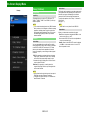
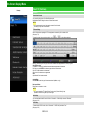
>> Watching TV
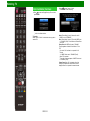
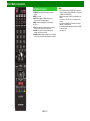
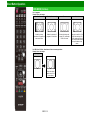
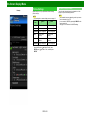
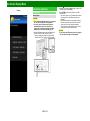
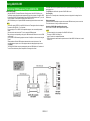
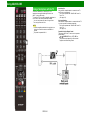
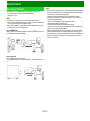
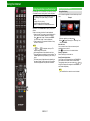
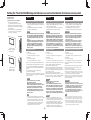
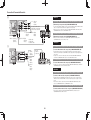
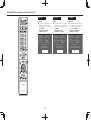
<< Displaying an External Equipment Image
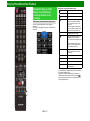
To view external source images, select the input source by pressing INPUT on the remote control
unit or on the TV.
Example
1 Press INPUT.
The INPUT list screen displays.
2 Press / to select the input source.
An image from the selected source
automatically displays.
If the corresponding input is not plugged
in, you cannot change the input. Be
sure to connect the equipment
beforehand.
You can also select the input source by pressing INPUT.
Each time INPUT is pressed, the input source toggles.
ENG 2-1
>> Watching TV
<<
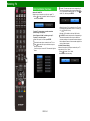
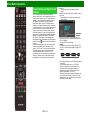
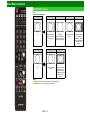
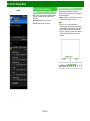
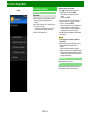
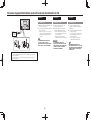
Initial Installation
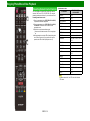
Perform the following steps before you press POWER on the
remote control unit.
1. Insert the batteries into the remote control unit.
2. Connect the antenna cable to the TV.
3. Plug in the AC cord to the AC outlet.
Location & Time
Make settings for the country, area and time zone where
you use the TV.
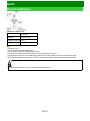
2 Press / to select "United States", "Canada" or
"Mexico", and then press ENTER.
Language (Language setting)
Select from among 3 languages: English, French and
Spanish.
1 Press / to select the desired language listed on the
screen, and then press ENTER.
3 Press / to select the time zone where you are using
the TV, and then press ENTER.
Example
The time zone differs depending on the selected
country.
The factory preset value is the time zone for the capital
of the selected country.
ENG 2-2
>> Watching TV
<<
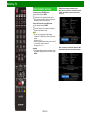
Initial Installation (Continue)
5 Press / to select "Home" or "Store".
Press ENTER to enter the setting.
4 Press / to select the Daylight Savings Time, and then
press ENTER.
"Auto" is the default selection.
TV Location
Select "Home" or "Store" for the location where you plan to
install the TV.
ENG 2-3
Home: "Power Saving" is set to "Advanced", and AV
MODE is set to "STANDARD".
Store: "Power Saving" is set to "Off" and AV MODE is set
to "DYNAMIC (Fixed)". Picture Reset and Feature Demo
can be set.
Picture Reset: AV MODE will be set to "DYNAMIC
(Fixed)" regardless of whether Picture Reset is "On" or
"Off".
If you select "On" and there is no operation for 30
minutes:
- AV MODE will be reset to "DYNAMIC (Fixed)".
When "Off" is selected:
- Even after 30 minutes elapses, AV MODE is not reset
to "DYNAMIC (Fixed)".
Feature Demo: When "On" is selected, after all the
settings are completed, the Feature Demo screen is
displayed if there is no operation for several minutes.
>> Watching TV
<<
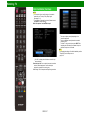
Initial Installation (Continue)
Antenna & Cable/STB
Select the type of connection you will use to watch TV.
6 Press / to select "Antenna & Cable" or "Set-top box",
and then press ENTER.
To watch TV via
(without using a
Select "Antenna
To watch TV via
an antenna or cable connection
set-top box):
& Cable", and then go to step 7.
a set-top box:
Select "Set-top box", and then press ENTER.
Check that the set-top box connected to the TV is on.
Press / to select the input to which the set-top box
has been connected.
If your Set-top box is turned off, "Disconnected" might be
shown.
ENG 2-4
To watch TV, select the input source corresponding to
the terminal connected to the set-top box. When doing
so, you must make the setting to skip "TV". Press / to
select "On", and then press ENTER.
When this is set to "On", the channel on the TV cannot
be changed using the remote control unit or menu. (e.g.
CH
/ , Favorite CH, etc.)
See page 4-20 for details on the Input Skip function.
Press INPUT to select the input source corresponding to
the terminal connected to the set-top box. Make the
necessary settings on the connected external equipment.
See the operation manual of the connected equipment for
setting up the equipment.
Air/Cable (Antenna setting)
Make sure what kind of connection is made with your TV
when selecting "Air" or "Cable".
7 Press / to select "Air" or "Cable".
Press ENTER to enter the setting.
>> Watching TV
<<
Initial Installation (Continue)
CH Search (Channel search)
Channel auto search makes the TV look for all channels
viewable in the set area.
8 When "Air" is selected in Antenna setting:
Press / to select "Start", and then press ENTER.
When "Cable" is selected in Antenna setting:
Press / to select "Analog & Digital Search Start" to
search both analog and digital broadcasts, or to select
"Analog Search Start" to search only analog broadcasts,
and then press ENTER.
The Channel search results may include scrambled
channels or channels that are not viewable in the set
area. Press / to select "Yes", and then press ENTER
to remove scrambled channels.
Smart TV
When you connect to the Internet on the TV, select the
desired connection method and follow the instructions shown
on the display.
Wireless LAN connection is possible only when the WPS
(push button) method is used. If any other method is
used, make settings by Smart TV > Internet Setup >
Internet Connection. (See pages 8-2 to 8-4.)
9 Press / to select "Yes", and then press ENTER.
10 Press / to select "Wired" or "Wireless", and then
press ENTER.
The Channel search will start automatically.
To exit the Channel search screen, select "Cancel", and
then press ENTER.
ENG 2-5
>> Watching TV
<<
Initial Installation (Continue)
Connection using an ETHERNET cable:
Select "Wired" and press ENTER.
Examples of the settings confirmation screen
When one or more channel is received after "Antenna
& Cable" was selected in step 6 and a search was
carried out.
Confirm that the TV is properly connected with the
router, and then press "Next". Follow the instructions on
the display to perform the connection test.
Wireless LAN connection by the WPS method:
Select "Wireless" and press ENTER.
Follow the instructions on the display, and finalize the
connection after testing its viability.
NOTE
After you finish configuring the network settings,
configure the "TV Name Setting", "Remote Control App"
settings.
(See page 4-26, 7-2.)
When you change the network settings, refer to Smart TV
> Internet Setup > Internet Connection.
(See pages 8-2 to 8-4.)
Completed
11 The settings confirmation screen is displayed. Confirm
the information displayed on the screen, and then press
ENTER.
ENG 2-6
When no channel is received after "Antenna & Cable"
was selected in step 6 and a search was carried out.
>> Watching TV
<<
Initial Installation (Continue)
NOTE
If no channel is found, confirm the type of connection
made with your TV and try "Easy Setup" again.
(See page 4-13.)
To see the list of channels found during Channel search,
press INPUT, and then press .
When "Set-top box" was selected in step 6.
This may not display correctly depending on the
connected equipment.
This is not displayed correctly when the connected
equipment is off.
To watch TV using a set-top box, press INPUT after
completing the initial settings, and select the input to
which the set-top box is connected.
NOTE
For changing the settings of the Initial Installation, perform
"Easy Setup" on the Setup menu on
page 4-13.
Click "OK" to display the confirmation screen for input
source switching.
Show the input list: You can check the current connection
status of external equipment. Confirm which input
terminal is connected to the set-top box.
OK: Clicking "OK" will complete the Easy Setup procedure.
ENG 2-7
>> Direct Button Operation
<<
Changing Channels
You can change channels in several ways.
Method 1
Using CH / on the remote control unit or on the TV.
Method 2
Using remote control buttons 0-9, • (DOT).
Examples:
To select a 1 or 2-digit channel number (e. g., Channel
5):
Press 5
ENTER
To select a 3-digit channel number (e. g., Channel
115):
Press 1
1
5
ENTER
To select a 4-digit channel number (e. g., Channel
22.1):
Press 2
2
• (DOT)
1
ENTER
Method 3
Selecting the program from the Channel list.
1 Press INPUT on the remote control unit.
The INPUT list displays.
2 Press / to select "AIR" or "CABLE".
The Channel list displays.
3 Press / to select the desired channel, and then press
ENTER.
ENG 3-1
NOTE
When selecting a 1-digit channel number, it is not
necessary to press 0 before the number.
When you enter 0-9 only, channel selection will be made
if there is no operation within a few seconds.
If you push "0" by itself, nothing will happen.
Complete the above steps within a few seconds.
When you enter 0-9 and • (DOT), channel selection will
be made if there is no operation within a few seconds.
>> Direct Button Operation
<<
Changing Volume
You can change the volume by pressing VOL+/- on the TV
or on the remote control unit.
To increase the volume, press VOL +.
To decrease the volume, press VOL -.
Audio status
Output device
Speaker
Output Select
Fixed
Variable
Variable sound
Mute
When "Output Select" is set to "Variable", the indicator on
the screen changes as shown below.
NOTE
See page 4-20 for details on the Output Select function.
ENG 3-2
>> Direct Button Operation
<<
MUTE
3D Surround
Mutes the current sound output.
Press MUTE.
"
" will be displayed on the screen for 30 minutes, and
the sound is silenced.
NOTE
Within 30 minutes of pressing MUTE, mute can be
canceled by pressing VOL+/- or MUTE.
Mute will be canceled after 30 minutes have passed.
However, the TV will not suddenly output a loud sound
as the volume level is set to 0 automatically.
The surround function produces Surround effect from the
speakers.
3D Stadium: Reproduces lifelike experience of excitements
such that live sports or concert performances in a
stadium create.
3D Hall: Reproduces concert hall experience with realistic
live surround sound using measured reverberant sound
in the concert hall.
3D Movie: Reproduces movie theater experience with
realistic live surround sound using measured reverberant
sound in the movie theater.
3D Standard: Creates 3 dimensional surround sound with
detailed control of the signal phase.
Normal: Provides mild surround sound.
Off: Outputs the normal sound.
NOTE
The Audio Settings menu is grayed out when "Output
Select" is set to "Variable".
(See page 4-20.)
For some discs, setup may be required on your BD/DVD
player. In this case, please refer to the operation manual
of your BD/DVD player.
This button doesn't operate when you are watching Home
Network or SD/USB mode.
ENG 3-3
>> Direct Button Operation
<<
FREEZE
Allows you to capture and freeze a moving image that you
are watching.
Press FREEZE.
A moving image is captured.
Press FREEZE again to cancel the function.
NOTE
When this function is not available, "No displaying still
image available." will display.
The still image automatically goes out after 30 minutes.
If you are using the freeze function and a broadcast
activates the V-CHIP BLOCK, the freeze function will be
canceled and a V-CHIP BLOCK message will appear.
You can have the same settings by choosing "Freeze" on
the menu items.
(See page 4-28.)
You cannot operate the "FREEZE" function during 4K
signal input.
Operate this function during the input of other types of
signals(as Full HD).
ENG 3-4
>> Direct Button Operation
<<
FLASHBACK
Press FLASHBACK to switch to the previously tuned
channel or previous input mode.
Press FLASHBACK again to switch back to the currently
tuned channel.
NOTE
FLASHBACK will not work if no channel has been
changed after the TV is turned on.
ENG 3-5
>> Direct Button Operation
<<
SmartCentral
Allows you to directly activate various types of applications.
1 Press SmartCentral to display the application window.
Press SmartCentral again to display a list of
applications by category.
2 Press / (or / ) to select the desired application, and
then press ENTER.
If you changed the display to the list of applications in
step 1, select a category and then an application.
See pages 8-11 to 8-12 for details.
If "
" is displayed, check the USB connection.
If "
" or "
" is displayed, check your TV’s
network settings and connection.
NOTE
See page 5-2, 8-6 to 8-8 for details of viewable
applications.
You can display the application window by choosing "App
Dock" on the menu items.
(See page 4-28.)
When this function is not available, "Can not operate this
function now" will display.
ENG 3-6
>> Direct Button Operation
<<
NETFLIX
Displays the Netflix screen.
Press NETFLIX.
NOTE
If you press the NETFLIX button when the TV is turned off,
the TV turns on and the NETFLIX screen is displayed.
To enjoy Netflix, you need to make:
—a broadband Internet connection
(See page 8-1.)
—settings of Internet Setup
(See pages 8-2 to 8-4.)
—adjustments for Netflix
(See page 8-12.)
ENG 3-7
>> Direct Button Operation
<<
Examples: when receiving MTS and SAP
STEREO mode:
AUDIO
MTS/SAP stereo mode
The TV has a feature that allows reception of sound other
than the main audio for the program. This feature is called
Multi-channel Television Sound (MTS). The TV with MTS
can receive mono sound, stereo sound
and Secondary Audio Programs (SAP). The SAP feature
allows a TV station to broadcast other information, which
could be audio in another language or something completely
different like weather information.
You can enjoy Hi-Fi stereo sound or SAP broadcasts
where available.
Stereo broadcasts: View programs like live sporting
events, shows and concerts in dynamic stereo sound.
SAP broadcasts: Receive TV broadcasts in either MAIN
or SAP sound.
MAIN sound: The normal program soundtrack (either in
mono or stereo).
SAP sound: Listen to a second language, supplementary
commentary or other information. (SAP is mono sound.)
If stereo sound is difficult to hear.
Obtain a clearer sound by manually switching to fixed
mono-sound mode.
You can change MTS as shown below to match the
television broadcast signal.
Press AUDIO to toggle between audio modes.
ENG 3-8
STEREO + SAP mode:
MAIN + SAP mode:
MONO mode:
MONO
Digital broadcasting audio mode
The types of audio transmitted in a digital broadcast include
SURROUND as well as MONO and STEREO. In addition, it
is possible for multiple audio tracks to accompany a single
video track.
Press AUDIO to toggle between audio modes.
Example: when receiving Digital broadcasting
NOTE
MTS only operates while in TV mode.
You can have the same settings by choosing "Change
Audio" on the menu items.
(See page 4-29.)
>> Direct Button Operation
<<
Sleep Timer
Allows you to set a time when the TV automatically switches
to standby.
Press SLEEP.
The remaining time displays when the sleep timer has
been set.
Each time you press SLEEP, the remaining time switches
as shown below.
When set, the time automatically starts counting down.
If you want to adjust the sleep timer, you can press
SLEEP twice then change the time setting.
When it is 5 minutes before the time expires, the
remaining time will start to keep appearing every minute.
NOTE
Select "Off" by pressing SLEEP to cancel the sleep timer.
The TV will enter standby when the remaining time
reaches 0.
ENG 3-9
>> Direct Button Operation
<<
Example:
When using the HDMI IN 1 to 4 terminals
AV MODE
AV MODE gives you several viewing options to choose from
to best match the surrounding environment of the TV, which
can vary due to factors like room brightness, type of
program watched or the type of device connected.
You can use USER Mode to create customized settings for
each TV input. These settings will be automatically saved on
each input for convenience.
Press AV MODE. Current AV MODE displays.
Press AV MODE again before the mode displayed on the
screen disappears.
The mode changes as shown below:
Example:
When using the COMPONENT IN/VIDEO IN terminal
ENG 3-10
>> Direct Button Operation
<<
AV MODE (Continue)
STANDARD: For a highly defined image in a normal
lighting.
MOVIE: For a movie.
MOVIE THX: Changes the image quality so that it
conforms to the THX display standard.
GAME: Lowers image brightness for easier viewing.
PC: For PC.
USER: Allows the user to customize settings as desired.
You can set the mode for each input source.
DYNAMIC: For a clear-cut image emphasizing high
contrast, useful for sports viewing.
DYNAMIC (Fixed): Changes the image and sound settings
to the factory preset values. No adjustments are allowed.
ENG 3-11
NOTE
You can select a different AV MODE item for each input
mode. (For example, select STANDARD for TV input and
DYNAMIC for COMPONENT.)
When you play games, "GAME" is recommended for AV
MODE.
You cannot set "PC" when the TV is connected to the
Internet.
You cannot set "GAME" or "PC" when the input "Home
Network" or "SD/SDHC/USB".
You can have the same settings by choosing "AV MODE"
on the menu items.
(See page 4-5.)
>> Direct Button Operation
<<
Closed Captions and Digital Closed
Captions
Your TV is equipped with an internal Closed Caption
decoder. It allows you to view conversations, narration and
sound effects as subtitles on your TV. Closed Captions are
available on some TV programs and on some VHS home
video tapes at the discretion of the program provider.
Digital Closed Caption service is a new caption service
available only on digital TV programs (also at the discretion
of the service provider). It is a more flexible system than the
original Closed Caption system, because it allows for a
variety of caption sizes and font styles. When the Digital
Closed Caption service is in use, it will be indicated by the
appearance of a 3-letter abbreviation that also indicates the
language of the Digital Closed Captions: ENG (English),
SPA (Spanish), FRA (French) or other language codes.
Not all programs and VHS videotapes offer closed captions.
Please look for the " " symbol to ensure that captions will
be shown.
In the Closed Caption system, there can be more than one
caption service provided. Each is identified by its own
number. The "CC1" and "CC2" services display subtitles of
TV programs superimposed over the program’s picture.
In the Closed Caption system, the "Text1" or "Text2"
services display text that is unrelated to the program being
viewed (e.g., weather or news). These services are also
superimposed over the program currently being viewed.
1 Press CC.
This will present the Closed Caption information
display.
2 Press CC while the Closed Caption information is still on
the screen.
Press repeatedly until you select the desired closed
caption service.
Depending on the number of caption services in the
signal being received, you will see information such as
1/2 or 1/4 displayed.
1/2 means "the first of two services".
Example:
If a program has three services (Digital CC(ENG), CC1
and Text1), the closed caption display will toggle in this
sequence:
The CC button keeps a record of the last service selected
in its memory.
If the last closed caption mode (e.g. 1/3 ENG) you
selected is not available for the next program, or on
another channel, the closed caption service that is
available is automatically selected, and this service
appears in parentheses, e.g. "1/3(CC1)".
Closed Caption services that appear in parentheses will
not be stored in the CC button’s memory as your last
selected service. Only services that you have selected
with the CC button are stored.
ENG 3-12
>> Direct Button Operation
<<
Closed Captions and Digital Closed
Captions (Continue)
Examples:
In a case where there are two closed caption services
provided (for instance, Digital CC(ENG) and CC1), and
Digital CC(ENG) is displayed as your current selection, if
Digital CC(ENG) is not broadcast for the next program, the
other closed caption service, CC1, will be displayed in
parentheses.
A closed caption service appears in parentheses because
the service you selected is not available and a different
service is displayed on your screen. "1/1(CC1)" is displayed
instead of "1/2/ENG".
ENG 3-13
NOTE
When "Power Saving" is set to "Standard" or "Advanced",
the Power Saving leaf icon appears on the channel
information window.
See page 4-27 for details of Power Saving settings.
See page 4-30 for detailed closed caption settings.
When the program contains no closed caption, "--"
displays in the closed caption information.
If the language code, e.g. "ENG", is not found on Digital
TV programs, "--" will be shown.
Four kinds of closed caption service (CC1, CC2, Text1,
Text2) are potentially available, but a broadcast may
contain none or only some of these services at the
discretion of the program provider.
When a web page is displayed, Closed Captions are not
available.
You can have the same settings by choosing "Change
CC" on the menu items.
(See page 4-29.)
>> Direct Button Operation
<<
VIEW MODE
You can select the screen size.
1 Press VIEW MODE.
The View Mode menu displays.
The menu lists the View Mode options selectable for the type of video signal currently being received.
2 Press VIEW MODE or / while the View Mode menu is displayed to select a desired item on the menu.
You can sequentially select a View Mode that has its own aspect ratio.
NOTE
You can have the same settings by choosing "View Mode" on the menu items.
(See page 4-28.)
For HD programs
Stretch
Suitable for viewing widescreen 1.78:1 aspect ratio
program, stretch mode will
still show very thin black
bands at the top and
bottom of the screen.
Dot by Dot (Full Screen)
S.Stretch (Smart stretch)
"Dot by Dot" when the
number of pixels on the
screen and the resolution of
the signal are the same.
"Full Screen" when the
number of pixels on the
screen and the resolution of
the signal are different. In
either case, the image fully
fills the screen.
Suitable for stretching 4:3
programs to fill the screen.
Zoom
Suitable for viewing widescreen 2.35:1 aspect-ratio
programs in full screen.
NOTE
When using Dot by Dot or Full Screen, it is possible to see noise or bars around different outer portions of the screen. Please
change view mode to correct this.
ENG 3-14
>> Direct Button Operation
<<
VIEW MODE (Continue)
For 4:3 programs
Example: Screen size images
Side Bar
Suitable for viewing
conventional 4:3 programs in
their normal format.
S.Stretch (Smart stretch)
Zoom
Stretch
Suitable for stretching 4:3
programs to fill the screen.
Suitable for viewing widescreen 2.35:1 anamorphic
DVDs in full screen.
This mode is useful for 1.78:1
DVDs. When viewing 1.85:1
DVDs, stretch mode will still
show very thin black bands at
the top and bottom of the
screen.
For USB-Video, SD-Video, Home Network Video or Internet applications
Example: Screen size images
Input signal
Keeps the original
aspect ratio in a full
screen display.
ENG 3-15
>> Direct Button Operation
<<
VIEW MODE (Continue)
For PC
Example: Screen size images
Input signal
Normal
Zoom
Stretch
Dot by Dot
4:3
Keeps the original
aspect ratio in a full
screen display.
For viewing
widescreen programs.
The top and bottom of
the image is cropped.
An image fully fills the
screen.
Detects the resolution
of the signal and
displays an image
with the same number
of pixels on the
screen.
Input signal
Stretch
Dot by Dot
16:9
An image fully fills the
screen.
Detects the resolution
of the signal and
displays an image
with the same number
of pixels on the
screen.
NOTE
Connect the PC before making adjustments. See the Setup Guide.
Selectable screen size may vary with input signal type.
ENG 3-16
>> On-Screen Display Menu
<<
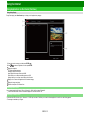
Introduction
LCFONT embedded
Guide display
This indicates the buttons that can be operated on the
displayed screen. The guide display varies depending on
the menu setting screen.
The operations for some selected items may be displayed
in the operational guide bar at the bottom of the screen.
Item displayed in blue
This indicates the item currently selected.
Press ENTER to go to the adjustment screen for this
item.
Item in brackets
This indicates the current setting for the item.
ENG 4-1
Item displayed in white
This indicates that the item can be selected.
>> On-Screen Display Menu
<<
Introduction (Continue)
About Menu Items
Some menu items may not be displayed depending on the
selected input source.
NOTE
The screens in the operation manual are for explanation
purposes (some are enlarged, others cropped) and may
vary slightly from the actual screens.
The order of explanations for each menu item in the
following pages is not necessarily in accordance with the
alignment of the items on the screen.
LCFONT:
This product is embedded with LC Font technology, which
was developed by SHARP Corporation for clearly
displaying easy-to-read characters on LCD screens.
ENG 4-2
>> On-Screen Display Menu
<<
On-Screen Display Menu Operation
Example
1 Press MENU to display the MENU screen.
3 Press MENU to exit.
2
NOTE
Menu options differ in the selected input modes, but the
operating procedures are the same.
Press
/
to select the desired menu.
Press / to select a specific adjustment item, and then
press ENTER.
Additional related adjustment items may be displayed.
Press / to select the desired item.
Adjust the item while referring to the guide display.
Operations vary depending on the function or item.
Refer to the guide display corresponding to the menu
setting screen for button operations.
ENG 4-3
>> On-Screen Display Menu
<<
Menu Operation Buttons
Using the remote control
Use the following buttons on the remote control to operate
the menu.
MENU: Press to open or close the menu screen.
/ / / : Press to select a desired item on the screen or
adjust a selected item.
ENTER: Press to go to the next step or complete the
setting.
RETURN: Press to return to the previous step.
Using the control panel of the TV
You can also operate the menu with the control panel of the
TV.
Button operations on the control panel correspond to the
ones on the remote control as shown below.
MENU: MENU on the remote control.
INPUT: ENTER on the remote control.
CH / : Cursor / on the remote control.
VOL+/-: Cursor / on the remote control.
ENG 4-4
>> On-Screen Display Menu
<<
Example
Picture Settings
AV MODE (Changing Pic.Quality)
Adjusts the picture to your preference with the following
picture settings.
NOTE
For operating the on-screen display menu, see page 4-3.
Selected
button
button
item
Backlight
The screen dims
The screen brightens
Contrast
For less contrast
For more contrast
Brightness
For less brightness
For more brightness
Color
For less color
intensity
For more color
intensity
Tint
Skin tones become
reddish
Skin tones become
greenish
Sharpness
For less sharpness
For more sharpness
For resetting all Picture adjustment items to the factory
preset values, press / to select "Reset", press
ENTER, press / to select "Yes", and then press
ENTER
ENG 4-5
The audio and video settings can be changed to suit the
program or input content being watched.
NOTE
The selectable items vary depending on the input source
and on the model of your TV.
You can select AV MODE by pressing AV MODE on the
remote control unit.
See page 3-10 for details of AV MODE settings.
>> On-Screen Display Menu
<<
Example
Picture Settings (Continue)
THX Setup
Adjust the picture to room illumination or ambient brightness.
This function is available only when AV MODE is set to
"MOVIE THX".
Bright room: Select this item for a bright room.
Dark room: Select this item for a dark room.
ENG 4-6
Automatic Light Sensor(Light Sensor)
Automatically adjusts the brightness of the screen.
Off: The brightness is fixed at the value set in "Backlight".
On: Automatically adjusts.
On:Display: Displays the Light Sensor effect on the screen
while adjusting the brightness of the screen.
NOTE
When set to "On", the Light Sensor senses the
surrounding light and automatically adjusts the backlight
brightness. Make sure nothing obstructs the Light Sensor,
which could affect its ability to sense surrounding light.
When set to "On:Display", Light Sensor effect displays on
the screen while the Light Sensor adjusts the screen
brightness.
>> On-Screen Display Menu
<<
Example
Picture Settings (Continue)
Motion Enhancement
Use Motion Enhancement to view fast-action video more
clearly.
Selected item
Description
Advanced
Resolution
This function adjusts the fineness of image for each portion.
Detail/Narrow edge/Wide edge: The fineness can be
adjusted in the range of 0 to +10.
NOTE
"Resolution" is not available when you set AV MODE to
"PC.
AquoMotion480
Turn the LED backlight on or off for
120Hz drive display.
120Hz High
For obtaining a clearer image.
120Hz Low
Off
Original image.
NOTE
"Motion Enhancement" may cause image noise. If this
occurs, turn the function "Off".
When AV MODE is set to "GAME" or "PC", or PC format
is being input, "Motion Enhancement" is not available.
Multi Pixel Drive
Set this function when two or more people are going to
watch a TV program or when you are viewing the screen
obliquely.
On: For wider viewing angle.
Off: Normally choose this.
AquoDimming
Fine brightness control can be used to adjust the contrast
between the light and shadow of the image.
High/Middle/Low/Off
NOTE
This function cannot be used during 4K signal input.
ENG 4-7
>> On-Screen Display Menu
<<
Example
Picture Settings (Continue)
Advanced
C.M.S. (Color Management System)
Color tone is managed using the six-color adjustment
setting.
C.M.S.-Hue: This is a standard to adjust the color either
more reddish or more bluish in tone.
C.M.S.-Saturation: Increases or decreases the saturation
of a selected color.
C.M.S.-Value: A higher value makes the image brighter.
A lower value makes the image darker.
NOTE
For resetting all adjustment items to the factory preset
values, press / to select "Reset", and then press
ENTER.
ENG 4-8
Color Temp. (Color Temperature)
For a better white balance, use color temperature correction.
High:
White with bluish tone
Mid-High:
Middle:
Mid-Low:
Low:
White with reddish tone
White balance can be adjusted between a maximum of +30
and a minimum of –30 for each color temperature.
R Gain (LO/HI)/G Gain (LO/HI)/B Gain (LO/HI)
Fine tuning the color temperature
To fine tune the color temperature, set "10 Point Setting" to
"On".
You can adjust the "Position" setting. Adjust the set color
temperature from +1 to +10.
White balance can be adjusted between a maximum of +30
and a minimum of –30 for each color temperature.
NOTE
When "Position" is set to "10", you can adjust the white
balance between –30 and 0.
For resetting all adjustment items to the factory preset
values, press / to select "Reset", and then press
ENTER.
>> On-Screen Display Menu
<<
Example
Picture Settings (Continue)
Advanced
Gamma Adjustment
Adjusts the differences of picture tones between bright parts
and dark parts. The adjustment range of the gamma can be
set to a maximum of +3 and a minimum of –3 by pressing
or .
Film Mode (3:2 pull-down)
This function provides high-quality playback of images
originally encoded at 24 frames/second, such as films.
Advanced (High): Provides smoother image motion while
ensuring high-quality playback.
Advanced (Low): Adjusts effect to reduce judder from film
contents.
Standard: Plays back images with equal display time for
each frame, reproducing movie theater experience.
Off: Normal viewing mode.
NOTE
"Film Mode" does not function depending on input signal
type.
"Film Mode" does not function when you set AV MODE to
"GAME" or "PC".
"Standard" does not function depending on input signal
type.
ENG 4-9
Digital Noise Reduction
Produces a clearer video image.
High/Middle/Low: You can select a desired level for
viewing a clearer video image.
Off: No adjustment.
NOTE
"Digital Noise Reduction" is not available when you set
AV MODE to "PC" or PC format is being input.
>> On-Screen Display Menu
<<
Example
Picture Settings (Continue)
Advanced
Monochrome
For viewing a video in monochrome.
Black Level
Adjusts on-screen black level to your preferred level.
High: The black level gets brighter.
Low: The black level gets darker.
NOTE
"Black Level" is available for input signal from Composite
Video, Component 480i and analog broadcasts (air and
cable).
Light Sensor Adjustment
The brightness level range of the Light Sensor's automatic
adjustments can be set according to your preferences.
The adjustment range of the Light Sensor can be set to a
maximum of +16 and a minimum of –16.
Max.: –16 through +16
Min.: –16 through +16
NOTE
The "Light Sensor Adjustment" settings are active only
when "Automatic Light Sensor" is set to "On".
The maximum setting cannot be set to a smaller number
than the minimum setting.
The minimum setting cannot be set to a bigger number
than the maximum setting.
Depending on the brightness of the surrounding light, the
Light Sensor might not operate if the adjustment range is
small.
Reset
Returns Picture Settings to their factory preset values. To
reset, select "YES" and then press ENTER.
ENG 4-10
>> On-Screen Display Menu
<<
Example
Audio Settings
You can adjust the sound quality to your preference with the
following settings.
NOTE
For operating the on-screen display menu,
see page 4-3.
Selected
button
button
item
Treble
For weaker treble
For stronger treble
Bass
For weaker bass
For stronger bass
Balance
Decrease audio from
the right speaker
Decrease audio from
the left speaker
NOTE
The Audio menu is grayed out when "Output Select" is
set to "Variable".
(See page 4-20.)
For resetting Audio adjustment items to the factory preset
values, press / to select "Reset", press ENTER, press
/ to select "Yes", and then press ENTER.
Adaptive Volume
Different sound sources sometimes do not have the same
loudness level, such as a program and its commercial
brakes, The Automatic Volume Control(Auto Volume)
reduces this problem by equalizing.
ON: Reduces the loudness gaps among different sound
source. The result is automatically adjusted according to
the sound sources.
OFF: No adjustment.
ENG 4-11
>> On-Screen Display Menu
<<
Example
Audio Settings (Continue)
3D Surround
The surround function produces Surround effect from the
speakers.
3D Stadium: Reproduces lifelike experience of excitements
such that live sports or concert performances in a
stadium create.
3D Hall: Reproduces concert hall experience with realistic
live surround sound using measured reverberant sound
in the concert hall.
3D Movie: Reproduces movie theater experience with
realistic live surround sound using measured reverberant
sound in the movie theater.
3D Standard: Creates 3 dimensional surround sound with
detailed control of the signal phase.
Normal: Provides mild surround sound.
Off: Outputs the normal sound.
NOTE
The Audio Settings menu is grayed out when "Output
Select" is set to "Variable".
(See page 4-20.)
For some discs, setup may be required on your BD/DVD
player. In this case, please refer to the operation manual
of your BD/DVD player.
ENG 4-12
Harmonics Enhancer Extended
This function improves the sound quality by extending the
selected range.
All Range: The low range will be extended and the sounds
in the medium and high ranges, which have been lost
due to the data being compressed, will be restored.
This setting is effective when playing back audio through
a wireless interface such as when using Bluetooth
playback.
Low Range: The low range will be extended.
Off: No adjustment.
Clear Voice
This function emphasizes speech against background noise
for greater clarity.
NOTE
The Audio Settings menu is grayed out when "Output
Select" is set to "Variable".
(See page 4-20.)
Wall Mount Setup
This selects the optimal audio for the program you are
currently watching even when the TV is mounted to a wall.
Reset
Returns Audio Settings to their factory preset values. To
reset, select "YES" and then press ENTER.
>> On-Screen Display Menu
<<
Example
Setup
Easy Setup
NOTE
For operating the on-screen display menu,
see page 4-3.
When you select "Easy Setup", "CH Setup", "Parental
Control" or "Reset", you can enter the 4-digit secret
number here.
See page 4-21 for setting a secret number.
Language
You can also select a language from the Setup menu.
Select from among 3 languages: English, French and
Spanish.
NOTE
To change the language of the manual, select "MENU" >
"Setup" > "Language" to change the language. Then,
press MANUAL again.
ENG 4-13
You can run Easy Setup again, even after setting up the
preset channels.
Language: Select from among 3 languages (English,
French and Spanish).
Location & Time: Make settings for the country, area and
time zone where you use the TV.
Select your country: Select either "United States",
"Canada" or "Mexico".
Select your time zone: Select your time zone. The
available settings differ depending on the selected country.
Select DST (Daylight Savings Time): Select "Auto",
"Manual" or "Off".
TV Location: Select "Home" or "Store" for the location
where you plan to install the TV.
Home: "Power Saving" is set to "Advanced", and AV
MODE is set to "STANDARD".
Store: "Power Saving" is set to "Off" and AV MODE is set
to "DYNAMIC (Fixed)". Picture Reset and Feature Demo
can be set.
Picture Reset: AV MODE will be set to "DYNAMIC
(Fixed)" regardless of whether Picture Reset is "On" or
"Off". If you select "On", AV MODE will be reset to
"DYNAMIC (Fixed)" if there is no operation for 30 minutes.
When "Off" is selected, even after 30 minutes elapses, AV
MODE is not reset to "DYNAMIC (Fixed)".
>> On-Screen Display Menu
<<
Example
Setup (Continue)
TV Channel Setup
CH Setup
Easy Setup
Feature Demo: When "On" is selected, after all the
settings are completed, the Feature Demo screen is
displayed if there is no operation for several minutes.
Antenna & Cable/STB: Select the type of connection you
will use to watch TV.
Air/Cable: Make sure what kind of connection is made
with your TV when selecting "Air" or "Cable".
CH Search: Channel auto search makes the TV look for
all channels viewable in the set area.
If "Cable" is selected for Antenna setting, scrambled
channels are removed after the Channel search has
been completed.
Smart TV: When you connect to the Internet on the TV,
confirm the connection method and make adjustments.
Wireless LAN connection is possible only when the
WPS (push button) method is used. If any other
method is used, make settings by Smart TV > Internet
Setup > Internet Connection.
(See pages 8-2 to 8-4.)
Completed: The settings confirmation screen is displayed.
Confirm the information displayed on the screen.
NOTE
See Initial Installation on
pages 2-2 to 2-7 for setting each item.
If no channel is found, confirm the type of connection
made with your TV and try "Easy Setup" again.
If you select "Analog Search Start" and initiate the
channel search, the CH Memory for Cable Digital will be
deleted.
ENG 4-14
If Initial Installation does not memorize all the channels in
your region, follow the instructions below to manually
memorize the channels.
Air/Cable: Make sure what kind of connection is made
with your TV when selecting "Air" or "Cable".
CH Search: Channel auto search makes the TV look for
all channels viewable in the set area.
CH Memory: You can select the channels to skip in each
ANALOG (Air), ANALOG (Cable), DIGITAL (Air) and
DIGITAL (Cable).
On: Skips channels. (Channel selection disabled using CH
/ .)
Off: Does not skip channels. (Channel selection enabled
using CH / .)
Remove Scrambled CH: This function makes the TV look
for and then delete digital cable channels that are
scrambled and so unavailable in the set area. The
process may take more than 20 minutes.
Yes: Starts to remove scrambled channels.
No: This function does not work.
NOTE
See Initial Installation on
pages 2-2 to 2-7 for setting each item.
If no channel is found, confirm the type of connection
made with your TV and try channel search again.
If you select "Analog Search Start" and initiate the
channel search, the CH Memory for Cable Digital will be
deleted.
>> On-Screen Display Menu
<<
Example
Setup (Continue)
TV Channel Setup
Favorite CH (Favorite Channel Setting)
This function allows you to program 4 favorite channels, in 4
different categories. By setting the favorite channels in
advance, you can select your favorite channels easily.
To register your favorite channel:
Select "Register" and then press ENTER. Press / / / to
select the position in the category, and then press ENTER
to register.
To delete your favorite channel:
Select "1 Data Clear" and then press ENTER. Press / / /
to select the channel you want to delete, and then
press ENTER. Select "Yes" and then press ENTER.
To delete all the favorite channels, select "All Data Clear".
NOTE
Before setting the channel, select the channel you want
to register as a favorite channel.
You can display the "Favorite CH" screen by pressing
FAVORITE CH on the remote control.
ENG 4-15
Antenna Setup-DIGITAL
In order to receive digital air broadcasts, you need a digital
broadcast antenna. You can confirm the antenna
configuration through the "Antenna Setup-DIGITAL" screen.
If necessary, adjust the direction of the antenna to obtain the
maximum signal strength.
Signal Strength: The signal strength of DIGITAL channel
is displayed. The signal information is based on the
current channel.
Channel Strength: Input the 2-digit channel number to
check the signal strength of the selected channel. Make
sure the signal is strong enough for each channel.
This function is available for DIGITAL (Air) only.
>> On-Screen Display Menu
<<
Example
Setup (Continue)
MPAA (Voluntary movie rating system)
Example
Parental Control
(Parental Control Setting)
V-Chip
V-CHIP is an electronic filtering device built into your TV.
This tool gives parents a great degree of control over
broadcasts accessed by their children. It allows parents to
select programs judged suitable for child viewing while
blocking ones judged not suitable. It does so automatically
once you activate the V-CHIP feature in your TV. "V-Chip"
and "Status" will not be selectable from the menu if you do
not first configure your secret number.
The U.S. has two rating systems for viewing content: TV
Parental Guidelines and movie ratings.
The TV Parental Guidelines work in conjunction with the
V-CHIP to help parents screen out inappropriate
television shows from their children.
Movie ratings are used for original movies rated by the
Motion Picture Association of America (MPAA) as
watched on cable TV and not edited for television. The
V-CHIP can also be set to block MPAA-rated movies.
NOTE
The setting automatically enters "Block" for any ratings
below your selection.
If Status is not set to "On", the configuration settings will
not work.
ENG 4-16
Press / to adjust the item to your desired position.
" " indicates the item is blocked. Press MENU to exit.
G: General audiences. All ages admitted.
PG: Parental guidance suggested. Some material may not
be suitable for children.
PG-13: Parents strongly cautioned. Some material may be
inappropriate for children under 13.
R: Restricted. Under 17 requires accompanying parent or
adult guardian (age varies in some jurisdictions).
NC-17: No one 17 and under admitted.
X: X is an older rating that is unified with NC-17 but may be
encoded in the data of older movies.
NOTE
Voluntary movie rating system only uses an age-based
rating.
>> On-Screen Display Menu
<<
Example
Setup (Continue)
Parental Control
(Parental Control Setting)
Content
FV: Fantasy violence.
V: Violence.
S: Sexual situation.
L: Adult language.
D: Sexually suggestive dialog.
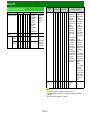
TV Parental Guidelines
Example
Rating
Content
FV
V
S
L
D
TV-Y
TV-Y7
Suggested
age
TV-G
TV-PG
TV-14
TV-MA
Suggested age
TV-Y: All children.
TV-Y7: Directed to older children.
TV-G: General audience.
TV-PG: Parental Guidance suggested.
TV-14: Parents strongly cautioned.
TV-MA: Mature audience only.
When setting an individual content-based rating item:
1 Press or ENTER to access blocked content items from
the currently selected age-based rating item.
2 Press / to select an individual item, and then press
ENTER to unblock it (" " is removed). Repeat the same
steps for the other items.
3 Press or RETURN to register after all individual
content rating items are set.
ENG 4-17
: The content rating can be set, but this rating is not
normally broadcast by TV stations.
: Content rating can be set.
Canadian Rating Systems (Canadian English ratings
and Canadian French ratings)
The TV rating systems in Canada are based on the
Canadian Radio-Television and Telecommunications
Commission (CRTC) policy on violence in television
programming.
While violence is the most important content element to
be rated, the structure developed takes into consideration
other program content like language, nudity, sexuality
and mature themes.
When setting the V-CHIP on the Canadian system you
can choose either the Canadian English ratings or the
Canadian French ratings.
>> On-Screen Display Menu
<<
Example
Setup (Continue)
Parental Control
(Parental Control Setting)
Canadian English Ratings
E: Exempt: Includes news, sports, documentaries and
other information programming; talk shows, music
videos, and variety programming.
C: Children: Intended for younger children under the age of
8 years. Pays careful attention to themes that could
threaten their sense of security and well-being.
C8+: Children over 8 years old: Contains no portrayal of
violence as the preferred, acceptable, or only way to
resolve conflict; nor encourage children to imitate
dangerous acts which they may see on the screen.
G: General: Considered acceptable for all age groups.
Appropriate viewing for the entire family, contains very
little violence, physical, verbal or emotional.
PG: Parental Guidance: Intended for a general audience,
but may not be suitable for younger children (under the
age of 8) because it could contain controversial themes
or issues.
14+: Over 14 years: Could contain themes where violence
is one of the dominant elements of the storyline, but it
must be integral to the development of plot or character.
Language usage could be profane and nudity present
within the context of the theme.
18+: Adults: Intended for viewers 18 years and older and
might contain depictions of violence, which while related
to the development of plot, character or themes, are
intended for adult viewing. Could contain graphic
language and portrayals of sex and nudity.
ENG 4-18
Canadian French Ratings
E: Exempt programming.
G: General: All ages and children, contains minimal direct
violence, but may be integrated into the plot in a
humorous or unrealistic manner.
8ans+: General but inadvisable for young children: May be
viewed by a wide public audience, but could contain
scenes disturbing to children under 8 who cannot
distinguish between imaginary and real situations.
Recommended for viewing with parent.
13ans+: Over 13 years: Could contain scenes of frequent
violent scenes and therefore recommended for viewing
with parent.
16ans+: Over 16 years: Could contain frequent violent
scenes and intense violence.
18ans+: Over 18 years: Only for adult viewing. Could
contain frequent violent scenes and extreme violence.
How to temporarily release the V-CHIP BLOCK
When the V-CHIP BLOCK is working and censors a
broadcast, "V-CHIP HAS BEEN ACTIVATED." displays.
1 Press ENTER while the V-CHIP is working, and then the
secret number setting menu displays.
2 Input the 4-digit secret number by using 0–9 . At this time
V-CHIP BLOCK temporarily releases.
>> On-Screen Display Menu
<<
Example
Setup (Continue)
Parental Control
(Parental Control Setting)
IMPORTANT:
Three conditions must be met to enable the V-Chip
(see pages 4-16 to 4-19):
1. Secret No. is registered.
2. V-Chip/V-Chip (DTV Only) settings have been made.
The "V-Chip (DTV Only)" will only be selectable when
a new rating system can be downloaded via digital
broadcasting in the U.S.
3. "Status" is set to "On".
Reactivating the temporarily released V-CHIP BLOCK
You can reactivate the temporarily released V-CHIP BLOCK
as shown below.
Select "Status" setting from the Parental Control menu to
reactivate BLOCK.
Select "V-Chip" setting ("MPAA", "TV Guidelines", "Can.
English Ratings" or "Can. French Ratings") from the
Parental Control to reactivate BLOCK.
(See pages 4-16 to 4-18.)
Switch off the TV power.
NOTE
Performing any of the three above will activate the VCHIP BLOCK.
Status
Input Settings
HDMI Setup - Auto View
When you view images sent from external equipment in an
HDMI connection, this function allows the image size on the
TV to automatically switch to an appropriate one.
NOTE
Refer to your external equipment operation manual for the
signal type.
COMPONENT/VIDEO Select
For image input applied to the COMPONENT IN or VIDEO
IN terminal, switch to “Component” or “Video”, respectively.
AUTO: Auto select signal based on fixed priority.
Component: Select component video.
Video: Select composite video.
NOTE
If no (color) image displays, try changing to
another signal type.
Check the operation manual of the external
equipment for the signal type.
When the signal type is set to “Auto”, the
input terminal where a cable is connected is
automatically selected.
When the signal type is set to “Auto” and
multiple video signal cables are connected,
"Video" will be selected.
Custom Input Label
Used to enable or disable the parental control function. This
function will not be selectable from the menu if you do not
first configure your secret number.
Quick Start Mode
When this function is activated, you can reduce the TV's
start-up time or even let the TV in standby mode start
displaying images and so on via the connected equipment
on the network.
NOTE
Setting "Quick Start Mode" to "On" consumes more
power.
ENG 4-19
Lets you set the input terminal displayed when using the
INPUT list or channel display. Press / / / to select the
new name for the input mode.
Using the software keyboard, you can enter up to
10 characters for text.
(See page 4-26.)
NOTE
You cannot change labels if the input source is TV, Home
Network, Screen Sharing, Bluetooth or SD/SDHC/USB.
>> On-Screen Display Menu
<<
Example
Setup (Continue)
Input Settings
Input Skip
This setting allows you to skip the TV, HDMI Input ("TV",
"HDMI 1", "HDMI 2", "HDMI 3" and "HDMI 4") on the Input
Selection operation.
NOTE
If you connect external equipment to an HDMI IN terminal
which you have set to be skipped, a notification message
appears on the display when a signal is received from
the connected external equipment. Press "Yes" to reset
the related skipping setting so that the input terminal
becomes available.
Advanced
Audio Setup
You can output digital audio to an AV amplifier or similar
device whose DIGITAL AUDIO INPUT terminal is connected
to the DIGITAL AUDIO OUT terminal on the TV. Please
select an audio output format compatible with the audio
format of the program you are watching and the equipment
connected.
PCM: For connecting to equipment that does not support
Dolby Digital. The same audio (main, sub, or main/sub)
as the audio of the program being viewed is output.
2-channel audio with a sampling rate of 48 kHz or less is
output as linear PCM audio.
Bitstream: For connecting to an audio system that
supports Dolby Digital. Audio is output through both the
main and sub channels.
NOTE
Analog channel audio and video input audio are output in
PCM mode even when "Bitstream" is selected.
PCM digital input signals are output in PCM mode even
when "Bitstream" is selected.
ENG 4-20
Audio Select
This function sets the terminal to output the computer audio.
The adjustment items vary depending on the input source.
Select the input source corresponding to the terminal
connected to the PC and then adjust the desired item.
To perform the operation, refer to "Setup" > "Advanced" >
"Audio Select".
(See page 7-1.)
NOTE
"Audio Select" can only be set for the HDMI IN 3.
Output Select
Allows you to select what controls the audio output.
Fixed: Sound via speaker is adjusted with VOL+/- on the
remote control unit or on the TV.
Sound via the AUDIO OUT terminal is not adjustable and
outputs at a consistent level.
Variable: Sound via the AUDIO OUT terminal is adjusted
with VOL+/- on the remote control unit or on the TV.
Sound via speaker is muted.
>> On-Screen Display Menu
<<
Example
Setup (Continue)
Advanced
AQUOS LINK Setup
Make the settings to use AQUOS LINK.
Set the settings with "Setup" > "Advanced" > "AQUOS LINK
Setup".
(See page 6-2.)
Secret No.
Allows you to use a secret number to protect certain
settings from being accidentally changed.
Setting Secret No.
You can set and change the secret number by using 0-9.
Yes: Changes or sets the Secret No.
No: The confirmation screen to clear the Secret No.
appears when the Secret No. has been set. When the
Secret No. has not been set, the previous screen will be
displayed.
Delete Secret No.
You can clear your secret number.
Yes: Your secret number is cleared.
No: Your secret number is not cleared.
NOTE
As a precautionary measure, make a note of your secret
number and keep it in a familiar place.
If the secret number is cleared, the Status setting
automatically sets to "Off". "V-Chip" and "Status" will not
be selectable from the menu.
Reset
If complex adjustments are made and the settings cannot be
restored to normal, you can reset the settings to the factory
preset values.
If you have already set the Secret No., input the 4-digit
secret number here.
NOTE
The Channel Setup settings will not be changed.
The Language settings will not be changed.
The Secret number settings will not be changed.
The TV Location settings will not be changed.
ENG 4-21
>> On-Screen Display Menu
<<
Example
Smart TV
Internet Setup
Configures LAN and Internet settings.
Dashboard
You can display a list of the main Smart TV settings.
Internet Connection
You can connect your TV to the Internet using the setting
item "Internet Connection".
(See page 8-2 to 8-4.)
Interactive Service
If you do not want other people to connect to the Internet in
your absence, you can make settings to keep the TV away
from the Internet.
(See page 8-4.)
SmartCentral Settings
Switch to the SmartCentral Settings screen.
AQUOS Remote Control
Set this function when operating the TV from equipment
connected by LAN or wireless LAN.
(See page 7-2.)
ENG 4-22
>> On-Screen Display Menu
<<
Example
Smart TV (Continue)
Wallpaper
Activating the function will display still images when the TV
is in standby mode.
Wallpaper Mode
Configures Wallpaper Mode settings.
Off:Nothing will be displayed.
Picture:Still images will be displayed when the TV is in
standby mode.
Clock: The clock will be displayed when the TV is in
standby mode.
Configure the clock settings.
NOTE
The clock mode can only be used when a network
connection has been established.
Finish configuring the network settings.
After you set the time once, the clock will continue to
operate even if you disconnect from the network.
However, you cannot switch the daylight saving time
setting when disconnected from the network.
Data Source
For the wallpaper, you can select either the still images preinstalled in the TV or your favorite still images stored in the
USB memory device or SD memory card.
Pre-Installed: The images pre-installed in the TV will be
displayed in a slideshow.
SD/SDHC/USB: Your favorite images stored for the
wallpaper will appear.
If only a single still image is stored in the USB memory
device or SD memory card, that image will be displayed
as the wallpaper. When there are multiple still images in
the memory, all the images will be displayed in a
slideshow.
NOTE
Images are displayed in 3-minute intervals as a
slideshow.
When the TV is in Wallpaper mode, you can turn off the
TV by pressing and holding POWER on the TV for 5
seconds.
- Just before the TV turns off, the last image shown
when the TV was turned off appears briefly.
- Your settings may not be saved in some cases.
ENG 4-23
When you display images by using the USB memory
device or SD memory card:
Create a folder named "WP" in the root directory of the
USB memory device or SD memory card (the first
directory when the USB memory device or SD memory
card is opened), and store into the folder the still images
you want to display for the wallpaper.
You must insert the USB memory device or SD memory
card to the TV before turning off the TV.
If there are images on the USB memory device or SD
memory card but they do not appear on the screen,
switch to SD/USB mode and check whether the image
files on the USB memory device or SD memory card are
shown correctly.
Timer Setting
You can set the length of time the TV will remain in the
Wallpaper Mode.
3 hours/6 hours/12 hours/24 hours
NOTE
No buttons except for POWER work even while the still
images are being displayed.
If the ready-for-use USB memory device or SD memory
card is not inserted, the still images pre-installed in the
TV will be displayed in a slideshow even when "Data
Source" is set to "SD/SDHC/USB".
Because the USB memory device or SD memory card
cannot be detected immediately after the TV is turned on
from standby mode, the wallpaper pre-installed in the TV
may be displayed even when "Data Source" is set to
"SD/SDHC/USB".
The still images will be displayed until the set time has
elapsed.
Clock
Configures clock settings.
Set the type of clock to use in wallpaper mode.
Spring/Summer/Fall/Winter:A clock that represents the
corresponding season will be displayed.
Random:A randomly selected clock from among the four
types will be displayed.
>> On-Screen Display Menu
<<
Example
Smart TV (Continue)
Bluetooth
Set this function when using the bluetooth devices with your
TV.
See page 8-10,9-1 for how to use the devices.
NOTE
When you use the Bluetooth device with your TV for the
first time, you must make pairing between the device and
the TV. Once the pairing is correctly carried out, the
Bluetooth device will be registered on the TV.
Keyboard Setting/Mouse Setting/Other devices Setting
You can add, delete or select Bluetooth devices in the
registration.
Addition of a Bluetooth Device
Before making the settings, press the Connect button on the
Bluetooth device you want to connect.
1 Press / to select "Search", and then press ENTER.
2 Model names of the detected devices will be displayed.
Select the device with the message "New" attached, and
then press ENTER.
When a keyboard is being paired with the TV, a PIN
code will be displayed. Enter the PIN code using the
keyboard, and then press "Enter" key on the keyboard.
When you perform pairing operation on a mouse,
select "Yes", and then press ENTER.
3 After the message indicating the pairing is complete has
been displayed, click "OK".
ENG 4-24
Deletion of a Bluetooth Device
1 Press / to select the device to delete, and then press
ENTER.
2 Press / to select "Delete", and then press ENTER.
Selection of a Bluetooth Device
1 Press / to select the device to use, and then press
ENTER.
2 Press / to select "Select", and then press ENTER.
NOTE
See also the instruction manual supplied with the
Bluetooth device.
You can register up to 6 devices to the TV, but only one
keyboard and mouse can be used at a time.
If a device for which "Selected" is displayed does not
operate properly, try searching and selecting the device
again.
The keyboard or mouse may not operate properly
depending on the application being used.
The Bluetooth device may not operate properly depending
on the device being used.
Other Devices Setting
Though up to six devices (smartphones) can be
registered, only one can be used at a time.
Repairing is required whenever you change the device
being used.
To have TV power turn on automatically when a playback
signal is received from a paired device while TV power is
off, set “Quick Start Mode” to “ON”.
>> On-Screen Display Menu
<<
Example
Smart TV (Continue)
Miracast Screen Sharing
Connection Mode Setting
Configures Connection Mode settings.
PUSH Button Mode:The push button method will be used
to establish connections.
PIN Code Mode:the PIN code method will be used to
establish connections.
Wireless Channel Setting
Set preferred wireless channel for Miracast Connection
NOTE
You cannot operate the "Miracast Screen Sharing"
function during "Screen Sharing" input.
Operate this function during the input of other types.
Depending on the connected device, different channels
may be assigned.
You can use the Wireless Channel setting to specify the
preferred channel. Select "Auto" to select the optimum
channel for the usage conditions.
Home Network
Make the settings for remote playback.
(See page 5-13.)
ENG 4-25
>> On-Screen Display Menu
<<
Example
Smart TV (Continue)
Advanced
SmartCentral Sounds
You can setting the volume of the SmartCentral sounds.
High/Medium/Low/Off: Setting the volume of SmartCentral sounds
NOTE
If an external speaker is used, the operation sound will not be heard.
This setting is only valid in SmartCentral.
TV Name Setting
Set this function when operating the TV from equipment connected by LAN or wireless LAN.
(See page 7-2.)
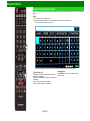
To move the cursor (the current input position), use "
" or "
" on the software keyboard.
While you are entering text, likely input conversion candidates are displayed based on what you typed in.
Caps Off/Caps Lock
If "alphabet" is selected, this switches characters between uppercase and lowercase.
Each time you press ENTER, the character type switches as shown below:
Caps Off: all the characters are lowercased
Caps Lock: all the characters are uppercased
Shift
Capitalizes the first character entered.
alphabet/Sign
Press ENTER to select the type of characters entered: alphabet, or sign.
Back space/Delete
Erases text one character at a time.
NOTE
You cannot operate the "TV Name Setting" function during "Screen Sharing" input.
Operate this function during the input of other types.
Netflix Help
You can deactivate the Netflix function. Refer to "Information" > "Netflix Help" and select "Deactivate".
(See page 8-12.)
VUDU Help
To deactivate the VUDU function, refer to "Information" > "VUDU Help" and select "Yes".
(See page 8-12.)
ENG 4-26
>> On-Screen Display Menu
<<
Example
System Options
NOTE
For operating the on-screen display menu,
see page 4-3.
Power Control
Power control setting allows you to save energy.
Audio Only
When listening to music from a music program, you can
turn the screen off and enjoy audio only.
NOTE
The screen image will return to normal when a button
(except those for audio adjustment, such as VOL,
MUTE) is pressed.
You cannot select a different Power Saving item for each
AV MODE.
When "Power Saving" is set, the "Automatic Light
Sensor" settings for all AV Modes will automatically
change.
- If you set "Automatic Light Sensor" to "On" when
"Power Saving" is set to "Standard", then the "Power
Saving" setting will change to "Advanced".
- When you change the "Power Saving" setting from
"Advanced" to "Off" or to "Standard", "Automatic Light
Sensor" will be set to "Off".
- "DYNAMIC (Fixed)" will remain set to "Off".
When "Power Saving" is set to "Standard" or "Advanced",
the Power Saving leaf icon appears to the left of
"Automatic Light Sensor" in the Picture Settings menu
screen.
No Signal Off
When this function is enabled, the TV automatically shuts
down if no signal is received for more than 15 minutes.
Power Saving
This function allows you to set the Power Saving level in
order to decrease the power consumption and increase the
backlight lifespan.
Standard: Optimizes power reduction based upon video
content. When set to "Standard", " " appears on the
screen.
Advanced: Optimizes power reduction based upon video
content and engages Light Sensor. When set to
"Advanced",
"
" appears on the screen.
Off: This function does not work.
NOTE
"Power Saving" does not function when you set AV
MODE to "DYNAMIC (Fixed)".
ENG 4-27
NOTE
When it is 5 minutes before the power shuts down, the
remaining time will start to keep appearing every minute.
When a TV program finishes, this function may not
operate.
No Operation Off
When you enable this function, the TV automatically shuts
down if no operation is performed for more than 3 hours.
NOTE
When it is 5 minutes before the power shuts down, the
remaining time will start to keep appearing every minute.
>> On-Screen Display Menu
<<
Example
System Options (Continue)
Shortcuts
These functions are useful for adjusting the audio and video
settings. The Shortcuts functions can be operated with the
remote control unit.
SmartCentral Home
Displays the SmartCentral home screen.
App Dock
The application window can be displayed by selecting "App
Dock" on the MENU screen.
NOTE
You can display the application window by pressing
SmartCentral on the remote control unit.
(See page 3-6.)
View Mode
This function changes the screen size.
Select "Shortcuts" on the menu to display the View Mode
menu screen.
The View Mode menu varies depending on the input source.
NOTE
You can select View Mode by pressing VIEW MODE on
the remote control unit.
— See pages 3-14 and 3-15 for adjusting the video being
input from a TV, other audiovisual equipment, USB-Video,
SD-Video, Home Network Video or Internet applications.
— See page 3-16 for adjusting the video being input from a
PC.
Freeze
Allows you to capture and freeze a moving image that you
are watching.
NOTE
You can select Freeze by pressing FREEZE on the
remote control unit.
See page 3-4 for details of Freeze function.
ENG 4-28
>> On-Screen Display Menu
<<
Example
System Options (Continue)
Advanced
Menu Design
Shortcuts
Configures Letter and Caption screen display settings.
Change Audio
Allows you to change the audio when multiple audio is
available for the program you are watching.
NOTE
You can change Audio by pressing AUDIO on the remote
control unit.
See page 3-8 for details of Audio function.
Change CC
Allows you to change the Closed Caption display.
Select "Change CC" on the menu to display the Closed
Caption information.
The information displayed varies depending on the
program you are watching.
NOTE
You can change Closed Caption by pressing CC on the
remote control unit.
See pages 3-12 to 3-13 for details of Closed Caption
function.
ENG 4-29
Channel Changing Effect
You can select whether to use transition effects when
changing channels.
NOTE
In some cases, "Channel Changing Effect" does not work.
Program Title Display
Select the CH display when changing channels for digital
broadcasting.
Position
For adjusting a picture's horizontal and vertical position.
H-Pos.: Centers the image by moving it to the left or right.
V-Pos.: Centers the image by moving it up or down.
NOTE
For resetting adjustments to the factory preset values,
press / to select "Reset", and then press ENTER.
When connecting a PC to the HDMI IN terminal, the
image position will be automatically adjusted. It cannot
be manually adjusted.
The screen position variable ranges depend on the View
Mode or the signal type. The ranges can be seen on the
position-setting screen.
Adjustments are stored separately according to input
source.
"Position" does not work when SD/USB mode, Home
Network mode or an Internet application is used.
>> On-Screen Display Menu
<<
Example
System Options (Continue)
Demo Mode
You can select the image from several types of demo mode.
Advanced
Menu Design
Caption Setup
This function allows you to adjust the closed caption screen
appearance to suit your preference.
Caption Size/Font Style/Foreground Color/Foreground
Opacity/Background Color/Background
Opacity/Character Edge
NOTE
For resetting adjustments to the factory preset values,
press / to select "Reset", and then press ENTER.
The default value depends on the broadcasting station.
Startup Screen
With this function activated, the SHARP logo will be
displayed when you turn on the TV.
NOTE
This function is not available when the TV is set to "Quick
Start Mode".
ENG 4-30
NOTE
What kinds of setting item are available depends on the
model of your TV.
This function will be canceled when you press EXIT on
the remote control unit.
"Demo Mode" may not be selected depending on input
signal type or application status.
"Demo Mode" may be automatically canceled depending
on input signal type.
>> On-Screen Display Menu
<<
Example
System Options (Continue)
Front Indicator Light
When this function is set to "On", the LED on the front of
the TV turns on.
NOTE
"On" is the factory preset value. If you want to turn off
the LED, set the function to "Off".
Operation Lock Out
This function locks the operation buttons on the TV and the
remote control.
Off: No adjustment.
RC Control Lock: All buttons on the remote control are
locked.
Button Control Lock: All buttons on the TV, except
POWER, are locked.
Game Play Time
This function will enable the TV to display the elapsed time
every 30 minutes, so that you do not become too absorbed
in game playing to keep track of time.
Switch AV MODE to "GAME" to activate the function.
When "RC Control Lock" or "Button Control Lock" is
selected, a confirmation screen appears.
Yes: Locks the operation buttons.
No: No adjustment.
NOTE
To unlock the buttons on the remote control by using the
control panel of the TV
(see page 4-4):
Press MENU to display the MENU screen, press
VOL+/- to select "System Options", and then press
INPUT.
Press CH / to select "Operation Lock Out", and
then press INPUT.
Press CH / to select "Off", and then press INPUT.
Press MENU to exit.
To unlock the buttons on the TV, press MENU on the
remote control, and then select "Off" in "Operation Lock
Out".
ENG 4-31
>> On-Screen Display Menu
<<
Example
Information
Auto Update Setting
NOTE
For operating the on-screen display menu,
see page 4-3.
Identification
The current version of the TV software is displayed.
Digital Caption Info.
(Digital Caption Information)
This function allows viewing of digital closed caption
information for the digital broadcast program being viewed.
NOTE
This list is not displayed for analog broadcasts or external
input audio/video.
This information is not included in CC1, CC2, Text1, or
Text2, and is not displayed in a list.
Software Update
This is used to upgrade the system software to enhance the
TV functions.
1 Press MENU to display the MENU screen, and then
press / to select "Information".
2 Press / to select "Software Update", and then press
ENTER.
If you have already set the Secret No., go to step 3.
3 Input the 4-digit secret number by using 0-9.
4 Press / to select "Manual Update" or "Auto Update
Setting", and then press ENTER.
The operations thereafter vary depending on the
setting.
ENG 4-32
When the TV is on, or when an Internet application is being
accessed, this function enables the TV to connect to the
network and check for updates automatically.
When an update is available, a message is displayed.
Press / to select "Yes", and then press ENTER to display
the download screen.
(See page 4-34.)
NOTE
This function does not work when a broadband
connection or Internet Setup is not available.
A message may also be displayed when an application is
running.The message varies depending on the
application.
Manual Update
Select the method for manually updating the software.
USB Update: Updates the software using a USB memory
device containing the update file. (See "Updating the
Software with a USB Memory Device".)
Network Update: Downloads the update file via the
network and then updates the software.
(See page 4-34.)
NOTE
You cannot update the software using a SD memory card
containing the update file.
A broadband connection and Internet Setup are required
to update the software using the network.
(See pages 8-2 to 8-4.)
It may take time to access and download the update
depending on the Internet connection and other factors.
Updating the Software with a USB Memory Device
To check for the availability of a software update, visit
http://www.sharpusa.com/products/support/. If you have any
questions, please
call 1-800-BE-SHARP (800-237-4277).
>> On-Screen Display Menu
<<
Example
Information (Continue)
Software Update
Manual Update
CAUTION
Do not remove the USB memory device or unplug the
AC cord while the software is being updated.
Be sure to properly follow the whole procedure
described below, step by step. Otherwise, for
example, the TV cannot read the data in the USB
memory device and software updating will fail.
1 Insert the USB memory device with the update file into
the USB 1, USB 2 or USB 3 terminal on the TV.
When you update the software, use only one USB
terminal. Either USB 1, USB 2 or USB 3 is usable.
ENG 4-33
2 Press / on the Manual Update screen to select "USB
Update", and then press ENTER.
3 Press ENTER to start checking the data in the USB
memory device.
The current version of the TV software and the version
of the update file on the USB memory device are
displayed.
If the USB memory device is not properly installed or
the correct update file cannot be found on the USB
memory device, an error message is displayed.
Check the file on the USB memory device, and then
reinsert the USB memory device correctly.
CAUTION
Do not remove the USB memory device or unplug the
AC cord while the software is being updated.
>> On-Screen Display Menu
<<
Example
Information (Continue)
Software Update
Manual Update
4 When the software is successfully updated, a screen is
displayed indicating that the update process is
completed.
After this screen is displayed, the TV automatically turns
off and then turns on again.
If the update has failed, check the file in the USB
memory device and try Software Update again.
5 Remove the USB memory device.
Updating the Software via the Network
1 Press / on the Manual Update screen to select
"Network Update", and then press ENTER.
The TV connects to the network and checks for
updates.
To cancel, press ENTER.
2 The current version of the TV and the latest version of
software are displayed. To update the TV software,
select "Yes", and then press ENTER.
When a server connection cannot be established or an
update is not available, a message is displayed.
If a server connection cannot be established, check
the broadband connection and Internet Setup.
3 After the update file is downloaded, the software update
process begins.
CAUTION
Do not unplug the AC cord while the software is
being updated.
4 When the software is successfully updated, a screen is
displayed indicating that the update process is
completed.
A screen indicating that the update is completed is
displayed. 4 seconds later, the TV restarts automatically.
If the software was not updated successfully, check the
broadband connection and Internet Setup, and then try
updating the software again.
Software License
Displays software version information.
Manual
Displays the built-in operation manual on the screen. You
can read information about how to use this device.
ENG 4-34
>> Enjoying Photo/Music/Video Playback
<< Preparation
You can connect the TV to a USB memory device, USB hard drive, SD memory card or Home
Network server to enjoy viewing pictures, listening to music, and watching videos.
NOTE
Depending on the USB memory device/USB hard drive/SD memory card/Home Network server,
the TV may not be able to recognize the recorded data.
It may take time to read the recorded data if the USB memory device/USB hard drive/SD
memory card/Home Network server contains many files or folders.
Use only alphanumeric characters for naming files.
File names over 80 characters (may vary depending on character set) may not be displayed.
CAUTION
Do not use a USB extension cable when connecting a USB memory device to the USB
terminal on the TV.
Using a USB extension cable with the USB memory device may prevent the TV from
performing correctly.
Connecting a Home Network Server
Connect the TV to the Home Network server using an ETHERNET cable.
You can also connect a Home Network server by using a wireless LAN.
Connecting a USB Memory Device/USB Hard Drive/SD Memory Card
Insert the USB memory device or SD memory card with recorded photos, music or videos into the
USB 1, USB 2 or USB 3 terminal or SD memory card slot on the TV.
If USB memory devices are inserted into multiple terminals, the USB 1 terminal has priority.
NOTE
Do not disconnect a Home Network server from the TV while transferring files, when a screen is
switching to another or before you exit "Home Network" from the INPUT list.
Do not connect and disconnect a Home Network server from the TV repeatedly.
When connecting a USB hard drive, be sure to use a hard drive with an AC adapter.
Do not remove a USB memory device or SD memory card from the TV while transferring files,
using the slide show function, or switching screens, or before you exit "SD/SDHC/USB" from the
INPUT list.
Do not insert and remove a USB memory device/USB hard drive/SD memory card to and from
the TV repeatedly.
When using a card reader, be sure to insert a USB memory device first.
ENG 5-1
>> Enjoying Photo/Music/Video Playback
<<
Selecting the Folders to Play Back
To play back data on a USB memory device or SD
memory card, insert the USB memory device or SD
memory card on the TV. SD/USB mode is selected
automatically. (Go to step 2)
Use the following procedure to switch back to SD/USB
mode after switching from SD/USB mode to another
mode.
1 Select "SD/SDHC/USB" or "Home Network" from INPUT
list screen.
2 Press D.
3 Press / (or / ) to select the drive/server where you
want to find your files, and then press ENTER.
ForSD/USB mode, select the drive.
When in Home Network mode, select the server.
4 Press / to select "Photo", "Music" or "Video", and
then press ENTER.
Example
You do not need to select the drive/server in step 3 when
there is only one drive in the connected USB memory
device or SD memory card or there is only one Home
Network server connected to the TV.
16 is the maximum number of USB or SD drives and 10
is the maximum number of Home Network servers that
can be displayed.
If the TV is turned off and then on again, the number
assigned to the USB or SD drive may change.
USB Device Compatibility
USB device
USB Memory, USB card reader (Mass
Storage class), USB hard drive
File system
FAT/FAT32/NTFS (USB hard drive only)
SD memory card Compatibility
SD card
SD/SDHC memory card
File system
FAT/FAT32
Photo file format
Format
JPEG, PNG
Music file format
5 Press /
ENTER.
to select the desired folder, and then press
NOTE
The Media screen can be displayed even by using the
application window. To display the application window,
press SmartCentral.
(See page 3-6.)
You cannot switch the input mode if a USB memory
device or SD memory card is not connected.
ENG 5-2
Format
Sampling rate
[KHz]
Bitrate
[Kbps]
MP3
8/11.025/12/16/
22.050/24/32/44.1/48
8~320
AAC
32/44.1/48
8~320
WMA
8/11.025/16/22.05/
32/44.1/48/64/88.2/96
8~384
WAV
(LPCM)
8/11.025/12/16/
22.050/24/32/44.1/48
8~1024
>> Enjoying Photo/Music/Video Playback
<<
Selecting the Folders to Play Back
(Continue)
Video file format
Container
Video
Audio
MPEG-1
MPEG-2
H.264
MPEG-4
VC1(WMV3)
VP6/VP8
PCM: S16LE/S16BE/
U16LE/U16BE
MP2: MPEG-1 Layer2
MP3: MPEG-1 Layer3
AC3
AAC
WMA
MPEG-1
MPEG-2
H.264
MPEG-4
VC1(WMV3)
VP6/VP8
HEVC
PCM: S16LE/S16BE/
U16LE/U16BE
MP2: MPEG-1 Layer2
MP3: MPEG-1 Layer3
AC3
AAC
WMA
Vorbis
ASF
H.264
MPEG-4
VC1(WMV3)
PCM: S16LE/S16BE/
U16LE/U16BE
MP3: MPEG-1 Layer3
AC3
WMA
PS/VRO/
VOB
MPEG-1
MPEG-2
H.264
MPEG-4
PCM: LPCM
MP2: MPEG-1 Layer2
MP3: MPEG-1 Layer3
AC3
AAC
TS
MPEG-1
MPEG-2
H.264
MPEG-4
PCM: LPCM
MP2: MPEG-1 Layer2
MP3: MPEG-1 Layer3
AC3
AAC
MP4/
SMP4
H.264
MPEG-4
VC1(WMV3)
MP2: MPEG-1 Layer2
MP3: MPEG-1 Layer3
AC3
AAC
AVI
MKV
ENG 5-3
NOTE
Progressive format jpeg files are not supported.
USB 1.1 devices may not be played properly.
Operation using USB hubs is not guaranteed.
Some video file formats may not be played depending on
the file.
Some images may not be displayed in the appropriate
aspect ratio depending on the file format.
If you insert any card other than the SD/SDHC (class 6
or higher), it will not work.
File extensions are not used to determine the file format.
Home Network Server Compatibility
Photo file format
JPEG
Music file format
LPCM, MP3
Video file format
MPEG2-PS, MPEG2-TS,
WMV, ASF, MP4, MOV, AVI
NOTE
Progressive format jpeg files are not supported.
Some video file formats may not be played depending on
the file or the server.
>> Enjoying Photo/Music/Video Playback
<<
Playing Back Files on a USB
Memory Device/SD Memory
Card/Home Network Server
Buttons for thumbnail operations
Buttons
Description
/ / /
When selecting a folder icon:
Enter this directory.
When selecting a photo thumbnail:
Enlarge the photo.
RETURN
Return to the previous process.
A (red)
SD/USB mode:
Select the images to be displayed.
Press this button to add or remove a
checkmark.
NOTE
The screen images in this section are for the SD/USB
mode. It may be slightly different in Home network mode.
Photo Mode
Viewing Thumbnails
Select a desired item.
ENTER
Example
Home Network mode:
Display the Media screen.
B (green)*
Display the music list screen. You can
select the background music to be
played for the slide show.
C (blue)
Start the slide show.
D (yellow)
Display the SD/USB MENU/Home
Network Menu screen.
*This function is available only for the SD/USB mode.
NOTE
When there are invalid photo files, the X mark will be
displayed for the file. (SD/USB mode only.)
You can see the file name, shooting date, file size and
pixel size of the selected photo in the lower-left corner of
the screen (shooting date is only available in the EXIF
file format).
ENG 5-4
>> Enjoying Photo/Music/Video Playback
<<
Playing Back Files on a USB
Memory Device/SD Memory
Card/Home Network Server
(Continue)
Viewing Individual Photos
The photo selected on the thumbnail selection screen is
displayed.
Buttons for individual display operation
Buttons
Description
/
Go to the previous/next photo in the
same directory.
RETURN
Return to the thumbnail selection
screen.
A (red)
Rotate the photo by 90 degrees to
the left.
B (green)
Rotate the photo by 90 degrees to
the right.
D (yellow)*
Display the SD/USB Menu screen.
* This function is available for the SD/USB mode only.
NOTE
The key guide display disappears automatically after a
particular time has elapsed. To display the key guide
display again, press DISPLAY.
ENG 5-5
Slide Show
The photos displayed on the thumbnail selection screen are
displayed as a slide show.
Buttons for slide show operation
Buttons
Description
RETURN
Return to the thumbnail selection
screen.
D (yellow)
Display the SD/USB MENU/Home
Network Menu screen.
NOTE
The selected BGM is played repeatedly.
The slide show continues until you press RETURN.
For setting the slide show speed, select "Select Slide
Show Interval" on the SD/USB MENU/Home Network
Menu screen.
The key guide display disappears automatically after a
particular time has elapsed. To display the key guide
display again, press DISPLAY.
>> Enjoying Photo/Music/Video Playback
<<
Playing Back Files on a USB
Memory Device/SD Memory
Card/Home Network Server
(Continue)
SD/USB MENU
On the menu to be displayed in SD/USB mode, use /
select an item and make settings to your preferences.
Example
to
Select Slide Show BGM
The music list screen appears when you select "Select
Slide Show BGM".
You can select the music to be played in the background
while the slide show is being displayed.
1 Select the music you want to play from the music list.
For operations on the music list screen, see "Music
Mode".
2 Press RETURN to display the thumbnail selection
screen, and then press C to start the slide show and the
background music.
NOTE
All of the music files are selected by default.
Select Slide Show Interval
Specify the length of time before the next image appears.
Press / to select the desired length of the time, and then
press ENTER.
5sec/10sec/30sec/60sec
NOTE
For Home Network mode, follow the same procedure.
Depending on the photo files, the length of the slide show
interval may differ from the selected interval time.
ENG 5-6
Set/Reset All Slide Show Image
Selecting "Set All Slide Show Image" or "Reset All Slide
Show Image" will display the thumbnail selection screen. On
the screen, set or reset the images to be displayed in the
slide show.
Set All Slide Show Image: Checkmarks are added to all
the images.
Reset All Slide Show Image: Removes all the
checkmarks from all the images.
Sort
You can change the way in which files are ordered.Press
to select "new→old", "old→new", or "File name order",
and then press ENTER.
Remove SD/USB Media Device
To remove the USB device or SD memory card properly,
use / to select "Yes" and then press ENTER.
/
>> Enjoying Photo/Music/Video Playback
<<
Playing Back Files on a USB
Memory Device/SD Memory
Card/Home Network Server
(Continue)
SD/USB Menu
On the menu to be displayed in SD/USB mode, use /
select an item and make settings to your preferences.
Example
to
Music Mode
Example
* See page 5-6 for details on the Remove SD/USB Media
Device function.
Buttons for music mode
Buttons
/ / /
Description
Select a desired item.
ENTER
When selecting a folder icon:
Enter this directory.
When selecting a music file:
Play music.
RETURN
Return to the previous process.
A (red)
SD/USB mode:
Select the music to be played back.
Press this button to add or remove a
checkmark.
Home Network mode:
Display the Media screen.
B (green)
Stop music.
C (blue)
Play/(Pause)* music.
D (yellow)*
Display the SD/USB MENU screen.
* This function is available only for the SD/USB mode.
NOTE
When there are invalid music files, the X mark will be
displayed for the file. (SD/USB mode only.)
The displayed play time may differ slightly from the actual
play time depending on the files.
ENG 5-7
Set/Reset All Auto Play
Selecting "Set All Auto Play" or "Reset All Auto Play" will
display the music list screen. On the screen, set or reset the
music to be played back in the slide show.
Set All Auto Play: Checkmarks are added to all the music
files.
Reset All Auto Play: Removes all the checkmarks from all
the music files.
>> Enjoying Photo/Music/Video Playback
<<
Playing Back Files on a USB
Memory Device/SD Memory
Card/Home Network Server
(Continue)
Video Mode
Example
Buttons for file selecting operations
Buttons
Description
/ / /
Select a desired item.
ENTER
When selecting a folder icon:
Enter this directory.
When selecting a video file: Play the
video.
RETURN
Return to the previous process.
A (red)
SD/USB mode:
Select/deselect items (checkmarks
are added to the selected items).
Home Network mode:
Display the Media screen.
B (green)*
Play the video file from the top of the
file.
D (yellow)*
Display the SD/USB MENU screen.
* This function is available only for the SD/USB mode.
ENG 5-8
>> Enjoying Photo/Music/Video Playback
<<
Playing Back Files on a USB
Memory Device/SD Memory
Card/Home Network Server
(Continue)
Buttons for playing mode
Buttons
Description
Go to the beginning of a file by
pressing once or to the previous file
by pressing twice.
Go to the next file.
SD/USB mode:
The fast forward speed changes
every time you press . After playing
to the end, the TV goes to the next
file and starts to play.
Home Network mode:
Jump forward in a video. *2
SD/USB mode:
The reverse speed changes every
time you press . After going back
to the beginning, the TV starts to
play the same file.
Home Network mode:
Jump back in a video. *2
ENTER
SD/USB mode:
Play/Pause the video.
Home Network mode:
Play/Pause the video. *2
RETURN
Go back to the file selection screen.
ENG 5-9
Buttons
Description
A (red)*1
Jump to the scene where playback
was last stopped.
B (green)
Stop a video.
C (blue)
Display the USB/Home Network
operation panel.
D (yellow)*1
Display the SD/USB MENU screen.
0-9*1
Jump to a point in the video during
playback of a file without chapters.
You can jump to a later point by
pressing a higher number.*3
*1 These functions are available only for the SD/USB mode.
*2 Jump forward/back and play/pause may not be available
depending on the files.
*3 During playback of a file without chapters, playback
points are set automatically. Playback points are set at
intervals of a one-tenth of playback time.
Example for a file with a playback time of 100 minutes:
Pressing 1 jumps 10 minutes forward, and pressing 2 jumps
20 minutes forward. Pressing 0 returns to the start of the file
being played back.
>> Enjoying Photo/Music/Video Playback
<<
Menu for playing mode
Playing Back Files on a USB
Memory Device/SD Memory
Card/Home Network Server
(Continue)
Example
SD/USB Menu
On the menu to be displayed in SD/USB mode, use /
select an item and make settings to your preferences.
to
Menu for file selecting operations
Example
* See page 5-6 for details on the Remove SD/USB Media
Device function.
Title (Edition)/Chapter
Selecting "Title (Edition)" or "Chapter" will display a list of
titles/chapters contained in the video file. Select the title or
chapter you want to play back.
The selected title or chapter is played back.
"0-9" is displayed for files without chapters. Playback
jumps to the playback point of the selected number.
* See page 5-6 for details on the Remove SD/USB Media
Device function.
Set/Reset All Auto Play
Selecting "Set All Auto Play" or "Reset All Auto Play" will
display the video list screen. On the screen, set or reset the
video to be played back in the slide show.
Set All Auto Play: Checkmarks are added to all the video
files.
Reset All Auto Play: Removes all the checkmarks from all
the video files.
ENG 5-10
NOTE
If there is Edition information, this screen is displayed
when the title is selected.
If there is no title or edition, you cannot select "Title
(Edition)".
"Chapter" cannot be selected when there is no chapter.
Show Video Information
The information of the current file is displayed.
>> Enjoying Photo/Music/Video Playback
<<
Playing Back Files on a USB
Memory Device/SD Memory
Card/Home Network Server
(Continue)
Buttons for using the USB operation panel
Hold down to go in reverse.
Starts playback.
Hold down to fast forward.
Video without chapters: Press once
to return to the previous playback
point.* Press twice to return to the
previous file.
Video with chapters: Press once to
return to the previous chapter. Press
twice to return to the previous file.
USB Operation Panel/Home Network Operation Panel
You can use the operation panel for video playback
operations.
You can call up this operation panel from "System Option" >
"Shortcuts".
Example
Sets pauses and still pictures.
Video without chapters: Press once
to advance to the next playback
point.* Press twice to display the next
file.
Video with chapters: Press once to
advance to the next chapter. Press
twice to display the next file.
Audio
Change the audio when multiple
audio is available for the video you
are watching.
Playback stops.
CC
Change the Closed Caption display.
Title
Displays the title (edition).
Resume jump
Jump to the scene where playback
was last stopped.
* During playback of a file without chapters, playback points
are set automatically. Playback points are set at intervals of
a one-tenth of playback time.
Example for a file with a playback time of 100 minutes:
Playback points are set every 10 minutes. Pressing
one time after viewing the file for 15 minutes jumps to the
20-minute playback point.
ENG 5-11
>> Enjoying Photo/Music/Video Playback
<<
Playing Back Files on a USB
Memory Device/SD Memory
Card/Home Network Server
(Continue)
NOTE
Reverse/fast forward continues from one file to another
during continuous playback.
Use "CC" on the operation panel to change the Closed
Caption display. You can also switch the Closed Caption
display by using "System Options" > "Shortcuts" >
"Change CC" or by pressing CC on the remote control
unit.
Use "Audio" on the operation panel to change the audio.
You can also switch the audio by using "System Options"
> "Shortcuts" > "Change Audio".
Buttons for using the Home Network operation panel
Starts playback.
Go to the beginning of a file by
pressing once or to the previous file
by pressing twice.
Sets pauses and still pictures.
Go to the next file.
Playback stops.
Jump back in a video.
Jump forward in a video.
NOTE
Jamp forward/back and play/pause may not be available
depending on the file
ENG 5-12
>> Enjoying Photo/Music/Video Playback
<<
Playing Back Files from a Portable
Device or PC
With the remote playback function, you can use your
portable device to play back pictures, video, and music on
the Home Network server.
To use the remote playback function, your portable device
must be a DLNA Certified Digital Media Controller.
A wireless access point is required to use a portable
device.
Set Up Home Network
Make the settings for remote playback.
1 Press / to select "Smart TV", and then press ENTER.
2 Press / to select "Home Network", and then press
ENTER.
3 Press / to select the specific adjustment item, and
then press ENTER to set each item.
Remote Control Play Settings
This setting allows the TV to perform remote playback.
Permitted/Not allowed
Timeout Setup
This sets the time until the TV returns automatically to TV
mode after remote playback ends.
10 sec./60 sec./No
NOTE
This function may not work while an Internet application is
being used.
For information on the compatible formats, see "Home
Network Server Compatibility" on
page 5-3.
ENG 5-13
>> Enjoying Photo/Music/Video Playback
<<
Presetting Remote Control Function
You can operate the connected AV products (AV receiver,
cable box, SAT tuner, DTV, VCR, BD, DVD, LD) using the
presetting manufacturer function of your remote control unit.
Presetting manufacturer codes
1 Press an appropriate button (STB, DVD•VCR or AUDIO)
to operate the connected equipment.
2 Press an appropriate button (STB, DVD•VCR or AUDIO)
and DISPLAY at the same time to enter the code
registration mode.
3 Press 0–9 to enter the manufacturer code.
Preset mode is finished once the LED no longer lights
up.
4 After registering the code, the LED will stop blinking then
turn off after one second. (If you perform an incorrect
operation, the LED will blink quickly then turn off.)
Manufacturer codes
REMOTE CONTROL
CODE NUMBER
STB BRAND
ANVISION
04, 05
CABLE STAR
04, 05
DISH NETWORK
39, 40
DIRECTV
41
EAGLE
05
G.INSTRUMENT
02, 03, 10, 11, 17, 20
GERROLD
17
JERROLD
02, 03, 10, 11, 12, 20, 25-34
MAGNAVOX
04, 05, 08, 12, 15, 16, 18, 19,
22, 23
MOTOROLA
38
OKA SIGMA
07
PANASONIC
14, 21
PHILIPS
04, 05, 08, 13, 15, 16, 18, 19,
22, 23
PIONEER
07
RANDTEK
04, 05
RCA
14, 36*, 37*
S.ATLANTA
01, 09, 24
VIEWSTAR
04, 05, 08, 13, 15, 16, 18, 19,
22, 23
ZENITH
06, 35
NOTE
Numbers marked with * are SAT codes, all others are
STB codes.
ENG 5-14
>> Enjoying Photo/Music/Video Playback
<<
Presetting Remote Control Function
(Continue)
REMOTE CONTROL
CODE NUMBER
BD/DVD/LD BRAND
DENON
24
JVC
31
KENWOOD
36
MAGNAVOX
26
MARANTZ
26
MITSUBISHI
28
PANASONIC
24, 37
PHILIPS
26, 38
PIONEER
30, 33, 35
PROSCAN
25
RCA
25, 39
SAMSUNG
29, 34
SHARP
23, 32, 41, 42
SONY
27, 40
TOSHIBA
26
YAMAHA
24
ZENITH
26
Depending on the brand, the codes of some BD players
may not be supported.
ENG 5-15
REMOTE CONTROL
CODE NUMBER
VCR BRAND
AUDIO DYNAMICS
09
BROCKSONIC
13
CANON
04
CRAIG
12
CURTIS MATHIS
04
DBX
09
EMERSON
10, 13, 14
GE
04
INSTANT REOLYA
04
JC PENNEY
04
JVC
09, 16, 17, 22
KENWOOD
09
MAGNAVOX
04, 05, 06
MAGNIN
12
MEMOREX
04
MONTGOMERY WARD
02
NEC
09
PANASONIC
04, 18, 19, 20, 21
PENTAX
05
PHILCO
04, 05
PHILIPS
04, 05, 06
QUASAR
04
REALISTIC
01, 02
SAMSUNG
11, 12
>> Enjoying Photo/Music/Video Playback
<<
Presetting Remote Control Function
(Continue)
REMOTE CONTROL
CODE NUMBER
VCR BRAND
SHARP
01, 02, 03
SONY
07, 08, 15
SYLVANIA
04, 05, 06
TATUNG
09
TEAC
09
TMK
10
YAMAHA
09
ENG 5-16
REMOTE CONTROL
CODE NUMBER
AUDIO BRAND
SHARP
01
SHARP (SOUND BAR)
02
>> Enjoying Photo/Music/Video Playback
<<
Operating the Connected
Equipment
To operate the connected equipment, press STB, DVD•VCR
or AUDIO to select your device. (STB
(cable/satellite set-top box), BD, DVD, VCR or AUDIO.) The
remote control unit button will function as follows.
When you operate VCR, DVD or BD, press INPUT to
select the terminal connected to your device.
CABLE and SAT cannot be selected at the same time.
1 POWER (SOURCE)
Turns the connected equipment power on and off.
2
Starts playback. (VCR, BD, DVD)
3
Rewinds the tape and allows picture search. (VCR)
Hold down to go in reverse. (BD, DVD)
4
Stops the tape transport. (VCR)
Playback stops when pressed. With some Blu-ray
disc/DVD players, pressing the button twice may open
the disc tray. (BD, DVD)
5
Pressing quickly once takes you to the start of the
chapter currently playing. Each time you press it, you
move back to the start of the previous chapter. (BD,
DVD)
6 0–9 , • (DOT)
Press a button (or buttons) that corresponds to the
channel that you wish to watch.(STB)
7
Rapidly advances the tape and allows picture search.
(VCR)
Hold down to fast forward. (BD, DVD)
8
Sets pauses and still pictures. (VCR, BD, DVD)
9
Pressing quickly once takes you to the start of the next
chapter. Each time you press it, you move ahead to
the start of the next chapter. (BD, DVD)
10 FLASHBACK
Press to switch between the current channel and the
channel you were watching immediately before. Some
manufacturers do not preset FLASHBACK. (STB)
ENG 5-17
11 CH /
Press CH
or CH to tune in to a higher or lower
channel. (STB)
Press to select the channel of the TV tuner on the
VCR. (VCR)
12 MENU
When this button is pressed, the BD/DVD menu will
display. (BD, DVD)
13 / / / , ENTER
/ / / : Press the button to select items on the STB
GUIDE screen or STB MENU screen. (STB)
Press the button to select items on the BD/DVD menu
screen. (BD, DVD)
ENTER: Press to activate the selected function. (STB,
BD, DVD)
>> Using AQUOS LINK
<< Controlling HDMI Equipment Using AQUOS LINK
What’s AQUOS LINK?
Using the HDMI CEC (Consumer Electronics Control) protocol, with AQUOS LINK you can
interactively operate compatible system equipment (Blu-ray disc equipment, AV amplifier, DVD).
By connecting AQUOS LINK-compatible devices with HDMI-certified cables to the TV, you can
control a recorder or AV amplifier using the remote control of the TV.
AQUOS LINK allows you to operate the HDMI-connected equipment with one remote control.
NOTE
Connect 4K signals (HDCP2.2) to the HDMI IN 4 terminal. These signals will not be displayed if
connected to the HDMI IN 1, 2, or 3 terminals.
For connecting the TV to AQUOS LINK-compatible equipment, use commercially available
cables.
Point the remote control toward the TV, not to connected HDMI equipment.
Video noise may occur depending on the type of HDMI cable used. Make sure to use an HDMIcertified cable.
Up to 3 pieces of HDMI recording equipment and one AV amplifier can be connected using this
system.
These operations affect the HDMI equipment selected as the current input source. If the
equipment does not operate, turn on the equipment and select the appropriate input source
using INPUT.
The AQUOS LINK feature may not operate properly when an HDMI splitter or AV selector unit
is used. These devices may cause interruptions to the image and/or sound.
Connected AQUOS LINK-compatible devices can be operated without changing the settings of the
remote control unit.
The OPTION button will function only when AQUOS LINK is used.
One Touch Play
While the TV is in standby mode, it automatically turns on and plays back the image from the
HDMI source.
Single remote control
The AQUOS LINK automatically recognizes the connected HDMI device and you can control the
TV and the devices as if using a universal remote control.
Control the AQUOS LINK-compatible audio system
Set the volume of AQUOS LINK-compatible audio system.
NOTE
The above description is an example of the AQUOS LINK function.
The steps in "AQUOS LINK Setup" on
page 6-2 need to be completed beforehand.
Refer to this operation manual and the operation manual of the AQUOS LINK device to be used
with this TV.
ENG 6-1
>> Using AQUOS LINK
<<
Controlling HDMI Equipment Using
AQUOS LINK (Continue)
AQUOS LINK Setup
Make the settings to use AQUOS LINK. Set the settings
with "Setup" > "Advanced" > "AQUOS LINK Setup".
AQUOS LINK Control
Select AQUOS LINK Control to disable the AQUOS LINK
function even when an AQUOS LINK-compatible HDMI
device is connected to the TV. This function prevents the
device from starting to operate unexpectedly.
Auto Power On
If this is activated, the One Touch Play function is enabled.
While the TV is in standby mode, it automatically turns on
and plays back the image from the HDMI source.
Selecting Recorder
When multiple AQUOS LINK-compatible devices are
connected, this function allows you to set the recorder.
Channel Select Key
This function can be set for each input terminal.
The remote control unit of the TV can be used to select the
channel, display program information, and perform other
operations of the connected AQUOS LINK-compatible
equipment.
ENG 6-2
Audio Return Channel
This function allows you to listen to the TV audio via audio
equipment without using an optical fiber cable, which
conventionally is required.
Requirements for using an ARC-compatible AV
amplifier:
ARC-compatible AV amplifier connected to the ARCcompatible HDMI IN 1 terminal.
(Refer to the operation manual of the ARC-compatible
equipment for details.)
Use of an ARC-compatible cable.
Auto: You can listen to the TV audio with ARC-compatible
audio equipment.
Off: This function does not work.
NOTE
If the TV audio cannot be output from the AV amplifier
even after making the necessary settings, connect the
TV to the AV amplifier with an optical fiber cable and
select "Off".
>> Using AQUOS LINK
<<
Controlling HDMI Equipment Using
AQUOS LINK (Continue)
One Touch Playback
AQUOS LINK allows you to operate the HDMI-connected
equipment with one remote control.
Press to start playing back a title.
The last played program is played back. You can use the
following buttons during broadcast viewing.
Buttons
Description
POWER
(SOURCE)
Turns the power of the HDMI
connected devices on and off.
Hold down this button to go in
reverse.
Starts playback.
Hold down this button to fast
forward.
Stops playback.
Sets pauses and still pictures.
Pressing quickly once takes you to
the start of the chapter currently
playing. Each time you press it, you
move back to the start of the
previous chapter.
Pressing quickly once takes you to
the start of the next chapter. Each
time you press it, you move ahead
to the start of the next chapter.
NOTE
The buttons
/
do not function with the following
Blu-ray disc players currently available.
- BD-HP20U, BD-HP50U
ENG 6-3
>> Using AQUOS LINK
<<
Link Operation Menu
Recorder Power On/Off
You can manually turn on/off the power of the connected
AQUOS LINK-compatible equipment.
Each time you press ENTER, the connected equipment
switches on or off.
Device Operation Panel
You can use the device operation panel to control playback
operations.
Press / / / to select the desired operation.
NOTE
This function works only when AQUOS LINK-compatible
equipment with the Device Operation Panel function is
connected.
Play from Rec. List
This function allows you to display the title list for the
connected equipment and to play back the title you want to
enjoy.
Before using this function.
Power on the AQUOS LINK-compatible equipment, and
select the appropriate external input.
Select the title with / / / , and then press to start
playback.
The Link Operation Menu allows you to make adjustments
during operation of AQUOS LINK-compatible equipment.
1 Press OPTION to display the Link Operation Menu.
2 Press / to select the desired item, and then press
ENTER.
Specific operations differ depending on the item you
select. Following are the basic operations for each
item.
ENG 6-4
NOTE
This function works only when AQUOS LINK-compatible
equipment is connected.
>> Using AQUOS LINK
<<
Link Operation Menu (Continue)
Show Start Menu
You can call up a setup menu from the connected AQUOS
LINK-compatible equipment.
NOTE
Depending on the status of the equipment (recording or in
standby mode, etc), the setup menu will not be
displayed.
The setup menu will not be displayed with the player BDHP20U currently available.
Change Media of Device
You can switch the media (HDD or DVD) for playback or
recording on the AQUOS LINK-compatible recorder.
The Media type toggles each time you press ENTER in
"Change Media of Device".
Link Booking (Rec. Book)
You can call up the AQUOS LINK-compatible recorder's
EPG and preset timer recordings using the TV's remote
control.
Select the program on the recorder's EPG.
You can use / / / , ENTER, RETURN, EXIT and the
colored buttons.
NOTE
This function works only when an AQUOS LINKcompatible recorder is connected.
Refer to the operation manual of the recorder for details.
ENG 6-5
Change Audio Output Device
You can select to listen to the TV sound only from the
AQUOS LINK-compatible audio system.
By AQUOS audio SP: The sound from the TV speaker is
muted and only the sound from the AQUOS LINKcompatible audio system is audible.
• You can use VOL+/- and MUTE.
By AQUOS SP: The sound is output from the TV speaker.
Change Surround Mode
You can manually change the AQUOS AUDIO speaker
system's sound mode.
The sound mode changes each time you press ENTER.
Refer to the operation manual of the AQUOS LINKcompatible audio system for details.
HDMI Device Selection
If multiple HDMI devices are connected in a daisy chain, you
can specify which device to control here.
Press / to select the desired device from a list of
connected HDMI devices, and then press ENTER.
AQUOS Link Setup
You can also display the AQUOS LINK Setup screen from
the Link Operation Menu.
Start/Stop Recording
You can also use the Link Operation Menu for recording on
the connected AQUOS LINK-compatible equipment.
>> Using AQUOS LINK
<<
Using a Smartphone with the TV
This function enables you to connect the TV to a
smartphone that supports Mobile High-Definition Link
(MHL™ ) using an MHL cable.
To connect the TV to your MHL-compatible smartphone, be
sure to use an MHL cable (commercially available).
You can view pictures and video on a large screen.
You can play back music files.
NOTE
An MHL-compatible portable device is required to use
this function. Connect the device to the HDMI IN 4
terminal.
This product incorporates MHL 1.
ENG 6-6
Auto Power On
When an MHL-compatible device is connected to the TV,
the TV turns on automatically.
This function operates when "AQUOS LINK Control" is
set to "On".
(See page 6-2.)
Auto Input Selection
When an MHL-compatible device is connected while the TV
is on, the input mode is selected automatically.
This function operates when "AQUOS LINK Control" is
set to "On".
(See page 6-2.)
Operation Using the Remote Control
The remote control of the TV can be used to operate a
portable device.
/ / / , ENTER, EXIT, 0-9, • (DOT), ENT, etc.
The operations vary depending on the connected
equipment and content being viewed.
>> Using a PC
<< Setting Audio Input
Audio Select
This function sets the terminal to output the computer audio.
The adjustment items vary depending on the input source. Select the input source corresponding
to the terminal connected to the PC and then adjust the desired item.
To perform the operation, refer to "Setup" > "Advanced" > "Audio Select".
HDMI 3
HDMI(Digital): Select this when the TV and PC are connected using an HDMI-certified cable and
audio is input via the same cable.
HDMI+Analog: Select this when the TV and PC are connected using a HDMI-certified cable and
the audio is input via a Ø 3.5 mm stereo minijack.
NOTE
When "Audio Select" is set to "HDMI(Digital)", sound will not be produced if you use only an
HDMI-certified cable to connect HDMI-compatible equipment. To produce sound, you should
make an analog audio connection.
If you want to connect HDMI-compatible equipment using only an HDMI-certified cable, set
"Audio Select" to "HDMI(Digital)".
ENG 7-1
>> Using a PC
<< Control of the TV
Communication Conditions for IP
The TV can be controlled from a PC, control panels and other devices using the RS-232C or IP.
Use a cross-type RS-232C cable, ETHERNET cable (commercially available) or wireless LAN for
the connections.
NOTE
This operation system should be used by a person who is accustomed to using computers.
AQUOS Remote Control
Set this function when operating the TV from equipment connected by LAN or wireless LAN. To
perform the operation, refer to "Smart TV".
Remote Control App
When "Remote Control App" is selected, "Change" will be highlighted. Press ENTER.
Detailed Settings
Make the detailed settings (Login ID, password, etc.).
Follow the on-screen instructions to configure the settings.
TV Name Setting
Set the name of the TV displayed on other network devices.
Use the software keyboard to set the name.
See page 4-26 for details on the software keyboard.
Connect to the TV with the following settings made for IP on the PC.
IP protocol:
TCP/IP
Host IP address:
Set the IP address on the TV menu
Service:
None (Do not select Telnet or SSH)
TCP port#:
Set a port number on the TV menu (Control
port)
When you set your ID and password on the TV menu, you need to enter them as soon as you
connect to the TV.
NOTE
When you use this function, make settings for "AQUOS Remote Control".
The connection will be cut off when there has been no communication for 3 minutes.
Communication Conditions for RS-232C
Set the RS-232C communication settings on the PC to match the TV's communication conditions.
The TV's communication settings are as follows:
Baud rate:
9,600 bps
Data length:
8 bits
Parity bit:
None
Stop bit:
1 bit
Flow control:
None
Communication procedure
Send the control commands from the PC via the RS-232C or IP.
The TV operates according to the received command and sends a response message to the PC.
Do not send multiple commands at the same time.
Wait until the PC receives the OK response before sending the next command.
ENG 7-2
>> Using a PC
<< Control of the TV (Continue)
Command table
Commands not indicated here are not guaranteed to operate.
CONTROL ITEM
COMMAND
PARAMETER
Command format
Eight ASCII codes +CR
POWER ON
COMMAND SETTING
R
S
P
W
Command 4-digits: Command. The text of four characters.
Parameter 4-digits: Parameter 0–9, x, blank, ?
Parameter
Input the parameter values, aligning left, and fill with blank(s) for the remainder. (Be sure that 4
values are input for the parameter.)
When the input parameter is not within an adjustable range, "ERR" returns. (Refer to "Response
code format".)
Any numerical value can replace the "x" on the table.
POWER SETTING
P
INPUT
TOGGLE I
SELECTION
CONTROL CONTENTS
0
_
_
_
Off
The Power On
command
rejected.
1
_
_
_
On [RS-232C]
The Power On
command
accepted.
2
_
_
_
On [IP]
The Power On
command
accepted.
0
_
_
_
Power Off
It shifts to
standby.
O
W
R
1
_
_
_
Power On
Power On
T
G
D
x
_
_
_
(Toggle)
It inputswitches by
the toggle. (It
is the same as
an input
change key)
Response code format
Normal response
TV
I
T
V
D
0
_
_
_
1-8
I
A
V
D
*
_
_
_
It inputswitches to
TV. (A channel
remains as it
is. (Last
memory))
Problem response
(communication error or incorrect command)
1: HDMI IN 1,
2: HDMI IN 2,
3: HDMI IN 3,
4: HDMI IN 4,
5: COMPONENT/
VIDEO IN
NOTE
If an underbar (_) appears in the parameter column, enter a space.
If an asterisk (*) appears, enter a value in the range indicated in brackets under CONTROL
CONTENTS.
Any numerical value can replace the "x" on the table.
ENG 7-3
>> Using a PC
<< Control of the TV (Continue)
CONTROL ITEM
COMMAND
CONTROL
ITEM
PARAMETER
CONTROL CONTENTS
AV MODE SELECTION
A
V
M
D
*
*
*
_
0: (Toggle),
1: STANDARD,
2: MOVIE,
3: GAME,
4: USER,
5: DYNAMIC
(Fixed),
6: DYNAMIC,
7: PC,
17: MOVIE THX
VOLUME
Volume (0-100)
POSITION
V
O
L
M
*
*
*_
_
HPOSITION
H
P
O
S
*
*
*
_
VPOSITION
V
P
O
S
*
*
*
_
COMMAND
PARAMETER
CONTROL CONTENTS
VIEW MODE
W
I
D
E
*
*
_
_
0: (Toggle) [AV],
1: Side Bar [AV],
2: S.Stretch [AV]
3: Zoom [AV],
4: Stretch [AV,
USB-Video, Home
Network Video or
Internet
applications],
5: Normal [PC]
6: Zoom [PC],
7: Stretch [PC],
8: Dot by Dot [PC]
[AV],
9: Full Screen [AV]
10: Auto [USBVideo, USB-Photo,
SD-Video, SDPhoto, Home
Network Video,
Photo or Internet
applications],
11: Original [USBVideo, USB-Photo,
SD-Video, SDPhoto, Home
Network Video,
Photo or Internet
applications]
MUTE
M
U
T
E
*
_
_
_
0: (Toggle),
1: On,
2: Off
Although it can
choose now, it
is toggle
operation in
inside.
The screen
position
variable ranges
depend on the
View Mode or
the signal type.
0: Although it can
choose now, it is
toggle operation
in inside.
1: Only available
when 4:3 signal
is being input.
5, 6: Only
available when
4:3 signal is
being input.
8: [PC] Available
except when
UXGA is being
input.
[AV] Only
available when
the number of
pixels on the
screen and the
resolution of the
signal are the
same.
9: Only available
when the number
of pixels on the
screen and the
resolution of the
signal are
different.
10, 11: Available
when USBVideo, USBPhoto, SD-Video,
SD-Photo, Home
Network Video,
Photo or Internet
application is
used.
NOTE
If an underbar (_) appears in the parameter column, enter a space.
If an asterisk (*) appears, enter a value in the range indicated in brackets under CONTROL
CONTENTS.
Any numerical value can replace the "x" on the table.
ENG 7-4
>> Using a PC
<< Control of the TV (Continue)
CONTROL ITEM
SURROUND
COMMAND
A
C
S
U
CONTROL ITEM
PARAMETER
*
_
_
_
CONTROL CONTENTS
0:
2:
4:
5:
6:
7:
(Toggle),
Off,
Hall,
Movie,
Standard,
Stadium
AUDIO
SELECTION
A
C
H
A
x
_
_
_
(Toggle)
SLEEP TIMER
O
F
T
M
*
_
_
_
0: Off,
1: OFF
MIN.,
2: OFF
MIN.,
3: OFF
MIN.,
4: OFF
MIN.
COMMAND PARAMETER
CONTROL CONTENTS
CHANNEL DIRECT
D C C H *
CHANNEL
(ANALOG)
*
*
_
The
channel
number of
TV
(1-135)
An input change is included if it
is not TV display.
In Air, 2-69ch is effective.
In Cable, 1-135ch is effective.
DIRECT
D A 2 P *
CHANNEL
(DIGITAL)
D C 2 U *
*
*
*
(01009999)
DIGITAL Air (Two-Part
numbers, 2-digit plus 2-digit)
*
*
_
(1-999)
DIGITAL Cable (Two-Part
numbers, 3-digit plus 3-digit)
Front half of DIGITAL CABLE
CHANNEL NO. (Designate
major channel)
D C 2 L *
*
*
_
(0-999)
DIGITAL Cable (Two-Part
numbers, 3-digit plus 3-digit)
Rear half of DIGITAL CABLE
CHANNEL NO. (Designate
minor channel)
TIMER - 30
TIMER - 60
TIMER - 90
TIMER - 120
NOTE
If an underbar (_) appears in the parameter column, enter a space.
If an asterisk (*) appears, enter a value in the range indicated in brackets under CONTROL
CONTENTS.
Any numerical value can replace the "x" on the table.
ENG 7-5
>> Using a PC
<< Control of the TV (Continue)
CONTROL ITEM
CHANNEL
DIRECT
CHANNEL
(DIGITAL)
COMMAND
D
D
C
C
1
1
0
1
CONTROL ITEM
PARAMETER
*
*
*
*
*
*
*
*
CONTROL CONTENTS
(0-9999)
(0-6383)
DIGITAL Cable
(One-Part
numbers, 5digit, less than
10,000)
DIGITAL Cable
(One-Part
numbers, 5digit, more than
10,000)
CH UP
C
H
U
P
x
_
_
_
The channel If it is not TV
number of TV display, it will
+1
input-switch to
TV. (same
function as CH
)
CH DOWN
C
H
D
W
x
_
_
_
The channel If it is not TV
number of TV display, it will
-1
input-switch to
TV. (same
function as CH
)
CC
C
L
C
P
x
_
_
_
(Toggle)
DEVICE NAME
T
V
N
M
1
_
_
_
The device
name set in
“TV Name
Setting” is
displayed.
MODEL NAME
M
N
R
D
1
_
_
_
The model
name of the TV
COMMAND
PARAMETER
CONTROL CONTENTS
SOFTWARE
VERSION
S
W
V
N
1
_
_
_
The current
version of the TV
software is
displayed.
IP PROTOCOL
VERSION
I
P
P
V
1
_
_
_
The currently
supported version
of IP protocol is
displayed.
NOTE
If an underbar (_) appears in the parameter column, enter a space.
If an asterisk (*) appears, enter a value in the range indicated in brackets under CONTROL
CONTENTS.
Any numerical value can replace the "x" on the table.
Toggle
operation of a
closed caption.
ENG 7-6
>> Using a PC
<< Control of the TV (Continue)
CONTROL ITEM
REMOTE CONTROL R
BUTTONS
COMMAND
C
K
PARAMETER
Y
*
*
_
_
CONTROL CONTENTS
0-9: 0-9,
10: DOT,
11: ENT,
12: POWER,
13: DISPLAY,
14: POWER
(SOURCE)
15:
,
16: ,
17:
,
18:
,
19:
,
20: ,
21:
,
23: OPTION,
24: SLEEP,
27: CC,
28: AV MODE,
29: VIEW MODE,
30: FLASHBACK,
31: MUTE,
32: VOL -,
33: VOL +,
34: CH ,
35: CH ,
36: INPUT,
38: MENU,
39: SmartCentral,
40: ENTER,
41: ,
42: ,
43: ,
44: ,
45: RETURN,
46: EXIT,
47: FAVORITE CH,
49: AUDIO,
50: A (red),
51: B (green),
52: C (blue),
53: D (yellow),
54: FREEZE,
55: FAV APP 1,
56: FAV APP 2,
57: FAV APP 3,
59: NETFLIX,
60: AAL,
61: MANUAL
NOTE
If an underbar (_) appears in the parameter column, enter a space.
If an asterisk (*) appears, enter a value in the range indicated in brackets under CONTROL
CONTENTS.
Any numerical value can replace the "x" on the table.
ENG 7-7
>> Using a PC
<< PC Compatibility Chart
It is necessary to set the PC correctly to display XGA and WXGA signal.
Resolution
720 x 400
VGA
SVGA
XGA
640 x 480
Horizontal
Frequency
Vertical
Frequency
VESA Standard
31.5 kHz
70 Hz
—
31.5 kHz
60 Hz
37.9 kHz
72 Hz
37.5 kHz
75 Hz
35.1 kHz
56 Hz
37.9 kHz
60 Hz
48.1 kHz
72 Hz
46.9 kHz
75 Hz
48.4 kHz
60 Hz
56.5 kHz
70 Hz
60.0 kHz
75 Hz
800 x 600
1024 x 768
WXGA
1360 x 768
47.7 kHz
60 Hz
SXGA
1280 x 1024
64.0 kHz
60 Hz
SXGA+
1400 x 1050
65.3 kHz
60 Hz
UXGA
1600 x 1200
75.0 kHz
60 Hz
1080p
1920 x 1080
67.5 kHz
60 Hz
―
53.95 kHz
24 Hz
―
*1
56.25 kHz
25 Hz
―
*1
67.5 kHz
30 Hz
―
*1
135 kHz
60 Hz
―
VGA and XGA are registered trademarks of International Business Machines Corp.
*1: When connecting 4K equipment, use HDMI IN 1, 2, 3 or 4 terminal.
*2: When connecting 4K60P equipment, use HDMI IN 1, 2, 3 or 4 terminal.
*2
2160p
3840 x 2160
NOTE
When connecting HDCP 2.2 equipment, use HDMI IN 4 terminal.
ENG 7-8
>> Using the Internet
<< Connecting to the Internet
By connecting your TV to a broadband system, you can access the Internet from the TV.
You can enjoy a variety of streaming content and Internet applications.
(See pages 8-11 to 8-13.)
NOTE
To connect your TV to the Internet, you must have a broadband Internet connection.
If you do not have a broadband Internet connection, consult the store where you purchased your
TV or ask your Internet service provider or telephone company.
When an Internet connection is made, an Ethernet and wireless connection cannot be used at
the same time. Use only one of the connection types.
Using an ETHERNET cable
Use an ETHERNET cable (commercially available) to connect the ETHERNET terminal on the TV
to your broadband router (commercially available).
NOTE
This TV has a built-in wireless LAN function. Using a separate wireless USB LAN adapter may
result in radio communications that do not comply with regulations on radio communications.
Therefore, do not use a separate wireless LAN adapter.
A wireless LAN connection and performance cannot be guaranteed for all residential
environments. In the following cases, the wireless LAN signal may be poor or drop, or the
connection speed may become slower.
- When used in buildings made with concrete, reinforced steel, or metal
- When placed near objects that obstruct the signal
- When used with other wireless devices that emit the same frequency
- When used in the vicinity of microwave ovens and other devices that emit a magnetic field,
electrostatic charge, or electromagnetic interference
When there is significant interference in the 2.4-GHz frequency (such as from other wireless
LAN devices, Bluetooth® devices, 2.4-GHz cordless telephones, and microwave ovens), it is
recommended that you use a wireless LAN router/access point that supports IEEE802.11a/n (5
GHz) and set the access point to transmit at 5 GHz. For setup details, see the operation
manual of your access point.
Using the wireless LAN
This TV is equipped with a wireless LAN function.
For a wireless LAN connection, you must use "Wireless Setup" to connect the access point and
TV.
ENG 8-1
>> Using the Internet
<<
Internet Setup
Internet Connection
Perform the procedure below to make adjustments or to
confirm the settings for accessing the Internet.
1 Press MENU to display the MENU screen, and then
press ENTER.
2 Press / to select "Smart TV", and then press ENTER.
3 Press / to select "Internet Setup", and then press
ENTER.
4 Press / to select "Internet Connection" or "Interactive
Service", and then press ENTER.
Select "Internet Connection" when you make general
adjustments to connect to the Internet.
If you want to make settings to restrict access to the
Internet, then select "Interactive Service".
5 Press / to select a specific item, and then press
ENTER.
6 Press / (or / ) to select the desired setting, and
then press ENTER.
7 Press MENU to exit.
ENG 8-2
You can connect your TV to the Internet using the setting
item "Internet Connection".
Auto Setup
Adjustments for network connection will be made
automatically. Select "Wired" or "Wireless" and follow the
instructions displayed on the screen.
Automatic adjustments for wireless LAN connection can
be made only for the WPS method.
If your access point uses any other method, perform
"Manual Setup".
Select the desired connection method and follow the
instructions shown on the display.
Manual Setup
You can make adjustments manually for network
connection.
Connection Type
Select the connection type.
Wired: The signal is detected and setup is performed
automatically. Use "IP Setup" to check and change the
settings as necessary.
Wireless: Configure the access point settings on "Wireless
Setup".
>> Using the Internet
<<
Internet Setup (Continue)
Wireless Setup
Make adjustments and confirm the settings necessary for
wireless LAN connection (such as search for the access
point and registration of it).
WPS push button: Allows the TV to automatically
establish the connection using a button on the access
point.
WPS PIN code: Sets up the connection by registering a
PIN code for the access point.
Selecting wireless network: Searches for and selects the
access point to be connected.
Registering wireless network: Allows you to make the
connection by entering an SSID for the access point.
If your access point supports Wi-Fi Protected Setup (WPS
push button method), it is recommended that you use this
function for the wireless connection. You can press the WPS
button on the access point to configure the settings
automatically.
The name of the WPS button function may differ
depending on the access point. See the operation
manual of the access point for details.
1 Confirm the current settings in "Connection Type".
If "Wired" is selected, press / to select "Wireless".
2 Press / to select "Wireless Setup", and then press
ENTER.
Confirm the settings. If each setting item is correct,
press MENU to exit.
If you are configuring the wireless setup for the first
time or changing the settings, go to step 3.
3 Press / to select "Change", and then press ENTER.
4 Select the desired connection method and follow the
instructions shown on the display.
5 When a connection is established, the connection details
are displayed. Press ENTER.
ENG 8-3
NOTE
Operations cannot be guaranteed when used with access
points that do not have Wi-Fi® certification.
A wireless LAN router/access point is required to connect
the TV to the Internet using a wireless LAN. See the
operation manual of your access point for setup.
If your access point is set to a stealth mode (that
prevents detection by other devices), you may not be
able to establish a connection. In this case, disable the
stealth mode on the access point.
A stable connection speed is required to play back
streaming content. Use an Ethernet connection if the
wireless LAN speed is unstable.
Before transferring to a third party or disposal, be sure to
initialize the wireless LAN settings.
Please follow the legislation in your country when using
the wireless LAN outdoors.
IP Setup
You can make adjustments manually for the IP.
Check that numbers are displayed for each setting.
If there are any settings without numbers, specify the
numbers by following the on-screen instructions.
Input the IP address by using remote control buttons 0-9.
Example
>> Using the Internet
<<
Internet Setup (Continue)
Connection Test
After the connecting and setting procedures have been
completed, you can check that the preparation is correct.
Press "Yes" to start the "Connection Test".
When the test results are displayed, follow the
instructions shown on the screen.
Interactive Service
If you do not want other people to connect to the Internet in
your absence, you can make settings to keep the TV away
from the Internet.
Input the 4-digit secret number by using 0-9.
NOTE
If you have failed to connect to the Internet in the above
operation, then an error message will appear. In this
case, press EXIT to exit from the connected TV feature
to make changes to the network settings.
If you still cannot connect to the Internet, please consult
your Internet service provider or telephone company.
When an application is used, you cannot make settings
for "Internet Setup".
If you need to make the settings of "Internet Setup",
press EXIT to exit from the connected TV feature.
If you cannot connect to the Internet
If the TV fails to connect to the Internet, then select "Internet
Connection" and;
When the TV is in a wired LAN connection, make sure
the values for "IP Setup" are all correctly set.
In the case of a wireless LAN connection, check the
settings of "Wireless Setup".
ENG 8-4
>> Using the Internet
<<
Entering Text (Software Keyboard)
When you are editing an input screen or specifying the Network settings used for accessing the Internet, enter text from the software
keyboard.
NOTE
You can enter up to 128 characters for text.
Some special characters or diacritics may not be available depending on where you enter the text.
The text you enter is displayed as you type it in.
While you are entering text, likely input conversion candidates are displayed based on what you typed in.
(Caps Off/Caps Lock)
If "alphabet" is selected, this switches characters between
uppercase and lowercase.
Each time you press ENTER, the character type switches as
shown below:
Caps Off: all the characters are lowercased
Caps Lock: all the characters are uppercased
ENG 8-5
åé(alphabet/Sign)
Press ENTER to select the type of characters entered:
alphabet, or sign.
>> Using the Internet
<<
Using the Browser
1 Press SmartCentral, press / (or / ) to select the
browser icon from the application window, and then
press ENTER.
Press SmartCentral again to display a list of
applications by category.
Buttons for Using the Browser
ENTER, / / /
Press / / / to select a link that you want to jump,
and then press ENTER.
To display the toolbar, press to move the cursor to the
top of the display.
EXIT
Press the button to return to the TV screen.
RETURN
Press the button to return to the previous page.
NOTE
Restrictions apply to window display.
ENG 8-6
>> Using the Internet
<<
Using the Browser (Continue)
Selected
item
Description
Goes to the top page that exists for the Speed
Dial and bookmarks.
Displays a list of pages in a tab that have been
displayed up to now.
Refreshes the page.
Interrupts a page while it is loading.
Selected item
Description
When Edit Mode is on, you can change
the position of the Speed Dial items.
Displayed when the Speed Dial
thumbnails cannot be used (example:
when loading).
Indicates that the selected item can be
moved during Edit Mode.
Using the Toolbar
Displays the bookmarks list.
Restrictions apply to window display.
You can use the toolbar to control the browser and to specify
settings.
1 When the cursor is moved to the top of the display by
pressing , the toolbar will be displayed.
2 Press / to select a function, and then press ENTER.
Browsing Web Contents
Displays the menu.
Displays your browsing history.
Configures browser settings such as your home
page and browsing security.
(See page 8-9.)
Searches for a phrase in the page.
Displays the browser's help.
Exits TV Browser.
ENG 8-7
You can display the web content you want to enjoy.
1 When the cursor is moved to the top of the display by
pressing , the toolbar will be displayed.
2 Press / to move to the address area in the toolbar, and
then press ENTER.
The Enter Address menu is displayed.
3 Enter an address, and then press ENTER.
The web content you want to view is displayed.
>> Using the Internet
<<
Using the Browser (Continue)
CAUTION
If the power is cut due to a power failure or the TV being
unplugged while you are using the Internet, information
such as bookmarks or cookies may not be saved
correctly.
NOTE
When a security notification window is displayed:
Press ENTER to close the window.
This window appears when you visit a web page that has
security protection, or when you move from a protected
page to an unprotected page.
To users who access the Internet from a PC
When you access the Internet from this TV, the
procedures may not be the same as regular browserbased access on a PC.
On some pages, video and audio, text or images may
not be displayed correctly.
ENG 8-8
About links
Web pages on the Internet often include "links" that allow
you to jump to other web pages (or sites).
"Links" can take various forms, including words or images,
but they always work in the same way letting you jump to
the link destination when you select them.
Selected items (such as links of text input fields) are
enclosed in a frame.
You can jump from a "link" to the corresponding link
destination.
DISCLAIMERS
SHARP corporation bears no responsibility regarding the
content and quality of the content provided by the content
serve provider.
>> Using the Internet
<<
Using the Browser (Continue)
Browser Settings
You can check or modify your browser settings from the
Browser menu.
1 When the cursor is moved to the top of the display by
pressing , the toolbar will be displayed.
2 Press / to select "
" in the toolbar, and then press
ENTER.
3 Press / to select and confirm the item you want to
set.
4 Press / / / to specify the required setting, and then
press ENTER.
ENG 8-9
>> Using the Internet
<<
Using Keyboard and Mouse
You can use a keyboard or mouse for operating the TV
while using the browser.
When you use the USB devices, connect the device to the
USB terminal on the TV.
When you use the bluetooth device, make necessary
settings with "Bluetooth".
(See page 4-24.)
NOTE
The keyboard and mouse can only be used on a browser
screen.
The keyboard or mouse may not operate properly
depending on the application being used.
The software keyboard cannot be used by the keyboard
and mouse connected via Bluetooth even on the browser
screen.
The bluetooth device may not operate properly depending
on the device being used.
ENG 8-10
>> Using the Internet
<<
Using Applications via the Internet
By connecting the TV to the Internet, you can enjoy a variety
of broadband content, including videos, music and photos.
Please check that the most current software is loaded on
TV by selecting "Auto Update Setting" on "Software
Update"
(see page 4-32) or by visiting
http://www.sharpusa.com/products/support/
to check for a download of the newest software version.
Use the application window to access your favorite Internet
applications. Press SmartCentral to display the application
window.
Follow the on-screen instructions for each application.
When using this TV to access an Internet application for
the first time, the Disclaimer appears on the screen.
Press / to select "Agree", and then press ENTER.
(You must select "Agree" to use the application.)
Check the web site of the provider for details on setup
and use of the functions.
NOTE
If "
" or "
" is displayed, check your TV's
network settings and connection.
Additional applications will be available in the future.
These applications are provided by content providers. The
available applications vary depending on your country or
region.
The delivery speed of applications varies depending on
the network speed. Check the web site of the provider
for details on application setup and other information.
Using the Application Window
During Dock Display
You can move the application icons and delete any unused
icons.
Example
1 Select an application, and then press .
2 Press / to select "Move App" or "Delete App", and
then press ENTER.
Move the Icons
You can move the icons of the more commonly used
applications closer to the left.
Press / to move the icon to the desired location.
Delete an Application
Select "Delete App" to delete the icon.
Saving Favorite Applications
You can set your favorite applications to the FAV APP1, 2,
and 3 buttons on the remote control for easier startup.
The applications whose icons are moved onto ,
and
during Dock Display will be assigned to the FAV APP 1, 2
and 3 buttons respectively.
NOTE
The SmartCentral icon cannot be moved or deleted.
ENG 8-11
>> Using the Internet
<< Using Applications via the Internet (Continue)
During Gallery Display
During Dock display, press SmartCentral again to display a list of applications by category.
1 Press
2 Press
/ to select a category, and then press ENTER or .
/ / / to select an application, and then press ENTER.
Displays the categories.
TV: Displays broadcast programs.
Streaming: Displays VOD content.
Apps: Displays various apps offered by AQUOS.
Search: Allows you to search broadcast programs and VOD.
Settings: Allows you to configure various settings for this function.
Displays a list of contents and applications for the selected category.
Displays the image now playing.
Provides a description of the selected item.
Deactivating Netflix Function
You can deactivate the Netflix function. Refer to "Information" > "Netflix Help" and select "Deactivate".
To confirm the Netflix status, check the information displayed on the screen and click "OK".
Deactivating the VUDU Function
To deactivate the VUDU function, refer to "Information" > "VUDU Help" and select "Yes".When you access the Internet application for the first time, the following appears.
This message is available only in English.
ENG 8-12
>> Using the Internet
<<
Using Applications via the Internet (Continue)
SmartCentral TV/Streaming
When "TV" or "Streaming" is selected on the SmartCentral screen, a list of broadcast programs or
VOD is displayed.
(TV)Guide: Displays a list of all broadcast programs.
(Streaming)New: Displays a list of new content.
Popular: Displays popular programs.
Favorites: Displays programs/content sorted by favorite genre as set in Settings.
NOTE
To display broadcast programs, you must set your ZIP code and TV provider on the Settings
screen.
To display streaming content, you must select the apps on the Settings screen.
However, the set apps may not be displayed on the list depending on the region.
SmartCentral Search
You can search across broadcast programs and VOD.
AQUOS Advantage Live
When you select this app on the SmartCentral screen, you can use the remote support function
from the support center and display the network status.
ENG 8-13
>> Using the Internet
<< Notes
DISCLAIMERS
This SHARP device facilitates the access to content and services provided by third parties. The content and services accessible via this device belong to and may be proprietary to third parties.
Therefore, any use of such third party content and services must be in accordance with any authorization or terms of use provided by such content or service provider. SHARP shall not be liable
to you or any third party for your failure to abide by such authorization or terms of use. Unless otherwise specifically authorized by the applicable content or service provider, all third party content
and services provided are for personal and non-commercial use; you may not modify, copy, distribute, transmit, display, perform, reproduce, upload, publish, license, create derivative works from,
transfer or sell in any manner or medium any content or services available via this device.
SHARP is not responsible, nor liable, for customer service-related issues related to the third party content or services. Any questions, comments or service-related inquiries relating to the third
party content or service should be made directly to the applicable content or service provider.
You may not be able to access content or services from the device for a variety of reasons which may be unrelated to the device itself, including, but not limited to, power failure, other Internet
connection, or failure to configure your device properly. SHARP, its directors, officers, employees, agents, contractors and affiliates shall not be liable to you or any third party with respect to such
failures or maintenance outages, regardless of cause or whether or not it could have been avoided.
ALL THIRD PARTY CONTENT OR SERVICES ACCESSIBLE VIA THIS DEVICE IS PROVIDED TO YOU ON AN "AS-IS" AND "AS AVAILABLE" BASIS AND SHARP AND ITS AFFILIATES MAKE
NO WARRANTY OR REPRESENTATION OF ANY KIND TO YOU, EITHER EXPRESS OR IMPLIED, INCLUDING, WITHOUT LIMITATION, ANY WARRANTIES OF MERCHANTABILITY, NONINFRINGEMENT, FITNESS FOR A PARTICULAR PURPOSE OR ANY WARRANTIES OF SUITABILITY, AVAILABILITY, ACCURACY, COMPLETENESS, SECURITY, TITLE, USEFULNESS,
LACK OF NEGLIGENCE OR ERROR-FREE OR UNINTERRUPTED OPERATION OR USE OF THE CONTENT OR SERVICES PROVIDED TO YOU OR THAT THE CONTENT OR SERVICES
WILL MEET YOUR REQUIREMENTS OR EXPECTATIONS.
SHARP IS NOT AN AGENT OF AND ASSUMES NO RESPONSIBILITY FOR THE ACTS OR OMISSIONS OF THIRD PARTY CONTENT OR SERVICE PROVIDERS, NOR ANY ASPECT OF THE
CONTENT OR SERVICE RELATED TO SUCH THIRD PARTY PROVIDERS.
IN NO EVENT WILL SHARP AND/OR ITS AFFILIATES BE LIABLE TO YOU OR ANY THIRD PARTY FOR ANY DIRECT, INDIRECT, SPECIAL, INCIDENTAL, PUNITIVE, CONSEQUENTIAL OR
OTHER DAMAGES, WHETHER THE THEORY OF LIABILITY IS BASED ON CONTRACT, TORT, NEGLIGENCE, BREACH OF WARRANTY, STRICT LIABILITY OR OTHERWISE AND
WHETHER OR NOT SHARP AND/OR ITS AFFILIATES HAVE BEEN ADVISED OF THE POSSIBILITY OF SUCH DAMAGES.
Examples of Application Logos
ENG 8-14
>> Using the Bluetooth/Miracast devices
<<
Bluetooth devices
You can listen to music from your TV when you connect a smartphone or other Bluetooth music
player to your TV.
And when "Quick Start Mode" is set to "ON", you can also turn on your TV with a Bluetooth
signal. (The TV automatically goes to the Bluetooth Music playback screen)
1 Switch the TV input to "Bluetooth".
NOTE
Before using a Bluetooth device, you must pair it to the TV with "Menu" > "Smart TV" >
"Bluetooth" > "Pairing New Device" > "Other Devices Setting".
When the Bluetooth device is connected to the TV over a wireless LAN, Bluetooth audio may
be interrupted depending on the status of the TV's connection to the access point.
Miracast devices
When you connect a device such as a Miracast-compatible smartphone or tablet to this TV, you
can enjoy video and audio from the device on the TV's large screen and speakers.
1 Switch the TV input to "Screen Sharing".
2 Enable the Miracast function on the Miracast device and connect to the TV.
(The TV screen changes according to the behavior of the device)
NOTE
When the TV is turned off or the connection is ended on the device, you must connect the
device again.
When connecting using a PIN code, first select the corresponding menu on the "Miracast
Screen Sharing" menu, and then perform the operations from step 1.
If you want to specify the preferred band to use with this function, select the corresponding
menu on the "Miracast Screen Sharing" menu.
(See page 4-25.)
You cannot operate the "Miracast Screen Sharing" function during "Screen Sharing" input.
Operate this function during the input of other types.
For details about the operation of the Miracast-compatible device, check the manual for that
device.
When the Miracast device is connected to the TV over a wireless LAN, Miracast video may be
distorted and Miracast audio may be interrupted depending on the status of the TV's connection
to the access point.
ENG 9-1
>> Appendix
<< Removing the Stand
2 Detach the stand from the TV.
Before detaching (or attaching) the stand, make sure to turn off the TV and unplug the AC cord.
CAUTION
Do not remove the stand from the TV unless using an optional wall mount bracket to
mount it.
1 Unfasten the four screws used to secure the stand in place.
Example
NOTE
Be sure to always carry the TV by two people holding it with two hands.
In the installation procedure, be careful not to catch your fingers between the TV set and the
floor.
ENG 10-1
>> Appendix
<< Setting the TV on the Wall
The wall mount kit (sold separately) allows you to mount the TV on the wall.
For detailed information on installing the wall mount, see the instructions provided with the product.
We recommend you to contact a technician for assistance when installing it.
SHARP is not responsible for any damage to the product or injury to yourself or others if you elect
to install the wall mount on your own.
Using an optional bracket to mount the TV
You can ask a qualified service professional about using an optional AN-52AG4 bracket to
mount the TV on the wall.
Carefully read the instructions that come with the bracket before beginning work.
CAUTION
This TV should be mounted on the wall only with the wall mount bracket AN-52AG4
(SHARP). The use of other wall mount brackets may result in an unstable installation
and may cause serious injuries.
Installing the TV requires special skill that should only be performed by qualified service
personnel. Customers should not attempt to do the work themselves. SHARP bears no
responsibility for improper mounting or mounting that results in accident or injury.
Hanging on the wall
AN-52AG4 wall mount bracket.
(See the bracket instructions for
details.)
Hanging on the wall
AN-52AG4
CAUTION
Install your wall mount on a solid wall perpendicular to the floor.
When you want to attach the wall mount to surfaces other than plaster board, please
contact your nearest retailer/adviser for additional information. If you install the TV on a
ceiling or slanted wall, it may fall and result in severe personal injury. Always have two
people mount the TV on a wall.
NOTE
Due to the terminal configuration on this TV, when you wall-mount this model, make sure there
is enough space between the wall and the TV for the cables.
To use this TV mounted on a wall, remove the AC cord holder on the rear of the TV, and then
use the screws supplied with the wall mount bracket to secure the bracket to the rear of the
TV.
LC-70UD27U
The center of the display:
3/32 inch (2mm) above the "c" position.
LC-60UD27U
The center of the display:
13/32 inch (10mm) above the "c" position.
Refer to the operation manual of AN-52AG4
for details.
ENG 10-2
>> Appendix
<< Setting the TV on the Wall(Continue)
LC-70UD27U/LC-60UD27U
The location of the AC cord holder differs depending on whether it is in its shipment location
(A)or has been used as a cable tie (B).
ENG 10-3
>> Appendix
<< Setting the TV on the Wall(Continue)
Wall Mount Kit Specifications
Standard dimensions for wall mount kits are shown below.
a1:
a2:
b1:
b2:
b3:
c1:
LC-70UD27U
VESA screw
hole specs (A-B)
Width
Height
c1
Maximum distance from the mounting hole
Maximum distance from the TV's center
Distance between the TV's center and the mounting hole
Maximum distance from the TV's center
Maximum distance from the mounting hole
Minimum gap
LC-60UD27U
15 3/4 (400) - 15 3/4 (400)
a1
2 3/8 (60)
a2
10 1/4 (260)
b1
8 9/32 (210)
8 19/32 (218)
b2
10 29/32 (277)
10 41/64 (270)
b3
3 7/16 (87)
2 39/64 (66)
ENG 10-4
>> Appendix
<< Setting the TV on the Wall(Continue)
For the screws, refer to the table shown below.
70/60 inch models
Standard screws
M6 (Use 1.0 pitch screws.)
Length(Depth of mounting holes)
15/32 (12)
Quantity
4 pcs.
NOTE
Do not mount the TV at a tilt.
To use this TV mounted on a wall, remove the cable tie as needed.
Do not use screws that do not comply with the VESA standard screw specifications.
Do not use screws that are longer than the standard length. Screws that are too long may cause damage to the inside of the TV.
Do not fasten the screws too firmly or loosely. This may damage the product or cause the product to fall, leading to personal injury. SHARP is not liable for these kinds of accidents.
SHARP is not liable for product damage or personal injury when a non-VESA or non-specified wall mount is used or the consumer fails to follow the product installation instructions.
Do not install the wall mount kit while your TV is turned on. It may result in personal injury due to electric shock.
ENG 10-5
>> Appendix
<< Troubleshooting
Problem
Problem
Possible Solution
No power
Check if you pressed POWER on the remote control unit.
Is the AC cord disconnected?
Has the power been turned on?
Unit cannot
be operated.
External influences such as lightning, static electricity, may cause improper
operation. In this case, operate the unit after first turning off the power of the
TV or unplugging the AC cord and replugging it in after 1 or 2 minutes.
Remote
control unit
does not
operate.
Is the equipment to be operated by the remote control unit set correctly?
Press TV to set the remote control unit to the setting for operating the TV.
Are batteries inserted with polarity (+, -) aligned?
Are batteries worn out? (Replace with new batteries.)
Are you using it under strong or fluorescent lighting?
Is a fluorescent light illuminated near the remote control sensor?
Is "RC Control Lock" selected in "Operation Lock Out"?
Page 4-31
Picture is cut
off/with
sidebar
screen.
Is the image position correct?
Page 4-29
Are screen mode adjustments such as picture size made correctly?
Pages 3-14 to 3-16
Strange color,
light color, or
color
misalignment
Adjust the picture tone.
Pages 4-5 to 4-10
Is the room too bright? The picture may look dark in a room that is too bright.
Power is
suddenly
turned off.
Is the sleep timer set?
Pages 3-9
Check the power control settings.
Page 4-27
The unit's internal temperature has increased. Remove any objects blocking
vent or clean.
Possible Solution
No picture
Is connection to other components correct?
Is the correct input selected?
Pages 2-1
Is "On" selected in "Audio Only"?
Page 4-27
If the PC image is not displayed, check the following:
- When connecting a laptop PC to the TV, check that display
output mode of the PC is set to external monitor.
- Check the resolution setting on the PC. Is a non-compatible
signal being input?
Page 7-8
The 4K signal (HDCP2.2) can be viewed via HDMI IN 4 only.
Change the connection.
Picture quality of HD
programs is poor.
To enjoy HD images from external equipment, you are required to
set up HDMI connection or component connection.
If the program content is not of HD quality, HD images cannot be
displayed. Check that the program you are viewing provides HD
images.
The HD cable/satellite set-top box may need to be configured to
output HD images via cable/satellite.
The cable/satellite broadcast may not support a signal resolution
of 1080p.
The TV sometimes
makes a cracking sound.
This is not a malfunction. This happens when the cabinet slightly
expands and contracts according to change in temperature. This
does not affect the TV's performance.
Some Internet functions
used on a PC are not
available from the TV.
The TV has only limited functions compared with regular PC
browsers.
Pages 8-6 to 8-8
ENG 10-6
>> Appendix
<< Troubleshooting (Continue)
Problem
No sound
Possible Solution
Is connection to other components correct?
Is the volume too low ?
Page 3-2
Is "Variable" selected in "Output Select"?
Page 4-20
Have you pressed MUTE on the remote control unit?
Page 3-3
Check the audio output of the connected external equipment. Is
the volume too low or muted?
When external equipment is connected via an HDMI cable, you
may need to configure the audio to be output through the HDMI
cable.
When audio is not output from external equipment connected to
the HDMI IN 3 terminal, check the "Audio Select" setting.
Page 7-1
Even when external equipment is connected using an HDMIcertified cable, an audio cable connection may be required
depending on the type of equipment and the media being played
back. In this case, in addition to connecting an HDMI-certified
cable to the HDMI IN 3 terminal, connect a Ø 3.5 mm stereo
minijack cable to the AUDIO IN terminal and set "Audio Select" to
"HDMI+Analog".
Page 7-1
When connecting a PC via an HDMI-certified cable, check the
following:
- Is the audio output of the PC configured correctly? Check the
audio output settings and output audio format in Sound Properties
on the PC.
The audio formats compatible with this TV are PCM, Dolby Digital.
With other formats, audio cannot be output.
- Depending on the board, only video signals may be output. In
this case, in addition to connecting an HDMI-certified cable to the
HDMI IN 3 terminal, connect a Ø 3.5 mm stereo minijack cable to
the AUDIO IN terminal and set "Audio Select" to "HDMI+Analog".
Page 7-1
Problem
Possible Solution
Bluetooth (smartphone)
playback cannot be
displayed on the TV.
Check pairing.
If you register 6 or more smartphones, these smartphones will be
automatically deleted starting with the ones that are not being
used. Perform the pairing operation again.
Miracast image/audio
cannot be output to the
TV.
Check pairing.
ENG 10-7
>> Appendix
<< Troubleshooting - Error Message
The example of an error
message displayed on a
screen
Error code
Possible Solution
Failed to receive
broadcast.
E202
Check the antenna cable. Check that the antenna
is correctly setup.
No broadcast now.
E203
Check the broadcast time in the program guide.
An incompatible audio
signal has been
received. Check the
output device settings.
—
This message is displayed when an audio format
other than PCM, Dolby Digital is input.
- Set the audio output format of connected
external HDMI equipment to PCM, Dolby Digital.
- Refer to the operation manual of the external
equipment for setting details.
ENG 10-8
>> Appendix
<< Information on the Software License for This Product
Software License
You can read the software licenses in the on-screen display menu. Refer to "Information" >
"Software License".
Software composition
The software included in this product is comprised of various software components whose
individual copyrights are held by SHARP or by third parties.
Cautions regarding use in high and low temperature environments
When the unit is used in a low temperature space (e.g. room, office), the picture may leave
trails or appear slightly delayed. This is not a malfunction, and the unit will recover when the
temperature returns to normal.
Do not leave the unit in a hot or cold location. Also, do not leave the unit in a location
exposed to direct sunlight or near a heater, as this may cause the cabinet to deform and the
front panel to malfunction.
Storage temperature: -4°F to +140°F (-20°C to +60°C)
ENG 10-9
>> Specifications
<< TV
Item
LCD panel
TV Function
Size
Resolution
TV-standard (CCIR)
VHF/UHF
CATV
Digital Terrestrial Broadcast (8VSB)
Digital cable*1 (64/256 QAM)
Receiving Channel
Audio multiplex
Audio out
Side
Back panel vertical side
Terminals
Back panel surface side
Back panel horizontal side
SD card slot
HDMI IN 1
HDMI IN 2
HDMI IN 3
HDMI IN 4
AUDIO OUT
USB 1
COMPONENT IN/VIDEO IN
RS-232C
ANT/CABLE
AUDIO IN
DIGITAL AUDIO OUT
ETHERNET
USB 2
USB 3
OSD language
Power Requirement
On Mode Power
Power Consumption
Weight
TV
TV
TV
TV
+ stand
only
+ stand
only
Model: LC-70UD27U
Model: LC-60UD27U
70" Class (69 1/2" Diagonal)
60" Class (60 3/32" Diagonal)
8,294,400 pixels (3,840 x 2,160)
American TV Standard ATSC/NTSC System
VHF 2-13ch, UHF 14-69ch
1-135ch (non-scrambled channel only)
2-69ch
1-135ch (non-scrambled channel only)
BTSC System
10W x 2 + 15W(WF)
SD/SDHC memory card *2
HDMI in with HDCP, ARC
HDMI in with HDCP
HDMI in with HDCP, Audio in (Ø 3.5 mm stereo jack)
HDMI in with HDCP, MHL (HDCP2.2 supported)
Audio out (Ø 3.5 mm stereo jack)
Photo/Music/Video mode, Software update, USB keyboard/mouse, Wallpaper Picture
COMPONENT in/AV in
9-pin D-sub male connector
75
Unbalance, F Type x 1 for Analog (VHF/UHF/CATV) and Digital (AIR/CABLE)
Audio in (Ø 3.5 mm stereo jack)
Optical Digital audio out x 1 (PCM/Dolby Digital)
Network connector
Photo/Music/Video mode, Software update, USB keyboard/mouse, Wallpaper Picture
Photo/Music/Video mode, Software update, USB keyboard/mouse, Wallpaper Picture
English/French/Spanish
AC 120 V, 60 Hz
160 W
145 W
300 W (0.5 W Standby with AC 120 V)
270 W (0.5 W Standby with AC 120 V)
90.4 lbs./41.0 kg
67.2 lbs./30.5 kg
83.7 lbs./38.0 kg
60.6 lbs./27.5 kg
61 25/64 x 37 1/64 x 13 25/32
53 19/32 x 32 9/16 x 13 25/32
61 25/64 x 35 41/64 x 2 49/64
53 19/32 x 31 5/32 x 2 23/32
+32°F to +104°F (0°C to +40°C)
Dimensions
(W x H x D)(inch)
Operating temperature
*1 Emergency alert messages via Cable are unreceivable.
*2 If you insert any card other than the SD/SDHC (class 6 or higher), it will not work.
As part of policy of continuous improvement, SHARP reserves the right to make design and specification changes for product improvement without prior notice. The performance specification
figures indicated are nominal values of production units. There may be some deviations from these values in individual units.
ENG 11-1
>> Specifications
<< Wireless LAN
Standard
Frequency Band
Security
Modulation
Specification
IEEE 802.11a/b/g/n
2412-2484 MHz
5150-5850 MHz
Static WEP (64/128 bit key Index 1 only)
WPA-PSK (TKIP)
WPA2-PSK (AES)
DBPSK@1Mbps
DQPSK@2Mbps
[email protected]/11Mbps
BPSK@6/9 Mbps
QPSK@12/18Mbps
16-QAM@24Mbps
64-QAM@48/54Mbps and above, Rx up to 300Mbps
ENG 11-2
>> Specifications
<< Bluetooth
Ver. name
profile name
Specification
Ver. 3.0+EDR
HID
A2DP
IMPORTANT SAFETY INSTRUCTIONS
Bluetooth
Notes on Radio Wave Certification in the U.S.A. and Canada
This device complies with part 15 of the FCC Rules. Operation is subject to the following two
conditions: (1) This device may not cause harmful interference, and (2) this device must accept
any interference received, including interference that may cause undesired operation.
"This transmitter must not be co-located or operated in conjunction with any other antenna or
transmitter."
FCC/INDUSTRY CANADA NOTICE
This device complies with Part 15 of FCC Rules and Industry Canada license-exempt RSS
standard(s). Operation is subject to the following two conditions: (1) this device may not cause
interference, and (2) this device must accept any interference, including interference that may
cause undesired operation of this device.
This equipment complies with FCC/IC radiation exposure limits set forth for an uncontrolled
environment and meets the FCC radio frequency (RF) Exposure Guidelines in Supplement C to
OET65 and RSS-102 of the IC radio frequency (RF) Exprosure rules. This equipment has very low
levels of RF energy that are deemed to comply without testing of specific absorption ratio (SAR).
Note: This equipment has been tested and found to comply with the limits for a Class B digital
device, pursuant to Part 15 of the FCC Rules. These limits are designed to provide reasonable
protection against harmful interference in a residential installation. This equipment generates, uses
and can radiate radio frequency energy and, if not installed and used in accordance with the
instructions, may cause harmful interference to radio communications. However, there is no
guarantee that interference will not occur in a particular installation. If this equipment does cause
harmful interference to radio or television reception, which can be determined by turning the
equipment off and on, the user is encouraged to try to correct the interference by one or more of
the following measures:
Reorient or relocate the receiving antenna. Increase the separation between the equipment and
receiver. Connect the equipment into an outlet on a circuit different from that to which the receiver
is connected. Consult the dealer or an experienced radio/TV technician for help.
This Class B digital apparatus complies with Canadian ICES-003
Le présent appareil est conforme aux la prtie 15 des règles de la FCC et CNR d'Industrie Canada
applicables aux appareils radio exempts de licence. L'exploitation est autorisée aux deux
conditions suivantes : (1) l'appareil ne doit pas produire de brouillage, et (2) l'uitilisateur de
l'appareil doit accepter tout brouillage radioélectrique subi, même si le brouillage est susceptible
d'en compromettre le fonctionnement.
Cet équipement est conforme aux limites d'exposition aux rayonnements énoncées pour un
environnement non contrôlé et respecte les règles les radioélectriques (RF) de la FCC lignes
directrices d'exposition dans le Supplément C à OET65 et d'exposition aux fréquences
radioélectriques (RF) CNR-102 de l'IC. Cet équipement émet une énergie RF très faible qui est
considérée conforme sans évaluation du débit d'absorption spécifique (DAS).
Cet appareil numérique de la classe B est conforme à la norme NMB-3 du Canada.
FCC CAUTION
Changes or modifications not expressly approved by Hosiden responsible for compliance could
void the user's authority to operate the equipment.
ENG 11-3
>> Trademarks
<<
SmartCentral is a registered trademark of Sharp Corporation.
MHL, the MHL Logo, and Mobile High-Definition Link are trademarks or registered
trademarks of MHL LLC in the United States and other countries.
MHL™
Manufactured under license from Dolby Laboratories. Dolby and the double-D symbol
are trademarks of Dolby Laboratories.
The Bluetooth® word mark and logos are registered trademarks owned by Bluetooth
SIG, Inc. and any use of such marks by SHARP Corporation is under license. Other
trademarks and trade names are those of their respective owners.
The terms HDMI and HDMI High-Definition Multimedia Interface, and the HDMI Logo
are trademarks or registered trademarks of HDMI Licensing LLC in the United States
and other countries.
THX and the THX logo are trademarks of THX Ltd., registered in the United States
and other jurisdictions. All rights reserved.
The Wi-Fi CERTIFIED Logo is a certification mark of the Wi-Fi Alliance.
The Wi-Fi Protected Setup Mark is a mark of the Wi-Fi Alliance.
Wi-Fi CERTIFIED Miracast™ and Miracast™ are trademarks of Wi-Fi Alliance.
This product includes Home Networking Software 'DiXiM' developed by DigiOn, Inc.
and LC logo mark are
registered trademarks of SHARP Corporation.
This product is embedded with LC Font technology, which was developed by
SHARP Corporation for clearly displaying easy-to-read characters on LCD screens.
However, other fonts are used for some screen pages, too.
Netflix and the Netflix logo are the registered trademarks of Netflix, Inc.
VUDU™ is a trademark of VUDU, Inc.
SDHC Logo is a trademark of SD-3C, LLC.
ENG 12-1
>> Dimensional Drawings
<<LC-70UD27U
Unit: inch (mm)
Unité: pouce (mm)
Unidad: pulgada (mm)
*1 Active area/Área activa/Zone active
*2 Thinnest part/Parte más delgada/Partie la plus mince
*3 Including projecting parts/Incluyendo partes salientes/Parties saillantes incluses
ENG 13-1
>> Dimensional Drawings
<<LC-60UD27U
*1 Active area/Área activa/Zone active
*2 Thinnest part/Parte más delgada/Partie la plus mince
*3 Including projecting parts/Incluyendo partes salientes/Parties saillantes incluses
Unit: inch (mm)
Unité: pouce (mm)
Unidad: pulgada (mm)
ENG 13-2
<<
ENGLISH
FRANÇAIS
LIQUID CRYSTAL TELEVISION
TÉLÉVISEUR À CRISTAUX
LIQUIDES
TELEVISOR DE CRISTAL LÍQUIDO
LC-70UD27U
LC-60UD27U
ESPAÑOL
Setup Guide
Guide de Setup
Guía de Configuración
SHARP ELECTRONICS CORPORATION
1 Sharp Plaza, Suite 1, Mahwah, New Jersey 07495-1123
IMPORTANT
: Please read this setup guide and builtin operation manual before starting
operating the equipment.
IMPORTANT : Veuillez lire ce guide de setup et le mode
d’emploi intégré avant de commencer à
travailler sur l’équipement.
IMPORTANTE : Lea detenidamente esta guía de
configuración y manual de instrucciones
integrado antes de comenzar a usar el
equipo.
SHARP CORPORATION
TINS-G254WJZZ
Printed in Mexico
Imprimé au Mexique
Impreso en México
TINS-G254WJZZ
14P09-MX-NS
ENGLISH
IMPORTANT INFORMATION
IMPORTANT:
To aid reporting in case of loss or theft, please record the
TV's model and serial numbers in the space provided.
The numbers are located at the rear and left side of the TV.
DECLARATION OF CONFORMITY:
SHARP LIQUID CRYSTAL TELEVISION, MODEL LC-70UD27U/LC-60UD27U
This device complies with Part 15 of the FCC Rules. Operation is subject to the following two
conditions:
(1) This device may not cause harmful interference, and (2) this device must accept any interference
received, including interference that may cause undesired operation.
RESPONSIBLE PARTY:
SHARP ELECTRONICS CORPORATION
1 Sharp Plaza, Suite 1, Mahwah, New Jersey 07495-1123
TEL: 1-800-BE-SHARP
For Business Customers: URL http://www.sharpusa.com
Model No.:
Serial No.:
WARNING: TO REDUCE THE RISK OF FIRE OR ELECTRIC
SHOCK, DO NOT EXPOSE THIS PRODUCT TO
RAIN OR MOISTURE.
CAUTION
RISK OF ELECTRIC SHOCK
DO NOT OPEN
CAUTION: TO REDUCE THE RISK OF ELECTRIC SHOCK,
DO NOT REMOVE COVER (OR BACK).
NO USER-SERVICEABLE PARTS INSIDE.
REFER SERVICING TO QUALIFIED SERVICE
PERSONNEL.
INFORMATION:
This equipment has been tested and found to comply with the limits for a Class B digital device,
pursuant to Part 15 of the FCC Rules. These limits are designed to provide reasonable protection
against harmful interference in a residential installation. This equipment generates, uses and can
radiate radio frequency energy and, if not installed and used in accordance with the instructions, may
cause harmful interference to radio communications. However, there is no guarantee that interference
will not occur in a particular installation. If this equipment does cause harmful interference to radio
or television reception, which can be determined by turning the equipment off and on, the user is
encouraged to try to correct the interference by one or more of the following measures:
—Reorient or relocate the receiving antenna.
—Increase the separation between the equipment and receiver.
—Connect the equipment into an outlet on a circuit different from that to which the receiver is connected.
—Consult the dealer or an experienced radio/TV technician for help.
The lightning flash with arrow-head
symbol, within an equilateral
triangle, is intended to alert the
user to the presence of
uninsulated "dangerous voltage"
within the product's enclosure that
may be of sufficient magnitude to
constitute a risk of electric shock
to persons.
The exclamation point within a
triangle is intended to alert the
user to the presence of important
operating and maintenance
(servicing) instructions in the
literature accompanying the
product.
CAUTION: TO PREVENT ELECTRIC SHOCK, MATCH WIDE BLADE OF PLUG TO WIDE
SLOT, FULLY INSERT.
WARNING: FCC Regulations state that any unauthorized changes or modifications to this
equipment not expressly approved by the manufacturer could void the user's authority
to operate this equipment.
CAUTION: This product satisfies FCC regulations when shielded cables and connectors are used to
connect the unit to other equipment. To prevent electromagnetic interference with electric
appliances such as radios and televisions, use shielded cables and connectors
for connections.
1
38
IMPORTANT INFORMATION
ENGLISH
FCC Compliance Statement
This device complies with part 15 of the FCC Rules. Operation is subject to the following two conditions:
(1) This device may not cause harmful interference, and (2) this device must accept any interference
received, including interference that may cause undesired operation.
Wireless Radio
For product available in the USA/Canada market, only channel 1–11 can be operated. Selection of
other channels is not possible. This device is going to be operated in 5.15–5.25GHz frequency range,
it is restricted in indoor environment only.
Important: Any changes or modifications not expressly approved by the party responsible for
compliance could void the user’s authority to operate the equipment.
FCC Radiation Exposure Statement: This equipment complies with FCC radiation exposure limits set
forth for an uncontrolled environment. This equipment should be installed and operated with minimum
distance 20cm between the radiator & your body.
Industry Canada Statement
This Class B digital apparatus complies with CAN ICES-003(B)/NMB-3(B)
Wireless Radio
For product available in the USA/Canada market, only channel 1–11 can be operated. Selection of
other channels is not possible.
The device could automatically discontinue transmission in case of absence of information to transmit,
or operational failure.
Note that this is not intended to prohibit transmission of control or signaling information or the use of
repetitive codes where required by the technology.
Important: Any changes or modifications not expressly approved by the party responsible for
compliance could void the user’s authority to operate the equipment.
IC Radiation Exposure Statement: This device complies with IC RSS-210 rules; Operation is subject
to the following two conditions:
(1) This device may not cause harmful interference, and (2) this device must accept interference
recieved, including interference that may cause undesired operation.
"Note to CATV system installer: This reminder is provided to call the CATV system installer's attention
to Article 820 of the National Electrical Code that provides guidelines for proper grounding and, in
particular, specifies that the cable ground shall be connected to the grounding system of the building,
as close to the point of cable entry as practical."
2
DEAR SHARP CUSTOMER
IMPORTANT SAFETY INSTRUCTIONS
Thank you for your purchase of the Sharp Liquid Crystal Television. To ensure safety and many
years of trouble-free operation of your product, please read the Important Safety Instructions
carefully before using this product.
e) If the product has been dropped or damaged in any way, and
f ) When the product exhibits a distinct change in performance - this indicates a need for
service.
19) Replacement Parts—When replacement parts are required, be sure the service technician has
used replacement parts specified by the manufacturer or have the same characteristics as the
original part. Unauthorized substitutions may result in fire, electric shock, or other hazards.
20) Safety Check—Upon completion of any service or repairs to this product, ask the service
technician to perform safety checks to determine that the product is in proper operating
condition.
21) Wall or ceiling mounting—When mounting the product on a wall or ceiling, be sure to install the
product according to the method recommended by the manufacturer.
IMPORTANT SAFETY INSTRUCTIONS
Electricity is used to perform many useful functions, but it can also cause personal injuries and
property damage if improperly handled. This product has been engineered and manufactured with
the highest priority on safety. However, improper use can result in electric shock and/or fire. In order
to prevent potential danger, please observe the following instructions when installing, operating
and cleaning the product. To ensure your safety and prolong the service life of your Liquid Crystal
Television, please read the following precautions carefully before using the product.
• Outdoor Antenna Grounding — If an outside
antenna is connected to the television
equipment, be sure the antenna system is
grounded so as to provide some protection
against voltage surges and built-up static
charges.
Article 810 of the National Electrical Code,
ANSI/NFPA 70, provides information with
regard to proper grounding of the mast and
supporting structure, grounding of the leadin wire to an antenna discharge unit, size of
grounding conductors, location of antennadischarge unit, connection to grounding
electrodes, and requirements for the
grounding electrode.
1)
2)
3)
4)
5)
6)
7)
8)
Read these instructions.
Keep these instructions.
Heed all warnings.
Follow all instructions.
Do not use this apparatus near water.
Clean only with dry cloth.
Do not block any ventilation openings. Install in accordance with the manufacturer's instructions.
Do not install near any heat sources such as radiators, heat registers, stoves, or other apparatus
(including amplifiers) that produce heat.
9) Do not defeat the safety purpose of the polarized or grounding-type plug. A polarized plug has two
blades with one wider than the other. A grounding type plug has two blades and a third grounding
prong. The wide blade or the third prong are provided for your safety. If the provided plug does not fit
into your outlet, consult an electrician for replacement of the obsolete outlet.
10) Protect the power cord from being walked on or pinched particularly at plugs, convenience
receptacles, and the point where they exit from the apparatus.
11) Only use attachments/accessories specified by the manufacturer.
12) Use only with the cart, stand, tripod, bracket, or table specified by the manufacturer,
or sold with the apparatus. When a cart is used, use caution when moving the cart/
apparatus combination to avoid injury from tip-over.
13) Unplug this apparatus during lightning storms or when unused for long periods of
time.
14) Refer all servicing to qualified service personnel. Servicing is required when the apparatus has
been damaged in any way, such as power-supply cord or plug is damaged, liquid has been
spilled or objects have fallen into the apparatus, the apparatus has been exposed to rain or
moisture, does not operate normally, or has been dropped.
EXAMPLE OF ANTENNA GROUNDING AS PER
NATIONAL ELECTRICAL CODE, ANSI/NFPA 70
ANTENNA LEAD
IN WIRE
GROUND
CLAMP
ELECTRIC
SERVICE
EQUIPMENT
ANTENNA
DISCHARGE UNIT
(NEC SECTION 810-20)
GROUNDING CONDUCTORS
(NEC SECTION 810-21)
GROUND CLAMPS
POWER SERVICE GROUNDING
ELECTRODE SYSTEM
(NEC ART 250)
NEC — NATIONAL ELECTRICAL CODE
• Water and Moisture — Do not use this product near water - for example, near a bath tub, wash bowl,
kitchen sink, or laundry tub; in a wet basement; or near a swimming pool; and the like.
• Stand — Do not place the product on an unstable cart, stand, tripod or table. Placing the product on an
unstable base can cause the product to fall, resulting in serious personal injuries as well as damage to the
product. Use only a cart, stand, tripod, bracket or table recommended by the manufacturer or sold with
the product. When mounting the product on a wall, be sure to follow the manufacturer's instructions. Use
only the mounting hardware recommended by the manufacturer.
• Selecting the location — Select a place with no direct sunlight and good ventilation.
• Ventilation — The vents and other openings in the cabinet are designed for ventilation. Do not cover
or block these vents and openings since insufficient ventilation can cause overheating and/or shorten
the life of the product. Do not place the product on a bed, sofa, rug or other similar surface, since they
can block ventilation openings. This product is not designed for built-in installation; do not place the
product in an enclosed place such as a bookcase or rack, unless proper ventilation is provided or the
manufacturer's instructions are followed.
• The front panel used in this product is made of glass. Therefore, it can break when the product is dropped
or applied with impact. Be careful not to be injured by broken glass pieces in case the panel breaks.
• Heat — The product should be situated away from heat sources such as radiators, heat registers,
stoves, or other products (including amplifiers) that produce heat.
• The Liquid Crystal panel is a very high technology product with 8,294,400 pixels, giving you fine picture
details.Occasionally, a few non-active pixels may appear on the screen as a fixed point of blue, green or
red. Please note that this does not affect the performance of your product.
• Lightning — For added protection for this television equipment during a lightning storm, or when it is
left unattended and unused for long periods of time, unplug it from the wall outlet and disconnect the
antenna. This will prevent damage to the equipment due to lightning and power-line surges.
• Power Lines — An outside antenna system should not be located in the vicinity of overhead power
lines or other electric light or power circuits, or where it can fall into such power lines or circuits. When
installing an outside antenna system, extreme care should be taken to keep from touching such power
lines or circuits as contact with them might be fatal.
• To prevent fire, never place any type of candle or flames on the top or near the TV set.
• To prevent fire or shock hazard, do not place the AC cord under the TV set or other heavy items.
Additional Safety Information
15) Power Sources—This product should be operated only from the type of power source indicated
on the marking label. If you are not sure of the type of power supply to your home, consult your
product dealer or local power company. For products intended to operate from battery power, or
other sources, refer to the operating instructions.
16) Overloading—Do not overload wall outlets, extension cords, or integral convenience receptacles
as this can result in a risk of fire or electric shock.
17) Object and Liquid Entry—Never push objects of any kind into this product through openings as
they may touch dangerous voltage points or short-out parts that could result in a fire or electric
shock. Never spill liquid of any kind on the product.
18) Damage Requiring Service—Unplug this product from the wall outlet and refer servicing to
qualified service personnel under the following conditions:
a) When the AC cord or plug is damaged,
b) If liquid has been spilled, or objects have fallen into the product,
c) If the product has been exposed to rain or water,
d) If the product does not operate normally by following the operating instructions.
Adjust only those controls that are covered by the operating instructions as an improper adjustment
of other controls may result in damage and will often require extensive work by a qualified technician
to restore the product to its normal operation,
3
CHILD SAFETY:
• Do not display a still picture for a long time, as this could cause an afterimage to remain.
• To prevent fire or shock hazard, do not expose this product to dripping or splashing.
No objects filled with liquids, such as vases, should be placed on the product.
• Do not insert foreign objects into the product. Inserting objects in the air vents or other
openings may result in fire or electric shock. Exercise special caution when using the
product around children.
PROPER TELEVISION PLACEMENT MATTERS
THE CONSUMER ELECTRONICS INDUSTRY CARES
• Manufacturers, retailers and the rest of the consumer electronics industry are
committed to making home entertainment safe and enjoyable.
• As you enjoy your television, please note that all televisions – new and old- must
be supported on proper stands or installed according to the manufacturer’s
recommendations. Televisions that are inappropriately situated on dressers,
bookcases, shelves, desks, speakers, chests, carts, etc., may fall over, resulting
in injury.
Precautions when transporting the TV
• When transporting the TV, never carry it by holding or otherwise putting
pressure onto the display. Be sure to always carry the TV by two people
holding it with two hands.
TUNE IN TO SAFETY
• ALWAYS follow the manufacturer’s recommendations for the safe installation of
your television.
• ALWAYS read and follow all instructions for proper use of your television.
• NEVER allow children to climb on or play on the television or the furniture on
which the television is placed.
• NEVER place the television on furniture that can easily be used as steps, such
as a chest of drawers.
• ALWAYS install the television where it cannot be pushed, pulled over or
knocked down.
• ALWAYS route cords and cables connected to the television so that they
cannot be tripped over, pulled or grabbed.
Caring for the cabinet
• Use a soft cloth (cotton, flannel, etc.) and gently wipe the surface of the cabinet.
• Using a chemical cloth (wet/dry sheet type cloth, etc.) may deform the components of the main unit cabinet
or cause cracking.
• Wiping with a hard cloth or using strong force may scratch the surface of the cabinet.
• If the cabinet is very dirty, wipe with a soft cloth (cotton, flannel, etc.) soaked in neutral detergent diluted
with water and thoroughly wrung out, and then wipe with a soft dry cloth.
• Avoid using benzene, thinner, and other solvents, as these may deform the cabinet and cause the paint
to peel off.
• Do not apply insecticides or other volatile liquids.
Also, do not allow the cabinet to remain in contact with rubber or vinyl products for a long period of time.
Plasticizers inside the plastic may cause the cabinet to deform and cause the paint to peel off.
WALL OR CEILING MOUNT YOUR TELEVISION
• ALWAYS contact your retailer about professional installation if you have any
doubts about your ability to safely mount your television.
• ALWAYS use a mount that has been recommended by the television
manufacturer and has a safety certification by an independent laboratory (such
as UL, CSA, ETL).
• ALWAYS follow all instructions supplied by the television and mount
manufacturers.
• ALWAYS make sure that the wall or ceiling where you are mounting the
television is appropriate.
Some mounts are not designed to be mounted to walls and ceilings with steel
studs or cinder block construction. If you are unsure, contact a professional
installer.
• Televisions can be heavy. A minimum of two people is required for a wall or
ceiling mount installation.
Caring for the front panel
• Turn off the main power and unplug the AC cord from the wall outlet before handling.
• Gently wipe the surface of the front panel with a soft cloth (cotton, flannel, etc.).
To protect the front panel, do not use a dirty cloth, liquid cleaners, or a chemical
cloth (wet/dry sheet type cloth, etc.). This may damage the surface of the front
panel.
• Wiping with a hard cloth or using strong force may scratch the surface of the front
panel.
• Use a soft damp cloth to gently wipe the front panel when it is really dirty.(It may scratch the surface of
the front panel when wiped strongly.)
• If the front panel is dusty, use an anti-static brush, which is commercially available, to clean it.
• To avoid scratching the frame or screen, please use a soft, lint free cloth for cleaning. Approved cleaning
cloths are available directly from Sharp in single (00Z-LCD-CLOTH) or triple (00Z-LCD-CLOTH-3) packs.
Call 1-800-BE-SHARP for ordering, or VISIT http://www.sharpusa.com/SharpDirect.
MOVING AN OLDER TELEVISION TO A NEW PLACE IN YOUR HOME
• Many new television buyers move their older CRT televisions into a secondary
room after the purchase of a flat-panel television. Special care should be made
in the placement of older CRT televisions.
• ALWAYS place your older CRT television on furniture that is sturdy and
appropriate for its size and weight.
• NEVER place your older CRT television on a dresser where children may be
tempted to use the drawers to climb.
• ALWAYS make sure your older CRT television does not hang over the edge of
your furniture.
CE.org/safety
4
ENGLISH
IMPORTANT SAFETY INSTRUCTIONS
IMPORTANT SAFETY INSTRUCTIONS
Wireless LAN
This TV has received the following certifications.
- Wi-Fi CERTIFIED™ (certification program from the Wi-Fi Alliance® )
- Wi-Fi Protected Setup™ (certification program from the Wi-Fi Alliance® )
FCC
This device complies with part 15 of the FCC Rules. Operation is subject to the following two conditions:
(1) This device may not cause harmful interference, and (2) this device must accept any interference received, including
interference that may cause undesired operation. Changes or modifications not expressly approved by the party
responsible for compliance could void the user’s authority to operate the equipment. To comply with the FCC RF
exposure compliance
requirements, this device and its antenna must not be co-located or operated in conjunction with any other antenna or
transmitter.
The device for the band 5150-5250 MHz is only for indoor usage to reduce potential for harmful interference to cochannel mobile satellite systems;
The maximum antenna gain permitted (for devices in the bands 5250-5350 MHz and 5470-5725 MHz) to comply with
the e.i.r.p. limit; and High-power radars are allocated as primary users (meaning they have priority) of the bands 52505350 MHz and 5650-5850 MHz and these radars could cause interference and/or damage to LE-LAN devices.
IFETEL
This equipment operates on a secondary basis and, consequently, must accept harmful interference, including from
station of the same kind, and may not cause harmful interference to systems operating on a primary basis.
CONTAINS TRANSMITTER MODULE IFETEL ID: RCPSHDH13-2254
Brand: SHARP
Model: DHUB-SP1
5
Le présent appareil est conforme aux la prtie 15 des règles de la FCC et CNR d'Industrie Canada applicables aux
appareils radio exempts de licence. L'exploitation est autorisée aux deux conditions suivantes : (1) l'appareil ne doit
pas produire de brouillage, et (2) l'uitilisateur de l'appareil doit accepter tout brouillage radioélectrique subi, même si le
brouillage est susceptible d'en compromettre le fonctionnement.
Cet équipement est conforme aux limites d'exposition aux rayonnements énoncées pour un environnement non
contrôlé et respecte les règles les radioélectriques (RF) de la FCC lignes directrices d'exposition dans le Supplément C
à OET65 et d'exposition aux fréquences radioélectriques (RF) CNR-102 de l'IC. Cet équipement émet une énergie RF
très faible qui est considérée conforme sans évaluation du débit d'absorption spécifique (DAS).
Bluetooth
Notes on Radio Wave Certification in the U.S.A. and Canada
This device complies with part 15 of the FCC Rules. Operation is subject to the following two conditions:
(1) This device may not cause harmful interference, and (2) this device must accept any interference received, including
interference that may cause undesired operation.
"This transmitter must not be co-located or operated in conjunction with any other antenna or transmitter."
FCC/INDUSTRY CANADA NOTICE
This device complies with Part 15 of FCC Rules and Industry Canada license-exempt RSS standard(s). Operation is
subject to the following two conditions: (1) this device may not cause interference, and (2) this device must accept any
interference, including interference that may cause undesired operation of this device.
This equipment complies with FCC/IC radiation exposure limits set forth for an uncontrolled environment and meets
the FCC radio frequency (RF) Exposure Guidelines in Supplement C to OET65 and RSS-102 of the IC radio frequency
(RF) Exprosure rules. This equipment has very low levels of RF energy that are deemed to comply without testing of
specific absorption ratio (SAR).
Cet appareil numérique de la classe B est conforme à la norme NMB-3 du Canada.
TV
Notas sobre la Certificación de Radiodifusión en México
• IFETEL: RCPSHDH13-2254
• Nombre de la marca del módulo con licencia: SHARP CORPORATION
• Nombre de modelo del módulo con licencia: ARC0517
• Módulo ARC0517 instalado adentro de esta gafas
FCC CAUTION
Changes or modifications not expressly approved by Hosiden responsible for compliance could void the user's
authority to operate the equipment.
PRECAUCIÓN
La operación de este equipo está sujeta a las siguientes dos condiciones: (1) es posible que este equipo
o dispositivo no cause interferencia perjudicial y (2) este equipo o dispositivo debe aceptar cualquier
interferencia, incluyendo la que pueda causar su operación no deseada.
Note: This equipment has been tested and found to comply with the limits for a Class B digital device, pursuant to
Part 15 of the FCC Rules. These limits are designed to provide reasonable protection against harmful interference in
a residential installation. This equipment generates, uses and can radiate radio frequency energy and, if not installed
and used in accordance with the instructions, may cause harmful interference to radio communications. However,
there is no guarantee that interference will not occur in a particular installation. If this equipment does cause harmful
interference to radio or television reception, which can be determined by turning the equipment off and on, the user is
encouraged to try to correct the interference by one or more of the following measures:
Reorient or relocate the receiving antenna.
Increase the separation between the equipment and receiver.
Connect the equipment into an outlet on a circuit different from that to which the receiver is connected.
Consult the dealer or an experienced radio/TV technician for help.
Número de licencia para la certificación de radiodifusión
Estados Unidos CONTAINS FCC ID: NKR-SP1
Canadá CONTAINS IC: 4441A-SP1
This Class B digital apparatus complies with Canadian ICES-003
6
ENGLISH
IMPORTANT SAFETY INSTRUCTIONS
FRANÇAIS
INFORMATIONS IMPORTANTES
IMPORTANT :
Pour faciliter la déclaration de perte ou de vol, veuillez noter
les numéros de modèle et de série dans l'espace prévu à
cet effet. Identifiez les numéros sur le côté du téléviseur où
se trouve le panneau de commande.
DÉCLARATION DE CONFORMITÉ:
TÉLÉVISION À ÉCRAN À CRISTAUX LIQUIDES SHARP, MODÈLE LC-70UD27U/LC-60UD27U
Cet appareil est conforme à la partie 15 des règlements FCC. Son fonctionnement est soumis aux deux
conditions suivantes : (1) l'appareil ne provoquera pas d'interférences nuisibles, et (2) il doit accepter les
interférences reçues, y compris celles pouvant provoquer un fonctionnement indésiré.
PARTIE RESPONSABLE :
N° de modèle :
N° de série:
SHARP ELECTRONICS CORPORATION
1 Sharp Plaza, Suite 1, Mahwah, New Jersey 07495-1123
TEL: 1-800-BE-SHARP
Pour la clientèle commerciale : URL http://www.sharpusa.com
AVERTISSEMENT: POUR RÉDUIRE LES RISQUES D'INCENDIE
OU D'ÉLECTROCUTION, N'EXPOSEZ PAS CET
APPAREIL À LA PLUIE OU À L'HUMIDITÉ.
ATTENTION
RISQUE
D'ÉLECTROCUTION
NE PAS OUVRIR
ATTENTION: AFIN DE RÉDUIRE LE RISQUE
D'ÉLECTROCUTION, NE PAS RETIRER LE COUVERCLE
(OU PANNEAU ARRIÈRE).
PAS DE PIÈCES RÉPARABLES PAR L'UTILISATEUR À
L'INTÉRIEUR.
CONFIER TOUTE PROCÉDURE D'ENTRETIEN À UN
PERSONNEL D'ENTRETIEN QUALIFIÉ.
ATTENTION:
INFORMATION:
Cet appareil a été testé et trouvé conforme aux limites des appareils numériques de classe B,
conformément à l'article 15 du règlement FCC. Ces limites sont conçues pour offrir une protection
raisonnable contre les interférences nuisibles dans une installation résidentielle. Cet appareil génère,
utilise et peut émettre de l'énergie de radiofréquence et, s'il n'est pas installé et utilisé conformément
aux instructions, peut provoquer des interférences nuisibles aux communications radio. Cependant,
il n'y a aucune garantie que de telles interférences ne se produisent pas pour une installation
particulière. Si cet appareil provoque des interférences nuisibles à la réception radio ou télévisée, ce
qui peut être déterminé en mettant l'appareil hors et sous tension, vous êtes encouragé à essayer de
corriger ces interférences à l'aide de l'une ou de plusieurs des mesures suivantes :
—Réorientez ou déplacez l'antenne réceptrice.
—Augmentez l'espace entre l'appareil et le récepteur.
—Connectez l'appareil sur une prise secteur appartenant à un circuit différent de celui sur lequel le
récepteur est connecté.
—Consultez votre revendeur ou un technicien radio/télévisé.
Ce symbole (éclair dans un triangle
équilatéral) avertit l'utilisateur de la
présence dans le boîtier de
l'appareil d'une « tension
dangereuse » non isolée
suffisamment élevée pour causer
une électrocution aux personnes.
Ce symbole (point d'exclamation
dans un triangle équilatéral) avertit
l'utilisateur de la présence
d'instructions d'utilisation et
d'entretien (dépannage)
importantes dans la
documentation accompagnant
l'appareil.
POUR NE PAS RISQUER UNE ÉLECTROCUTION, PRÉSENTEZ LA
FICHE AVEC SA LAME LA PLUS LARGE FACE À LA FENTE
CORRESPONDANTE DE LA PRISE ET ENFONCEZ-LA À FOND.
AVERTISSEMENT: Les règles de la FCC stipulent que tout changement ou modification apporté(e) à
cet appareil sans l'autorisation expresse du fabricant peut entraîner la révocation du droit de
l'utilisateur d'utiliser cet appareil.
ATTENTION:
Cet appareil est conforme aux règlements FCC lorsque des câbles et connecteurs blindés sont utilisés
pour le brancher sur un autre appareil. Pour éviter les interférences électromagnétiques avec les
appareils électriques comme les radios et les téléviseurs, utilisez des câbles et connecteurs blindés
pour les connexions.
7
INFORMATIONS IMPORTANTES
Déclaration de conformité de la FCC
Cet appareil est conforme à la partie 15 des règlements FCC. Son fonctionnement est soumis aux deux
conditions suivantes : (1) l'appareil ne provoquera pas d'interférences nuisibles, et (2) il doit accepter les
interférences reçues, y compris celles pouvant provoquer un fonctionnement indésiré.
FRANÇAIS
Radio sans fil
Pour le produit disponible sur le marché des États-Unis/du Canada, seuls les canaux 1 à 11 peuvent
être utilisés. La sélection d'autres canaux est impossible.
Cet appareil étant utilisé dans la plage de fréquences de 5,15 à 5,25 GHz, son utilisation est limitée
exclusivement à un environnement intérieur.
Important : Tout changement ou modification non expressément homologué par la partie responsable
de la conformité peut annuler le droit de l'utilisateur à utiliser l'équipement.
Déclaration d'exposition aux rayonnements de la FCC : Cet appareil est conforme aux limites
d'exposition aux rayonnements définies pour un environnement non contrôlé. Cet équipement doit
être installé et utilisé à une distance minimale de 20 cm entre l'élément rayonnant et votre corps.
Déclaration d'Industrie Canada
Cet appareil numérique de la classe B est conforme à la norme CAN ICES-003(B)/NMB-3(B)
Radio sans fil
Pour le produit disponible sur le marché des États-Unis/du Canada, seuls les canaux 1 à 11 peuvent
être utilisés. La sélection d'autres canaux est impossible.
Cet appareil pourrait interrompre automatiquement une émission en cas d'absence d'informations à
émettre ou de dysfonctionnement.
Veuillez noter qu'il n'est pas destiné à interdire des émissions de commande ou des informations de
signalisation ni l'utilisation de codes répétitifs s'ils s'avèrent requis par la technologie.
Important : Tout changement ou modification non expressément homologué par la partie responsable
de la conformité peut annuler le droit de l'utilisateur à utiliser l'équipement.
Déclaration d'exposition aux rayonnements d'IC : Cet appareil est conforme aux règlements CNR210 de l'IC. Son fonctionnement est soumis aux deux conditions suivantes :
(1) l'appareil ne provoquera pas d'interférences nuisibles, et (2) il doit accepter les interférences
reçues, y compris celles pouvant provoquer un fonctionnement non désiré.
« Note à l'intention de l'installateur de télévision par câble : Nous attirons l'attention de l'installateur
de télévision par câble sur l'article 820 du Code National de l'Électricité qui fournit des directives pour
l'exécution correcte de la mise à la terre et spécifie notamment que la terre du câble doit être reliée au
réseau de mise à la terre du bâtiment, le plus près possible du point d'entrée du câble. »
8
CHER CLIENT SHARP
CONSIGNES DE SÉCURITÉ IMPORTANTES
Nous vous remercions pour votre achat de ce téléviseur à cristaux liquides Sharp. Pour en assurer
la sécurité et le bon fonctionnement pendant de longues années, veuillez lire attentivement les
consignes de sécurité importantes avant toute utilisation.
e) si l'appareil est tombé ou a été endommagé ;
f) Si l'appareil présente des changements visibles de performances – Ceci indique la nécessité
d'une inspection d'entretien.
19) Pièces de rechange — Si des pièces sont à remplacer, assurez-vous que le technicien utilise
bien les pièces de rechange prescrites par le fabricant ou ayant les mêmes caractéristiques que
les pièces d'origine. L'utilisation de pièces non autorisées peut occasionner un incendie, une
électrocution et d'autres dangers.
20) Vérification de sécurité — Après un travail d'entretien ou de réparation, demandez au technicien d'effectuer
les vérifications de sécurité nécessaires pour s'assurer que l'appareil est en bon état de fonctionnement.
21) Montage au plafond ou au mur—Si vous montez l'appareil au mur ou au plafond, observez la
procédure d'installation recommandée par le fabricant.
CONSIGNES DE SÉCURITÉ IMPORTANTES
L'électricité remplit de nombreuses fonctions utiles, mais si on l'utilise mal, elle peut occasionner des
blessures et des dégâts matériels. Bien que la conception et la fabrication de ce produit aient été axées
sur la sécurité, une mauvaise utilisation de l'appareil peut faire courir un risque d'électrocution et/ou
d'incendie. Pour ne pas vous exposer à de tels dangers, respectez les consignes suivantes lorsque
vous installez, utilisez ou nettoyez le téléviseur. Par mesure de sécurité et pour prolonger la durée de
service de votre téléviseur à cristaux liquides, veuillez lire les précautions suivantes avant de l'utiliser :
• Mise à la terre de l'antenne extérieure —
Si le téléviseur est raccordé à une antenne
extérieure, assurez-vous que celle-ci est
reliée à la terre afin de protéger le poste
contre les sautes de tension et l'accumulation
de charges électrostatiques.
L'article 810 du Code national de l'électricité
ANSI/NFPA 70 fournit des informations sur
la mise à la terre correcte du mât d'antenne
et de sa structure de support, la mise à
la terre de la descente d'antenne à une
unité de décharge d'antenne, le calibre des
conducteurs, l'emplacement de l'unité de
décharge d'antenne, le raccordement aux
électrodes de terre et les conditions requises
pour l'électrode de terre.
1)
2)
3)
4)
5)
6)
7)
8)
Lisez ces instructions.
Conservez ces instructions.
Respectez les mises en garde.
Suivez toutes les instructions.
N'utilisez pas cet appareil à proximité de l'eau.
Nettoyez uniquement avec un chiffon sec.
Ne bloquez pas les ouvertures de ventilation. Installez l'appareil en respectant les instructions du fabricant.
N'installez pas l'appareil à proximité de sources de chaleur comme des radiateurs, des chauffages,
des cuisinières ou d'autres appareils (y compris les amplificateurs) produisant de la chaleur.
9) Ne passez pas outre la caractéristique de sécurité de la fiche polarisée ou avec mise à la terre.
Une fiche polarisée comprend deux lames dont une plus large que l'autre. Une fiche avec mise
à la terre comprend deux lames et une troisième broche de terre. La lame la plus large ou la
troisième broche est une mesure de sécurité. Si la fiche fournie ne rentre pas dans votre prise
secteur, consultez un électricien pour remplacer la prise obsolète.
10) Assurez-vous que le cordon secteur ne puisse être piétiné ou pincé tout particulièrement au
niveau des fiches, des prises de courant et aux points où il sort de l'appareil.
11) N'utilisez que des accessoires/fixations recommandés par le fabricant.
12) Placez l'appareil uniquement sur un chariot, un socle, un trépied, un support ou une
table recommandé par le fabricant ou vendu avec l'appareil. Si vous utilisez un chariot,
manoeuvrez avec précaution l'ensemble chariot/appareil afin d'empêcher toute
blessure suite à un renversement.
13) Débranchez cet appareil pendant un orage ou lorsqu'il doit rester longtemps inutilisé.
14) Faites appel à un technicien qualifié pour tout dépannage. Un dépannage est requis lorsque
l'appareil a été endommagé d'une façon ou d'une autre, comme lorsque le cordon secteur ou
la fiche est endommagé, du liquide a été renversé sur l'appareil ou des objets sont tombés
dans l'appareil, l'appareil a été exposé à la pluie ou à l'humidité, l'appareil ne fonctionne pas
normalement ou l'appareil est tombé.
EXEMPLE DE MISE À LA TERRE D'UNE ANTENNE SELON
LE CODE NATIONAL DE L'ÉLECTRICITÉ ANSI/NFPA 70
DESCENTE
D'ANTENNE
COLLIER DE
MISE À LA
TERRE
BOÎTIER DE LA
COMPAGNIE
D'ÉLECTRICITÉ
UNITÉ DE DÉCHARGE
D'ANTENNE
(NEC SECTION 810-20)
CONDUCTEURS DE TERRE
(NEC SECTION 810-21)
COLLIERS DE MISE À LA TERRE
ÉLECTRODE DE TERRE DE LA
COMPAGNIE D'ÉLECTRICITÉ
(NEC ART. 250)
NEC — CODE NATIONAL DE L'ÉLECTRICITÉ
• Eau et humidité — N'utilisez pas l'appareil à proximité de l'eau, près d'une baignoire, d'un lavabo, d'un
évier, d'une machine à laver, par exemple, ni dans un sous-sol humide ou à proximité d'une piscine.
• Support — Ne placez pas l'appareil sur un chariot, un support, un trépied ou une table instable. S'il
est sur une base instable, l'appareil peut tomber et provoquer des blessures corporelles graves ou
être endommagé. Utilisez uniquement un chariot, un support, un trépied ou une table recommandés
par le fabricant ou vendus avec l'appareil. Pour monter l'appareil sur un mur, suivez les instructions du
fabricant. N'utilisez que du matériel recommandé par ce dernier.
• Sélection de l'emplacement — Sélectionnez un emplacement bien aéré et éloigné de la lumière directe
du soleil.
• Ventilation — Les évents et autres ouvertures du coffret sont destinés à la ventilation. Ne les recouvrez
pas et ne les bloquez pas car une ventilation insuffisante risque de provoquer une surchauffe et/ou de
réduire la durée de vie de l'appareil. Ne placez pas l'appareil sur un lit, un sofa, un tapis ou une autre
surface similaire risquant de bloquer les ouvertures de ventilation. Ce produit n'est pas conçu pour être
encastré ; ne le placez pas dans des endroits clos comme une bibliothèque ou une étagère, sauf si une
ventilation adéquate est prévue ou si les instructions du fabricant sont respectées.
• Le panneau avant utilisé dans ce produit est en verre. Il peut donc se briser s'il tombe ou s'il subit un
choc. Veillez à ne pas vous blesser avec des morceaux de verre si le panneau à cristaux liquides venait à
se briser.
• Sources de chaleur — Éloignez l'appareil des sources de chaleur comme les radiateurs, les chauffages
et les autres appareils produisant de la chaleur (y compris les amplificateurs).
• Le panneau à cristaux liquides est un appareil de très haute technologie avec 8 294 400 pixels qui vous
offre une très grande finesse de détail. Un petit nombre de pixels non actifs peuvent occasionnellement
apparaître à l'écran sous forme de point fixe bleu, vert ou rouge. Notez que cela n'affecte en rien les
performances de l'appareil.
• Foudre — Pour mieux protéger ce téléviseur pendant un orage ou lorsqu'il doit rester longtemps sans
surveillance et inutilisé, débranchez-le de la prise murale et déconnectez l'antenne. Ceci l'empêchera
d'être endommagé par la foudre ou les surtensions de la ligne électrique.
• Lignes électriques — L'antenne extérieure ne doit pas se trouver à proximité de lignes électriques
Informations de sécurité supplémentaires
15) Alimentation électrique — Cet appareil ne doit être utilisé qu'avec l'alimentation spécifiée sur
l'étiquette signalétique. En cas de doute sur le type de courant de votre domicile, consultez votre
revendeur ou la compagnie d'électricité locale. Pour les appareils fonctionnant sur batteries ou
sur tout autre type d'alimentation, consultez le mode d'emploi.
16) Surcharge électrique — Ne dépassez pas la capacité électrique des prises murales, des rallonges
ou des prises de courant intégrales, ceci risquant de provoquer un incendie ou une électrocution.
17) Pénétration d'objets et de liquides — N'introduisez jamais d'objets par les orifices de cet appareil.
Ils pourraient toucher des points sous tension et court-circuiter des pièces et provoquer ainsi un
incendie ou une électrocution. Veillez également à ne jamais renverser de liquide dans l'appareil.
18) Dommages nécessitant une réparation — Dans les situations ci-dessous, débranchez l'appareil
de la prise murale et faites appel à un technicien qualifié pour les réparations :
a) si le cordon secteur ou la fiche est endommagée ;
b) si du liquide a été renversé sur l'appareil ou si des objets sont tombés à l'intérieur ;
c) si l'appareil a été exposé à la pluie ou à l'eau ;
d) si l'appareil ne fonctionne pas normalement en suivant le mode d'emploi.
Ne touchez qu'aux commandes indiquées dans le mode d'emploi. Un réglage incorrect
d'autres commandes peut causer des dommages qui demanderont par la suite un travail
intensif à un technicien qualifié.
9
CONSIGNES DE SÉCURITÉ IMPORTANTES
•
•
•
•
L'IMPORTANCE D'UN EMPLACEMENT APPROPRIÉ POUR LE TÉLÉVISEUR
L'INDUSTRIE DE L'ÉLECTRONIQUE GRAND PUBLIC EST SOUCIEUSE
DE VOTRE SÉCURITÉ
• Les fabricants, les détaillants et l'industrie de l'électronique grand public
dans son ensemble sont déterminés à faire en sorte que le divertissement
domestique soit sûr et plaisant.
• Alors que vous vous divertissez devant la télévision, n'oubliez pas que tous les
téléviseurs, neufs comme anciens, doivent être : soit positionnés sur un socle
approprié, soit installés selon les recommandations spécifiques du fabricant.
Les téléviseurs placés de façon non appropriée sur des commodes, des
bibliothèques, des étagères, des bureaux, des haut-parleurs, des armoires, des
chariots, etc. peuvent tomber et entraîner des blessures.
RESTER À L'ÉCOUTE DE LA SÉCURITÉ
• Respectez TOUJOURS les recommandations du fabricant pour une installation
sûre de votre téléviseur.
• Lisez et suivez TOUJOURS toutes les instructions données pour un bon usage
de votre téléviseur.
• Ne permettez JAMAIS aux enfants de grimper ou de jouer sur le téléviseur ou
le meuble sur lequel le téléviseur est placé.
• Ne placez JAMAIS le téléviseur sur un meuble pouvant facilement être utilisé
comme marche-pied, telle qu'une commode par exemple.
• Installez TOUJOURS le téléviseur à un endroit où il ne peut pas être poussé,
tiré ou renversé.
• Faites TOUJOURS passer les prises et câbles connectés au téléviseur à un
endroit où ils ne pourront pas faire trébucher quelqu'un ou encore où ils ne
pourront pas être tirés ou attrapés.
Précautions lors du transport du téléviseur
• Lors du transport du téléviseur, ne le transportez jamais en le tenant ou
en faisant pression sur l'écran. Veillez à toujours le transporter à deux
personnes, en le tenant à deux mains.
Entretien du coffret
• Utilisez un chiffon doux (en coton, en flanelle, etc.) et essuyez délicatement la surface du coffret.
• L'utilisation d'un chiffon abrasif (chiffon sous forme de feuille humide/sec, etc.) peut déformer les
composants du coffret ou provoquer des fissures.
• Essuyer avec un chiffon rêche ou avec force risque de rayer la surface du coffret.
• Si le coffret est très sale, essuyez avec un chiffon doux (en coton, en flanelle, etc.) humidifié à l'aide d'un
détergent neutre dilué avec de l'eau et bien essoré, puis essuyez avec un chiffon sec.
• Le coffret est essentiellement constitué de plastique. Évitez d'utiliser de la benzine, un diluant ou d'autres
solvants, car ils pourraient déformer le coffret et provoquer l'écaillage de la peinture.
• N'appliquez pas d'insecticides ni d'autres liquides volatiles.
De même, ne laissez pas le coffret en contact avec du caoutchouc ou des appareils en vinyle pendant
longtemps. Les plastifiants à l'intérieur du plastique peuvent provoquer des déformations du coffret et
l'écaillage de la peinture.
FIXATION DU TÉLÉVISEUR SUR LE MUR OU LE PLAFOND
• Contactez TOUJOURS votre revendeur pour une installation professionnelle au
moindre doute quant à votre capacité à fixer le téléviseur de manière sûre.
• Utilisez TOUJOURS un support recommandé par le fabricant du téléviseur et
dont la sécurité a été certifiée par un laboratoire indépendant (tel que UL, CSA,
ETL).
• Suivez TOUJOURS toutes les instructions fournies par les fabricants du
téléviseur et du support.
• Assurez-vous TOUJOURS que le mur ou le plafond sur lequel vous fixez le
téléviseur est approprié.
Certains supports ne sont pas conçus pour être fixés aux murs ou aux plafonds
ayant une armature en acier ou construits avec des parpaings. En cas de doute,
contactez un installateur professionnel.
• Les téléviseurs peuvent être lourds. Deux personnes minimum sont nécessaires
pour la fixation au mur ou au plafond.
Entretien du panneau avant
• Mettez l'alimentation principale hors tension et débranchez le cordon secteur de
la prise murale avant la manipulation.
• Essuyez délicatement la surface du panneau avant à l'aide d'un chiffon doux (en
coton, en flanelle, etc.).
Pour protéger le panneau avant, n'utilisez pas de chiffon sale, de nettoyants
liquides ni chiffon imprégné de produit chimique (chiffon sous forme de feuille
humide/sec, etc.). Ceci pourrait endommager la surface du panneau avant.
• Essuyer avec un chiffon rêche ou avec force risque de rayer la surface du panneau avant.
• Utilisez un chiffon doux et mouillé pour essuyer délicatement le panneau avant s'il est vraiment sale. (Frotter
fort risque de rayer la surface du panneau avant.)
• Si le panneau avant est poussiéreux, utilisez une brosse antistatique en vente dans le commerce pour le
nettoyer.
• Pour éviter tout risque de rayer le cadre ou l'écran, veuillez utiliser un chiffon doux et non-pelucheux pour
le nettoyage. Des chiffons de nettoyage approuvés sont disponibles directement auprès de Sharp, par
paquet d'une (00Z-LCD-CLOTH) ou de trois (00Z-LCD-CLOTH-3) unités. APPELEZ le (905)568-7140 ou
CONSULTEZ le site http://www.sharp.ca pour les commander.
DÉPLACER UN ANCIEN TÉLÉVISEUR DANS VOTRE MAISON
• Nombreuses sont les personnes déplaçant leur ancien téléviseur CRT dans une
autre pièce de la maison après l'achat d'un téléviseur à écran plat. Une attention
particulière doit être portée au nouvel emplacement d'un ancien téléviseur CRT.
• Placez TOUJOURS votre ancien téléviseur CRT sur un meuble solide et adapté
à la taille et au poids du téléviseur.
• Ne placez JAMAIS votre ancien téléviseur CRT sur une commode dont les
enfants sont susceptibles d'utiliser les tiroirs pour grimper.
• Assurez-vous TOUJOURS que votre ancien téléviseur CRT ne dépasse pas le
bord de votre meuble.
CE.org/safety
10
FRANÇAIS
•
LA SÉCURITÉ DES ENFANTS :
aériennes ou d'autres circuits d'éclairage ou de distribution électrique. Elle ne doit pas non plus être
installée sur une position d'où elle pourrait tomber sur ces lignes ou circuits. Lors de l'installation d'une
antenne extérieure, toutes les précautions doivent être prises pour ne pas toucher ces lignes ou circuits
électriques. Tout contact avec eux pourrait être mortel.
Ne placez pas de bougies ni de flammes nues sur le téléviseur ou à sa proximité, afin d'éviter les
incendies.
Afin d'empêcher tout incendie ou électrocution, ne placez pas le cordon secteur sous l'ensemble du
téléviseur ou autres objets volumineux.
N'affichez pas une image fixe pendant un période prolongée, sous peine de laisser un
traînage à l'écran.
Pour éviter les incendies ou les électrocutions, veillez à ne pas éclabousser ni faire
tomber de l'eau sur cet appareil.
Ne placez jamais d'objets remplis de liquide, comme des vases, sur l'appareil.
N'introduisez pas d'objets étrangers dans le produit. L'introduction d'objets dans
les évents ou dans d'autres ouvertures pourrait provoquer un incendie ou un choc
électrique. Faites particulièrement attention lorsque vous utilisez le produit à proximité d'enfants.
CONSIGNES DE SÉCURITÉ IMPORTANTES
LAN sans-fil
Ce téléviseur a reçu les certifications suivantes.
- Wi-Fi CERTIFIED™ (programme de certification de Wi-Fi Alliance® )
- Wi-Fi Protected Setup™ (programme de certification de Wi-Fi Alliance® )
FCC
Cet appareil est conforme à la partie 15 des règlements FCC. Son fonctionnement est soumis aux deux conditions
suivantes:
(1) l'appareil ne provoquera pas d’interférences nuisibles, et (2) il doit accepter les interférences reçues, y compris
celles pouvant provoquer un fonctionnement indésiré. Les changements ou modifications non expressément
homologués par la partie responsable de la conformité peuvent annuler le droit de l'utilisateur à utiliser l'équipement.
En vue de la conformité avec les exigences relatives à l'exposition aux FR de la FCC, cet appareil et l'antenne ne
doivent pas se trouver au même endroit ni être utilisés conjointement avec une autre antenne ou un autre émetteur.
L'appareil conçu pour la bande 5150-5250 MHz est uniquement destiné à une utilisation en intérieur afin de réduire de
possibles interférences nuisibles à des systèmes de satellites du service mobile à canal commun.
Le gain maximal autorisé de l'antenne (pour des appareils dans les bandes 5250-5350 MHz et 5470-5725 MHz) en
conformité avec la limite PIRE; et les radars de haute puissance sont attribués comme utilisateurs principaux (c'estàdire qu'ils ont la priorité) sur les bandes 5250-5350 MHz et 5650-5850 MHz, et que ces radars peuvent provoquer
des interférences et/ou des dommages aux appareils LE-LAN.
IFETEL
Cet equipement fonctionne a titre secondaire et, par consequent, peut accepter des interferences nuisibles,
par exemple d'une station de meme type, et ne peut pas provoquer d'interferences nuisibles sur des systemes
fonctionnant a titre primaire.
CONTIENT UN MODULE D'EMISSION IFETEL ID: RCPSHDH13-2254
Marque: SHARP
Modele: DHUB-SP1
11
CONSIGNES DE SÉCURITÉ IMPORTANTES
Le présent appareil est conforme aux la prtie 15 des règles de la FCC et CNR d'Industrie Canada applicables aux
appareils radio exempts de licence. L'exploitation est autorisée aux deux conditions suivantes : (1) l'appareil ne doit
pas produire de brouillage, et (2) l'uitilisateur de l'appareil doit accepter tout brouillage radioélectrique subi, même si le
brouillage est susceptible d'en compromettre le fonctionnement.
Cet équipement est conforme aux limites d'exposition aux rayonnements énoncées pour un environnement non
contrôlé et respecte les règles les radioélectriques (RF) de la FCC lignes directrices d'exposition dans le Supplément C
à OET65 et d'exposition aux fréquences radioélectriques (RF) CNR-102 de l'IC. Cet équipement émet une énergie RF
très faible qui est considérée conforme sans évaluation du débit d'absorption spécifique (DAS).
Bluetooth
Remarques sur la Certification des Ondes Radio aux Etats-Unis et au Canada
Cet appareil est conforme à la partie 15 des règlements FCC. Son fonctionnement est soumis aux deux conditions
suivantes
(1) l’appareil ne provoquera pas d’interférences nuisibles, et (2) il doit accepter les interférences reçues, y compris
celles pouvant provoquer un fonctionnement indésiré.
« Cet émetteur ne doit pas être installé ou utilisé conjointement avec une autre antenne ou un autre émetteur. »
Cet appareil numérique de la classe B est conforme à la norme NMB-3 du Canada.
FCC/DÉCLARATION D’INDUSTRIE CANADA
Ce dispositif est conforme à la partie 15 des règlements FCC et aux CNR exempts de licence d’Industrie Canada. Son
fonctionnement est soumis aux deux conditions suivantes: (1) l’appareil ne provoquera pas d’interférences nuisibles, et
(2) il doit accepter les interférences reçues, y compris celles pouvant provoquer un fonctionnement indésiré de l’appareil.
Cet équipement est conforme aux limites d’exposition aux rayonnements énoncées pour un environnement non
contrôlé FCC/IC et respecte les lignes directrices d’exposition aux fréquences radioélectriques (RF) de la FCC dans
le Supplément C à OET65 et les règles d’exposition aux fréquences radioélectriques (RF) CNR-102 de l’IC. Cet
équipement émet une énergie RF très faible qui est considérée conforme sans évaluation du débit d’absorption spécifi
que (DAS).
Número de licencia para la certificación de radiodifusión
Estados Unidos CONTAINS FCC ID: NKR-SP1
Canadá CONTAINS IC: 4441A-SP1
AVERTISSEMENT FCC
Tout changement ou modifi cation non expressément homologué par Hosiden, responsable de la conformité, peut
annuler le droit de l’utilisateur à utiliser l’équipement.
Remarque: Cet appareil a été testé et trouvé conforme aux limites des appareils numériques de classe B,
conformément à l'article 15 du règlement FCC. Ces limites sont conçues pour offrir une protection raisonnable contre
les interférences nuisibles dans une installation résidentielle. Cet appareil génère, utilise et peut émettre de l'énergie
de radiofréquence et, s'il n'est pas installé et utilisé conformément aux instructions, peut provoquer des interférences
nuisibles aux communications radio. Cependant, il n'y a aucune garantie que de telles interférences ne se produisent
pas pour une installation particulière. Si cet appareil provoque des interférences nuisibles à la réception radio ou
télévisée, ce qui peut être déterminé en mettant l'appareil hors et sous tension, vous êtes encouragé à essayer de
corriger ces interférences à l'aide de l'une ou de plusieurs des mesures suivantes:
Réorientez ou déplacez l'antenne réceptrice.
Augmentez l'espace entre l'appareil et le récepteur.
Connectez l'appareil sur une prise secteur appartenant à un circuit différent de celui sur lequel le récepteur est
connecté.
Consultez votre revendeur ou un technicien radio/télévisé.
Cet appareil numérique de la classe B est conforme à la norme CAN ICES-003
12
FRANÇAIS
Téléviseur
ESPAÑOL
INFORMACIÓN IMPORTANTE
IMPORTANTE:
Para facilitar el reporte en caso de pérdida o robo, escriba
por favor el modelo del TV y los números de serie en el
espacio suministrado. Los números se encuentran en la
parte posterior y el lado izquierdo del televisor.
DECLARACIÓN DE CONFORMIDAD:
TELEVISOR CON PANTALLA DE CRISTAL LÍQUIDO SHARP, MODELO LC-70UD27U/LC-60UD27U
Este dispositivo cumple con el Apartado 15 de las Normas FCC. Su funcionamiento está sujeto a las dos
condiciones siguientes: (1) Este dispositivo no deberá causar interferencias perjudiciales, y (2) deberá
aceptar cualquier interferencia que reciba, incluyendo interferencias que puedan causar un funcionamiento
no deseado.
PARTE RESPONSABLE:
Modelo N°:
Serie N°:
ADVERTENCIA: PARA REDUCIR EL RIESGO DE FUEGO O
SHARP ELECTRONICS CORPORATION
1 Sharp Plaza, Suite 1, Mahwah, New Jersey 07495-1123
TEL: 1-800-BE-SHARP
Para clientes de negocios: URL http://www.sharpusa.com
DESCARGA ELÉCTRICA, NO EXPONGA ESTE
PRODUCTO A LA LLUVIA O HUMEDAD.
PRECAUCIÓN
RIESGO DE DESCARGA
ELÉCTRICA
NO ABRIR
PRECAUCIÓN: PARA REDUCIR EL RIESGO
DE DESCARGA ELÉCTRICA,
NO RETIRE LA CUBIERTA (O LA PARTE TRASERA).
NO HAY PARTES INTERNAS PARA SERVICIO
POR PARTE DEL USUARIO.
DEJE EL SERVICIO A PERSONAL DE SERVICIO CUALIFICADO.
INFORMACIÓN:
Este equipo ha sido probado y ha demostrado cumplir con los límites establecidos para los aparatos
digitales de la Clase B, de conformidad con el Apartado 15 de las Normas de la FCC. Estos límites
han sido designados para proporcionar una protección razonable contra la interferencia perjudicial en
una instalación residencial. Este equipo genera, utiliza y puede radiar energía radioeléctrica, y, si no
se instala y utiliza de acuerdo con las instrucciones, puede causar una interferencia perjudicial en las
comunicaciones por radio. Sin embargo, no hay ninguna garantía de que no se produzcan interferencias
en una instalación particular. Si este equipo causa interferencias perjudiciales en las recepciones de
radio o televisión, lo que puede determinarse fácilmente apagando y encendiendo el equipo, al usuario
se le recomienda corregir la interferencia tomando una o más de las medidas siguientes:
—Cambie la orientación o el lugar de instalación de la antena receptora.
—Aumente la separación entre el equipo y el receptor.
—Conecte el equipo a una toma de corriente de un circuito diferente del aquel al que está conectado el receptor.
—Consulte al concesionario o técnico de radio/TV cualificado para solicitar su ayuda.
El símbolo del relámpago con la
flecha, dentro de un triángulo
equilátero, sirve para alertar al
usuario de la presencia de “voltaje
peligroso” en el interior del
producto que puede ser de
suficiente magnitud como para
constituir riesgo de descarga
eléctrica a las personas.
El signo de exclamación dentro de
un triángulo sirve para alertar al
usuario de la presencia de
importantes instrucciones en la
operación y mantenimiento
(servicio) en la literatura que
acompaña el producto.
PRECAUCIÓN: PARA PREVENIR UNA DESCARGA ELÉCTRICA, HAGA COINCIDIR LA
LÁMINA ANCHA DEL ENCHUFE CON LA RANURA ANCHA, E
INSERTE COMPLETAMENTE.
ADVERTENCIA: Las regulaciones de la FCC señalan que cualquier cambio o modificación no autorizado en
este equipo, los cuales no hayan sido expresamente aprobados por el fabricante, podría anular la autorización del
usuario para utilizar este equipo.
PRECAUCIÓN:
Este producto satisface los reglamentos de la FCC cuando se utilizan conectores y cables blindados
para conectar la unidad a otro equipo. Para impedir las interferencias electromagnéticas con aparatos
eléctricos tales como radios y televisores, utilice conectores y cables blindados para hacer las
conexiones.
13
INFORMACIÓN IMPORTANTE
Declaración de conformidad con la FCC
Este dispositivo cumple con el Apartado 15 de las Normas FCC. Su funcionamiento está sujeto a las dos
condiciones siguientes:
(1) Este dispositivo no deberá causar interferencias perjudiciales, y (2) deberá aceptar cualquier
interferencia que reciba, incluyendo interferencias que puedan causar un funcionamiento no deseado.
ESPAÑOL
Radio inalámbrica
En el producto disponible en el mercado de EE.UU./Canadá sólo se pueden utilizar los canales 1-11.
No se pueden seleccionar otros canales.
Este dispositivo se va a utilizar en el rango de frecuencias de 5,15 GHz a 5,25 GHz y su uso está
restringido a entornos interiores.
Importante: Cualquier cambio o modificación no aprobado expresamente por la parte responsable de la
conformidad podría anular la autorización del usuario para utilizar el equipo.
Declaración de exposición a las radiaciones de la FCC: Este equipo cumple con los límites de
exposición a las radiaciones establecidos por la FCC para entornos no controlados. El equipo deberá
instalarse y utilizarse con una distancia mínima de 20 cm entre el radiador y su cuerpo.
Declaración industrial de Canadá
Este aparato digital de clase B cumple con CAN ICES-003(B)/NMB-3(B)
Radio inalámbrica
En el producto disponible en el mercado de EE.UU./Canadá sólo se pueden utilizar los canales 1-11.
No se pueden seleccionar otros canales.
El dispositivo podría interrumpir automáticamente la transmisión en caso de ausencia de información
que transmitir o de fallo de funcionamiento.
Tenga en cuenta que el objetivo de esto no es prohibir la transmisión de información de control o de
señalización ni el uso de códigos repetitivos cuando lo requiera la tecnología.
Importante: Cualquier cambio o modificación no aprobado expresamente por la parte responsable de
la conformidad podría anular la autorización del usuario para utilizar el equipo.
Declaración de exposición a las radiaciones de IC: Este dispositivo cumple con las normas IC RSS210; el funcionamiento está sujeto a las siguientes dos condiciones:
(1) Este dispositivo no deberá causar interferencias perjudiciales y (2) deberá aceptar las interferencias
que reciba, incluyendo interferencias que puedan causar un funcionamiento no deseado.
“Nota al instalador del sistema de CATV: El instalador del sistema debe recordar el Articulo 820 del
Código Nacional Eléctrico que contiene las guías de los conocimientos básicos y, en particular,
especifica que el cable a tierra debe ser conectado al sistema de toma de tierra del edificio, lo más
cerca posible al punto de entrada del cable como sea práctico.”
14
ESTIMADO CLIENTE DE SHARP
INSTRUCCIONES DE SEGURIDAD IMPORTANTES
Gracias por haber adquirido este televisor SHARP con pantalla de cristal líquido. Para garantizar
su seguridad y muchos años de uso sin problemas de su producto, por favor lea cuidadosamente
las instrucciones de seguridad importantes antes de usar este producto.
d) Si el producto no funciona normalmente siguiendo las instrucciones de operación.
Ajuste solamente aquellos controles descritos en las instrucciones de operación, ya que un ajuste
incorrecto de otros controles podrá causar daños que a menudo requieren un arduo trabajo de ajuste
por parte de un técnico cualificado para que el producto pueda volver a funcionar normalmente.
e) Si el producto se ha caído o dañado de cualquier forma.
f) Cuando el producto muestra un cambio notable en su rendimiento, lo que indica que
necesita ser reparado.
19) Piezas de repuesto — Cuando se necesiten piezas de repuesto, asegúrese de que el técnico
de servicio utilice las piezas de repuesto especificadas por el fabricante u otras cuyas
características sean similares a las de las piezas originales. El uso de piezas no autorizadas
puede causar incendios, descargas eléctricas u otros peligros.
20) Verificación de seguridad — Una vez completado cualquier trabajo de mantenimiento o
reparación en este producto, pida al técnico de servicio que realice verificaciones de seguridad
para determinar si el producto está en condiciones de funcionamiento apropiadas.
21) Montaje en la pared o en el techo — Cuando monte el producto en la pared o en el techo,
asegúrese de instalarlo de acuerdo con el método recomendado por el fabricante.
INSTRUCCIONES DE SEGURIDAD IMPORTANTES
La electricidad se usa para realizar muchas funciones útiles, pero también puede causar lesiones en
personas y daños en la propiedad si se utiliza incorrectamente. Este producto ha sido diseñado y
fabricado con la más alta prioridad en la seguridad. Sin embargo, su uso incorrecto puede provocar
descargas eléctricas y/o incendios. Para evitar peligros potenciales, por favor tenga muy en cuenta
las instrucciones siguientes al instalar, operar y limpiar el producto. Para garantizar su seguridad
y prolongar la duración de su televisor con pantalla de cristal líquido, lea cuidadosamente las
precauciones siguientes antes de utilizarlo.
1)
2)
3)
4)
5)
6)
7)
8)
Lea estas instrucciones.
Guarde estas instrucciones.
Preste atención a todas las advertencias.
Siga todas las instrucciones.
No utilice este aparato cerca del agua.
Límpielo solamente con un paño seco.
No tape las aberturas de ventilación. Instale el aparato de acuerdo con las instrucciones del fabricante.
No instale el aparato cerca de ninguna fuente de calor como, por ejemplo, radiadores, salidas de
aire caliente, estufas u otros aparatos (incluyendo amplificadores) que produzcan calor.
9) No anule la seguridad de la clavija polarizada ni la de la clavija con conexión a tierra. Una clavija
polarizada tiene dos patillas, una más ancha que la otra. Una clavija con conexión a tierra tiene
dos patillas y una espiga de conexión a tierra. La patilla ancha y la espiga se proporcionan
para su seguridad. Si la clavija proporcionada no entra en su toma de corriente, consulte a un
electricista para reemplazar la toma de corriente obsoleta.
10) Proteja el cable de alimentación para que nadie lo pise ni quede aplastado, especialmente en las
clavijas, tomas de corriente y puntos por donde sale del aparato.
11) Utilice solamente los accesorios suministrados por el fabricante.
12) Utilice el aparato solamente con el carrito, soporte, trípode, ménsula o mesa especificado por
el fabricante, o vendido con el propio aparato. Cuando utilice un carrito, tenga cuidado cuando
mueva la combinación del carrito y el aparato para evitar que se caigan y se estropeen.
13) Desenchufe este aparato durante las tormentas eléctricas o cuando no lo utilice
durante largos periodos de tiempo.
14) Solicite todos los trabajos de reparación al personal cualificado solamente. Las reparaciones
serán necesarias cuando se haya dañado el aparato de cualquier forma: cuando se haya
estropeado el cable o la clavija de alimentación, se hayan derramado líquidos o hayan caído
objetos en el interior del aparato, cuando éste haya estado expuesto a la lluvia o a la humedad,
cuando no funcione normalmente o cuando se haya caído.
• Puesta a tierra de la antena exterior — Si
se conecta una antena exterior al televisor,
asegúrese de que el sistema de antena
esté conectado a tierra para obtener cierta
protección ante los aumentos de voltaje y la
acumulación de cargas estáticas.
El artículo 810 del Código Eléctrico Nacional,
ANSI/NFPA 70, proporciona información
relacionada con la conexión a tierra correcta
del poste y la estructura de apoyo, la
conexión a tierra del cable de entrada a una
unidad de descarga de antena, el tamaño
de los conductores de conexión a tierra,
la ubicación de la unidad de descarga de
antena, la conexión a los electrodos de
conexión a tierra y los requerimientos para el
electrodo de conexión a tierra.
EJEMPLO DE CONEXIÓN A TIERRA DE LA ANTENA
SEGÚN EL CÓDIGO ELÉCTRICO NACIONAL, ANSI/NFPA 70
CABLE DE ENTRADA
DE ANTENA
ABRAZADERA
DE CONEXIÓN
A TIERRA
EQUIPO DE
SERVICIO
ELÉCTRICO
UNIDAD DE DESCARGA
DE ANTENA
(NEC SECCIÓN 810-20)
CONDUCTORES DE
CONEXIÓN A TIERRA
(NEC SECCIÓN 810-21)
ABRAZADERAS DE
CONEXIÓN A TIERRA
SISTEMA DE CONEXIÓN A TIERRA
DEL ELECTRODO DE SERVICIO
ELÉCTRICO (NEC ART. 250)
NEC — CÓDIGO ELÉCTRICO NACIONAL
• Agua y humedad — No utilice este producto cerca del agua como, - por ejemplo, una bañera, palangana,
fregadero de cocina o lavadora; en un sótano húmedo; cerca de una piscina o un lugar similar.
• Soporte — No coloque el producto en un carrito, soporte, trípode o mesa inestable. La colocación del
producto en una base inestable puede ser la causa de que el producto se caiga, lo que podrá causar
lesiones graves a personas y también daños al producto. Utilice solamente un carrito, soporte, trípode,
ménsula o mesa recomendado por el fabricante o vendido junto con el producto. Cuando coloque
el producto en una pared, asegúrese de seguir las instrucciones del fabricante. Utilice solamente el
hardware de montaje recomendado por el fabricante.
• Selección de la ubicación — Seleccione un lugar donde no dé directamente la luz del sol y haya buena ventilación.
• Ventilación — Los orificios de ventilación y otras aberturas de la caja han sido diseñados para ventilar
el producto. No cubra ni bloquee estos orificios de ventilación y aberturas porque la falta de ventilación
puede causar recalentamiento y/o reducir la duración del producto. No coloque el producto en una
cama, sofá, alfombra u otra superficie similar porque las aberturas de ventilación podrán quedar
bloqueadas. Este producto no ha sido diseñado para ser empotrado; no lo coloque en un lugar cerrado
como, por ejemplo, un mueble librería o estantería a menos que disponga de la ventilación apropiada o
se sigan las instrucciones del fabricante.
• El panel frontal utilizado en este producto está hecho de cristal. Por lo tanto, podrá romperse si el
producto se cae o recibe un impacto fuerte. En el caso de que se rompa la pantalla de cristal líquido,
tenga cuidado para que no le hieran las piezas de cristal roto.
• Calor — El producto deberá colocarse alejado de las fuentes de calor como, por ejemplo, radiadores,
salidas de aire caliente, estufas u otros productos (incluyendo amplificadores) que produzcan calor.
• La pantalla de cristal líquido es un producto de alta tecnología que tiene 8.294.400 píxeles, lo que le
proporciona una imagen fina muy detallada.
De vez en cuando puede que aparezcan algunos píxeles no activos en la pantalla a modo de puntos
fijos de color azul, verde o rojo. Tenga en cuenta que esto no afecta para nada al funcionamiento de su
producto.
• Tormentas eléctricas — Para una mayor protección del televisor durante una tormenta de rayos, y
Información de seguridad adicional
15) Fuentes de energía — Este producto deberá utilizarse solamente con el tipo de fuente de energía
indicado en la etiqueta de especificaciones. Si no está seguro del tipo de suministro de energía de su
casa, consulte a su distribuidor o a la compañía de electricidad de su localidad. Para los productos
diseñados para funcionar con pilas u otra fuente de energía, consulte las instrucciones de operación.
16) Sobrecarga — No sobrecargue las tomas de corriente, los cables de prolongación o los
receptáculos de conveniencia integrales porque se puede correr el riesgo de causar un incendio
o recibir una descarga eléctrica.
17) Entrada de objetos y líquidos — No meta nunca objetos de ninguna clase en este producto a
través de las aberturas porque pueden tocar puntos de alto voltaje peligrosos o cortocircuitar
partes que podrían causar un incendio o una descarga eléctrica. No derrame nunca líquidos de
ningún tipo sobre el producto.
18) Daños que necesitan ser reparados — Desenchufe este producto de la toma de corriente y solicite
las reparaciones al personal de servicio cualificado cuando se den las condiciones siguientes:
a) Cuando el cable o la clavija de CA está dañado.
b) Si se ha derramado algún líquido o han caído objetos en el interior del producto.
c) Si el producto ha sido expuesto a la lluvia o al agua.
15
INSTRUCCIONES DE SEGURIDAD IMPORTANTES
•
•
•
•
•
ASUNTOS RELACIONADOS CON LA CORRECTA COLOCACIÓN DEL TELEVISOR
A LA INDUSTRIA DE LOS ARTÍCULOS ELECTRÓNICOS DE
CONSUMO LE IMPORTA
• Los fabricantes, los minoristas y el resto de la industria de los artículos
electrónicos de consumo han asumido el compromiso de lograr que el
entretenimiento en el hogar sea seguro y se pueda disfrutar.
• Cuando disfrute de su televisor, tenga en cuenta que todos los televisores —
ya sean nuevos o viejos—deben estar colocados sobre un soporte adecuado
o instalados según las recomendaciones del fabricante. Los televisores que
se colocan en forma inadecuada sobre tocadores, bibliotecas, estantes,
escritorios, parlantes, cajoneras, carros, etc. pueden caer y provocar lesiones.
SINTONICE LA SEGURIDAD
• SIEMPRE siga las recomendaciones del fabricante para instalar el televisor de
manera segura.
• SIEMPRE lea y siga todas las instrucciones para el uso adecuado del televisor.
• NUNCA permita que los niños trepen o jueguen sobre el televisor o sobre el
mueble en el que se encuentra ubicado el televisor.
• NUNCA coloque el televisor sobre un mueble que se pueda usar fácilmente
como escalera; por ejemplo, una cajonera.
• SIEMPRE instale el televisor donde no se pueda empujar, ni sea posible tirar
de él o voltearlo.
• SIEMPRE acomode los cables conectados al televisor de manera tal que nadie
pueda tropezar con ellos ni tirar de ellos.
Precauciones al transportar el televisor
• Cuando transporte el televisor nunca lo lleve colgando ni ejerciendo presión
sobre el visualizador. El televisor deberá ser transportado siempre por dos
personas que lo tomarán con ambas manos.
INSTALACIÓN DEL TELEVISOR EN LA PARED O EN EL CIELO RASO
• SIEMPRE comuníquese con su vendedor para consultarle acerca de un
instalador profesional si tiene dudas con respecto a su capacidad de instalar el
televisor de manera segura.
• SIEMPRE utilice un soporte recomendado por el fabricante de televisores que
tenga una certificación de seguridad de un laboratorio independiente (como UL,
CSA, ETL).
• SIEMPRE siga todas las instrucciones proporcionadas por los fabricantes del
televisor y del soporte.
• SIEMPRE asegúrese de que la pared o el cielo raso sobre el que instala
el televisor sea adecuado. Ciertos soportes no están diseñados para ser
instalados en paredes o cielo rasos con travesaños de acero o construcciones
con bloques de cemento prefabricados. Si no está seguro al respecto,
comuníquese con un instalador profesional.
• Los televisores pueden ser pesados. Se requieren como mínimo dos personas
para instalar un televisor en la pared o el cielo raso.
Cuidado del gabinete
• Use un paño suave (algodón, franela, etc.) y limpie la superficie del gabinete.
• El uso de un paño químico (paño de tipo de hoja mojado/seco, etc.) puede deformar los componentes del
gabinete o causar rajaduras.
• La limpieza con un paño duro o el uso enérgico de fuerza pueden rayar la superficie del gabinete.
• Si el gabinete está muy sucio, límpielo con un paño suave (algodón, franela, etc.) empapado en un
detergente neutro diluido con agua y escurrido completamente y, luego, repase con un paño suave seco.
• Evite usar benceno, disolvente y otros solventes, ya que estos podrían deformar el gabinete y causar que la
pintura se descascare.
• No aplique insecticidas u otros líquidos volátiles. Así mismo, no permita que el gabinete permanezca en
contacto con productos de goma o vinilo durante un largo período de tiempo. Los plastificantes dentro del
plástico pueden causar que el gabinete se deforme y hacer que la pintura se descascare.
CÓMO REUBICAR UN TELEVISOR VIEJO EN EL HOGAR
• Muchas personas llevan sus viejos televisores CRT a una habitación secundaria
de la casa cuando compran un televisor de pantalla plana. Se debe prestar
especial atención a la ubicación de los viejos televisores CRT.
• SIEMPRE coloque su viejo televisor CRT sobre un mueble resistente que
resulte adecuado para su tamaño y su peso.
• NUNCA coloque su viejo televisor CRT sobre un tocador en el que los niños
puedan usar los cajones para trepar.
• SIEMPRE asegúrese de que su viejo televisor CRT no sobresalga por los
bordes del mueble.
Cuidado del panel frontal
• Apague la alimentación principal y desconecte el cable de CA de la toma de
corriente antes de manipularla.
• Limpie la superficie del panel frontal delicadamente con un paño suave (algodón,
franela, etc.).
Para proteger la superficie del panel frontal, no use un paño sucio, limpiadores
líquidos o un paño químico (paño de tipo de hoja mojada/seca, etc.). Esto puede
dañar la superficie del panel frontal.
• La limpieza con un paño duro o el uso enérgico de fuerza puede rayar la superficie del panel frontal.
• Use un paño húmedo suave para limpiar delicadamente el panel frontal cuando esté realmente sucio.
(Se podría rayar la superficie del panel frontal si se limpia vigorosamente.)
• Si el panel frontal está empolvado, use un cepillo anti-estática, el cual está disponible comercialmente, para
CE.org/safety
limpiarlo.
16
ESPAÑOL
•
SEGURIDAD DE LOS NIÑOS:
cuando se deja descuidado y sin usar durante largos periodos de tiempo, desenchúfelo de la toma de
corriente de la pared y desconecte la antena. Esto evitará daños al televisor debidos a rayos y subidas
de tensión.
Cables de electricidad — No deberá ubicarse un sistema de antena exterior cercano a cables de
electricidad que pasen por encima del mismo u otras luces eléctricas o circuitos de alimentación, o
donde puede caer sobre tales cables de electricidad o circuitos. Cuando instale un sistema de antena
exterior, deberá tomar un cuidado extremo para evitar tocar tales cables de electricidad o circuitos, pues
el contacto con ellos podría resultar fatal.
Para impedir un incendio, no ponga nunca ningún tipo de vela o llama al descubierto encima o cerca del
televisor.
Para impedir un incendio o una descarga eléctrica, no ponga el cable de CA debajo del televisor u otros
objetos pesados.
No muestre una imagen fija durante mucho tiempo porque esto podrá ser la causa de que quede una
imagen residual en la pantalla.
Para impedir un incendio o una descarga eléctrica, no exponga este aparato al goteo
ni a las salpicaduras. Tampoco deberán ponerse encima del producto objetos llenos
de líquidos como, por ejemplo, floreros.
No introduzca ningún tipo de objeto en el producto. Introducir objetos por las aberturas
de ventilación o por otras aberturas puede ser causa de incendio o de descarga
eléctrica. Tome especiales precauciones al utilizar el producto con niños en las
proximidades.
INSTRUCCIONES DE SEGURIDAD IMPORTANTES
LAN inalámbrico
Este televisor ha recibido las siguientes certificaciones.
- Wi-Fi CERTIFIED™ (programa de certificación de la Wi-Fi Alliance® )
- Wi-Fi Protected Setup™ (programa de certificación de la Wi-Fi Alliance® )
FCC
Este dispositivo cumple con el Apartado 15 de las Normas FCC. Su funcionamiento está sujeto a las dos condiciones
siguientes:
(1) Este dispositivo no deberá causar interferencias perjudiciales, y (2) deberá aceptar cualquier interferencia que
reciba, incluyendo interferencias que puedan causar un funcionamiento no deseado. Cualquier cambio o modificación
no aprobado expresamente por la parte responsable de la conformidad podría anular la autorización del usuario para
utilizar el equipo. Para cumplir con los requisitos de exposición a radiofrecuencias de la FCC, este dispositivo y su
antena no deben colocarse ni funcionar en conjunción con ninguna otra antena o transmisor.
El dispositivo para la banda de 5150-5250 MHz es sólo para uso en interiores para reducir la posibilidad de
interferencias cocanal dañinas en los sistemas móviles por satélite;
La máxima ganancia de antena permitida (para dispositivos en las bandas 5250-5350 MHz y 5470-5725 MHz) deberá
cumplir con el límite e.i.r.p.; y los radares de alta potencia se asignan como usuarios primarios (lo que quiere decir que
tienen prioridad) de las bandas 5250-5350 MHz y 5650-5850 MHz y estos radares podrían causar interferencias y/o
dañar los dispositivos LELAN.
IFETEL
Este equipo opera a titulo secundario, consecuentemente, debe aceptar interferencias perjudiciales incluyendo
equipos de la misma clase y puede no causar interferencias a sistemas operando a titulo primario.
CONTIENE MODULO TRANSMISOR IFETEL ID: RCPSHDH13-2254
Marca: SHARP
Modelo: DHUB-SP1
17
INSTRUCCIONES DE SEGURIDAD IMPORTANTES
Le présent appareil est conforme aux la prtie 15 des règles de la FCC et CNR d'Industrie Canada applicables aux
appareils radio exempts de licence. L'exploitation est autorisée aux deux conditions suivantes : (1) l'appareil ne doit
pas produire de brouillage, et (2) l'uitilisateur de l'appareil doit accepter tout brouillage radioélectrique subi, même si le
brouillage est susceptible d'en compromettre le fonctionnement.
Cet équipement est conforme aux limites d'exposition aux rayonnements énoncées pour un environnement non
contrôlé et respecte les règles les radioélectriques (RF) de la FCC lignes directrices d'exposition dans le Supplément C
à OET65 et d'exposition aux fréquences radioélectriques (RF) CNR-102 de l'IC. Cet équipement émet une énergie RF
très faible qui est considérée conforme sans évaluation du débit d'absorption spécifique (DAS).
Bluetooth
Notes on Radio Wave Certification in the U.S.A. and Canada
This device complies with part 15 of the FCC Rules. Operation is subject to the following two conditions:
(1) This device may not cause harmful interference, and (2) this device must accept any interference received, including
interference that may cause undesired operation.
"This transmitter must not be co-located or operated in conjunction with any other antenna or transmitter."
FCC/INDUSTRY CANADA NOTICE
This device complies with Part 15 of FCC Rules and Industry Canada license-exempt RSS standard(s). Operation is
subject to the following two conditions: (1) this device may not cause interference, and (2) this device must accept any
interference, including interference that may cause undesired operation of this device.
This equipment complies with FCC/IC radiation exposure limits set forth for an uncontrolled environment and meets
the FCC radio frequency (RF) Exposure Guidelines in Supplement C to OET65 and RSS-102 of the IC radio frequency
(RF) Exprosure rules. This equipment has very low levels of RF energy that are deemed to comply without testing of
specific absorption ratio (SAR).
Cet appareil numérique de la classe B est conforme à la norme NMB-3 du Canada.
Televisor
Notas sobre la Certificación de Radiodifusión en México
• IFETEL: RCPSHDH13-2254
• Nombre de la marca del módulo con licencia: SHARP CORPORATION
• Nombre de modelo del módulo con licencia: ARC0517
• Módulo ARC0517 instalado adentro de esta gafas
FCC CAUTION
Changes or modifications not expressly approved by Hosiden responsible for compliance could void the user's
authority to operate the equipment.
PRECAUCIÓN
Número de licencia para la certificación de radiodifusión
Estados Unidos CONTAINS FCC ID: NKR-SP1
Canadá CONTAINS IC: 4441A-SP1
This Class B digital apparatus complies with Canadian ICES-003
18
ESPAÑOL
La operación de este equipo está sujeta a las siguientes dos condiciones: (1) es posible que este equipo o dispositivo
no cause interferencia perjudicial y (2) este equipo o dispositivo debe aceptar cualquier interferencia, incluyendo la que
pueda causar su operación no deseada.
Note: This equipment has been tested and found to comply with the limits for a Class B digital device, pursuant to
Part 15 of the FCC Rules. These limits are designed to provide reasonable protection against harmful interference in
a residential installation. This equipment generates, uses and can radiate radio frequency energy and, if not installed
and used in accordance with the instructions, may cause harmful interference to radio communications. However,
there is no guarantee that interference will not occur in a particular installation. If this equipment does cause harmful
interference to radio or television reception, which can be determined by turning the equipment off and on, the user is
encouraged to try to correct the interference by one or more of the following measures:
Reorient or relocate the receiving antenna.
Increase the separation between the equipment and receiver.
Connect the equipment into an outlet on a circuit different from that to which the receiver is connected.
Consult the dealer or an experienced radio/TV technician for help.
Accessories/Accessoires/Accesorios
1
2
ENGLISH
FRANÇAIS
Supplied Accessories
Make sure the following accessories are provided
with the product.
3
NOTE
• Always use the AC cord supplied with the TV.
• The illustrations above are for explanation
purposes and may vary slightly from the actual
accessories.
1 Remote control unit (x1)
2 "AAA " size battery (x2)
3 Stand unit (x1)
Setup Guide (this publication)
Optional Accessories
The listed optional accessories are available for
the Liquid Crystal Television. Please purchase
them at your nearest shop.
• Additional optional accessories may be
available in the near future. When purchasing,
please read the newest catalogue for
compatibility and check the availability.
Part name
Wall mount
bracket
Model number
AN-52AG4
19
ESPAÑOL
Accessoires fournis
Vérifiez si les accessoires suivants sont fournis
avec l'appareil.
Accesorios suministrados
Asegúrese de que los siguientes accesorios
hayan sido suministrados con el producto.
REMARQUE
NOTA
• Utilisez toujours le cordon secteur fourni avec
le téléviseur.
• Les illustrations de ce mode d'emploi sont
présentées à titre explicatif et peuvent être
légèrement différentes des accessoires réels.
1 Télécommande (x1)
2 Pile format « AAA » (x2)
3 Ensemble du socle (x1)
• Utilice siempre el cable de CA suministrado
con el televisor.
• Las ilustraciones anteriores son para propósitos
de explicación y podrían variar levemente con
respecto a los accesorios reales.
1 Control remoto (x1)
2 Pila tamaño “AAA” (x2)
3 Soporte (x1)
Guide de Setup (ce document)
Guía de Setup (esta publicación)
Accessoires en option
Les accessoires en option de la liste sont
disponibles pour ce téléviseur à écran à cristaux
liquides.
Vous les trouverez chez votre revendeur le plus
proche.
• D'autres accessoires en option peuvent être
disponibles dans un proche avenir. Lors de vos
achats, lisez le catalogue le plus récent pour
la compatibilité et vérifiez la disponibilité des
accessoires.
Désignation
Applique
pour
montage
mural
Numéro de modèle
AN-52AG4
Accesorios opcionales
Los accesorios opcionales listados se encuentran
disponibles para el televisor con pantalla de
cristal líquido. Adquiéralos en la tienda más
cercana.
• En un futuro cercano podrán encontrarse
disponibles accesorios opcionales adicionales.
Lea el catálogo más reciente para conocer
la compatibilidad y la disponibilidad de esos
accesorios.
Nombre de
pieza
Ménsula
de montaje
en la pared
Número del modelo
AN-52AG4
Attaching the Stand/Fixation du socle/Colocación del soporte
1
2
ENGLISH
1
(Example: Right Stand)
(Exemple: Socle de droite)
(Ejemplo : Soporte derecha)
2
• Stand base
• Base du socle
• Base del soporte
• Supporting post
• Pied soutien
• Poste de apoyo
"R"
• Screws
• Vis
• Tornillos
FRANÇAIS
• Before attaching (or detaching) the
stand, unplug the AC cord.
• Before performing work spread
cushioning over the base area to lay the
TV on. This will prevent it from being
damaged.
• Avant de poser (ou déposer) le socle,
débranchez le cordon secteur.
• Avant de procéder aux opérations,
étendez un rembourrage sur la surface
de travail pour y placer le téléviseur.
Ceci lui évitera d'être endommagé.
ESPAÑOL
• Antes de poner (o quitar) el soporte,
desenchufe el cable de CA.
• Antes de trabajar con el televisor,
extienda un material blando sobre el
área donde va a ponerlo. Esto impedirá
que se estropee el televisor.
CAUTION
ATTENTION
PRECAUCIÓN
• Be sure to follow the instructions.
Incorrect installation of the stand may
result in the TV falling over.
• Suivez attentivement les instructions.
Un montage incorrect du socle peut
entraîner la chute du téléviseur.
• Asegúrese de seguir las instrucciones.
La instalación incorrecta del soporte
puede causar la caída del televisor.
1
Confirm that there are 10 screws
supplied with the stand unit.
1
Confirmez que 10 vis sont fournies
avec le socle.
1
Confirme que se han suministrado
10 tornillos con el soporte.
2
1Set the post for the stand unit into the
TOP LEFT polystyrene foam.
2Attach the base to the post.
3Insert and tighten the 3 screws into
the 3 holes on the bottom of the base.
• Hold the stand unit securely with one
hand, and then tighten the screws.
4Assemble the left stand as well as the
right stand.
2
1Posez le pied pour l'ensemble du
socle en HAUT À GAUCHE sur la
mousse de polystyrène.
2Fixez la base au pied.
3Insérez et serrez les 3 vis dans les 3
orifices sur la partie inférieure de la base.
• Maintenez fermement le socle d'une
main, puis serrez les vis.
4Montez le socle de gauche ainsi que le
socle de droite.
2
1Coloque el poste para el soporte en
la espuma de poliestireno SUPERIOR
IZQUIERDA.
2Acople la base al poste.
3Inserte y apriete los 3 tornillos en los 3
agujeros en la parte inferior de la base.
• Sujete el soporte de forma segura con
una mano, y luego ajuste los tornillos.
4Ensamble el soporte izquierdo así
como el soporte derecha.
3
4
"L"
20
Attaching the Stand/Fixation du socle/Colocación del soporte
3
• Screws
• Vis
• Tornillos
ENGLISH
3
FRANÇAIS
Insert the stand into the openings on
the rear of the TV, and then tighten
the 4 screws into the 4 holes on the
rear of the stand unit.
• Make sure that the stand is firmly
inserted into the TV.
Improper installation may result in tilting
of the TV set.
3
Insérez le socle dans les ouvertures
au dos du téléviseur et serrez les 4 vis
dans les 4 orifices au dos du socle.
• Assurez-vous que le support est
fermement inséré dans le téléviseur.
Si ce n'est pas le cas, le téléviseur
pourrait s'incliner.
ESPAÑOL
3
Inserte el soporte en las aberturas en
la parte posterior del televisor y apriete
los 4 tornillos en los 4 orificios en la
parte posterior del soporte.
• Asegúrese de que el soporte esté
firmemente introducido en el televisor.
Una instalación incorrecta puede
resultar en la inclinación del televisor.
• Soft cushion
• Coussin moelleux
• Cojin blando
• In the installation procedure, be
careful not to catch your fingers
between the TV set and the floor.
• Lors de l'installation, faites attention
de ne pas vous coincer les doigts
entre le téléviseur et le sol.
• Do not remove the stand from the
TV unless using an optional wall
mount bracket to mount it.
• After attaching the stand to the
TV, do not hold the stand when
you put up, set up, move or lay
down the TV.
• Ne retirez pas le socle du
téléviseur, sauf si vous utilisez
l'applique pour montage mural en
option pour le monter.
• Après avoir fixé le socle au
téléviseur, ne tenez pas le socle
lorsque vous posez, installez,
déplacez ou fixez le téléviseur.
21
• Durante el procedimiento de
instalación, asegúrese de que sus
dedos no queden atrapados entre el
televisor y el suelo.
• No quite el soporte del televisor a
menos que utilice una ménsula de
montaje en pared opcional para
montarlo.
• Tras instalar el soporte al
televisor, no sujete el soporte
cuando cuelgue, monte, mueva o
coloque el televisor.
Setting the TV on the Wall/Montage du téléviseur sur un mur/Instalación del televisor en una pared
Hanging on the wall
Suspension au mur
Suspensión del televisor en una pared
• AN-52AG4 wall mount bracket.
(See the bracket instructions for details.)
• Applique pour montage au mur AN-52AG4.
(Reportez-vous aux instructions de l'applique
pour les détails.)
• Ménsula de montaje en la pared AN-52AG4.
(Consulte las instrucciones de la ménsula
para conocer más detalles.)
AN-52AG4
Vertical mounting
Montage à la verticale
Montaje vertical
ESPAÑOL
Using an optional bracket to mount the TV
Utilisation de l'applique en option pour monter le téléviseur
Utilización de una ménsula opcional para montar el televisor
• You can ask a qualified service professional about
using an optional AN-52AG4 bracket to mount the TV
on the wall.
• Carefully read the instructions that come with the
bracket before beginning work.
• Vous pouvez faire appel à un technicien de service
qualifié et utiliser l'applique AN-52AG4 en option pour
monter le téléviseur sur un mur.
• Lisez attentivement les instructions accompagnant
l'applique avant de commencer les travaux.
• Puede preguntar al personal de servicio cualificado
acerca de la utilización de una ménsula AN-52AG4
opcional para montar el televisor en una pared.
• Lea cuidadosamente las instrucciones que
acompañan a la ménsula antes de iniciar el trabajo.
CAUTION
ATTENTION
PRECAUCIÓN
• This TV should be mounted on the wall only with
the wall mount bracket AN-52AG4 (SHARP). The
use of other wall mount brackets may result in
an unstable installation and may cause serious
injuries.
• Installing the TV requires special skill that should
only be performed by qualified service personnel.
Customers should not attempt to do the work
themselves. SHARP bears no responsibility for
improper mounting or mounting that results in
accident or injury.
• Ce téléviseur doit être installé sur un mur
uniquement avec l'applique pour montage mural
AN-52AG4 (SHARP). Une installation instable et un
risque de blessures graves pourraient résulter de
l'utilisation d'autres appliqués pour montage mural.
• L'installation du téléviseur demande une qualification
spéciale et ne devra être exécutée que par un personnel
d'entretien qualifié. Nous vous conseillons de ne pas
effectuer vous-même ce travail. SHARP décline toute
responsabilité en cas de montage défectueux pouvant
provoquer un accident ou des blessures.
• Este televisor se instalará en la pared solamente con
la ménsula de montaje en pared AN-52AG4 (SHARP).
El uso de otras ménsulas de montaje en pared puede
conducir a una instalación inestable y esto puede
causar lesiones graves.
• La instalación del televisor requiere un conocimiento
especial, por lo que ésta sólo deberá ser realizada
por personal de servicio cualificado. Los clientes no
deberán intentar hacer este trabajo ellos mismos.
SHARP no se hace responsable del montaje incorrecto
ni del montaje que pueda causar accidentes o lesiones.
Suspension au mur
Hanging on the wall
5°
Angular mounting
Montage en angle
Montaje en ángulo
FRANÇAIS
ENGLISH
Suspensión del televisor en una pared
LC-70UD27U
• The center of the display:
3/32 inch (2mm) above the "c" position.
LC-70UD27U
• Le centre de l'écran:
3/32 de pouce (2mm) au-dessus de la position "c".
LC-70UD27U
• El centro de la pantalla:
3/32 pulgadas (2 mm) por encima de la posición "c".
LC-60UD27U
• The center of the display:
13/32 inch (10mm) above the "c" position.
LC-60UD27U
• Le centre de l'écran:
13/32 de pouce (10mm) au-dessus de la position "c".
LC-60UD27U
• El centro de la pantalla:
13/32 pulgadas (10 mm) por encima de la posición "c".
Refer to the operation manual of AN-52AG4 for details.
Consultez le mode d'emploi de AN-52AG4 pour les détails.
The wall mount kit (sold separately) allows you to mount
the TV on the wall.For detailed information on installing
the wall mount, see the instructions provided with the
product.
We recommend you to contact a technician for
assistance when installing it.
SHARP is not responsible for any damage to the product
or injury to yourself or others if you elect to install the wall
mount on your own.
Le kit de montage mural (vendu séparément) vous
permet de monter le téléviseur au mur.
Pour des informations détaillées sur l'installation murale,
référez-vous aux instructions fournies avec le produit.
Nous vous recommandons de faire appel à un technicien
pour vous aider à l'installer.
SHARP ne pourra être tenu pour responsable de
l'endommagement du produit ou des blessures corporelles
causées à vous-même ou à autrui si vous décidez d'installer
le téléviseur au mur, sans assistance professionnelle.
Consulte el manual de operación de AN-52AG4 para
más detalles.
CAUTION
ATTENTION
• Install your wall mount on a solid wall
perpendicular to the floor.
When you want to attach the wall mount to
surfaces other than plaster board, please contact
your nearest retailer/adviser for additional
information. If you install the TV on a ceiling
or slanted wall, it may fall and result in severe
personal injury. Always have two people mount
the TV on a wall.
• Installez l'appareil sur un mur solide,
perpendiculaire au sol.
Si vous souhaitez fixer l'applique murale sur une
surface autre qu'une plaque de plâtre, prenez contact
avec votre détaillant/conseiller pour de plus amples
informations. Si vous installez le téléviseur au plafond
ou sur un mur incliné, il peut tomber et provoquer des
blessures corporelles graves. Il faut un minimum de
deux personnes pour l'installation murale du téléviseur.
NOTE
REMARQUE
• Due to the terminal configuration on this TV, when
you wall-mount this model, make sure there is enough
space between the wall and the TV for the cables.
• To use this TV mounted on a wall, remove the AC
cord holder on the rear of the TV, and then use the
screws supplied with the wall mount bracket to
secure the bracket to the rear of the TV.
• En raison de la configuration des prises sur ce
téléviseur, lors du montage au mur de ce modèle,
assurez-vous de laisser un espace suffisant entre le
mur et le téléviseur pour faire passer les câbles.
• Avant toute installation du téléviseur au mur, retirer le
support du cordon secteur à l'arrière du téléviseur,
puis utiliser les vis fournies avec l'applique pour
montage mural pour la fixer à l'arrière du téléviseur.
22
Utilización del kit de montaje mural para montar el televisor.
El kit de montaje mural (se vende por separado) le permite
montar el televisor en una pared.
Para obtener información detallada sobre la instalación del
montaje mural, consulte las instrucciones que se proporcionan
con el producto. Le recomendamos que se ponga en contacto
con un técnico para obtener ayuda para la instalación.
SHARP no se hace responsable de los daños que pueda sufrir
el producto, usted mismo u otras personas si decide instalar el
montaje mural usted mismo.
PRECAUCIÓN
• Instale el montaje mural en un muro sólido y
perpendicular al suelo. Si desea colocar el montaje mural
en superficies que no sean de yeso, póngase en contacto
con el distribuidor/asesor más próximo para obtener
información adicional. Si instala el televisor en un techo
o en una pared inclinada, este podría caer y provocar
lesiones personales graves. El montaje del televisor en la
pared requiere la presencia de dos personas.
NOTA
• Debido a la configuración de los terminales en este televisor,
al instalar este modelo en la pared, asegúrese de que haya
espacio suficiente para los cables entre la pared y el televisor.
• Para utilizar este TV instalado en la pared, quite el soporte
del cable de CA de la parte posterior del TV, y a continuación
utilice los tornillos, suministrados con la ménsula de montaje
en pared, para fijarla en la parte posterior del TV.
AC power supply/Alimentation secteur/Fuente de alimentación de CA
ENGLISH
FRANÇAIS
ESPAÑOL
AC connection
Connexion secteur
Conexión de CA
1
2
Attach your antenna to the back of the
television. (See page 26.)
Connect the AC plug for the television
into the AC outlet.
• Place the TV close to the AC outlet,
and keep the power plug within reach.
• Bundle the cords properly with the
cable tie.
• AC outlet
• Prise secteur
• Toma de CA
NOTE
1
1
2
or
ou
o
1
2
• TO PREVENT RISK OF ELECTRIC
SHOCK, DO NOT TOUCH UNINSULATED PARTS OF ANY CABLES
WITH THE AC CORD CONNECTED.
• Place the TV close to the AC outlet, and keep the power plug within reach.
• Placez le téléviseur près de la prise secteur et gardez la fiche du cordon
secteur à proximité.
• Coloque el televisor cerca de la toma de CA, y mantenga el enchufe al
alcance de la mano.
23
1
2
Fixez votre antenne au dos du
téléviseur. (Voir page 26.)
Branchez la fiche secteur pour le
téléviseur dans la prise secteur.
• Placez le téléviseur près de la prise
secteur et gardez la fiche du cordon
secteur à proximité.
• Attachez soigneusement les
cordons avec le collier de serrage.
REMARQUE
• POUR ÉVITER LES RISQUES
D'ÉLECTROCUTION, NE TOUCHEZ
PAS LES PIÈCES NON-ISOLÉES DES
CÂBLES LORSQUE LE CORDON
SECTEUR EST BRANCHÉ.
1
2
Coloque su antena en la parte
posterior del televisor. (Consulte la
página 26.)
Conecte la clavija de CA del televisor
en una toma de CA.
• Coloque el televisor cerca de la toma
de CA, y mantenga el enchufe al
alcance de la mano.
• Ate los cables correctamente
utilizando la banda de cable.
NOTA
• PARA IMPEDIR EL RIESGO DE
DESCARGA ELÉCTRICA, NO TOQUE
LAS PARTES SIN AISLAR DE NINGÚN
CABLE ESTANDO CONECTADO EL
CABLE DE CA.
AC power supply/Alimentation secteur/Fuente de alimentación de CA
ENGLISH
POWER button
3
4
FRANÇAIS
When turning on the TV for the first
time, press POWER on the television.
Insert the batteries into the remote
control unit. (See page 25.)
NOTE
• Speakers cannot be detached from the TV.
• The TV angle cannot be adjusted.
Turning On/Off the Power
Press POWER on the TV or on the remote
control unit to turn the power on.
NOTE
• The Initial Installation starts when the TV
powers on for the first time. If the TV has
been turned on before, the Initial Installation
will not be invoked. For changing the
settings of the Initial Installation, perform
"Easy Setup" on the Setup menu.
Press POWER on the TV or on the remote
control unit again to turn the power off.
• The TV enters standby and the image
on the screen disappears.
NOTE
POWER (On/Standby)
• If you are not going to use this TV for a long
period of time, be sure to remove the AC
cord from the AC outlet.
• Weak electric power is still consumed even
when the TV is turned off.
Experiencing HD Images
An HDTV without an HD source is just an
ordinary TV.
To enjoy HD images on the TV, you
should get HD programming from the
following:
• Over-the-air broadcasting via HD quality
antenna
• HD cable/satellite subscription
• HD compatible external equipment
NOTE
• For information on updating to HD
programming, ask your cable/satellite
service provider.
24
3
4
Lorsque vous allumez le téléviseur
pour la première fois, appuyez sur
POWER sur le téléviseur.
Introduisez les piles dans la
télécommande. (Voir page 25.)
REMARQUE
• Le haut-parleur ne peut pas être séparé du
téléviseur.
• L'angle du téléviseur ne peut pas être
ajusté.
Mise sous/hors tension
Appuyez sur la touche d'alimentation
(POWER) sur le téléviseur ou sur la
télécommande pour le mettre sous tension.
REMARQUE
• L'installation initiale démarre lorsque le
téléviseur est mis sous tension pour la première
fois. Si le téléviseur a déjà été mis sous
tension, l'installation initiale n'a pas lieu. Pour
changer les réglages de l'installation initiale,
procédez « Configuration facile » dans le menu
Configuration.
Appuyez de nouveau sur la touche
d'alimentation (POWER) sur le téléviseur ou
sur la télécommande pour l'éteindre.
• Le téléviseur entre en attente et l'image à
l'écran disparaît.
REMARQUE
• Si vous prévoyez de ne pas utiliser le téléviseur
pendant une période prolongée, veillez à retirer
le cordon secteur de la prise secteur.
• Une faible quantité d'électricité est consommée
même lorsque le téléviseur est mis hors
tension.
Expérience d'images HD
Un téléviseur haute définition sans
source HD n'est qu'un téléviseur
ordinaire.
Pour profiter d'images HD sur le
téléviseur, vous devez bénéficier d'une
programmation HD depuis l'une des
sources suivantes :
• Diffusion hertzienne via une antenne HD de
qualité
• Abonnement câble/satellite HD
• Équipement externe compatible HD
ESPAÑOL
3
4
Al encender el televisor por primera
vez, pulse POWER en el televisor.
Inserte las pilas en el control remoto.
(Consulte la página 25.)
NOTA
• Las bocinas no pueden ser separadas del
televisor.
• El ángulo del televisor no se puede ajustar.
Conexión/Desconexión de la alimentación
Pulse POWER en el televisor o en
el control remoto para conectar la
alimentación.
NOTA
• La preparación inicial empieza cuando
se enciende el televisor por primera vez.
Si el televisor ya ha sido encendido con
anterioridad, la preparación inicial no se
activará. Para cambiar los ajustes de la
preparación inicial, intente “Autoinstalación”
en el menú Configuración.
Pulse de nuevo POWER en el televisor o
en el control remoto para desconectar la
alimentación.
• El televisor entra en espera y la imagen
de la pantalla desaparece.
NOTA
• Si no va a utilizar este televisor durante un
largo periodo de tiempo, asegúrese de
desconectar el cable de CA de la toma de
CA.
• Se consume algo de energía eléctrica
incluso cuando el televisor esté apagado.
Vivencia de imágenes en HD
Un televisor de Alta Definición (HDTV)
sin una fuente de HD es simplemente
un televisor común.
Para disfrutar de las imágenes de
HD en el televisor, debe obtener
programación de HD por medio de
una de las fuentes siguientes.
• Emisión aérea a través de una antena de
calidad HD
• Suscripción a cable/satélite de HD
• Equipo externo compatible con HD
REMARQUE
NOTA
• Pour de plus amples informations sur la mise
à jour vers une programmation HD, consultez
votre prestataire de service par câble/satellite.
• Para mayor información sobre cómo
actualizar a programación HD, pregunte a
su proveedor de servicio de cable/satélite.
Remote Control Unit/Télécommande/Control Remoto
1
ENGLISH
FRANÇAIS
ESPAÑOL
Installing Batteries in the
Remote Control Unit
Mise en place des piles dans la
télécommande
Instalación de las pilas en el
control remoto
If the remote control fails to operate TV functions,
replace the batteries in the remote control unit.
Si la télécommande ne contrôle plus les fonctions du
téléviseur, remplacez les piles dans la télécommande.
Reemplace las pilas del control remoto si éste no
puede operar el televisor.
1
2
1
2
1
2
2
Open the battery cover.
Insert two "AAA" size batteries
(supplied with the product).
• Placez les piles en faisant correspondre
leurs bornes avec les indications (e) et
(f) dans le compartiment.
• Place the batteries with their terminals
corresponding to the (e) and (f)
indications in the battery compartment.
3
Close the battery cover.
Improper use of batteries can result in chemical
leakage or explosion. Be sure to follow the instructions
below.
• Do not mix batteries of different types. Different
types of batteries have different characteristics.
• Do not mix old and new batteries. Mixing old and
new batteries can shorten the life of new batteries
or cause chemical leakage in old batteries.
• Remove batteries as soon as they are worn out.
Chemicals that leak from batteries that come in
contact with skin can cause a rash. If you find any
chemical leakage, wipe thoroughly with a cloth.
• The batteries supplied with this product may have a
shorter life expectancy due to storage conditions.
• If you will not be using the remote control unit for
an extended period of time, remove batteries from
it.
•
•
•
Remote control sensor
Capteur de télécommande
Sensor de control remoto
30°
17´ (5 m)
30°
30°
30° *
*
• The angle is 15° when the stand is attached.
• L'angle est de 15° lorsque le socle est fixé.
• El ángulo es de 15° cuando el soporte está sujeto.
3
Refermez le couvercle.
ATTENTION
CAUTION
3
Ouvrez le couvercle des piles.
Insérez les deux piles format « AAA »
(fournies avec l'appareil).
Une utilisation incorrecte des piles peut provoquer
des fuites ou une explosion. Veillez à suivre les
instructions ci-dessous.
• N'utilisez pas ensemble des piles de types
différents. Les autres piles ont des caractéristiques
différentes.
• N'utilisez pas ensemble des piles usagées et
neuves. Ceci peut raccourcir la durée de vie des
piles neuves ou provoquer des fuites des piles
usagées.
• Retirez les piles dès qu'elles sont usées. Le contact
avec la peau de produits chimiques s'écoulant
d'une pile peut provoquer une allergie. En cas de
fuite, essuyez soigneusement avec un chiffon.
• Les piles fournies avec l'appareil peuvent avoir une
durée de vie plus courte que prévue en raison des
conditions de stockage.
• Si vous n'avez pas l'intention d'utiliser la
télécommande pendant une période prolongée,
retirez les piles.
3
Abra la cubierta de las pilas.
Inserte dos pilas tamaño “AAA”
(suministradas con el producto).
• Ponga las pilas con sus terminales
correspondientes en los indicadores
(e) y (f) del compartimiento de las
pilas.
Cierre la cubierta de las pilas.
PRECAUCIÓN
La utilización incorrecta de las pilas puede causar
escapes de sustancias químicas o explosiones.
Asegúrese de seguir las instrucciones dadas a
continuación.
• No mezcle pilas de tipos diferentes. Las pilas de tipos
diferentes tienen también características diferentes.
• No mezcle pilas viejas y nuevas. La mezcla de pilas viejas
y nuevas puede reducir la duración de las pilas nuevas o
causar fugas de sustancias químicas en las pilas viejas.
• Quite las pilas tan pronto como se agoten. Las
sustancias químicas que escapan de las pilas
y entran en contacto con la piel pueden causar
sarpullido. Si detecta alguna fuga de sustancias
químicas, limpie bien con un paño.
• Las pilas suministradas con este producto
pueden durar menos de lo esperado debido a las
condiciones en las que han estado guardadas.
• Si no va a utilizar el control remoto durante un largo
periodo de tiempo, retire las pilas del mismo.
Using the Remote Control Unit
Utilisation de la télécommande
Utilización del control remoto
Use the remote control unit by pointing it towards
the remote control sensor on the TV. Objects
between the remote control unit and the remote
control sensor may prevent proper operation.
Utilisez la télécommande en la dirigeant vers
le capteur de télécommande du téléviseur.
Les objets placés entre la télécommande et le
capteur de télécommande risquent d'empêcher
le bon fonctionnement des appareils.
Utilice el control remoto apuntándolo hacia el
sensor de control remoto en el televisor. Los
objetos ubicados entre el control remoto y el
sensor de control remoto pueden impedir el
funcionamiento apropiado.
Cautions regarding the remote
control unit
• Do not expose the remote control unit to shock.
In addition, do not expose the remote control unit
to liquids, and do not place it in an area with high
humidity.
• Do not install or place the remote control unit under
direct sunlight. The heat may cause deformation of
the remote control unit.
• The remote control unit may not work properly if
the remote control sensor on the TV is under direct
sunlight or strong lighting. In such cases, change
the angle of the lighting or the TV, or operate the
remote control unit closer to the remote control
sensor.
IMPORTANT:
IF THE UNIT DOES NOT POWER ON - UNPLUG
THE TELEVISION FROM THE OUTLET AND
REPEAT THE INSTALLATION STEPS.
IF YOU STILL ENCOUNTER NO POWER,
PLEASE CONTACT US AT 1-800-BE-SHARP.
25
Précautions relatives à la
télécommande
Precauciones relacionadas con el
control remoto
• N'exposez pas la télécommande à des chocs. Ne
l'exposez pas non plus à des liquides et ne la placez
pas dans des endroits très humides.
• N'installez pas et n'exposez pas la télécommande
directement au soleil. La chaleur peut provoquer la
déformation de la télécommande.
• La télécommande risque de ne pas fonctionner
normalement si le capteur de télécommande du
téléviseur est directement exposé au soleil ou
sous un éclairage violent. Dans ce cas, changez
l'angle de l'éclairage ou du téléviseur, ou utilisez la
télécommande en vous rapprochant du capteur de
télécommande.
• No exponga a golpes el control remoto. Además, no
exponga tampoco el control remoto a los líquidos, y
no lo coloque en un área con alta humedad.
• No instale ni coloque el control remoto bajo la luz
directa del sol. El calor puede causar deformaciones
en el mismo.
• El control remoto puede que no funcione
correctamente si el sensor de control remoto del
televisor está bajo la luz solar directa o una fuente
de iluminación intensa. En tales casos, cambie el
ángulo de la iluminación o del televisor, o utilice el
control remoto más cerca del sensor de control
remoto.
IMPORTANT:
IMPORTANTE:
SI L'UNITÉ NE SE MET PAS SOUS TENSION DÉBRANCHEZ LE TÉLÉVISEUR DE LA PRISE
SECTEUR ET RÉPÉTEZ LES ÉTAPES DE
L'INSTALLATION.
SI LE TÉLÉVISEUR NE SE MET TOUJOURS
PAS SOUS TENSION, CONTACTEZ-NOUS AU
1-800-BE-SHARP.
SI LA UNIDAD NO SE ENCIENDE, DESENCHUFE
EL TELEVISOR DE LA TOMA DE CORRIENTE Y
REPITA LOS PASOS DE INSTALACIÓN.
SI SIGUE SIN PODER ENCENDERLO, PÓNGASE
EN CONTACTO CON NOSOTROS LLAMANDO
AL 1-800-BE-SHARP.
Connection/Connexion/Conexión
• Cable TV lead-In
• Entrée de câble TV
• Cable de entrada de TV por cable
• Home Antenna terminal (75-ohm)
• Prise d'antenne de résidence (75 ohms)
• Terminal de antena de casa (75 ohmios)
2
• 75-ohm coaxial cable (round)
• Câble coaxial de 75 ohms (rond)
• Cable coaxial de 75 ohmios (redondo)
• Coaxial cable
• Câble coaxial
• Cable coaxial
• Home Antenna
terminal (75-ohm)
• Prise d'antenne
de résidence (75 ohms)
• Terminal de antena
de casa (75 ohmios)
3
• 75-ohm coaxial cable (round)
• Câble coaxial de 75 ohms (rond)
• Cable coaxial de 75 ohmios (redondo)
1
• 300-ohm twin-lead
cable (flat)
• Câble méplat
300 ohms (plat)
• Cable bifilar de
300 ohmios (plano)
ENGLISH
Antennas
To enjoy a clearer picture, use an outdoor antenna. The following is a brief explanation of the types of
connections that are used for a coaxial cable. If your outdoor antenna uses a 75-ohm coaxial cable
with an F-type connector, plug it into the antenna terminal at the rear of the TV set. For connecting the
antenna cable to the TV, use commercially available cables.
Connecting Antenna Cable
• Connect the antenna cable to the TV using one of the methods in the illustration as shown
(1, 2, 3 or 4).
1 Cable without a CATV converter
2 VHF/UHF antenna
3 Combination VHF/UHF antenna
4 Separate VHF/UHF antenna
* A 75-ohm system is generally a round cable with F-type connector that can easily be attached to a terminal
without tools.
* A 300-ohm system is a flat "twin-lead" cable that can be attached to a 75-ohm terminal through a 300/75ohm adapter.
• Coaxial cable
• Câble coaxial
• Cable coaxial
• or
• ou
•o
NOTICE
• 300/75-ohm
adapter
• Adaptateur
300/75 ohms
• Adaptador de
300/75 ohmios
F-type connector should be finger-tightened only.
When connecting the RF cable to the TV set, do not tighten F-type connector with tools.
If tools are used, it may cause damage to your TV set. (The breaking of internal circuit, etc.)
FRANÇAIS
Antennes
UHF
ANTENNA
4
VHF
ANTENNA
Pour obtenir des images plus nettes, utilisez une antenne externe. Ce qui suit est une brève explication des
types de raccordements utilisés pour le câble coaxial. Si votre antenne externe est dotée d'un câble coaxial
de 75 ohms avec un connecteur de type F, branchez-la dans la prise d'antenne à l'arrière du téléviseur.
Pour raccorder le câble d'antenne à un téléviseur, utilisez des câbles disponibles dans le commerce.
Raccordement du câble d'antenne
• Raccordez le câble d'antenne au téléviseur par l'une des méthodes illustrées (1, 2, 3 ou 4).
1 Câble sans convertisseur CATV
2 Antenne VHF/UHF
3 Antenne mixte VHF/UHF
4 Antenne séparée VHF/UHF
• 300-ohm twin-lead cable
• Câble méplat 300 ohms
• Cable bifilar de 300 ohmios
• 300-ohm twin-lead cable
• Câble méplat 300 ohms
• Cable bifilar de 300 ohmios
•OUT
•IN
•ENTRÉE •SORTIE
•ENTRADA •SALIDA
• Combiner
• Multiplexeur
• Combinador
• or 75-ohm coaxial cable
• ou Câble coaxial de 75 ohms
• o Cable coaxial de 75 ohmios
• To TV antenna
terminal
• Vers la prise
d'antenne TV
• Al terminal de
antena del televisor
* Une antenne de 75 ohms comporte généralement un câble rond avec un connecteur de type F qui peut être
facilement raccordé sans outils à la borne.
* Une antenne de 300 ohms comporte un câble plat à deux conducteurs « câble méplat » pouvant être
raccordé à une borne de 75 ohms par l'intermédiaire d'un adaptateur 300/75 ohms.
REMARQUE
75-ohm coaxial cable (round)
Câble coaxial de 75 ohms (rond)
Cable coaxial de 75 ohmios (redondo)
• F-type connector
• Connecteur de type F
• Conector tipo F
Le connecteur de type F doit être serré manuellement.
Lors du raccordement du câble RF sur le téléviseur, ne serrez pas le connecteur de type F avec des outils.
Si des outils sont utilisés, ceci risque d'endommager le téléviseur (dommage du circuit interne, par ex.).
• F-type connector
• Connecteur de type F
• Conector tipo F
ESPAÑOL
Antenas
Para disfrutar de una imagen clara, utilice una antena exterior. A continuación se ofrece una breve
explicación de los tipos de conexiones que se utilizan para un cable coaxial. Si su antena exterior
utiliza un cable coaxial de 75 ohmios con un conector tipo F, enchúfela al terminal de antena del
panel trasero del televisor. Para conectar el cable de la antena al TV, utilice cables comercialmente
disponibles.
Conexión de cable de antena
• Conecte el cable de antena al televisor utilizando uno de los métodos mostrados en la
ilustración (1, 2, 3 ó 4).
1 Cable sin convertidor CATV
2 Antenas de VHF/UHF
3 Combinación de antenas de VHF/UHF
4 Antenas de VHF/UHF separadas
* Un sistema de 75 ohmios es generalmente un cable redondo con un conector tipo F que se puede conectar
fácilmente a un terminal sin herramientas.
* Un sistema de 300 ohmios es un cable “bifilar” plano que se puede conectar a un terminal de 75 ohmios a
través de un adaptador 300/75 ohmios.
AVISO
26
El conector del tipo F deberá apretarse con los dedos solamente.
Cuando conecte el cable de RF al televisor, no apriete el conector tipo F con ninguna herramienta.
Si emplease herramientas podría dañar su televisor.
(La ruptura del circuito interno, etc.)
Connection/Connexion/Conexión
Connecting to video equipment or PC
Connexion à un équipement vidéo ou à un ordinateur
Conexión a un equipo de vídeo o a un PC
• Image
Quality
• Qualité de
l'image
• Calidad
de imagen
• Terminal
on the TV
• Prise sur le
téléviseur
• Terminal del
televisor
• Cable
• Câble
• Cable
•HD
Quality
•Qualité
HD
•Calidad
HD
ENGLISH
Types of Connection
• Terminal on external
equipment
• Prise sur appareil
externe
• Terminal del equipo
externo
• HDMI-certified cable
• Câble certifié HDMI
• Cable certificado HDMI
• Pages
• Pages
• Páginas
28,30,31
For connecting the TV to external equipment, use commercially available
cables.
• The illustrations of the terminals are for explanation purposes and may vary slightly from the
actual products.
Connecting to video equipment or PC
Image quality differs depending on the terminal used. To enjoy clearer images, check
the output terminals of your external equipment and use its appropriate terminals for
higher quality images.
Connecting to audio equipment
Check the output terminals of your external equipment and use its appropriate
terminals.
• Ø 3.5 mm stereo minijack cable
• Câble avec mini-prise stéréo ø 3,5 mm
• Cable con miniconector estéreo de 3,5 mm ø
31
AUDIO
FRANÇAIS
• HDMI-certified cable
• Câble certifié HDMI
• Cable certificado HDMI
Types de connexions
Pour connecter le téléviseur à un équipement externe, utilisez les câbles
disponibles commercialement.
• Component video cable
• Câble vidéo composante
• Cable de vídeo componente
29
• Audio cable
• Câble audio
• Cable de audio
•Standard
Quality
•Qualité
standard
•Calidad
estándar
• AV cable
• Câble AV
• Cable de AV
29
Connecting to audio equipment
Connexion à un équipement audio
Conexión a un equipo de audio
• Terminal on the TV
• Prise sur le téléviseur
• Terminal del televisor
• Les illustrations des prises sont fournies à titre d'exemple et peuvent légèrement varier sur
les produits réels.
Connexion à un équipement vidéo ou à un ordinateur
La qualité de l'image diffère en fonction de la prise utilisée. Pour profiter d'images
plus claires, vérifiez les prises de sortie de votre appareil externe et utilisez les prises
appropriées pour des images de plus grande qualité.
Connexion à un équipement audio
Vérifiez les bornes de sortie de votre équipement externe et utilisez ses bornes
appropriées.
ESPAÑOL
Tipos de conexiones
• Cable
• Câble
• Cable
• Terminal on external
equipment
• Prise sur appareil
externe
• Terminal del equipo
externo
• Pages
• Pages
• Páginas
• Optical fiber cable
• Câble à fibre optique
• Cable de fibra óptica
30
OPTICAL
DIGITAL AUDIO INPUT
Para la conexión del televisor a un equipo externo, use cables disponibles
comercialmente.
• Las ilustraciones de los terminales son con fines explicativos y es posible que varíen
ligeramente con respecto a los productos reales.
Conexión a un equipo de vídeo o a un PC
La calidad de imagen difiere según el terminal que se utilice. Para disfrutar de imágenes
más claras, verifique los terminales de salida de su equipo externo y utilice los
terminales adecuados para obtener imagenes de mejor calidad.
Conexión a un equipo de audio
Compruebe los terminales de salida del equipo externo y utilice los terminales
apropiados.
• Ø3.5 mm stereo minijack to RCA audio cable
• Câble audio avec mini-prise stéréo ø 3,5 mm vers RCA
• Cable de audio con miniconector estéreo de 3,5 mm ø a RCA
30
ANALOG AUDIO IN
27
Connection/Connexion/Conexión
1
ENGLISH
• HDMI-certified cable
• Câble certifié HDMI
• Cable certificado HDMI
You can connect many types of external equipment to your TV. To view external source images, select the input source by
pressing INPUT on the remote control unit or on the TV.
For connecting the TV to external equipment, use commercially available cables.
CAUTION
• To protect equipment, always turn off the TV before connecting any external equipment.
• Please read the relevant operation manual (Blu-ray disc player, etc.) carefully before making connections.
Connecting a Blu-ray Disc/DVD Player or HD Cable/Satellite Set-top Box
1 When using an HDMI cable (HDMI IN 1, 2, 3 or 4):
HDMI OUT
HDMI IN1: 4K60P 4:2:0
HDMI IN2: 4K60P 4:2:0
HDMI IN3: 4K60P 4:4:4
HDMI IN4: 4K60P 4:2:0
• When connecting 4K equipment to the TV, use the HDMI IN 1, 2, 3 or 4 terminal (3840 x 2160(Ultra HD) 60Hz,30Hz,
25Hz, 24Hz are available.).
• Connect 4K signal (HDCP2.2) to the HDMI IN 4 terminal.
• HDMI IN 3 is suitable for 4K(2160p, 4:4:4) signal.
If there is a problem viewing a signal through the HDMI IN 3 video input,please use either HDMI IN 1, 2 or 4 video input.
• When you connect ARC-compatible equipment, use HDMI IN 1.
• The HDMI (High Definition Multimedia Interface) terminal is an audio-video interface that enables a connection for audio
and video signals using a single cable. The HDMI IN terminal supports high-resolution video input.
• To enjoy 1080p display capability, connect your external equipment using an HDMI-certified cable or a component
cable and set the equipment to 1080p output.
• Supported Audio format: Linear PCM, Dolby Digital, sampling rate 32/44.1/48kHz.
FRANÇAIS
Vous pouvez raccorder différents types d'appareil externe à votre téléviseur. Pour regarder des images d'une source externe,
sélectionnez la source d'entrée à en appuyant sur INPUT sur la télécommande ou sur le téléviseur.
Pour connecter le téléviseur à un équipement externe, utilisez les câbles disponibles commercialement.
ATTENTION
• Pour protéger l'appareil, éteignez toujours le téléviseur avant de raccorder un appareil externe.
• Reportez-vous aux modes d'emploi appropriés (lecteur de disque Blu-ray, etc.) avant de procéder aux raccordements.
Raccordement d'un lecteur de disque Blu-ray, lecteur DVD ou boîtier décodeur de réception HD par câble/satellite
1 Lors de l'utilisation d'un câble HDMI (HDMI IN 1, 2, 3 ou 4):
• Lors de la connexion d’un équipement 4K au téléviseur, utilisez la prise HDMI IN 1, 2, 3 ou 4 (3840 x 2160 (Ultra HD)
60Hz,30Hz, 25Hz, 24Hz sont disponibles.).
• Connecte les signaux 4K (HDCP2.2) au terminal HDMI IN 4.
• L'HDMI 3 est adaptée à un signal 4K(2160p) 50/60Hz (4: 4: 4).
Si vous rencontrez un problème pour lire un signal sur l'entrée vidéo HDMI IN 3, merci d'utiliser l'entrée HDMI IN 1, 2 ou 4.
• Lorsque vous raccordez un appareil compatible ARC, utilisez HDMI IN 1.
• La prise HDMI (High Definition Multimedia Interface) est une interface audio-vidéo qui permet une connexion pour des
signaux audio et vidéo à l'aide d'un simple câble. La prise HDMI IN prend en charge l'entrée vidéo en haute résolution.
• Pour bénéficier de toutes les fonctionnalités de l'affichage 1080p, branchez l'appareil externe au moyen d'un câble
certifié HDMI ou câble composantes et réglez l'appareil sur la sortie 1080p.
• Format audio pris en charge : PCM linéaire, Dolby Digital, taux d'échantillonnage 32/44,1/48 kHz.
ESPAÑOL
Puede conectar muchos tipos de equipos externos a su televisor. Para ver las imágenes de la fuente externa, seleccione la fuente
de entrada pulsando INPUT en el control remoto o en el televisor.
Para la conexión del televisor a un equipo externo, use cables disponibles comercialmente.
PRECAUCIÓN
• Para proteger al equipo, apague siempre el televisor antes de conectar cualquier equipo externo.
• Lea cuidadosamente el manual de operación pertinente (reproductor de disco Blu-ray, etc.) antes de hacer las
conexiones.
Conexión de un reproductor de disco Blu-ray, reproductor de DVD o decodificador de cable/satélite de HD
1 Cuando se utiliza un cable HDMI (HDMI IN 1, 2, 3 ó 4):
• Cuando conecte un equipo 4K al televisor, utilice el terminal HDMI IN 1, 2, 3 ó 4 (3840 x 2160 (Ultra HD) 60Hz,30Hz,
25Hz, 24Hz están disponibles).
• Conecte señales 4K (HDCP2.2) al terminal HDMI IN 4.
• La entrada HDMI 3 es adecuada para señales de video 4K (2160p) 50/60Hz.(en formato 4: 4: 4) .
Cuando hay algún problema con la entrada de vídeo HDMI IN 3, utilice alguna de las entradas de video HDMI IN 1, 2 o 4.
• Si conecta un equipo compatible con ARC, utilice HDMI IN 1.
• El terminal de HDMI (High Definition Multimedia Interface) es una interfaz de audio-vídeo que facilita una conexión para
señales de audio y vídeo que utiliza un solo cable. El terminal de HDMI IN soporta entrada de vídeo de alta resolución.
• Para disfrutar de las posibilidades de visualización de 1080p, conecte su equipo externo utilizando un cable certificado
HDMI o un cable componente y ajuste el equipo a la salida 1080p.
• Formato de audio soportado: PCM lineal, Dolby Digital, frecuencia de muestreo 32/44,1/48kHz.
28
Connection/Connexion/Conexión
2
ENGLISH
Y • (Green)
• (Vert)
• (Verde)
Connecting a Blu-ray Disc/DVD Player or HD Cable/Satellite Set-top Box
2 When using a Component cable (COMPONENT IN/VIDEO IN):
• To enjoy 1080p display capability, connect your external equipment using an HDMI-certified
cable or a component cable and set the equipment to 1080p output.
• When you connect a component cable to the COMPONENT IN/VIDEO IN terminal, switch
COMPONENT/VIDEO select to COMPONENT or Auto.
• Component video cable
• Câble vidéo composante
• Cable de vídeo componente
PB • (Blue)
• (Bleu)
• (Azul)
PR • (Red)
• (Rouge)
• (Rojo)
AUDIO-L • (White)
• (Blanc)
• (Blanco)
AUDIO-R • (Red)
• (Rouge)
• (Rojo)
Connecting a VCR, Game Console, Camcorder or Cable/Satellite Set-top Box
COMPONENT OUT
3 When using a Composite cable (COMPONENT IN/VIDEO IN):
• When you connect an AV cable to the COMPONENT IN/VIDEO IN terminal, switch
COMPONENT/VIDEO select to VIDEO or Auto.
• Audio cable
• Câble audio
• Cable de audio
FRANÇAIS
3
Raccordement d'un lecteur de disque Blu-ray, lecteur DVD ou boîtier décodeur de réception HD par câble/satellite
VIDEO
• (Yellow)
• (Jaune)
• (Amarillo)
2 Lors de l'utilisation d'un câble composante (COMPONENT IN/VIDEO IN) :
• AV cable
• Câble AV
• Cable de AV
• Pour bénéficier de toutes les fonctionnalités de l'affichage 1080p, branchez l'appareil
externe au moyen d'un câble certifié HDMI ou câble composantes et réglez l'appareil sur la
sortie 1080p.
• Lorsque vous connectez un câble composante au terminal COMPONENT IN/VIDEO IN,
commutez la COMPONENT/VIDEO sélection sur COMPONENT ou AUTO.
AUDIO-L
• (White)
• (Blanc)
• (Blanco)
Raccordement d'un magnétoscope, console de jeu, caméscope ou boîtier décodeur de réception par câble/satellite
3 Lors de l'utilisation d'un câble composite (COMPONENT IN/VIDEO IN) :
• Lorsque vous connectez un câble AV au terminal COMPONENT IN/VIDEO IN, commutez la
COMPONENT/VIDEO sélection sur VIDEO ou AUTO.
AUDIO-R
• (Red)
• (Rouge)
• (Rojo)
ESPAÑOL
Conexión de un reproductor de disco Blu-ray, reproductor de DVD o decodificador de cable/satélite de HD
2 Cuando se utiliza un cable componente (COMPONENT IN/VIDEO IN):
• Para disfrutar de las posibilidades de visualización de 1080p, conecte su equipo externo
utilizando un cable certificado HDMI o un cable componente y ajuste el equipo a la salida
1080p.
• Al conectar un cable de componentes al terminal COMPONENT IN/VIDEO IN, cambie
Selección COMPONENTE/VIDEO a COMPONENTE o AUTO.
Conexión de una videograbadora, una consola de videojuegos, una videocámara o un decodificador de cable/satélite
3 Cuando se utiliza un cable de vídeo compuesto (COMPONENT IN/VIDEO IN):
• Al conectar un cable AV al terminal COMPONENT IN/VIDEO IN, cambie Selección
COMPONENTE/VIDEO a VIDEO o AUTO.
29
Connection/Connexion/Conexión
4
ENGLISH
• HD Cable/Satellite set-top box
• Boîtier décodeur de réception HD par câble/satellite
• Decodificador de cable/satélite de HD
Connecting a Surround System/Audio System
4 When connecting an AV amplifier for a surround system
• HDMI-certified cable *1
• Câble certifié HDMI *1
• Cable certificado HDMI *1
• Letting the TV output the audio to an AV amplifier:
*1 When you connect ARC-compatible equipment, use HDMI IN 1.
*2 If the equipment to be connected is not compatible with the ARC, connect an optical
fiber cable to the DIGITAL AUDIO OUT terminal.
• If the image is not in sync with the audio, check the settings of the connected surround
system.
HDMI OUT
5 When connecting an audio amplifier
It is possible to output audio through the DIGITAL AUDIO OUT terminal.
• In this case, set "Audio Setup" to "PCM" or "Bitstream". (Refer to built-in operation manual.)
FRANÇAIS
OPTICAL
DIGITAL AUDIO INPUT
HDMI OUT HDMI IN
Raccordement d'un système ambiophonique/un système audio
4 Lors de la connexion d'un amplificateur AV pour un système ambiophonique
• Optical fiber cable *2
• Câble à fibre optique *2
• Cable de fibra óptica *2
• Laisser le téléviseur reproduire l'audio sur un amplificateur AV :
*1 Lorsque vous raccordez un appareil compatible ARC, utilisez HDMI IN 1.
*2 Si l'équipement à raccorder n'est pas compatible ARC, raccordez un câble en fibre
optique sur la prise de sortie DIGITAL AUDIO OUT.
• Si l'image n'est pas synchronisée avec le son, vérifiez les réglages du système
ambiophonique raccordé.
5
• Optical fiber cable
• Câble à fibre optique
• Cable de fibra óptica
5 Lors de la connexion d'un amplificateur audio
Il est possible d'émettre un son audio via la prise de sortie DIGITAL AUDIO OUT.
• Dans ce cas, réglez « Réglage audio » sur « PCM » ou « Flux binaire ». (Reportez-vous au
mode d'emploi intégré)
ESPAÑOL
OPTICAL
Conexión a un sistema de sonido envolvente/sistema de audio
DIGITAL AUDIO INPUT
4 Conexión a un amplificador de AV para un sistema de sonido envolvente
• Ø3.5 mm stereo minijack to RCA audio cable
• Câble audio avec mini-prise stéréo ø 3,5 mm vers RCA
• Cable de audio con miniconector estéreo de 3,5 mm ø a RCA
• Para dejar que el televisor emita el audio a un amplificador AV:
*1 Si conecta un equipo compatible con ARC, utilice HDMI IN 1.
*2 Si el equipo que va a conectar no es compatible con ARC, conecte un cable de fibra
óptica en el terminal DIGITAL AUDIO OUT.
• Si la imagen no está sincronizada con el audio, compruebe los ajustes del sistema de
sonido envolvente conectado.
5 Conexión a un amplificador de audio
Es posible dar salida de audio a través del terminal DIGITAL AUDIO OUT.
• En tal caso, seleccionar "Ajuste de audio" en "PCM" o en "Flujo de bits". (Consulte el Manual
de instrucciones integrado.)
ANALOG AUDIO IN
30
Connection/Connexion/Conexión
6
ENGLISH
• HDMI-certified cable
• Câble certifié HDMI
• Cable certificado HDMI
Connecting a PC
Refer to built-in operation manual for a list of PC signals compatible with the TV.
6 When using an HDMI cable (HDMI IN 3):
• Depending on the board, only video signals may be output. In this case, in addition to connecting an HDMIcertified cable to the HDMI IN 3 terminal, connect a Ø 3.5 mm stereo minijack cable to the AUDIO IN terminal
and set "Audio Select" to "HDMI+Analog". (Refer to built-in operation manual.)
• The HDMI IN terminals only support digital signal.
FRANÇAIS
Raccordement d'un ordinateur
Reportez-vous au mode d'emploi intégré pour la liste des signaux d'ordinateur compatibles avec le
téléviseur.
6 Lors de l'utilisation d'un câble HDMI (HDMI IN 3) :
HDMI OUT
• Selon la carte, il est possible que seuls des signaux vidéo puissent être envoyés sur la sortie. Dans ce cas,
outre la connexion d'un câble certifié HDMI sur la prise HDMI IN 3, connectez un câble avec mini-prise stéréo
ø 3,5 mm sur la prise AUDIO IN et réglez « Sélection Audio » sur « HDMI + analogique ». (Reportez-vous au
mode d'emploi intégré)
• Les prises HDMI IN ne prennent en charge que le signal numérique.
or/ou/o
• HDMI-certified cable
• Câble certifié HDMI
• Cable certificado HDMI
• Ø 3.5 mm stereo minijack cable
• Câble avec mini-prise stéréo ø 3,5 mm
• Cable con miniconector estéreo de 3,5 mm ø
ESPAÑOL
Conexión de un PC
HDMI OUT
Consulte el Manual de instrucciones integrado para conocer una lista de las señales de PC
compatibles con el televisor.
6 Cuando se utiliza un cable HDMI (HDMI IN 3):
AUDIO
• Dependiendo de la tarjeta, solamente se podrán sacar señales de vídeo. En este caso, en adición a conectar
un cable certificado HDMI al terminal HDMI IN 3, conecte un cable con miniconector estéreo de 3,5 mm ø
al terminal AUDIO IN y ajuste “Selección Audio” a “HDMI + Análogo”. (Consulte el Manual de instrucciones
integrado.)
• Los terminales HDMI IN solamente soportan señal digital.
31
Watching TV/Pour regarder la télévision/Para ver TV
ENGLISH
FRANÇAIS
Initial Installation
Installation initiale
Perform the following steps before you
press POWER on the remote control unit.
1 Insert the batteries into the remote
control unit.
2 Connect the antenna cable to the TV.
3 Plug in the AC cord to the AC outlet.
Language (Language setting)
Select from among 3 languages: English,
French and Spanish.
1 Press a/b to select the desired
language listed on the screen, and
then press ENTER.
Language
Location & Time
TV Location
ESPAÑOL
Preparación inicial
Procédez aux étapes suivantes avant
d'appuyer sur
POWER de la télécommande.
1 Introduisez les piles dans la
télécommande.
2 Branchez le câble d'antenne sur le
téléviseur.
3 Branchez le cordon secteur dans la
prise secteur.
Langue (Réglage de la langue)
Sélectionnez parmi 3 langues : anglais,
français et espagnol.
1 Appuyez sur a/b pour sélectionner
la langue désirée sur la liste à l'écran,
et appuyez ensuite sur ENTER.
English
Antenna & Cable/STB
Español
CH Search
Idioma (Ajuste de idioma)
Seleccione entre 3 idiomas: Inglés,
Francés y Español.
1 Pulse a/b para seleccionar el idioma
deseado listado en la pantalla, y luego
pulse ENTER.
Idioma
Locación & Hora
Langue
Ubicación TV
Lieu et heure
Antena & Cable/STB
Emplacement TV
Ant./Cable
Français
Air/Cable
Ejecute los pasos siguientes antes de
pulsar POWER en el control remoto.
1 Inserte las pilas en el control remoto.
2 Conecte el cable de la antena al
televisor.
3 Enchufe el cable de CA en la toma de
CA.
Smart TV
Antenne&câble/boîtier
Completed
Ant/Câble
Rech. Canal
English
Français
Busq. Canal
English
Français
Español
Red
Español
Completado
Réseau
Location & Time
Make settings for the country, area and
time zone where you use the TV.
2 Press a/b to select "United States",
"Canada" or "Mexico", and then press
ENTER.
3 Press a/b to select the time zone
where you are using the TV, and then
press ENTER.
4 Press a/b to select the Daylight
Savings Time, and then press ENTER.
32
Terminé
Lieu et heure
Effectuez les réglages pour le pays, la
zone et le fuseau horaire où vous utilisez
le téléviseur.
2 Appuyez sur a/b pour sélectionner
« États-Unis », « Canada » ou
« Mexique », et appuyez ensuite sur
ENTER.
3 Appuyez sur a/b pour sélectionner
le fuseau horaire où vous utilisez le
téléviseur, et appuyez ensuite sur
ENTER.
4 Appuyez sur a/b pour sélectionner
l'heure d'été, et appuyez ensuite sur
ENTER.
Locación & Hora
Realice los ajustes de acuerdo con el
país, área y zona horaria en la que utiliza
el televisor.
2 Pulse a/b para seleccionar “Estados
Unidos”, “Canadá” o “México”, y
luego pulse ENTER.
3 Pulse a/b para seleccionar la zona
horaria en la que utiliza el televisor, y
luego pulse ENTER.
4 Pulse a/b para seleccionar Horario
de Verano, y luego pulse ENTER.
Watching TV/Pour regarder la télévision/Para ver TV
ENGLISH
FRANÇAIS
TV Location
Select "Home" or "Store" for the location
where you plan to install the TV.
5 Press c/d to select "Home" or
"Store".
Press ENTER to enter the setting.
Antenna & Cable/STB
Select the type of connection you will use
to watch TV.
6 Press c/d to select "Antenna &
Cable" or "Set-top box", and then
press ENTER.
Air/Cable (Antenna setting)
Make sure what kind of connection is
made with your TV when selecting "Air" or
"Cable".
7 Press c/d to select "Air" or "Cable".
Press ENTER to enter the setting.
CH Search (Channel search)
Channel auto search makes the TV look
for all channels viewable in the set area.
8 When "Air" is selected in Antenna
setting:
Press c/d to select "Start", and then
press ENTER.
Smart TV
When you connect to the Internet on the
TV, select the desired connection method
and follow the instructions shown on the
display.
9 Press c/d to select "Yes", and then
press ENTER.
10 Press a/b to select "Wired" or
"Wireless", and then press ENTER.
33
Emplacement TV
Sélectionnez « Maison » ou « Magasin »
comme emplacement d'installation du
téléviseur.
5 Appuyez sur c/d pour sélectionner «
Maison » ou « Magasin ».
Appuyez sur ENTER pour valider le
réglage.
Antenne&câble/boîtier
Sélectionnez le type de connexion que
vous utiliserez pour regarder la TV.
6 Appuyez sur c/d pour sélectionner
« Antenne&câble » ou « Boîtier
décodeur », et appuyez ensuite sur
ENTER.
Ant/Câble (Réglage de l'antenne)
Vérifiez le type de branchement qui est
effectué avec votre téléviseur « Ant » ou
« Câble ».
7 Appuyez sur c/d pour sélectionner
« Ant » ou « Câble ».
Appuyez sur ENTER pour valider le
réglage.
Rech. Canal (Recherche des canaux)
Avec la recherche automatique des
canaux, le téléviseur recherche tous les
canaux visibles dans la région déterminée.
8 Avec « Ant » sélectionné dans
Réglage de l'antenne :
Appuyez sur c/d pour sélectionner
« Début », et appuyez ensuite sur
ENTER.
Smart TV
Lorsque vous vous connectez à Internet
via le téléviseur, sélectionnez la méthode
de connexion souhaitée et suivez les
instructions apparaissant à l'écran.
9 Appuyez sur c/d pour sélectionner «
oui », et appuyez ensuite sur ENTER.
10 Appuyez sur a/b pour sélectionner
« À fil » ou « Sans fil », et appuyez
ensuite sur ENTER.
ESPAÑOL
Ubicación TV
Seleccione “Casa” o “Tienda” según el
lugar en el que va a instalar el televisor.
5 Pulse c/d para seleccionar “Casa” o
“Tienda”.
Pulse ENTER para introducir el ajuste.
Antena & Cable/STB
Seleccione el tipo de conexión que
utilizará para ver la televisión.
6 Pulse c/d para seleccionar “Antena
& Cable” o “Set-Top Box”, y luego
pulse ENTER.
Ant./Cable (Ajuste de antena)
Asegúrese de la clase de conexión que
se hace con su televisor cuando se
selecciona “Antena” o “Cable”.
7 Pulse c/d para seleccionar “Antena”
o “Cable”.
Pulse ENTER para introducir el ajuste.
Busq. Canal (Búsqueda de canales)
La búsqueda automática de canales hace
que el televisor busque todos los canales
que puedan verse en la zona establecida.
8 Cuando “Antena” está
seleccionado en el ajuste Antena:
Pulse c/d para seleccionar “Inicio”, y
luego pulse ENTER.
Smart TV
Cuando se conecte a Internet en el
televisor, seleccione el método de
conexión deseado y siga las instrucciones
que aparecen en la pantalla.
9 Pulse c/d para seleccionar “Sí”, y
luego pulse ENTER.
10 Pulse a/b para seleccionar
“Alámbrico” o “Inalámbrico”, y luego
pulse ENTER.
Watching TV/Pour regarder la télévision/Para ver TV
ENGLISH
FRANÇAIS
Completed
11 The settings confirmation screen is
displayed. Confirm the information
displayed on the screen, and then
press ENTER.
Examples of the settings
confirmation screen
Language
Location & Time
TV Location
Antenna & Cable/STB
Air/Cable
Search Result
Network Connection
: English
: United States/EST/Auto
: Home
: Antenna & Cable
: Air
: Digital 4ch
Analog 7ch
: Not completed
ESPAÑOL
Terminé
11 L'écran de confirmation des réglages
est affiché. Confirmez les informations
affichées à l'écran, et appuyez ensuite
sur ENTER.
Exemples de l'écran de
confirmation des réglages
Langue
Lieu et heure
Emplacement TV
Antenne&câble/boîtier
Ant/Câble
Résultat d'interrogation
Connexion réseau
: Français
: États-Unis/HNE/Auto
: Maison
: Antenne&câble
: Ant
: Numériqu 4 ch
Analogiqu 7 ch
: Pas complété
Completado
11 Se visualiza la pantalla de confirmación
de los ajustes. Confirme la información
que se muestra en la pantalla y
después pulse ENTER.
Ejemplos de la pantalla de
confirmación de ajustes
Idioma
: Español
Locación & Hora
: Estados Unidos/Este/Auto
Ubicación TV
: Casa
Antena & Cable/STB
: Antena & Cable
Ant./Cable
: Antena
Resultado de Búsqueda : Digital
4 ch
Analógico 7 ch
Conexión de red
: No completa
Press the INPUT button,
then the right arrow d,
to see the list of channels found.
Appuyez sur la touche INPUT,
puis sur la flèche droite d,
pour voir la liste des canaux.
Pulse el botón INPUT y,
a continuación, la flecha a la derecha d,
para ver la lista de canales encontrados.
OK
OK
Bien
34
Viewing the Built-in Operation Manual/Affichage du mode d'emploi intégré/Visualización del Manual de instrucciones integrado
ENGLISH
FRANÇAIS
Viewing the Built-in Operation Manual
Affichage du mode d'emploi intégré
Press MANUAL on the remote control unit to display operation
information on the screen.
To search for an item from the table of contents, and to search
for a particular term and to find troubleshooting information, press
MANUAL while watching the TV and then select the applicable item
from the manual cover page that appears.
1 Press MANUAL while watching the TV.
This displays the e-manual screen.
2
ESPAÑOL
When you select contents, its page will be displayed.
Appuyez sur MANUAL de la télécommande pour afficher les
informations de fonctionnement sur l'écran. Pour rechercher un
élément dans la table des matières et pour rechercher un terme
particulier et trouver des informations en vue du dépannage, appuyez
sur MANUAL tout en regardant la télévision puis sélectionnez
l'élément applicable sur la page de garde du manuel qui s'ouvre alors.
1 Appuyez sur MANUAL pendant que vous regardez la télévision.
Ceci affiche l'écran du manuel électronique.
2 Si vous sélectionnez un contenu, la page correspondante s'affiche.
NOTE
REMARQUE
• You can also display the built-in operation manual by selecting
"Information" > "Manual" from the menu screen.
• When USB mode, Home Network mode, or Internet application is used,
can not be displayed the built-in operation manual.
• Vous pouvez également afficher le mode d'emploi intégré en sélectionnant
« Renseignements » > « Manual » dans l'écran menu.
• Le mode d'emploi intégré ne peut pas être utilisé en mode USB, en mode
réseau ou lorsqu'une application Internet est utilisée.
2
1
35
Visualización del Manual de instrucciones integrado
Pulse MANUAL en el control remoto para ver información sobre
operaciones en la pantalla. Para buscar un elemento de índice o
buscar un elemento en particular para obtener información sobre
resolución de problemas, pulse MANUAL mientras ve la televisión,
y luego seleccione el elemento correspondiente en la portada del
manual que aparece.
1 Pulse MANUAL mientras ve la televisión.
Aparece el manual electrónico en pantalla.
2
Cuando seleccione un contenido, se mostrará la página
correspondiente.
NOTA
• También puede ver el manual de instrucciones integrado seleccionando
“Información” > “Manual” en la pantalla del menú.
• Cuando se utilice el modo USB, el modo Red doméstica o Aplicación de
Internet, no podrá visualizar el manual de instrucciones integrado.
Troubleshooting/Guide de dépannage/Solución de problemas
ENGLISH
FRANÇAIS
Problem
Possible Solution
ESPAÑOL
Problème
Solution possible
Problema
Posible solución
• No power
• Check if you pressed POWER on the remote control
unit. Page 24.
• Is the AC cord disconnected? Page 23.
• Has the power been turned on? Page 24.
• Appareil hors
tension
• Vérifiez si vous avez appuyé sur le bouton marche
(POWER) de la télécommande. Page 24.
• Le câble secteur est-il débranché ? Page 23.
• L'alimentation a-t-elle été activée ? Page 24.
• No hay
alimentación
eléctrica
• Compruebe si ha pulsado POWER en el control
remoto. Página 24.
• ¿Está desconectado el cable de CA? Página 23.
• ¿Se ha conectado la alimentación? Página 24.
• Remote control
unit does not
operate.
• Are batteries inserted with polarity (e, f) aligned?
Page 25.
• Les piles sont-elles insérées avec la polarité (e, f)
requise ? Page 25.
• El control
remoto no
funciona.
• ¿Se han insertado las batería con la polaridad (e, f)
alineada? Página 25.
• No picture
• Is connection to other components correct?
27 to 31.
Page
• La
télécommande
ne fonctionne
pas.
• No hay imagen
• Aucune image
• ¿Está correcta la conexión a otros componentes?
Páginas 27 a 31.
• Is connection to other components correct?
27 to 31.
Page
• La connexion avec les autres composants est-elle
correcte ? Page 27 a 31.
• No hay sonido
• ¿Está correcta la conexión a otros componentes?
Páginas 27 a 31.
• No sound
CLEARING THE SECRET NUMBER
EFFACER LE NUMÉRO SECRET
If you forget the secret number, clear the secret number using the
following procedure.
1 Select an item to display the secret number input screen.
2
Press and hold both CH
and VOL+ on the TV simultaneously
until the message appears on the screen.
NOTE
• As a precautionary measure, make a note of your secret number
above, and keep it in a safe place.
The secret number is
• Absence de son • La connexion avec les autres composants est-elle
correcte ? Page 27 a 31.
BORRADO DEL NÚMERO SECRETO
Si vous avez oublié votre numéro secret, effacez-le en procédant
comme suit.
1 Sélectionnez une rubrique pour afficher l'écran de saisie du numéro
secret.
2
Maintenez enfoncées simultanément CH
et VOL+ sur le
téléviseur jusqu'à ce que le message apparaisse à l'écran.
Si olvida el número secreto, borre el número secreto usando el
siguiente procedimiento.
1 Seleccione un elemento para visualizar la pantalla de introducción
del número secreto.
2
Pulse y mantenga pulsados CH
y VOL+ simultáneamente en el
televisor hasta que en la pantalla aparezca el mensaje.
REMARQUE
NOTA
• Par mesure de précaution, notez votre numéro secret ci-dessus, et
conservez-le dans un endroit sûr.
• Como medida de precaución, anote más arriba su número secreto,
y guárdelo en un lugar seguro.
.
.
Le numéro secret est
36
El número secreto es
.
Calling for Service
For location of the nearest Sharp Authorized Service, or to obtain product literature, accessories, supplies, or
customer assistance, please call 1-800-BE-SHARP.
LIMITED WARRANTY
CONSUMER LIMITED WARRANTY
SHARP ELECTRONICS CORPORATION warrants to the first consumer purchaser that this Sharp brand Liquid Crystal Display product
(the “Product”), when shipped in its original container, will be free from defective workmanship and materials, and agrees that it will,
at its option, either repair the defect or replace the defective Product or part thereof with a new or remanufactured equivalent at no
charge to the purchaser for parts or labor for the period(s) set forth below.
This warranty does not apply to any appearance items of the Product or if the serial number or model number affixed to the Product has
been removed, defaced, changed, altered or tampered with. This warranty does not cover installation or signal reception problems. This
limited warranty will not apply if the Product has been or is being used in a commercial setting or application; this warranty is meant solely
for the non-commercial, household use of the Product by consumers in their home or residence. If you intend to or already use this Product
for commercial purposes or in a commercial setting, there are warranties available to cover your use of this Product, the terms of which may
vary. Please contact 1-888-GO-SHARP for further information.
In order to enforce your rights under this limited warranty, you should follow the steps set forth below. You must be able to provide
proof of purchase to the servicer, which proof must include the date of purchase.
To the extent permitted by applicable state law, the warranties set forth are in lieu of, and exclusive of, all other warranties, express
or implied. Specifically ALL OTHER WARRANTIES OTHER THAN THOSE SET FORTH ABOVE ARE EXCLUDED, ALL EXPRESS
AND IMPLIED WARRANTIES INCLUDING THE WARRANTIES OF MERCHANTABILITY, FITNESS FOR USE, AND FITNESS FOR A
PARTICULAR PURPOSE ARE SPECIFICALLY EXCLUDED. IF, UNDER APPLICABLE STATE LAW, IMPLIED WARRANTIES MAY NOT
VALIDLY BE DISCLAIMED OR EXCLUDED, THE DURATION OF SUCH IMPLIED WARRANTIES IS LIMITED TO THE PERIOD(S) FROM
THE DATE OF PURCHASE SET FORTH BELOW. THIS WARRANTY GIVES YOU SPECIFIC LEGAL RIGHTS. YOU MAY ALSO HAVE
OTHER RIGHTS WHICH VARY FROM STATE TO STATE.
The warranties given herein shall be the sole and exclusive warranties granted by Sharp and shall be the sole and exclusive remedy available to
the purchaser and only for the time periods set forth herein. No other representations or promises made by anyone are permitted. Correction of
defects, in the manner and for the period of time described herein, shall constitute complete fulfillment of all liabilities and responsibilities of Sharp to
the purchaser with respect to the Product, and shall constitute full satisfaction of all claims, whether based on contract, negligence, strict liability or
otherwise. Sharp does not warrant nor shall Sharp be liable, or in any way
responsible, for Products which have been subject to abuse (including, but not limited to, improper voltage), accident, misuse, negligence, lack of
reasonable care, alteration, modification, tampering, misuse, improper operation or maintenance or any damages or defects in the Product which
were caused by repairs or attempted repairs performed by anyone other than a Sharp authorized servicer. Nor shall Sharp be liable or in any way
responsible for any incidental or consequential economic or property damage. Some states do not allow limits on warranties or on remedies for
breach in certain transactions; in such states, the limits herein may not apply.
THIS LIMITED WARRANTY IS VALID ONLY IN THE FIFTY (50) UNITED STATES, THE DISTRICT OF COLUMBIA AND PUERTO RICO.
Model Specific Section
Your Product Model Number & Description:
LC-70UD27U/LC-60UD27U
LCD Color Television
(Be sure to have this information available when you need service for your Product.)
Warranty Period for this Product:
One (1) year parts and labor from the date of purchase.
Additional Exclusions from
Warranty Coverage (if any):
In order for the Product to be serviced, the Product must be readily available to
the servicer, free and clear of any complex or non-standard installation, mounting
or other encumbrance which would unreasonably interfere with servicing the
Product. The Servicer will remount the Product after service, provided that such
remounting is not into a complex or non-standard installation. Any additional labor
and materials required to remove and/or reinstall a Product above and beyond the
foregoing are not covered by this warranty, may result in additional charges and
are the responsibility of the consumer.
Image Retention resulting from a fixed image being displayed for long periods of time is
not covered by this Limited Warranty (see Operation Manual on how to prevent this).
Where to Obtain Service:
From a Sharp Authorized Servicer located in the United States. To find the
location of the nearest Sharp Authorized Servicer, please call Sharp toll free at
1-800-BE-SHARP.
What to do to Obtain Service:
Contact your Sharp Authorized Servicer to obtain in home service for this
product. The Servicer will come to your location and if necessary remove the unit
for repair at the Servicer’s facility and return the set to you once completed. Be
sure to have Proof of Purchase available.
TO OBTAIN PRODUCT INFORMATION OR PURCHASE ACCESSORIES AND EXTENDED WARRANTIES, CALL
1-800-BE-SHARP
OR VISIT www.sharpusa.com
37
ENGLISH
IMPORTANT INFORMATION
IMPORTANT:
To aid reporting in case of loss or theft, please record the
TV's model and serial numbers in the space provided.
The numbers are located at the rear and left side of the TV.
DECLARATION OF CONFORMITY:
SHARP LIQUID CRYSTAL TELEVISION, MODEL LC-70UD27U/LC-60UD27U
This device complies with Part 15 of the FCC Rules. Operation is subject to the following two
conditions:
(1) This device may not cause harmful interference, and (2) this device must accept any interference
received, including interference that may cause undesired operation.
RESPONSIBLE PARTY:
SHARP ELECTRONICS CORPORATION
1 Sharp Plaza, Suite 1, Mahwah, New Jersey 07495-1123
TEL: 1-800-BE-SHARP
For Business Customers: URL http://www.sharpusa.com
Model No.:
Serial No.:
WARNING: TO REDUCE THE RISK OF FIRE OR ELECTRIC
SHOCK, DO NOT EXPOSE THIS PRODUCT TO
RAIN OR MOISTURE.
CAUTION
RISK OF ELECTRIC SHOCK
DO NOT OPEN
CAUTION: TO REDUCE THE RISK OF ELECTRIC SHOCK,
DO NOT REMOVE COVER (OR BACK).
NO USER-SERVICEABLE PARTS INSIDE.
REFER SERVICING TO QUALIFIED SERVICE
PERSONNEL.
INFORMATION:
This equipment has been tested and found to comply with the limits for a Class B digital device,
pursuant to Part 15 of the FCC Rules. These limits are designed to provide reasonable protection
against harmful interference in a residential installation. This equipment generates, uses and can
radiate radio frequency energy and, if not installed and used in accordance with the instructions, may
cause harmful interference to radio communications. However, there is no guarantee that interference
will not occur in a particular installation. If this equipment does cause harmful interference to radio
or television reception, which can be determined by turning the equipment off and on, the user is
encouraged to try to correct the interference by one or more of the following measures:
—Reorient or relocate the receiving antenna.
—Increase the separation between the equipment and receiver.
—Connect the equipment into an outlet on a circuit different from that to which the receiver is connected.
—Consult the dealer or an experienced radio/TV technician for help.
The lightning flash with arrow-head
symbol, within an equilateral
triangle, is intended to alert the
user to the presence of
uninsulated "dangerous voltage"
within the product's enclosure that
may be of sufficient magnitude to
constitute a risk of electric shock
to persons.
The exclamation point within a
triangle is intended to alert the
user to the presence of important
operating and maintenance
(servicing) instructions in the
literature accompanying the
product.
CAUTION: TO PREVENT ELECTRIC SHOCK, MATCH WIDE BLADE OF PLUG TO WIDE
SLOT, FULLY INSERT.
WARNING: FCC Regulations state that any unauthorized changes or modifications to this
equipment not expressly approved by the manufacturer could void the user's authority
to operate this equipment.
CAUTION: This product satisfies FCC regulations when shielded cables and connectors are used to
connect the unit to other equipment. To prevent electromagnetic interference with electric
appliances such as radios and televisions, use shielded cables and connectors
for connections.
1
38
ENGLISH
FRANÇAIS
LIQUID CRYSTAL TELEVISION
TÉLÉVISEUR À CRISTAUX
LIQUIDES
TELEVISOR DE CRISTAL LÍQUIDO
LC-70UD27U
LC-60UD27U
ESPAÑOL
Setup Guide
Guide de Setup
Guía de Configuración
SHARP ELECTRONICS CORPORATION
1 Sharp Plaza, Suite 1, Mahwah, New Jersey 07495-1123
IMPORTANT
: Please read this setup guide and builtin operation manual before starting
operating the equipment.
IMPORTANT : Veuillez lire ce guide de setup et le mode
d’emploi intégré avant de commencer à
travailler sur l’équipement.
IMPORTANTE : Lea detenidamente esta guía de
configuración y manual de instrucciones
integrado antes de comenzar a usar el
equipo.
SHARP CORPORATION
TINS-G254WJZZ
Printed in Mexico
Imprimé au Mexique
Impreso en México
TINS-G254WJZZ
14P09-MX-NS