1
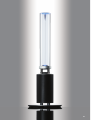
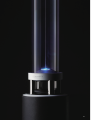
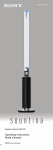
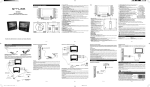
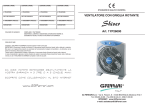
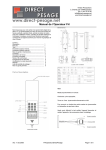
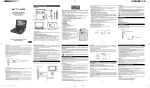
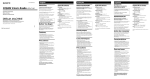
3-877-457-71(1) Speaker System NSA-PF1 Operating Instructions Mode d’emploi ©2008 Sony Corporation WARNING To reduce the risk of fire or electric shock, do not expose this apparatus to rain or moisture. Do not install the appliance in a confined space, such as a bookcase or built-in cabinet. To reduce the risk of fire, do not cover the ventilation opening of the apparatus with newspapers, tablecloths, curtains, etc. Do not place the naked flame sources such as lighted candles on the apparatus. To prevent fire or shock hazard, do not place objects filled with liquids, such as vases, on the apparatus. Batteries or batteries installed apparatus shall not be exposed to excessive heat such as sunshine, fire or the like. The unit is not disconnected from the AC power source (mains) as long as it is connected to the wall outlet (mains), even if the unit itself has been turned off. Install this system so that the AC power cord (mains lead) can be unplugged from the wall socket immediately in the event of trouble. For the customers in the U.S.A This symbol is intended to alert the user to the presence of uninsulated “dangerous voltage” within the product’s enclosure that may be of sufficient magnitude to constitute a risk of electric shock to persons. This symbol is intended to alert the user to the presence of important operating and maintenance (servicing) instructions in the literature accompanying the appliance. This CAUTION marking is located at the bottom of the apparatus. Owner’s Record The model and serial numbers are located at the rear exterior of the control unit. Record the serial number in the space provided below. Refer to them whenever you call upon your Sony dealer regarding this product. Model No. NSA-PF1 Serial No.______________ CAUTION You are cautioned that any changes or modifications not expressly approved in this manual could void your authority to operate this equipment. Important Safety Instructions 1) 2) 3) 4) 5) 6) 7) Read these instructions. Keep these instructions. Heed all warnings. Follow all instructions. Do not use this apparatus near water. Clean only with dry cloth. Do not block any ventilation openings. Install in accordance with the manufacturer’s instructions. 8) Do not install near any heat sources such as radiators, heat registers, stoves, or other apparatus (including amplifiers) that produce heat. 9) Do not defeat the safety purpose of the polarized or grounding-type plug. A polarized plug has two blades with one wider than the other. A grounding type plug has two blades and a third grounding prong. The wide blade or the third prong are provided for your safety. If the provided plug does not fit into your outlet, consult an electrician for replacement of the obsolete outlet. 10)Protect the power cord from being walked on or pinched particularly at plugs, convenience receptacles, and the point where they exit from the apparatus. 11)Only use attachments/accessories specified by the manufacturer. 12)Use only with the cart, stand, tripod, bracket, or table specified by the manufacturer, or sold with the apparatus. When a cart is used, use caution when moving the cart/apparatus combination to avoid injury from tip-over. 13)Unplug this apparatus during lightning storms or when unused for long periods of time. 14)Refer all servicing to qualified service personnel. Servicing is required when the apparatus has been damaged in any way, such as powersupply cord or plug is damaged, liquid has been spilled or objects have fallen into the apparatus, the apparatus has been exposed to rain or moisture, does not operate normally, or has been dropped. The following FCC statement applies only to the version of this model manufactured for sale in the U.S.A. Other versions may not comply with FCC technical regulations. NOTE: This equipment has been tested and found to comply with the limits for a Class B digital device, pursuant to Part 15 of the FCC Rules. These limits are designed to provide reasonable protection against harmful interference in a residential installation. This equipment generates, uses and can radiate radio frequency energy and, if not installed and used in accordance with the instructions, may cause harmful interference to radio communications. However, there is no guarantee that interference will not occur in a particular installation. If this equipment does cause harmful interference to radio or television reception, which can be determined by turning the equipment off and on, the user is encouraged to try to correct the interference by one or more of the following measures: - Reorient or relocate the receiving antenna. - Increase the separation between the equipment and receiver. - Connect the equipment into an outlet on a circuit different from that to which the receiver is connected. - Consult the dealer or an experienced radio/TV technician for help. Notice for the customers in Canada This class B digital apparatus complies with Canadian ICES-003. About the AC power cord (mains lead) The supplied AC power cord (mains lead) is only for use with this unit (NSA-PF1). Do not use with other components. About the location of the nameplate The nameplate is located on the aluminium pipe (when the sleeve is attached, the nameplate is hidden). Nameplate AVERTISSEMENT Pour réduire les risques d’incendie ou d’électrocution, gardez cet appareil à l’abri de la pluie et de l’humidité. N’installez pas l’appareil dans un espace confiné comme dans une bibliothèque ou un meuble encastré. Pour réduire le risque d’incendie, n’obstruez pas l’orifice de ventilation de l’appareil avec un journal, une nappe, une tenture, etc. Ne posez pas non plus de source de flamme nue, notamment une bougie allumée, sur l’appareil. Pour prévenir tout risque d’incendie ou d’électrocution, ne placez pas d’objets remplis de liquides, comme des vases, sur l’appareil. Les piles ou les appareils contenant des piles ne doivent pas être exposés à une chaleur excessive, notamment aux rayons directs du soleil ou à un appareil de chauffage, par exemple. Le système n’est pas déconnecté de la source d’alimentation tant que le caisson de graves reste branché sur la prise murale, même si l’unité de commande proprement dite a été mise hors tension. Installez ce système de façon à pouvoir débrancher immédiatement le cordon d’alimentation de la prise murale en cas de problème. Cet appareil numérique de la classe B est conforme à la norme NMB-003 du Canada. A propos du cordon d’alimentation Le cordon d’alimentation fourni est exclusivement destiné à cet appareil (NSA-PF1). Ne l’utilisez avec aucun autre composant. A propos de l’emplacement de la plaque signalétique La plaque signalétique se trouve sur le tuyau d’aluminium (et est masquée lorsque le manchon est présent). Plaque signalétique Presenting a new way to listen. Sound, space and materials combine to provide a listening experience like never before. Une nouvelle manière d’écouter. Le son, l’espace et les matériaux se combinent pour offrir une expérience audio inconnue jusqu’ici. Listen in style Ecouter. Une attitude. The sophisticated, yet flexible design enables quick changes of color and texture. Un design recherché, mais souple pour changer rapidement de couleur et de texture. Remove the real leather sleeve for a modern appearance. Retirez le manchon en cuir véritable pour donner un aspect contemporain. Change the color of the organic glass tube illumination to suit your mood. Changez la couleur d’éclairage du tube en verre organique en fonction de votre humeur. To remove the sleeve Lift up the sleeve, and then slide it over the top of the glass tube. When the sleeve is not in use, hide the stopper by pushing it in. Before you re-attach the sleeve, pull out the stopper to its original position. Pour retirer le manchon Stopper Soulevez le manchon et faites-le glisser parButée dessus le sommet du tube en verre. Lorsque vous n’utilisez pas le manchon, masquez la butée en l’enfonçant. Avant de refixer le manchon, tirez sur la butée pour qu’elle retrouve sa position d’origine. Omnidirectional Sound Son omnidirectionnel The organic glass tube behaves as a 360˚ driver, delivering equal sound in all directions to all listeners, regardless of location. Le tube en verre organique se comporte comme un transducteur à 360°, diffusant un son homogène dans toutes les directions vers l’ensemble des auditeurs, où qu’ils se trouvent. By vibrating the entire organic glass tube, the speaker is more acoustically efficient than standard speakers. It covers a wide range of listening positions, without placing a limit on speaker installation height, listening distance or position. En faisant vibrer l’ensemble du tube en verre organique, l’enceinte atteint un niveau d’efficacité acoustique supérieur aux enceintes standard. Elle couvre un large éventail de positions d’écoute, sans imposer la moindre limite, que ce soit sur la hauteur d’installation de l’enceinte, la position ou encore la distance d’écoute. The shortcoming of standard speaker systems is their reliance on speaker location. Le défaut des enceintes standard réside dans leur dépendance par rapport à leur emplacement. Narrow listening position Position d’écoute étroite To obtain better sound Place the speaker away from surfaces that can vibrate, such as walls. Pour obtenir un meilleur son Eloignez l’enceinte des surfaces qui vibrent, notamment les murs. The Power of a Single Speaker La puissance d’une enceinte unique Experience the dynamism of a live performance and feel the artist's technique through the strong vibrations of the one meter tall organic glass tube. Appréciez le dynamisme d’un concert live et sentez physiquement la technique de l’artiste grâce aux fortes vibrations du tube en verre organique d’un mètre de haut. The colored illustration of this vibration simulation reveals how the entire organic glass tube resonates. Amplitude Amplitude Large Grande L’illustration en couleur de cette simulation de vibration révèle le mode de résonnance de l’ensemble du tube en verre organique. Small Petite Analysis of vibrations at 5 kHz Analyse des vibrations à 5 kHz 10 11 Parts and Controls : Speaker Pièces et commandes : enceinte Buttons and jacks are located at the bottom of the speaker. Les touches et les prises sont situées sur le dessous de l’enceinte. (on/standby) switch Turns the power on/off. SLEEP ANALOG OPTICAL COAXIAL Commutateur (activité/ veille) Commande la mise sous/hors tension. WIDE SLEEP timer indicator Témoin de minuterie SLEEP Lights up in red when the timer Brille en rouge lorsque la is active. minuterie est active. INPUT SELECT (ANALOG, OPTICAL, and COAXIAL) indicators Selected input source lights up in green. Témoins INPUT SELECT (ANALOG, OPTICAL et COAXIAL) La source d’entrée sélectionnée brille en vert. WIDE indicator Lights up in amber when the “WIDE” acoustic effect is selected. Témoin WIDE Brille en ambre lorsque l’effet acoustique « WIDE » est sélectionné. - VOLUME + INPUT SELECTOR VOLUME+/− buttons Adjust the volume. Touches VOLUME+/− Règlent le volume. INPUT SELECTOR button Selects the playback input source. Touche INPUT SELECTOR Sélectionne la source d’entrée de la lecture. INPUT OPTICAL - COAXIAL - ANALOG (R-L) INPUT jack Connect source components here.* Prise INPUT Raccordez ici les composants source.* AC IN AC IN jack Prise AC IN Connect AC power cord (mains Raccordez ici le cordon lead) here. d’alimentation. Remote sensor Receives the remote control’s signal from all directions. Capteur de télécommande Reçoit le signal de la télécommande, quelle que soit sa direction. * When connecting a component using a digital audio connection, set the audio output of the component to Stereo Linear PCM. * Lorsque vous raccordez un composant en utilisant une connexion audio numérique, réglez la sortie audio du composant sur PCM linéaire stéréo. 12 13 Parts and Controls : Remote Pièces et commandes : télécommande Simply beautiful. Beauté simple. (on/standby) Turns the power on/off. (activité/veille) Commande la mise sous/ hors tension. SLEEP Turns off the power in 60 minutes. SLEEP Met l’enceinte hors tension après 60 minutes. ANALOG / OPTICAL / COAXIAL Selects the input source. ANALOG / OPTICAL / COAXIAL Sélectionne la source d’entrée. DIMMER Adjusts the brightness. DIMMER Règle la luminosité. LIGHTING COLOR Changes the illumination color. (Blue, amber, or light purple) LIGHTING COLOR Change la couleur de l’éclairage. (Bleu, ambre ou mauve clair) BASS / TREBLE Adjusts the bass/treble level. The default setting is flat (0 dB). Each press changes the level in the following order: + (up), − (down) ,flat (0dB). BASS / TREBLE Règle le niveau des graves/aigus. Le réglage par défaut est uniforme (0 dB). Chaque pression modifie le niveau dans l’ordre suivant : + (haut), − (bas) , uniforme (0 dB). NORMAL / WIDE Sets the acoustic effect. WIDE: creates a wider sound image. The WIDE indicator lights up in amber. NORMAL: no effect. NORMAL / WIDE Règle l’effet acoustique. WIDE : crée une image sonore élargie. Le témoin WIDE brille en ambre. NORMAL : aucun effet. VOLUME +/− Adjusts the volume. VOLUME +/− Règle le volume. 14 15 Precautions On moving the unit Move with two or more persons. Hold by the aluminium base section. Do not hold the organic glass tube. Do not bump the unit against other objects. Notes on the organic glass tube This unit uses organic glass. Incorrect use may cause damage of the glass, heavy injury, or loss of eyesight. To prevent accidents, observe the following. Avoid strong impact Do not drop or impact by bumping into anything. The glass will break even if the impact is slight. Avoid cracking the glass A small crack or chip may break the glass. The glass may not break immediately after the impact, but may break unexpectedly as a result. If you find a small crack or chip, consult your nearest Sony dealer. Avoid extreme temperature changes The organic glass tube is not heat-resistant glass. Do not place hot objects on top of or close to the organic glass tube. An extreme temperature change may cause it to break. Notes on caring for the organic glass tube Avoid scrubbing the organic glass tube. Dust off the organic glass tube with a soft brush or soft feather broom, and then lightly wipe the organic glass tube with the cleaning cloth (supplied). (Do not use a scrubbing brush or a sponge.) Remove any fingerprints or oil stains by lightly breathing on the surface and wiping with the cleaning cloth (supplied). In the case of stubborn stains/marks, use a soft cloth lightly moistened with warm soapy water. To avoid damaging the surface finish, do not use detergents, thinners, benzene, or alcohol. Do not dismantle the unit as dust may accumulate in the glass tube. Avoiding breaking the unit Do not dismantle or modify the unit. Lower the volume to a minimum before you turn on/off the unit, or change the input source. Do not input the following signals continuously: – white noise from FM broadcasts. – continuous high frequency signals, such as from electronic instruments. – high level, and high frequency signals typically output from a tape deck while fast-forwarding. Note on the light in the organic glass tube Do not look at the light source directly. Inserting batteries into the remote Insert two R03 (size AAA) batteries by matching the and ends on the batteries to the markings inside the compartment. Do not leave the remote in an extremely hot or humid place. Use a coin, etc. to unlock. Do not drop any foreign object into the remote casing, particularly when replacing the batteries. Wrong usage of the batteries may cause battery leakage or battery rupture. To prevent this, observe the following. -Do not use a new battery with an old one. Do not use different types of batteries. -Do not attempt to charge the batteries. -If you do not intend to use the remote for an extended period of time, remove the batteries. 16 -If battery leakage occurs, avoid touching the liquid. Wipe the liquid thoroughly before inserting new batteries. Do not expose the remote sensor to direct sunlight or lighting apparatus. Remote control operation may be affected. Troubleshooting If you experience any of the following difficulties while using the system, use this troubleshooting guide to help remedy the problem before requesting repairs. Should any problem persist, consult your nearest Sony dealer. No sound is output from the system. The power of the system is off. Check the power of the system. Playback component is not connected correctly. Check that the component is connected correctly. Volume of the system is low. Check the volume of the system. Input source of the system is not selected. Select the input of the system correctly. The settings on a digitally-connected component is not set to Linear PCM. Check that a digitally-connected component is set to Linear PCM. There is hum or noise. Playback component is not connected correctly. Check that the component is connected correctly. Audio components are placed near other components that are causing noise (TV set, etc.). Place the audio components farther away from the TV set, etc. Color irregularity occurs on TV monitor. Place the system farther away from the TV set. Three INPUT SELECT indicators flash at the same time. Turn off the system, unplug the AC power cord (mains lead), and then consult your nearest Sony dealer. Specifications Amplifier section POWER OUTPUT AND TOTAL HARMONIC DISTORTION (FTC Output Power): 37 Watts × 4, 8 ohm (Tweeter) + 37 Watts, 8 ohm (Mid Range) + 65 Watts, 4 ohm (Woofer) at 50 Hz - 20 kHz, 1% THD Total harmonic distortion from 250 milli watts to rated output. Speaker system Speaker unit Enclosure system Frequency range Inputs Analog Digital 3 way active speaker Woofer: 13 cm cone type, Mid range: 7 cm cone type, Tweeter: organic glass type Bass reflex 50 Hz - 20 kHz Line (pin jack L/R) COAXIAL (pin jack), OPTICAL (TOS), Linear PCM 2 ch (32, 44.1, 48, 96 kHz/16 bit, 24 bit) General Power requirements 120 V AC, 60 Hz Power consumption 85 W 0.3 W (standby mode) Dimensions (approx.) 325 mm × 1,845 mm × 325 mm (w/h/d) Mass (approx.) 12.5 kg Supplied accessoriesAC power cord (mains lead) (1) Cleaning cloth (1) Remote control (1) R03 (size AAA) batteries (2) Operating Instructions Design and specifications are subject to change without notice. 17 Précautions En cas de déplacement de l’enceinte Deux personnes ou davantage sont nécessaires pour déplacer l’enceinte. Saisissez l’enceinte par sa base en aluminium. Ne saisissez pas le tube en verre organique. Ne heurtez pas d’autres objets avec l’enceinte. Remarques sur le tube en verre organique Cette enceinte utilise du verre organique. Toute utilisation incorrecte peut endommager le verre, provoquer des blessures graves ou la perte de la vue. Pour éviter les accidents, respectez les précautions suivantes. Evitez tout impact violent Ne laissez pas tomber l’enceinte et ne heurtez aucun objet. Le verre se brise, même en cas d’impact léger. Evitez que le verre se fissure Une petite fissure ou un petit éclat peut briser le verre. Il est possible que le verre ne se brise pas immédiatement après l’impact, mais par la suite, de manière impromptue. Si vous remarquez une petite fissure ou un petit éclat, consultez votre revendeur Sony le plus proche. Evitez les changements de température extrêmes Le verre organique ne résiste pas à la chaleur. Ne posez pas d’objets brûlants sur le dessus ou à proximité du tube en verre organique. Il peut se briser sous l’effet d’un changement de température extrême. Remarques sur l’entretien du tube en verre organique Evitez de frotter le tube en verre organique. Epoussetez le tube en verre organique avec une brosse souple ou un plumeau doux, puis essuyez légèrement le tube en verre organique avec la lingette de nettoyage (fournie). (N’utilisez pas d’éponge ou de tampon abrasif.) Eliminez les empreintes ou les taches d’huile en expirant légèrement sur la surface du tube et en frottant avec la lingette de nettoyage (fournie). En cas de taches ou de traces rebelles, utilisez un linge doux légèrement trempé dans de l’eau chaude savonneuse. Pour éviter d’endommager la finition de la surface, n’utilisez pas de détergent, de diluant, de benzène ou d’alcool. Ne démontez pas l’enceinte, car de la poussière risquerait alors de s’accumuler à l’intérieur du tube en verre. Evitez de briser l’enceinte Ne démontez pas l’enceinte et ne la modifiez pas. Réduisez le volume au minimum avant de mettre l’enceinte sous/hors tension ou de changer de source d’entrée. L’entrée en continu des signaux suivants doit être absolument évitée : – bruit blanc des émissions FM. – signaux haute fréquence continus, notamment ceux d’instruments électroniques. – signaux haute fréquence et de niveau élevé provenant généralement d’une platine à cassette en mode de bobinage rapide. Remarque relative à l’éclairage du tube en verre organique Ne regardez pas directement la source lumineuse. 18 Insertion des piles dans la télécommande Insérez deux piles R03 (format AAA) en faisant correspondre les polarités et des piles avec les symboles situés à l’intérieur du logement des piles. Ne laissez pas la télécommande Pour le déverrouiller, utilisez une dans un endroit extrêmement pièce de monnaie, par exemple. chaud ou humide. Ne laissez tomber aucun corps étranger dans le boîtier de la télécommande, en particulier lors du remplacement des piles. Une mauvaise utilisation des piles peut provoquer des fuites ou leur rupture. Pour éviter cela, respectez les précautions suivantes. -N’utilisez pas simultanément une pile neuve et une pile usagée. N’utilisez pas différents types de piles. -N’essayez pas de recharger les piles. -Si vous ne prévoyez pas d’utiliser la télécommande pendant une période prolongée, retirez les piles. -Si une pile fuit, évitez de toucher le liquide qui s’en échappe. Essuyez soigneusement le liquide pour l’éliminer avant d’insérer de nouvelles piles. N’exposez pas le capteur de télécommande à la lumière directe du soleil ou d’un luminaire. Cela risque d’affecter le fonctionnement de la télécommande. Dépannage Si vous rencontrez l’une des difficultés suivantes lors de l’utilisation de ce système, consultez ce guide de dépannage pour tenter de remédier au problème. Si le problème persiste, consultez votre revendeur Sony le plus proche. Aucun son n’est reproduit par le système. Le système est hors tension. Vérifiez l’alimentation du système. Le composant de lecture n’est pas correctement raccordé. Vérifiez si le composant est correctement raccordé. Le volume du système est faible. Vérifiez le volume du système. La source d’entrée du système n’est pas sélectionnée. Sélectionnez correctement l’entrée du système. Les réglages d’un composant raccordé numériquement ne correspondent pas à PCM linéaire. Vérifiez si un composant raccordé numériquement est réglé sur PCM linéaire. Présence de ronflement ou de bruit. Le composant de lecture n’est pas correctement raccordé. Vérifiez si le composant est correctement raccordé. Des composants audio se trouvent à proximité d’autres composants qui génèrent du bruit (téléviseur, etc.). Eloignez les composants audio du téléviseur, etc. Le téléviseur présente des irrégularités de couleur. Eloignez le système du téléviseur. Trois témoins INPUT SELECT clignotent simultanément. Mettez le système hors tension, débranchez le cordon d’alimentation et consultez votre revendeur Sony le plus proche. 19 Spécifications Enceinte Haut-parleur Enceinte active à 3 voies Haut-parleur de graves : type conique de 13 cm, Médium : type conique de 7 cm, Hautparleur d’aigus : type en verre organique Système d’enceinte Bass reflex Plage de fréquences 50 Hz - 20 kHz Entrées Analogique Numérique Ligne (prise G/D à broche) COAXIAL (prise à broche), OPTICAL (TOS), PCM linéaire 2 canaux (32, 44,1, 48, 96 kHz/ 16 bits, 24 bits) Généralités Puissance de raccordement 120 V CA, 60 Hz Consommation électrique 85 W 0,3 W (mode de veille) Dimensions (approx.) 325 mm × 1 845 mm × 325 mm (l/h/p) Poids (approx.) 12,5 kg Accessoires fournis Cordon d’alimentation (1) Lingette de nettoyage (1) Télécommande (1) Piles R03 (format AAA) (2) Mode d’emploi La conception et les spécifications sont sujettes à modification sans préavis. Printed in Japan (1)