1
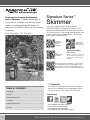
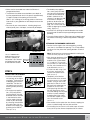
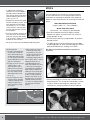
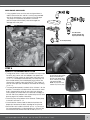
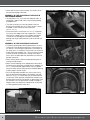
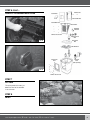
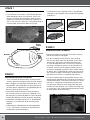
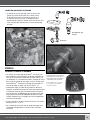
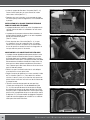
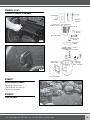
I N S T R U C T I O N S
&
M A I N T E N A N C E
Signature Series™
Skimmer
For Model #’s
09019 - Signature Series 6.0
29349 - Signature Series 8.0
www.aquascapeinc.com
Thank you for choosing the Signature
Series™ Skimmer. At Aquascape our goal is
to provide our customers with the best valued
products in water gardening. We hope you
enjoy your purchase and thank you for choosing
Aquascape.
Your Paradise. Our Passion.
®
Signature Series™
Skimmer
Aquascape’s Signature Series Skimmer provides
mechanical filtration to your pond. Our Skimmers were
designed by pond professionals to be functional and easyto-install and maintain. They include patented features that
make a maintenance free pond effortless. The Skimmer
Filter includes a lifetime warranty!
VIDEO ON
SIGNATURE
SERIES
SKIMMERS
VISIT
AQUASCAPE
ACADEMY
DOWNLOAD A
FREE COPY OF
OUR CATALOG
AQUASCAPE ACADEMY
Online Training
Access a series of courses
designed to help propel you
forward as a water feature
hobbyist.
AQUASCAPE ONLINE RESOURCES - ACCESS PRODUCT INFORMATION, INSTALLATION MANUALS (ENGLISH & FRENCH), VIDEOS, INSPIRATIONAL PHOTOS
AND MORE ALL LOCATED IN ONE CONVENIENT SITE.
☎ Contact Us
TABLE OF CONTENTS
Introduction……………………………………………… 2
Contents ………………………………………………… 3
For more information about our company or products
please visit our website at www.aquascapeinc.com or
call (US) 1-866-877-6637 (CAN) 1-866-766-3426.
Find us on:
Recommended Tools …………………………………… 3
Installation………………………………………………… 4
General Maintenance ………………………………… 11
Warranty ……………………………………………… 11
2
www.facebook.com/AquascapeInc
www.youtube.com/aquascape4
www.twitter.com/AquascapeInc
www.flipboard.com/profile/AquascapeInc
☎ US 1-866-877-6637 | ☎ CAN 1-866-766-3426 | www.aquascapeinc.com
Contents
No.
Description
1.
Rock Lid
2.
Thumb Screw Set
3.
Side Plate
4.
Weir Plate
5.
Weir
6.
Debris Basket
7.
Screw Set 10-32x1/2” (7/bag)
8.
Filter Mat
9.
Filter Rack
10.
2” Bulkhead Fitting
11.
Overflow Elbow
12.
Liner Plate
13.
14.
1
2
4
5
3
6
7
8
Mat Brass Screw Set
1/4”x20x3/4” - 8/bag
9
Skimmer
10
12
13
11
14
Recommended Tools
Wheelbarrow
Carpenters
Level
Friends
(optional)
Bright Colored
Spray Paint
Screwdrivers
Channel
Locks
www.aquascapeinc.com | ☎ CAN 1-866-766-3426 | ☎ US 1-866-877-6637
Soil Tamper
Shovels
Scissors
3
STEP 1
PLACEMENT OF THE SKIMMER
• In order to maximize circulation, the Skimmer should be
placed directly across from a waterfall. If you do not have
a waterfall, use your area’s prevailing winds to determine
where you should place your skimmer along the longest
axis. Use the wind to help push the debris toward the
skimmer.
• The second is typically down another 8-10”deeper. In this
step start your excavation of the skimmer hole (See Ex. 2).
• The third shelf (if desired) will be excavated down another
6” (See Ex. 3), reaching a final excavation of 24”.
Ex. 1
Ex. 2
Ex. 3
Prevailing
Winds
STEP 3
EXCAVATING YOUR SKIMMER LOCATION
MicroSkim®
Waterfall
• Rough out and excavate an area for the Skimmer. Use the
outline of the Skimmer as your guide.
• When installing a Skimmer onto an existing pond you
will need to drain the water from the pond. If you have
fish, save some water from the pond and place in a large
bucket, kiddie pool, or cooler. Catch your fish and place
them in your container. Be sure to add an aerator and keep
the fish in a shaded area. Remove any rock that is within 3
feet on either side and in front of where you will place the
skimmer. Pull your existing liner and underlayment back into
the pond 3-4 feet from edge so you expose the area that
needs to be excavated for the Skimmer.
STEP 2
EXCAVATING YOUR POND BASIN
• If you are installing the Skimmer on an existing pond skip this step and proceed to the next.
• We suggest excavating the pond no more than 18-24”
deep. This depth provides the proper water levels required
for aquatic plants and is deep enough to keep fish alive
during winter.
• When installing into an existing pond, we recommend
placing the Skimmer lid in the position you have chosen.
Overhang the lid about 6” towards the inside of the pond.
Mark the outside edge of the lid with spray paint or just
score the ground around the lid with a shovel. Positioning
the Skimmer towards the inside of the pond an extra 6” will
allow you some slack in the liner and make attaching the
faceplate easier.
• The excavation should be dug with a series of shelves.
The shelves will add stability to the walls of the pond
and will also create planting beds for different types of
aquatic plants.
• The first shelf should be about 8-10” deep (See Ex. 1),
or the height of a standard shovel blade.
4
☎ US 1-866-877-6637 | ☎ CAN 1-866-766-3426 | www.aquascapeinc.com
• Make sure the excavated area under the Skimmer is
compacted and level.
• The Skimmer should be excavated down to a depth so
that the proposed water level in the pond is approximately
¾” below the top of the opening of the skimmer.
(See Ex. 4) If installing on an existing pond use the known
water level as your guideline on how deep to excavate the
skimmer.
• Re-check all your measurements, including length and
width of pond, plant shelf depth, and overall pond depth.
• For double pump applications, each pump will hook
up to one of the bulkheads.
A third hole will need to be
drilled in the back of the
skimmer if you desire to add
an overflow. A drill point
guide can be found on the
Ex. 6
head of the frog within the
logo. Use a 3-inch hole saw
to drill the opening for another bulkhead fitting (sold separately). (See Ex. 6)
• Install the PVC slip fitting into each bulkhead on the outside
of the skimmer to receive the pump plumbing and overflow
plumbing.
• Use some silicone sealant or Teflon tape (not included) to coat
the threads of the fitting, in order to help provide a watertight
seal.
ATTACHING THE SKIMMER LINER PLATE
• Position the liner against the skimmer opening, making
sure there is slack below the opening. This will help reduce
tension on the liner plate when placing boulders in front of
the unit.
Ideal Water Level
Use a 2’ bubble level in
order to make sure your
skimmer is properly set
into position. Your skimmer
should be level from sideto-side and front-to-back.
Note: Power tools are not recommended for installing the
screws and may strip the nut inserts.
Soil Level on
1st Shelf
3/4” Below
Front of Skimmer
Ex. 4
• Cut the inner box using a pair
of scissors, and insert the
skimmer liner plate into the
hole. (See Ex. 8)
STEP 4
INSTALLING THE SKIMMER
• Install the two bulkheads
Bulkhead
Rubber Nut
Gasket
into the back of the Signa™
ture Series Skimmer prior
to dropping into the excavated hole. The filter has
two openings on the back
allowing several plumbing
Bulkhead assembly.
options.
• For single pump applications, the pump plumbing line attaches into one
bulkhead and the overflow
is attached to the other.
Use the angle of the bulkheads to your advantage
by choosing the bulkhead
that works best with the
direction and sweep of the
plumbing to the BioFalls®
Filter. (See Ex. 5)
• Mark the outer perimeter of the
skimmer opening on the liner,
and then mark a second box
1.5” inside of it. This ensures
that you don’t cut too much of
the liner, which would result in
a possible leak. (See Ex. 7)
Flex
PVC
Plastic Bulkhead
Washer Adapter
• Temporarily install the liner
plate and liner to the skimmer
using two screws in the upper
corners. Using an awl or nail,
poke the first hole in the liner.
Be careful not to damage the
threads on the nut inserts
when punching the holes with
the awl! Remove the awl or
nail while holding the liner plate
and liner in place and begin
threading one of the screws
into the filter. Repeat this process for the other screw.
Ex. 7
Ex. 8
Ex. 9
(See Ex. 9)
• Now remove the liner plate from the skimmer, keeping the
screws installed through the liner plate and liner.
Ex. 5
• Pre-installing the two screws in the earlier steps will make
it easy to line up the skimmer faceplate after the silicone
www.aquascapeinc.com | ☎ CAN 1-866-766-3426 | ☎ US 1-866-877-6637
5
STEP 5
is applied and will keep the
silicone in as thick of a bead as
possible. Apply a bead of fishsafe silicone sealant around the
skimmer opening, over the nut
inserts. (See Ex. 10)
• Replace the skimmer liner plate
and the two corner screws, and
then proceed with the bottom
two corners (see Ex. 11). Make
sure the holes in the liner plate
that the weir flap clicks into are
on the bottom.
Ex. 10
ADD ROCK AND GRAVEL
You can expect to use several tons of stone and gravel
for your water feature. Visit www.aquascapeinc.com for
information on calculating the required stone and gravel.
Below are some helpful formulas for choosing the stone and
gravel.
Stone Calculation for the Pond
Length x Width / 65 = Tons of boulders
Gravel Used in the Pond
Pond Gravel = 30% total tons of pond boulders
• With the 4 corners secured, you
may now punch the remaining
Ex. 11
holes with your awl and thread
in all the screws. Again, be careful not to damage the
threads on the nut inserts.
• Let dry for at least one hour before introducing water.
Overflow Installation
• P rime and glue the section of
PVC Flex pipe into the bulk• The built in overflow will allow
head and run it to the top of
the water in an overflow situthe gravel pit. Cover the gravel
ation to flow through the pipe
pit with a small section of
and drain away from the pond.
underlayment and top with soil.
Use a pvc plug (not included) to
plug the bulkhead if you do not Note: Install the “dial-in” overflow
want the overflow option.
adjustment arm into the cor• Excavate a trench for a section responding bulkhead on the
inside of the skimmer. Use silicon
of PVC Flex pipe to come
or Teflon tape (not included) on
off the back of the desired
the threads prior to installing the
bulkhead. The trench should
fitting. Tighten the fitting in the
be no less than 5 ft from the
bulkhead as far as possible with
back of the skimmer and be
the overflow arm in the highest
graded away from the pond
position. The final overflow ad(See Ex. 12).
justment can be made once the
• Create a drainage area at the
final water level is set using the
end of the pipe by excavating
adjustable skimmer liner plate.
a small pit, roughly 16 inches
See section on setting the adjustin diameter and at least 12
able liner plate and overflow
inches deep. Fill the pit with
(page 8).
excess gravel
• Start from the bottom and set the largest character
boulders first against the vertical walls, then stack the
smaller boulders on top.
• Be careful when placing any large boulders so you don’t
damage the liner.
• The opening on the front of the Skimmer can be hidden
by placing boulders on either side and bridging a stone or
piece of driftwood across, creating a cave effect.
Note: Make sure the boulders do not block the water flow into
the skimmer.
• Cover all remaining flat surfaces with a couple inches of
decorative gravel. This will help lock the boulders in place,
as well as cover the remaining liner, protecting it from
ultraviolet rays, and giving bacteria a place to colonize.
Ex. 12 Overflow diagram.
6
☎ US 1-866-877-6637 | ☎ CAN 1-866-766-3426 | www.aquascapeinc.com
WASH ROCKS AND GRAVEL
• Using a garden hose, wash the rock and gravel down in
order to remove the dust and dirt. Use the pump provided
with the kit attached to a scrap section of kink-free pipe.
The pump can temporarily be placed in the lowest point of the pond and the dirty water discharged to a drainage area in the yard.
Ex.13 Check Valve
Assembly (available with
AquascapePond Kits only)
Ex. 14 Pump Assembly
STEP 6
COMPLETE THE SKIMMER INSTALLATION
• The Signature Series™ check valve (available with Aquascape
Pond Kits only) comes with two adaptors that replace the
standard PVC pipe sockets on each end of the check valve
(see Ex. 13). One adaptor threads directly into the pump, the
other threads directly into the bulkhead on the back of the
skimmer that supplies water to the BioFalls® Filter. Apply silicone or Teflon tape (not included) to the threads of the fitting
(see Ex. 15).
Ex. 15 One adaptor threads directly
into the pump, the other threads
directly into the bulkhead on
the back of the skimmer. Apply
silicone or Teflon tape (not included)
to the threads of the fitting.
NOTE: One pump shown. Your
installation may have two pumps.
•T
he second hole located in the back of the skimmer is for the
overflow. The overflow will help maintain the maximum water
level in the pond after rainfall, ensuring that your skimmer
works properly and water does not travel over the edges of
the liner and cause problems with hydrostatic pressure. Refer
back to page 6 for overflow information.
• Place the pump at the bottom of the Skimmer. Follow pump
instructions and see Ex. 14.
•O
nce inside the skimmer, feed the electrical cord over the
depression located on the back, top edge of the skimmer.
•S
et the filter rack inside the skimmer. (See Ex. 16) Punch out
the corresponding die-cut hole located on the skimmer filter
mat and insert the skimmer mat into the filter. (See Ex. 17)
www.aquascapeinc.com | ☎ CAN 1-866-766-3426 | ☎ US 1-866-877-6637
Ex. 16
Ex. 17
7
• Please refer to check valve assembly instructions for further pump plumbing information.
ASSEMBLY OF THE ADJUSTABLE FACEPLATE IN
THE SKIMMER BASKET
• The weir plate (see Ex. 18) fits onto the slide plate and is attached with 2 large thumb screws into the corresponding
threaded inserts.
•T
he slide assembly can now be placed inside the
basket and attached with the 6 small stainless screws
threaded in from outside face of the basket.
(See Ex. 19 & 20)
• Place the basket in the skimmer. (See Ex. 21) The basket
fits into the front edge of the filter support rack. Please
note that the support rack is what supports the basket.
The tabs on the top edge of the basket are not load
bearing and simply hold the basket up to the face of the
skimmer.
Ex. 19
ASSEMBLY OF THE ADJUSTABLE FACEPLATE
• The patent-pending adjustable faceplate allows the final
water level of the pond to be adjusted. Please note that
this feature is for making final adjustments and tweaks to
the water level. It is important the skimmer was set to the
proper water level to begin with. You may find you’ll need
to reset the entire skimmer box if making minor adjustments when the adjustable liner plate does not meet the
desired water level.
•M
ake sure the pond is filled to the desired level prior to
making final adjustments.
•A
djust the weir opening to the appropriate water level by
loosening the thumbscrews and adjusting as needed. (See
Ex. 22.) There should be approximately 3/4 inch gap between the water level and the top of the faceplate opening
to allow proper skimmer action.
Ex. 20
• Dial-in the adjustable overflow arm so that water rising
past the desired level will begin to trickle down the overflow arm. (See Ex. 23) Please note that we recommend to
re-silicone or Teflon tape (not included) the threads of the
overflow fitting once the final position is determined. Once
the overflow is set, the pond owner should not readjust.
Readjustment may require the threads to be re-siliconed
or Teflon taped to prevent water loss.
Ex. 21
Ex. 18
8
☎ US 1-866-877-6637 | ☎ CAN 1-866-766-3426 | www.aquascapeinc.com
STEP 6 CONT...
COMPLETE THE SKIMMER INSTALLATION
6.0/8.0 Weir
Thumbscrews
6.0/8.0 Slide Plate
6.0/8.0 Weir Plate
Debris Basket
Adjustable
Overflow
Stainless Steel Screws
Signature Check
Valve
Ex. 22
6.0/8.0 Filter
Mat
Filter Mat Rack
6.0/8.0 Liner
Plate
Water Fill
Valve
(sold separately)
Ex. 23
Stainless Steel Screws
STEP 7
FILL POND
Fill up the pond with water, just
below the level of the overflow
in the skimmer.
STEP 8
ENJOY!
www.aquascapeinc.com | ☎ CAN 1-866-766-3426 | ☎ US 1-866-877-6637
9
SIGNATURE SERIES™ STONE LID
• The Signature Series™ stone has several channels molded
in the top to allow mulch or gravel to be added to help
camouflage.
• The stone lid fits on in one direction. Look at the underside
of the stone to determine the proper interface with the
shape of the skimmer basket. (See Ex. 24)
This tight fit is designed to help keep frogs from jumping
over the side of the basket.
• You can cover the lid with rocks, mulch, or whatever landscaping material you have surrounding your skimmer. (See
Ex. 25)
Ex. 24
Ex. 25
GENERAL MAINTENANCE & SEASONAL CARE
Debris Basket
Filter Mat
The Signature Series™ Skimmer is designed to sweep the
surface of the water so this it is free from debris. The debris
basket inside the skimmer is the first filter stage of the skimmer. The basket will collect leaves, twigs, seeds, and other
pond debris. It takes approximately two to three minutes
every other week to empty the debris net. More frequent
changes will be required during the fall and spring because of
the quantity of leaves falling off the surrounding trees.
The filter mat below the debris basket is the second stage of
the skimmer. The mat is designed to handle any debris that
finds its way past the basket. The mat will not need maintenance as frequently as the basket, since the basket will
remove the majority of debris from the water. Remove and
rinse the mat when you notice less flow over the waterfall.
It is a good habit during your first season with the pond to periodically lift the skimmer lid and check the quantity of debris
in the basket. This is especially true in the fall. Keep a mental
note as to how often your basket has to be emptied. It’s
important that the debris basket is not allowed to become too
full. Too much debris can reduce the water flow to the pump.
10
☎ US 1-866-877-6637 | ☎ CAN 1-866-766-3426 | www.aquascapeinc.com
Replacement Parts
1
Skimmer Replacement Parts
No.
Item number/description
1.
29005 6.0 & 8.0 Rock Lid
2.
29008 6.0 & 8.0 Thumb Screw Set
3.
29214 6.0 & 8.0 Slide Plate
4.
29529 6.0 Weir Plate
4.
29213 8.0 Weir Plate
5.
29230 Skimmer 6” Weir (6.0)
5.
29258 Skimmer 8” Weir (8.0)
6.
29003 6.0 & 8.0 Debris Basket
7.
29217 6.0 & 8.0 Screw Set 10-32x1/2” (7/bag)
8.
29004 6.0 & 8.0 Filter Mat
9.
29655 6.0 & 8.0 Filter Rack
10.
29103 2” Bulkhead Fitting (qty 1)
11.
29149 6.0 & 8.0 Overflow Elbow
12.
29215 6.0 & 8.0 Liner Plate
13.
30078 Mat Brass Screw Set 1/4”-20x3/4”
(8/bag)
2
4
5
3
6
7
8
9
13
12
10
11
Warranty
LIFETIME WARRANTY
Aquascape warrants that the Signature Series Skimmer Filter will be free of manufacturing defect for the lifetime of the
product if properly installed and maintained. If upon Aquascape’s inspection, the Signature Series Skimmer Filter shows
evidence of a manufacturing defect, Aquascape’s liability is limited, at Aquascape’s option, to the repair of the defect,
or the replacement of the defective product. There are no warranties either expressed or implied, including the implied
warranties of merchantability and fitness for a particular purpose, which extend beyond the warranties contained in this
document. Aquascape shall not be liable for any incidental, consequential or other damages arising under any
theory of law whatsoever.
One Year Warranty:
Signature Series Skimmer internal parts
www.aquascapeinc.com | ☎ CAN 1-866-766-3426 | ☎ US 1-866-877-6637
11
For more information about our company or products, please visit our website at www.aquascapeinc.com
or call us at (US) 1-866-877-6637 (CAN) 1-866-766-3426
Rev. 3/15
12
©2015 Aquascape, Inc. • All Worldwide Rights Reserved
I N S T R U C T I O N S
&
M A I N T E N A N C E
Signature Series™ Skimmer
For Article #’s
09019 - Signature Series 6.0
29349 - Signature Series 8.0
www.aquascapeinc.com
Merci d’avoir choisi le filtre Signature
Series™ Skimmer.
Chez Aquascape, notre but est de fournir à nos
clients des produits de la plus haute qualité pour
le jardinage aquatique. Nous espérons que vous
aimerez votre achat et nous vous remercions
d’avoir choisi Aquascape.
Votre paradis. Notre passion.MD
Signature Series™
Skimmer
Les filtres Skimmer d’Aquascape offrent une filtration
mécanique pour votre plan d’eau. Nos écumoires sont
conçues par une équipe professionnelle pour qu’elle soit
facile à installer dans votre étang artificiel et à entretenir.
Inclus aussi les options brevetées pour un entretien d’étang
artificiel gratuit et sans effort. Le filtre Skimmer est garanti à
vie!
Les codes barres suivants vous offrent des options
inspirantes, un guide de dépannage et des services
d’entretient.
TÉLÉCHARGEZ
GRATUITEMENT
NOTRE
CATALOGUE
VIDÉO SUR
LES ÉCUMOIRS
D’AQUASCAPE
AQUASCAPE ACADEMY
Online Training
VISITEZ
L’ACADÉMIE
AQUASCAPE
Inscrivez-vous à une série
de cours conçus pour vous
aider à devenir rapidement un véritable amateur
d’accessoires aquatiques.
VOUS POUVEZ RETROUVER LES RESSOURCES EN
LIGNE D’AQUASCAPE - ACCÈS AUX INFORMATIONS
SUR LE PRODUIT, LE GUIDE D’INSTALLATION (FRANÇAIS & ANGLAIS), VIDÉO, PHOTOS INSPIRANTES
ET ENCORE PLUS, SUR UN SEUL ET UNIQUE SITE
PRATIQUE.
☎ NOUS JOINDRE
Introduction……………………………………………… 2
Pour plus de renseignements au sujet de notre société ou
de nos produits, veuillez visiter notre site Web au www.
aquascapeinc.com ou téléphonez sans frais au 1 866 766
3426, au Canada, ou au 1 866 877 6637, aux États-Unis.
Composants ……………………………………………… 3
Rejoignez-nous sur :
TABLE OF CONTENTS
Outils recommandés …………………………………… 3
Instructions pour l’installation…………………………… 4
Entretien Général ……………………………………… 11
Informations sur la garantie…………………………… 11
14
www.facebook.com/AquascapeInc
www.youtube.com/aquascape4
www.twitter.com/AquascapeInc
www.flipboard.com/profile/AquascapeInc
☎ US 1-866-877-6637 | ☎ CAN 1-866-766-3426 | www.aquascapeinc.com
Composants
No.
Description
1.
Rock Lid
2.
Thumb Screw Set
3.
Side Plate
4.
Weir Plate
5.
Weir
6.
Debris Basket
7.
Screw Set 10-32x1/2” (7/bag)
8.
Filter Mat
9.
Filter Rack
10.
2” Bulkhead Fitting
11.
Overflow Elbow
12.
Liner Plate
13.
14.
1
2
4
5
3
6
7
8
Mat Brass Screw Set
1/4”x20x3/4” - 8/bag
9
Skimmer
10
13
12
11
14
Outils recommandés
Brouette
Amis
(facultatif)
Peinture au
pistolet de
couleur vive
Tournevis
Dameuse
Pelles
Niveau à bulle
Pince multiprise
à crémaillère
Ciseaux
www.aquascapeinc.com | ☎ CAN 1-866-766-3426 | ☎ US 1-866-877-6637
15
ÉTAPE 1
POSITIONNEMENT DE L’ÉCUMOIR
• Pour maximiser la circulation, le filtre Skimmer doit être
placé directement devant la chute d’eau. Dans le cas
où vous n’auriez pas de chute d’eau, utiliser les vents
prédominants du terrain pour déterminer la position du
filtre sur son axe le plus long. Ainsi, vous pouvez utiliser le
vent pour aider à pousser les débris vers le filtre.
• La troisième marche (si désirée) est de 6’’ de profondeur
(exemple 3), pour atteindre une excavation de profondeur
finale de 24’’.
Ex. 1
Ex. 2
Ex. 3
Vent prédominant
ÉTAPE 3
EXCAVATION POUR L’ÉCUMOIRE
MicroSkim®
Chute d’eau
• Dégrossir et fouiller une zone pour le Skimmer. Utilisez le
plan de l’écumoire comme guide.
• Lors de l’installation du filtre Skimmer pour un étang
existant, vous devez vider l’eau de l’étang. Si vous avez
des poissons, préserver un peu d’eau de l’étang dans
un sceau de large dimension, un bassin ou une piscine
pour enfant. Attrapez vos poissons et les placer dans le
contenant. Assurez-vous d’intégrer un aérateur dans le
contenant et de garder les poissons dans l’ombre. Retirez
les pierres dans un périmètre de 3 pieds autour du site du
filtre. Exposer la région à excaver pour l’emplacement du
filtre Skimmer en retirant 3 à 4 pieds de toile à bassin.
ÉTAPE 2
EXCAVATION DE VOTRE PLAN D’EAU
• Pour l’installation de Skimmer dans un étang artificiel
existant, ignorez cette étape et continuez avec l’étape 3.
• Nous suggérons une excavation maximale de 18’’ à 24’’
de profondeur. Cette profondeur est nécessaire pour la
santé des plantes aquatiques et est appropriée pour les
poissons durant la saison hivernale.
• Lors de l’installation pour un étang artificiel existant, nous
recommandons de positionner le couvercle du Skimmer sur
l’emplacement désiré. Chevaucher le couvercle sur l’étang
d’environ 6’’. Marquez les extrémités du couvercle avec
une peinture en aérosol ou avec la pointe de votre pelle.
Positionner le filtre Skimmer vers l’intérieur de l’étang avec
un surplus de 6’’ pour faciliter le positionnement de la toile
et l’attachement du panneau frontal.
• L’excavation doit être creusée en forme de marches.
Ces marches servent à maximiser la stabilité des murs
de l’étang et à la création de différents niveaux de platebandes pour différentes familles de plantes aquatiques.
• La première marche doit être de 8 à 10’’ de profondeur
(exemple 1), ou la dimension de la lame d’une pelle
régulière.
• La deuxième est habituellement de même profondeur,
8 à 10’’. Commencer l’excavation à cette étape pour
l’emplacement de filtre (exemple 2).
16
☎ US 1-866-877-6637 | ☎ CAN 1-866-766-3426 | www.aquascapeinc.com
• Assurez-vous que la zone sous le filtre Skimmer est
compactée et est à niveau.
• La profondeur de l’excavation doit permettre 3/4’’ d’eau
au-dessus de l’ouverture de l’écumoire. (exemple 4) Pour
l’installation dans un étang artificiel existant, veuillez utiliser
le niveau d’eau connu pour l’excavation de l’écumoire.
• Vérifier deux fois toutes vos mesures, ce qui inclus la
longueur et la profondeur de l’étang, les plate-bandes et la
profondeur générale de l’étang.
• Si vous utilisez deux
pompes, chacune sera raccordée à l’une des cloisons.
Il faudra percer un troisième
trou à l’arrière de l’écumoire
si vous désirez ajouter un
trop-plein. La tête de la
grenouille qui figure sur le
Ex. 6
logo comporte un guide de
perçage. Utilisez une scie cylindrique de 3 po pour percer
l’ouverture requise pour une autre traversée de cloison
(vendue séparément) (Ex. 6)
• Suivez les étapes décrites pour l’installation de la cloison sur
le filtre BioFallsMD (se reporter à la rubrique sur le montage
des cloisons).
• Posez un raccord coulissant en PVC dans chaque cloison,
de l’extérieur de l’écumoire, pour recevoir la tuyauterie de la
pompe et du trop-plein.
• Recouvrez le filetage du raccord d’un scellant à base de
silicone ou de ruban de téflon (non fourni) afin d’assurer
l’étanchéité du joint.
Niveau d’eau idéal
Utilisez un niveau 2 ‘de la
bulle pour vous assurer
que votre skimmer est
correctement septembre
en position. Votre skimmer
doit être au niveau d’un
côté à-côté et front-toback.
Niveau de
la terre
sur le 1er
palier
• Placez la toile devant l’ouverture de l’écumoire en veillant à
laisser du jeu sous l’ouverture. Ce jeu permettra de réduire
la tension sur le cadre lorsque vous placerez les grosses
pierres devant l’appareil.
¾ po en dessous
Face avant de
l’écumoire
Ex. 4
ÉTAPE 4
INSTALLATION DU MICROSKIM
• Installez les deux cloiCloison
Joint
Écrou
d’étanchéité en
sons verticales à l’arrière
caoutchouc
de l’écumoire Signature
SeriesMC avant d’insérer
l’écumoire dans le trou
Rondelle de
plastique
creusé pour la loger. Le filtre
Installation
de
la
cloison.
comporte à l’arrière deux
ouvertures pouvant recevoir diverses tuyauteries.
• Si vous utilisez une seule
pompe, la tuyauterie de la
pompe sera raccordée à
une cloison et le trop-plein
sera raccordé à l’autre.
Examinez bien les cloisons
afin d’utiliser celle dont
l’angle correspond le mieux
à l’angle du filtre BioFallsMD
(Ex. 5)
Fixation du cadre de retenue de la toile
Tuyau souple
en PVC
Traversée
de cloison
Ex. 5
AVERTISSEMENT
Les outils électriques ne sont pas recommandés pour l’installation des vis
et peuvent endommager les écrous
• Marquez le contour externe
de l’ouverture de l’écumoire
sur la toile et tracez un second
cadre à 1,5 po à l’intérieur du
premier cadre. Vous éviterez
ainsi de découper une trop
grande ouverture dans la toile,
ce qui pourrait entraîner une
fuite (Ex. 7)
Ex. 7
• Découpez le cadre interne à
l’aide de ciseaux et insérez le
cadre de retenue de l’écumoire
dans l’ouverture. (Ex.8)
• Fixez temporairement le
cadre de retenue et la toile à
l’écumoire au moyen de deux
vis dans les coins supérieurs.
Servez-vous d’un poinçon
ou d’un clou pour percer la
toile. Prenez garde de ne pas
endommager le filetage des
garnitures d’écrou en perçant
les trous. Retirez le poinçon ou
le clou en tenant le cadre de
retenue et la toile en place, et
www.aquascapeinc.com | ☎ CAN 1-866-766-3426 | ☎ US 1-866-877-6637
Ex. 8
Ex. 9
17
ÉTAPE 5
insérez une des vis dans le filtre.
Répétez l’opération pour les
autres vis (Ex. 9)
• Retirez maintenant le cadre de
retenue de l’écumoire en laissant
les vis dans le cadre et la toile.
• Les deux vis temporaires qui ont
Ex. 10
été précédemment posées faciliteront l’alignement de la plaque
frontale de l’écumoire après
l’application de silicone en plus de
protéger l’épaisseur de la couche
de silicone. Appliquez une couche
de scellant à base de silicone
sans danger pour les poissons
Ex. 11
autour de l’ouverture
de l’écumoire, par-dessus les chevilles d’écrous (Ex. 10)
• Replacez le cadre de retenue et les deux vis des coins supérieurs, puis fixez les deux coins inférieurs (Ex. 11). Assurezvous que les ouvertures du cadre de retenue de la toile dans
lesquelles seront fixés les rabats du déversoir se trouvent dans
le bas.
• Maintenant que les quatre coins sont fixés, vous pouvez
percer les autres trous avec un poinçon ou un clou et insérer
les autres vis. Prenez bien soin de ne pas endommager le pas
de vis des chevilles d’écrous.
AJOUTEZ LES ROCHES ET LE GRAVIER
Il faut vous attendre à utiliser plusieurs tonnes de roches et de
gravier pour vos accessoires aquatiques. Consultez un détaillant
Aquascape ou un fournisseur de roches pour vous aider à choisir
la quantité et la taille des pierres et du gravier. Visitez le site www.
aquascapeinc.com pour avoir des informations sur le calcul de la
quantité de pierres et de gravier. Vous trouverez ci-dessous des
formules utiles pour vous aider à choisir les pierres et le gravier.
Calcul de la quantité de pierres pour le bassin
Longueur x largeur ÷ 65 = quantité de roches en tonnes
Gravier utilisé dans le bassin
Quantité de gravier = 30 % du poids total des roches
• En partant du fond, posez d’abord les roches de plus grande
taille contre les parois verticales, puis empilez par dessus les
roches plus petites.
• Pour ne pas endommager la poche, soyez attentifs quand vous
posez de grosses roches.
• L’ouverture à l’avant de la Skimmer peut être cachée en plaçant
des roches de chaque côté et en posant une pierre ou un
morceau de bois de grève par dessus et en travers pour créer
une sorte de petite caverne.
Remarque : assurez-vous que les grosses roches ne bloquent pas le débit
d’eau dans l’écumoire.
• Laissez sécher au moins pendant une heure avant d’ajouter
l’eau !
Installation du trop-plein
• Le trop-plein intégré permettra à
l’eau de s’écouler hors du bassin
en cas de débordement. Si vous
ne voulez pas installer ce dispositif,
vous devez boucher l’orifice destiné au tuyau de trop-plein par un
bouchon de PVC (non fourni).
• Creusez une tranchée pour faire
passer le tuyau de PVC souple en
provenance de l’arrière de la cloison.
La tranchée ne doit pas s’arrêter
à moins de 5 pieds de l’écumoire
et elle doit avoir une pente qui
permettra à l’eau de s’écouler loin
du bassin (Fig. 17).
• Créez une zone de drainage à
l’extrémité du tuyau en creusant
un petit trou d’environ 16 po de
diamètre et d’au moins 12 po de
profondeur que vous remplirez de
gravier.
• Enduisez le tuyau de PVC souple et
collez-le dans la cloison, Faites-le
sortir au-dessus du trou de gravier. Recouvrez le trou d’une petite
bâche géotextile et de terre.
Nota : Installez le manchon orientable de trop-plein dans la cloison
appropriée, à l’intérieur de l’écumoire.
Enduisez le filetage de silicone ou
de ruban de téflon (non fourni) avant
d’installer le raccord. Insérez le raccord le plus loin possible à l’intérieur
de la cloison en laissant le manchon
de trop-plein en position haute. Le réglage final du trop-plein peut se faire
par le cadre de retenue de la toile une
fois que le niveau définitif de l’eau est
établi à l’aide de la plaque réglable.
Se reporter à la section portant sur la
mise en place de du cadre réglable
de retenue de la toile et du trop-plein
(page 12).
• Couvrez toutes les surfaces restantes en déposant quelques
centimètres de gravier décoratif. Ceci aidera à bien maintenir en
place les grosses roches et aussi à recouvrir le reste de la poche
en la protégeant des rayons ultraviolets et en offrant un endroit
aux bactéries pour qu’elles se développent.
Ex. 12 Évacuation du trop-plein.
18
☎ US 1-866-877-6637 | ☎ CAN 1-866-766-3426 | www.aquascapeinc.com
LAVEZ LES ROCHES ET LE GRAVIER
• À l’aide d’un tuyau d’arrosage, lavez les roches et le
gravier pour retirer la poussière et la saleté. Utilisez
la pompe fournie avec l’ensemble et attachez-la à
un morceau de tuyau anti-pli. La pompe peut être
temporairement placée à l’endroit le plus bas du bassin et
l’eau sale peut être refoulée dans une zone de drainage
du jardin.
Ex.13 Éléments du clapet
anti-retour
Ex. 14 Pompe
ÉTAPE 6
ACHEVEZ LA POSE DE LA SKIMMER
• Les clapets anti-retour Signature SeriesMC sont livrés avec
deux adaptateurs qui remplacent les douilles habituelles en
PVC qui se trouvent de chaque côté du clapet (see Ex.13).
Un adaptateur se visse directement dans la pompe et l’autre
dans la cloison arrière de l’écumoire assurant l’arrivée d’eau
au filtre BioFallsMD. Recouvrez le filetage du raccord de silicone ou de ruban en téflon (non fourni) (see Ex. 15).
Ex. 15 Un adaptateur se visse directement dans la pompe et l’autre dans la
cloison arrière de l’écumoire. Recouvrez le filetage du raccord de silicone
ou de ruban de téflon (non fourni).
NOTA : Installation à une seule pompe.
Il est possible que votre installation
comporte deux pompes.
• Le deuxième orifice à l’arrière de l’écumoire est destiné au
trop-plein. Ce dispositif maintient le niveau d’eau optimal après
une forte plus pluie afin que l’écumoire fonctionne correctement et que l’eau ne déborde pas des extrémités de la toile,
ce qui pourrait entraîner des problèmes de pression hydrostatique. Reportez-vous à la page 6 pour les renseignements
concernant le trop-plein.
• Placer la pompe au fond du skimmer. Suivez les instructions
pompe et voir Ex. 14 & 15.
• De l’intérieur de l’écumoire, tirez le cordon électrique dans
la découpe ménagée dans le haut de la face arrière de
l’écumoire.
www.aquascapeinc.com | ☎ CAN 1-866-766-3426 | ☎ US 1-866-877-6637
Ex. 16
Ex. 17
19
• Insérez le support de filtre dans l’écumoire (See Ex. 16)
Percez l’orifice tracé dans la masse filtrante et insérez
celle-ci dans le filtre (See Ex.17)
• Reportez-vous aux instructions sur le montage du clapet
anti-retour pour plus de renseignements sur l’installation de
la pompe.
INSTALLATION DE LA PLAQUE FRONTALE RÉGLABLE
DANS LE PANIER DE L’ÉCUMOIRE
• La plaque de déversoir (see Ex.18) se fixe à la plaque coulissante en insérant les deux vis à oreille dans les trous correspondants.
Ex. 18
• La plaque coulissante peut maintenant être insérée dans le
panier et fixée à l’aide de six petites vis en acier inoxydable
posées de l’extérieur du panier
(See Ex. 19&20)
• Placez le panier dans l’écumoire (See Ex. 21) Le panier s’adapte à l’avant du support du filtre. Ce support
soutient aussi le panier. Les pattes qui se trouvent dans
le haut du panier ne soutiennent aucune charge; elles ne
font que retenir le panier à l’écumoire.
MONTAGE DE LA PLAQUE FRONTALE RÉGLABLE
• La plaque frontale réglable brevetée permet de faire la mise
au point finale du niveau d’eau dans le bassin. Notez bien
que cette plaque sert aux derniers réglages et à la mise au
point finale du niveau d’eau. Il faut que l’écumoire ait d’abord
été correctement installée en fonction du niveau d’eau. Il se
peut que vous deviez replacer complètement l’écumoire si
vous n’obtenez pas le bon niveau d’eau en faisant la mise au
point à l’aide de la plaque.
Ex. 19
• Veillez à ce que le niveau d’eau du bassin soit adéquat
avant de faire la mise au point finale.
• Réglez l’ouverture du déversoir au niveau souhaité à l’aide
des vis à oreilles (See Ex 22.) Pour obtenir les meilleurs
résultats, il devrait y avoir un jeu d’environ trois-quarts de
pouce entre le niveau de l’eau et le haut de l’ouverture de
la plaque frontale.
• Tournez le manchon de trop-plein de sorte que l’eau
s’écoule par ce dispositif en cas de débordement (See
Ex. 23) Il est conseillé de recouvrir de nouveau le filetage
du trop-plein de silicone ou de ruban de téflon (non fourni)
lorsqu’il est dans sa position définitive. Une fois que le tropplein est fixé, le propriétaire du bassin ne devrait pas avoir à
le déplacer. S’il y a lieu de modifier le réglage du trop-plein il
faudra de nouveau appliquer de la silicone ou un ruban de
téflon pour éviter toute fuite d’eau.
Ex. 20
Ex. 21
20
☎ US 1-866-877-6637 | ☎ CAN 1-866-766-3426 | www.aquascapeinc.com
ÉTAPE 6 CONT...
ACHEVEZ LA POSE DE LA SKIMMER
6.0/8.0 Déversoir
Vis à oreilles
6.0/8.0 Plaque
coulissante
6.0/8.0 Plaque de
montage du déversoir
Panier à débris
Trop-plein
orientable
Vis en acier inoxydable
Clapet anti-retour
Signature
Ex. 22
6.0/8.0 Masse
filtrante
Support de
masse filtrante
6.0/8.0 Cadre de
retenue de la toile
Robinet de
remplissage
(Vendue séparément)
Ex. 23
Vis en acier inoxydable
ÉTAPE 7
REMPLISSAGE DU BASSIN
Remplissez le bassin d’eau
juste en dessous du niveau du
trop-plein de l’écumoire.
ÉTAPE 8
PROFITEZ BIEN!
www.aquascapeinc.com | ☎ CAN 1-866-766-3426 | ☎ US 1-866-877-6637
21
COUVERCLE EN FAUSSE ROCHE SIGNATURE SERIESMC
• La fausse pierre Signature SeriesMC comporte des sillons
servant à recevoir du paillis ou du gravier pour donner un
aspect naturel.
• Le couvercle en fausse roche ne s’ajuste que d’une seule
manière. Regardez la face interne de la pierre pour ajuster
le couvercle à la forme du panier de l’écumoire (See Ex. 24)
Ex. 24
Cet ajustement étanche empêche les grenouilles de passer
dans le côté du panier.
• Le couvercle peut être recouvert de pierres, de paillis ou de
tout autre matériau de paysagisme (See Ex. 25)
Ex. 25
ENTRETIEN COURANT ET SAISONNIER
Panier à débris
L’écumoire Signature SeriesMD est conçue pour capter les
débris présents à la surface de l’eau. Le panier à débris qui
se trouve à l’intérieur de l’écumoire constitue le premier étage
de filtration. Il recueille les feuilles, les brindilles, les graines
et autres débris. Il suffit de deux ou trois minutes toutes les
deux semaines pour vider le panier. Il faut toutefois répéter
l’opération plus souvent à l’automne et au printemps en raison de la quantité de feuilles qui s’accumulent.
Durant la première année, il est conseillé de soulever le couvercle de l’écumoire de temps à autre pour vérifier le niveau
des débris accumulés − surtout à l’automne. Essayez de
22
vous souvenir de la fréquence à laquelle vous videz le panier.
Il faut éviter que le panier ne soit trop plein, ce qui pourrait
ralentir le débit de l’eau alimentant la pompe.
Masse filtrante
La masse filtrante qui se trouve sous le panier à débris constitue le deuxième étage de filtration. Cette masse est conçue
pour retenir tout débris qui s’échappe du panier. La masse
filtrante n’exige pas un entretien aussi fréquent que le panier
puisque c’est ce dernier qui recueille la grande majorité des
débris. Retirez la masse filtrante et rincez-la lorsque vous
constatez que le débit de l’eau ralentit.
☎ US 1-866-877-6637 | ☎ CAN 1-866-766-3426 | www.aquascapeinc.com
Pièces de rechange
1
MicroSkim® Replacement Parts
No.
Item number/description
1.
29005 6.0 & 8.0 Rock Lid
2.
29008 6.0 & 8.0 Thumb Screw Set
3.
29214 6.0 & 8.0 Slide Plate
4.
29529 6.0 Weir Plate
4.
29213 8.0 Weir Plate
5.
29230 Skimmer 6” Weir (6.0)
5.
29258 Skimmer 8” Weir (8.0)
6.
29003 6.0 & 8.0 Debris Basket
7.
29217 6.0 & 8.0 Screw Set 10-32x1/2” (7/bag)
8.
29004 6.0 & 8.0 Filter Mat
9.
29655 6.0 & 8.0 Filter Rack
10.
29103 2” Bulkhead Fitting (qty 1)
11.
29149 6.0 & 8.0 Overflow Elbow
12.
29215 6.0 & 8.0 Liner Plate
13.
30078 Mat Brass Screw Set 1/4”-20x3/4”
(8/bag)
2
4
5
3
6
7
8
9
13
12
10
11
Informations sur la garantie
Garantie à vie
Aquascape garantit que le filtre Signature Series Skimmer est sans défaut de fabrication pour la durée de vie du produit
avec une installation et un entretien approprié. Suivant une inspection d’Aquascape, si le filtre Skimmer démontre
des défauts de fabrication, la responsabilité d’Aquascape est limitée, à son choix, aux réparations du défaut ou au
remplacement de produit défectueux. Il n’y a aucune garantie expresse ou implicite, aux choix d’Aquascape, inclus la
garantie implicite de qualité marchande et d’adéquation à une utilisation particulière, au-delà de la garantie contenue
dans le présent document. Aquascape ne sera pas tenu responsable des dommages directs, indirects ou toute autre
théorie légale.
Garantie d’un an:
les pièces internes Signature Series Skimmer
www.aquascapeinc.com | ☎ CAN 1-866-766-3426 | ☎ US 1-866-877-6637
23
For more information about our company or products, please visit our website at www.aquascapeinc.com
or call us at (US) 1-866-877-6637 (CAN) 1-866-766-3426
Rev. 3/15
24
©2015 Aquascape, Inc. • All Worldwide Rights Reserved