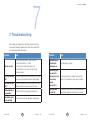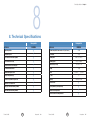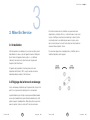
1
Us e r Ma n u al Thermo Scientific Homogenizer Laboratory Blender Version 1 • September 2014 EN FR Thank you for choosing Thermo ScientificTM Homogenizer Your new lab blender: • Ensures an excellent preparation of solid samples before their analysis. • Avoids the use of whirring mixers or speed blenders which damages the cells and bacteria contained in the sample, and which require fastidious cleaning and sterilization. Table of Contents Using the Homogenizer will guarantee optimal analysis results in ideal conditions of reproductibility and hygiene. To get the best use from your Homogenizer and high-quality sample preparations in compliance with ISO 7218 / ISO 6887-1983 specifications, please read this manual carefully. Chapter 1 Chapter 2 Chapter 3 _______________________________________________________________ English user’s manual p. 3 Chapter 4 Chapter 5 Merci d’avoir choisi Thermo Scientific Homogenizer Chapter 6 Votre nouveau malaxeur à pales: • Permet une excellente préparation des échantillons solides en vue de leur analyse en phase liquide. • Évite l’emploi de malaxeurs ou broyeurs à hélice qui endommagent les cellules, et dont le nettoyage et la stérilisation sont fastidieux. Chapter 7 Chapter 8 L’emploi du Homogenizer permet d’obtenir des résultats d’analyse dans des conditions de reproductibilité et d’hygiène optimales. Table of Contents.................................................................. 3 1. Precautions...................................................................... 4 2. Description....................................................................... 5 2.1 Foreword........................................................................ 5 2.2 General specifications..................................................... 6 3. Starting Up....................................................................... 8 3.1 Installation...................................................................... 8 3.2 Adjusting the blending power.......................................... 8 4. Operating Method........................................................... 10 5. Special Settings.............................................................. 12 5.1. To revert to the factory settings.................................... 12 5.2. Presence/absence of beeps......................................... 12 5.3. Presence/absence of the backlighting........................... 13 6. Maintenance.................................................................. 14 6.1. Daily maintenance of the housing and blending chamber........................................................ 14 6.3.Cleaning of door seals................................................. 15 6.4.Annual maintenance ................................................... 15 7. Troubleshooting.............................................................. 18 8. Technical Specifications.................................................. 20 Certificates......................................................................... 42 Pour que votre Homogenizer vous donne entière satisfaction et permette la préparation de vos échantillons conformément à la norme ISO 7218 / ISO 6887-1983, nous vous invitons à lire attentivement ce manuel. _______________________________________________________________ Mode d’emploi en français p. 23 Thermo Scientific EN Homogenizer | 2 Thermo Scientific EN Homogenizer | 3 1. Precautions 1 Before use, please read these instructions thoroughly. Any damage incurred due to non-respect of these instructions will render the guarantee void. The unit must be placed on its feet, on a stable and horizontal surface. Never operate the Homogenizer in a different position. The unit must always be powered with a grounded lead in compliance with electrical standards. The unit must be used in a well-ventilated room in normal conditions of temperature, pressure and humidity. If it has been stored at a temperature below 10°C, allow the unit to return to room temperature before operating. The housing should only be removed by a qualified and authorized technician. If the housing must be removed, be sure to disconnect the power lead first. 2 2. Description 2.1 Foreword The Homogenizer is a lab paddle blender. It is used to prepare microbiological samples, in sterile bags, prior to their analysis. The Homogenizer blends into suspension the solid sample to be analyzed. The samples to be blended with the Homogenizer usually weigh between 10 and 40 grams before dilution. The total recommended volume in the bag should not exceed 400 mL. You can use the Homogenizer with the following products: • Sterile filter and non-filter bags • Thermo ScientificTM DiluFlux Gravimetric Dilutor for sample dilution preparation Each unit is delivered in a specific box. Please keep the box and the inside packing for future use. For best operation, it is important to maintain and clean regularly the Homogenizer. Please refer to the ”MAINTENANCE” section for the cleaning procedure and the list of non-recommended products. Thermo Scientific EN Homogenizer | 4 Thermo Scientific EN Homogenizer | 5 Chapter 2 | Description Description | Chapter 2 2.2 General specifications Front view of Homogenizer. Rear view of Homogenizer 1 1.Digital screen and multifunctional keypad: • Variable speed (4, 6, 8, 10 strokes/sec.) • Variable time (1 sec.- 1h, and open running) Inside the Homogenizer features: • Monoblock blending chamber in white polycarbonate, with inside lighting and drip tray • Adjustable paddles, with side-by-side stopping and patented Click & Clean® system. • Patented TotalAccess System with 180° door-opening and leak-tight Q-Tight® system. • Brushless motor 6 | Homogenizer EN Thermo Scientific Thermo Scientific EN Homogenizer | 7 3. Starting Up 3 3.1 Installation Remove the Homogenizer from its packing and place it on a flat, stable surface. Connect the power lead to the rear of the unit and put the switch in position “I”. The displays will light up and a green light will flash at the bottom of the front side. The unit is now ready to use. Starting Up | Chapter 3 Depending on the nature of the sample, you may need to increase or reduce the blending power, i.e. advance or retract the paddles. To do this, simply turn the handle at the rear of the unit counter-clockwise to advance the paddles or clockwise to retract them. For information, one complete revolution corresponds to a displacement of 1.5 mm. To revert to the factory setting (“standard setting”), please follow the instructions at the rear of the unit. If the unit has been stored at a temperature below 10°C, allow it to return to room temperature before operating. 3.2 Adjusting the blending power The blending power is determined by the distance between the paddles and the door. The smaller the gap, the more powerful the blending. The initial paddle setting is factory set for a standard use with a standard power. When the unit is empty, without a bag, the paddles just touch the door. From this position, you can advance the paddles 3 mm or retract them by 15 mm, depending on your requirements. Thermo Scientific EN Homogenizer | 8 Thermo Scientific EN Homogenizer | 9 4 Operating Method | Chapter 4 • The Homogenizer starts automatically and the lighting under the front side flashes orange slowly. 4. Operating Method Timer Speed • At the end of the cycle, the Homogenizer stops automatically. The lighting turns green, flashes quickly then more slowly. At the end, the unit makes a beep. • Open the door and remove the bag. The Homogenizer is ready for the next cycle. Open running On/Off • Connect the Homogenizer to the power mains (100-240 VAC). Put the switch in position “I“. or ) keys or the • Set the blending time using the Time ( for open running. • Set the blending speed 1, 2, 3, 4 (4, 6, 8, 10 strokes/sec.) with the Speed ( or ) keys. • Pull the lever down to open the door. Place the bag with the sample in the unit on the bag‑rest. • Close the door by raising the lever until it clicks shut. Thermo Scientific EN Homogenizer | 10 Thermo Scientific EN Homogenizer | 11 5. Special Settings 5 You can decide to activate or deactivate some functions of the Homogenizer such as: the beeps, the backlighting and the lighting in the blending chamber. Special Settings | Chapter 5 Then press continuously on the “Time ) ” key until you obtain the desired result, i.e. “SOn1” to active the sound or “SOn0” to deactivate it. 5.3. Presence/absence of the backlighting Press simultaneously the key and the “Time ” key After 4 seconds, 4 hyphens will appear: “----” You can now release the keys. key until you reach the obtain Then press continuously on the result, i.e. “dEl1” to activate the backlighting or “0dEl” to deactivate it. All these operations must be carried out in “standby” mode. At any time, you can revert the factory settings. 5.1. To revert to the factory settings Press simultaneously the key and the “Speed ” key. On the display, after a series of hyphens, “rSEt” will appear. This confirms the reinitialization of the factory settings. 5.2. Presence/absence of beeps Press simultaneously the key and the “Time ” key After 4 seconds, 4 hyphens will appear: “----” You can now release the keys. Thermo Scientific EN Homogenizer | 12 Thermo Scientific EN Homogenizer | 13 6. Maintenance 6 Maintenance | Chapter 6 • Put the unit on the edge of the table. • Open the door flat. Do not use Sodium hypochlorite (Bleach) to clean the unit. It is important to keep the unit clean, in particular the blending chamber. • Remove the drip tray and clean it. 6.1. Daily maintenance of the housing and blending chamber The housing of the blender can be cleaned with a wet cloth or a product to clean stainless steel. The inside of the unit, the paddles and the drip tray can be cleaned and disinfected with regular disinfecting wipes or 70° ethanol. Make sure that the mains switch is in position “0”. • Click the paddles and remove them. To clean the blending chamber: • Unplug the power cord. • Clean the blending chamber. Thermo Scientific EN Homogenizer | 14 Thermo Scientific EN Homogenizer | 15 Chapter 6 | Maintenance Maintenance | Chapter 6 6.2. Cleaning of door seals • Reposition the padddles by clicking them and put back the drip tray in the blending chamber. Regularly lubricate the door seals with a lubricant containing silicone. 6.3. Annual maintenance Lubricate the paddle rods with lubricating silicone grease. Apply with a brush or a spray. • Lift up the door and plug the power cord. • Position the switch at the back of the unit on “I”. • Close the door. Check that the unit is operating. 16 | Homogenizer EN Thermo Scientific Thermo Scientific EN Homogenizer | 17 7. Troubleshooting 7 Troubleshooting | Chapter 7 Before calling technical support, please check that your problem cannot be solved easily by following the guidelines below. In this chart, you will find the most common problems and their solutions. PROBLEMS CHECK PROBLEMS CHECK The blending bags leak during the blending process Check the quality of your bags. Unit does not start • Check that the power cord is correctly connected. • Check that the switch is on “I” (ON). • Check the fuses and the mains voltage are ok. • Check that the door closes well. If needed clean the blending chamber. You may increase the space between the door and the paddles of 5 mm and/or decrease the speed of blending. Check the state of the seal on top of the blending chamber. If needed, turn it a quarter turn. (Contact Customer support) The screen indicates “Err I” This alarm is activated when an overvoltage is detected in the motor. Increase the gap between the door and the paddles. The screen indicates “Err 2” This alarm is activated when the motor is blocked. Check that nothing prevents the mechanical operation of the device. The blending bags leak during the blending process for hard or heavy samples (wood, cloths…) The blending time is not convenient Set the timer (Time) on the appropriate blending time. The sample spits over the door The blending speed is not convenient Set the speed (Speed) on the appropriate blending speed. Thermo Scientific EN Homogenizer | 18 Thermo Scientific EN Homogenizer | 19 8 Technical Specifications | Chapter 8 8. Technical Specifications Homogenizer Reference DB5000A Adjustable paddles 4 adjustable speed Click and Clean® removable paddles 304 L stainless steel body Integrated stainless steel drip tray 180 Watts brushless motor Multifunction digital screen Side-by-side paddle stop TotalAccess System: door opens flat LightCode: color status LED White polycarbonate blending chamber White LED light in blending chamber Homogenizer Reference DB5000A Sound level (with 250 mL of water + 22 g of cheese) 48 dB Door weight 1050 g Blending time From 1 s to 59 mn, ∞ Blending speed 4, 6, 8, 10 coups/s Dimensions (w x d x h) 29 x 45 x 37 cm Weight 25 kg Power 100-240 V~ 50-60 Hz IP class 31 Capacity From 50 to 400 mL Made in France 3-year guarantee (after registration) Window life-time guarantee Shock-absorbers life-time guarantee Thermo Scientific EN Homogenizer | 20 Thermo Scientific EN Homogenizer | 21 Table des Matières Chapter 1 1. Precautions.................................................................... 24 Chapter 2 2. Description..................................................................... 25 2.1 Préalable...................................................................... 25 2.2 Caractéristiques générales............................................ 26 Chapter 3 3. Mise En Service.............................................................. 28 3.1 Installation.................................................................... 28 3.2 Réglage de la force de malaxage.................................. 29 Chapter 4 4. Mode de Fonctionnement................................................ 30 Chapter 5 5. Reglages Particuliers...................................................... 32 5.1. Pour revenir au réglage usine:...................................... 32 5.2. Présence/absence de bips sonores:.............................. 33 5.3. Présence/absence de rétro-éclairage............................ 33 Chapter 6 6. Entretien........................................................................ 34 6.1. Entretien quotidien du capot et de la chambre de malaxage................................................................ 34 6.2.Entretien des joints de porte........................................ 37 6.3.Maintenance annuelle ................................................ 37 Chapter 7 7. Guide de Depannage...................................................... 38 Chapter 8 8. Caracteristiques Techniques ........................................... 40 Certificats........................................................................... 42 Thermo Scientific EN Homogenizer | 22 Thermo Scientific FR Homogenizer | 23 1. Precautions 1 Avant la mise en service, il est recommandé de lire ce manuel entièrement. Tous dommages consécutifs au non-respect des consignes indiquées ci-après rendront la garantie caduque. L’appareil doit être impérativement posé sur ses pieds, sur un support stable et horizontal. Il est impératif de ne jamais faire fonctionner Homogenizer dans une autre position. L’équipement doit être toujours alimenté à l’aide d’une prise électrique munie de la terre et protégée contre les risques électriques. 2 2. Description 2.1 Préalable Homogenizer S et Homogenizer SW sont des malaxeurs à pales de laboratoire. Ils sont utilisés pour la préparation des échantillons microbiologiques, en sac d’analyse stérile, en vue de leur analyse. Homogenizer S et SW permettent de mettre en suspension les germes présents dans l’échantillon solide à analyser. L’appareil doit être utilisé dans un local ventilé dans des conditions normales de température, de pression et d’humidité. En cas d’entreposage à une température inférieure à 10°C, veuillez respecter une période de remise à température ambiante. Les échantillons à analyser avec les Homogenizer S et SW peuvent avoir un poids compris entre 10 et 40 grammes avant dilution. Le volume total conseillé dans le sac ne doit pas dépasser 400 mL. Le capot de l’appareil ne doit être retiré que par un technicien qualifié et dûment autorisé. Le cas échéant, il ne faut jamais intervenir sur l’appareil sans avoir débranché le cordon d’alimentation électrique au préalable. • Sachets-filtre stériles et sachets sans filtre d’analyse • Dilueur gravimétrique Thermo ScientificTM DilufluxTM pour la dilution des échantillons Il est possible d’associer aux Homogenizer S et SW les produits suivants: Chaque équipement vous est livré dans un emballage, qui lui est parfaitement adapté. Il est important de conserver cet emballage pour un éventuel déplacement ou retour en nos locaux. Pour un fonctionnement optimal, il est important de bien entretenir et nettoyer votre Homogenizer. Se référer à la section « 6 Entretien », pour la procédure de nettoyage et pour connaître la liste des éventuels produits contre-indiqués. Thermo Scientific FR Homogenizer | 24 Thermo Scientific FR Homogenizer | 25 Chapitre 2 | Description Description | Chapitre 2 Face arrière Homogenizer S et Homogenizer SW 2.2 Caractéristiques générales Face avant Homogenizer S et Homogenizer SW. 1 2 3 5 7 6 4 1.Écran numérique et clavier multifonction: • Vitesse variable (4, 6, 8, 10 coups/sec.) • Temps variable (1 sec.- 1h, et infini) 2.Chambre de malaxage monobloc en polycarbonate blanc, avec éclairage interne et bac de sécurité 3.Pales réglables, avec arrêt côte à côte et système breveté Click & Clean® 4.TotalAccess System breveté avec porte à ouverture 180° et système d’étanchéité Q-Tight® 5.Moteur brushless Modèle SW seulement: 6. Porte vitrée en polycarbonate. Vitre garantie à vie 7. Détecteur de fuites breveté LiquidSensor et repose-sac 26 | Homogenizer FR Thermo Scientific Thermo Scientific FR Homogenizer | 27 3. Mise En Service 3 3.1 Installation Sortir Homogenizer de son emballage et le poser sur une surface plane et stable. Brancher le cordon-secteur de l’appareil et basculer l’interrupteur situé à l’arrière de l’équipement sur la position « I ». Les afficheurs s’allument et une lumière verte clignote en bas de la façade avant. L’appareil est prêt à fonctionner. Mise En Service | Chapitre 3 En fonction de la nature de votre échantillon, vous pouvez avoir besoin d’augmenter ou de réduire cette force, c’est-à-dire d’avancer ou de reculer les pales. Il suffit pour cela de tourner la manivelle qui se trouve à l’arrière de la machine, dans le sens antihoraire pour avancer les pales, ou bien dans le sens horaire pour les reculer. Sachez qu’un tour complet permet un mouvement d’une ampleur de 1,5 mm. Pour revenir au réglage usine (« standard position »), il suffit de suivre les instructions figurant au dos de l’appareil. Si l’appareil avait, au préalable, été entreposé dans un lieu où la température était inférieure à 10 °C, respecter un temps de remise à température ambiante avant de le faire fonctionner. 3.2 Réglage de la force de malaxage La force de malaxage est déterminée par l’espacement entre les pales et la porte. Plus cet espacement est réduit, plus la force est importante. La position initiale des pales est réglée en usine pour une utilisation standard avec une force standard. À vide, les pales effleurent seulement la porte. Cette position est appelée « standard position ». Dans cette position, on peut encore avancer les pales de 3 mm ou les reculer de 15 mm, selon vos besoins. Thermo Scientific FR Homogenizer | 28 Thermo Scientific FR Homogenizer | 29 4 Mode de Fonctionnement | Chapitre 4 • Homogenizer démarre automatiquement, l’éclairage situé sous la façade clignote lentement en émettant une lumière orange. • A la fin du cycle, Homogenizer s’arrête automatiquement. L’éclairage sous la façade passe au vert, clignote rapidement puis plus lentement. Enfin l’appareil émet un BIP sonore. 4. Mode de Fonctionnement Minuteur Vitesse • Ouvrir la porte et retirer le sac. Le Homogenizer est prêt pour un nouveau cycle. Cas particulier du Homogenizer SW : Cet appareil est équipé d’un détecteur de fuite. Si une fuite est détectée lors du cycle de malaxage, l’appareil s’arrête, émet plusieurs BIP sonores, l’éclairage sous la façade clignote en rouge et l’afficheur indique « Err 3 ». Infini On/Off • Brancher Homogenizer au secteur (100-240 VAC). Faire basculer l’interrupteur au dos de l’appareil sur la position « I ». ou ) ou • Régler la durée de malaxage à l’aide des touches Time ( pour une utilisation en continu. avec la touche • Régler la vitesse de malaxage 1, 2, 3, 4 (4, 6, 8, 10 cps/s) grâce aux touches Speed ou ). ( • Ouvrir la porte en basculant la poignée vers le bas. Placer le sac contenant l’échantillon dans l’appareil sur le repose-sac. Thermo Scientific FR Homogenizer | 30 Après évaluation de la fuite sur le sac, l’utilisateur peut décider : • de continuer le malaxage. Pour cela il suffit de replacer le sac dans l’appareil et de refermer la porte. L’appareil reprend alors son cycle. A l’écran se succèdent les indications « Err 3 » et le temps de malaxage restant. • d’arrêter le malaxage. Pour cela, il convient de retirer le sac. Bien essuyer avec un papier absorbant le détecteur de fuite et la porte jusqu’à obtention d’un éclairage vert sous la façade de l’appareil. Si besoin, vider le bac de rétention. Le message « err 3 » clignotant disparaît. Le temps de malaxage initialement programmé s’affiche à nouveau. L’appareil est prêt à démarrer un nouveau cycle. Remarque : Pour une utilisation particulière (échantillon dur, coupant,…), merci de nous consulter. Thermo Scientific FR Homogenizer | 31 5 5. Reglages Particuliers Vous pouvez décider d’activer ou de désactiver certaines fonctions de votre Homogenizer à savoir : les BIP sonores, le rétro-éclairage et l’éclairage dans la chambre de malaxage. Toutes ces opérations doivent être réalisées avec la machine en mode veille. A tout moment, vous pouvez revenir au réglage usine. 5.1. Pour revenir au réglage usine: Maintenir enfoncées la touche et la touche « Speed Reglages Particuliers | Chapitre 5 5.2. Présence/absence de bips sonores: Maintenir enfoncées la touche et la touche « Time » Au bout d’une seconde 4 tirets apparaissent : “----” On peut alors relâcher les touches. » et la maintenir enfoncée jusqu’à Appuyer alors sur la touche « Time obtenir l’état souhaité, soit « SOn1 » pour son activé ou « SOn0 » pour son désactivé. 5.3. Présence/absence de rétroéclairage Maintenir enfoncées la touche et la touche « Time » Au bout d’une seconde 4 tirets apparaissent : « ----« On peut alors relâcher les touches. et la maintenir enfoncée jusqu’à Appuyer alors sur la touche obtenir l’état souhaité, soit « dEl1 » pour rétro-éclairage activé ou « 0dEl » pour rétro-éclairage désactivé. » Sur l’écran, après l’affichage successif de tirets, on voit apparaître « rSEt ». Cet affichage indique la réinitialisation du réglage usine. Thermo Scientific FR Homogenizer | 32 Thermo Scientific FR Homogenizer | 33 6. Entretien 6 Entretien | Chapitre 6 • Mettre l’appareil en bord de table ou de paillass. Proscrire absolument l’hypochlorite de Sodium (eau de javel) sur toutes les parties de l’appareil. • Ouvrir complètement la porte (à plat). Il est important de garder l’ensemble de la machine propre en particulier la chambre de malaxage, la porte et le détecteur de fuite (Homogenizer SW). 6.1. Entretien quotidien du capot et de la chambre de malaxage • Retirer le bac de rétention et le nettoyer. L’extérieur de l’appareil se nettoie à l’aide d’un chiffon humide ou de produit du commerce destiné à l’acier inoxydable. L’intérieur de l’appareil, les pales et le bac de rétention se nettoient et se désinfectent à l’aide de lingettes désinfectantes ou d’éthanol à 70°. Veuillez basculer l’interrupteur principal en position “0”. Pour nettoyer la chambre de malaxage : • Retirer les pales en les décliquant. • Débrancher le cordon d’alimentation. Thermo Scientific FR Homogenizer | 34 Thermo Scientific FR Homogenizer | 35 Chapitre 6 | Entretien Entretien | Chapitre 6 • Repositionner les pales en les cliquant et le bac de rétention dans son logement. 6.2. Entretien des joints de porte Procéder réguièrement à une lubrification des joints de porte, à l’aide d’une graisse lubrifiante à base de silicone. 6.3. Maintenance annuelle Lubrifier les tiges de pales avec une graisse lubrifiante à base de silicone. Appliquer à l’aide d’un pinceau ou d’un vaporisateur. • Nettoyer la chambre de malaxage. • Relever la porte et rebrancher le cordon d’alimentation. • Positionner l’interrupteur au dos de l’appareil sur « I ». • Fermer la porte. Tester le fonctionnement de l’appareil. 36 | Homogenizer FR Thermo Scientific Thermo Scientific FR Homogenizer | 37 7 Guide de Depannage | Chapitre 7 7. Guide de Depannage PROBLEMS L’appareil ne démarre pas CHECK PROBLEMS CHECK • Vérifier le branchement au secteur. La vitesse de malaxage ne convient pas Régler la vitesse (Speed) sur la vitesse de malaxage souhaité Les sacs fuient souvent pendant ou à la fin du malaxage Vérifier la qualité des sacs. Les sacs fuient souvent pendant ou à la fin du malaxage lorsqu’on malaxe des échantillons durs ou lourd (bois, tissus…) Augmenter éventuellement l’espace entre la porte et les pâles de 5 mm et/ou diminuer la vitesse de malaxage. L’échantillon déborde au dessus de la porte Vérifier l’état du joint d’étanchéité du haut de la chambre de malaxage. Si besoin, le tourner d’un quart de tour (contacter le support SAV) • Vérifier la position de l’interrupteur sur « I » (ON) • Vérifier les fusibles et la tension secteur • Vérifier que la porte se ferme bien, si besoin nettoyer la chambre de malaxage Les afficheurs indiquent « Err I » Cette alarme s’active lorsqu’une surintensité est détectée au niveau du moteur, augmentez l’espacement entre la porte et les pales Les afficheurs indiquent « Err 2 » Cette alarme s’active lorsque le moteur est bloqué. Vérifier que rien n’empêche le fonctionnement mécanique de l’appareil La durée de malaxage ne convient pas Régler la minuterie (Time) sur le temps de malaxage souhaité Thermo Scientific FR Homogenizer | 38 Thermo Scientific FR Homogenizer | 39 8. Caracteristiques Techniques 8 Homogenizer S Homogenizer SW DB5000A DB5500A Reference Pales ajustables 4 vitesses ajustables Pales amovibles Click and Clean® Coque tout acier inox 304 L Bac de sécurité intégré acier inox Moteur brushless silencieux 180 Watts Écran digital multifonction Arrêt des pales côte-à-côte TotalAccess System : ouverture à plat de la porte LightCode : LED couleur selon statut Chambre de malaxage blanche Éclairage LED blanches dans chambre de malaxage Caracteristiques Techniques | Chapitre 8 Homogenizer S Homogenizer SW DB5000A DB5500A Reference Niveau de son avec 250 mL d'eau + 22 g de fromage 48 dB Poids de la porte 1050 g Temps de malaxage de 1 s à 59 mn, ∞ Vitesse de malaxage 4, 6, 8, 10 coups/s Dimensions (l x p x h) 29 x 45 x 37 cm Poids 25 kg Alimentation 100-240 V~ 50-60 Hz Classe IP 31 Capacité de 50 à 400 mL Fabriqué en France 3 ans de garantie (après enregistrement) Vitre garantie à vie Amortisseurs garantis à vie Thermo Scientific FR Homogenizer | 40 950 g Thermo Scientific FR Homogenizer | 41 Certificates / Certificats 42 | Homogenizer Thermo Scientific Thermo Scientific Homogenizer | 43 44 | Homogenizer Thermo Scientific Thermo Scientific Homogenizer | 45 46 | Homogenizer Thermo Scientific thermoscientific.com/microbiology © 2015 Thermo Fisher Scientific Inc. All rights reserved. Click & Clean and Q-Tight are trademarks of INTERSCIENCE. All other trademarks are the property of Thermo Fisher Scientific and its subsidiaries. This information is presented as an example of the capabilities of Thermo Fisher Scientific products. It is not intended to encourage use of these products in any manners that might infringe the intellectual property rights of others. Specifications, terms and pricing are subject to change. Not all products are available in all countries. Please consult your local sales representative for details. Contact details United States [email protected] Tel (800) 255-6730 LT2133A International [email protected] Tel +44 (0) 1256 841144