1
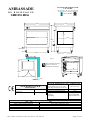
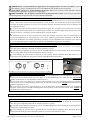
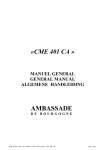
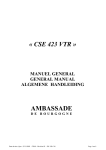
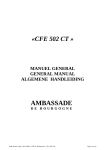
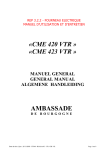
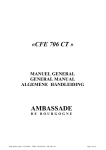
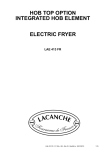
«CME 810 MCA »
MANUEL GENERAL
GENERAL MANUAL
ALGEMENE HANDLEIDING
AMBASSADE
DE BOURGOGNE
Date d’édition :29/09/2005 - FT035 - Révision 05 - FR / GB / NL
Page 1 sur 10
SOCIETE INDUSTRIELLE DE
LACANCHE
AMBASSADE
Tél. :03.80.90.35.00 - Fax : 03.80.84.24.92
Société anonyme au capital de 150.000 €
DE BOURGOGNE
Adhérent SYNEG
CME 810 MCA
800
650
415
650
532
900
705
150 (175)
700
420
570
Fig. 1
Raccordement électrique
Electric connection
Elektrische aansluiting
1020
A
50
FR
FR GB DIRECTIVES NL
INSTRUKTIES
Basse Tension / Low Voltage /
Zwakstroom
CEM
FR
GB
2006/95/CEE
2004/108/CEE
CONSTRUCTION
Carosserie / Body / Karosserie
Table / Cooking surface /Kooktafel
Façade / Front / Voorkant
Placard / Cupboard / Kast
Arrière / Behind / Achterkant
Date d’édition :29/09/2005 - FT035 - Révision 05 - FR / GB / NL
GB DIMENSIONS NL AFMETINGEN
Dimensions extérieures (L x P x H)
800 x 650 x 900
External dimensions (L x W x H )
Uitwendige afmetingen (B x D x H)
Poids Brut / Gross weight / Bruto gewicht
98 kg
Poids Net / Net weight / Netto gewicht
78 kg
Carton/ palette bois
Colisage
Carton-wooden palette
Packaging
Karton-houden palet
Verpackking
NL
KONSTRUKTIE
Acier inoxydable/ Stainless Steel / RVS
Acier / Steel / Staal Z7CN 18.10
Acier / Steel / Staal Z8C17
Acier / Steel / Staal Z7CN 18.10
Aluzinc AZ 150
Page 2 sur 10
FR
ACCESSOIRES
GB
ACCESSORIES
Modéle / Modell / Model
NL
ACCESSOIRES
CME 810 MCA
3 traverses / dividers / steunbalkjes
1 tôle perforée/ geperforeerde bodemplaat / perforated baseplate
Echelles / laders / ladders,
2 grilles / shelf / inschuifrooster GN 2/1
FR
DONNEES TECHNIQUES GB
TECHNICAL DATAS
NL
TECHNISCHE GEGEVENS
BAIN - MARIE
Cuve 530 x 650 x 180 mm (GN 2/1) acier inoxydable Z7CN18.09 / Stainless steel Z7CN18.09 vessel GN 2/1 (530 x
650 x 180 mm) / Bain-mariebak GN 2/1 (530 x 650 x 180 mm) RVS Z7CN18.09.
Thermostat de régulation 0°C-110°C / Control thermostat (0 °C-110 °C) / Regelthermostaat 0°-110°C.
Résistances / Heating element / Weestand : 2 x 1000 W
Capacité nominale / Nominal capacity / Nominale capaciteit : 5 litres / liter
CHAUFFE ASSIETTES / PLATE WARMER / WARMKAST
Dimensions (L x P x H) / Dimensions (L x W x H) / Afmetigen (B x D x H) : 530 x 650 x 415
Echelles 5 niveaux espacés de 68 mm / Laders with a space of 68 mm /
Ladders onderlinge afstand 68 mm.
Thermostat de régulation 0°C-110°C / Control thermostat (0 °C-110 °C) / Regelthermostaat 0°-110°C.
Résistances / Heating element / Weestand : 2 x 950 W
AME 810 MCA
Puissance / Rating / Kapaciteit :
3 ,80 kW
Alimentation / Supply / Voeding
230 V 1N~50 Hz + T
400 3N~ 50 Hz + T
RACCORDEMENT ELECTRIQUE / ELECTRIC CONNECTION / ELECTRISCHE
AANSLUITING
Sur bornier au dos de l’appareil / On terminal block at the rear of the appliance / Op klemblok aan de achterkant van
het apparaat.
Date d’édition :29/09/2005 - FT035 - Révision 05 - FR / GB / NL
Page 3 sur 10
«CME 810 MCA »
MANUEL D’INSTALLATION
INSTALLER’S MANUAL
INSTALLATIEHANDLEIDING
FR
L’installation doit se faire selon les règles de l’art conformément aux instructions contenues dans
cette notice et les règlements en vigueur dans le pays d’installation.
Ce manuel sera remis à l’utilisateur après installation.
GB
Appliances must be installed in a workmanlike manner in accordance with the instructions in this
manual and locally applicable regulations.
This manual will be handed over to the user after installation.
NL
De apparaten moeten volgens de in het betreffende land geldende wetten en voorschriften worden
geïnstalleerd, met strikte inachtneming van de instrukties uit deze handleiding.
Deze handleiding moet na het installeren aan de gebruiker overhandigd worden.
AMBASSADE
DE BOURGOGNE
Date d’édition :29/09/2005 - FT035 - Révision 05 - FR / GB / NL
Page 4 sur 10
Implantation / Siting / Plaatsing
FR
Si cet appareil doit être mis en place près d’un mur, d’une cloison, d’un meuble, de bordures décoratives. Il est
recommandé que ceux-ci soient faits d’un matériau non combustible. Si ce n’est pas le cas, ils doivent être recouverts
d’un matériau approprié, bon isolant thermique non combustible. Une attention toute spéciale étant accordée aux
réglementations de prévention des incendies.
Avant toute utilisation, il est impératif d’enlever toute les protections plastiques intérieures et extérieures sous peine
de dommages irréversibles aux parois aciers.
GB Do not install this unit near combustible walls, partitions, pieces of furniture or decorative material unless these
are covered with adequate thermal insulation of the noncombustible type. Making sure the resulting installation meets
local fire regulations.
Before use, it is mandatory to remove all the internal and external plastic packing pieces, failure to do so will cause
irreversible damage to the steel walls
NL Dit kooktoestel mag uitsluitend in de nabijheid van brandbare muren, scheidingswanden, keukenmeubels, sierof ander materialen worden geplaatst wanneer deze bedekt dan wel overtrokken zijn met brandwerend
isolatiemateriaal. De aldus ontstane installatie dient te voldoen aan de plaatselijke voorschriften t.a.v. brandveiligheid.
Voor elk gebruik moeten alle plastic beschermonderdelen aan binnen- en buitenkant verwijderd worden, omdat
anders de stalen wanden onherstelbaar beschadigd raken.
FR ATTENTION - Utiliser un câble souple normalisé (245 IEC 57 ou 245 IEC 66 ou toutes autres natures de câble
présentant les mêmes caractéristiques). Si cet appareil est relié de façon permanente à une canalisation électrique fixe,
cette canalisation devra posséder une protection adaptée aux courants de fuite. Si cet appareil est raccordé par un
câble muni d’une fiche de prise de courant, cette prise devra être accessible en permanence.
GB DANGER - Cable insulation must be type 245 IEC 57 or 245 IEC 66. If this unit is permanently connected to a
fixed electrical cable, the cable should be equipped with a fault leak protector. If this unit is connected to a wall outlet,
the outlet should be permanently.
NL WAARSCHUWING -Gebruik een genormaliseerd sner (245 IEC 57 of 245 IEC 66 of een ander type kabel
met equivalente specificatic). Indien dit apparaat aangesloten is op een vaste elektrische leiding dan dient deze leiding
met een aardlekbeveiliging te zijn uitgevoerd. Indien dit apparaat is aangesloten op een wandcontactdoos, dan dient
deze permanent toegankelijk te zijn.
Avant
raccordement,
vérifier :
Before connection,
check that the
Voor het
aansluiten eerst
controleren
FR Que la tension électrique du réseau est compatible avec la tension et puissance de
l’appareil (plaquette signalétique A fig. 1).
Que l’installation fixe de l’utilisateur comporte un dispositif à coupure omnipolaire ayant
une distance d’ouverture des contacts d’au moins 3 mm.
GB Mains voltage is compatible with the appliance’s rated voltage and thermal output
(rating plate A fig. 1).
Customer’s installation includes an all pole switch with contact separation of at least 3 mm.
NL Of de netspanning overeenkomt met de spanning en het vermogen van het apparaat
(zie konstruktie A fig. 1).
Of de elektrische installatie van de gebruiker voorzien is van een omnipolaire
stroomonderbreker met minimale contactopeningsafstand van 3 mm.
FR Déposer les vis maintenant le capot arrière rep. A (fig. 2). Raccorder au bornier B
Raccordement
Connection
Aansluiten
suivant figures 2 & 3. Fixer le câble au moyen du serre câble rep. C (fig. 2).
GB Remove the screws that secure the rear cover, item A (fig. 2). Connect to terminal block
B in accordance with Figures 2 & 3. Secure the cable by means of cable clamp, item C(fig. 2).
NL Verwijder de bevestigingsschroeven van achterpaneel A (fig. 2). Aansluiten op
klemblok B volgens figuur 2 & 3. Bevestig de kabel met behulp van kabelklem C(fig. 2).
FR
Il y a danger à mettre l’appareil en service sans relier sa masse à la terre.
Notre responsabilité ne saurait être engagée en cas d’accidents consécutifs à une mise à la terre inexistante ou
incorrecte
GB
It is hazardous to put the appliance into service without connecting it to earth.
No liability can be accepted for accidents resulting from non-compliance with this requirement or incorrect earthing
NL
Het is gevaarlijk dit apparaat in bedrijf te stellen zonder het eerst op de massa te hebben
aangesloten.
Wij wijzen elke aansprakelijkheid af bij ongevallen die veroorzaakt worden door afwezige of onjuiste aarding.
Date d’édition :29/09/2005 - FT035 - Révision 05 - FR / GB / NL
Page 5 sur 10
B
1
2
3
4
A
N
L
C
5
230 V 1N~ 50 Hz
1
2
3
4
Fig. 3
5
Fig. 4
N
L1 L2 L3
400 V 3N~ 50 Hz
Fig. 2
FR
Raccorder la borne d’équipotentialité (fig. 4).
Connect the equipotential bonding terminal (Figure 4).
NL Sluit de equipotentiaalklem aan (fig. 4).
GB
INTERVENTIONS - REPARATIES - INTERVENTIES
FR Toute intervention ou dépannage sur un appareil doit être effectuée par un installateur qualifié.
GB All work on or repair of an appliance must be carried out by a qualified installer.
NL Alle onderhouds- en reparatiewerkzaamheden aan deze apparaten moeten worden uitgevoerd door een
gekwalificeerde installateur.
SCHEMAS ELECTRIQUES / ELECTRIC CIRCUIT DIAGRAMMES /
ELEKTRISCHE SCHEMAS
Voir tableau annexe 2 - See Table in Appendix 2 - Zie tabel bijlage 2.
TH2
1
X1
4
2
5
SB
N2
RV5
CME 810 MCA
230 V 1N~ 50 Hz
H
N1
186201
L3
TH2
L2
R3
L1
1
2
4
5
SB
Date d’édition :29/09/2005 - FT035 - Révision 05 - FR / GB / NL
Page 6 sur 10
«CME 810 MCA »
MANUEL D’UTILISATION
USER’S MANUAL
BEDIENINGSHANDLEIDING
FR Cet appareil est à usage professionnel et doit être utilisé par des personnels qualifiés. Il doit être installé
conformément aux réglementations et normes en vigueur dans un local suffisamment aéré.
Tout changement de tension, autre que celui pour lequel il est réglé, doit être réalisé par un installateur qualifié.
GARANTIE. La garantie est portée sur le contrat de vente. Pour toute intervention de garantie, s’adresser à un
revendeur agréé. Cette garantie ne couvre pas les détériorations provenant d’une mauvaise installation, utilisation ou
d’un mauvais entretien.
GB This appliance is intended for professional use and must be used by qualified persons. It must be installed in
accordance with the applicable regulations and standards in an adequately ventilated room.
Any changeover to a voltage other than that for which the appliance is set up must be carried out by a qualified
installer.
WARRANTY. The warranty is stated on the sales contract. Please contact your approved Dealer if any work has to
be carried out under warranty. This warranty excludes damage resulting from incorrect installation, improper use or
inadequate servicing.
NL Dit apparaat is bestemd voor professionele toepassingen en mag alleen worden gebruikt door gekwalificeerd
personeel. Het apparaat moet in een goed geventileerde ruimte en volgens de geldende wetten en voorschriften
worden geïnstalleerd.
Het omschakelen naar een andere spanning dan die waarvoor het apparaat oorspronkelijk werd ingesteld mag alleen
worden uitgevoerd door een gekwalificeerde installateur.
GARANTIE. De garantie wordt aangetekend op het verkoopcontract. Voor alle reparaties onder garantie dient u
zich te wenden tot een erkende dealer. Beschadigingen ten gevolge van verkeerde installatie, verkeerd gebruik en
verkeerd onderhoud vallen niet onder de garantie.
AMBASSADE
DE BOURGOGNE
Date d’édition :29/09/2005 - FT035 - Révision 05 - FR / GB / NL
Page 7 sur 10
FR
IMPORTANT - En fonctionnement, l’appareil doit être obligatoirement tenu sous surveillance. Avant la
première utilisation, nettoyer soigneusement la cuve à l’eau additionnée d’un produit lessiviel non agressif.
GB CAUTION - Keep an eye on the appliance when in use. Before using for the first time, thoroughly clean the
vessel using water containing a non-aggressive washing agent.
NL BELANGRIJK - Als de apparaat aanstaat moet hij altijd bewaakt worden. Voor het eerste gebruik de
friteusebak grondig reinigen met water en een niet bijtend afwasmiddel.
Remplissage de la cuve / Fill the vessel / Vullen van de friteusebak
FR
Fermez la vanne et remplir d’eau chaude. Le niveau minimum est matérialisé dans la cuve par un trait (X ;fig.6)
(environ 5 litres d’eau). Posez la tôle de fond perforée. La tôle de fond sera utilisée dans le cas d’emploi de bacs
gastronorme de hauteur supérieure à 150 mm, ou tout autres récipients. Possibilité d’utilisé des sous multiples G.N
avec l’emploi des barrettes.
GB
Close the slive-gate and fill up with hot water(around 5 liters). The minimum level is marked in the vat with a
dash. Place perforated baseplate in the vessel. The baseplate is used if GN containers higher than 150 mm or any other
containers are used. It is possible to use GN submultiples by using the dividers.
NL
Aftapkraan sluiten en reservoir met heet water vullen. Het minimum vulniveau is met een reliefstreepje in de
reservoirwand aangemerkt. (X ; fig.6).(ongeveer 5 liter water). Plaats de geperforeerde bodemplaat in de bak. De
geperforeerde bodemplaat moet worden gebruikt bij toepassing van GN inzetbakken met een hoogte groter dan 150
mm, of voor alle andere bakken. Toepassing van kleinere GN inzetbakken mogelijk met steunbalkjes.
Mise en service bain marie / Use bain-marie / Aanzetten bain-marie (fig. 7)
FR
Le voyant A représente la mise sous tension, basculer l’interrupteur B, tourner la manette C sur la position
choisie. Dès que la température demandée est atteinte, garnissez vos bacs.
GB
Indicator lamp A indicates powering-up, operate switch B and then turn control knob C to the desired position.
Load trays and griddles when the desired temperature has been reached
NL
Controlelampje A geeft aan dat het apparaat stroom ontvangt. Kantel schakelaar B en draai knop C in de
gewenste stand. Vul de bakken en de roosters zodra de ingestelde temperatuur bereikt is.
x
Fig. 7
C
B
E
D
A
Fig.6
Recommandations / Recommendations / Aanbevelingen
FR
Contrôlez le niveau d’eau toutes les 2 heures environ, lorsque le thermostat est sur la température maxi (bacs en
position), sous peine de détérioration de la cuve. Dans le cas de l’utilisation du bain marie sans eau, NE JAMAIS
positionner le thermostat sur une température supérieure à 50°C.
GB
Check the water level roughly every 2 hours if the thermostat is set to the maximum temperature (containers
fitted) to prevent the vessel being damaged. When using the bain-marie without water, NEVER set the thermostat to a
temperature higher than 50 °C.
NL Controleer het waterniveau ongeveer om de 2 uur als de thermostaat op maximumstand staat (met inzetbakken
in het bad). Anders kan het waterbad beschadigd raken. Bij toepassing van de bain-marie zonder water, NOOIT de
thermostaat hoger instellen dan 50°C.
CHAUFFE ASSIETTES / PLATE WARMER / WARMKAST
Mise en service chauffe assiettes / Use plate warmer / Aanzetten warmkast (fig. 7)
FR
Le voyant A représente la mise sous tension, basculer l’interrupteur D, tourner la manette E sur la position
choisie. Dès que la température demandée est atteinte, garnissez vos grilles.
GB
Indicator lamp A indicates powering-up, operate switch D and then turn control knob E to the desired position.
As temperature is reached,fill your shelfs.
NL
Controlelampje A geeft aan dat het apparaat stroom ontvangt. Kantel schakelaar D en draai knop E in de
gewenste stand. Zodra de gewenste temperatuur bereikt is, kunt u uw inschuifroosters vullen.
Date d’édition :29/09/2005 - FT035 - Révision 05 - FR / GB / NL
Page 8 sur 10
Conseils d’utilisation Useful hints Gebruikstips
FR Le préchauffage du chauffe assiettes doit se faire une heure environ avant l’introduction de plats ou
préparations. Ne poser pas d’assiettes directement sur la sole sous peine de bris de vaisselle du fait de l’élévation
rapide de la température. Vos plats ou assiettes peuvent être très chaudes, en fonction de la température sélectionnée.
Prenez toutes précautions utiles avant de les manipuler.
GB The plate warmer must be pre-heated roughly one hour before plates or dishes are placed inside it. Never place
plates directly on the base, crockery may break due to the rapid increase in temperature. Your dishes or plates may be
extremely hot depending on the temperature selected. Take the necessary precautions before handling them.
NL De warmkast moet ongeveer een uur voordat er borden of gerechten in worden gezet voorverwarmen. Plaats de
borden of schalen nooit rechtstreeks op de kastvloer. Door de snelle temperatuursstijging kunnen ze uit elkaar barsten.
De borden en schalen kunnen zeer heet worden, afhankelijk van de door u gekozen temperatuur. Ga er voorzichtig
mee om en neem alle voorzorgsmaatregelen om verbranding te voorkomen.
NETTOYAGE ET ENTRETIEN / CLEANNING AND MAINTENANCE / ONDERHOUD EN REINIGING
FR DANGER - CET APPAREIL NE DOIT PAS ETRE NETTOYE AUX MOYENS DE JETS D’EAU SOUS
PRESSION OU SUBIR D’IMPORTANTES PROJECTIONS D’EAU. AVANT TOUTES OPERATIONS DE
NETTOYAGE, S’ASURER DE LA MISE HORS TENSION DE L’APPAREIL.
GB DANGER - NEVER USE PRESSURISED WATER JETS TO CLEAN THIS APPLIANCE OR EXPOSE
IT TO SPLASHING WATER. BEFORE ANY CLEANING OPERATION CHECK THAT THE APPLIANCE
IS DISCONNECTED FROM THE SUPPLY
NL BELANGRIJK : DIT APPARAAT MAG NIET WORDEN GEREINIGD MET HOGEDRUKWATERSTRALEN NOCH WORDEN BLOOTGESTELD AAN GROTE HOEVEELHEDEN OPSPATTEND
WATER. VOORDAT MET HET SCHOONMAKEN WORDT BEGONNEN MOET HET APPARAAT EERST
WORDEN UITGESCHAKELD EN DE STEKKER UIT HET STOPCONTACT WORDEN GETROKKEN.
FR
Vidange de la cuve : Attendez le refroidissement partiel de la cuve. Ouvrer la vanne de vidange, après avoir
pris soin de positionner un récipient sous celle-ci
Nettoyage journalier : La faible température, liée à la fonction même du bain marie favorise le développement de la
faune microbienne. Seule une hygiène parfaite de tous les ustensiles garantira la sécurité de vos Clients. Après chaque
service, nettoyez soigneusement la cuve du bain marie par rinçage à l’eau froide en laissant la vanne de vidange
ouverte au dessus d’un récipient. Essuyez la cuve à l’aide d’une éponge, si nécessaire employez une eau savonneuse,
puis rincer soigneusement . NOTA : Laisser la vanne ouverte entre deux services.
GB Draining the vessel : Allow the vessel to cool down for a while. Open drain valve after having placed a
container underneath it.
Daily cleaning : The warm temperatures associated with operation of the bain-marie encourage the multiplication of
microbes. Only scrupulously hygienic care of all utensils can protect the health of your customers. After each service,
thoroughly clean the vessel of the bain-marie by rinsing it with cold water with the drain valve open and emptying
into a container. Wipe the vessel with a sponge, use soapy water if necessary and then rinse thoroughly. NOTE :
Leave the drain valve open between services.
NL
Leegmaken van het waterbad : Wacht tot het waterbad voldoende is afgekoeld. Zet een opvangbak onder de
aftapkraan en zet de kraan open.
Dagelijkse reiniging : De lage temperatuur, die voor bain-marie toepassingen noodzakelijk is, bevordert
bacteriegroei. Alleen een perfekte hygiène garandeert de veiligheid van uw klanten. Na elke service moet het
waterbad van de bain-marie met koud water worden schoongespoeld. Laat daarbij de aftapkraan open staan. Vergeet
niet een opvangbak onder de kraan te zetten. Veeg het waterbad schoon met een spons. Gebruik daarbij zonodig een
sopje. Daarna grondig schoonspoelen. N.B. : Laat de aftapkraan tussen twee services open staan.
FR
GB
NL
ATTENTION : Il est formellement déconseillé de nettoyer cet appareil à l'aide de produits chlorés.
CAUTION : Use NO chlorinated cleasers to clean this unit.
WAARSCHUWING : Gebruik GEEN chloorhoudende middelen om deze appareten te reinigen.
Date d’édition :29/09/2005 - FT035 - Révision 05 - FR / GB / NL
Page 9 sur 10
FR
Placard / Chauffe assiettes
Nettoyer les parois avec un produit d’entretien non abrasif. L’utilisation de produits agressifs est à éviter. Si vous
deviez utiliser de tels produits, dégrafer le joint de porte, et à le replacer ensuite. Rincer et sécher.
Carrosserie :
Vous pouvez utiliser des produits spécifiques à inoxydable (par exemple SUMAINOX ®, JONHSON
INOXYDABLE ®, PPZ INOXYDABLE ®), jamais de produits abrasifs.
Pièce émaillé :
Utiliser une éponge imbibée d’eau savonneuse, jamais de poudre récurante.
GB Cupboard / Plate warmer :
Use a non-abrasive product to clean the oven walls. Avoid the use of caustic products. If you have to use such
products, remove the door seal and then refit it. Rinse and dry.
Body panels :
You can use special-purpose products for stainless steel (e.g. SUMAINOX ®, JOHNSON STAINLESS STEEL ®,
PPZ STAINLESS STEEL ®). Never use abrasive products.
Enamelled surfaces:
Use a sponge soaked in soapy water, never use scouring powder.
NL Kast / Warmkast :
Reinig de ovenwanden met een niet schurend reinigingsmiddel. Gebruik geen bijtende schoonmaakmiddelen. Mocht
het toch noodzakelijk zijn een dergelijk middel te gebruiken, verwijder dan eerst de afdichtring van de ovendeur en
breng deze na het reinigen weer aan.
Afspoelen en laten drogen.
Omkasting :
U kunt speciale roestvrijstaal reinigingsprodukten gebruiken (bijvoorbeeld SUMAINOX ®, JONSHON
INOXYDABLE ®, PPZ INOXYDABLE ®), maar gebruik nooit schurende middelen.
Emaille onderdelen :
Reinigen met een spons en een sopje. Nooit schuurpoeder gebruiken.
Date d’édition :29/09/2005 - FT035 - Révision 05 - FR / GB / NL
Page 10 sur 10