1
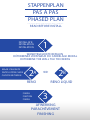
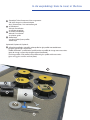
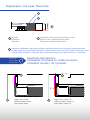
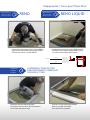
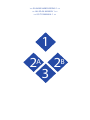
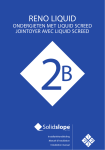
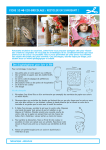
STAPPENPLAN
READ BEFORE INSTALL
PAS À PAS
LISEZ AVANT D'INSTALLER
PHASED PLAN
READ BEFORE INSTALLATION
2
A
1
3
2
Installatiehandleiding
Manuel d'installation
Installation guide
B
Aandachtspunten/ Points d'attention/ Attention
NL
Gelieve het product voor de installatie te controleren op beschadigingen.
Beschadigde producten mogen niet geïnstalleerd worden.
De afvoerleiding moet in overeenstemming met de DIN normen geïnstalleerd worden.
Controleer na de aansluiting van de afvoerbuis de dichtheid van de afvoerleiding.
Ten laatste na 0,5 meter van DN40 op DN50 overgaan of voor een bocht.
Alle producten met het volgend symbool (zoals cementsluier-verwijderaar,
ontstopper, ...) mogen niet gebruikt worden met ons systeem.
Ook oplosmiddelen zoals aceton, ... mogen niet gebruikt worden.
Steeds direct afvoeren naar de standleiding ≥ Ø 110mm.
Bovenkant Solidslope™ dient gelijk te liggen met bestaande of aan te brengen specievloer.
Uitsparing maken in de specievloer van ± 10 cm groter dan de Solidslope™,
of uitsparing controleren op deze afmeting.
FR Veuillez vérifier avant l'installation si le produit n'est pas endommagé.
Les produits endommagés ne peuvent pas être installés.
La conduite d'évacuation doit être posée conformément aux normes DIN.
Après le raccordement du tuyau d'évacuation, contrôlez l'étanchéité de la conduite d'évacuation.
Passez de DN 40 au DN 50 au plus tard après 0,5 mètre ou avant un coude.
Il est interdit d'utiliser dans notre système tous les produits qui portent le
symbole suivant (comme produit pour éliminer le lait de ciment, déboucheur...).
Les solvants tels que l'acétone, etc. ne peuvent pas être utilisés non plus.
Évacuez toujours directement vers la colonne ≥ Ø 110 mm.
Le côté supérieur du Solidslope™ doit être au même niveau que la chape existante ou à poser.
Pratiquez un évidement dans la chape de ± 10 cm de plus que le Solidslope™, ou vérifiez si l'évidement possède
ces dimensions.
EN Please check the product for damages before installation.
Damaged products may not be installed.
The drain pipe must be installed according to the DIN standards.
After 0.5 meter of DN40 continue with DN50 or for a curve.
No products with the following symbol (like cement residue remove,
drain unblocker, ...) may be used with our system.
Always drain directly to the position ≥ Ø 110 mm.
The top of the Solidslope™ should be equal with the existing or to be applied mortar floor.
!
Make a cut-out in the mortar floor, approximately 10 cm larger than the Solidslope™, or check the cut-out for
this dimension.
Indien men in een ongunstige situatie terecht komt waarbij de verstelbare steunschijven niet kunnen
geplaatst worden, dient men gebruik te maken van de LIQUID SCREED (RENO LIQUID).
Si la configuration locale ne permet pas d'utiliser les disques de support réglables, vous devez utiliser
le LIQUID SCREED (RENO LIQUID).
If one stumbles across an unfavourable situation where the adjustable support disks cannot be placed,
the LIQUID SCREED product should be used (RENO LIQUID).
STAPPENPLAN
PAS À PAS
PHASED PLAN
READ BEFORE INSTALL
INSTALLATIE
INSTALATION
INSTALATION
1
WANDTEGELDIKTE BEPALEN
DÉTERMINEZ L'ÉPAISSEUR DU CARRELAGE MURAL
DETERMINE THE WALL TILE THICKNESS
MAAK UW KEUZE
FAITES VOTRE CHOIX
CHOOSE BETWEEN
2A
<=>
RENO
FINISH
FINITION
FINISH
2B
RENO LIQUID
3
AFWERKING
PARACHÈVEMENT
FINISHING
In de verpakking/ dans la case/ in the box
Incl. *
1 - Solidslope™ (bezand onder/bovenkant, voorzien van een donkergrijze dilatatieband rondom, incl sifon).
- Solidslope™ (sablé face inférieure/supérieure, pourvu d'un ruban de dilation gris foncé tout autour, inclusif siphon).
- Solidslope™ (sanded bottom / top, with a dark grey expansion band around, including siphon).
2 - Roosterdrager in RVS look
- Porte-grille en aspect inox
- Grid support in stainless steel look
3 - Verbindingstape
- Ruban de raccordement
- Connection tape
4 - MS polymeerlijm
- MS polymeerlijm
- MS polymer adhesive
5 - 2 x Mof (zwart) Ø:40
- 2 x Manchon (noir) Ø 40 mm
- 2 x Muff (black) Ø: 40
6 - Verstelbare steunschijven + Sleuteltje om steunschijven op te hogen
- Disques de support réglables + clé pour rehausser les disques de support
- Adjustable support disks + Key to raise support disks
7 - Afstelblokje
- Blochet de réglage
- Adjustable block
2
9
10
12
*
-NL
-FR
-EN
In de verpakking/ dans la case/ in the box
- Sleuteltje/ Tube siliconenvet /Haarvangrooster
- Clé/ tube de graisse silicone/crépine
- Key/ Silicone tube / Hair connection grid
9 - Installatiemal
- Gabarit d'installation
- Installation template
10 - Instalatie Handleiding
- Manuel d' instalation
- Instalation guide
11 - Profiel tape
- Le ruban abhésif pour profilés
- Profile tape
8
Optioneel/ Optionnel/ Optional:
12
- Afwerkingsprofielen: zijprofiel, achterprofiel en glasprofiel met toebehoren.
(glaspees, glasdragers en einstuk)
- Profilés de finition : profilé latéral, profilé arrière et profilé de vitrage avec accessoires
(joint de vitrage, support de vitrage et pièce d'extrémité).
- Finishing profiles: side profile, back profile and glass profile with accessories.
(glass string, glass carriers and end piece)
1
6
4
7
5
3
11
8
Stappenplan / Pas à pas/ Phase Plan
1
2
!
Solidslope™
1
Dilatatie
Delatation
Expantion
2
3
Aanwerken met specie/chape of liquid screed
Égaliser avec la chape ou liquid screed
Filling with screed or liquid screed
TEGEL + LIJM
<
= 12 MM
3
Bovenkant Solidslope™ dient gelijk te liggen met bestaande of aan te brengen specie/chapevloer.
Le côté supérieur du Solidslope™ doit être au même niveau que le mortier/la chape existant ou à poser.
The top of the Solidslope™ should be equal with the existing or to be applied mortar / screed floor.
INSTALLATIE
INSTALLATION
INSTALLATION
1
WANDTEGELDIKTE BEPALEN
DÉTERMINEZ L'ÉPAISSEUR DU CARRELAGE MURAL
DETERMINE THE WALL TILE THICKNESS
1
TEGEL + LIJM
2
TEGEL + LIJM
<
= 12 MM
> 12 MM = X
X
1
Tegel + lijm ≤ 12mm
Carreau + colle ≤ 12mm
TEGEL
LIJM
Tile + Glue
≤+ 12mm
> 12 MM = X
X
2
Tegel + lijm >12mm = X
Carreau + colle > 12mm = X
Tile + Glue > 12mm = X
Stappenplan / Pas à pas/ Phase Plan
Make your chois
2 RENO
A
Maak uw keuze
Fait votre choix
Make your chois
Aanwerken met droge specie / chape. (RENO)
Égalisez avec le mortier sec/la chape. (RENO)
Fill with dry mortar / screed. (RENO)
Ondergieten met liquid screed.
(RENO liquid)
FORMULE
=
• •••(RENO
•• • • • •• ••liquid)
• • • •
Jointoyez avec le liquid screed.
----------------------Cast with liquid screed. (RENO liquid)
15
FORMULLE=
Vb.
AFWERKING
FINITION
FINITING
3
2B RENO LIQUID
m2 x h (mm)
15
1,3 x 78
15
aantal zakken
= combien de sacs
amount of sacks
6,76 zakken (7 zakken)
•• • ••• •• • • • • • • • • • • •
= 6,76 sacs (7 sacs) •--------------= 6.76 > 7 zakken
6,76 sacks (7 sacks) 15
AFWERKING/TEGELZETTER
PARACHÈVEMENT/CARRELEUR
FINISHING/ TILER
Afwerken met de verbindingstape.
Parachevez avec le ruban de raccordement.
Finish with connection tape.
Plaatsen van de afwerkingsprofielen.
Posez les profilés de finition.
Place the finishing profiles.
1.0M
1.3M
Fait votre choix
78MM
Maak uw keuze
• • • • • •
>> GA NAAR HANDLEIDING 1 <<
>> ALLEZ AU MANUEL 1 <<
>> GO TO MANUAL 1 <<
1
2
A
3
2
B