1
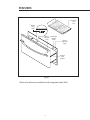
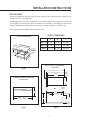
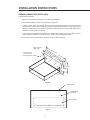
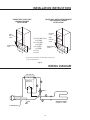
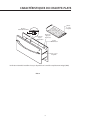
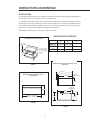
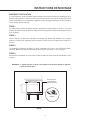
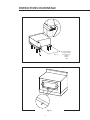
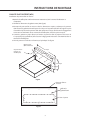
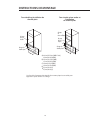
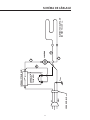
THE PROFESSIONAL WARMING DRAWER
Installation Guide
MODELS:
WDI
WDS-27
WDS-30
A MESSAGE TO OUR CUSTOMERS
Thank you for selecting this DCS Warming Drawer. Because of its unique features, we have developed this
Installation Guide. It contains valuable information on how to properly install your new Warming Drawer
for years of safe and enjoyable use.
To help serve you better, please fill out and submit your Ownership Registration Card by visiting our website
at www.dcsappliances.com and selecting “Customer Service” on the home page and then select “Ownership
Registration”. You may also submit the enclosed Ownership Registration Card by mail to the address below.
In addition, keep this guide handy, as it will help answer questions that may arise as you use your new
appliance.
For your convenience, product questions can be answered by a DCS Customer Service Representative by
phone:1-888-281-5698.
DCS
Attention: Customer Service
5800 Skylab Road
Huntington Beach, CA 92647
www.dcsappliances.com
WARNING
The warming drawer is not intended to be used in conjunction with water. DO
NOT fill the drawer or warming cavity with water. Doing so could create a
shock hazard resulting in a possible injury.
WARNING
TO REDUCE THE RISK OF INJURY TO PERSONS IN THE EVENT OF A RANGE TOP
GREASE FIRE, OBSERVE THE FOLLOWING: SMOTHER FLAMES with a closefitting lid, cookie sheet, or metal tray, then turn off the burner. BE CAREFUL TO
PREVENT BURNS. If the flames do not go out immediately EVACUATE AND CALL
THE FIRE DEPARTMENT. NEVER PICK UP A FLAMING PAN - You may be burned.
DO NOT USE WATER, including wet dishcloths or towels - a violent steam
explosion will result. Use an extinguisher ONLY if:
1. You know you have a Class ABC extinguisher, and you already know how
to operate it.
2. The fire is small and contained in the area where it started.
3. The fire department is being called.
4. You can fight the fire with your back to an exit.
PLEASE RETAIN THIS MANUAL FOR FUTURE REFERENCE.
1
TABLE OF CONTENTS
SAFETY PRACTICES & PRECAUTIONS ...........................................................................................................3-4
FEATURES ................................................................................................................................................................................5
INSTALLATION INSTRUCTIONS ........................................................................................................................6-10
Specifications............................................................................................................................................................6
Mounting Installation ........................................................................................................................................7-8
Warming Drawer Integrated ...............................................................................................................................9
Wall Oven and Microwave and Warming Drawer Installation................................................................9
WIRING DIAGRAM ..........................................................................................................................................................10
SERVICE ..................................................................................................................................................................................11
WARRANTY ..........................................................................................................................................................................12
2
SAFETY PRACTICES AND PRECAUTIONS
READ AND UNDERSTAND THESE PRECAUTIONS
Read this Installation Guide thoroughly before installation. This will help to reduce the risk of
fire, electric shock, or injury to persons.
Remove all packaging materials from your appliance.
Install according to instructions. See page 6-9 to insure proper installation and servicing.
Be sure to have a qualified service technician install and ground this appliance.
Plug into rated outlet: 120 Volts AC, 5 amp minimum circuit requirement.
PREHEATING INSTRUCTIONS
The Warming Drawer is designed to keep cooked foods warm for extended periods of time. The
drawer must be pre-heated before use on high (see Use and Care Guide). If the warming drawer isn’t
pre-heated, the internal temperature of the food being warmed could fall below the minimum safe
level and bacteria could develop. Always preheat the drawer according to the instructions described
in the warming drawer Use and Care Guide.
Children should not be left alone or unattended in an area where appliances are in use. They
should never be allowed to turn knobs, push buttons, sit or stand on any part of an appliance.
Children in walkers, or children crawling can be attracted to the round door handle and may
grab and open the warming drawer. This can result in injury from the door being pulled open
on a child, or severe burns if it is in use and hot.
WARNING:
Do not store items of interest to children in, above or around any appliance.
Children could be seriously injured if they should climb onto the appliance to
reach these items.
Be certain to use only dry pot holders: Moist or damp pot holders on hot surfaces may cause burns
from steam. Do not use a towel or other bulky cloth in place of pot holders.
Never store anything in the warming drawer. Flammable materials can catch fire, plastic items
may melt or ignite and other types of items could be ruined.
Do not hang articles from any part of the appliance or place anything against the drawer. Some
fabrics are quite flammable and could catch on fire.
For safety reasons and to avoid damage to the appliance, never sit, stand, or lean on the
warming drawer door.
For personal safety, wear proper apparel. Loose fitting garments or hanging sleeves should
never be worn while using this appliance. Some synthetic fabrics are highly flammable and
should not be worn while using this appliance.
Do not use aluminum foil to line any part of the warming drawer. Using a foil liner could result
in a fire hazard, or the obstruction of the flow of heat and ventilation air. Foil is an excellent heat
insulator and heat will be trapped underneath it. This trapped heat can upset the performance
of the warming drawer parts.
WARNING:
This appliance is designed for warming food. Based on safety considerations,
never use the warming drawer to warm or heat a room.
3
SAFETY PRACTICES & PRECAUTIONS
As with any cooking or heating appliance, never leave the warming drawer unattended when
warming food, this could be a fire hazard.
Only certain types of glass, heat proof glass-ceramic, ceramic, earthenware or glazes are
suitable for use in this warming drawer. Utensils that are not thermally heat safe may break
with sudden temperature changes.
Never heat unopened containers, a build up of pressure may cause the container to burst.
Grease is flammable, avoid letting grease deposits collect in the warming drawer, clean up
spillage.
DO NOT use water on grease fires. Turn OFF the warming drawer, then smother the fire with
baking soda or use a dry chemical or foam-type fire extinguisher.
When opening the drawer while keeping sauces warm, tomato sauce, etc., the drawer must be
opened slowly to avoid spillage.
Use care when opening a hot warming drawer; to avoid severe burns, open slowly, allow the hot
air or steam to escape before reaching in to remove or replace any foods.
Do not repair or replace any part of this appliance unless it is specifically recommended in this
manual. All other servicing should be referred to a qualified Service Technician. Service
Technicians must disconnect the power supply before servicing this appliance.
When using the warming drawer: DO NOT TOUCH THE INTERIOR SURFACES or the exterior
area immediately surrounding the door until it has had sufficient time to cool to avoid burn
injuries.
Clean the warming drawer with caution. Avoid steam burns; do not use a wet sponge or cloth
to clean the appliance while it is hot. Some cleaners produce noxious fumes if applied to a hot
surface. Follow directions provided by the cleaner manufacturer.
Be sure all the controls are turned off and the appliance is cool before using any type of aerosol
cleaner on or around the appliance. The chemical that produces the spraying action could, in
the presence of heat, ignite or cause metal parts to corrode.
Do not touch the heating element or interior surfaces of the warming drawer, even if they
appear dark in color. They may still be hot enough to cause burn injury, allow sufficient time to
cool.
Do not allow flammable materials which may ignite to come in contact with the hot heating
element or the interior surface of the warming drawer until the unit has had a sufficient time to
cool.
4
FEATURES
Stainless
Steel
Tray
* Moist/
Crisp
Knob
Power Thermostat
Indicator Control
Lens
Knob
Power
Indicator
Light
Stainless
Steel
Drawer
Fig. 01
* Moist/crisp feature not available on fully integrated model (WDI).
5
INSTALLATION INSTRUCTIONS
SPECIFICATIONS
The cabinet depth from the outer edge of the face frame to the inside back of the cabinet or wall
should be at least 24” (see figure 02).
The Warming Drawer should be installed into a base cabinet with minimum outside dimensions of
13-1/4” high by 30” wide by 24” deep for 30” models. For 27” models 13-1/4” high by 27” wide by 24”
deep. For WDI Model 15-1/4” high by 26-3/4” wide by 24” deep (see figure 03 and figure 04).
Power supply required: 120VAC; 5A min., 15A max. circuit.
CUTOUT DIMENSIONS
CUT OUT DIMENSIONS
A
1-1/2" min.
to bottom of
countertop
A 120 volt AC
outlet should be
located below the
Warming Drawer
A
B
C
WDS-27 9-7/8” 25-5/16”
24” (min.)
WDS-30 9-7/8” 25-5/16”
24” (min.)
WDI
26-1/8”
11-1/4”
24” (min.)
2x4's or similar
support
C
B
WDS-27 & WDS-30 DIMENSIONS
(SIDE VIEW)
Fig. 02
28-3/16"
25-1/16"
23-7/8"
POWER
CORD
WARMING DRAWER DIMENSIONS
(FRONT VIEW)
9-7/8"
WDI
10-1/4"
POWER
CORD
24"
1"
WDS-27 – 26-7/8 "
WDS-30 – 29-7/8"
11-1/4"
9-7/8"
11-7/8"
Fig. 03
Fig. 04
6
INSTALLATION INSTRUCTIONS
MOUNTING INSTALLATION
The lower rear corners of the cabinet need to provide proper support to the back of the Warming
Drawer and the anti-tip mounting clips. A 120 volt AC outlet should be located no further than 36
inches from the back center of the Warming Drawer. Illustrations suggest one possible bottom
support, but the consumer is not limited to this idea for mounting configuration.
STEP 1
The bottom rear section of the cabinet should be made of solid plywood or 2x4 and needs to be
installed to hold the anti-tip mounting clips and support the weight of Warming Drawer, which is
90 lbs.
STEP 2
Use the screws provided to attach the mounting clips which must be installed for anti-tip safety to the
bottom support at the back. See placement dimensions in figure below.
STEP 3
The Warming Drawer has slots on the back side where it will slide onto the anti-tip mounting clips.
See page 8. Plug power cord into AC outlet.
STEP 4
Fasten the front face to the cabinet by passing the screws through the holes of the front face of the
warming drawer to finish the installation. See page 8.
NOTE: Bottom support made of plywood or other solid wood construction capable of supporting
the weight of the warming drawer.
WDS – 21-1/2"
WDI – 21-7/8"
Slide drawer
on to Anti-Tip
mounting clips
mounting clips
Fig. 05
7
INSTALLATION INSTRUCTIONS
21-1/8"
Center line
to Center line
for mounting clips for
WDS-30
WDS-27
WDI
Fig. 06
Fig. 07
8
INSTALLATION INSTRUCTIONS
WARMING DRAWER INTEGRATED (WDI)
Custom Panel Installation
1. Remove drawer as per instructions. (See Use & Care Manual.)
2. Check the dimensions of the front template. (See fig. 08.)
3. Cut the custom panel to required dimensions, knowing that the panel must cover the front
template plus 1/8” on all four sides for a good presentation. The thickness of the custom panel
must be greater than 3/8” to allow for clearance of the tips of the screws holding the drawer
when the custom panel is mounted.
4. Center the paper template provided on the back of the custom panel to pre-drill 1/4” holes
(5/16” depth) to allow for clearance of the tips of the screws holding the drawer.
5. Fasten the custom panel with the supplied screws as shown in fig. 08 .
Front template
( WDI only)
27”
Screws to hold
custom panel to
Warming Drawer
26-3/4”
12-1/8”
11-7/8”
Fig. 08
Custom Panel
Use template
provided
Holes to drill
Fig. 09
9
INSTALLATION INSTRUCTIONS
SINGLE WALL OVEN AND MICROWAVE
AND WARMING DRAWER
INSTALLATION
DOUBLE WALL OVEN AND
WARMING DRAWER
INSTALLATION
microwave
cut-out
double
wall oven
cutout
A) 25-5/16" (WDS-27 & 30)
26-1/8" (WDI)
C
B) 11-1/16" (WDS)
warming drawer
cutout
C
12-5/8" (WDI)
C) 9-7/8" (WDS)
11-1/4"(WDI)
D) 15-3/4"
E) 18-3/4"
B
D
A
single
wall oven
cutout
warming drawer
cutout**
B
E
A
**The floor of the opening should be constructed of plywood strong enough
to support the weight of the oven.
Fig. 10
WIRING DIAGRAM
AUX. SWITCH
1
2
THERMOSTAT
TEMP. SWITCH
3
4
2
1
LIGHT
2
L1
NEU
1
WARMING ELEMENT
500 WATTS, 120 VAC.
GND
STRAIN RELIEF
10
HOW TO OBTAIN SERVICE
HOW TO OBTAIN SERVICE:
Before you call for service:
1) Is the circuit breaker tripped or the fuse blown?
2) Is there a power outage in the area?
For warranty service, please contact your local service provider or DCS Customer Service
Representativeat (888) 281-5698, Monday thru Friday, 6 am – 4:30 pm PST. Before you call, please have
the following information ready:
Model Number
Serial Number
Date of installation
A brief description of the problem
Your satisfaction is of the utmost importance to us. If a problem cannot be resolved to your
satisfaction, please write:
Write:
DCS
Attention: Customer Service
5800 Skylab Road
Huntington Beach, CA 92647
www.dcsappliances.com
11
WARRANTY
LENGTH OF WARRANTY
One (1) Year Full parts and Labor Covers the entire product
DCS WILL PAY FOR
All repair labor and parts found to be defective due to materials or workmanship for one full year “IN
HOME” warranty during the first year of ownership. This does not apply if the unit was subjected to
other than normal household use. Service must be provided by Authorized Factory Agent during
normal working hours. No charges will be made for repair or replacement at the location of initial
installation or factory for parts returned pre-paid, through the dealer and claimed within the warranty
period, and found by DCS to be defective.
Replacement will be F.O.B. DCS, and DCS will not be liable for any transportation costs, labor costs, or
export duties. This warranty shall not apply, nor can we assume responsibility for damage that might
result from failure to follow manufactures instructions or local codes, where the appliance has been
tampered with or altered in anyway or which, in our judgement, has been subjected to misuse,
negligence, or accident. Implied warranty shall not extend beyond the duration of this written
warranty. This warranty is in lieu of all warranties expressed or implied and all other obligations or
liability in connection with the sale of this appliance.
DCS Will Not Pay For
Installation or start-up.
Shipping damage.
Service by an unauthorized agency.
Damage or repairs due to service by an unauthorized agency or the use of unauthorized parts.
Service during other than normal working hours.
Improper installation, such as improper hook-up, etc.
Service visits to teach you how to use the appliance; correct the installation; reset circuit
breakers or replace home fuses.
Cleaning of filters and outer panels.
Repairs due to other than normal household use.
Damage caused from accident, abuse, alteration, misuse, incorrect installation or installation
not in accordance with local codes.
Units installed in non-residential application such as day care centers, bed and breakfast
centers, churches, nursing homes, restaurants, hotels, schools, etc.
This warranty applies to appliances used in residential applications; it does not cover their use in
commercial situations. This warranty is for products purchased and retained in the 50 states of the
U.S.A., the District of Columbia and Canada. This warranty applies even if you should move during the
warranty period. Should the appliance be sold by the original purchaser during the warranty period,
the new owner continues to be protected until the expiration date of the original purchaser’s warranty
period. This warranty gives you specific legal rights. You may also have other rights which vary from
state to state.
12
CHAUFFE-PLATS PROFESSIONNEL
PROFESSIONNEL
Guide d'installation
MODELS:
WDI
WDS-27
WDS-30
À L'INTENTION DE NOS CLIENTS
Nous vous remercions d'avoir choisi ce chauffe-plats DCS. Nous avons conçu ce Manuel d'installation et
d'entretien pour expliquer les fonctions uniques de cet appareil. Il contient des informations extrêmement
utiles sur la façon correcte de faire fonctionner votre nouveau chauffe-plats et d'en faire l'entretien. Vous
pourrez ainsi en profiter pendant des années en toute sécurité.
Aidez-nous à mieux vous servir en remplissant la Carte d'enregistrement du propriétaire et en nous la
soumettant depuis notre site Web à www.dcsappliances.com. Sélectionnez « Service à la clientèle » sur
la page d'accueil puis « Enregistrement du propriétaire ». Vous pouvez également nous soumettre par
courrier à l'adresse ci-dessous la Carte d'enregistrement du propriétaire ci-jointe. Gardez ce manuel à
portée de main afin de trouver rapidement réponse à vos questions durant l'utilisation de votre
chauffe-plats DCS.
Si vous avez des questions au sujet de notre produit, communiquez avec un représentant du service à la
clientèle DCS par téléphone : 1-888-281-5698, ou par email :[email protected]
ou par courrier :
DCS
Attention : Customer Service
5800 Skylab Road,
Huntington Beach, CA 92647
www.dcsappliances.com
AVERTISSEMENT
Le chauffe-plats n'est pas conçu pour être utilisé avec de l'eau. NE remplissez
PAS le tiroir ou le logement du chauffe-plats avec de l'eau. Cela pourrait créer
un risque de choc et causer des blessures.
AVERTISSEMENT
POUR RÉDUIRE LES RISQUES DE BLESSURES EN CAS DE FEU DE GRAISSE SUR LA
CUISINIÈRE, RESPECTEZ LES CONSIGNES SUIVANTES : ÉTOUFFEZ LES FLAMMES
à l'aide d'un couvercle hermétique, d'une plaque à biscuits ou d'un plateau
métallique, puis éteignez le brûleur. ÉVITEZ DE VOUS BRÛLER. Si les flammes
ne s'éteignent pas immédiatement, ÉVACUEZ LES LIEUX ET APPELEZ LES
POMPIERS. NE SOULEVEZ JAMAIS UN RÉCIPIENT EN FEU - Vous pourriez vous
brûler. N'UTILISEZ PAS D'EAU, y compris des serviettes mouillées - une
explosion de vapeur violente pourrait en résulter. Utilisez un extincteur
SEULEMENT si :
1.Vous êtes sûr qu'il s'agit d'un extincteur de classe ABC et savez comment le
faire fonctionner.
2. Le feu est limité et restreint à la zone où il s'est déclenché.
3. Le service des pompiers a été appelé.
4. Vous pouvez combattre l'incendie le dos tourné vers une sortie.
VEUILLEZ CONSERVER CE MANUEL À TITRE DE RÉFÉRENCE.
1
TABLE DES MATIÈRES
MESURES DE SÉCURITÉ ET DE PRÉCAUTION ..........................................................................................3-4
CARACTERISTIQUES DU CHAUFFE-PLATS.....................................................................................................5
INSTRUCTIONS DE MONTAGE ..........................................................................................................................6-10
Specifications............................................................................................................................................................6
Montage et Installation.....................................................................................................................................7-8
Chauffe-plats intégré ............................................................................................................................................9
Four, micro-ondes et installation de chauffe-plats ...................................................................................10
SCHEMA DE CABLAGE ................................................................................................................................................11
SERVICE ..................................................................................................................................................................................12
GARANTIE .............................................................................................................................................................................13
2
MESURES DE SÉCURITÉ ET DE PRÉCAUTION
VEUILLEZ LIRE ET BIEN ASSIMILER CES CONSIGNES
Veuillez lire attentivement ce manuel d'installation avant d'installer votre nouvel appareil.
Ceci vous permettra de réduire les risques d'incendie, de chocs électriques ou de blessures.
Retirez tout le matériel d'emballage de l'appareil.
Procédez à l'installation conformément aux instructions. Pour assurer une installation et un
entretien corrects, consultez les pages 6 à 9.
Confiez la mise à la terre de l'appareil à un technicien qualifié.
Branchez l'appareil dans une prise de 120 V C.A., 5 A minimum.
INSTRUCTIONS DE PRÉCHAUFFAGE
Le chauffe-plats est conçu pour garder les aliments cuits à une température chaude pendant de
longues périodes. Il doit être préchauffé avant toute utilisation (Voir le manuel d'utilisation et
d'entretien.). Il doit être préchauffé pendant une demi-heure au moins à température maximum. Si
le chauffe-plats n'est pas préchauffé, la température interne des aliments chauffés pourrait baisser à
un niveau dangereux propice au développement des bactéries. Préchauffez toujours le chauffe-plats
selon les instructions de la section du manuel qui traite de l'utilisation et d'entretien.
Les enfants ne doivent pas être laissés seuls ou sans surveillance dans un endroit où l'on utilise
ce type d'appareil. Il ne faut jamais les laisser tourner ou enfoncer des boutons, ni s'asseoir ou
se tenir debout sur l'appareil.
Des enfants en marchette ou à quatre pattes peuvent être attirés par la poignée ronde de la
porte et la saisir pour ouvrir le chauffe-plats. Ils pourraient alors se blesser ou être brûlés
sérieusement si l'appareil est en fonctionnement et qu'il est chaud.
AVERTISSEMENT :
Évitez de ranger des articles pouvant attirer les enfants dans l'appareil, audessus ou à proximité. Les enfants pourraient être blessés sérieusement s'ils
grimpent sur l'appareil pour atteindre ces articles.
Utilisez seulement des gants isolants secs : Les gants humides sur des surfaces chaudes peuvent
provoquer des brûlures causées par la vapeur. N'utilisez pas de serviette ou de chiffon épais à la place
de gants isolants.
Ne rangez jamais rien dans le chauffe-plats. Des matériaux inflammables pourraient prendre
feu, des éléments en plastique pourraient fondre ou s'enflammer et d'autres types d'objets
pourraient être détruits.
Ne suspendez aucun article sur l'appareil et ne placez aucun objet contre lui. Certains
matériaux sont extrêmement inflammables et pourraient prendre feu.
Pour des raisons de sécurité et pour ne pas endommager l'appareil, évitez de vous asseoir, de
vous tenir debout ou de vous appuyer contre la porte du chauffe-plats.
Pour assurer votre propre sécurité, habillez-vous de façon appropriée. Ne portez jamais de
vêtements ou de manches lâches lorsque vous utilisez l'appareil. Certains tissus synthétiques
sont extrêmement inflammables et ne doivent pas être portés pendant l'utilisation de
l'appareil.
Ne recouvrez aucune partie du chauffe-plats avec du papier aluminium. L'utilisation de papier
aluminium peut créer un risque d'incendie ou empêcher la circulation de la chaleur et de l'air
de ventilation. C'est un excellent isolant thermique qui peut emprisonner la chaleur. Celle-ci
pourrait alors affecter la performance des pièces du chauffe-plats.
3
MESURES DE SÉCURITÉ ET DE PRÉCAUTION
AVERTISSEMENT :
Cet appareil est conçu pour réchauffer les aliments. Pour des raisons de
sécurité, n'utilisez jamais le chauffe-plats pour chauffer une pièce.
Comme pour tout appareil de cuisson ou de chauffage, ne laissez jamais le chauffe-plats sans
surveillance quand vous réchauffez de la nourriture, car il y a risque d'incendie.
Seuls certains types d'ustensiles en verre, vitrocéramique calorifugée, céramique, poterie ou
émaillés sont appropriés pour être utilisés dans ce chauffe-plats. Les ustensiles non thermorésistants peuvent se briser à la suite de changements de température soudains.
Ne chauffez pas de récipients hermétiques car ils pourraient exploser suite à une accumulation
de pression.
La graisse est inflammable. Évitez donc de laisser des dépôts de graisse s'accumuler dans le
chauffe-plats et nettoyez tout déversement.
NE VERSEZ PAS d'eau sur les feux de graisse. Éteignez le chauffe-plats, puis étouffez le feu avec
du bicarbonate de soude ou à l'aide d'un extincteur à poudre ou à mousse.
Si vous ouvrez le tiroir et qu'il contient des sauces chaudes, de la sauce tomate, etc., ouvrez-le
lentement pour éviter tout déversement.
Faites attention quand vous ouvrez un chauffe-plats chaud; pour éviter tout risque de brûlures
graves, ouvrez-le lentement en laissant s'échapper l'air chaud ou la vapeur avant de retirer ou
d'introduire des aliments.
Ne réparez pas ni ne remplacez aucune pièce de cet appareil, sauf indication contraire du
manuel. Tout autre travail d'entretien doit être confié à un technicien qualifié. Celui-ci doit
débrancher le bloc d'alimentation avant de travailler sur l'appareil.
Durant l'utilisation du chauffe-plats : afin d'éviter de vous brûler, NE TOUCHEZ PAS LES
SURFACES INTÉRIEURES ni la surface extérieure autour de la porte tant qu'elles n'ont pas
refroidi.
Nettoyez le chauffe-plats avec précaution. Évitez de vous brûler à la vapeur : n'utilisez pas
d'éponge ou de chiffon mouillé pour nettoyer l'appareil alors qu'il est encore chaud. Certains
produits de nettoyage produisent des vapeurs nocives s'ils sont appliqués à une surface
chaude. Suivez le mode d'emploi fourni par le fabricant du produit de nettoyage.
Assurez-vous que les boutons de l'appareil sont fermés et que celui-ci est froid avant d'utiliser
des nettoyants aérosol à proximité. L'élément chimique qui produit le jet de vaporisation peut,
en présence de chaleur, s'enflammer ou provoquer la corrosion des parties métalliques.
Ne touchez par l'élément chauffant ni les surfaces intérieures du chauffe-plats. Même si leur
couleur semble sombre, ils peuvent encore être assez chauds pour causer des brûlures. Laissezleur le temps de refroidir.
Ne mettez par des matériaux inflammables pouvant s'enflammer en contact avec l'élément
chauffant ou la surface intérieure du chauffe-plats tant que l'appareil n'a pas refroidi.
4
CARACTÉRISTIQUES DU CHAUFFE-PLATS
Plateau
en acier
inoxydable
*Bouton
Humide/Croustillant
Lentille du
voyant
d'alimentation
Bouton de
réglage du
thermostat
Voyant
d'alimentation
Tiroir en acier
inoxydable
* La fonction Humide/Croustillant n'est pas disponible sur le modèle complètement intégré (WDI).
FIG. 01
5
INSTRUCTIONS DE MONTAGE
SPÉCIFICATIONS
La profondeur du boîtier, à partir de la bordure extérieure de la face avant jusqu'au fond du boîtier ou
au mur, doit mesurer 61 cm (24 po) minimum (voir figure 02).
Le chauffe-plats doit être installé dans un boîtier dont les dimensions extérieures minimum doivent
être de 33,5 cm (13-1/4 po) de haut sur 76 cm (30 po) de large sur 61 cm (24 po) de profondeur pour
les modèles de 30 po. Pour les modèles de 27 po : 33,5 cm (13-1/4 po) de haut sur 69 cm (27 po) de
large sur 61 cm (24 po) de profondeur (voir figure 03 et figure o4).
Alimentation requise : 120 V c.a.; circuit de 5 A min., 15 A max.
DIMENSIONS DES DÉCOUPES
DIMENSIONS DES DÉCOUPES
A
3,8 cm (1-1/2 po) min.
jusqu'au bas du dessus
de comptoir
Une prise d'alimentation CA
de 120 volts doit être située
au-dessous du chauffe-plats
A
B
C
WDS-27 9-7/8 po 25-5/16 po 24 po (min.)
WDS-30 9-7/8 po 25-5/16 po 24 po (min.)
WDI 11-1/4 po 26-1/8 po 24 po (min.)
2x4 ou support
similaire
C
B
DIMENSIONS DU CHAUFFE-PLATS (VUE
WDS-27
– 26-7/8 po
LATÉRALE)
FIG. 02
WDS-30 – 29-7/8 po
28-3/16 po
25-1/16 po
23-7/8 po
DIMENSIONS DU CHAUFFE-PLATS
(VUE AVANT)
CORDON
D'ALIMENTATION
9-7/8 po
CORDON
D'ALIMENTATION
10-1/4 po
24 po
1 po
WDS-27 – 26-7/8 po
WDS-30 – 29-7/8 po
11-1/4 po
9-7/8 po
11-7/8 po
FIG. 03
FIG. 04
6
INSTRUCTIONS DE MONTAGE
MONTAGE ET INSTALLATION
Les coins inférieurs arrière du boîtier doivent soutenir correctement l'arrière du chauffe-plats et les
fixations antibasculement. Une prise c.a. de 120 V doit être située à moins de 92 cm (36 po) du centre
arrière du chauffe-plats. Les illustrations suggèrent un type de support inférieur, mais vous pouvez en
choisir d'autres pour le montage :
ÉTAPE 1
La section arrière du fond du boîtier doit être constituée de contre-plaqué ou de bois 2 x 4 et être
installée de manière à tenir les fixations antibasculement et supporter le poids du chauffe-plats qui est
de 41 kg (90 lb).
ÉTAPE 2
Fixez, à l'aide des vis fournies, les fixations de montage qui doivent être installées sur le support
inférieur, à l'arrière, pour empêcher tout basculement. Voir les mesures de placement à la figure cidessous.
ÉTAPE 3
Le chauffe-plats comporte des fentes à l'arrière permettant de le glisser sur les fixations antibasculement. Branchez le cordon d'alimentation dans une prise de courant c.a. Voir à la page 7.
ÉTAPE 4
Pour terminer l'installation, vissez la vis dans le trou du milieu de la face avant du chauffe-plats. Voir à
la page 7.
REMARQUE : Le support inférieur est fait de contre-plaqué ou de bois plein capable de supporter
le poids du chauffe-plats.
Glissez le tiroir
sur les fixations
antibasculement
WDS 21-1/2 po
WDI 21-7/8 po
fixations
FIG. 05
7
INSTRUCTIONS DE MONTAGE
21-1/8 po
FIG. 06
Fig. 07
8
De la ligne médiane
à la ligne médiane
pour les fixations
WDS-30
WDS-27
WDI
INSTRUCTIONS DE MONTAGE
CHAUFFE-PLATS INTÉGRÉ (WDI)
Installation de panneau fait sur mesure
1. Retirez le chauffe-plats conformément aux instructions. (Voir le manuel d'utilisation et
d'entretien.)
2. Vérifiez les dimensions du gabarit avant. (Voir fig. 08.)
3. Découpez le panneau fait sur mesure selon les dimensions requises, sachant que le panneau
doit recouvrir le gabarit avant et dépasser de 1/8 po sur les quatre côtés afin de soigner l'aspect
d'ensemble. L'épaisseur du panneau doit être supérieure à 3/8 po afin d'assurer le dégagement
nécessaire aux extrémités des vis retenant le chauffe-plats, une fois le panneau posé.
4. Centrez le gabarit en papier fourni sur l'arrière du panneau afin de prépercer des trous de
1/4 po (5/16 po de profondeur) afin d'assurer le dégagement nécessaire aux extrémités des vis
retenant le chauffe-plats.
5. Fixez le panneau à l'aide des vis fournies, tel qu'indiqué à la fig. 08.
Gabarit avant
(WDI seulement
27 po
Vis pour fixer le
panneau au
chauffe-plats.
26-3/4 po
12-1/8 po
11-7/8 po
Fig. 08
Panneau fait sur
mesure
Utilisez le
gabarit fourni
Trous à percer
Fig. 09
9
INSTRUCTIONS DE MONTAGE
Four double et installation de
chauffe-plats
Four simple, micro-ondes et
installation
de chauffe-plats
découpe
de
micro-ondes
découpe
de four
double
découpe
de four
simple
C
C
découpe de
chauffe-plats
découpe de
chauffe-plats**
B
B
D
A
A
A) 64,3 cm (25-5/16 po)(WDS-27 & 30)
66,4 cm (26-1/8 po)(WDI)
B) 28,1 cm (11-1/16 po)(WDS)
32,1 cm (12-5/8 po) (WDI)
C) 24,8 cm (9-7/8 po)(WDS)
28,6 cm (11-1/4 po)(WDI)
D) 40,0 cm (15-3/4 po)
E) 47,6 cm (18-3/4 po)
** Le fonds de l'ouverture doit être fait d'un contre-plaqué assez solide pour
supporter le poids du four et sa charge.
10
E
11
SERRE-CÂBLE
NEU
L1
1
Terre
2
COMMUTATEUR
DE TEMP. DU
THERMOSTAT
INTERRUPTEUR AUX.
2
1
4
3
1
2
LUMIÈRE
ÉLÉMENT CHAUFFANT
500 WATTS, 120 V c.a.
SCHÉMA DE CÂBLAGE
SERVICE
POUR L'OBTENTION DE SERVICE :
Avant d'appeler le service technique :
1) Est-ce que le disjoncteur s'est déclenché ou que le fusible est grillé?
2) Y a-t-il une coupure de courant dans le secteur?
Pour le service sous garantie, veuillez contacter votre distributeur ou contactez le centre DCS agréé le
plus proche au (888) 281-5698,du lundi au vendredi, de 6 h à 16 h 30, heure normale du Pacifique.
Avant d'appeler, veuillez avoir les informations suivantes à portée de main :
Numéro de modèle
Numéro de série
Date d'installation
Brève description du problème
Votre satisfaction revêt la plus haute importance pour nous. Si un problème n'est pas résolu à votre
entière satisfaction, veuillez communiquer avec nous :
Écrivez-nous à l'adresse suivante :
DCS
Attention: Customer Service
5800 Skylab Road
Huntington Beach, CA 92647
www.dcsappliances.com
12
GARANTIE
DURÉE DE LA GARANTIE
Un (1) an, pièces et main-d'œuvre sur tout le produit
DCS COUVRE LES FRAIS SUIVANTS
Frais de main-d'œuvre et de réparation de pièces jugées défectueuses pour cause de vice de matière ou
de fabrication, et ce pendant une année complète avec garantie « À DOMICILE » pendant la première
année d'achat. Cette garantie ne s'applique pas si l'appareil a été soumis à une utilisation autre qu'une
utilisation domestique normale. Le service doit être fourni par un agent agréé de l'usine durant les
heures ouvrables normales. Il n'y aura pas de frais facturés pour les réparations ou remplacements
effectués sur le site de l'installation initiale ou en usine pour des pièces renvoyées port payé, par l'intermédiaire du distributeur, pendant la période de garantie, et jugées défectueuses par DCS.
Les remplacements sont effectués franco à bord DCS et DCS n'est pas responsable des frais de transport,
de main-d'œuvre ou des tarifs douaniers s'appliquant à l'exportation. Cette garantie ne saurait
s'appliquer, et nous n'assumons aucune responsabilité pour les dommages pouvant résulter du fait de
ne pas avoir respecté les consignes du fabricant ou des codes en vigueur, ou d'avoir trafiqué ou altéré
l'appareil de quelque façon, ou d'avoir, selon nous, soumis l'appareil à une mauvaise utilisation, à de la
négligence ou à un accident. Tout garantie implicite ne pourra s'étendre au-delà de la durée de cette
garantie écrite. Cette garantie remplace toutes les autres garanties, explicites ou implicites, ainsi que
toutes les autres obligations ou responsabilités relatives à la vente de cet appareil.
DCS ne couvre pas les frais suivants
Installation ou démarrage.
Dommages subis durant le transport.
Service effectué par un centre non agréé.
Dommages ou réparations causés par un service effectué par un centre non agréé ou par l'utilisation de pièces non autorisées.
Service effectué en dehors des heures ouvrables normales.
Mauvaise installation, telle qu'un branchement incorrect, etc.
Visites de service pour vous apprendre comment utiliser l'appareil, corriger l'installation, réarmer
les disjoncteurs ou remplacer les fusibles de la maison.
Nettoyage des filtres et panneaux extérieurs.
Réparations dues à une utilisation autre qu'une utilisation domestique normale.
Dommages causés par accident, abus, altération, mauvaise utilisation, installation incorrecte ou
installation non conforme aux codes en vigueur.
Appareils installés dans le cadre d'applications non résidentielles telles que garderies, auberges,
lieux de culte, maisons de soin, restaurants, hôtels, écoles, etc.
Dommages superficiels au-delà des premiers 90 jours.
Cette garantie s'applique aux appareils utilisés dans des applications résidentielles. Elle ne couvre pas
les utilisations commerciales. Cette garantie couvre les produits achetés et utilisés dans les 50 états des
États-Unis, le District de Columbia et au Canada. La garantie s'applique même si vous déménagez durant
la période de garantie. Si l'appareil est vendu par l'acheteur initial durant la période de garantie, le
nouveau propriétaire continue de bénéficier de la protection jusqu'à la date d'expiration de la période
de garantie de l'acheteur initial. Cette garantie vous donne des droits juridiques spécifiques. Il se peut
que vous ayez d'autres droits pouvant varier d'une juridiction à l'autre.
13
NOTES
14
NOTES
15
5800 Skylab Road, Huntington Beach, CA 92647
Tel: 714.372.7000 • Fax: 714.372.7001
Customer Service: (888) 281-5698
www.dcsappliances.com
DCS améliore constamment ses produits et se réserve le droit
de modifier les spécifications ou la conception de ses produits
sans aucun préavis.
As product improvement is an ongoing process at DCS, we
reserve the right to change specifications or design without
notice.
P/N 17654 Rev. B
Litho in USA 08/2004