1
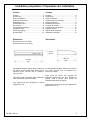
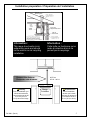
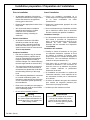
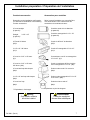
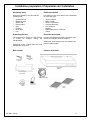
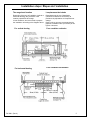
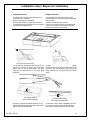
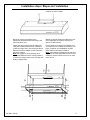
Installation
Instructions
Range hood / Hotte de cuisine : Aroua®- Practix
(Pr101/BL.BX/01..06)
Un air distinctif – A distinctive air
For your Safety / Pour Votre sécurité
Before you begin
Avant de commencer
This range hood was designed for a domestic
purpose.
Cette hotte a été conçue pour un usage à domicile.
AVERTISSEMENT - AFIN DE RÉDUIRE LE RISQUE
D’INCENDIE,
D’ÉLECTROCUTION
OU
DE
BLESSURES CORPORELLES, OBSERVEZ CE QUI
SUIT :
a) L’installation et la connexion électrique doit être faite
par une (des) personne(s) qualifiée(s) en conformité
avec les codes et normes du bâtiment applicables, en
matière de prévention d’incendie.
b) Une circulation d’air efficace est requise afin
d’assurer la combustion et l’évacuation complète des
gaz par la cheminée des équipements à combustion
pour prévenir les retours de cheminée. Conformezvous aux instructions et aux standards de sécurité des
manufacturiers d’équipement de chauffage, tels qu’ils
sont publiés par la National Fire Protection Association
(NFPA) et l’American Society for Heating, Refrigeration
and Air Conditioning Engineers (ASHRAE) ainsi que
les responsables des codes locaux.
c) Lorsque vous coupez ou perforez un mur ou un
plafond, prenez garde de ne pas endommager les fils
électriques ou autre installation qui pourrait y être
dissimulés.
d) Les conduits de l’installation doivent toujours
évacuer l’air à l’extérieur.
e) Ne jamais utiliser un système de contrôle de vitesse
externe pour contrôler la vitesse du moteur.
f) Cet appareil doit être relié à une mise à la terre pour
éviter tout choc électrique.
AVERTISSEMENT – POUR RÉDUIRE LE RISQUE
DE FEU, UTILISER SEULEMENT DES CONDUITS
D’AIR MÉTALLIQUES.
AVERTISSEMENT- POUR RÉDUIRE LE RISQUE DE
FEU DE LA CUISINIÈRE :
a) Ne laissez jamais les appareils de cuisson sans
surveillance lorsqu’ils sont réglés à feu vif. Les
débordements engendrent de la fumée et des
éversements graisseux pouvant s’enflammer. Chauffez
l’huile lentement, à feu doux ou moyen.
b) Mettez toujours la hotte en marche lorsque vous
cuisinez à feu vif ou que vous cuisinez des mets
flambés (par exemple : crêpes Suzette, cerises jubilé,
steak au poivre flambé).
c) Nettoyez régulièrement la roue du moteur de
ventilateur. Ne laissez pas la graisse s’accumuler sur
le ventilateur ou les filtres.
d) Utilisez le bon format de casserole. Servez-vous
toujours de casseroles et d’ustensiles de cuisson
appropriés à la dimension de la surface chauffante.
WARNING – TO REDUCE THE RISK OF FIRE,
ELECTRIC SHOCK, OR INJURY TO PERSONS,
OBSERVE THE FOLLOWING:
a) Installation work and electrical wiring must be
done by qualified person(s) in accordance with all
applicable codes and standards, including fire-rated
construction
b) Sufficient air is needed for proper combustion
and exhausting of gases through the flue (chimney)
of fuel burning equipment to prevent back drafting.
Follow the heating equipment manufacturer’s
guideline and safety standards such as those
published by the National Fire Protection
Association (NFPA), and the American Society for
Heating, Refrigeration and Air Conditioning
Engineers (ASHRAE), and the local code
authorities.
c) When cutting or drilling into wall or ceiling, do not
damage electrical wiring and other hidden utilities.
d) Ducted fans must always be vented to the
outdoors.
e) Do not use any external speed control devices.
f) This unit must be grounded properly to avoid any
electrical shock.
WARNING - TO REDUCE THE RISK OF FIRE,
USE ONLY METAL DUCTWORK.
WARNING – TO REDUCE THE RISK OF A
RANGE TOP GREASE FIRE:
a) Never leave surface units unattended at high
settings. Boilovers cause smoking and greasy
spillovers that may ignite. Heat oils slowly on low or
medium settings.
b) Always turn hood ON when cooking at high heat
or when flambeing food (i.e. Crepes Suzette,
Cherries Jubilee, Peppercorn Beef Flambe’).
c) Clean ventilating fans frequently. Grease should
not be allowed to accumulate on fan or filter.
d) Use proper pan size. Always use cookware
appropriate for the size of the surface element
WARNING – TO REDUCE THE RISK OF INJURY
TO PERSONS IN THE EVENT OF A RANGE TOP
GREASE FIRE, OBSERVE THE FOLLOWING *:
PK-4001 (Rev.4)
2
For your Safety / Pour Votre sécurité
a) SMOTHER FLAMES with a close-fitting lid,
cookie sheet, or metal tray, then turn off the burner.
BE CAREFUL TO PREVENT BURNS. If the flames
do not go out immediately,
EVACUATE AND CALL THE FIRE
DEPARTMENT.
b) NEVER PICK UP A FLAMING PAN – You may
be burned.
c) DO NOT USE WATER, including wet dishcloths
or towels – a violent steam explosion will result.
d) Use an extinguisher ONLY if:
1- You know you have a Class ABC extinguisher,
and you already know how to operate it.
2- The fire is small and contained in the area where
it started.
3- The fire department is being called.
4- You can fight the fire with your back to an exit.
*Based on “Kitchen Firesafety Tips” published by
NFPA.
CAUTION
•
The installer should keep this document with
the customer.
•
The customer should keep this document in a
safe place for future purposes.
•
The person who will install this range hood
should have a minimum of mechanical and
electrical skills.
•
Any deficiency following an incorrect installation
is not covered by the original warranty.
•
The estimated time to install this range hood is
1 to 3 hours.
•
Because of the weight of the range hood, 2
installers are recommended.
The range hood motor is equipped with a thermal
overload switch which will automatically shut off the
motor if it becomes overheated. The motor will
restart when it will cool down. If the motor continues
to shut off and restart, have the hood serviced.
PK-4001 (Rev.4)
AVERTISSEMENT - AFIN D’ÉVITER TOUT RISQUE
DE BLESSURES LORS D’UN FEU DE CUISINIÈRE,
OBSERVEZ LES DIRECTIVES SUIVANTES* :
a) ÉTOUFFEZ LES FLAMMES avec un couvercle
hermétique, une tôle à biscuits ou un plateau
métallique, puis éteignez le brûleur. ATTENTION DE
NE PAS VOUS BRÛLER. Si les flammes ne
s’éteignent pas immédiatement, SORTEZ ET
APPELEZ LES POMPIERS.
b) NE PRENEZ JAMAIS EN MAIN UNE POÊLE OU
UNE CASSEROLE QUI A PRIS FEU. Vous pourriez
vous brûler.
c) N’UTILISEZ PAS D’EAU, ni de linge à vaisselle ou
de serviette mouillée; cela pourrait occasionner une
violente explosion de vapeur.
d) N’utiliser un extincteur que si :
1- Vous savez qu’il s’agit d’un extincteur de classe
ABC et que vous en connaissez le fonctionnement.
2- L’incendie est petit et limité à l’endroit où il a débuté.
3- Les pompiers ont été avisés.
4- Vous pouvez combattre l’incendie en ayant accès à
une sortie de secours.
* Extrée du « Kitchen Fire Safety Tips » publié par la
NFPA.
ATTENTION
•
L’installateur doit garder ce document chez le
client.
•
Le client doit garder ce document dans un milieu
sûr pour de futures références.
•
La personne qui installe cette hotte doit avoir des
connaissances minimales en mécanique et en
électricité.
•
Toute défaillance suite à une mauvaise installation
est non couverte par la garantie offerte.
•
La durée d’installation peut prendre de 1 à 3
heures.
•
À cause du poids de la hotte, deux personnes
seront requises pour le déboîtage et l’installation.
•
Le moteur de la hotte de cuisine est équipé d’un
interrupteur de protection thermique qui arrêtera
automatiquement le moteur s’il devient surchauffé.
Il redémarrera automatiquement une fois refroidi.
Si le moteur continue à s’arrêter et à se remettre
en marche, faites vérifier votre hotte.
3
Installation preparation / Préparation de l’installation
Content
Contenu
Content ............................................................ 4
Dimensions ...................................................... 4
Prior to installation ........................................... 6
Conducts accessories ..................................... 7
Necessary tools ............................................... 8
Unpacking the box ........................................... 8
Box content...................................................... 8
The range hood location.................................. 9
Prepair the hood ............................................ 10
Electrical plugging.......................................... 12
Use and Care................................................. 12
Contenu ........................................................... 4
Dimensions ...................................................... 4
Avant l’installation ............................................ 6
Accessoires pour conduites............................. 7
Outils nécessaires ........................................... 8
Déboîtage de la hotte ...................................... 8
Contenu de la boîte ......................................... 8
L’emplacement de la hotte............................... 9
Préparer la hotte ............................................ 10
Branchement électrique................................. 12
Utilisation et entretien .................................... 12
Dimensions
Dimensions
Dimensions are in cm (inch)
Dimensions sont en cm (inch)
12 cm
(4.72”)
76.2 cm
(30”)
The distance between the top of the range and
the bottom of the range hood should be at
minimum 65cm (24"1/2) and at maximum
75cm (29"1/2).
This range hood is provided with a telescopic
duct cover which can hit the ceiling.
This range hood was designed for ceiling
height of 8’ to 10’
PK-4001 (Rev.4)
50.8 cm
(20”)
La hotte doit être installée à 65cm (24"1/2) min.
et à 75cm (29"1/2) max. au dessus de la
surface de cuisson.
Cette hotte est munie d’un système de
cheminée télescopique qui peut atteindre le
plafond, ainsi il servira pour couvrir les
conduites d’extraction de vapeur.
Cette hotte a été conçue pour des plafonds de
hauteurs de 8’ à 10’.
4
Installation preparation / Préparation de l’installation
Information :
Information :
This range hood works in air
exhausting mode and should
not be used in an air recycling
installation.
Cette hotte ne fonctionne qu’en
mode d’extraction d’air et ne
permet pas le recyclage.
Respect this distance
Respecter cette distance
Warning
Prior to installation you
should know that the
range hood must be 65
to 75 cm (25"½ to
29"½) above the range
PK-4001 (Rev.4)
65-75 cm
25"1/2 - 29"1/2
Range
Cuisinière
Avertissement
Avant l’installation,
sachez que la hotte
doit être au dessus de
la cuisinière de 65 à
75 cm (25"½ to 29 "½).
5
Installation preparation / Préparation de l’installation
Prior to installation
Avant l’installation
•
An adequate ventilation of the kitchen
•
shall be provided when the range hood is
used at the same time as appliances
burning gas or other fuels
Prévoir une ventilation convenable de la
cuisine lorsqu’un autre appareil utilisant un gaz
ou un autre combustible est utilisé
simultanément.
•
Determine the appropriate location of the •
range hood.
Déterminer l’emplacement approprié de votre
hotte de cuisine.
•
We recommend that this installation
should be performed by a certified
electrician. So to schedule the
installation, start by contacting an
electrician.
•
Nous recommandons que l’installation soit faite
par un électricien certifié. Ainsi un électricien
doit être contacté pour planifier l’installation.
Electrical Installation
•
•
•
•
•
•
An electrical connexion 120V 60Hz
should be provided near the range
hood’s location, and should have two
wires and a third one for ground. This
electrical source must be connected to a
15 to 20 amp breaker.
Conducts installation
•
Installation électrique
Installation des conduites
•
Plan the air extraction way (for a better
exhausting efficiency, optimize the air
circuit by minimizing the total conducts
length to outside and the number of
direction changes. For a better efficiency,
the total length should not exceed 100’) •
This range hood should be connected to
a 6 round conduct. Duct conversions in
downstream are allowed but could affect
the exhausting efficiency of the range
hood.
Une alimentation électrique de 120V 60Hz doit
être fournie à proximité de l’emplacement
prévu, et doit être assurée par deux fils et un
troisième de terre. Cette alimentation
électrique doit être raccordée à un disjoncteur
15 ou 20Amp.
•
If the exhausting installation is connected
to a natural combustion system, it is
important to read carefully the instruction
of such combustion system provided by •
the manufacturer.
Refer to the next table (see next page) to
calculate the total length of the conducts •
of the exhausting system.
Planifier le chemin d’extraction de l’air (pour
une efficacité d’extraction, optimiser le circuit
de manière à minimiser la longueur totale
jusqu’à l’extérieur et le nombre de changement
de direction. Pour une meilleure efficacité, la
conduite ne doit pas atteindre 50’).
Cette hotte doit se connecter à un conduit
circulaire de diamètre 6’. Une conversion en
avale de forme ou de diamètre est permise
mais risquera d’affecter la performance
d’extraction de la hotte.
Si l’installation est connectée à un système de
combustion naturelle, il sera important de lire
les instructions fournies par le manufacturier
de ce dernier.
Se référer au tableau des types des conduites
pour calculer les longueurs permises pour
chacun d’eux (voir page suivante).
N’utiliser que des conduites en métal
Do not use non metallic conducts.
Warning
To avoid any fire risk, be sure that
the conduct system exhausts the air
outside and not in a non closed area
with a ceiling or walls.
PK-4001 (Rev.4)
Avertissement
Pour éviter tout risque de feu, assurezvous que la conduite d’air permet
d’évacuer l’air vers l’extérieur et non
dans un endroit clos ayant un plafond
ou des murs.
6
Installation preparation / Préparation de l’installation
Conducts accessories
Accessoires pour conduites
Depending on the installation configuration,
you will need a combination of the following
conduct accessories :
Selon le type d’installation que vous allez faire,
vous aurez besoin d’une combinaison des
accessoires de conduites suivants :
6" round straight
(1’ per 1’)*
Straight
3-1/4" x 10"
(1’ per 1’)*
Conduite ronde de 6 de diamètre
(1’ pour 1’)*
Conduite rectangulaire 3-1/4" x 10"
(1’ pour 1’)*
6" Round 90° elbow
(15’)*
Coude de 90° de 6" de diamètre
(15’)*
3-1/4" x 10" 90° elbow
(11’)*
Coude 90° rectangulaire 3"1/4 x 10"
(11’)*
6" round to 3-1/4" x 10" trans.
(1’)*
Convertisseur rond 6" au rectangulaire
3"1/4 x 10" (1’)*
6" round to 3-1/4" x 10" trans.
90° elbow (16’)
Coude convertisseur 90° de circulaire
6 au rectangulaire 3"1/4 x 10" (16’)
6" round wall cap with damper
(30’)*
Sortie murale ronde 6" à couvercle
(30’)*
3-1/4" x 10" wall cap with damper
(30’)*
Sortie murale rectangulaire 3"1/4 x 10"
à couvercle (30’)*
6" round roof cap
(26’)*
Sortie de toiture ronde 6"
(26’)*
* Equivalents in foot length
Warning
Only metallic conducts
should be installed.
PK-4001 (Rev.4)
* Équivalents en pied de longueur
Avertissement
Toutes les conduites
doivent être métalliques.
7
Installation preparation / Préparation de l’installation
Necessary tools
Outils nécessaires
During the installation you will need the
following tools:
Les outils que vous aurez besoin pour l’installation
de votre hotte sont :
•
•
•
•
•
•
•
•
•
•
•
•
•
•
•
•
Screw driver set
Measuring tape
Water level
Electrical Drill
Saw
Hammer
Ducts tape
Pen
Jeu de tournevis
Mètre à ruban
Niveau à bulle d’aire
Perceuse électrique
Scie électrique
Marteau
Ruban adhésif pour conduites
Crayon
Unpacking the box
Extraction de la hotte
The range hood is packed in a safe manner
to
insure
its
integrity
during
the
transportation.
La hotte est emballée de manière sécuritaire pour
assurer son intégrité durant le transport.
Unpacking is also a critical task and could
damage the range hood.
Box content
4 wood screws
4 vis à bois
Néanmoins, sortir la hotte reste une opération qui
pourrait l’endommager.
Contenu de la boîte
2 thread forming
screws
Range hood
Hotte de
Bacvkdraft damper
Sortie à clapet
Cord grip
Collet de fixation câble
4 rondelles
4 washers
PK-4001 (Rev.4)
3 connectors
3 connecteurs
2 Filters
2 filtres
8
Installation steps / Étapes de l’installation
The range hood location
L’emplacement de la hotte
Depending of the type of installation (vertical or
horizontal ducting), the procedure of the
location preparation will change.
In both situations, we recommend to prepare
the installation according to the diagram above.
Dépendamment du type d’installation
(conduites verticales ou horizontale), la
procédure de préparation de l’emplacement
change.
Dans les deux cas nous recommandons de
préparer l’installation telle que décrite par les
figures ci-dessous.
For vertical ducting
Pour conduites verticales
For horizontal ducting
Pour conduites horizontales
PK-4001 (Rev.4)
9
Installation steps / Étapes de l’installation
Prepare the hood
Préparer la hotte
To protect the hood top, place the hood on a
soft surface (ex: a towel).
Start by removing the two filters.
Remove the bottom cover by removing the 6
screws and moving the bottom cover according
to the pictures shown below.
Pour protéger le dessus de la hotte, poser
cette dernière sur une surface douce (exemple
une serviette).
Commencer par enlever les filtres.
Enlever le couvercle inférieur en dévissant les
6 vis et en suivant les mouvements tels que
décrits sur les figures ci-dessous.
1
2
To remove the appropriate Duct Knockout, cut
the ties by using a tin snips (Of course from
where the air will be exhausted). Put Duct
tapes on the opening lines of the other Duct
Knockout.
For vertical ducting
Pour conduite verticale
Use the 2 screws to install the adaptor on the
appropriate side of the range hood. Add a duct
tape to improve the tightness.
PK-4001 (Rev.4)
À l’aide d’une pair de ciseaux de métal, couper
les points de joint de la sortie d’air (bien sur du
côté d’où l’air est supposé sortir). Poser du
ruban adhésif sur les ouvertures de l’autre
sortie.
For horizontal ducting
Pour conduite horizontale
À l’aide des 2 vis, installer l’adaptateur à volet
sur le bon côté de la hotte. Ajouter du ruban
pour assurer l’étanchéité entre la hotte et la
10
Installation steps / Étapes de l’installation
conduite de sortie à clapet.
Mount the cord grip provided on the
appropriate hole and introduce through it the
home electrical cord.
Monter le collet de fixation de câble fourni sur
le trou approprié et introduire à travers ce
dernier le câble maison.
Fasten the range hood under the cabinet by
using the 4 hood screws and the 4 washers
(under the range hood), see the picture above.
Make sure that the adaptor is well inserted in
the home conduct.
Note: we suggest to screw partially the 4
screws and washers in their correct positions,
to mount the range hoods on the 4 screws and
finally to tighten them.
Fixer la hotte sous l’armoire en utilisant les 4
vis à bois et les 4 rondelles (au dessous), voir
figure. S’assurer que l’adaptateur est bien
inséré dans le conduit de la maison.
Note : pour faciliter la fixation de la hotte nous
suggérons de visser partiellement les vis avec
rondelles, monter la hotte sur ces vis et enfin
serrer les vis.
PK-4001 (Rev.4)
11
Installation steps / Étapes de l’installation
Electrical plugging
Warning
Branchement électrique
Avertissement
Before starting this step,
check if the breaker is
deactivated and that no
electrical current can be in
the installation’s wires.
Avant de commencer cette
étape, vérifier si le disjoncteur
est bel et bien désactivé et
qu’aucun courant électrique ne
circule dans l’installation.
Unscrew the cord grip and introduce the power
cord through it, and tight it (be sure the cable
will not move after installation).
Using the range hood’s terminal bloc, connect
the cable’s black wire to the range hood’s black
wire, the cable’s white wire to the range hood’s
white wire (use the wire nuts) and connect the
cable’s ground wire to the range hood’s green
wire.
Once the screws well tighten, reassemble the
button cover and its six screws and finally
install the filters.
Now your range hood is ready to start working.
Dévisser les vis de serrage du collet de fixation
du câble d’alimentation, introduire le câble et
serrer de nouveau (S’assurer que le câble ne
bougera plus après l’installation).
En utilisant les connecteurs fournis, connecter
le fil noir du câble maison au fil noir de la hotte,
le fil blanc du câble de la maison au fil blanc de
la hotte et le fil terre au fil vert de la hotte.
Une fois les vis bien serrées, reposer le
couvercle inférieur et ses six vis et enfin poser
les filtres.
Votre hotte est ainsi prête à être utilisée.
Use and Care
Utilisation et entretien
Please refer to Use & Care Manual joined also
to the range hood or visit our website
www.arouatek.com
Pour l’utilisation et l’entretient, veuillez se
référer au manuel d’utilisation et d’entretien qui
est aussi joint à la hotte ou visiter notre site
internet
www.arouatek.com
PK-4001 (Rev.4)
12
Thinking environment
Many documents are not provided with the range hood but
are available in our website: www.arouatek.com. We invite
you to visit it.
Pensons environnement
Plusieurs documents ne sont pas fournis avec la hotte mais
sont disponibles électroniquement sur notre site Internet:
www.arouatek.com. Nous vous invitons à le consulter.
Un air distinctif – A distinctive air
This book was written to help you to install
your new range hood.
For more information, please call
877 561 6454
or visit
www.arouatek.com
Ce Document a été établi pour vous aider à
bien installer votre nouvelle hotte de cuisine.
Pour toute autre information, nous vous
invitons à nous appeler au 877 561 6454
ou visiter
www.arouatek.com
13


![[R21] - MR 3a/9](http://vs1.manualzilla.com/store/data/006317180_1-680b86dbd164f0a4430e4742c1fc7eef-150x150.png)