1
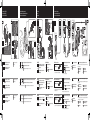
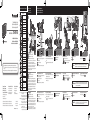
Components / Composants / Componentes 2 Model/Modèle: CN-GP50U Installation Instructions Instructions d'installation Instrucciones de instalación 3 4 7 l R eadthe“Safetyinformation”presentedintheImportantInformationbeforeusingthisproduct. l L ireles«Informationsrelativesàlasécurité»présentéesdanslemanuel«Informationsimportantes»avantd'utili- serceproduit. l Antesdeutilizaresteproducto,leala“Informacióndeseguridad”incluidaenInformaciónimportante. Panasonic Consumer Electronics Company, Division of Panasonic Corporation of North America OnePanasonicWay,Secaucus, NewJersey07094 http://www.panasonic.com Panasonic Puerto Rico, Inc. Panasonic Canada Inc. Ave.65deInfantería,Km.9.5 SanGabrielIndustrialPark, Carolina,PuertoRico00985 http://www.panasonic.com 5770AmblerDrive, Mississauga,Ontario L4W2T3 http://www.panasonic.ca ©2007MatsushitaElectricIndustrialCo.,Ltd.AllRightsReserved. ©2007MatsushitaElectricIndustrialCo.,Ltd.Tousdroitsréservés. ©2007MatsushitaElectricIndustrialCo.,Ltd.Todoslosderechosreservados. PrintedinChina ImpriméenChine ImpresoenChina YGFM294452 FX1107-0 CigaretteLighterAdapter/Adaptateur d’allume-cigare/Adaptadorparamechero (K2QZYYY00001) MountingBracket/Supportdemontage/Soportedemontaje (YGFX9996515) AdapterPlate/Plaqued’adaptation/Adaptador Mounting the Mounting Bracket Installation de le support de montage Instalación del soporte de montaje A A A 1 B A A B 1 4 1 (YGFK061564) DashMountingPlate/Plaquedemontage detableaudebord/Placademontajepara salpicadero (YGFX9996516) Cushioning/Rembourrage/Acolchado (YGFS012667) USBCable/CâbleUSB/CableUSB (K1HY05YY0005) StringKit(Theinstructionmanualisenclosed.)/Kit defil(manueld’instructionsfourni)./Kitdecuerda (elmanualdeinstruccionesestáadjunto). (YGP9FZ8713) 1 SDMemoryCard(InsertedintheCN-GP50U)/ CartemémoireSD(InséréedansleCN-GP50U)/ TarjetadememoriaSD(InsertadaenelCN-GP50U) (M3DKYY000003) DVD-ROM/DVD-ROM/DVD-ROM (YGAR040051) ImportantInformation/Informationimportante/Informaciónimportante (YGFM286109) InstallationInstructions/Instructionsd'installation/Instruccionesdeinstalación (YGFM294452) QuickReferenceGuide/Guidederéférence rapide/Guíabreve (YGFM262898) ImportantNotice/Remarqueimportante/ Avisoimportante (YGFM992019) ProductRegistrationCard/LaCarte d'enregistrementduproduit/Tarjetade Matrículadeproducto CustomerCarePlan/LeProjetclientèlede Soin/PlandeCuidadodecliente 1 B 3 A B * 1 1 B 1 1 1 Before mounting Whenmountingtheunittothedashboard 1 Whenmountingtheunittothefrontglass Wipeawayalloilanddirtetc.fromthemountingsurface. l Whenmountingtheunittothefrontglass,fixthemountingbracket directlytotheglasswithoutusingtheDashMountingPlate. l Itisrecommendedthatthisunitbestabilizedbyattachingcushioningto theadapterplate,topreventnoisegenerationfromvibrations,andthen positioningtheadapterplatesothatit’scontactingthedashboard. *Dependingonthelawsofthestateorcountry,connectingasshown inthefiguremaynotbepermitted. Avant le montage 1 Lorsdumontagedel’unitésurletableaudebord 1 1 Lorsdumontagedel'appareilsurlavitreavant 1 l T he number in parentheses is the part number for maintenanceandservice. l Accessoriesandtheirpartsnumbersaresubjectto modificationwithoutpriornoticeduetoimprovements. Remarques : l Lenuméroentreparenthèsesreprésentelenumérode piècepourl’entretienetlaréparation. l Lesaccessoiresetleursnumérosdepiècesontsujetsà changementsanspréavisenvuedel’amélioration. Notes: l Elnúmeroentreparéntesiseselnúmerodepieza paramantenimientoyservicio. l Losaccesoriosysusnúmerosdepiezaestánsujetos amodificacionessinprevioavisodebidoamejoras. E ssuyezlasurfacedemontagepouréliminerlapoussière,l’huile,etc. l Lorsdumontagedel'appareilsurlavitreavant,fixezlesupportdemontage directementàlavitresansutiliserlaplaquedemontagedetableaudebord. l Ilestconseillédestabilisercetteunitéenfixantleconssinetàlaplaque d’adaptation,pouréviterunegénérationdebruitssuiteauxvibrationsetensuite depositionnerlaplaqued’adaptationpourqu’elletoucheletableaudebord. *Selonlesloisdel'étatoudupays,leraccordementcommeillustréà lafigurepeutnepasêtreautorisé. Antes del montaje Notes: Cuandoinstalelaunidadenelsalpicadero Cuandoinstalelaunidadenelcristaldelantero Español PortableNavigationSystem Systèmedenavigationportable Sistemadenavegaciónportátil CN-GP50U/CN-GP50U/CN-GP50U Q’ty / Qté 1 English 1 Parts / Pièces Français No. / N° Examples of mounting Exemples de montage Ejemplos de instalación E liminecualquierrestodegrasaosuciedaddelasuperficiedemontaje. l Cuandoinstalelaunidadenelcristaldelantero,pegueelsoportedemontaje directamenteenelcristalsinutilizarlaplacademontajeparasalpicadero. l Serecomiendaestabilizarlaunidadcolocandoelacolchadoeneladaptador paraimpedirlosruidosderivadosdelavibracióny,acontinuación,colocarel adaptadordeformaqueestéencontactoconelsalpicadero. *Dependiendodelasleyesdelestadoopaís,esposiblequenose permitarealizarlaconexióntalycomosedescribeenlailustración. 1 C Mount the Mounting Bracket to the car. Removetheprotectivesheetandsecurelyaffixthe mountingbracket. Removethebackingsheet. Dashboard 2 3 Lower the lever of the Mounting Bracket. l TheMountingBracketisfixedtotheDashMounting Plate. l ConfirmthattheMountingBracketissecurelyfixed inplace. Loosen the ball joint lock. Release the arm lock. Abaissez le levier du support de montage. l Lesupportdemontageestinstallésurlaplaquede montagedutableaudebord. l Assurez-vousquelesupportdemontageestfermementmisenplace. Desserrez le verrouillage de l'articulation sphérique. Libérez le verrouillage du bras. 4 Adjust the angle of the arm. Adjusttheangleoftheballjoint. Rotatetheleverofthemountingbracketso thatthe directionisfacingupward. Enlevezlesfeuillesdeprotectionetapposezfermementlesupportdemontage. Enlevezlafeuillesdeprotection. Tableaudebord Réglez l'angle du bras. Réglezl'angledel'articulationsphérique. Faites tourner le levier du support de montagepourquelesens soittournévers lehaut. l Quandlatempératuredel'airestbasse,réchauffezlaventouse. Instalación del soporte de montaje en el coche. Quitelaláminadeprotecciónypeguefirmementeel soportedemontaje. Quitelaláminadeseguridad. Salpicadero l Cuandolatemperaturadelaireesbaja,calienteeldiscodelaventosa. 6 Tighten the ball joint lock. Attach the Adapter Plate to the Mounting Bracket. Lock the arm. l Insertthegroovesof Caution l Whentheairtemperatureislow,warmupthesuctiondisc. Montez le support de montage à la voiture. 5 Afloje la articulación de junta esférica. Suelte la articulación del brazo. Ajuste el ángulo del brazo. Ajusteelángulodelajuntaesférica. Girelapalancadelsoportedemontajehasta queladireccióndela mirehaciaarriba. . InstallMountingBracketonacarusingtheStringKit[stringwithbracket,tappingscrew(3mm×12mm)] includedwiththeproduct.SeetheinstructionmanualincludedintheStringKitforinstallationdetails. Serrez le verrouillage de l'articulation sphérique. Fixez la plaque d’adaptation au support de montage. Verrouillez le bras. l Insérezlesrainuresde Avertissement Baje la palanca del soporte de montaje. l Elsoportedemontajequedafijadoenlaplacade montajeparasalpicadero. l Compruebequeelsoportedemontajeestéfirmementesujeto. in dans . Installezlafixationdemontagedansunevoitureàl’aidedukitdefil[filavecfixation,vistaraudeuse (3mmx12mm)]fourniavecleproduit.Consultezlemanueld’instructionsfourniaveclekitdefil pourobtenirdesdétailssurl’installation. Apriete la articulación de junta esférica. Instale el adaptador en el soporte de montaje. Bloquee el brazo. l Insertelasranurasde Precaución en . InstaleelsoportedemontajeenunautomóvilusandoelKitdecuerda[cuerdaconescuadra,tornillo autoroscante(3mm×12mm)]queseentregaconelproducto.Consulteelmanualdeinstrucciones quehayenelKitdecuerdasinecesitamásinformaciónsobrelainstalación. Mounting the CN-GP50U Montage du CN-GP50U Instalación del CN-GP50U A Cigarette Lighter Adapter connection Raccordements de l'adaptateur d’allume-cigare Conexiones del adaptador para mechero Removing Retrait Desmontaje B 1 External unit connections Raccordements de l'unité externe Conexiones con unidades externas 1 1 1 2 3 2 A A A 1 2 Français English F it the CN-GP50U to the protrusion on the lower section of the Adapter Plate. F it the CN-GP50U to the protrusion on the upper section of the Adapter Plate. Insert plug of the cigar plug adapter into the cigar lighter socket of the vehicle. Connect plug CN-GP50U Bend the part indicated by on the Adapter Plate and remove the CN-GP50U from protrusion of the adapter plate. of the cigar plug adapter to the power connecter. l When not in use, remove of the cigar plug adapter from the cigar lighter socket of the vehicle. F irmly hold the CN-GP50U, and remove it in the direction indicated by . justez le CN-GP50U à la protubérance A sur la section inférieure de la plaque d’adaptation. Enlevez la feuille de protection. Vue de dessus E ncaje el CN-GP50U en el saliente de la sección superior del adaptador. Insérez la fiche de l'adaptateur de fiche de l’allume-cigare dans la prise de l’allume-cigare du véhicule. Branchez la fiche de l'adaptateur de fiche de l’allume-cigare à la prise d'alimentation. l Lorsque vous ne l’utilisez pas, retirez la fiche justez le CN-GP50U à la protubérance A sur la section supérieure de la plaque d’adaptation. E ncaje el CN-GP50U en el saliente de la sección inferior del adaptador. Español 3 Quite la lámina de protección. Vista superior Inserte el conector Enchufe el conector l Cuando no se use, quite de l'adaptateur de fiche de l’allume-cigare de la prise de l’allume-cigare du véhicule. del adaptador para cigarrillos en la toma para mechero del vehículo. del adaptador para cigarrillos en el conector de alimentación. del adaptador para cigarrillos de la toma para mechero del vehículo. CN-GP50U 7 B AC Charger connections Pull the lever left/right switch. Lift up the lever. and remove the mounting bracket. Support de montage Tirez le levier de relâche gauche/droite. Tenez fermement le CN-GP50U, et enlevez-le dans le sens indiqué par . T enez la pièce tage. Levez le levier vers le haut. et enlevez le support de mon- Soporte de montaje T ire del botón de bloqueo izquierda/derecha de la palanca. Sujete firmemente el CN-GP50U y quítelo en la dirección indicada con . Sujete la pieza Levante la palanca. y quite el soporte de montaje. Set the switch to the LOCK position. Insert plug Raccordements du chargeur c.a. Chargeur c.a. (CY-ZAC50U, en option) l Faites bien attention qu'aucun objet étranger tel que Conexiones para el adaptador de CA Cargador de CA (CY-ZAC50U, opción) l Evite que cuerpos extraños, como objetos metálicos, penetren en el interior del adaptador de red de CA. of the AC charger into the outlet. Connect plug l Be careful that no foreign objects such as metal des objets métalliques ne pénètrent à l'intérieur de l’ adapteur de fiche c.a. Incline la parte indicada con en el adaptador y extraiga el CN-GP50U del saliente del adaptador. Attach the AC Plug Adapter (Type A) to the AC Charger. AC Charger (CY-ZAC50U, option) objects enter inside the AC Plug Adapter. Courbez la pièce indiquée par sur la plaque d’adaptation et enlevez le CN-GP50U de la protubérance de la plaque d’adaptation. CN-GP50U a 1 Mounting Bracket Hold part B * 3 3 B Remove the protective sheet. Top view C 1 2 2 c A 2 2 1 b B 4 1 B A 4 A When connecting a PC to the unit USB connector of the PC USB connector of the unit of the AC charger to the CN-GP50U. l When not in use, unplug the product. F ixez l’adaptateur de fiche c.a. (type A) au chargeur de courant alternatif. Glissez le sélecteur sur la position «LOCK» (verrouillage). I nsérez la fiche du chargeur de courant alternatif dans la prise. Raccordez la fiche du chargeur de courant alternatif au CN-GP50U. A Raccordement d'un ordinateur à l'appareil Connecteur USB de l'ordinateur Connecteur USB de l'appareil B When connecting a separately purchased antenna to the unit *Depending on the laws of the state or country, connecting as shown in the figure may not be permitted. E xternal GPS Antenna (CA-GA60U, option) T MC Traffic Receiver (CY-TM200U, option) GPS connector Traffic receiver connector B Lors du raccordement d'une antenne achetée séparément à l'appareil *Selon les lois de l'état ou du pays, le raccordement comme illustré à la figure peut ne pas être autorisé. ntenne GPS externe A (CA-GA60U, en option) Récepteur de trafic TMC (CY-TM200U, en option) Connecteur GPS Connecteur de récepteur de trafic l Lorsque vous ne l’utilisez pas, débranchez le produit. onecte el adaptador de red de CA (Tipo A) al cargaC dor de CA. Coloque el interruptor en la posición LOCK. Inserte el enchufe de corriente. Conecte el enchufe del cargador de CA en la toma del cargador de CA al CN-GP50U. l Desenchufe el producto cuando no lo utilice. A Cuando conecte un PC a la unidad Conector USB del PC Conector USB de la unidad B Cuando conecte a la unidad una antena comprada por separado *Dependiendo de las leyes del estado o país, es posible que no se permita realizar la conexión tal y como se describe en la ilustración. ntena GPS externa A (CA-GA60U, opción) eceptor de información de tráfico R TMC (CY-TM200U, opción) Conector GPS Conector de receptor de tráfico