1
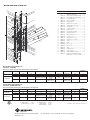
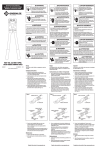
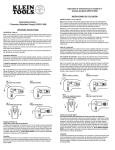
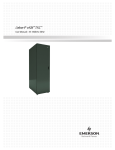
INSTRUCTION MANUAL
MANUAL DE INSTRUCCIONES
MANUEL D’INSTRUCTIONS
A person who has not read and does not
understand all operating instructions is
not qualified to operate this tool.
Failure to read and understand safety
instructions may result in injury or death.
Electrical shock hazard:
This tool is not insulated. Contact with
live circuits can result in severe injury or
death.
•Do not use on aluminum connectors or aluminum wire.
•Use proper die, connector and wire combinations.
Mismatched components can result in an incomplete
crimp. An incomplete crimp may have high electrical
resistance or may separate, resulting in a fire, severe
injury or death.
Keep hands away from closing dies and
other moving parts. Failure to observe this
precaution can result in injury.
99922045
IM 1289 REV 3 3/12
© 2012 Greenlee Textron Inc.
Peligro de electrocución:
Esta herramienta no está aislada. El
contacto con circuitos activados puede
ocasionar graves lesiones o incluso la
muerte.
Risques de choc électrique :
Cet outil n’est pas isolé. Le contact avec
des circuits sous tension peut causer des
blessures graves ou la mort.
•Ne pas utiliser avec des connecteurs ou des fils en
aluminium.
•Utiliser les bonnes combinaisons de matrices, de
connecteurs et de câbles.
Des éléments mal assortis peuvent résulter en un
sertissage incomplet. Un sertissage incomplet peut avoir
une haute résistance électrique ou peut se séparer, le
résultat pouvant être un incendie, des blessures grâves
ou même la mort.
Al manejar esta herramienta utilice
protectores para los ojos; de lo contrario
podría sufrir graves lesiones oculares
ocasionadas si los restos de cable
llegaran a saltar.
Esta herramienta ha sido diseñada para manejarse
con las dos manos. Sujete firmemente ambas manijas
mientras la herramienta está en funcionamiento.
Utilizarla de otra forma podría ocasionar lesiones o dañar
el engarzador.
Porter une protection des yeux pendant
l’utilisation de cet outil.
Négliger de se protéger les yeux peut
résulter en de sérieuses blessures aux
yeux causées par la projection de débris.
Cet outil est prévu pour être manié avec les deux mains.
Pendant son utilisation, maintenir une forte prise sur
les deux branches. Utiliser cet outil de toute autre façon
peut résulter en blessures ou en dommages matériels.
Garder les mains à l’écart de la fermeture
des matrices et de toutes autres parties
mobiles. Négliger cette précaution peut
résulter en blessures.
Mantenga las manos lejos de los
casquillos mientras se cierran y de otras
partes en movimiento; de lo contrario
podría sufrir lesiones.
K09-2GL, K09-2SPGL
and K09-3GL
COLOR-CODED CRIMPING TOOLS
Une personne qui n’a pas lu et ne
comprend pas toutes les instructions
d’utilisation n’est pas qualifiée pour
utiliser cet outil.
Négliger de lire et de comprendre les
instructions de sécurité peut résulter en
blessures ou en mort.
•No lo utilice con conectores ni cables de aluminio.
•Utilice la combinación adecuada de casquillos,
conectores y cables.
No utilizar los componentes correspondientes puede
dar como resultado un engarzado incompleto o bien,
provocar un incendio, graves lesiones o incluso la
muerte, si un empalme se separa o presenta una
resistencia muy alta a la corriente eléctrica.
Wear eye protection when using this tool.
Failure to wear eye protection can result
in serious eye injury from flying debris.
This tool is intended for two-handed operation. Maintain
a firm grip on both handles during operation. Using this
tool in any other manner can result in injury or damage
to the tool.
La persona que no haya leído o no
comprenda estas instrucciones de
operación no estará calificada para
manejar esta herramienta.
De no leerse y comprenderse estas
instrucciones sobre seguridad podrían
sufrirse lesiones o incluso la muerte.
Range
Rango
Capacité
•K09-2GL, K09-2SPGL: 8 AWG – 4/0 AWG
•K09-3GL: 3/0 AWG – 400 kcmil
•K09-2GL, K09-2SPGL: 8 AWG – 4/0 AWG
•K09-3GL: 3/0 AWG – 400 kcmil
•K09-2GL, K09-2SPGL: 8 AWG – 4/0 AWG
•K09-3GL: 3/0 AWG – 400 kcmil
Crimping Instructions
Instrucciones para realizar el engarzado
Instructions de sertissage
1. Remove the cable insulation according to the
instructions supplied with each lug or splice. Do not
cut or nick the individual strands.
2. Open the tool to its widest point and depress the die
post mechanism.
3. Select the proper die setting by rotating the die,
matching the cable size and colored dot at the top
of the die to the cable size and colored bands of the
connector. Release the post so that it returns to its
original position. Repeat this process for the opposite
die, making sure both dies match.
4. Insert the appropriate connector between the colorcoded bands closest to the tongue for lugs, between
the center marks for splices (see Figure 1).
1. Pele el cable tal como se indica en las instrucciones
incluidas con cada orejeta o empalmador. No corte ni
melle los hilos del cable.
2. Abra la herramienta completamente y desactive el
mecanismo colocador de casquillos.
3. Seleccione la posición correcta del casquillo girándolo,
y haciendo que el tamaño del cable y el punto de color
en su parte superior coincida con el tamaño del cable
y las rayas de color del conector. Suelte el colocador
de modo que vuelva a su posición original. Repita este
procedimiento para el otro casquillo asegurándose de
que ambos coincidan.
4. Inserte el conector apropiado entre las bandas
codificadas por color más próximas a la lengüeta
para orejetas, entre las marcas centrales para los
empalmes. (Véase la figura 1).
1. Dénuder le câble conformèment aux instructions
fournies avec chaque cosse ou épissure. Ne pas
couper ni entailler les torons individuels.
2. Ouvrir l’outil à son point le plus large et appuyer sur le
mécanisme de rotation de la matrice.
3. Choisir le réglage de matrice correct en tournant la
matrice, accordant le calibre du câble et le point de
couleur sur le dessus de la matrice avec la dimension
du câble et les bandes de couleur du connecteur.
Relâcher le mécanisme de la matrice pour qu’il
revienne à sa position d’origine. Répéter le même
processus pour la matrice opposée, en s’assurant que
les deux matrices s’accordent.
4. Insérer le connecteur approprié entre les bandes
codées couleur les plus proches de la patte pour
cosses, entre les marques centrales pour épissures
(Voir Figure 1).
Figura 1
Figure 1
Figure 1
DIRECCIÓN DE ENGARZADO
CRIMPING DIRECTION
PRIMERA COMPRESSIÓN
1ST COMPRESSION
CRIMPING DIRECTION
SIDE B
1ST COMPRESSION
SIDE A
CRIMPING DIRECTION
SIDE A
1ST COMPRESSION
SIDE B
5. Close the tool completely. Make sure the crimp
remains parallel to the color-coded bands.
Note: A ratcheting tool can not be opened until the
crimp is complete.
Repeat this procedure for the recommended number of
crimps as described in the chart on the following page.
Crimp away from the first crimp (see Figure 1).
Maintenance
1. Clean the tool often and store in a dry location.
2 Oil the moving parts, including rotating die selectors,
frequently.
Register this product at www.greenlee.com
SENS DU SERTISSAGE
DIRECCIÓN DE ENGARZADO
LADO B
PRIMERA COMPRESIÓN
LADO A
1E COMPRESSION
SENS DU SERTISSAGE
CÔTÉ B
1E COMPRESSION
CÔTÉ A
PRIMERA COMPRESIÓN
LADO B
DIRECCIÓN DE ENGARZADO
LADO A
SENS DU SERTISSAGE
CÔTÉ A
1E COMPRESSION
CÔTÉ B
5. Cierre completamente la herramienta. Asegúrese de
que el engarzado se mantenga paralelo a las bandas
codificadas por color.
Nota: Nunca deberá abrirse una herramienta de
trinquete hasta que no se haya completado el
engarzado.
Repita este procedimiento para el número
recomendado de engarzados tal como se describe en
el diagrama de la siguiente página. Comience a partir
del primer engarzado (Véase la figura 1).
5. Fermer l’outil complètement. S’assurer que le
sertissage est parallèle aux bandes du codage couleur.
Remarque : Un outil à cliquet ne peut pas être ouvert
avant que le sertissage soit complété.
Répéter ce processus pour le nombre de sertissage
recommandé comme décrit sur le tableau de la page
suivante. Sertir en s’éloignant du premier sertissage
(Voir Figure 1).
Mantenimiento
1. Nettoyer souvent l’outil et le ranger dans un endroit
sec.
2. Huiler fréquemment les pièces mobiles, y compris le
sélecteur rotatif de matrices.
1. Limpie con frecuencia la herramienta y guárdela en un
lugar seco.
2. Aceite frecuentemente las partes móviles incluyendo
los selectores giratorios de casquillo.
Registre este producto en www.greenlee.com
Entretien
Enregistrez votre produit en ligne, www.greenlee.com
K09-2GL, K09-2SPGL and K09-3GL
15
12
13
3
Key
13
Part No.
Description
Qty
1 50029118 Crimp Head Plate
(K09-2GL, K09-3GL)..............................4
6
5
50029118
Crimp Head Plate (K09-2SPGL)............2
2
50029126
Die Set (K09-2GL, K09-2SPGL).............1
50029134
Die Set (K09-3GL)..................................1
3
50029142
Crimp Jaw Strap....................................2
450029150Pivot Bushing.........................................2
28
15
16
13
22
7
6
1
16
50029169
Bushing (8.1 x 14 x 30)..........................2
6
50029231
Bushings (8.1 x 12 x 20)........................3
750029240Inner Bushing.........................................4
9
50029274
Die Axle Assembly.................................2
1050029290Ratchet Pawl..........................................1
7
2
9
5
31
11
50031074
Pivot Bushing Retainer..........................4
12
50031104
Allen Bolt 8x42 mm................................2
1350031112Washer, Burnished...............................10
16
20
17
10
19
4
11
14
50031120
Locknut, 8 mm.......................................5
15
50031139
Allen Bolt, 8 x 32 mm.............................3
16
50031147
Retainer Pin, 5 x 20 mm........................4
1750034065Spring....................................................1
30
1850034081Rack.......................................................1
28
3
13
14
Pin, 2 x 20..............................................1
20
50034103
Pin, 2 x 10..............................................1
2650034308Retaining Ring.......................................2
2750034421Return Spring.........................................2
28
13
14
27
50034090
2250034138Grip........................................................2
13
14
18
16
1
19
50034707
Crimp Plate (K09-2SPGL)......................2
29 50034944
Ratchet Assembly (K09-2SPGL)
(includes 10, 17, 18, 19 and 20).............1
26
Greenlee K09-2 Type Crimping Tools
Tool Range: 8–4/0 AWG
This tool is cUL and UL classified for use with the following connector brands:
CONNECTOR TYPE
Copper Splice
BARREL TYPE
ANDERSON
BLACKBURN®
BURNDY
Short
VHSS
CSP
Long
VHS
CU
Short
VHCS
PANDUIT
T&B
YS-L
CT
SCSS/SCS
54504–54512
BCU
A
YS
CTL
SCL/SCH
54804–54812
BBCU
B
CTL-2/CTL
YA/YA-L/YA-2L
YA-2LN/YA-L-TC/YA-L-2TC
CSW
CRA/CRB
LCAS/LCA
LCD
54104–54112
54204–54212
BLU
A
Long
VHCL
CTL-L/LCN
YA-2N
CLN/CLW
CRA-L/CRB-L
CRA-2L/CRB-2L
LCB/LCC
54930BE–54970BE
54850BE–54866BE
BBLU
B
Copper Lugs
PENN-UNION
NUMBER OF
CRIMPS*
ILSCO
Greenlee K09-3 Type Crimping Tools
Tool Range: 3/0 AWG–400 kcmil
This tool is cUL and UL classified for use with the following connector brands:
CONNECTOR TYPE
Copper Splice
BARREL TYPE
ANDERSON
BLACKBURN®
BURNDY
ILSCO
PANDUIT
T&B
PENN-UNION
NUMBER OF
CRIMPS*
Short
VHSS
CSP
YS-L
CT
SCSS/SCS
54511–54516
BCU
A
Long
VHS
CU
YS
CTL
SCL/SCH
54811–54816
BBCU
B
Short
VHCS
CTL-2/CTL
YA/YA-L/YA-2L
YA-2LN/YA-L-TC/YA-L-2TC
CSW
CRA/CRB
LCAS/LCA
LCD
54111–54116
54211–54216
BLU
A
Long
VHCL
CTL-L/LCN
YA-2N
CLN/CLW
CRA-L/CRB-L
CRA-2L/CRB-2L
LCB/LCC
54965BE–54916BE
54864BE–54874BE
BBLU
B
Copper Lugs
*Use the number of crimps listed in the last column instead of the number provided with the connector:
A: 8 AWG–1/0 AWG:
1 crimp
B: 8 AWG–1/0 AWG:
2 crimps
2/0 AWG–400 kcmil: 2 crimps
2/0 AWG–3/0 AWG:
3 crimps
4/0 AWG–400 kcmil: 4 crimps
4455 Boeing Drive • Rockford, IL 61109-2988 • USA • 815-397-7070
An ISO 9001 Company • Greenlee Textron Inc. is a subsidiary of Textron Inc.
www.greenlee.com
USA Tel: 800-435-0786
Fax: 800-451-2632
Canada Tel: 800-435-0786
Fax: 800-524-2853
BLACKBURN is a registered trademark of Thomas & Betts.
International Tel: +1-815-397-7070
Fax: +1-815-397-9247