1
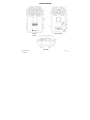
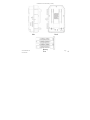
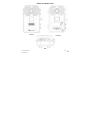
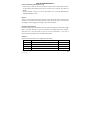
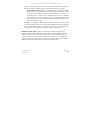
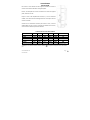
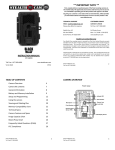
INSTRUCTION MANUAL MODEL: STC-‐G42NG www.stealthcam.com 877-‐269-‐8490 Page 2 **IMPORTANT NOTE** To ensure the product is being utilized to its full potential, we recommend checking our website for new product updates. If your unit is having trouble, please check the website to determine you are using the latest firmware or software version. TECHNICAL SUPPORT EMAIL: [email protected] Please allow 48 hours for email response. STEALTHCAM LLC P.O. Box 535189 Grand Prairie, TX 75053-‐9504 www.stealthcam.com 877-‐269-‐8490 CUSTOMER SERVICE CONTACT & HOURS Toll Free: 877-‐269-‐8490 CALL CENTER HOURS Mon – Fri / 8 AM – 5 PM (CST) Page 3 TABLE OF CONTENTS Camera Overview Quick Start Guide General Information Camera Programming Quick Set 1 (Q1) Quick Set 2 (Q2) Quick Set 3 (Q3) Custom Settings Test Mode Memory Card Installation Formatting Image Capacity Chart Battery Removal & Installation View and Deleting files Definitions Frequently Asked Questions (FAQs) FCC Compliance Limited Warranty Information www.stealthcam.com 877-‐269-‐8490 5 7 8 9 9 9 9 10 20 21 22 21 23 24 25 27 29 30 Page 4 CAMERA OVERVIEW Front Open Front Close Bottom www.stealthcam.com 877-‐269-‐8490 Page 5 CAMERA OVERVIEW (CONT) Back Side www.stealthcam.com 877-‐269-‐8490 Battery Tray Page 6 QUICK START GUIDE Power Options (Select one) 1. Insert 8 ‘AA’ batteries into the Battery Tray. Slide Battery Tray into the bottom of the G42NG camera until it is secured. (See page 23 for more details) 2. Connect 12V Battery Box to the bottom of the unit under the AUX POWER 12V DC gasket. Memory Insert a clean Class 10 SD memory card, between 2GB and 32GB into memory card slot. Memory card must be inserted in the correct orientation until spring lock mechanism engages. (See page 21 for more details) Mount Camera Mount the camera at the desired location using the strap mount, Python Lock cable, Articulating Ball Joint Mount, or other desired mounting mechanism. Position the camera so that it does not face East or West directly as the rising and setting of the sun can cause false positive triggers. Activation Move the slide switch to the desired activation programming: Position Settings Details on Page Q1 8MP – 30 Sec Time Out – 3 Images 9 Q2 8MP – 30 Sec Time Out – 1 Image 9 Q3 10 Sec HD Video – 30 Sec Time Out 9 5MP – 5 Sec Time Out – 1 Image (Default) 10 CUSTOM www.stealthcam.com 877-‐269-‐8490 Page 7 GENERAL INFORMATION Storing conditions • Operating Environment: 14 to 104 deg F (-‐10 to 40 deg C). 20-‐85% relative humidity, non-‐condensing. Special care instructions!! • • • • • • • • • • The camera is designed to be weather resistant. Never attempt to immerse the unit in water or any other liquid. This will damage the unit and void the warranty. Do not mix old and new batteries. Do not mix alkaline, standard, or rechargeable batteries. Use a soft lens cloth for cleaning lens. Avoid touching lens with fingers. Remove dirt or stains with a soft cloth dampened with water or neutral detergent. Keep your camera in a dry and cool dust-‐free environment or container when it is NOT used. Remove batteries when camera is NOT in use for an extended period of time. Avoid dropping your camera on to a hard surface. Do not disassemble your camera. Do not mix new and old batteries. Do not access the camera’s internal components compartment for unauthorized service, as this could cause serious damage to the unit and WILL void the warranty. NOTE: This camera is a precision electronic device. Do not attempt to service this camera yourself, as opening or removing covers may expose you to dangerous voltage points or other risks. www.stealthcam.com 877-‐269-‐8490 Page 8 CAMERA PROGRAMMING This G42NG features 6 distinct modes of operation: Off / Q1 / Q2 /Q3 / Custom / Test. Each setting is activated based upon the position of the switch on the inside of the unit. Off – This position completely powers down the unit. Q1 – This is the first Quick Set programming mode. When the camera is changed to the this mode, the display screen will give a digital read out of how the camera is preprogrammed. It will scroll across the display as follows: PHOTO…8.0MP…30 S DELAY…3 PHOTO BURST With this setting the camera is preprogrammed to take photos at 8MP resolution, a 30 second timeout delay between activations and takes a burst of 3 photos every trigger activation. Q2 – This is the second Quick Set programming mode. This setting is preprogrammed to take photos as 8MP resolution, 30-‐second timeout delay and take a single photo per trigger activation. Q3 – This is the third Quick Set programming mode. This setting the camera is preprogrammed to take a 720P HD Video with audio, have a 30 second timeout delay between activations, and each video will be 10 seconds in length. www.stealthcam.com 877-‐269-‐8490 Page 9 CAMERA PROGRAMMING – CUSTOM (CONT) Custom – This is the fifth setting and is defined by the user. When the camera is changed to this mode, the display screen will reflect the last program setting: Number of images on the memory card, Countdown timer and Battery percentage. PHOTO 00000 00:30 100% The system default programming is set to 5MP, 5-‐second timeout delay and 1 Photo Burst. The 30-‐second timer on the lower left of the display will count down towards 0 showing how much time is left to enter the Custom configuration mode. Should no change be made, the system will give an additional 30 seconds for the operator to move out of the coverage area before the camera becomes active. To make changes to the programming, press the MENU button to enter the configuration menu before the countdown reaches zero. When in the MENU configuration, pressing the DOWN arrow button will move the configuration to the next setting option. Pressing the ENTER button on the listed configuration option will cause the option to blink and allow it to be changed. Pressing ENTER again once an option has been changed will set the new configuration, save it to the camera’s memory, and return to selection section of the MENU configuration. Once all the settings have been changed to the operator’s desired settings pressing the MENU button will return to the initial display and the 30-‐second timer will start the countdown again. The following are the options and descriptions of how to change the configuration: www.stealthcam.com 877-‐269-‐8490 Page 10 CAMERA PROGRAMMING – CUSTOM (CONT) Ø Ø SETUP DATE – 01/01/14 (default): This setting is used to give the camera the correct date to use on the Info Bar of the images. The format is in a MM/DD/YY setup. With the MM (month) setting blinking, use the UP and DOWN arrows to be change the setting from 1 to 12. Once this setting is on the appropriate month, press the RIGHT arrow key to move to the DD (day) setting and it will start to blink. Using the UP and DOWN arrows will allow the setting to be change from 1 to 31 based upon the MM that has previously set. Again when this setting is on the appropriate day, press the RIGHT arrow key to move to the YY (year) setting and it will start to blink. Using the UP and DOWN arrows will allow the setting to be changed from 14 to 35. SETUP TIME – 12:00AM (default): This setting is used to give the camera the correct time to use on the Info Bar of the images. The default format is in a HH/MM/AP setup. With the HH (hour) setting blinking, use the UP and DOWN arrows to change from 1 to 12. Once this setting is on the appropriate hour, press the RIGHT arrow key to move to the MM (minute) setting and it will start to blink. Using the UP and DOWN arrows will allow the setting to be change from 00 to 59. Again when this setting is on the appropriate minute, press the RIGHT arrow key to move to the AP (am/pm) setting and it will start to blink. Using the UP and DOWN arrows will allow the setting to be changed from AM to PM. www.stealthcam.com 877-‐269-‐8490 Page 11 CAMERA PROGRAMMING -‐ CUSTOM (CONT) Ø Ø TIME FORMAT – 12 HOUR (default): This setting is used to tell camera if the time programmed and displayed on the Info Bar should be in the basic 12 hour (AM/PM) format or the 24 hour (military) format. With this option blinking, pressing the UP or DOWN arrow buttons will cause the camera to cycle between the two options. NOTE: Should the format be changed to 24 hour, the previous SETUP TIME will now be adjusted as such and remove the AM/PM part of the time. MODE – This setting is used to tell the camera how it should take its images. The camera is equipped with TRIAD Technology, allowing for 3 different options to be selected by the user. With this option blinking, use the UP or DOWN arrow key to move between the options of: PIR PHOTO, PIR VIDEO, or TL. Based upon the selection chosen the menus for the camera will change. o PIR PHOTO (default): In this mode the camera will take a designated amount of picture with a designated time out when the camera senses activity in front of the unit. This mode is available for both day and night activities. § PHOTO RES – 5.0 MP (default): This setting is used to determine the Megapixel resolution of each image taken by the camera. With this option blinking, use the UP or DOWN arrow key to move between the options of: 10MP, 8MP, 4MP, 2MP or 0.5MP. The higher the resolution of an image the more space the file will take on the SD memory card. PIR DELAY – 00min 05sec (default): This setting is used to determine the length of the time that the camera will wait before it reinitializes its PIR sensor for the next activation. With the TL mode this setting is only active if TL Delay is set to 1 min or greater. This setting can be changed between the numbers of 00min 05sec to 59min 59sec. With this option blinking, use of the UP and DOWN arrows will allow the minutes setting to be changed from 00 to 59. Once this setting is on the appropriate minutes, press the RIGHT arrow key to move to the seconds setting and it will start to blink. Use of the UP and Down arrows will allow the seconds setting to be changed from 00 to 59 (05 to 59 if minutes = 00). www.stealthcam.com 877-‐269-‐8490 Page 12 CAMERA PROGRAMMING -‐ CUSTOM (CONT) § § o REDUCE BLUR – ON: This setting is used to determine if the camera should use the MATRIX Blur reduction technology to dramatically reduce the blur effect resulting in clearer night time infrared shots. With this option blinking, pressing the UP or DOWN arrow buttons will cause the camera to cycle between the two options of ON or OFF. PHOTO BURST – 1 PHOTO (default): This setting is used to determine the number of photos the camera will take during its activation. This setting can be changed between 1 PHOTO up to 9 PHOTOS. With this option blinking, use the UP or DOWN arrow key to move between the value range in increments of 1. PIR VIDEO: In this mode the camera will take a video clip at a designated resolution for a designated length with a designated time out when the camera senses activity in front of the unit. This mode is available for both day and night activities. § PIR DELAY – 00min 05sec (default): This setting is used to determine the length of the time that the camera will wait before it reinitializes its PIR sensor for the next activation. With the TL mode this setting is only active if TL Delay is set to 1 min or greater. This setting can be changed between the numbers of 00min 05sec to 59min 59sec. With this option blinking, use of the UP and DOWN arrows will allow the minutes setting to be changed from 00 to 59. Once this setting is on the appropriate minutes, press the RIGHT arrow key to move to the seconds setting and it will start to blink. Use of the UP and Down arrows will allow the seconds setting to be changed from 00 to 59 (05 to 59 if minutes = 00). www.stealthcam.com 877-‐269-‐8490 Page 13 CAMERA PROGRAMMING -‐ CUSTOM (CONT) § § § o VIDEO RES – 720 x 480 (default): This setting is used to determine the resolution of each video taken by the camera. With this option blinking, use the UP or DOWN arrow key to move between the options of: 720 x 480 or 1280 x 720. The higher the resolution of a video the more space the file will take on the SD memory card. VIDEO LENGTH – 010 S (default): This setting is used to determine the length of time, in seconds, of the video recording. This setting can be changed between the numbers of 10 to 180. With this option blinking, use the UP or DOWN arrow key to move between the value range in increments of 5. The maximum night video is 30 seconds to conserve the batteries. VIDEO AUDIO – ON (default): This setting is used to determine if the camera should record audio (sound) with its video recording. With this option blinking, pressing the UP or DOWN arrow buttons will cause the camera to cycle between the two options of ON or OFF. TL (Time Lapse): In this mode the camera will take a designated amount of pictures with a designated time out between the designated hours of operation even if there is no activity in front of the camera. § PHOTO RES – 5.0 MP (default): This setting is used to determine the Megapixel resolution of each image taken by the camera. With this option blinking, use the UP or DOWN arrow key to move between the options of: 10MP, 8MP, 5MP, 2MP or 0.5MP. The higher the resolution of an image the more space the file will take on the SD memory card. www.stealthcam.com 877-‐269-‐8490 Page 14 CAMERA PROGRAMMING -‐ CUSTOM (CONT) § PIR DELAY – 00min 05sec (default): This setting is used to determine the length of the time that the camera will wait before it reinitializes its PIR sensor for the next activation. With the TL mode this setting is only active if TL Delay is set to 1 min or greater. This setting can be changed between the numbers of 00min 05sec to 59min 59sec. With this option blinking, use of the UP and DOWN arrows will allow the minutes setting to be changed from 00 to 59. Once this setting is on the appropriate minutes, press the RIGHT arrow key to move to the seconds setting and it will start to blink. Use of the UP and Down arrows will allow the seconds setting to be changed from 05 to 59 (05 to 59 if minutes = 00). • TL DELAY – 00min 30sec (default): This setting is used to set a delay between TIME LAPSE images. This setting can be changed between the numbers of 00min 05sec to 59min 59sec. With this option blinking, use of the UP and DOWN arrows will allow the minutes setting to be changed from 00 to 59. Once this setting is on the appropriate minutes, press the RIGHT arrow key to move to the seconds setting and it will start to blink. Use of the UP and Down arrows will allow the seconds setting to be changed from 00 to 59 (05 to 59 if minutes = 00). If the TL Delay is greater than or equal to 1 min, then the PIR sensor will be active between time-‐lapse photos. • TL START – 06:00PM (default): This setting is used to give the camera the start time for when to start the time-‐lapse photography. The default format is in a HH/MM/AP setup, should the time format be in 24 hour the format it will show HH/MM. With the HH (hour) setting blinking, use the UP and DOWN arrows to allow the setting to be changed from 1 to 12. Once this setting is on the appropriate hour, press the RIGHT arrow key to move to the MM (minute) setting and it will start to blink. www.stealthcam.com 877-‐269-‐8490 Page 15 CAMERA PROGRAMMING -‐ CUSTOM (CONT) § § Using the UP and DOWN arrows will allow the setting to be change from 00 to 59. Again when this setting is on the appropriate minute, press the RIGHT arrow key to move to the AP (am/pm) setting and it will start to blink. Using the UP and DOWN arrows will allow the setting to be changed from AM to PM. TL STOP – 08:00AM (default): This setting is used to give the camera the stop time for when to end the time-‐lapse photography. The default format is in a HH/MM/AP setup, should the time format be in 24 hour the format will be HH/MM. With the HH (hour) setting to blinking, use the UP and DOWN arrows to allow the setting to be changed from 1 to 12. Once this setting is on the appropriate hour, press the RIGHT arrow key to move to the MM (minute) setting and it will start to blink. Using the UP and DOWN arrows will allow the setting to be change from 00 to 59. Again when this setting is on the appropriate minute, press the RIGHT arrow key to move to the AP (am/pm) setting and it will start to blink. Using the UP and DOWN arrows will allow the setting to be changed from AM to PM. REDUCE BLUR – ON: This is used to determine if the camera should use the MATRIX Blur reduction technology to dramatically reduce the blur effect resulting in clearer night time infrared shots. With this option blinking, press UP/DN arrows will cause the camera to cycle between On/Off. EXAMPLE: Data Stamping on the bottom portion of the picture indicates the camera took a picture in Time Lapse (TL) mode. www.stealthcam.com 877-‐269-‐8490 Page 16 CAMERA PROGRAMMING -‐ CUSTOM (CONT) Ø Ø Ø Ø CAMERA NAME – STEALTH CAM (default): This setting is used to identify the camera on the Info Bar. It can be up to 13 characters long in the form of alpha (A-‐Z), numeric (0-‐9), or spaces. With this option blinking, use the UP or DOWN arrow buttons to change the initial character. Once the blinking character has been changed, use the RIGHT arrow button to continue to the next character. Repeat until the desired name is entered. When finished press the ENTER button again to confirm and store the new camera name. Pressing the DOWN arrow key will move the display to the next configuration option. TEMPERATURE – FAHRENHEIT (default): This setting is used to tell camera if the temperature reading on the Info Bar should be in Fahrenheit or Celsius. With this option blinking, pressing the UP or DOWN arrow buttons will cause the camera to cycle between the two options. INFO BAR – ON (default): This setting is used to tell camera if the Info Bar should be displayed at the bottom of images and video or not. With this option blinking, pressing the UP or DOWN arrow buttons will cause the camera to cycle between the two options of ON or OFF. LATITUDE – 000.000000N (default): This setting is used for the GEO-‐TAG of the camera. It will not be displayed on the images directly, but rather on the background image information. The coordinates can be changed from 000.000000 to 179.999999 www.stealthcam.com 877-‐269-‐8490 Page 17 CAMERA PROGRAMMING -‐ CUSTOM (CONT) and either N (North) or S (South). With this option blinking, use the UP or DOWN arrow buttons to change the initial number blinking. Once the number is correct use the RIGHT arrow button to continue to the next value. Repeat until the final desired numeric sequence is entered. Ø LONGITUDE – 000.000000E (default): This setting is used for the GEO-‐TAG of the camera. It will not be displayed on the images directly, but rather on the background image information. The coordinates can be changed from 000.000000 to 179.999999 and either E (East) or W (West). With this option blinking, use the UP or DOWN arrow buttons to change the initial number blinking. Once the number is correct use the RIGHT arrow button to continue to the next value. Repeat until the final desired numeric sequence is entered. Ø FACTORY RESET – NO (default): This setting is used to reset the camera to its factory defaults. With this option blinking, pressing the UP or DOWN arrow buttons will cause the camera to cycle between the two options of NO or YES. When the YES option is chosen and the ENTER button is press the camera will default all configurations made up to this point. SECURITY KEY – OFF (default): This setting allows the owner of the camera to program a four (4) character alphanumeric code to keep unauthorized people from accessing their camera settings. To turn this feature on press the ENTER button, then press the UP or DOWN arrow buttons to change to the YES option. Once chosen, www.stealthcam.com 877-‐269-‐8490 Page 18 CAMERA PROGRAMMING -‐ CUSTOM (CONT) press the ENTER button and the camera will now engage this feature. Pressing the DOWN arrow key will move to the security key configuration. o SECURITY KEY – 0000 (default): To change the key to an owner operated one press the ENTER button. With this option blinking, use the UP or DOWN arrow buttons change the first digit to the preferred number or letter. Then using the LEFT button, move to the second digit and change it to the preferred number or letter as well. Continue this until all 4 digits are correctly set. Finally press the ENTER button to secure the new code. NOTE: The camera owner is responsible for remembering the code. Should the code be forgotten the owner must call in to Customer Service (877-‐269-‐8490) for directions on getting the unit restored to factory default. In order for the owner to be authorized for the reset, this camera must be registered with StealthCam. FORMAT CARD – NO (default): This setting is used to format the SD memory card installed. With this option blinking, pressing the UP or DOWN arrow buttons will cause the camera to cycle between the two options of NO or YES. When the YES option is chosen and the ENTER button is press the camera will format the card, deleting any previous information that was on the card. Pressing the DOWN arrow key will move the display back to the starting option of SETUP DATE. (See page 22 for more details.) www.stealthcam.com 877-‐269-‐8490 Page 19 CAMERA PROGRAMMING Ø TEST – This is the final switch setting, and is used to test the camera’s PIR sensor coverage area. When moved to this setting the display will display: TEST VXX.XX.XX The number listed at the bottom of the display shows the current version of the firmware that is installed on the camera. Please check the StealthCam website to see if any firmware updates are available. When in this mode the Test Mode light will blink green when the camera detects motion. This will help determine if the camera is positioned at a location that will sense motion as it passes by causing the camera to activate in its PIR and video mode. www.stealthcam.com 877-‐269-‐8490 Page 20 MEMORY CARD INSTALLATION To insert the SD memory card into the camera: first locate the SD card slot on the right hand side of the of the camera case. Next with the SD card label facing towards the front of the camera, insert the SD card. When the card has been pressed in fully there will be a noticeable resistance as the spring locking mechanism activates to hold on the SD card. No force should be required to insert the card, should it feel as though the card will not freely slide into the slot, remove the card and check for any obstructions. IMAGE CAPACITY CHART 10MP 8MP 5MP 2MP 0.5MP 10sec HD Video 2GB SD CARD 307 384 1333 1536 6144 68 4GB SD CARD 614 768 2666 3072 12288 136 8GB SD CARD 1226 1536 5333 6144 24576 272 16GB SD CARD 2456 3072 10666 12288 49152 544 32GB SD CARD 4912 6144 21333 24576 98304 1088 *Number of images/videos is approximate and subject to change based upon subject footage. *NOTE: For best results use cards with designation on memory cards 4GB or higher. www.stealthcam.com 877-‐269-‐8490 Page 21 MEMORY CARD (CONT) FORMATTING SD CARD It always best to format your SD cards from the actual device your using, in this case the camera. This will allow the camera to format the card in the proper fashion. 1. First insert your SD memory card into the camera. 2. Slide the switch to the Custom setting. 3. Press the Menu. 4. Press the Up Arrow once. The display will show “Format Card – No” 5. Press the Enter button. The word “No” will start to blink. 6. Press the Down Arrow once. The word “Yes” will start blinking. 7. Press the Enter button to delete and format the card. The display will read “Format Card -‐ Deleting….” 8. Once the card has been formatted the screen will go back to read “Format Card – No” 9. Press the Menu key to return back to ready mode. www.stealthcam.com 877-‐269-‐8490 Page 22 BATTERY REMOVAL & INSTALLATION To remove the batteries from the unit; open the case and press the EJECT button on the lower right hand corner. This will cause the battery tray to be released and slide downwards. New, Alkaline or Lithium, ‘AA’ batteries must be inserted with the orientation as shown on the tray. As with most electronic devices the negative ( -‐ ) orientation of the batteries should be against the springs. Failure to insert the batteries properly will cause damage to the unit. To reinsert the battery tray; position the tray so the base of the tray matches with the opening at the bottom of the camera. The tray is notched so that incorrect insertion of the battery tray is not possible. With the orientation correct simply slide the battery tray into its final locked position. Should the battery tray not willingly slide into it destination, remove the tray and examine the area of possible debris that may be causing the issue. NOTE: Replacing the batteries will not reset the cameras current configurations. **WARNING** Do not mix new and old batteries. Remove batteries from the tray if the unit will not be in use for extended period of time. www.stealthcam.com 877-‐269-‐8490 Page 23 VIEW & DELETING IMAGES The camera allows for two (2) ways to view your images. First is the direct connection for the camera to the computer via a USB cable (not included). This is a USB mini to standard USB (type A/B) cable. By simply turning the unit to the OFF position, and plugging the USB mini end into the camera and the standard USB end into the computer, the computer will register the camera as a card reading device. Once connection with the computer has been established the files may be review based upon the software installed on the computer. Please refer to the software’s Owner’s Manual for exact viewing of images. NOTE: Support for this operation is limited to but not exclusive to the Windows Vista operating system and above, and also the Mac OS 10.6 and above. Any operating systems below the above-‐mentioned are not guaranteed to be compatible and may result in system errors. The second option is to remove the SD memory card from the camera, and using a card reading device to view the images. Please refer to the Owner’s Manual for the particular device in use for viewing the files. NOTE: SD memory card viewers not manufactured by Stealth Cam may create conflicts on the memory card. Should this occur and the card is no longer working properly with the unit, the SD memory card will need to be reformatted. www.stealthcam.com 877-‐269-‐8490 Page 24 DEFINITIONS REFLEX (Advanced Low-‐Light Sensitivity) – Ultra-‐fast trigger speed, averaging < 1 second with recovery times programmable as low as 5 seconds. MATRIX (Blur Reduction Technology) – Advanced blur reduction dramatically reduces blur effects resulting in sharper, clearer images. RETINA (Sub 1-‐Second Trigger) – Superior low light performance for extended nighttime range. MULTI-‐ZONE DETECTION -‐ Provides for more accurate coverage at angle & distance, maximizing the cameras triggering capability. TRIAD (3-‐in-‐1 Technology) Ø Hi-‐Res still images: The basis upon which scouting cameras were designed, today’s Stealth Cam’s shoot high-‐resolution still images (day & night) with unmatched clarity and detail. Coupled with Burst Mode (multiple exposures per triggering). Ø HD Video: Stealth Cam’s ability to shoot HD video with audio brings a whole new dimension to scouting by giving the user a true glimpse into the animal’s behavior and vocalizations. Ø Time Lapse: The option to set the camera to take images at predetermined intervals over a selected time periods (day or night) is the cornerstone behind Stealth Cam’s Time Lapse function. New for 2014 is motion sensor override – if a subject matter enters the cameras coverage zone between time-‐lapse shots the sensor will override the setting, trigger & capture the image when TL delay is greater than or equal to 1 min. BURST (Rapid Fire Mode) -‐ Multiple exposures per triggering delivers a sequence of images capturing subject movement. QUICK SET (Fast, Simple Setup) -‐ Pre-‐programmed setting switches which allows the user to literally set their trail cam up in a matter of seconds. SECURE LOCK (Digital Protection) – Secure Lock offers password protection rendering the camera access nearly impossible. www.stealthcam.com 877-‐269-‐8490 Page 25 DEFINITIONS (CONT) GEO-‐TAG (GPS Meta-‐Tagging) -‐ Allows the entry of GPS coordinates into the camera. These coordinates do not appear on the time date stamp but rather in the background image data. When GPS tagged image is opened with a location enabled program such as iPhoto or Picasa images are plotted on a map. www.stealthcam.com 877-‐269-‐8490 Page 26 FREQUENTLY ASKED QUESTIONS Q: Can I mix batteries together? A: NO, you should never mix old with new OR Alkaline with Lithium with Rechargeable. Q: Is my game camera Mac compatible? A: Yes, This camera model works with 10.6 and above. Q: Can I use rechargeable batteries in the camera? A: Rechargeable batteries are fine for the unit; regular alkaline batteries designed for digital electronics are recommended for best performance. Q: When I use a memory card can I view the pictures on my personal digital camera? A: We do not recommend viewing SD memory card images taken in your game camera on any other digital camera. You may experience compatibility issues. Q: Will I lose my images and setting when the batteries die? A: The images are stored on your external SD memory card so your images will be intact only on your card. However you will need to reset your settings. Q: What are my options if my camera is past its warranty? A: We have an out of warranty program in which you may purchase a refurbished / reconditioned replacement unit for 50% or more off (based on retail price of unit) discount exchange of your old unit. www.stealthcam.com 877-‐269-‐8490 Page 27 FREQUENTLY ASKED QUESTIONS (CONT) Q: Can I use my game camera through a window or glass door? A: Glass may disrupt your sensor beam we don’t advise using the camera in this fashion. Q: Do I need to recharge my 12V Battery Kit during the seasons if it’s not in use? A: The 12V Battery Kit should be recharge at least every 3 months, regardless if it is being used or not, in order to preserve the working condition of the battery inside the unit. To ensure optimum performance of your Stealth Cam camera, it’s best to always check for periodical free software updates. For the latest firmware downloads, please check http://www.stealthcam.com/download Sign up for our weekly newsletter to stay informed on updates & new product news. www.stealthcam.com 877-‐269-‐8490 Page 28 FCC COMPLIANCE GSM STC-‐G42NG NOTE: This equipment has been tested and found to comply with the limits for Class B digital device, pursuant to part 15 of the FCC Rules. These limits are designed to provide reasonable protection against harmful interference in a residential installation. This equipment generates uses and can radiate radio frequency energy and, if not installed and used in accordance with the instructions, may cause harmful interference to radio or television receptions, which can be determined by turning the equipment off and on, the user is encouraged to try to correct the interference by one or more of the following measure: Ø Ø Ø Reorient or relocate the receiving antenna. Increase the separation between the equipment and the receiver. Connect the equipment into an outlet on a circuit different from that to which the receiver is connected. Consult the dealer or an experienced radio/TV technician for help. Ø Caution: Changes or Modifications not expressly approved by the party responsible could void the user’s authority to operate this device. Product specifications are subject to change. Stealth Cam is not responsible for any photographic or typographical errors. May be protected by one or more U.S. Patent numbers: 6,735,387 / 6,768,868 / 6,834,162 / 7,149,422 / 7,308,196 / 7,593,632 / 7,710,457. www.stealthcam.com 877-‐269-‐8490 Page 29 LIMITED WARRANTY INFORMATION Your Stealth Cam scouting camera is covered by a 365 Day Limited Warranty on parts and labor from the date of original purchase, and purchases must be made through an authorized dealer. The warranty covers defects in workmanship and materials. The warranty does not apply to units, which have been damaged or abused intentionally or unintentionally. A purchase from individuals or unauthorized Internet sites such as eBay voids the warranty. This camera must be registered with Stealth Cam via web, email, or customer service phone support, and accompanied with a receipt from the point of purchase, for any Factory Reset options to be available. Tampering with or altering the unit will void the warranty. Any unauthorized service will void warranty. A copy of your original sales receipt must be produced for any warranty service and a Return Authorization (RA) number must be obtained from customer service at 877-‐269-‐8490 prior to returning product. Stealth Cam is not responsible for any lost untraceable packages or those without a Return Authorization at the time of return. www.stealthcam.com 877-‐269-‐8490 Page 30 MANUEL D'INSTRUCTIONS MODÈLE : STC-‐G42NG www.stealthcam.com 877-‐269-‐8490 Page 31 www.stealthcam.com 877-‐269-‐8490 Page 32 **NOTE IMPORTANTE** Pour vous assurer que le produit soit utilisé à son plein potentiel, nous vous recommandons de vérifier notre site Web pour obtenir les nouvelles mises à jour du produit. Si votre appareil a des problèmes, veuillez consulter le site pour déterminer si vous utilisez le dernier micrologiciel ou la toute dernière version du logiciel. SOUTIEN TECHNIQUE COURRIEL : [email protected] Veuillez allouer un délai de 48 heures avant d'obtenir une réponse par courriel. STEALTH CAM LLC P.O. Box 535189 Grand Prairie, TX 75053-‐9504 www.stealthcam.com 877-‐269-‐8490 SERVICE À LA CLIENTÈLE CONTACT & HEURES Sans frais : 1-‐877-‐269-‐8490 HEURES DU CENTRE D'APPEL Lun – Vend/8 h – 17 h (HCN) Page 33 TABLE DES MATIÈRES Aperçu de l'appareil photo Guide démarrage rapide Renseignements généraux Réglage de l'appareil photo Réglage rapide 1 (Q1) Réglage rapide 2 (Q2) Réglage rapide 3 (Q3) Paramètres personnalisés Mode Test 33 37 38 39 39 39 39 40 50 Carte mémoire Installation Formatage Tableau de la capacité de l'image Installation et retrait de la pile Affichage et Suppression des fichiers Définitions Foire aux questions (FAQ) Conformité FCC Renseignements sur la garantie limitée 50 51 50 52 53 54 56 58 59 www.stealthcam.com 877-‐269-‐8490 Page 34 Devan t APERÇU DE L'APPAREIL PHOTO Devant ouvert Bas www.stealthcam.com 877-‐269-‐8490 Page 35 APERÇU DE L'APPAREIL PHOTO (SUITE) Côté Arrière www.stealthcam.com 877-‐269-‐8490 Comparti ment à Page 36 GUIDE DE DÉMARRAGE RAPIDE 7 Options d'alimentation (Sélectionnez-‐en une) 1. Insérez 8 piles de type 'AA' dans le Compartiment à piles. Glissez le Compartiment à piles au bas de l'appareil photo G42NG jusqu'à ce qu'il soit fixé. (Lisez la page 23 pour obtenir les détails) 2. Branchez le Boîtier à piles de 12 V au bas de l'appareil, sous le joint AUX POWER 12V DC (ALIMENTATION AUX 12 V CD). Mémoire Insérez une carte mémoire SD de classe 10 propre, entre 2 GB et 32 GB, dans la fente de la carte mémoire. La carte mémoire doit être insérée dans le bon sens jusqu'à ce que le mécanisme de verrouillage à ressort s'engage. (Lisez la page 21 pour obtenir les détails) Montage de l'appareil photo Montez l'appareil photo à l'endroit désiré en utilisant l'étrier de montage, le câble de verrouillage Python, la monture Ball-‐Joint, ou tout autre mécanisme de montage désiré. Placez l'appareil-‐ photo afin qu'il ne soit pas orienté vers l'est ou vers l'ouest directement , car la force et l'orientation du soleil peuvent fausser les déclencheurs positifs. Activation Déplacez l'interrupteur latéral vers le réglage d'activation désiré : Position Réglages Détails sur la page Q1 8MP – Temporisation 30 sec – 3 Images 39 Q2 8MP – Temporisation 30 sec – 1 Image 39 Q3 Vidéo HD 10 sec -‐ Temporisation 30 sec 39 5MP – Temporisation 5 sec – 1 image (Par défaut) 40 Personnalisé www.stealthcam.com 877-‐269-‐8490 Page 37 RENSEIGNEMENTS GÉNÉRAUX Conditions de rangement • Environnement d'exploitation : -‐10 à 40 deg C (14 à 104 deg F). 20 -‐ 85 % humidité relative, sans condensation. Instructions pour les soins spéciaux • L'appareil photo est conçu pour résister à l'eau. N'essayez jamais de plonger l'appareil dans l'eau ou dans tout autre liquide. Ce qui pourrait endommager l'appareil et annuler la garantie. • • Ne pas mélanger piles neuves et anciennes. Ne mélangez pas les piles alcalines, standard ou rechargeables. • Utilisez un linge doux pour lentilles pour nettoyer les lentilles. Évitez de toucher les lentilles avec vos doigts. • Éliminez la saleté ou les taches avec un linge doux trempé dans l'eau ou un détergent neutre. Gardez votre appareil photo dans un environnement sans poussière, frais et sec lorsque vous NE l'utilisez PAS. • Retirez les piles lorsque vous n'utilisez pas l'appareil photo pendant une période de temps prolongée. • Évitez de laisser tomber votre appareil photo sur une surface dure. • Ne démontez pas votre appareil photo. • Ne mélangez pas les vieilles piles avec les neuves. • N'accédez pas aux composants internes de l'appareil photo pour un service non autorisé, ce qui pourrait endommager sérieusement l'appareil et ANNULERA la garantie. REMARQUE : Cet appareil-‐photo est un appareil électronique de précision. N'essayez pas de réparer cet appareil photo vous-‐même, car l'ouverture ou le retrait du couvercle peut vous exposer à des points de voltage dangereux ou à d'autres risques. www.stealthcam.com 877-‐269-‐8490 Page 38 RÉGLAGE DE L'APPAREIL PHOTO Ce G42NG comprend 6 modes distincts d'opération : Arrêt/Q1/Q2/Q3/Personnalisé/Test. Chaque paramètre est activé en fonction de la position de l'interrupteur à l'intérieur de l'appareil. Arrêt – Cette position coupe complètement l'alimentation de l'appareil. Q1 – Il s'agit du premier mode de programmation de Réglage rapide (Quick Set). Lorsque l'appareil est changé pour le ce mode, l'écran vous donnera une lecture numérique sur la façon dont l'appareil est préréglé. Il défilera sur l'écran comme suit : PHOTO…8.0 MP…30 S Délais…3 PHOTO BURST Avec ce réglage, l'appareil est préréglé pour prendre des photos à une résolution de 8 méga pixels, à 30 secondes de délai entre les activations et prend une rafale de 3 photos à chaque activation du déclencheur. Q2 – Il s'agit du deuxième mode de programmation de Réglage rapide (Quick Set). Ce paramètre est préréglé pour prendre des photos à une résolution de 8MP, à 30 secondes de délai et prendre une seule photo par activation du déclencheur. Q3 – Il s'agit du troisième mode de programmation de Réglage rapide (Quick Set). Ce paramètre est préréglé pour faire une vidéo HD de 720p avec audio, avoir un deuxième délai de 30 secondes entre les activations, et chaque vidéo durera 10 secondes. www.stealthcam.com 877-‐269-‐8490 Page 39 RÉGLAGE DE L'APPAREIL PHOTO -‐ PERSONNALISÉ (SUITE) Personnalisé – Il s'agit du cinquième paramètre et est défini par l'utilisateur. Lorsque l'appareil est changé pour ce mode, l'écran d'affichage reflètera le dernier réglage du programme : Nombre d'images contenues sur la carte mémoire, la minuterie et le pourcentage de la pile. PHOTO 00000 00:30 100 % Le réglage par défaut du système est réglé à 5MP, à 5 secondes de délai et 1 rafale de photos. La minuterie de 30 secondes sur le coin inférieur gauche de l'écran reviendra à 0, affichant le temps restant pour entrer en mode de configuration Personnalisé. Si aucun changement n'est apporté, le système donnera 30 secondes supplémentaires à l'opérateur pour se déplacer hors de la zone de couverture avant que l'appareil photo ne devienne actif. Pour apporter des modifications à la programmation, appuyez sur le bouton MENU pour accéder au menu de configuration avant que la minuterie n'atteigne zéro. Lorsque, dans la configuration du MENU, appuyer sur la flèche BAS déplacera la configuration à l'option de réglage suivante. En appuyant sur le bouton ENTRÉE sur l'option de configuration énumérée fera clignoter l'option à et lui permettra d'être modifiée. Appuyer sur ENTRÉE encore une fois après avoir modifié une option règlera la nouvelle configuration, l'enregistrera sur la mémoire de l'appareil photo, et retournera à la section de sélection de la configuration du MENU. Une fois que tous les paramètres ont été modifiés par les réglages souhaités de l'opérateur, appuyez sur le bouton MENU reviendra à l'affichage initial et la minuterie de 30 secondes recommencera. Ce qui suit représente les options et les descriptions de la façon de modifier la configuration : www.stealthcam.com 877-‐269-‐8490 Page 40 RÉGLAGE DE L'APPAREIL PHOTO -‐ PERSONNALISÉ (SUITE) Ø Ø RÉGLAGE DE LA DATE – 01/01/14 (par défaut) : Ce paramètre est utilisé pour indiquer la bonne date à la caméra à utiliser sur la Barre d'infos des images. Le format est MM/JJ/AAAA. Lorsque le MM (mois) clignote, utilisez les flèches vers le HAUT et vers le BAS pour passer de 1 à 12. Une fois ce paramètre sur le mois approprié, appuyez sur la flèche DROITE pour passer au réglage DD (jour) et ce dernier commencera à clignoter. Les flèches HAUT et BAS permettront de changer entre 1 et 31 en fonction du MM qui a été réglé précédemment. À nouveau, lorsque ce paramètre se trouve sur le bon jour, appuyez sur la flèche DROITE pour passer au réglage AAAA (année) et ce dernier commencera à clignoter. Les flèches HAUT et BAS permettront de changer entre 14 et 35. RÉGLAGE DE L'HEURE – 12:00 AM (par défaut) : Ce paramètre est utilisé pour indiquer la bonne heure à la caméra à utiliser sur la Barre d'infos des images. Le format est HH/MM/AP. Lorsque le HH (heure) clignote, utilisez les flèches vers le HAUT et vers le BAS pour passer de 1 à 12. Une fois ce paramètre sur le mois approprié, appuyez sur la flèche DROITE pour passer au réglage MM (minute) et ce dernier commencera à clignoter. Les flèches HAUT et BAS permettront de changer entre 00 et 59. À nouveau, lorsque ce paramètre se trouve sur la bonne minute, appuyez sur la flèche DROITE pour passer au réglage AP (AM/PM) et ce dernier commencera à clignoter. Les flèches HAUT et BAS permettront de changer entre AM. www.stealthcam.com 877-‐269-‐8490 Page 41 RÉGLAGE DE L'APPAREIL PHOTO -‐ PERSONNALISÉ (SUITE) Ø Ø FORMAT DE L'HEURE – 12 HEURES (par défaut) : Ce paramètre est utilisé pour indiquer à l'appareil photo si l'heure programmée et affichée sur la Barre d'infos doit être au format de base de 12 heures (AM/PM) ou au format 24 heures (militaire). Lorsque cette option clignote, appuyer sur les flèches HAUT ou BAS pour basculer entre les deux options. REMARQUE : Si le format doit être changé pour celui de 24 heures, le RÉGLAGE DE L'HEURE précédent sera maintenant ajusté et la partie AM/PM de l'heure sera supprimée. MODE – Ce paramètre est utilisé pour indiquer à l'appareil photo la manière selon laquelle il devrait prendre ses images. L'appareil est équipé de la technologie TRIAD, permettant à l'utilisateur de sélectionner 3 options différentes. Lorsque cette option clignote, utilisez les flèches HAUT ou BAS pour vous déplacer parmi les options suivantes: PHOTO PIR, VIDÉO ou TL. En se basant sur la sélection choisie, les menus de l'appareil photo changeront. o PHOTO PIR (par défaut) : Dans ce mode, l'appareil photo prend une quantité désignée de photos dans un laps de temps établi lorsque l'appareil photo détecte une activité se déroulant devant l'appareil. Ce mode est disponible à la fois pour les activités de jour et de nuit. § RÉS PHOTO – 5.0 MP (par défaut) : Ce paramètre est utilisé pour déterminer la résolution en méga pixels de chaque image prise par l'appareil photo. Lorsque cette option clignote, utilisez les flèches HAUT ou BAS pour vous déplacer parmi les options suivantes: 10MP, 8MP, 5MP, 2MP ou 0.5MP. Plus la résolution d'une image est haute, plus elle prendra de place sur la carte mémoire SD. § DÉLAI PIR – 05 S (par défaut) : Ce paramètre est utilisé pour déterminer la longueur de temps, en secondes, que l'appareil photo doit attendre avant de réinitialiser le capteur PIR pour la prochaine activation. Le format pour ce délai est MM/SS. Lorsque cette option clignote, utilisez les flèches HAUT et permettront de changer entre 00 et 59. Une fois ce paramètre sur l'heure appropriée, appuyez sur la flèche DROITE (RIGHT) pour passer au réglage SS (secondes) et ce dernier commencera à clignoter. Les flèches HAUT et BAS permettront de changer entre 00 et 59. www.stealthcam.com 877-‐269-‐8490 Page 42 RÉGLAGE DE L'APPAREIL PHOTO -‐ PERSONNALISÉ (SUITE) § § o Lorsque cette option clignote, utilisez les flèches HAUT ou BAS pour déplacer l'étendue de la valeur par échelon de 1. RÉDUCTION DU FLOU – ACTIVÉ : Ce paramètre est utilisé pour déterminer si l'appareil photo devrait utiliser la technologie de réduction du flou pour réduire de manière important les effets de flou résultant en de images infrarouge nocturnes plus claires. Lorsque cette option clignote, appuyer sur les flèches HAUT ou BAS pour basculer entre les deux options ACTIVÉ ou DÉSACTIVÉ. PHOTO en rafale – 1 PHOTO (par défaut) : Ce paramètre est utilisé pour déterminer le nombre de photos que l'appareil photo prendre pendant son activation. Ce réglage peut être modifié entre 1 PHOTO jusqu'à 9 PHOTOS. Lorsque cette option clignote, utilisez les flèches HAUT ou BAS pour déplacer l'étendue de la valeur par échelon de 1. VIDÉO : Dans ce mode, l'appareil photo prendre un clip vidéo à une résolution désignée pour une durée établie avec une temporisation spécifiées lorsque l'appareil photo détecte une activité se déroulant devant l'appareil. Ce mode est disponible à la fois pour les activités de jour et de nuit. DÉLAI PIR – 05 S (par défaut) : Ce paramètre est utilisé pour déterminer la longueur de temps, en secondes, que l'appareil photo doit attendre avant de réinitialiser le capteur PIR pour la prochaine activation. Le format pour ce délai est MM/SS. Lorsque cette option clignote, utilisez les flèches HAUT et permettront de changer entre 00 et 59. www.stealthcam.com 877-‐269-‐8490 Page 43 RÉGLAGE DE L'APPAREIL PHOTO -‐ PERSONNALISÉ (SUITE) Une fois ce paramètre sur l'heure appropriée, appuyez sur la flèche DROITE (RIGHT) pour passer au réglage SS (secondes) et ce dernier commencera à clignoter. Les flèches HAUT et BAS permettront de changer entre 00 et 59. Lorsque cette option clignote, utilisez les flèches HAUT ou BAS pour déplacer l'étendue de la valeur par échelon de 1. § RÉS VIDÉO – 720 x 480 (par défaut) : Ce paramètre est utilisé pour déterminer la résolution de chaque vidéo effectué par l'appareil photo. Lorsque cette option clignote, utilisez les flèches HAUT ou BAS pour vous déplacer parmi les options suivantes : 720 x 480 ou 1280 x 720. Plus la résolution d'une vidéo est haute, plus elle prendra de place sur la carte mémoire SD. § DURÉE DE LA VIDÉO – 010 S (par défaut) : Ce paramètre est utilisé pour déterminer la durée, en secondes, de l'enregistrement de la vidéo. Ce paramètre peut être modifié par les nombres de 05 à 180. Lorsque cette option clignote, utilisez les flèches HAUT ou BAS pour déplacer l'étendue de la valeur par échelon de 5. § AUDIOVIDÉO – ACTIVÉ (par défaut) : Ce paramètre est utilisé pour déterminer si l'appareil photo doit enregistrer avec l'audio (son) lors de l'enregistrement. Lorsque cette option clignote, appuyer sur les flèches HAUT ou BAS pour basculer entre les deux options ACTIVÉ ou DÉSACTIVÉ. TL (Délai) : Dans ce mode, l'appareil photo prend une quantité désignée de photos dans un délai établi entre les heures d'opération désignée même s'il n'y a aucune activité devant l'appareil photo. www.stealthcam.com 877-‐269-‐8490 Page 44 RÉGLAGE DE L'APPAREIL PHOTO -‐ PERSONNALISÉ (SUITE) § § § • RÉS PHOTO – 5.0 MP (par défaut) : Ce paramètre est utilisé pour déterminer la résolution en méga pixels de chaque image prise par l'appareil photo. Lorsque cette option clignote, utilisez les flèches HAUT ou BAS pour vous déplacer parmi les options suivantes : 10MP, 8MP, 5MP, 2MP ou 0.5MP. Plus la résolution d'une image est haute, plus elle prendra de place sur la carte mémoire SD. DÉLAI PIR – 05 S (par défaut) : Ce paramètre est utilisé pour déterminer la longueur de temps, en secondes, que l'appareil photo doit attendre avant de réinitialiser le capteur PIR pour la prochaine activation, que si le retard est réglé BA à une minute ou plus. Ce paramètre peut être modifié par les nombres de 05 à 99. Lorsque cette option clignote, utilisez les flèches HAUT ou BAS pour déplacer l'étendue de la valeur par échelon de 1. DÉLAI – 00:30 (par défaut) : Ce paramètre est utilisé pour établir un délai entre les images. Le format pour ce délai est MM/SS. Lorsque cette option clignote, utilisez les flèches HAUT et permettront de changer entre 00 et 59. Une fois ce paramètre sur l'heure appropriée, appuyez sur la flèche DROITE (RIGHT) pour passer au réglage SS (secondes) et ce dernier commencera à clignoter. Les flèches HAUT et BAS permettront de changer entre 00 et 59. Si le retard TL est supérieure ou égale à une minute, le capteur PIR sera actif entre temps les photos de déchéance. DÉBUT DU DÉLAI (TL) – 06:00 PM (par défaut) : Ce paramètre est utilisé pour donner à l'appareil photo le temps de démarrage pour commencer le délai de la photographie. Le format par défaut est HH/MM/AP, si le format de l'heure doit être celui de 24 heures sera HH/MM. Lorsque le paramètre HH (heure) clignote, utilisez les flèches vers le HAUT et vers les BAS www.stealthcam.com 877-‐269-‐8490 Page 45 RÉGLAGE DE L'APPAREIL PHOTO -‐ PERSONNALISÉ (SUITE) § § pour permettre au paramètre de changer de 1 à 12. Une fois ce paramètre sur la bonne heure, appuyez sur la flèche DROITE pour passer au réglage MM (minute) et ce dernier commencera à clignoter. Les flèches HAUT et permettront de changer entre 00 et 59. À nouveau, lorsque ce paramètre se trouve sur la bonne minute, appuyez sur la flèche DROITE pour passer au réglage AP (AM/PM) et ce dernier commencera à clignoter. Les flèches HAUT et BAS permettront de changer entre AM et PM. ARRÊT DU DÉLAI (TL) – 8 H AM (par défaut) : Ce paramètre est utilisé pour donner à l'appareil photo le temps d'arrêt pour arrêter le délai de la photographie. Le format par défaut est HH/MM/AP, si le format de l'heure doit être celui de 24 heures, qui est HH/MM. Lorsque cette option clignote, utilisez les flèches HAUT et BAS permettront de changer entre 1 et 12. Une fois ce paramètre sur le mois approprié, appuyez sur la flèche DROITE pour passer au réglage MM (minute) et ce dernier commencera à clignoter. Les flèches HAUT et BAS permettront de changer entre 00 et 59. À nouveau, lorsque ce paramètre se trouve sur la bonne minute, appuyez sur la flèche DROITE pour passer au réglage AP (AM/PM) et ce dernier commencera à clignoter. Les flèches HAUT et BAS permettront de changer entre AM et PM. RÉDUCTION DU FLOU – ACTIVÉ : Utilisé pour déterminer si l'appareil photo devrait utiliser la technologie de réduction du flou MATRIX pour réduire de manière important les effets de flou résultant en des images infrarouge nocturnes plus claires. Lorsque cette option clignote, appuyez sur les flèches HAUT/BAS pour permettre à l'appareil de basculer entre le cycle Activé/Désactivé. Exemple: Stamping données sur la partie inférieure de l'image indique que l'appareil a pris une photo en Time Lapse mode (TL). www.stealthcam.com 877-‐269-‐8490 Page 46 RÉGLAGE DE L'APPAREIL PHOTO -‐ PERSONNALISÉ (SUITE) Ø Ø Ø Ø NOM DE L'APPAREIL PHOTO – STEALTH CAM (par défaut) : Ce paramètre est utilisé pour identifier l'appareil photo sur la Barre d'infos. Il peut compter jusqu'à 13 caractères sous forme alpha (A -‐ Z), numérique (0 -‐ 9), ou comporter des espaces. Lorsque cette option clignote, utilisez les flèches HAUT ou BAS pour changer le nombre initial de caractères. Lorsque le caractère clignote a été changé, utilisez la flèche DROITE pour passer au caractère suivant. Répétez jusqu'à ce que le nom désiré soit saisi. Une fois terminé, appuyez sur le bouton Entrée à nouveau pour confirmer et stocker le nouveau nom de la caméra. Appuyez sur la flèche vers le BAS pour passer à l'option de configuration suivante. TEMPÉRATURE – FAHRENHEIT (par défaut) : Ce paramètre est utilisé pour informer l'appareil photo sur la lecture de la Barre d'infos devrait être en degrés Fahrenheit ou en degrés Celsius. Lorsque cette option clignote, appuyer sur les flèches HAUT ou BAS pour basculer entre les deux options. BARRE D'INFOS – ACTIVÉE (par défaut) : Ce paramètre est utilisé pour informer l'appareil photo s'il faut que la Barre d'infos apparaisse au bas des images et de la vidéo ou non. Lorsque cette option clignote, appuyer sur les flèches HAUT ou BAS pour basculer entre les deux options ACTIVÉ ou DÉSACTIVÉ. LATITUDE – 000.000000N (par défaut) : Ce paramètre est utilisé pour le GEO-‐TAG de l'appareil photo. Il ne sera pas affiché sur les images directement, mais plutôt sur les renseignements de l'image de fond. Les coordonnées peuvent être changées de 000.000000 à 179.999999 www.stealthcam.com 877-‐269-‐8490 Page 47 RÉGLAGE DE L'APPAREIL PHOTO -‐ PERSONNALISÉ (SUITE) appuyez sur le bouton Entrée (Enter) et l'appareil photo activera maintenant cette fonction. Appuyez sur la flèche vers le BAS pour passer à la configuration de la clé de sécurité. o CLÉ DE SÉCURITÉ – 0000 (par défaut) : Pour modifier la clé d'un propriétaire utilisée, appuyez une fois sur le bouton Entrée. Lorsque cette option clignote, utilisez la flèche vers le HAUT ou vers le BAS pour changer le premier chiffre par un nombre ou une lettre désiré. Ensuite, à l'aide du bouton GAUCHE, déplacez-‐vous vers un deuxième chiffre et changez-‐le aussi par un nombre ou une lettre. Continuez jusqu'à ce que tous les 4 chiffres soient correctement réglés. Finalement, appuyez sur le bouton Entrée pour sécuriser le nouveau code. REMARQUE -‐ Le propriétaire de l'appareil est responsable de se souvenir du code. S'il oublie le code, il doit appeler au Service à la clientèle ( 10877-‐269-‐8490) pour obtenir les directives sur la restauration de l'appareil aux paramètres par défaut. Afin que le propriétaire soit autorisé à le réinitialiser, l'appareil photo doit être enregistré avec Stealth Cam. FORMATER LA CARTE – NON(par défaut) : Ce paramètre est utilisé pour formater la carte mémoire SD installée. Lorsque cette option clignote, appuyer sur les flèches HAUT ou BAS pour basculer entre les deux options OUI ou NON. Lorsque l'option OUI est sélectionnée et que le bouton Entrée est enfoncé, l'appareil photo formatera la carte, supprimant les renseignements précédents contenus sur la carte. Appuyer sur la flèche vers le BAS fera revenir l'écran à l'option de départ du RÉGLAGE DE LA DATE. (Lisez la page 22 pour obtenir les détails) www.stealthcam.com 877-‐269-‐8490 Page 48 RÉGLAGE DE L'APPAREIL PHOTO Ø TEST – Il s'agit de dernier paramètre de l'interrupteur et est utilisé pour tester la zone de couverture PIR du détecteur. Lorsque l'appareil est placé sur ce paramètre, l'écran affichera : TEST VXX.XX.XX Le numéro figurant au bas de l'écran affiche la version actuelle du micrologiciel est installé sur l'appareil photo. Veuillez vérifier le site Web de Stealth Cam pour obtenir les plus récentes mises à jour disponibles. Dans ce mode, la lumière du Mode Test clignote en vert lorsque l'appareil photo détecte un mouvement. Ce qui permettra de déterminer si l'appareil photo est placé à un endroit qui détectera un mouvement qui passe en activant l'appareil photo en mode vidéo et PIR. www.stealthcam.com 877-‐269-‐8490 Page 49 CARTE MÉMOIRE INSTALLATION Pour insérer la carte mémoire SD dans l'appareil: localisez la fente de la carte SD sur le côté droit du boîtier de l'appareil photo. Ensuite, avec l'étiquette de la carte SD orientée vers l'avant de l'appareil photo, insérez la carte SD. Lorsque la carte a été complètement enfoncée, il y aura une résistance notable, car le mécanisme de verrouillage de source s'active pour mettre la carte SD en attente. Aucune force ne devrait être nécessaire pour insérer la carte, si cela est semble difficile et que la carte ne s'insèrera pas librement dans la fente, retirez-‐la carte et vérifiez la présence d'obstacles. TABLEAU DE LA CAPACITÉ DE l'IMAGE 10MP 8MP 5MP 2MP 0.5MP Vidéo HD 10 sec SD 2GB 307 384 1333 1536 6144 68 SD 4GB 614 768 2666 3072 12288 136 SD 8GB 1228 1536 5333 6144 24576 272 SD 16GB 2456 3072 10666 12288 49152 544 SD 32GB 4912 6144 21333 24576 98304 1088 *Le nombre d'images/de vidéos est approximatif et sujet à changement en fonction de l'enregistrement du sujet. *REMARQUE : Pour obtenir de meilleurs résultats, utilisez les cartes portant la désignation sur les cartes 4GB et plus. www.stealthcam.com 877-‐269-‐8490 Page 50 FOMATAGE DE LA CARTE SD Il est toujours mieux de formater vos cartes SD à partir de l'appareil actuel que vous utilisez, dans ce cas l'appareil photo. Ce qui permettra à l'appareil photo de formater la carte dans le mode approprié. 1. Insérez d'abord votre carte mémoire SD dans la caméra. 2. Glissez l'interrupteur au paramètre Personnalisé. 3. Appuyez sur Menu. 4. Appuyez une fois sur la flèche vers le haut (Up). L'écran affichera "Formater la carte -‐ Non" 5. Appuyez sur le bouton Entrée. Le mot "Non" commencera à clignoter. 6. Appuyez une fois sur la flèche vers le bas. Le mot "Oui" commencera à clignoter. 7. Appuyez sur Entré pour supprimer et formater la carte. L'écran affichera "Formater la carte -‐ Suppression ..." 8. Une fois que la carte a été formatée, l'écran reviendra à lire "Formater la carte -‐ Non" Appuyez sur la touche Menu pour revenir au mode Prêt. www.stealthcam.com 877-‐269-‐8490 Page 51 INSTALLATION ET RETRAIT DE LA PILE Pour retirer les piles de l'appareil, ouvrez le boîtier et appuyez sur le bouton ÉJECTION situé dans le coin inférieur droit. Ce qui permettra de glisser et de retirer le Compartiment à piles. De nouvelles piles, alcalines ou au lithium, de type 'AA' doivent être insérées en respectant l'orientation indiquée sur le compartiment. Comme avec la plupart des appareils électroniques, l'orientation négative (-‐) des piles devrait être contre les ressorts. Ne pas insérer les piles correctement endommagera l'appareil. Pour réinsérer le Compartiment à piles; placez le compartiment de sorte que sa base corresponde à l'ouverture située au bas de l'appareil photo. Le compartiment est entaillé de telle sorte que l'insertion incorrecte du compartiment de la pile soit impossible. Il suffit de glisser, dans le bon sens, le Compartiment à piles dans sa position finale verrouillée. Si le Compartiment à piles ne veut pas glisser dans sa destination, retirez-‐le et examinez-‐le pour voir s'il n'y aurait pas de débris qui pourraient être la cause du problème. REMARQUE :Le remplacement des pile ne réinitialise pas les configurations actuelles des appareils photos. **AVERTISSEMENT** Ne mélangez pas les vieilles piles avec les neuves. Retirez les piles du compartiment si vous savez que vous n'utilisera pas l'appareil pendant une longue période de temps. www.stealthcam.com 877-‐269-‐8490 Page 52 AFFICHAGE ET SUPPRESSION DES IMAGES La caméra offre deux (2) façons de voir vos images. La première est la connexion directe de l'appareil photo à l'ordinateur via un câble USB (non fourni). Il s'agit d'un mini câble USB vers un câble USB standard (type A/B). Il suffit de mettre l'appareil à la position OFF, et de brancher l'extrémité du mini câble USB à l'appareil photo et l'extrémité du câble USB standard dans l'ordinateur, qui lui enregistrera l'appareil photo comme un appareil de lecture de carte. Une fois la connexion à l'ordinateur établie, les fichiers peuvent être révisés en vous basant sur le logiciel installé sur l'ordinateur. Veuillez vous référer au Guide du propriétaire du logiciel pour obtenir une visualisation exacte des images. REMARQUE : La prise en charge de cette opération est limitée, mais non exclusive au système d'exploitation Windows Vista et plus, et aussi au Mac OS 10.6 et plus. Tous les systèmes d'exploitation mentionnés en-‐dessous de ce qui est susmentionné peuvent ne pas être compatibles et provoquer des erreurs de système. La deuxième option consiste à retirer la carte mémoire SD de l'appareil, et à utiliser un appareil de lecture de carte pour voir les images. Veuillez vous référer au Guide du propriétaire de l'appareil particulier utilisé pour voir les fichiers. REMARQUE : Les visionneurs carte mémoire SD qui ne sont pas fabriqués par Stealth Cam peuvent créer des conflits sur la carte mémoire. Si tel est le cas et que la carte ne fonctionne plus correctement avec l'appareil, la carte mémoire SD devra être reformatée. www.stealthcam.com 877-‐269-‐8490 Page 53 DÉFINITIONS REFLEX (Sensibilité avancée à faible luminosité) -‐ Vitesse de déclenchement ultra-‐rapide, en moyenne < 1 seconde avec des temps de récupération programmables aussi bas que 5 secondes. MATRIX(Technologie de réduction du flou) – La réduction avancée du flou réduit de manière importante les effets du flou, résultant en des images plus claires et plus nettes. RETINA(Sous-‐déclencheur 1 seconde) – Performance supérieure en conditions de faible luminosité pour une portée prolongée de nuit. DÉTECTION MULTI-‐ZONE -‐ Fournit une couverture plus précise à l'angle et la distance, en maximisant la capacité de déclenchement des caméras. TRIAD (Technologie 3-‐en-‐1) Ø Ø Ø Images fixes haute résolution : Base sur laquelle les appareils photos d'exploration ont été conçus, les images fixes haute résolution de Stealth Cam d'aujourd'hui (jour et nuit) avec une clarté et des détails inégalés. Couplé avec le mode Rafale (plusieurs expositions par déclenchement). Vidéo HD : La capacité de Stealth Cam à filmer des vidéos HD avec audio apporte une toute nouvelle dimension à l'exploration en donnant à l'utilisateur un aperçu réel dans le comportement et les vocalisations de l'animal. Délais : L'option pour régler l'appareil photo pour prendre des photos à intervalles préétablis sur une période de temps sélectionnée (jour ou nuit) est la pierre angulaire derrière la fonction Délais de Stealth Cam. Nouveau pour 2014 est un écraseur de détecteur de mouvement -‐ si un objet pénètre dans la zone de couverture des appareils photos entre les délais, le détecteur écrasera le paramètre, le déclencheur et capturera l'image quand tl retard est supérieure ou égale à une minute. BURST (Mode Rafale) -‐ Les expositions multiples par déclenchement permettent une séquence d'images capturant les mouvement du sujet. RÉGLAGE RAPIDE (QUICK SET)(Réglage simple et rapide) -‐ Interrupteurs préréglés qui permettent à l'utilisateur de définir littéralement sa came de piste en quelques secondes seulement. SECURE LOCK (Protection numérique) – Secure Lock offre une protection par mot de passe rendant l'accès à l'appareil photo presque impossible. www.stealthcam.com 877-‐269-‐8490 Page 54 DÉFINITIONS (SUITE) GEO-‐TAG (GPS Meta-‐Tagging (à étiquetage) -‐ Permet l'entrée des coordonnées GPS dans l'appareil. Ces coordonnées ne figurent pas sur l'horodatage, mais plutôt dans les données de l'image de fond. Lorsque l'image étiquetée du GPS est ouverte avec un programme compatible de localisation, tel que des images iPhoto ou Picasa, elles sont tracées sur une carte. www.stealthcam.com 877-‐269-‐8490 Page 55 FOIRE AUX QUESTIONS Q : Mon appareil de jeu pour Mac est-‐i compatible? R : Oui, ce modèle d'appareil photo fonctionne avec la version 10.6 et plus. Q : Puis-‐je utiliser des piles rechargeables dans l'appareil photo? R : Les piles rechargeables sont très bien pour l'appareil; les piles alcalines ordinaires conçues pour les appareils électroniques numériques sont recommandées pour obtenir une meilleure performance. Q : Lorsque j'utilise une carte mémoire, puis-‐je voir les photos contenues sur mon appareil photo numérique personnel? R : Nous ne recommandons pas de voir les images de la carte mémoire SD prises avec votre appareil de jeu sur un autre appareil photo numérique. Il se peut qu'il y ait des problèmes de compatibilité. Q :Vais-‐je perdre mes images et tous les réglages si les piles meurent? R : Les images sont stockées sur votre carte mémoire SD externe afin que vos images demeurent intactes seulement sur votre carte. Cependant, vous devrez réinitialiser vos paramètres. Q : Quelles sont mes options si mon appareil a dépassé sa garantie? R : Nous avons un programme de garantie dans lequel vous pouvez acheter un appareil de remplacement/reconditionné à 50 % ou plus de rabais (basé sur les prix de détail de l'appareil) de votre ancien appareil. www.stealthcam.com 877-‐269-‐8490 Page 56 FOIRE AUX QUESTIONS (SUITE) Q : Puis-‐je utiliser mon appareil de jeu par une fenêtre ou une porte de verre? R : Le verre peut perturber le faisceau de votre détecteur; nous ne vous conseillons pas d'utiliser l'appareil photo dans ce mode. Q : Dois-‐je recharger mon ensemble de pile de 12 V au cours des saisons, si je ne l'utilise pas? R : L'ensemble de pile de 12 V doit être rechargé au moins tous les 3 mois, sans vous soucier de l'utiliser ou non, afin de préserver l'état de fonctionnement de la pile contenue dans l'appareil. Pour garantir la performance optimale de l'appareil photo Stealth Cam, il vaut mieux toujours vérifier les mises à jour périodiques du logiciel libre. Pour obtenir les derniers téléchargements du micrologiciel, veuillez vérifier auhttp://www.StealthCam.com/download Inscrivez-‐vous à notre infolettre hebdomadaire pour connaître les mises à jour et les nouvelles reliées aux nouveaux produits. www.stealthcam.com 877-‐269-‐8490 Page 57 CONFORMITÉ FCC Remarque : Cet équipement a été testé et se conforme aux exigences des appareils numériques de classe B, conformément à la partie 15 des Règles FCC. Ces limites sont conçues pour fournir une protection raisonnable contre les interférences nuisibles présentes dans une installation résidentielle. Cet équipement génère les utilisations et peut émettre de l'énergie radio électrique et, s'il n'est pas installé et utilisé conformément aux instructions, il peut causer des interférences nuisibles aux réceptions radio ou télévision, ce qui peut être déterminé en éteignant l'appareil en marche, l'utilisateur est encouragé à essayer de corriger l'interférence selon une ou plusieurs des mesures suivantes : Ø Ø Ø Réorienter ou déplacer l'antenne réceptrice. Augmenter la séparation entre l'équipement et le récepteur. Brancher l'appareil dans une prise sur un circuit différent de celui sur lequel le récepteur est branché. Consulter le revendeur ou un technicien radio/TV expérimenté. Ø Attention: Des changements ou modifications non expressément approuvés par la partie responsable peut annuler le droit de l'utilisateur à utiliser ce dispositif. Les spécifications du produit sont sujettes à modification. Stealth Cam n'est pas responsable des erreurs photographiques ou typographiques. Peut être protégé par un ou plusieurs numéros de brevet américain : 6,735,387/ 6,768,868/ 6,834,162/ 7,149,422/ 7,308,196/ 7,593,632/ 7,710,457. www.stealthcam.com 877-‐269-‐8490 Page 58 www.stealthcam.com 877-‐269-‐8490 Page 59 RENSEIGNEMENTS SUR LA GARANTIE LIMITÉE Votre appareil photo d'exploration Stealth Cam est couverte par une garantie limitée de 365 jours sur les pièces et la main-‐d'œuvre à partir de la date d'achat initial, et les achats doivent être effectués auprès d'un revendeur autorisé. La garantie couvre les défauts de fabrication et les matériaux. La garantie ne s'applique pas aux appareils ayant été endommagés ou mal utilisés, intentionnellement ou non. Un achat effectué auprès d'une personne ou sur des sites Internet non autorisés, tels qu'eBay, annule la garantie. Cet appareil photo doit être enregistré auprès de Stealth Cam via Internet, par courriel ou par le biais du soutien téléphonique du service à la clientèle, et accompagné d'un reçu provenant du point de vente, pour obtenir toutes les options de Réinitialisation d'usine disponibles. Falsifier ou modifier l'appareil annulera la garantie. Toute réparation non autorisée annulera la garantie. Une copie de votre facture originale doit être produite pour tout service de garantie et un numéro d'autorisation de retour (AR) doit être obtenu du service à la clientèle au 877-‐269-‐8490 avant de retourner le produit. Stealth Cam n'est pas responsable de toute perte de colis introuvable ou de ceux ne possédant pas de numéro d'autorisation de retour au moment du retour. www.stealthcam.com 877-‐269-‐8490 Page 60