1
www.blackanddecker.ae
SMS254
ENGLISH
1
2
3
26
25
24
4
5
23
22
6
21
7
20
19
8
9
18
16
17
14
15
13
12
10
11
27
28
36
35
29
34
30
31
32
6
33
11
2
16
ENGLISH
45
30
15
38
30
0
39
9
40
41
11
B
10
C
22
20
34
E
D
21
42
34
43
0
1
1
2
2
0
0
3
1
4
3
2
4
4
7
3
5
5
8
6
9
4
6
7
10
3
1
2
5
6
8
5
7
30
45
0
8
15
6
30
7
9
11
12
G
9
23
10
8
F
3
ENGLISH
44
5
8
6
9
45
7
10
8
45
30
46
45
44
H
I
47
48
1
3
30
K
J
2
47
49
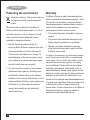
33.9°
L
4
31.6°
M
ENGLISH
5
50
N
O
51
36
35
26
P
52
34
Q
53
R
5
ENGLISH
Intended use
of electric shock if your body is earthed or
grounded.
Your Black & Decker sliding compound mitre
saw has been designed for sawing wood, plastic c. Do not expose power tools to rain or wet
conditions. Water entering a power tool will
and non-ferrous metal only.
increase the risk of electric shock.
Safety instructions
General power tool safety warnings
Warning! Read all safety warnings
and all instructions. Failure to follow
all instructions may result in electric
shock, fire and/or serious injury.
Save all warnings and instructions for future
reference.
The term "power tool" in all of the warnings
listed below refers to your mains operated
(corded) power tool or battery operated
(cordless) power tool.
1. Work area safety
a. Keep work area clean and well lit. Cluttered
and dark areas invite accidents.
d. Do not abuse the cord. Never use the cord for
carrying, pulling or unplugging the power tool.
Keep cord away from heat, oil, sharp edges
or moving parts. Damaged or entangled cords
increase the risk of electric shock.
e. When operating a power tool outdoors, use
an extension cord suitable for outdoor use.
Use of a cord suitable for outdoor use
reduces the risk of electric shock.
f. If operating a power tool in a damp location is
unavoidable, use a Residual Current Device
(RCD) protected supply. Use of an RCD
reduces the risk of electric shock.
3. Personal safety
a. Stay alert, watch what you are doing and use
common sense when operating a power tool.
b. Do not operate power tools in explosive
Do not use a power tool while you are tired or
atmospheres, such as in the presence of
under the influence of drugs, alcohol or
flammable liquids, gases or dust. Power
medication. A moment of inattention while
tools create sparks which may ignite the dust
operating power tools may result in serious
or fumes.
personal injury.
c. Keep children and bystanders away while
b. Use personal protective equipment. Always
operating a power tool. Distractions can
wear eye protection. Protective equipment
cause you to lose control.
such as dust mask, non-skid safety shoes,
2. Electrical safety
hard hat, or hearing protection used for
appropriate conditions will reduce personal
a. Power tool plugs must match the outlet.
injuries.
Never modify the plug in any way. Do not use
any adapter plugs with earthed (grounded)
power tools. Unmodified plugs and matching
outlets will reduce risk of electric shock.
c. Prevent unintentional starting. Ensure the
switch is in the off-position before connecting
to power source and/or battery pack, picking
up or carrying the tool. Carrying power tools
b. Avoid body contact with earthed or grounded
with your finger on the switch or energising
surfaces such as pipes, radiators, ranges
power tools that have the switch on invites
and refrigerators. There is an increased risk
accidents.
6
ENGLISH
d. Remove any adjusting key or wrench before
turning the power tool on. A wrench or a key
left attached to a rotating part of the power
tool may result in personal injury.
e. Do not overreach. Keep proper footing and
balance at all times. This enables better
control of the power tool in unexpected
situations.
e. Maintain power tools. Check for misalignment
or binding of moving parts, breakage of parts
and any other condition that may affect the
power tools operation. If damaged, have the
power tool repaired before use. Many
accidents are caused by poorly maintained
power tools.
f. Keep cutting tools sharp and clean. Properly
maintained cutting tools with sharp cutting
f. Dress properly. Do not wear loose clothing or
edges are less likely to bind and are easier to
jewellery. Keep your hair, clothing and gloves
control.
away from moving parts. Loose clothes,
jewellery or long hair can be caught in
moving parts.
g. If devices are provided for the connection of
dust extraction and collection facilities,
ensure these are connected and properly
used. Use of these devices can reduce dust
related hazards.
4. Power tool use and care
a. Do not force the power tool. Use the correct
power tool for your application. The correct
power tool will do the job better and safer at
the rate for which it was designed.
b. Do not use the power tool if the switch does
not turn it on and off. Any power tool that
cannot be controlled with the switch is
dangerous and must be repaired.
c. Disconnect the plug from the power source
and/or the battery pack from the power tool
before making any adjustments, changing
accessories, or storing power tools. Such
preventive safety measures reduce the risk
of starting the power tool accidentally.
d. Store idle power tools out of the reach of
children and do not allow persons unfamiliar
with the power tool or these instructions to
operate the power tool. Power tools are
dangerous in the hands of untrained users.
g. Use the power tool, accessories and tool bits
etc. in accordance with these instructions,
taking into account the working conditions
and the work to be performed. Use of the
power tool for operations different from those
intended could result in a hazardous situation.
5. Service
h. Have your power tool serviced by a qualified
repair person using only identical
replacement parts. This will make sure that
the safety of the power tool is maintained.
Additional power tool safety
warnings
Warning! Additional safety warnings
for mitre saws.
• Do not use cracked, bent, damaged or
deformed saw blades.
• Replace the table insert when worn.
• Do not use blades of larger or smaller
diameter than recommended. For the proper
blade rating refer to the technical data. Use
only the blades specified in this manual,
complying with EN 847-1.
• Do not use High Speed Steel (HSS) saw
blades.
7
ENGLISH
• Wear gloves when handling saw blades and
rough material (saw blades should be carried
in a holder when practicable).
• Use the dustbag provided when sawing
wood.
Warning! Contact with or inhalation of dusts
arising from sanding applications may endanger
the health of the operator and possible
bystanders. Wear a dust mask specifically
designed for protection against dust and fumes
and ensure that persons within or entering the
work area are also protected.
• Consider using specially designed
noise-reduction blades.
• Observe the maximum speed marked on the
saw blade.
• The laser fitted must never be exchanged
with a different type of laser. Repairs to the
laser should be carried out by authorised
repair agents or Black & Decker service staff.
• Disconnect the machine form the mains
before carrying out any maintenance or when
changing the blade.
• Never perform any cleaning, maintenance,
removal of any off-cuts or other parts of the
workpiece from the cutting area when the
machine is running and the saw head is not in
the rest position.
• Select the correct blade for the material to be • When possible, always mount the machine to
cut.
a bench.
• This mitre saw has been designed for sawing • Secure the workpiece. A workpiece held with
wood, plastic and non-ferrous metal only.
• Do not operate the machine without the
guard in position. Do not operate the
machine if the guard does not function or is
not maintained properly.
• Ensure that the arm is securely fixed when
performing bevel cuts.
• Keep the surrounding area of the machine
well maintained and free of loose materials,
e.g. chips and off-cuts.
• Ensure the machine and the work area are
provided with adequate general or localised
lighting.
• Do not allow untrained people to operate this
machine.
• Ensure that the blade is mounted correctly
before use. Make sure that the blade rotates
in the correct direction. Keep the blade
sharp.
8
a clamping device or a vice is more secure
than when held with the hand.
• Always firmly clamp the piece to be worked.
Do not work with pieces that are too small to
clamp, otherwise, the distance of the hands to
the rotating saw blade is too small. Always
use extra support when sawing long
workpieces.
• Make sure all locking knobs and handles are
tight before starting any operation.
• Never use your saw without the table insert.
• Never place either hand in the blade area
when the saw is connected to the mains
supply.
• Never attempt to stop the machine in motion
rapidly by jamming a tool or other means
against the blade; serious accidents can be
caused unintentionally in this way.
ENGLISH
• Before using any accessory consult the
instruction manual. The improper use of an
accessory can cause damage.
• Do not use any abrasive discs.
• Raise the blade from the table insert in the
workpiece prior to releasing the on/of switch.
• Do not wedge anything against the fan to
hold the motor shaft.
• The blade guard on your saw will
automatically raise when the arm is brought
down; it will lower over the blade when the
arm is raised. The guard can be raised by
hand when installing or removing saw blades
or for inspection of the saw. Never raise the
blade guard manually unless the machine is
switched off.
• Check periodically that the motor air slots are
clean and free of chips.
• Do not work with material containing
asbestos. Asbestos is considered to be
carcinogenic.
• Never make the warning signs on the power
tool unrecognisable.
• Never stand on the power tool. Serious
injuries could occur when the power tool tips
over or when coming in contact with the saw
blade.
• Do not take hold of the saw blade after
working before it has cooled. The saw blade
becomes very hot while working.
• Advance the saw blade against the
workpiece only when it is switched on.
Otherwise, the danger of kickback exists
when the saw blade catches in the
workpiece.
• The intended use is described in this
instruction manual. The use of any accessory
or attachment or performance of any
operation with this tool other than those
recommended in this instruction manual may
present a risk of personal injury and/or
damage to property.
• Never place hands near cutting area. Keep
hands outside the “No Hands Zone” which
includes the entire table and is labelled by
“No Hands” symbols.
• To avoid injury from materials being thrown,
unplug the saw to avoid accidental starting,
and then remove small materials.
• Before use and after any maintenance the
blade guard must be checked to ensure
proper function. This test must be performed
with the saw switched off and unplugged. The
arm must be raised and lowered to ensure
the guard covers the blade and the blade
does not contact the guard. If the guard fails
to operate correctly, have your power tool
serviced by a qualified repair agent. Call
Black & Decker customer services for your
nearest service agent.
Residual risks
The following risks are inherent to the use of
saws:
• Injuries caused by touching the rotating parts.
Even with the application of the relevant safety
regulations and the implementation of safety
devices, certain residual risks cannot be avoided,
these are:
• Impairment of hearing.
• Risk of accidents caused by the uncovered
parts of the rotating saw blade.
9
ENGLISH
• Risk of injury when changing the blade.
• Risk of squeezing fingers when opening the
guards.
• Health hazards caused by breathing dust
developed when sawing wood, especially
oak, beech and MDF.
Warning! If the electronic brake fails to work,
have your power tool serviced by a qualified
repair agent. Call Black & Decker customer
services for your nearest service agent.
Additional safety instructions
for lasers
This laser complies with class 1M according the
IEC 60825-1:2007. Do not replace a laser diode
with a different type. If the laser is damaged,
have the laser repaired by an authorised repair
agent. Do not use the laser for any purpose
other than projecting laser lines.
• Never look into the laser beam directly and
intentionally.
• Do not used optical tools to view the laser
beam.
• Do not set up the tool where the laser beam
can cross any person at head height.
• Do not let children come near the laser.
Warning! Avoid direct eye contact. Laser
radiated when laser guide is turned on. Always
unplug the mitre saw from power source before
making any adjustment.
• A laser pointer is not a toy and should not
come into hands of children. Misuse of this
appliance can lead to irreparable eye
injuries.
10
• Any adjustment to increase the laser power is
forbidden. Any liability for damages as a
result of not following these safety
instructions will be rejected.
• When using the laser pointer, do not point the
laser beam towards people and/or reflecting
surfaces. Even a laser beam of lower
intensity may cause eye damage. Therefore,
do not look directly into the laser beam.
• The laser pointer includes no servicing
components. Do not open the housing
otherwise the guarantee is void.
Safety of others
• This tool is not intended for use by persons
(including children) with reduced physical,
sensory or mental capabilities, or lack of
experience and knowledge, unless they have
been given supervision or instruction
concerning the use of the appliance by a
person responsible for their safety.
• Children should be supervised to ensure that
they do not play with the appliance.
Vibration
The declared vibration emission values stated in
the technical data and the declaration of
conformity have been measured in accordance
with a standard test method provided by EN
61029 and may be used for comparing one tool
with another. The declared vibration emission
value may also be used in a preliminary
assessment of exposure.
Warning! The vibration emission value during
actual use of the power tool can differ from the
declared value depending on the ways in which
the tool is used. The vibration level may increase
above the level stated.
ENGLISH
When assessing vibration exposure to
determine safety measures required by
2002/44/EC to protect persons regularly using
power tools in employment, an estimation of
vibration exposure should consider, the actual
conditions of use and the way the tool is used,
including taking account of all parts of the
operating cycle such as the times when the tool
is switched off and when it is running idle in
addition to the trigger time.
Labels on tools
Warning! To reduce the risk of
injury, the user must read the
instruction manual.
Electrical safety
This tool is double insulated; therefore
no earth wire is required. Always check
that the power supply corresponds to
the voltage on the rating plate.
• If the supply cord is damaged, it must be
replaced by the manufacturer or an
authorised Black & Decker Service Centre in
order to avoid a hazard.
Voltage drops
In-rush currents cause short-time voltage drops.
Under unfavourable power supply conditions,
other equipment may be affected.
If the system impedance of the power supply
Zmax<0.34, disturbances are unlikely to occur.
Wear safety glasses or goggles.
Using an extension cable
Wear ear protection.
• Always use an approved extension cable
Wear a dust mask.
This product is not to be used by
children under 16.
Keep fingers and arms away from
rotational saw blades.
suitable for the power input of this tool (see
technical data). Before use, inspect the
extension cable for signs of damage, wear
and ageing. Replace the extension cable if
damaged or defective. When using a cable
reel, always unwind the cable completely.
Use of an extension cable not suitable for the
power input of the tool or which is damaged
or defective may result in a risk of fire and
electric shock.
Wear gloves when handling saw
blades.
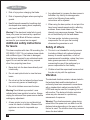
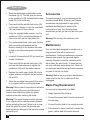
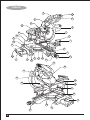
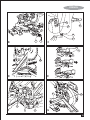
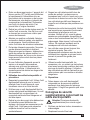
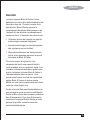
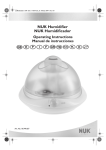
Features
Laser radiation.
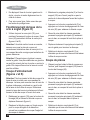
1. Laser on/off switch
Do not look into the laser beam.
2. Main operating handle
3. On/Off switch
Do not use optical tools to view the
4. Motor housing
laser beam.
5. Moveable lower guard
11
ENGLISH
6. Table extension material stop (right)
31. Bevel scale
7. Table extension (right)
32. Right-hand fence
8. Kerf plate
33. Laser
9. Superlok™ mitre clamp
34. Saw blade
10. Mitre lock knob
35. Spindle lock button
11. Mitre detent lever
36. Saw arm release lever
12. Mitre position adjustment pointer
Fig. R
13. Mitre scale
14. Rotating table
15. Bench mounting holes
16. Clamp locating mounts
53. Clamp
Assembly
Warning! Before assembly, make sure that the
tool is switched off and unplugged.
18. Table extension material stop (left)
Note: This tool is accurately adjusted before
shipping from the factory. Check the following
accuracy and readjust them if necessary in order
to obtain the best results in operation.
19. Table extension securing knob
Laser beam
20. High sliding fence clamp
The laser beam alignment is set at the
manufacturing source and is not user adjustable.
17. Table extension (left)
21. Left-hand fence
22. Left-hand high sliding fence
23. 33.9° bevel pin
24. Rear carry handle
25. Saw dust outlet
26. Metal upper guard
27. Front carry handle
28. Removable brush box
29. Carriage
30. Bevel lock handle
12
Mitre angle adjustment
The sliding compound mitre saw scale can be
easily read showing mitre angles from 0° to 47°
to the left and the right. The most common angle
cut setting slots have positive stops, permitting
fast adjustments to the required position. Follow
the process below for quickest and most
accurate adjustments.
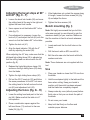
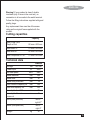
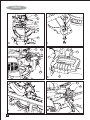
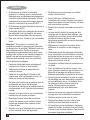
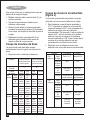
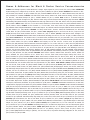
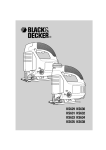
Superlok™ mitre clamp (fig. B)
The Superlok™ mitre clamp (9) allows the saw to
be set to specific angles other than the preset
angles of 0°, 15°, 22.5°, 31.6°, and 47° which
are set using the mitre detent lever (11).
ENGLISH
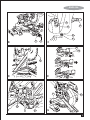
Adjusting the bevel stops at 90° •
and 45° (fig. C - F)
• Loosen the bevel lock handle (30) and move
the cutting head all the way to the right and
tighten the bevel lock handle.
• Use a square to set the blade at 90° to the
table (fig. D).
• If an adjustment is necessary, loosen the
lock nut (41) and adjust the bolt (40) with the
wrench so that the blade is 90° to the table.
• Tighten the lock nut (41).
• Align the bevel indicator (39) with the 0°
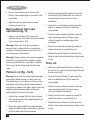
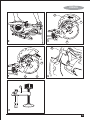
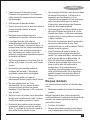
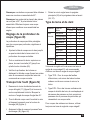
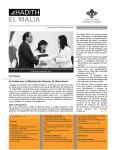
If the blade does not contact the square along
it’s length, loosen the three screws (44) (fig.
H) and adjust the fence.
• Tighten the three screws (44).
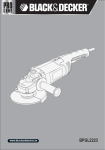
Bench mounting (fig. I)
Note: We highly recommend that you bolt this
mitre saw securely to a work bench to gain the
maximum stability of your machine. Make sure
that the machine is fixed to a bench whenever
possible.
• Locate and mark the four bolt holes on the
bench.
mark by adjusting the screw (38).
• Drill the bench with an Ø10 mm drill bit.
When adjusting the 45° stop, make sure that the
• Bolt the mitre saw onto the bench with bolts,
left-hand high sliding fence (22) is adjusted so
washers and nuts.
that the cutting head can be moved to the 45°
Note: These fasteners are not supplied with the
position (fig. E).
tool.
• Release the high sliding fence clamp (20)
and move the high sliding fence (22) away
Use
from the blade.
• Place your hands no closer that 150 mm from
• Tighten the high sliding fence clamp (20).
the blade.
• Pull out the 33.9° bevel pin (23) and follow
the same procedures for the 90° but move
the cutting head to the left and use the lock
nut (43) and adjustment bolt (42).
Adjusting the fence (fig. G - H)
• Lower the cutting head and push in the lock
pin (46). Make sure that the table is in 0°
mitre position.
• Place a combination square against the
left-hand fence (21) and next to the saw
blade (34) (fig. G).
• Hold the workpiece tightly to the table and the
fence when cutting. Keep your hands in
position until the switch has been released
and the blade has completely stopped.
• Always make dry runs (without power) before
finish cuts so that you can check the path of
the blade.
• Do not cross your hands.
• Keep both feet firmly on the floor and
maintain proper balance.
13
ENGLISH
• As you move the saw arm left and right,
follow it and stand slightly to the side of the
saw blade.
• Sight through the guard louvres when
following a pencil line.
Basic pullover mitre saw
operations (fig. H)
• Always use the clamp (53) to hold the
workpiece firmly. Two holes (45) are provided
for the clamp (fig. H & R).
Warning! Make sure that the workpiece is
securely held in place with the clamp before
operation. Severe personal injury can occur if
the workpiece is not secured.
Warning! Always position the workpiece against
the fence. Any piece that is bowed or warped
and cannot be held flat on the table or against
fence may trap the blade and should not be
used.
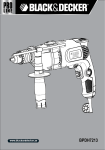
Pullover cut (fig. J & K)
• Hold the main operating handle (2) and pull
the carriage (29) forward until the centre of
the saw blade is over the front of the
workpiece.
• Operate the on/off switch (3) and press the
saw arm release lever (36) to lower the
cutting head.
• When the saw reaches full speed, push the
main operating handle (2) down slowly,
cutting through the leading edge of the
workpiece.
• Slowly move the main operating handle (2)
toward the fence to complete the cut.
• Release the on/off switch (3) and allow the
blade to stop before allowing the cutting head
to rise.
Chop cut
• Slide the cutting head to the rear position as
far as it will go, and lock the carriage (29) with
the lock knob (48).
Warning! Never pull the cutting head assembly
and rotating blade toward you during the cut.
The blade may try to climb up on the top of the
workpiece causing the cutting head assembly
and spinning blade to kick back. Never lower the
rotating saw blade down before pulling the
cutting head to the front of the saw.
• Operate the on/off switch (3) and press the
• Unlock the carriage (29) with the lock knob
• Slowly move the main operating handle (2)
(48) and allow the cutting head assembly to
move freely (fig. J).
• Move the cutting head to the required mitre
angle and bevel angle in accordance with the
mitre cut and bevel cut procedures.
14
saw arm release lever (36) to lower the
cutting head.
• When the saw reaches full speed, push the
main operating handle (2) down slowly,
cutting through the workpiece.
toward the fence to complete the cut.
• Release the on/off switch (3) and allow the
blade to stop before allowing the cutting head
to rise.
ENGLISH
Mitre cut
• Tighten the high sliding fence clamp (20) to
secure the fence in place.
• Switch the laser on/off switch (1) to on.
• Loosen the mitre detent lever (11) and move Warning! The guide groove can become
the table to the required angle. There are
preset stops at 0°, 15°, 22.5°, 31.6°, and
45°. Tighten the mitre detent lever (11).
• For any other angle use the Superlok™ mitre
clamp (9) (fig. B) to set the mitre to the
required angle.
• Operate the on/off switch (3), then press the
clogged with sawdust. Use a stick or low
pressure air to clear the guide groove.
Bevel cut
• Make sure that the high sliding fence is
adjusted to the correct orientation before
adjusting the bevel angle.
saw arm release lever (36) and lower the
cutting head.
Note: The saw is fitted with a special 33.9° bevel
pin (23) for special crown moulding.
• When the saw reaches full speed, push the
• Loosen the bevel lock handle (30) (fig. F) and
main operating handle (2) down slowly,
cutting through the workpiece.
• Slowly move the main operating handle (2)
toward the fence to complete the cut.
• Release the on/off switch (3) and allow the
blade to stop before allowing the cutting
head to rise.
Operating the high sliding fence for all bevel and
compound mitre cuts
• The moveable part of the left side of the
fence can be adjusted to provide maximum
support of the work piece near the blade,
while allowing the saw to bevel to a full 47°
left. The sliding distance is limited by stops in
both directions.
Adjusting the fence (fig. E)
move the cutting head to the required angle.
Tighten the bevel lock handle (30).
• Operate the on/off switch, then press the
release lever (36) when the saw reaches full
speed, push the main operating handle (2)
down slowly, cutting through the workpiece.
• When the saw reaches full speed, push the
main operating handle (2) down slowly,
cutting through the leading edge of the
workpiece.
• Slowly move the main operating handle (2)
toward the fence to complete the cut.
• Release the on/off switch (3) and allow the
blade to stop before allowing the cutting head
to rise.
• Loosen the high sliding fence clamp (20) and • Make sure that the arm is securely locked
slide the fence to the left.
• Make a dry run with the saw switched off and
check for clearance.
• Adjust the fence to be as close to the blade
as practical to provide maximum work piece
support, without interfering with the up and
down movement of the arm.
when bevelling.
Compound cut
• Make sure that the high sliding fence is
adjusted to the correct orientation before
adjusting the bevel angle to make a
compound cut.
15
ENGLISH
A compound cut is a combination of mitre cut
and bevel cut.
• Switch the laser on/off switch (1) to on.
• Refer to the above procedures to perform
this cut.
• When the saw reaches full speed, push the
main operating handle (2) down slowly,
cutting through the leading edge of the
workpiece.
• Slowly move the main operating handle (2)
toward the fence to complete the cut.
• Release the on/off switch (3) and allow the
blade to stop before allowing the cutting
head to rise.
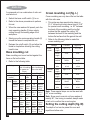
Base moulding cut
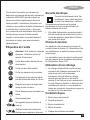
Crown moulding cut (fig. L)
Crown moulding can only be cut flat on the table
with this mitre saw.
• This mitre saw has special mitre stops on
31.6° left and right and a bevel stop of 33.9°
for special crown moulding, i.e. 52° between
the back of the moulding and the top flat
surface that fits against the ceiling; 38°
between the back of the moulding and the
bottom flat surface that fits against the wall.
• Refer to the following table to make this
crown moulding cut:
Settings
Inside
corner
Base moulding can be cut vertical against the
fence or flat on the table.
• Refer to the following table:
Settings
Bevel angle
Moulding
position
Inside Mitre
corner angle
Moulding
position
Finished
side
Outside Mitre
corner angle
Moulding
position
Finished
side
16
Vertical position Horizontal position
(back of moulding (back of moulding is
is against the
flat on the table)
fence)
0°
45°
Left side Right Left side Right
side
side
Left at Right at
0°
0°
45°
45°
Bottom Bottom
Top
Bottom
against against against against
table
table
fence
fence
Keep left Keep Keep left Keep left
side of right side side of side of
cut
of cut
cut
cut
Right at Left at
0°
0°
45°
45°
Bottom Bottom
Top
Bottom
against against against against
table
table
fence
fence
Keep left Keep
Keep
Keep
side of right side right side right side
cut
of cut
of cut
of cut
Left side
Right side
Mitre
angle
Right 31.6°
31.6° left
Bevel
angle
33.9°
33.9°
Moulding
position
Top against
fence
Bottom against
fence
Finished Keep left side Keep left side
side
of cut
of cut
Outside
corner
Mitre
angle
Right 31.6º
Left 31.6º
Bevel
angle
33.9°
33.9°
Moulding Bottom against
position
fence
Top against
fence
Finished Keep right side Keep right side
side
of cut
of cut
Note: These special stops can not be used with
45° crown moulding.
Note: Since most rooms do not have angles of
exactly 90°, fine tuning is needed, always make
a test cut to confirm the correct angles.
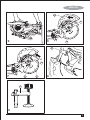
Setting the cutting depth (fig. M)
The depth of cut can be preset for even and
repetitive shallow cuts.
ENGLISH
• Adjust the cutting head down until the teeth
of the blade are at the required depth of cut.
• While holding the upper arm in position, turn
the stop knob (47) until it touches the stop
plate (49).
• Check the blade depth by moving the cutting
head front to back through the full motion of
a typical cut along the control arm.
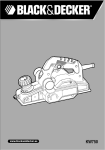
Carrying the tool (fig. N)
• Loosen the mitre detent lever (11) (fig. B)
and turn the table all the way to the right.
Lock the table at the 45° mitre angle.
• Pull the cutting head to the front of the saw
and lock the carriage with the lock knob (48)
(fig. J).
• Lower the cutting head and push in the lock
pin (46) (fig. H).
• Carry the mitre saw with the front and the
rear carrying handles (24, 27).
Wood
Tooth type 600 ~ 100T 24 ~100T
TCG
ATB
Lumber
Plywood
Hardboard
Chipboard
Plastic
PVC
ABS
Acrylic
PC
PS
Non-ferrous Aluminium
metal
Copper
•
•
•
•
•
•
•
•
•
•
•
• TCG type - For cutting aluminium sheets,
tubing extrusions and other non-ferrous
metals such as copper, brass.
• ATB type - For general cutting and trimming
of wood, plywood, and sizing pressboard,
hardboard, and particle board, when a neat
cut is needed.
Always use a negative rake blade when cutting
non-ferrous metals.
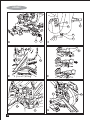
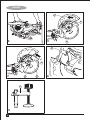
Changing blades (fig.O - Q)
Warning! To avoid injury from accidental
starting, always remove the power plug from the
power source before changing the blades. Use
correctly sharpened saw blades. Observe the
maximum speed and tooth type marked on the
saw blade. Only use Black & Decker
recommended blades.
To replace the saw blade (34), proceed as
follows:
Blade and tooth type
Material
Your mitre saw has been supplied with a
negative rake saw blade. It is advisable to use a
negative rake saw blade.
•
•
•
•
• Press the saw arm release lever (36) and
rotate the moveable lower guard counter
clockwise and clear of the blade. Use one
hand to hold the guard in place (fig. O).
• Using a screwdriver, loosen but do not
remove the screw (50). Do not remove the
screw completely as this will make
re-assembly difficult.
• Using a screwdriver, loosen but do not
remove the screw (51) until there is
movement in the metal guard plate. Do not
remove the screw completely as this will
make re-assembly difficult.
17
ENGLISH
• Move the metal upper guard plate counter
clockwise (fig. P). This will give you access
to the spindle bolt (52) that attaches the saw
blade (34) to the mitre saw.
• Press and hold the spindle lock button (35)
on the motor housing, to lock the saw blade
(34) and prevent it from rotating.
• Using the supplied blade spanner, turn the
spindle bolt (52) in a clockwise direction to
remove the bolt and the saw blade (34).
• Fit a replacement blade, make sure that the
teeth are pointing downward and the
direction marking on the blade is the same
as that on the mitre saws guard (clockwise)
(fig. P).
• Loosely fit the spindle bolt (52) by hand (turn
counter clockwise).
• Press and hold the spindle lock button (35)
and use the blade spanner to tighten the
spindle bolt (52) until the blade is secure.
• Replace the metal upper guard (26) into its
original position and tighten the two screws
(50 and 51).
• Allow the moveable lower guard (5) to return
to its original position covering the blade.
Accessories
The performance of your tool depends on the
accessory used. Black & Decker and Piranha
accessories are engineered to high quality
standards and designed to enhance the
performance of your tool. By using these
accessories you will get the very best from your
tool.
Warning! Do not carry the machine by the
guard.
Maintenance
Your tool has been designed to operate over a
long period of time with a minimum of
maintenance. Continuous satisfactory operation
depends upon proper tool care and regular
cleaning. Regularly clean the ventilation slots
with a clean, dry paint brush. To clean the tool,
use only mild soap and a damp cloth. Never let
any liquid get inside the tool and never immerse
any part of the tool into liquid.
Warning! Before carrying out any maintenance,
make sure that the tool is switched off and
unplugged.
Mains Plug Replacement
Warning! Never press the spindle lock while the
If a new mains plug needs to be fitted:
blade is rotating. Be sure to hold the guard
bracket down and firmly tighten the guard
• Safely dispose of the old plug.
bracket screw after installing the blade.
• Connect the brown lead to the live terminal of
Warning! The guard bracket must be returned
the new plug.
to its original position and the screw tightened
before activating the saw. Failure to do so may • Connect the blue lead to the neutral terminal.
allow the guard to contact the spinning saw
blade resulting in damage to the saw and severe • If the product is class l (earthed), connect the
green / yellow lead to the earth terminal.
personal injury.
18
ENGLISH
Warning! If your product is class ll double
insulated (only 2 wires in the cord set), no
connection is to be made to the earth terminal.
Follow the fitting instructions supplied with good
quality plugs.
Any replacement fuse must be of the same
rating as the original fuse supplied with the
product.
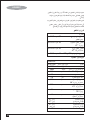
Cutting capacities
Capacity
Max Cross Cut x
Depth of Cut
92 mm x 305 mm
Max Bevel 47°
41 mm x 305 mm
Max Mitre 47°
92 mm x 203 mm
Max Compound 47°/47°
41 mm x 203 mm
Technical data
Voltage
Power input
No-load speed
Blade diameter
Blade bore
Blade body thickness
max cross-cut capacity 90°
max mitre capacity 45°
max depth of cut 90°
max depth of bevel
cross-cut
Mitre (max positions)
Vac
W
SMS254
220-240
2000
min-1
mm
mm
mm
mm
mm
mm
mm
4800
255
30
1.8
305
203
92
41
left 47°
right 47°
Bevel (max positions)
Weight
kg
left 47°
right 0°
22
19
ENGLISH
Protecting the environment
Warranty
Decker product needs replacement, or if it is of
If a Black & Decker product becomes defective
due to a material or manufacturing defect , within
12 months from the date of purchase, Black &
Decker guarantees to replace defective parts or
replace such products to ensure minimum
inconvenience to the customer unless:
no further use to you, do not dispose of it with
• The product has been subjected to misuse or
Separate collection. This product must not
be disposed of with normal household
waste.
Should you find one day that your Black &
other household waste. Make this product
available for separate collection.
• Black & Decker provides a facility for
recycling Black & Decker products once they
have reached the end of their working life.
This service is provided free of charge. To
take advantage of this service please return
your product to any authorised repair agent
who will collect them on our behalf.
• You can check the location of your nearest
authorised repair agent by contacting your
local Black & Decker office at the address
indicated in this manual. Alternatively, a list of
authorized Black & Decker repair agents and
full details of our after-sales service and
contact are available on the Internet at:
www.2helpU.com.
20
neglect.
• The product has sustained damage through
foreign objects, substances or accidents.
• Repairs have been attempted by persons
other than authorised repair agents or Black
& Decker service staff.
To claim on the warranty, you will need to submit
proof of purchase to the seller or an authorised
repair agent. You can check the location of your
nearest authorised repair agent by contacting
your local Black & Decker office at the address
indicated in this manual. Alternatively, a list of
authorised Black & Decker repair agents and full
details of our after-sales service and contacts are
available on the Internet at: www.2helpU.com.
Please visit our website www.blackanddecker.ae
to register your new Black & Decker product and
to be kept up to date on new products and
special offers. Further information on the Black &
Decker brand and our range of products is
available at www.blackanddecker.ae.
ARABIC
1
2
3
26
25
24
4
5
23
22
6
21
7
20
19
8
9
18
16
17
14
15
13
12
10
11
27
28
36
35
29
34
30
31
32
6
33
11
16
21
ARABIC
45
30
15
38
30
0
39
9
40
41
11
B
10
C
22
20
34
E
D
21
42
34
43
0
1
1
2
2
0
0
3
1
4
3
2
6
4
4
7
3
5
5
8
6
9
4
6
7
10
3
1
2
5
8
5
7
30
45
0
8
15
6
30
7
9
11
12
G
9
22
23
10
8
F
ARABIC
44
5
8
6
9
45
7
10
8
45
30
46
45
44
H
I
47
48
1
3
30
K
J
2
47
49
33.9°
L
31.6°
M
23
ARABIC
5
50
N
O
51
36
35
26
P
52
53
R
24
34
Q
ARABIC
.áÑWôdG AGƒLC’G hCG ô£ª∏d á«FÉHô¡µdG Iõ¡LC’G ¢Vô©J ’ .ê
¤EG »FÉHô¡µdG RÉ¡÷G πNGO AÉŸG π∏îJ …ODƒj ±ƒ°S
.á«FÉHô¡c áeó°üH áHÉ°UE’G ô£N IOÉjR
’ .»FÉHô¡µdG QÉ«àdG ∂∏°S ∫ɪ©à°SG IAÉ°SEG ΩóY »¨Ñæj .O
RÉ¡÷G πª◊ »FÉHô¡µdG QÉ«àdG ∂∏°S Ék≤∏£e Ωóîà°ùJ
»¨Ñæj .QÉ«àdG øY ¬∏°üa hCG ¬Ñë°S hCG »FÉHô¡µdG
hCG IQGô◊G øY Gók «©H »FÉHô¡µdG QÉ«àdG ∂∏°ùH ®ÉØàM’G
ójõJ .ácôëàŸG AGõLC’G hCG IOÉ◊G ±Gƒ◊G hCG âjõdG
áeó°üH áHÉ°UE’G ô£N øe áµHÉ°ûàŸG hCG áØdÉàdG ∑Ó°SC’G
.á«FÉHô¡c
Ωóîà°SG ,≥∏£dG AGƒ¡dG ‘ »FÉHô¡µdG RÉ¡÷G 𫨰ûJ óæY .`g
.≥∏£dG AGƒ¡dG ‘ ΩGóîà°SÓd Ö°SÉæe π«°UƒJ ∂∏°S
‘ ΩGóîà°SÓd Ö°SÉæe »FÉHô¡c QÉ«J ∂∏°S ΩGóîà°SG
.á«FÉHô¡c áeó°üd ¢Vô©àdG ô£N øe π∏≤j ≥∏£dG AGƒ¡dG
‘ »FÉHô¡µdG RÉ¡÷G 𫨰ûJ ÖæŒ øµÁ ’ ¿Éc GPEG .h
øe ájÉbh RÉ¡L ΩGóîà°SG »¨Ñæj ¬fEÉa ,ÖWQ ¿Éµe
QÉ«àdG øe ájÉbƒdG RÉ¡L ΩGóîà°SG π∏≤j .»≤ÑàŸG QÉ«àdG
.á«FÉHô¡c áeó°üH áHÉ°UE’G ô£N øe »≤ÑàŸG
á«°üî°ûdG áeÓ°ùdG .3
ΩGóîà°S’G ¢VôZ
¬ª«ª°üJ ” ôµjO ófBG ∑ÓH ≥dõæŸG áÑcôŸG ájhGõdG QÉ°ûæe
.§≤a ájójó◊G ÒZ ¿OÉ©ŸGh ∂«à°SÓÑdGh Ö°ûÿG öûæd
áeÓ°ùdG äGOÉ°TQEG
á«FÉHô¡µdG Iõ¡LC’G áeÓ°S ¢Uƒ°üîH áeÉ©dG äÉ¡«ÑæàdG
áeÓ°ùdG äÉ¡«ÑæJ áaÉc IAGôb »¨Ñæj !¬«ÑæJ
´ÉÑJEG ΩóY ÖÑ°ùàj ób .äGOÉ°TQE’G áaÉch
‘ »∏j ɪ«a IOQGƒdG äGOÉ°TQE’Gh äÉ¡«ÑæàdG
.IÒ£N áHÉ°UEG hCG/h ≥jôM hCG/h á«FÉHô¡c áeó°U çhóM
´ƒLô∏d äGOÉ°TQE’Gh äÉ¡«ÑæàdG áaɵH ®ÉØàM’G ≈Lôj
.kÓÑ≤à°ùe É¡«dEG
äÉ¡«ÑæàdG áaÉc ‘ OQGƒdG "»FÉHô¡c RÉ¡L" í∏£°üŸG
πª©j …òdG »FÉHô¡µdG RÉ¡÷G ¤EG Ò°ûj √ÉfOCG IQƒcòŸG
…òdG »FÉHô¡µdG RÉ¡÷G hCG (»µ∏°ùdG) »FÉHô¡µdG QÉ«àdÉH
.(»µ∏°SÓdG) ájQÉ£ÑdÉH πª©j
πª©dG á≤£æe áeÓ°S .1
áØ«¶f ádÉM ‘ πª©dG á≤£æe ≈∏Y ®ÉØ◊G »¨Ñæj .CG
á¶àµŸGh áª∏¶ŸG ≥WÉæŸG ÖÑ°ùàJ .Gók «L IAÉ°†eh
.çOGƒM ´ƒbh ‘ ΩÉcôdÉH
º«∏°ùdG ¢ù◊G Ωóîà°SGh ¬∏©ØH Ωƒ≤J Ée ÖbGQh É k¶≤j øc .CG
AGƒLCG ‘ á«FÉHô¡µdG Iõ¡LC’G 𫨰ûàH º≤J ’
Ωóîà°ùJ ’ .»FÉHô¡µdG RÉ¡÷G 𫨰ûàH Ωƒ≤J ÉeóæY
á∏HÉb πFGƒ°S OƒLh ‘ É¡∏«¨°ûJ πãe ;ájQÉéØfG
èàæj á«FÉHô¡µdG Iõ¡LC’G .QÉÑZ hCG äGRÉZ hCG ∫É©à°TÓd
ÒKCÉJ â– hCG Ékµ¡æe ¿ƒµJ ÉeóæY »FÉHô¡µdG RÉ¡÷G
.áæNOC’G hCG QÉѨdG ∫É©°TEG ¤EG …ODƒJ ób äGQGöT É¡æY
ÖÑ°ùàJ ób .AGhódG hCG á«dƒëµdG äÉHhöûŸG hCG ÒbÉ≤©dG
‘ á«FÉHô¡µdG Iõ¡LC’G 𫨰ûJ AÉæKCG á∏بdG øe á¶◊
RÉ¡÷G 𫨰ûJ AÉæKCG ÚLôØàŸGh ∫ÉØWC’G OÉ©HEG »¨Ñæj
.á¨dÉH á«°üî°T áHÉ°UEG çhóM
≈∏Y Iô£«°ù∏d ∂fGó≤a ‘ AÉ¡dE’G ÖÑ°ùàj ób .»FÉHô¡µdG
.RÉ¡÷G
»bGh ÉehO
k …óJQG .á«°üî°ûdG ájÉbƒdG äGó©e Ωóîà°SG .Ü
á«FÉHô¡µdG áeÓ°ùdG
äÉeɪc πãe ájÉbƒdG äGó©e ΩGóîà°SG π∏≤j ±ƒ°S .Ú©dG
áÑ∏°üdG á©Ñ≤dGh ≥∏Mõà∏d á©fÉŸG ájòMC’Gh áHôJC’G
QÉ«àdG Qó°üe ™e »FÉHô¡µdG QÉ«àdG ¢ùHGƒb ≥aGƒJ Ωõ∏j
.á«°üî°T äÉHÉ°UEG çhóM ô£N øe ™ª°ùdG »bGhh
,á≤jôW ájCÉH ¢ùHÉ≤dG πjó©J Ék≤∏£e ÖæŒ .»FÉHô¡µdG
á«FÉHô¡µdG
Iõ¡LC’G ™e ÅjÉ¡e ¢ùHGƒb ájCG Ωóîà°ùJ ’h
¿CG øe ócCÉJ .Oƒ°ü≤ŸG ÒZ 𫨰ûàdG AóH ™æe Ú©àj .ê
QOÉ°üeh
ádó©ŸG
ÒZ ¢ùHGƒ≤dG …ODƒJ ±ƒ°S .á°VQCÉŸG
QÉ«àdG Qó°üà π«°UƒàdG πÑb ≥∏¨dG ™°Vh ‘ ìÉàØŸG
¢Vô©àdG
ô£N
π«∏≤J
¤EG á≤aGƒàŸG »FÉHô¡µdG QÉ«àdG
.RÉ¡÷G πªM hCG ™aQ hCG ájQÉ£ÑdG áeõëH hCG/h »FÉHô¡µdG
.á«FÉHô¡c áeó°üd
áYƒ°Vƒe ™HÉ°UC’Gh á«FÉHô¡µdG Iõ¡LC’G πªM …ODƒj
Ö«HÉfC’G πãe á°VQDƒŸG í£°SCÓd º°ù÷G á°ùeÓe ÖæŒ
»àdG ᣰûædG á«FÉHô¡µdG Iõ¡LC’G πªM hCG ,ìÉàØŸG ≈∏Y
ô£N OGOõj .äÉLÓãdGh óbGƒŸGh ICÉaóŸG Iõ¡LCGh
.çOGƒM ´ƒbh ¤EG ,𫨰ûàdG ™°Vh ‘ ¿ƒµJ
.É°VQD
k ƒe ∂ª°ùL ¿Éc GPEG á«FÉHô¡c áeó°üH ∂àHÉ°UEG
.Ü
.ê
.2
.CG
.Ü
25
ARABIC
Gók «©H áeóîà°ùŸG ÒZ á«FÉHô¡µdG Iõ¡LC’G øjõîàH ºb .O
ÒZ ¢UÉî°TCÓd íª°ùJ ’h ∫ÉØWC’G ∫hÉæàe øY
ÒZ hCG »FÉHô¡µdG RÉ¡÷G ΩGóîà°SG ≈∏Y øjOÉà©ŸG
RÉ¡÷G 𫨰ûàH äGOÉ°TQE’G √òg ≈∏Y Ú©∏£ŸG
ÉeóæY Gô£N
k πµ°ûJ á«FÉHô¡µdG Iõ¡LC’G .»FÉHô¡µdG
.ÚHQóe ÒZ Úeóîà°ùe ój ‘ ¿ƒµJ
RÉ¡÷G ¢üëaG .á«FÉHô¡µdG Iõ¡LC’G áfÉ«°U »¨Ñæj .`g
ácôM ¥ƒ©J »àdG hCG áÑ«©ŸG AGõLC’G ≈∏Y ±ô©à∏d
AGõLC’G øe √ƒ∏N øe ócCÉà∏dh ácôëàŸG AGõLC’G
IAÉØc ≈∏Y ôKDƒJ ób iôNCG ádÉM …CG øeh IQƒ°ùµŸG
,∞∏J …CG ≈∏Y Qƒã©dG ” GPEG .á«FÉHô¡µdG Iõ¡LC’G 𫨰ûJ
èàæJ .ΩGóîà°S’G πÑb »FÉHô¡µdG RÉ¡÷G ìÓ°UEG »¨Ñæj
Iõ¡LC’G áfÉ«°U Aƒ°S øY çOGƒ◊G øe ójó©dG
.á«FÉHô¡µdG
IOÉM ádÉM ‘ ™£≤dG äGhOCG ≈∏Y ®ÉØ◊G »¨Ñæj .h
Ö°SÉæe πµ°ûH É¡«∏Y ßaÉëŸG ™£≤dG äGhOCG .áØ«¶fh
á°VôY πbCG »g IOÉM á©WÉb äGôØ°ûH IOhõŸGh
.ºµëàdG ‘ π¡°SCGh ∫É£YCÓd
º≤∏dGh ¬JÉ≤ë∏eh »FÉHô¡µdG RÉ¡÷G ΩGóîà°SG »¨Ñæj .R
±hôX òNCG ™e ,äGOÉ°TQE’G √ò¡d Ék≤ah ∂dP ¤EG Éeh
ÖÑ°ùàj ób .QÉÑàY’G ‘ √ò«ØæJ OGôŸG πª©dGh πª©dG
𫨰ûJ äÉ«∏ªY πLCG øe »FÉHô¡µdG RÉ¡÷G ΩGóîà°SG
çhóM ‘ IOƒ°ü≤ŸG 𫨰ûàdG äÉ«∏ªY øY áØ∏àfl
.ôWÉfl
áfÉ«°üdG .5
ᣰSGƒH »FÉHô¡µdG RÉ¡÷G ìÓ°UEGh áfÉ«°U »¨Ñæj .CG
Gòg .§≤a á≤HÉ£e QÉ«Z ™£b ΩGóîà°SÉH πgDƒe ¢üî°T
.»FÉHô¡µdG RÉ¡÷G áeÓ°S ≈∏Y ®ÉØ◊G øª°†«°S
RÉ¡÷G ¢Uƒ°üîH á«aÉ°VEG áeÓ°S äÉ¡«ÑæJ
»FÉHô¡µdG
¢Uƒ°üîH á«aÉ°VEG áeÓ°S äÉ¡«ÑæJ !¬«ÑæJ
.ájhGõdG Ò°TÉæe
hCG á«æëæŸG hCG IQƒ°ùµŸG QÉ°ûæŸG äGôØ°T Ωóîà°ùJ ’ •
.ágƒ°ûŸG hCG áØdÉàdG
26
πÑb …õ«∏‚EG ìÉàØe hCG …OÉY ìÉàØe …CG ádGREÉH ºb .O
ìÉàØe ∑ôJ ÖÑ°ùàj ób .»FÉHô¡µdG RÉ¡÷G 𫨰ûJ
çhóM ‘ »FÉHô¡µdG RÉ¡÷G øe QGhO AõéH Ék`≤∏©àe
.á«°üî°T áHÉ°UEG
äÉÑK ≈∏Y ®ÉØ◊G »¨Ñæj .•ôØŸG ÜGÎb’G ΩóY »¨Ñæj .`g
øe ∂æµÁ Gòg .äÉbhC’G áaÉc ‘ ¿RGƒàdGh Úeó≤dG
∞bGƒŸG ‘ »FÉHô¡µdG RÉ¡÷G ≈∏Y Ió«÷G Iô£«°ùdG
.á©bƒàŸG ÒZ
¢ùHÓŸG …óJôJ ’ .áÑ°SÉæŸG ¢ùHÓŸG AGóJQG »¨Ñæj .h
∑ô©°T ≈∏Y ®ÉØ◊G »¨Ñæj .äGôgƒéŸG hCG á°VÉØ°†ØdG
ób .ácôëàŸG AGõLC’G øY Gók «©H ∂JGRÉØbh ∂°ùHÓeh
ô©°ûdG hCG äGôgƒéŸG hCG á°VÉØ°†ØdG ¢ùHÓŸG ≥∏©àJ
.ácôëàŸG AGõLC’ÉH πjƒ£dG
π«°UƒJ ¢Uƒ°üîH Iôaƒe Iõ¡LCG ∑Éæg âfÉc GPEG .R
∂∏J π«°UƒJ øe ócCÉJ ,™ª÷Gh QÉѨdG êGôîà°SG ≥aGôe
π∏≤j ¿CG øµÁ .Ö°SÉæŸG πµ°ûdÉH É¡eGóîà°SGh Iõ¡LC’G
á£ÑJôŸG ôWÉîŸG çhóM øe Iõ¡LC’G ∂∏J ΩGóîà°SG
.QÉѨdÉH
¬H ájÉæ©dGh »FÉHô¡µdG RÉ¡÷G ΩGóîà°SG .4
¢VôZ ‘ »FÉHô¡µdG RÉ¡÷G ΩGóîà°SG ÖæŒ Ú©àj .CG
Ö°SÉæàj …òdG »FÉHô¡µdG RÉ¡÷G Ωóîà°SG .Ö°SÉæe ÒZ
Ωƒ≤j ±ƒ°S .√ójôJ …òdG ΩGóîà°S’Gh ¢Vô¨dG ™e
π°†aCG πµ°ûH πª©dG AGOCÉH í«ë°üdG »FÉHô¡µdG RÉ¡÷G
.¬∏LCG øe ¬ª«ª°üJ ” …òdG ∫ó©ŸÉH Éfk ÉeCG ÌcCGh
ìÉàØŸG º≤j ⁄ kGPEG »FÉHô¡µdG RÉ¡÷G Ωóîà°ùJ ’ .Ü
øµÁ ’ »FÉHô¡c RÉ¡L …CG .¬∏«¨°ûJ ±É≤jEGh ¬∏«¨°ûàH
»¨Ñæjh Gô£N
k ¿ƒµj ìÉàØŸG ΩGóîà°SÉH ¬«a ºµëàdG
.¬MÓ°UEG
QÉ«àdG Qó°üe øY »FÉHô¡µdG RÉ¡÷G ¢ùHÉb π°üaG .ê
ájCG AGôLEG πÑb ájQÉ£ÑdG áeõM øY hCG/h »FÉHô¡µdG
‘ äÉ≤ë∏e ájCG Ö«côJ hCG äGÒ«¨J hCG äÓjó©J
äGAGôLEG π∏≤J .É¡æjõîJ hCG á«FÉHô¡µdG Iõ¡LC’G
RÉ¡÷G 𫨰ûJ AóH ô£N øe √òg á«FÉbƒdG áeÓ°ùdG
.ó°üb ¿hO ICÉéa »FÉHô¡µdG
ARABIC
.RÉ¡÷G 𫨰ûàH ÚHQóŸG ÒZ ¢UÉî°TCÓd íª°ùJ ’ •
.É¡∏cBÉJ óæY ádhÉ£dG ‘ ∫ÉNOE’G IóMh ∫óÑà°SG •
πÑb í«ë°U πµ°ûH áÑcôe IôØ°ûdG ¿CG øe ócCÉJ • ô£≤dG øY Égô£b π≤j hCG ójõj »àdG äGôØ°ûdG Ωóîà°ùJ ’
Ö°SÉæe πµ°ûH IôØ°ûdG Úæ≤J πLCG øe .¬H ≈°UƒŸG
√ÉŒ’G ‘ QhóJ IôØ°ûdG ¿CG øe ócCÉJ .ΩGóîà°S’G
IOóëŸG äGôØ°ûdG §≤a Ωóîà°SG .á«æØdG äÉfÉ«ÑdG ™LGQ
.IOÉM IôØ°ûdG ≈∏Y ßaÉM .í«ë°üdG
.EN 847-1 QÉ«©ŸG ™e á≤aGƒàŸGh π«dódG Gòg ‘
.QÉ°ûæŸG IôØ°T ≈∏Y áë°VƒŸG iƒ°ü≤dG áYöùdÉH ΩõàdG •
P’ƒØdG øe áYƒæ°üŸG QÉ°ûæŸG äGôØ°T Ωóîà°ùJ ’
øe Qõ«d RÉ¡éH ÖcôŸG Qõ«∏dG RÉ¡L ∫GóÑà°SG ΩóY Ωõ∏j •
.áYöùdG ‹ÉY
É¡FGôLEG »¨Ñæj Qõ«∏dG ìÓ°UEG äÉ«∏ªY .∞∏àfl ´ƒf
QÉ°ûæŸG äGôØ°T ™e πeÉ©àdG óæY äGRÉØ≤dG …óJQG
∑ÓH áfÉ«°U ºbÉW hCG øjóªà©e ìÓ°UEG AÓch ᣰSGƒH
πeÉM ‘ QÉ°ûæŸG äGôØ°T πªM »¨Ñæj) áæ°ûÿG OGƒŸGh
.ôµjO ófBG
.(∂dP øµÁ ÉeóæY
…CG AGôLEG πÑb »FÉHô¡µdG QÉ«àdG Qó°üe øY RÉ¡÷G π°üaG •
.Ö°ûÿG öûf óæY IôaƒŸG QÉѨdG áÑ«≤M Ωóîà°SG
.IôØ°ûdG Ò«¨J óæY hCG áfÉ«°U
hCG áfÉ«°U hCG ∞«¶æJ á«∏ªY …CG AGôLEÉH Ék≤∏£e º≤J ’ •
øe iôNC’G πª©dG á©£b AGõLCG hCG ™£≤dG äÉØ∏fl ádGREG
¢SCGQ OƒLh ΩóYh RÉ¡÷G 𫨰ûJ AÉæKCG ™«£≤àdG á≤£æe
.É¡©°Vƒe ‘ QÉ°ûæŸG
.ó°†f ≈∏Y ɪFGO
k RÉ¡÷G âÑK ,∂dP øµÁ ÉeóæY •
hCG ∂Ñ°ûà ácƒ°ùªŸG πª©dG á©£b .Gók «L πª©dG á©£b âÑK •
.ó«dÉH É¡µ°ùe øe Éfk ÉeCGh ÉJk ÉÑK ÌcCG ¿ƒµJ áeõ∏e
πª©J ’ .∂Ñ°ûà ΩɵMEÉH πª©dG á©£b â«ÑãàH ɪFGO
k ºb •
øµÁ ’ å«ëH Gók L Ò¨°U ¿ƒµJ »àdG πª©dG ™£b ≈∏Y
øjó«dG ÚH áaÉ°ùŸG ¿ƒµJ ÉeóæY hCG ∂Ñ°ûà ɡà«ÑãJ
ɪFGO
k Ωóîà°SG .Gók L IÒ¨°U IQGhódG QÉ°ûæŸG IôØ°Th
.á∏jƒ£dG πª©dG ™£b öûf óæY ‘É°VE’G ºYódG
πÑb áWƒHôe ¢†HÉ≤ŸGh ≥∏¨dG äGóMh áaÉc ¿CG øe ócCÉJ •
.𫨰ûJ …CG AóH
.ádhÉ£dG ∫ÉNOEG IóMh ¿hO Ék≤∏£e QÉ°ûæŸG Ωóîà°ùJ ’ •
π«°UƒJ óæY IôØ°ûdG á≤£æe ‘ øjó«dG øe ój …CG ™°†J ’ •
.»FÉHô¡µdG QÉ«àdG Qó°üà QÉ°ûæŸG
≥jôW øY áYöùH ∑ôëàŸG RÉ¡÷G ∞bh Ék≤∏£e ∫hÉ– ’ •
…ODƒJ ¿CG øµÁ ;IôØ°ûdG ó°V iôNCG πFÉ°Sh hCG IGOCG öûM
.ó°üb ¿hO IÒ£N çOGƒM ´ƒbh ¤EG ≥jô£dG √òg
•
•
•
•
øY œÉædG QÉѨdG ¥É°ûæà°SG hCG á°ùeÓe !¬«ÑæJ
π¨°ûŸG áë°U ≈∏Y Gô£N
k πµ°ûj ób á«∏eôdG äÉeGóîà°S’G
᪪°üe QÉÑZ áeɪc …óJQG .Ú∏ªàëŸG ÚLôØàŸGh
øe É°†jC
k G ócCÉJh áæNOC’Gh QÉѨdG øe ájɪë∏d É°ü«°üN
k
¤EG Ú∏NGódG hCG πNGO øjóLGƒàŸG ¢UÉî°TC’G ájɪM
.πª©dG á≤£æe
É°ü«°üN
᪪°üŸG äGôØ°ûdG ΩGóîà°SG IÉYGôe »¨Ñæj •
k
.AÉ°Vƒ°†dG øe óë∏d
܃∏£ŸG IOɪ∏d áÑ°SÉæŸG áë«ë°üdG IôØ°ûdG ÎNG •
.É¡©£b
Ö°ûÿG öûf πLCG øe Gòg ájhGõdG QÉ°ûæe º«ª°üJ ” •
.§≤a ájójó◊G ÒZ ¿OÉ©ŸGh ∂«à°SÓÑdGh
’ .¬©°Vƒe ‘ »bGƒdG OƒLh ¿hO RÉ¡÷G π¨°ûJ ’ •
âÑãe ÒZ hCG πª©j ’ »bGƒdG ¿Éc GPEG RÉ¡÷G π¨°ûJ
.í«ë°U πµ°ûH
äÉ«∏ªY AGôLEG óæY ΩɵMEÉH âÑãe ´GQòdG ¿CG øe ócCÉJ •
.±ƒ£°ûŸG ™£≤dG
OGƒŸG øe RÉ¡÷ÉH ᣫëŸG á≤£æŸG ƒ∏N ≈∏Y ßaÉM •
.™£≤dG äÉØ∏flh äÉbÉbôdG πãe ;áÑFÉ°ùdG
áeÉY IAÉ°VEÉH πª©dG á£≤æeh RÉ¡÷G ójhõJ øe ócCÉJ •
.á«aÉc á«∏fi hCG
27
ARABIC
ób .Gòg äGOÉ°TQE’G π«dO ‘ í°Vƒe Oƒ°ü≤ŸG ΩGóîà°S’G •
á«∏ªY ájCG ò«ØæJ hCG á≤ë∏e IóMh …CG ΩGóîà°SG ÖÑ°ùàj
π«dO ‘ É¡H ≈°UƒŸG ∂∏J ±ÓîH RÉ¡÷G Gò¡H
∞∏J hCG/h á«°üî°T áHÉ°UEG çhóM ‘ Gòg äGOÉ°TQE’G
.äɵ∏પ∏d
.äGOÉ°TQE’G π«dO ™LGQ á≤ë∏e IóMh …CG ΩGóîà°SG πÑb •
¿CG øµÁ á≤ë∏e IóMh …C’ Ö°SÉæŸG ÒZ ΩGóîà°S’G
.GQöV
çóëj
k
.ᣰTÉc ¢UGôbCG …CG Ωóîà°ùJ ’ •
ßaÉM .™£≤dG á≤£æe øe Üô≤dÉH Ék≤∏£e øjó«dG ™°†J ’ • πª©dG á©£b ‘ ádhÉ£dG ∫ÉNOEG IóMh øY IôØ°ûdG ™aQG •
.±É≤jE’G/𫨰ûàdG QR ôjô– πÑb
»àdG "øjó«dG ™°Vh ΩóY á≤£æe" êQÉN øjó«dG AÉ≤H ≈∏Y
™°†J ’" RƒeôH áë°VƒŸGh πeɵdÉH ádhÉ£dG πª°ûJ
.∑ôëŸG áÑ°üb ±É≤jE’ áMhôŸG ™e A»°T …CG öû– ’ •
."øjó«dG
IôjÉ£àŸG OGƒŸG ÖÑ°ùH áHÉ°UE’ ¢Vô©àdG Öæéàd • É«k FÉ≤∏J QÉ°ûæŸG ‘ OƒLƒŸG IôØ°ûdG »bGh ™ØJôj ±ƒ°S •
IôØ°ûdG ¥ƒa ¢†Øîæj ±ƒ°Sh ,πØ°SC’ ´GQòdG ÜòL óæY
»FÉHô¡µdG QÉ«àdG Qó°üe øY QÉ°ûæŸG π°üaG ,áahò≤ŸGh
óæY ó«dG ΩGóîà°SÉH »bGƒdG ™aQ øµÁ .´GQòdG ™aQ óæY
.IÒ¨°üdG OGƒŸG ádGREÉH ºb ºK ,ÅLÉØŸG AóÑdG Öæéàd
’ .QÉ°ûæŸG ¢üëØd hCG QÉ°ûæŸG äGôØ°T ádGREG hCG Ö«côJ
»bGh ¢üëa Ωõ∏j áfÉ«°U …CG ó©Hh ΩGóîà°S’G πÑb •
𫨰ûJ AÉæKCG Éjk hój IôØ°ûdG »bGh ™aôH Ék≤∏£e º≤J
Gòg AGôLEG Öéj .í«ë°U πµ°ûH ¬∏ªY øe ócCÉà∏d IôØ°ûdG
.RÉ¡÷G
Qó°üe øY ¬∏°üah RÉ¡÷G 𫨰ûJ ±É≤jEG AÉæKCG QÉÑàN’G
øe ócCÉà∏d ¬°†ØNh ´GQòdG ™aQ Ωõ∏jh .»FÉHô¡µdG QÉ«àdG
øe ócCÉà∏d Éjk QhO ∑ôëŸÉH ájƒ¡àdG äÉëàa ¢üëaG •
GPEGh .»bGƒdG ¢ùeÓJ ’ IôØ°ûdG ¿CGh IôØ°ûdG »£¨j »bGƒdG
.Ö°ûÿG äÉbÉbQ øe á«dÉNh áØ«¶f É¡fCG
π«cƒH ø©à°SG ,í«ë°U πµ°ûH 𫨰ûàdG ‘ »bGƒdG π°ûa
Èà©j .¢Sƒà°ùÑ°SC’G ≈∏Y ájƒàëŸG OGƒŸG ≈∏Y πª©J ’ •
∑ÓH AÓªY áeóîH π°üJG .RÉ¡÷G áfÉ«°üd πgDƒe ìÓ°UEG
.áfÉ«°U π«ch ÜôbCG áaô©Ÿ ôµjO ófBG
.¿ÉWöù∏d áÑÑ°ùŸG OGƒŸG øe ¢Sƒà°ùÑ°SC’G
á«≤ÑàŸG ôWÉîŸG
≈∏Y IOƒLƒŸG ôjòëàdG äÉeÓY »£¨J hCG ¢ùª£J ’ •
.RÉ¡÷G
:Ò°TÉæŸG ΩGóîà°S’ áeRÓe ôWÉfl »g á«dÉàdG ôWÉîŸG
.IQGhO AGõLCG ájCG á°ùeÓe øY áŒÉædG äÉHÉ°UE’G •
ΩGóîà°SGh á∏°üdG äGP áeÓ°ùdG íFGƒd ≥«Ñ£J øe ºZôdG ≈∏Y
.á«≤ÑàŸG ôWÉîŸG ¢†©H ÖæŒ øµÁ ’ ,áeÓ°ùdG Iõ¡LCG
:»∏j Ée á«≤ÑàŸG ôWÉîŸG √òg πª°ûJ
.™ª°ùdG ∞©°V •
øe IÉ£¨ŸG ÒZ AGõLC’G øY áŒÉædG çOGƒ◊G ô£N •
.IQGhódG QÉ°ûæŸG IôØ°T
28
¿CG øµÁ .»FÉHô¡µdG RÉ¡÷G ≈∏Y Ék≤∏£e óæà°ùJ ’ •
óæY hCG RÉ¡÷G Ö∏≤æj ÉeóæY IÒ£N äÉHÉ°UEG çó–
.QÉ°ûæŸG IôØ°T ™e á°ùeÓe
íÑ°üJ ¿CG πÑb πª©dG ó©H QÉ°ûæŸG IôØ°T ∂°ù“ ’ •
.πª©dG AÉæKCG Gók L áæNÉ°S QÉ°ûæŸG IôØ°T íÑ°üJ .IOQÉH
𫨰ûJ óæY §≤a πª©dG á©£b πHÉ≤e QÉ°ûæŸG IôØ°T ™°V •
OQ çóëj ¿CG øµÁ ,∂dP π©a ΩóY ádÉM ‘ .RÉ¡÷G
.πª©dG á©£≤H QÉ°ûæŸG IôØ°T ≥∏©J óæY ∞«æY π©a
ARABIC
ºàj ød .Qõ«∏dG ábÉW IOÉjõd πjó©J …CG AGôLEG ÉeÉ“
k ô¶ëjo •
´ÉÑJG ΩóY øY áªLÉædG QGöVC’G øY á«dhDƒ°ùe …CG ∫ƒÑb
.√òg áeÓ°ùdG äGOÉ°TQEG
.IôØ°ûdG Ò«¨J óæY áHÉ°UE’G ô£N •
.QÉ°ûæŸG äÉ«bGh íàa óæY ™HÉ°UC’G QÉ°ûëfG ô£N •
´É©°T ¬«LƒJ ÉeÉ“
k ÖæŒ ,Qõ«∏dG öTDƒe ΩGóîà°SG óæY • œÉædG QÉѨdG ¥É°ûæà°SG øY áŒÉædG á«ë°üdG ôWÉîŸG •
•ƒ∏ÑdG Ö°ûN ¢Uƒ°üÿG ¬Lh ≈∏Yh ,Ö°ûÿG öûf AÉæKCG
¿EGh ≈àM .á°ùcÉ©dG í£°SC’G hCG/h ¢UÉî°TC’G √ÉŒ Qõ«∏dG
áaÉãµdG §°Sƒàe »Ø«∏dG Ö°ûÿGh ¿GõdG Ö°ûNh
GQöV
ÖÑ°ùj ób ¬fEÉa áaÉãµdG ¢†Øîæe Qõ«∏dG ´É©°T ¿Éc
k
.IöTÉÑe Qõ«∏dG ´É©°T ¤EG ô¶æJ ’ ,Gòd .Ú©∏d
ø©à°SG ,πª©dG øY ÊhεdE’G íѵŸG π£©J GPEG !¬«ÑæJ
.áfÉ«°ü∏d á∏HÉb äÉfƒµe …CG ≈∏Y Qõ«∏dG öTDƒe πªà°ûj ’ • AÓªY áeóîH π°üJG .RÉ¡÷G áfÉ«°üd πgDƒe ìÓ°UEG π«cƒH
.áfÉ«°U π«ch ÜôbCG áaô©Ÿ ôµjO ófBG ∑ÓH
.¿Éª°†dG π£Ñ«°S ’EGh AGƒjE’G IóMh íàØJ ’
øjôNB’G áeÓ°S
Iõ¡LCG ¢Uƒ°üîH á«aÉ°VEG áeÓ°S äGOÉ°TQEG
Qõ«∏dG
hhP ¢UÉî°TC’G ¬eóîà°ù«d ºª°üe ÒZ RÉ¡÷G Gòg •
IEC QÉ«©ŸG ≥ah 1M áÄØdG ™e Gòg Qõ«∏dG RÉ¡L ≥aGƒàj
á«fóàŸG á«∏≤©dGh á«°ù◊Gh á«ægòdGh ájó°ù÷G äGQó≤dG
»FÉæãdG Qõ«∏dG Ωɪ°U ∫óÑà°ùJ ’ .60825-1:2007
‘ ’EG (∫ÉØWC’G ∂dP ‘ ÉÃ) Úà∏«∏≤dG áaô©ŸGh IÈÿGh
ìÓ°UE
G »¨Ñæj ,Qõ«∏dG RÉ¡L ∞∏J ádÉM ‘ .∞∏àfl ´ƒæH
á≤∏©àŸG äɪ«∏©àdG º¡FÉ£YEG hCG º¡«∏Y ±GöTE’G πX
Ωóîà°ùJ ’ .óªà©e áfÉ«°U π«ch ᣰSGƒH Qõ«∏dG RÉ¡L
øY ∫hDƒ°ùŸG ¢üî°ûdG πÑb øe RÉ¡÷G ΩGóîà°SÉH
.Qõ«∏dG •ƒ£N •É≤°SEG ±ÓîH ¢VôZ …CG ‘ Qõ«∏dG
.º¡àeÓ°S
º¡ãÑY ΩóY ¿Éª°†d ∫ÉØWC’G ≈∏Y ±GöTE’G Ωõ∏j • .óª©àe πµ°ûHh Ik öTÉÑe Qõ«∏dG ´É©°T ‘ Ék≤∏£e ô¶æJ ’ •
.RÉ¡÷ÉH
.Qõ«∏dG ´É©°T ájDhôd ájöüH äGhOCG Ωóîà°ùJ ’ •
RGõàg’G
á«æØdG äÉfÉ«ÑdG ‘ IQƒcòŸG áæ∏©ŸG äGRGõàg’G çÉ©ÑfG º«b
á«°SÉ«b QÉÑàNG á≤jô£d Ék≤ah É¡°SÉ«b ” ≥aGƒàdG äÉeƒ∏©eh
øµÁh EN 61029 QÉ«©ŸG ÖLƒÃ É¡«∏Y ¢Uƒ°üæe
᪫b ΩGóîà°SG øµÁh .ôNBG ™e Ée RÉ¡L áfQÉ≤Ÿ É¡eGóîà°SG
.¢Vô©à∏d ‹hCG º««≤J AGôLEG ‘ áæ∏©ŸG äGRGõàg’G çÉ©ÑfG
AÉæKCG äGRGõàg’G çÉ©ÑfG ᪫b ∞∏àîJ ¿CG øµÁ !¬«ÑæJ
áæ∏©ŸG ᪫≤dG øY »FÉHô¡µdG RÉ¡é∏d »∏©ØdG ΩGóîà°S’G
OGOõj ób .RÉ¡÷G ΩGóîà°SG ¥ôW ≈∏Y ∂dP ∞bƒàj å«M
.QƒcòŸG iƒà°ùŸG øY RGõàg’G iƒà°ùe
…CG Qõ«∏dG ´É©°T È©j ¿CG øµÁ ÉeóæY RÉ¡÷G π¨°ûJ ’ •
.¢SCGôdG ´ÉØJQG iƒà°ùe ‘ ¢üî°T
.Qõ«∏dG øe ÜGÎb’ÉH ∫ÉØWCÓd íª°ùJ ’ •
á©°TCG Qõ«∏dG Qó°üj .Ú©∏d IöTÉÑŸG á°ùeÓŸG ÖæŒ !¬«ÑæJ
π°üØH ɪFGO
k ºb .𫨰ûàdG ó«b Qõ«∏dG π«dO ¿ƒµj ÉeóæY
…CG AGôLEG πÑb »FÉHô¡µdG QÉ«àdG Qó°üe øY ájhGõdG QÉ°ûæe
.Qõ«∏d πjó©J
…ójCG ¤EG π°üj ’CG »¨Ñæjh áÑ©d ¢ù«d Qõ«∏dG öTDƒe •
¤EG RÉ¡÷G Gòg ΩGóîà°SG Aƒ°S …ODƒj ¿CG øµÁ .∫ÉØWC’G
.É¡LÓY Qò©àj Ú©∏d IÒ£N äÉHÉ°UEG
29
ARABIC
á«FÉHô¡µdG áeÓ°ùdG
’ ,∂dòd ;ÉLhOõe
’k õY ∫hõ©e RÉ¡÷G Gòg
k
ɪFGO
k ócCÉàdG »¨Ñæjh .»°VQCG ∂∏°S ¤EG áLÉM
í°VƒŸG ó¡÷G ™e »FÉHô¡µdG QÉ«àdG ≥aGƒJ øe
.Úæ≤àdG áMƒd ≈∏Y
øe ¬dGóÑà°SG Öéj ,»FÉHô¡µdG QÉ«àdG ∂∏°S ∞∏J ádÉM ‘ •
ôµjO ófBG ∑ÓH áfÉ«°U õcôe hCG á©æ°üŸG ácöûdG πÑ pb
.ôWÉîŸG Öæéàd óªà©e
áeÓ°ùdG äGAGôLEG ójóëàd RGõàgÓd ¢Vô©àdG º««≤J óæY
ájɪ◊ EC/2002/44 QÉ«©ŸG ÖLƒÃ áHƒ∏£ŸG
πµ°ûH á«FÉHô¡µdG Iõ¡LC’G ¿ƒeóîà°ùj øjòdG ¢UÉî°TC’G
º««≤J á«∏ªY ‘ »∏j Ée IÉYGôe Ωõ∏j ,º¡∏ªY ‘ º¶àæe
á≤jô£dGh ΩGóîà°SÓd á«∏©ØdG ±hô¶dG :RGõàgÓd ¢Vô©àdG
AGõLCG áaÉc òNCG ∂dP ‘ Éà ,É¡H RÉ¡÷G ΩGóîà°SG ºàj »àdG
É¡«a ºàj »àdG äÉbhC’G πãe ;QÉÑàY’G ‘ 𫨰ûàdG IQhO
,¬eGóîà°SG øY ∞bƒàdG óæY hCG RÉ¡÷G 𫨰ûJ ±É≤jEG
.𫨰ûàdG äÉbhCG ¤EG áaÉ°VE’ÉH
»FÉHô¡µdG ó¡÷G ¢VÉØîfG
ó¡÷G ‘ ¢VÉØîfG çhóM ‘ á≤aóàŸG äGQÉ«àdG ÖÑ°ùàJ
πX ‘ iôNC’G äGó©ŸG ôKCÉàJ ób .IÒ°üb IóŸ »FÉHô¡µdG
.á«JGƒŸG ÒZ »FÉHô¡µdG QÉ«àdG ±hôX
Iõ¡LC’G ≈∏Y äÉ≤°ü∏ŸG
≈∏Y »¨Ñæj ,áHÉ°UE’G ô£N π«∏≤àd !¬«ÑæJ
.äGOÉ°TQE’G π«dO IAGôb Ωóîà°ùŸG
,Zmax<0.34 »FÉHô¡µdG QÉ«àdG áehÉ≤e Ωɶf ¿Éc GPEG
.äÉHGô£°VG çhóM πªàëŸG ÒZ øe ¬fEÉa
.á«bGƒdG äGQɶædG ɪFGO
k …óJQG
π«°UƒJ πHÉc ΩGóîà°SG
™ª°ùdG »bGh ɪFGO
k …óJQG
πNód Ö°SÉæe óªà©e π«°UƒJ πHÉc ɪFGO
k Ωóîà°SG •
.(á«æØdG äÉfÉ«ÑdG ô¶fG) RÉ¡÷G Gò¡H ¢UÉÿG ábÉ£dG
≈∏Y ±ô©à∏d π«°UƒàdG πHÉc ¢üëaG ,ΩGóîà°S’G πÑbh
πHÉc ∫óÑà°SG .≠dÉÑdG Ωó≤dG hCG ≈∏ÑdG hCG ∞∏àdG äÉeÓY
IôµH ΩGóîà°SG óæYh .Ö«Y ¬H hCG ÉkØdÉJ ¿Éc GPEG π«°UƒàdG
ΩGóîà°SG …ODƒj .πeɵdÉH πHɵdG OôØH ɪFGO
k ºb ,πHÉc
πHÉc hCG ,RÉ¡÷G ábÉW πNód Ö°SÉæe ÒZ π«°UƒJ πHÉc
áeó°U hCG ≥jôM çhóM ¤EG ,Ö«©e hCG ∞dÉJ π«°UƒJ
.á«FÉHô¡c
ÉjGõŸG
QÉѨdG áeɪc …óJQG
ᣰSGƒH ¬eGóîà°S’ ºª°üe ÒZ èàæŸG Gòg
.áæ°S 16 øe πbCG ∫ÉØWC’G
øY Gók «©H ÚYGQòdGh ™HÉ°UC’ÉH ßØàMG
.IQGhódG QÉ°ûæŸG äGôØ°T
äGôØ°T ™e πeÉ©àdG óæY äGRÉØ≤dG …óJQG
.QÉ°ûæŸG
Qõ«∏dG ±É≤jEG/𫨰ûJ ìÉàØe .1
»°ù«FôdG 𫨰ûàdG ¢†Ñ≤e .2
Qõ«d ´É©°TEG
±É≤jE’G/𫨰ûàdG ìÉàØe .3
Qõ«∏dG ´É©°T ‘ ô¶æJ ’
∑ôëŸG AGƒjEG IóMh .4
∑ôëàe »∏Ø°S »bGh .5
30
´É©°T ájDhôd ájöüH äGhOCG Ωóîà°ùJ ’
.Qõ«∏dG
ARABIC
ÉjGhõdG QÉ£°ùe ¢SÉ«≤e .31
(ÚÁ) ádhÉ£dG ™«°SƒJ ±É≤jEG IóMh
.6
øÁCG êÉ«°S .32
(ÚÁ) ádhÉ£dG ™«°SƒJ
.7
Qõ«∏dG .33
≥°ûdG áMƒd
.8
QÉ°ûæŸG IôØ°T .34
∑ƒd ôHƒ°S ájhGR ∂Ñ°ûe
.9
¿GQhódG OƒªY ≥∏Z QR .35
ájhGõdG ≥∏Z ¢Uôb .10
QÉ°ûæŸG ´GQP ôjô– ´GQP .36
ájhGõdG ¢ùÑM ´GQP .11
± πµ°ûdG
ájhGõdG ™°Vƒe πjó©J öTDƒe .12
∂Ñ°ûe .53
ájhGõdG ¢SÉ«≤e .13
Ö«cÎdG
IQGhO ádhÉW .14
¬∏°üah RÉ¡÷G 𫨰ûJ ±É≤jEG øe ócCÉJ ,Ö«cÎdG πÑb !¬«ÑæJ
.»FÉHô¡µdG QÉ«àdG øY
ó°†ædG â«ÑãJ äÉëàa .15
øe ¬æë°T πÑb ≥«bO πµ°ûH •ƒÑ°†e RÉ¡÷G Gòg :á¶MÓe
Ωõd GPEG ábódG §Ñ°V IOÉYEÉH ºbh »∏j Ée ábO ¢üëaG .™æ°üŸG
.𫨰ûàdG óæY èFÉàædG π°†aCG ≈∏Y ∫ƒ°ü◊G πLCG øe ôeC’G
∂HÉ°ûŸG ™bGƒe ójó– äGóMh .16
(QÉ°ùj) ádhÉ£dG ™«°SƒJ .17
(QÉ°ùj) ádhÉ£dG ™«°SƒJ ±É≤jEG IóMh .18
Qõ«∏dG ´É©°T
ádhÉ£dG ™«°SƒJ â«ÑãJ ¢Uôb .19
ÒZh ™«æ°üàdG Qó°üe ‘ áWƒÑ°†e Qõ«∏dG ´É©°T IGPÉfi
.Ωóîà°ùŸG ᣰSGƒH §Ñ°†∏d á∏HÉb
≥dõæŸG …ƒ∏©dG êÉ«°ùdG ∂Ñ°ûe .20
ájhGõdG §Ñ°V
≥dõæe …ƒ∏Y öùjCG êÉ«°S .22
øe ádƒ¡°ùH ¬JAGôb øµÁ ≥dõæŸG áÑcôŸG ájhGõdG QÉ°ûæe
á«MÉf áLQO 47 ¤EG áLQO ôØ°U øe ÉjGhõdG ¢VôY ∫ÓN
™£≤dG ájhGR §Ñ°V äÉëàa º¶©e …ƒà–h .Úª«dGh QÉ°ù«dG
≈∏Y ™jöùdG §Ñ°†dÉH íª°ùJ ±É≤jEG äGóMh ≈∏Y áeÉ©dG
πLCG øe √ÉfOCG IQƒcòŸG á«∏ª©dG ™ÑJG .܃∏£ŸG ™°VƒŸG
.≥«bódGh ™jöùdG §Ñ°†dG AGôLEG
° 33.9 ájhGõH ∞£°ûdG ¢SƒHO .23
(Ü πµ°ûdG) ∑ƒd ôHƒ°S ájhGõdG ∂Ñ°ûe
»eÉeCG πªM ¢†Ñ≤e .27
öùjCG êÉ«°S .21
»Ø∏N πªM ¢†Ñ≤e .24
QÉ°ûæŸG QÉÑZ òØæe .25
Êó©e …ƒ∏Y »bGh .26
ádGREÓd πHÉb ¿ƒLôa ¥hóæ°U .28
≈∏Y ¬£Ñ°V QÉ°ûæª∏d (9) ∑ƒd ôHƒ°S ájhGõdG ∂Ñ°ûe í«àj
áLQO ôØ°U πãe Ék ≤Ñ°ùe áWƒÑ°†ŸG ÉjGhõdG ÒZ áæ«©e ÉjGhR
»àdGh áLQO 47h áLQO 31.6h áLQO 22.5 áLQO 15h
(11) ájhGõdG ¢ùÑM ´GQP ΩGóîà°SÉH É¡£Ñ°V ºàj
áHôY .29
ÉjGhõdG QÉ£°ùe ≥∏Z ¢†Ñ≤e .30
31
ARABIC
(21) öùjC’G êÉ«°ùdG πHÉ≤e áÑcôe QÉ‚ ájhGR ™°V •
.("R" πµ°ûdG) (34) QÉ°ûæŸG IôØ°T ó©Hh
h áLQO 90 óæY ájhGõdG ±É≤jEG äGóMh §Ñ°V
("h" – "ê" πµ°ûdG) áLQO 45
QôM ,É¡dƒ£H QÉéædG ájhGR ¢ùeÓJ ’ IôØ°ûdG âfÉc GPEG •
¢SCGQ ∑ôMh (30) ÉjGhõdG QÉ£°ùe ≥∏Z ¢†Ñ≤e ∂a •
.êÉ«°ùdG §Ñ°VGh ("ì" πµ°ûdG) (44) áKÓãdG »ZGÈdG
QÉ£°ùe ≥∏Z ¢†Ñ≤e §HQGh Úª«dG √ÉŒ πeɵdÉH ™£≤dG
.ÉjGhõdG
.(44) áKÓãdG »ZGÈdG §HQG •
("•" πµ°ûdG) ó°†ædG â«ÑãJ
ΩɵMEÉH Gòg ájhGõdG QÉ°ûæe âÑãJ ¿CÉH Ió°ûH »°Uƒf :á¶MÓe
QGô≤à°SG ≈°übCG ≈∏Y ∫ƒ°üë∏d πªY ó°†f ‘ ÒeÉ°ùe ᣰSGƒH
.∂dP øµeCG ≈àe ó°†f ‘ âÑãe RÉ¡÷G ¿CG øe ócCÉJ .RÉ¡é∏d
.ó°†ædG ‘ á©HQC’G ÒeÉ°ùŸG äÉëàa º∏Yh OóM •
.º∏e 10 Égô£b ÜÉ≤ãe áª≤d ΩGóîà°SÉH ó°†ædG Ö≤KG •
ÒeÉ°ùe ΩGóîà°SÉH ó°†ædG ‘ ájhGõdG QÉ°ûæe §HQG •
.π«eGƒ°Uh äɵ∏ah
.RÉ¡÷G ™e Iôaƒe ÒZ √òg äGhOCG :á¶MÓe
ΩGóîà°S’G
.IôØ°ûdG øe º∏e 150 øY π≤j ’ ó©Ho ≈∏Y ∂jój ™°V •
AÉæKCG êÉ«°ùdGh ádhÉ£dG ‘ ΩɵMEÉH πª©dG á©£b âÑãJ •
ìÉàØŸG ôjô– ºàj ≈àM É¡©°Vƒe ‘ ∂jój ≥HG .™£≤dG
.ÉeÉ“
k IôØ°ûdG ∞bƒJh
πÑb (AÉHô¡c ¿hóH) 𫨰ûJ ¿hóH äÉØd AGôLEÉH ɪFGO
k ºb •
.IôØ°ûdG QÉ°ùe ¢üëØJ ¿CG øµÁ å«ëH ™£≤dG Ö«£°ûJ
.øjó«dG Ö«∏°üàH º≤J ’ •
90 ájhGR ≈∏Y IôØ°ûdG §Ñ°†d QÉ‚ ájhGR Ωóîà°SG •
.(O πµ°ûdG) ádhÉ£dG ™e áLQO
(41) ≥∏¨dG ádƒª°U ∂a ,πjó©J AGôLEG Ωõ∏j ¿Éc GPEG •
πµ°ûJ å«ëH ìÉàØŸG ΩGóîà°SÉH (40) Qɪ°ùŸG ∫óYh
.ádhÉ£dG ™e áLQO 90 ÉgQób ájhGR IôØ°ûdG
.(41) ≥∏¨dG ádƒª°U §HQG •
0° áeÓY ™e (39) ÉjGhõdG QÉ£°ùe öTDƒe IGPÉëà ºb •
.(38) »ZÈdG §Ñ°V ≥jôW øY
êÉ«°ùdG ¿CG øe ócCÉJ ,áLQO 45 ÉgQób ájhGR §Ñ°V óæY
¢SCGôd øµÁ å«ëH •ƒÑ°†e (22) ≥dõæŸG …ƒ∏©dG öùjC’G
.(`g πµ°ûdG) áLQO 45 ™°Vƒe ¤EG ∑ôëàdG ™£≤dG
∑ôMh (20) ≥dõæŸG …ƒ∏©dG êÉ«°ùdG ∂Ñ°ûe QôM •
.IôØ°ûdG øY Gók «©H (22) ≥dõæŸG …ƒ∏©dG êÉ«°ùdG
.(20) ≥dõæŸG …ƒ∏©dG êÉ«°ùdG ∂Ñ°ûe §HQG •
¢ùØf ™ÑJGh ° 33.9 ájhGõH ∞£°ûdG ¢SƒHO Öë°SG •
∑ôM øµdh áLQO 90 ájhGõH ≥∏©àj ɪ«a äGAGôLE’G
(43) ≥∏¨dG ádƒª°U Ωóîà°SGh QÉ°ù«dG ¤EG ™£≤dG ¢SCGQ
.(42) §Ñ°†dG Qɪ°ùeh
("ì" – "R" πµ°ûdG) êÉ«°ùdG §Ñ°V
¢VQC’G ≈∏Y ÉeÉ“
k ÚJô≤à°ùe Úeó≤dG ≈∏Y ßaÉM • øe ócCÉJ .(46) ≥∏¨dG ¢SƒHO ™aOGh ™£≤dG ¢SCGQ ¢†ØNG •
.Ö°SÉæe ¿RGƒJ ≈∏Y ßaÉMh
.0° ájhGõdG ™°Vƒe ‘ ádhÉ£dG ¿CG
32
ARABIC
áHô©dG Öë°SGh (2) »°ù«FôdG 𫨰ûàdG ¢†Ñ≤e ∂°ùeG •
áeó≤e ¥ƒa QÉ°ûæŸG IôØ°T §°Sh π°üj ≈àM ΩÉeCÓd (29)
.πª©dG á©£b
´GQP ≈∏Y §¨°VGh (3) ±É≤jE’G/𫨰ûàdG ìÉàØe π¨°T •
.πØ°SC’ ™£≤dG ¢SCGQ ¢†Øÿ (36) QÉ°ûæŸG ´GQP ôjô–
¢†Ñ≤e ™aOG ,á∏eɵdG ¬àYöS ¤EG QÉ°ûæŸG π°üj ÉeóæY •
áaÉ◊G ∫ÓN ™£bGh ,A§ÑH πØ°SC’ (2) »°ù«FôdG 𫨰ûàdG
.πª©dG á©£≤d á«eÉeC’G
êÉ«°ùdG √ÉŒ A§ÑH (2) »°ù«FôdG 𫨰ûàdG ¢†Ñ≤e ∑ôM •
.™£≤dG ∫ɪµà°S’
∞bƒàJ IôØ°ûdG ∑ôJGh (3) ±É≤jE’G/𫨰ûàdG ìÉàØe QôM •
.™aÎJ ¿CÉH ™£≤dG ¢SCGôd ìɪ°ùdG πÑb
≥°ûdG ™£b
≈°übCG ¤EG »Ø∏ÿG ™°VƒŸG ¤EG ™£≤dG ¢SCGQ Öë°SG •
¢Uôb ΩGóîà°SÉH (29) áHô©dG ≥∏ZCGh ,¬«dEG π°üj ™°Vƒe
.(48) ≥∏¨dG
´GQP ≈∏Y §¨°VGh (3) ±É≤jE’G/𫨰ûàdG ìÉàØe π¨°T •
.πØ°SC’ ™£≤dG ¢SCGQ ¢†Øÿ (36) QÉ°ûæŸG ´GQP ôjô–
¢†Ñ≤e ™aOG ,á∏eɵdG ¬àYöS ¤EG QÉ°ûæŸG π°üj ÉeóæY •
á©£b ∫ÓN ™£bGh ,A§ÑH πØ°SC’ (2) »°ù«FôdG 𫨰ûàdG
.πª©dG
™ÑJG ,QÉ°ù«dGh Úª«dG ¤EG QÉ°ûæŸG ´GQP ∑ô– ÉeóæY •
.QÉ°ûæŸG IôØ°T ÖfÉL ≈∏Y ∞£∏H ∞bh ´GQòdG
º∏b §N á©HÉàe óæY »bGƒdG äÉëàa ∫ÓN ô¶fG •
.¢UÉ°UQ
á«°SÉ°SC’G ájhGõdG QÉ°ûæe 𫨰ûJ äÉ«∏ªY
("ì" πµ°ûdG)
πª©dG á©£b ∂°ùŸ (53) ∂Ñ°ûŸG ɪFGO
k Ωóîà°SG •
∂Ñ°ûŸG πLCG øe (45) ¿Éàëàa óLƒj .ΩɵMEÉH
.("¢U" h "ì" πµ°ûdG)
É¡©°Vƒe ‘ ΩɵMEÉH πª©dG á©£b ∑É°ùeEG øe ócCÉJ !¬«ÑæJ
äÉHÉ°UEG çó– ¿CG øµÁ .𫨰ûàdG πÑb ∂Ñ°ûŸG ΩGóîà°SÉH
.πª©dG á©£b ∂°ùe ΩɵMEG ΩóY ádÉM ‘ á¨dÉH á«°üî°T
á©£b …CG .êÉ«°ùdG πHÉ≤e ɪFGO
k πª©dG á©£b ™°V !¬«ÑæJ
É¡µ°ùe øµÁ ’h áLƒ©e hCG á«æëæe É¡µ°ùe ºàj πªY
¥ƒ©J ¿CG øµÁ êÉ«°ùdG πHÉ≤e hCG ádhÉ£dG ≈∏Y ᣰùÑæe
.É¡eGóîà°SG ΩóY »¨Ñæjh IôØ°ûdG ácôM
("∑" h "…" πµ°ûdG) Öë°ùdÉH ™£≤dG
IôØ°ûdGh ™£≤dG ¢SCGQ ᩪ› Öë°ùH Ék≤∏£e º≤J ’ !¬«ÑæJ
IôØ°ûdG ∫hÉ– ¿CG øµÁ .™£≤dG AÉæKCG ∂gÉŒ IQGhódG
ᩪ› OGóJQG áÑÑ°ùe πª©dG á©£b ≈∏YCG ‘ ≈∏YC’ Oƒ©°üdG
QÉ°ûæŸG IôØ°T ¢†ØîJ ’ .IQGhódG IôØ°ûdGh ™£≤dG ¢SCGQ
.QÉ°ûæŸG √ÉŒ ™£≤dG ¢SCGQ Öë°S πÑb πØ°SC’ IQGhódG
êÉ«°ùdG √ÉŒ A§ÑH (2) »°ù«FôdG 𫨰ûàdG ¢†Ñ≤e ∑ôM •
(48) ≥∏¨dG ¢Uôb ΩGóîà°SÉH (29) áHô©dG πØb íàaG •
.™£≤dG ∫ɪµà°S’
.("…" πµ°ûdG) ájôëH ∑ôëàJ ™£≤dG ¢SCGQ ᩪ› ∑ôJGh
∞bƒàJ IôØ°ûdG ∑ôJGh (3) ±É≤jE’G/𫨰ûàdG ìÉàØe QôM •
.™aÎJ ¿CÉH ™£≤dG ¢SCGôd ìɪ°ùdG πÑb
∞£°ûdG ájhGR hCG IOÉ◊G ájhGõdG ¤EG ™£≤dG ¢SCGQ ∑ôM •
™£bh IOÉ◊G ájhGõdG ™£b äGAGôLEG ≥ah áHƒ∏£ŸG
.∞£°ûdG
33
ARABIC
Qób ÜôbC’ IôØ°ûdG øe ÜÎ≤j å«ëH êÉ«°ùdG §Ñ°VG •
‘ πNóàdG ¿hO ,πª©dG á©£≤d ºYO ≈°übCG Òaƒàd øµ‡
.πØ°SC’h ≈∏YC’ ´GQòdG ácôM
â«Ñãàd (20) ≥dõæŸG …ƒ∏©dG êÉ«°ùdG ∂Ñ°ûe §HQG •
.¬©°Vƒe ‘ êÉ«°ùdG
áHôJCÉH GOk hó°ùe …OÉ°TQE’G ∞jƒéàdG íÑ°üj ¿CG øµÁ !¬«ÑæJ
∞«¶æàd §¨°†dG ∞«ØN AGƒg hCG É°üY Ωóîà°SG ,öûædG
.áHôJC’G øe …OÉ°TQE’G ∞jƒéàdG
IOÉ◊G ájhGõdG ™£b
.(1) Qõ«∏dG ±É≤jEG/𫨰ûJ ìÉàØe π¨°T •
¤EG ádhÉ£dG ∑ôMh (11) ájhGõdG ¢ùÑM ´GQP QôM •
áWƒÑ°†e ±É≤jEG äGóMh ∑Éæg .áHƒ∏£ŸG ájhGõdG
h áLQO 22.5h áLQO 15h áLQO ôØ°U óæY Ék ≤Ñ°ùe
ájhGõdG ¢ùÑM ´GQP §HQG .áLQO 45h áLQO 31.6
.(11)
±ƒ£°ûŸG ™£≤dG
∑ƒd ôHƒ°S ájhGõdG ∂Ñ°ûe Ωóîà°SG ,iôNCG ájhGR …C’ •
.áHƒ∏£ŸG ájhGõdG §Ñ°†d ("Ü" πµ°ûdG) (9)
≈∏Y •ƒÑ°†e ≥dõæŸG …ƒ∏©dG êÉ«°ùdG ¿CG øe ócCÉJ •
.ÉjGhõdG QÉ£°ùe ájhGR §Ñ°V πÑb í«ë°üdG √ÉŒ’G
´GQP ≈∏Y §¨°VGh (3) ±É≤jE’G/𫨰ûàdG ìÉàØe π¨°T •
.πØ°SC’ ™£≤dG ¢SCGQ ¢†Øÿ (36) QÉ°ûæŸG ´GQP ôjô–
("h" πµ°ûdG) (30) ÉjGhõdG QÉ£°ùe ≥∏Z ¢†Ñ≤e ∂a •
¢†Ñ≤e §HQG .áHƒ∏£ŸG ájhGõdG ¤EG ™£≤dG ¢SCGQ ∑ôMh
.(30) ÉjGhõdG QÉ£°ùe ≥∏Z
¢†Ñ≤e ™aOG ,á∏eɵdG ¬àYöS ¤EG QÉ°ûæŸG π°üj ÉeóæY •
á©£b ∫ÓN ™£bGh ,A§ÑH πØ°SC’ (2) »°ù«FôdG 𫨰ûàdG
.πª©dG
´GQP ≈∏Y §¨°VG ºK ,±É≤jE’G/𫨰ûàdG ìÉàØe π¨°T •
¤EG QÉ°ûæŸG π°üj ÉeóæYh ,(36) QÉ°ûæŸG ´GQP ôjô–
(2) »°ù«FôdG 𫨰ûàdG ¢†Ñ≤e ™aOG ,á∏eɵdG ¬àYöS
.πª©dG á©£b ∫ÓN ™£bGh ,A§ÑH πØ°SC’
¢†Ñ≤e ™aOG ,á∏eɵdG ¬àYöS ¤EG QÉ°ûæŸG π°üj ÉeóæY •
áaÉ◊G ∫ÓN ™£bGh ,A§ÑH πØ°SC’ (2) »°ù«FôdG 𫨰ûàdG
.πª©dG á©£≤d á«eÉeC’G
êÉ«°ùdG √ÉŒ A§ÑH (2) »°ù«FôdG 𫨰ûàdG ¢†Ñ≤e ∑ôM •
.™£≤dG ∫ɪµà°S’
IôØ°ûdG ∑ôJGh (3) ±É≤jE’G/𫨰ûàdG ìÉàØe QôM •
.™aÎJ ¿CÉH ™£≤dG ¢SCGôd ìɪ°ùdG πÑb ∞bƒàJ
êÉ«°ùdG √ÉŒ A§ÑH (2) »°ù«FôdG 𫨰ûàdG ¢†Ñ≤e ∑ôM •
.™£≤dG ∫ɪµà°S’
IôØ°ûdG ∑ôJGh (3) ±É≤jE’G/𫨰ûàdG ìÉàØe QôM •
.™aÎJ ¿CÉH ™£≤dG ¢SCGôd ìɪ°ùdG πÑb ∞bƒàJ
äÉ«∏ªY áaÉc πLCG øe ≥dõæŸG …ƒ∏©dG êÉ«°ùdG 𫨰ûJ
.áÑcôŸG ájhGõdG ™£bh ±ƒ£°ûŸG ™£≤dG
øµÁ êÉ«°ùdG øe öùjC’G ÖfÉ÷G øe ∑ôëàŸG Aõ÷G •
øe Üô≤dÉH πª©dG á©£≤d ºYO ≈°übCG Òaƒàd ¬∏jó©J
á∏eÉc ájhGõH ∞£°ûdÉH QÉ°ûæª∏d ìɪ°ùdG AÉæKCG ,IôØ°ûdG
IOófi ¥’õf’G áaÉ°ùe .QÉ°ù«dG √ÉŒ áLQO 47 ÉgQób
.ÚgÉŒ’G Óc ‘ ±É≤jE’G äGóMƒH
.∞£°ûdG AÉæKCG ΩɵMEÉH ≥∏¨e ´GQòdG ¿CG øe ócCÉJ •
ÖcôŸG ™£≤dG
≈∏Y •ƒÑ°†e ≥dõæŸG …ƒ∏©dG êÉ«°ùdG ¿CG øe ócCÉJ •
ÉjGhõdG QÉ£°ùe ájhGR §Ñ°V πÑb í«ë°üdG √ÉŒ’G
.Öcôe ™£b AGôLE’
34
("`g" πµ°ûdG) êÉ«°ùdG §Ñ°V
Öë°SGh (20) ≥dõæŸG …ƒ∏©dG êÉ«°ùdG ∂Ñ°ûe ∂a •
.QÉ°ù«dG √ÉŒ êÉ«°ùdG
RÉ¡÷G 𫨰ûJ ±É≤jEG AÉæKCG 𫨰ûJ ¿hO áØd AGôLEÉH ºb •
.¢Uƒ∏ÿG ¢üëaGh
ARABIC
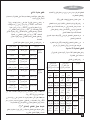
êÉàdG á«∏M ™£b
ΩGóîà°SÉH ádhÉ£dG ≈∏Y ᣰùÑæe §≤a êÉàdG á«∏M ™£b øµÁ
.Gòg ájhGõdG QÉ°ûæe
IOÉ◊G ájhGõdG ™£b øe èjõe øY IQÉÑY ÖcôŸG ™£≤dG
.±ƒ£°ûŸG ™£≤dGh
•
.(1) Qõ«∏dG ±É≤jEG/𫨰ûJ ìÉàØe π¨°T
ájhGR ±É≤jEG äGóMh ≈∏Y Gòg ájhGõdG QÉ°ûæe …ƒàëj •
.™£≤dG Gòg AGôLE’ √ÓYCG IQƒcòŸG äGAGôLE’G ™LGQ
±É≤jEG IóMhh ÚÁh QÉ°ùj áLQO 31.6° óæY á°UÉN
¢†Ñ≤e ™aOG ,á∏eɵdG ¬àYöS ¤EG QÉ°ûæŸG π°üj ÉeóæY
á«∏M πLCG øe áLQO 33.9° ÉgQób áaƒ£°ûe ájhGR
øe »Ø∏ÿG Aõ÷G ÚH áLQO 52° …CG ;á°UÉÿG êÉàdG
∫ÓN ™£bGh ,A§ÑH πØ°SC’ (2) »°ù«FôdG 𫨰ûàdG
πHÉ≤e ¬Ñ«côJ ºàj …òdG §°ùÑæŸG …ƒ∏©dG í£°ùdGh á«∏◊G
.πª©dG á©£≤d á«eÉeC’G áaÉ◊G
á«∏◊G øe »Ø∏ÿG Aõ÷G ÚH áLQO 38° ;∞≤°ùdG
êÉ«°ùdG √ÉŒ A§ÑH (2) »°ù«FôdG 𫨰ûàdG ¢†Ñ≤e ∑ôM
πHÉ≤e ¬Ñ«côJ ºàj …òdG §°ùÑæŸG »∏Ø°ùdG í£°ùdGh
.™£≤dG ∫ɪµà°S’
.§FÉ◊G
IôØ°ûdG ∑ôJGh (3) ±É≤jE’G/𫨰ûàdG ìÉàØe QôM
.êÉàdG á«∏M ™£b AGôLE’ ‹ÉàdG ∫hó÷G ™LGQ •
.™aÎJ ¿CÉH ™£≤dG ¢SCGôd ìɪ°ùdG πÑb ∞bƒàJ
øÁC’G ÖfÉ÷G
öùjC’G ÖfÉ÷G
QÉ°ùj 31.6°
31.6° ÚÁ
•
•
•
•
äGOGóYE’G
IOÉM ájhGR
á«°SÉ°SC’G á«∏◊G ™£b
ájhGõdG
á«∏NGódG
33.9°
33.9°
áaƒ£°ûe ájhGR
hCG êÉ«°ùdG πHÉ≤e É«k °SCGQ á«°SÉ°SC’G á«∏◊G ™£b øµÁ
.ádhÉ£dG ≈∏Y á룰ùe
»∏Ø°ùdG ÖfÉ÷G
êÉ«°ùdG πHÉ≤e
…ƒ∏©dG ÖfÉ÷G
êÉ«°ùdG πHÉ≤e
á«∏◊G ™°Vƒe
:‹ÉàdG ∫hó÷G ™LGQ •
ÖfÉ÷G õ¡L
™£≤dG øe öùjC’G
ÖfÉ÷G õ¡L õ¡éŸG ÖfÉ÷G
™£≤dG øe öùjC’G
31.6° QÉ°ùj
31.6° ÚÁ
IOÉM ájhGR
33.9°
33.9°
áaƒ£°ûe ájhGR
…ƒ∏©dG ÖfÉ÷G
êÉ«°ùdG πHÉ≤e
»∏Ø°ùdG ÖfÉ÷G
êÉ«°ùdG πHÉ≤e
á«∏◊G ™°Vƒe
ÖfÉ÷G õ¡L
™£≤dG øe øÁC’G
ÖfÉ÷G õ¡L õ¡éŸG ÖfÉ÷G
™£≤dG øe øÁC’G
»≤aC’G ™°VƒdG
»°SCGôdG ™°VƒdG
øe »Ø∏ÿG Aõ÷G)
øe »Ø∏ÿG Aõ÷G)
(ádhÉ£dG ≈∏Y §°ùÑæe á«∏◊G (êÉ«°ùdG πHÉ≤e á«∏◊G
ájhGõdG
á«LQÉÿG
™e ∂∏J á°UÉÿG ±É≤jE’G äGóMh ΩGóîà°SG øµÁ ’ :á¶MÓe
.áLQO 45 ájhGõH êÉàdG á«∏M
…hÉ°ùJ ÉjGhR ≈∏Y πªà°ûJ ’ ±ô¨dG º¶©e ¿C’ Gô¶f
k :á¶MÓe
ºb ,Ö°SÉæe ΩÉé°ùfG ≥«≤– ܃∏£ŸG øe ,§Ñ°†dÉH áLQO 90
.áë«ë°üdG ÉjGhõdG ó«cCÉàd …QÉÑàNG ™£b AGôLEÉH ɪFGO
k
("Ω" πµ°ûdG) ™£≤dG ≥ªY §Ñ°V
™£b äÉ«∏ªY AGôLEG πLCG øe Ék ≤Ñ°ùe ™£≤dG ≥ªY §Ñ°V øµÁ
.IQôµàe ≥ª©dG á∏«∏bh AÉ°ù∏e
áLQO 45
ÖfÉ÷G
ÖfÉ÷G
øÁC’G
öùjC’G
0°
0°
áLQO ôØ°U
ÖfÉ÷G
ÖfÉ÷G
øÁC’G
öùjC’G
óæY ÚÁ
45°
óæY QÉ°ùj
45°
äGOGóYE’G
∞£°ûdG ájhGR
á«∏◊G ™°Vƒe
IOÉM ájhGR
ájhGõdG
á«∏NGódG
»∏Ø°ùdG Aõ÷G …ƒ∏©dG Aõ÷G »∏Ø°ùdG Aõ÷G »∏Ø°ùdG Aõ÷G á«∏◊G ™°Vƒe
êÉ«°ùdG πHÉ≤e êÉ«°ùdG πHÉ≤e ádhÉ£dG πHÉ≤e ádhÉ£dG πHÉ≤e
ÖfÉ÷G õ¡L ÖfÉ÷G õ¡L ÖfÉ÷G õ¡L ÖfÉ÷G õ¡L
öùjC’G
öùjC’G
øÁC’G
öùjC’G
™£≤dG øe ™£≤dG øe ™£≤dG øe ™£≤dG øe
0°
0°
óæY QÉ°ùj
45°
óæY ÚÁ
45°
ÖfÉ÷G
õ¡éŸG
IOÉM ájhGR
ájhGõdG
á«LQÉÿG
»∏Ø°ùdG Aõ÷G …ƒ∏©dG Aõ÷G »∏Ø°ùdG Aõ÷G »∏Ø°ùdG Aõ÷G á«∏◊G ™°Vƒe
êÉ«°ùdG πHÉ≤e êÉ«°ùdG πHÉ≤e ádhÉ£dG πHÉ≤e ádhÉ£dG πHÉ≤e
ÖfÉ÷G õ¡L ÖfÉ÷G õ¡L ÖfÉ÷G õ¡L ÖfÉ÷G õ¡L
øÁC’G
øÁC’G
øÁC’G
öùjC’G
™£≤dG øe ™£≤dG øe ™£≤dG øe ™£≤dG øe
ÖfÉ÷G
õ¡éŸG
35
ARABIC
.IQóëæe ¿Éæ°SCG äGP QÉ°ûæe IôØ°ûH ájhGõdG QÉ°ûæe ójhõJ ” ¤EG IôØ°ûdG ¿Éæ°SCG π°üJ ≈àM πØ°SC’ ™£≤dG ¢SCGQ §Ñ°VG •
.܃∏£ŸG ™£≤dG ≥ªY
¿Éæ°SC’G äGP QÉ°ûæŸG IôØ°T ΩGóîà°SG ø°ùëà°ùŸG øe
.IQóëæŸG
IQGOEÉH ºb ,¬©°Vƒe ‘ …ƒ∏©dG ´GQòdG ∂°ùe AÉæKCG •
±É≤jE
’G áë«Ø°U ¢ùeÓj ≈àM (47) ±É≤jE’G ¢Uôb
Ö«HÉfC’Gh Ωƒ«æeƒdC’G íFÉØ°U ™£≤d – TCG ´ƒædG •
.(49)
πãe iôNC’G ájójó◊G ÒZ ¿OÉ©ŸGh ᫵«à°SÓÑdG
.ôªMC’G ¢SÉëædGh ôØ°UC’G ¢SÉëædG
øe ™£≤dG ¢SCGQ ∂jô– ∫ÓN øe IôØ°ûdG ≥ªY ¢üëaG •
á∏eÉc »LPƒ‰ ™£b ácôM ∫ÓN øe ∞∏î∏d ΩÉeC’G
áeÉ©dG Öjò°ûàdGh ™£≤dG äÉ«∏ª©d – ATB ´ƒædG •
.ºµëàdG ´GQP ∫ƒ£H
¢SƒÑµŸG iƒ≤ŸG ¥QƒdGh »≤FÉbôdG Ö°ûÿGh Ö°ûî∏d
("¿" πµ°ûdG) RÉ¡÷G πªM
¤EG áLÉ◊G óæY áaÉãµdG á«dÉY Ö°ûÿG ±É«dCG ìGƒdCGh
.¢ù∏eCG ™£b AGôLEG
IQGOEÉH ºbh (Ü" πµ°ûdG) (11) ájhGõdG ¢ùÑM ´GQP ∂a •
ájhGR óæY ádhÉ£dG ≥∏ZCG .Úª«dG √ÉŒ πeɵdÉH ádhÉ£dG
¿OÉ©ŸG ™£b óæY á∏FÉe ¿Éæ°SCG äGP IôØ°T ɪFGO
k Ωóîà°SG
.áLQO 45 ÉgQób IOÉM
.ájójó◊G ÒZ
≥∏ZCGh QÉ°ûæŸG øe »eÉeC’G Aõé∏d ™£≤dG ¢SCGQ Öë°SG •
("±" – "¢S" πµ°ûdG) äGôØ°ûdG Ò«¨J
.("…" πµ°ûdG) (48) ≥∏¨dG ¢Uôb ΩGóîà°SÉH áHô©dG
ÅLÉØŸG 𫨰ûàdG áé«àf áHÉ°UE’ ¢Vô©àdG Öæéàd !¬«ÑæJ
»FÉHô¡µdG QÉ«àdG Qó°üe øY ¢ùHÉ≤dG ɪFGO
k π°üaG ,RÉ¡é∏d
πµ°ûH IOÉ◊G QÉ°ûæŸG äGôØ°T Ωóîà°SG .äGôØ°ûdG Ò«¨J πÑb
Úë°VƒŸG ¿Éæ°SC’G ´ƒfh iƒ°ü≤dG áYöùdG ™ÑJG .í«ë°U
ôµjO ófBG ∑ÓH äGôØ°T §≤a Ωóîà°SG .QÉ°ûæŸG IôØ°T ≈∏Y
.É¡H ≈°UƒŸG
:á«dÉàdG äGƒ£ÿG ™ÑJG ,(34) QÉ°ûæŸG IôØ°T ∫GóÑà°S’
IQGOEÉH ºbh (36) QÉ°ûæŸG ´GQP ôjô– ´GQP ≈∏Y §¨°VG •
ÜQÉ≤Y ácôM √ÉŒG ¢ùµY ‘ ∑ôëàŸG »∏Ø°ùdG »bGƒdG
∂°ùŸ øjó«dG ióMEG Ωóîà°SG .IôØ°ûdG êôîà°SGh áYÉ°ùdG
.("¢S" πµ°ûdG) ¬©°Vƒe ‘ »bGƒdG
º≤J ’ .¬∏jõJ ’ øµdh (50) »ZÈdG ∂a ,∂Øe ΩGóîà°SÉH •
á«∏ªY ∂dP π©éj ±ƒ°S å«M πeɵdÉH »ZÈdG ádGREÉH
.áÑ©°U Ö«cÎdG IOÉYEG
≈àM ¬∏jõJ ’ øµdh (51) »ZÈdG ∂a ,∂Øe ΩGóîà°SÉH •
ádGREÉH º≤J ’ .Êó©ŸG »bGƒdG áMƒd ‘ ácôM çó–
IOÉYEG á«∏ªY ∂dP π©éj ±ƒ°S å«M πeɵdÉH »ZÈdG
.áÑ©°U Ö«cÎdG
36
(46) ≥∏¨dG ¢SƒHO ™aOGh ™£≤dG ¢SCGQ ¢†ØNG •
.("ì" πµ°ûdG)
Aõ÷G ‘ πª◊G ¢†HÉ≤e øe ájhGõdG QÉ°ûæe πªMG •
.»Ø∏ÿG Aõ÷Gh »eÉeC’G
¿Éæ°SC’Gh IôØ°ûdG ´ƒf
ø°S 100~24
ATB
•
•
•
•
ø°S 100~600
TCG
•
•
•
•
•
•
•
•
•
•
¿Éæ°SC’G ´ƒf
IOÉŸG
ìGƒdCG Ö°ûN
Ö°ûÿG
»≤FÉbQ Ö°ûN
Ö°ûN ±É«dCG ìƒd
áaÉãµdG ‹ÉY
•ƒ¨°†e ¥Qh ìƒd
ójQƒ∏c π«æ«a ‹ƒH
∂à°SÓÑdG
πjΫfƒ∏jôcCG
øjÒà°SEG ÚjGOÉJƒ«H
∂«∏jôcCG
â«fƒHQÉc ‹ƒH
øjôjÉà°S ‹ƒH
Ωƒ«æeƒdC’G
¿OÉ©ŸG
¢SÉëædG
ájójó◊G ÒZ
ARABIC
√ÉŒG ¢ùµY ‘ …ƒ∏©dG Êó©ŸG »bGƒdG áMƒd ∑ôM •
∂dP ∂æµÁ ±ƒ°S .("±" πµ°ûdG) áYÉ°ùdG ÜQÉ≤Y ácôM
äÉ≤ë∏e .áeóîà°ùŸG á≤ë∏ŸG IóMƒdG ≈∏Y RÉ¡÷G AGOCG óªà©j
…òdG (52) ¿GQhódG OƒªY Qɪ°ùe ¤EG ∫ƒ°UƒdG øe
IOƒ÷G ÒjÉ©e ≥ah É«k °Sóæg ᪪°üe É¡fGÒHh ôµjO ófBG ∑ÓH
.ájhGõdG QÉ°ûæe ™e (34) QÉ°ûæŸG IôØ°T §Hôj
√òg ΩGóîà°SÉH .RÉ¡÷G AGOCG Ú°ùëàd ᪪°üeh á«dÉ©dG
(35) ¿GQhódG OƒªY ≥∏Z QR ≈∏Y QGôªà°S’G ™e §¨°VG •
øe áHƒ∏£e áé«àf π°†aCG ≈∏Y π°ü– ±ƒ°S ,äÉ≤ë∏ŸG
(34) QÉ°ûæŸG IôØ°T ≥∏¨d ;∑ôëŸG AGƒjEG IóMh ‘
.RÉ¡÷G
.¿GQhódG øe É¡©æeh
äÉ≤ë∏ŸG
.»bGƒdG ΩGóîà°SÉH RÉ¡÷G πª– ’ !¬«ÑæJ
áfÉ«°üdG
á∏jƒW IÎØd ¬∏«¨°ûJ πLCG øe ºª°üe ôµjO ófBG ∑ÓH RÉ¡L
𫨰ûàdG á«∏ªY óªà©J .áfÉ«°üdG øe ≈fOCG óëH øeõdG øe
∞«¶æàdGh RÉ¡÷ÉH áÑ°SÉæŸG ájÉæ©dG ≈∏Y Iôªà°ùŸG á«°VôŸG
ΩGóîà°SÉH …QhO πµ°ûH ájƒ¡àdG äÉëàa ∞¶f .¬d º¶àæŸG
§≤a Ωóîà°SG ,RÉ¡÷G ∞«¶æàd .áaÉLh áØ«¶f ¿ÉgO IÉ°Tôa
πFÉ°S …CG ´óJ ’ .áÑWQ ¢Tɪb á©£bh ∫óà©ŸG ¿ƒHÉ°üdG
.πFÉ°S ‘ RÉ¡÷G øe AõL …CG ¢ùª¨J ’h RÉ¡÷G πNGO π∏îàj
RÉ¡÷G 𫨰ûJ ±É≤jEG Ωõ∏j ,áfÉ«°U …CG AGôLEG πÑb !¬«ÑæJ
.»FÉHô¡µdG QÉ«àdG øY ¬∏°üah
»FÉHô¡µdG QÉ«àdG ¢ùHÉb ∫GóÑà°SG
:ójóL »FÉHô¡c QÉ«J ¢ùHÉb Ö«côJ ¤EG áLÉM ∑Éæg ¿Éc GPEG
.áæeBG á≤jô£H Ëó≤dG ¢ùHÉ≤dG ∂ØH ºb •
IQGOEÉH ºb ,RÉ¡÷G ™e ôaƒŸG IôØ°ûdG ìÉàØe ΩGóîà°SÉH •
ÜQÉ≤Y ácôM √ÉŒG ‘ (52) ¿GQhódG OƒªY Qɪ°ùe
.(34) QÉ°ûæŸG IôØ°Th Qɪ°ùŸG ádGRE’ áYÉ°ùdG
á¡Lƒe ¿Éæ°SC’G ¿CG øe ócCÉJh ,á∏jóH IôØ°T ÖcQ •
¢ùØf ƒg IôØ°ûdG ≈∏Y í°VƒŸG √ÉŒ’G ¿CG øeh πØ°SC’
√ÉŒG ‘) ájhGõdG QÉ°ûæe »bGh ≈∏Y OƒLƒŸG √ÉŒ’G
.("±" πµ°ûdG) (áYÉ°ùdG ÜQÉ≤Y ácôM
IQGOE’ÉH ºb) ó«dÉH (52) ¿GQhódG OƒªY Qɪ°ùe ÖcQ •
.(áYÉ°ùdG ÜQÉ≤Y ácôM √ÉŒG ¢ùµY ‘
(35) ¿GQhódG OƒªY ≥∏Z QR ≈∏Y QGôªà°S’G ™e §¨°VG •
¿GQhódG OƒªY Qɪ°ùe §Hôd IôØ°ûdG ìÉàØe Ωóîà°SGh
.IôØ°ûdG â«ÑãJ ΩɵMEG ≈àM (52)
¬©°Vƒe ¤EG (26) …ƒ∏©dG Êó©ŸG »bGƒdG IOÉYEÉH ºb •
.(51 h 50) »ZGÈdG …Qɪ°ùe §HQGh »∏°UC’G
¬©°Vƒe ¤EG Oƒ©j (5) ∑ôëàŸG »∏Ø°ùdG »bGƒdG ∑ôJG •
.IôØ°ûdG »£¨«d »∏°UC’G
¿GQhO AÉæKCG ¿GQhódG OƒªY ≥∏Z QR ≈∏Y §¨°†J ’ !¬«ÑæJ
‘ »◊G QÉ«àdG ±ô£H »æÑdG π«°UƒàdG ∂∏°S π°Uh •
§HQ ΩɵMEGh πØ°SCG øe »bGƒdG áØ«àc ∂°ùe øe ócCÉJ .IôØ°ûdG
.ójó÷G ¢ùHÉ≤dG
.IôØ°ûdG Ö«côJ ó©H »bGƒdG áØ«àc »ZôH
.ójÉëŸG QÉ«àdG ±ô£H ¥QRC’G π«°UƒàdG ∂∏°S π°Uh •
»∏°UC’G É¡©°Vƒe ¤EG »bGƒdG áØ«àc IOÉYEG Öéj !¬«ÑæJ
π©a ‘ π°ûØdG …ODƒj ób .QÉ°ûæŸG 𫨰ûJ πÑb »ZÈdG §HQh
∂∏°S π°Uh ,(á°VQCÉŸG) 1 áÄØdG øe èàæŸG ¿Éc GPEG •
ób ɇ IQGhódG QÉ°ûæŸG IôØ°ûd »bGƒdG á°ùeÓe ¤EG ∂dP
.»°VQC’G ±ô£dÉH ôØ°UC’G / ö†NC’G π«°UƒàdG
.á¨dÉH á«°üî°T áHÉ°UEG çhóMh QÉ°ûæŸG ∞∏J ‘ ÖÑ°ùàj
37
ARABIC
Úµ∏°S) ∫õ©dG áLhOõe 2 áÄØdG øe èàæŸG ¿Éc GPEG !¬«ÑæJ
±ô£H π«°UƒàdG ºàj ’ ,(∂∏°ùdG áYƒª› ‘ §≤a ÚæKG
.»°VQCG
.IOƒ÷G á«dÉY ¢ùHGƒ≤dG ™e IôaƒŸG Ö«cÎdG äɪ«∏©J ™ÑJG
Úæ≤J ¢ùØæH ¿ƒµJ ¿CG Ωõ∏j á∏jóH á«FÉHô¡c áeɪ°U …CG
.èàæŸG ™e IôaƒŸG á«∏°UC’G á«FÉHô¡µdG áeɪ°üdG
™£≤dG äGQób
º∏e 305 × º∏e 92
º∏e 305 × º∏e 41
º∏e 203 × º∏e 92
º∏e 203 × º∏e 41
IQó≤dG
× »°VôY ™£b ≈°übCG
™£≤dG ≥ªY
±ƒ£°ûe ™£b ≈°übCG
47° ájhGõH
ájhGR ™£b ≈°übCG
47° ÉgQób IOÉM
47° / 47° Öcôe ™£b ≈°übCG
á«æØdG äÉfÉ«ÑdG
SMS254
220-240 ôªà°ùe QÉ«J âdƒa
ó¡÷G
2000
äGh
ábÉ£dG πNO
-1á≤«bO
4800
πªM ¿hO ¿GQhódG áYöS
255
º∏e
IôØ°ûdG ô£b
30
º∏e
IôØ°ûdG ∞jƒŒ
1.8
º∏e
IôØ°ûdG πµ«g ∂ª°S
305
º∏e
™£b IQób ≈°übCG
90° ájhGõH ¢Vô©à°ùe
203
º∏e
™£b IQób ≈°übCG
45° ájhGõH IOÉM
92
º∏e
™£b ≥ªY ≈°übCG
90° ájhGõH
41
º∏e
™£b ≥ªY ≈°übCG
±ƒ£°ûe ¢Vô©à°ùe
47° QÉ°ùj
IOÉ◊G ájhGõdG
47° ÚÁ
(™°VGƒŸG ≈°übCG)
47° QÉ°ùj
áaƒ£°ûŸG ájhGõdG
°ôØ°U ÚÁ
(™°VGƒŸG ≈°übCG)
22
ºéc
¿RƒdG
38
ARABIC
¿Éª°†dG
OGƒŸG ‘ Ö«Y ÖÑ°ùH ôµjO ófBG ∑ÓH èàæe ‘ π∏N ô¡X GPEG
¿EÉa ,AGöûdG ïjQÉJ øe kGô¡°T 12 ¿ƒ°†Z ‘ ,™«æ°üàdG hCG
∫GóÑà°SG hCG áÑ«©ŸG AGõLC’G ∫GóÑà°SG øª°†J ôµjO ófBG ∑ÓH
:GPEG ’EG ,𫪩∏d áMGôdG øe Qób ≈°übCG Òaƒàd äÉéàæŸG √òg
.∫ɪgE’G hCG ΩGóîà°S’G IAÉ°SE’ èàæŸG ¢Vô©J •
OGƒe hCG ΩÉ°ùLCG ÖÑ°ùH èàæŸÉH ᪫°ùL QGöVCG â≤◊ •
.çOGƒM hCG áÑjôZ
hCG øjóªà©ŸG áfÉ«°üdG AÓch iƒ°S ôNBG ¢üî°T ∫hÉM •
ìÓ°UEG ôµjO ófBG ∑ÓÑd Ú©HÉàdG áfÉ«°üdG »∏eÉY
.èàæŸG
AGöûdG IQƒJÉa Ëó≤J Öéj ,¿Éª°†dG äÉeóN ≈∏Y ∫ƒ°üë∏d
ÜôbCG ™bƒe áaô©e ∂æµÁ .óªà©ŸG áfÉ«°üdG π«ch hCG ™FÉÑ∏d
ófBG ∑ÓH ÖàµÃ ∫É°üJ’G ≥jôW øY óªà©e áfÉ«°U π«ch
øe ’k óHh .π«dódG Gòg ‘ ÚÑŸG ¿Gƒæ©dG ‘ »∏ëŸG ôµjO
ófBG ∑ÓH iód øjóªà©ŸG áfÉ«°üdG AÓcƒH áªFÉb ôaƒàJ ,∂dP
äÉ¡Lh ™«ÑdG ó©H Ée áeóÿ á∏eɵdG π«°UÉØàdGh ôµjO
:âfÎfE’G ≈∏Y Éæ©bƒe ≈∏Y ∫É°üJ’G
.www.2helpU.com
áÄ«ÑdG ájɪM
Gòg øe ¢ü∏îàdG ΩóY Ωõ∏j .π°üØæŸG ™ª÷G
.ájOÉ©dG á«dõæŸG áeɪ≤dG ™e èàæŸG
ôµjO ófBG ∑ÓH èàæe ∫GóÑà°SG ΩÉjC’G øe Ωƒj ‘ Ωõd GPEG
™e ¬æe ¢ü∏îàJ Óa ,¬eóîà°ùJ ó©J ⁄ GPEG hCG ,∂H ¢UÉÿG
èàæŸG Gòg áMÉJEG øe ócCÉJ πH ,iôNC’G á«dõæŸG áeɪ≤dG
.π°üØæŸG ™ªé∏d
ôjhóJ IOÉYE’ ≥aôe ôµjO ófBG ∑ÓH ácöT ôaƒJ •
ájÉ¡f ¤EG É¡dƒ°Uh Oôéà ôµjO ófBG ∑ÓH äÉéàæe
√òg Ëó≤J ºàjh .πª©∏d É¡à«MÓ°U ΩóYh ÉgôªY
≈Lôj ,áeóÿG √òg øe IOÉØà°SÓd .Éfk É› áeóÿG
±ƒ°S …òdGh óªà©e áfÉ«°U π«ch …CG ¤EG èàæŸG IOÉYEG
.ÉæY áHÉ«f äÉéàæŸG ™ªL √QhóH ¤ƒàj
óªà©e áfÉ«°U π«ch ÜôbCG ™bƒe ≈∏Y ±ô©àdG ∂æµÁ •
»∏ëŸG ôµjO ófBG ∑ÓH Öàµe ≈∏Y ∫É°üJ’G ∫ÓN øe
,∂dP øe ’k óHh .π«dódG Gòg ‘ í°VƒŸG ¿Gƒæ©dG ‘
Ú©HÉàdG øjóªà©ŸG áfÉ«°üdG AÓcƒH áªFÉb óLƒJ
Ée äÉeóÿ á∏eɵdG π«°UÉØàdGh ôµjO ófBG ∑ÓH ácöûd
âfÎfE’G ≈∏Y ÉæH á°UÉÿG ∫É°üJ’G πFÉ°Shh ™«ÑdG ó©H
.www.2helpU.com :ÊhεdE’G ™bƒŸG ≈∏Y
π«é°ùàd www.blackanddecker.ae IQÉjõH π°†ØJ
äÉéàæŸG ≈∏Y ´ÓW’Gh ôµjO ófBG ∑ÓH øe ójó÷G ∂éàæe
äÉeƒ∏©ŸG øe ójõŸG ôaƒàJ .á°UÉÿG ¢Vhô©dGh Iójó÷G
≈∏Y ÉæJÉéàæe áYƒª›h ôµjO ófBG ∑ÓH ácöT ∫ƒM
.www.blackanddecker.ae
39
FRENCH
1
2
3
26
25
24
4
5
23
22
6
21
7
20
19
8
9
18
16
17
14
15
13
12
10
11
27
28
36
35
29
34
30
31
32
6
33
11
40
16
FRENCH
45
30
15
38
30
0
39
9
40
41
11
B
10
C
22
20
34
E
D
21
42
34
43
0
1
1
2
2
0
0
3
1
4
3
2
6
4
4
7
3
5
5
8
6
9
4
6
7
10
3
1
2
5
8
5
7
30
45
0
8
15
6
30
7
9
11
12
G
9
23
10
8
F
41
FRENCH
44
5
8
6
9
45
7
10
8
45
30
46
45
44
H
I
47
48
1
3
30
K
J
2
47
49
33.9°
L
42
31.6°
M
FRENCH
5
50
N
O
51
36
35
26
P
52
34
Q
53
R
43
FRENCH
Utilisation
Votre scie à onglet à coulisse Black & Decker
permet de scier uniquement du bois, du métal
non ferreux et du plastique.
Consignes de sécurité
Consignes de sécurité concernant les outils
électroportatifs
Attention ! Lisez avec attention tous
les avertissements et toutes les
instructions. Le non-respect de cette consigne
peut entraîner une électrocution, un incendie
et/ou de graves blessures.
b. Évitez le contact physique avec des surfaces
mises à la terre telles que tuyaux, radiateurs,
fours et réfrigérateurs. Le risque de choc
électrique augmente si votre corps est relié à
la terre.
c. N'exposez pas l'outil électroportatif à la pluie
ou à l'humidité. La pénétration d'eau dans un
outil électroportatif augmente le risque de
choc électrique.
d. Préservez le câble d'alimentation. N'utilisez
pas le câble pour porter l'outil, pour
l'accrocher. Ne le tirez pas pour le
débrancher. Maintenez le câble éloigné des
sources de chaleurs, des parties huilées, des
bords tranchants ou des parties de l'appareil
Conservez tous les avertissements et
en rotation. Le risque de choc électrique
instructions pour référence ultérieure. La notion
augmente si les câbles sont endommagés ou
d'« outil électroportatif » mentionnée par la suite
emmêlés.
se rapporte à des outils électriques raccordés
e. Si vous utilisez l'outil électroportatif à
au secteur (avec câble de raccordement) ou
l'extérieur, utilisez une rallonge homologuée
fonctionnant avec piles (sans fil).
pour une utilisation à l'extérieur. L'utilisation
1. Sécurité de la zone de travail
d'une rallonge électrique homologuée pour
les travaux à l’extérieur réduit le risque de
a. Maintenez la zone de travail propre et bien
choc électrique.
éclairée. Un lieu de travail en désordre ou
mal éclairé augmente le risque d'accidents. f. Si l’outil doit être utilisé dans un endroit
humide, prenez les précautions nécessaires
b. N'utilisez pas les outils électroportatifs dans
en utilisant un dispositif à courant résiduel
un environnement présentant des risques
(RCD). L’utilisation d’un tel dispositif réduit les
d'explosion ni en présence de liquides, gaz
risques d’électrocution.
ou poussières inflammables. Les outils
3. Sécurité personnelle
électroportatifs génèrent des étincelles
a. Restez vigilant, surveillez ce que vous faites.
risquant d'enflammer les poussières ou les
Faites preuve de bon sens quand vous
vapeurs.
utilisez un outil électroportatif. N’utilisez pas
c. Pendant l’utilisation d’un outil électroportatif,
l’outil lorsque vous êtes fatigué ou après avoir
les enfants et autres personnes doivent
consommé de l’alcool ainsi que des
rester éloignés. En cas d'inattention, vous
médicaments. Un moment d'inattention en
utilisant l'outil peut entraîner de graves
risquez de perdre le contrôle de l'outil.
blessures.
2. Sécurité électrique
b. Portez un équipement de protection. Portez
a. La prise de l’outil électroportatif doit être
toujours des lunettes de protection. Selon le
compatible avec la prise d'alimentation. Ne
travail à effectuer, le port d'équipement de
modifiez en aucun cas la prise. N'utilisez pas
protection tels que masque anti-poussières,
de prises d'adaptateur avec des appareils
chaussures de sécurité antidérapantes,
ayant une prise de terre. Le respect de ces
casque ou protection auditive, réduit le risque
consignes réduit le risque de choc électrique.
de blessures.
44
FRENCH
c. Évitez un démarrage imprévu. L’appareil doit
être en position OFF (arrêt) avant d'effectuer
le branchement à l'alimentation et/ou au
bloc-batterie, de le ramasser ou de le porter.
Ne laissez pas votre doigt sur le bouton de
commande en le transportant. N'alimentez
pas l'outil si le bouton est activé. Ceci
pourrait être à l’origine d’accident.
d. Retirez les outils ou clés de réglage avant de
mettre l’outil en marche. Une clé ou un outil
se trouvant sur une partie en rotation peut
causer des blessures.
e. Adoptez une position confortable. Adoptez
une position stable et gardez votre équilibre
en permanence. Vous contrôlerez ainsi
mieux l'outil dans des situations inattendues.
f. Portez des vêtements appropriés. Ne portez
pas de vêtements amples ou de bijoux.
N’approchez pas les cheveux, vêtements ou
gants des parties des pièces mobiles. Les
vêtements amples, les bijoux ou les cheveux
longs peuvent s'accrocher dans les pièces
en mouvement.
g. En cas d’utilisation d’appareils servant à
aspirer ou à recueillir les poussières,
assurez-vous qu’ils sont correctement
raccordés et utilisés. L'utilisation de tels
appareils permet de réduire les dangers liés
aux poussières.
4. Utilisation des outils électroportatifs et
précautions
a. Respectez la capacité de l'outil. Utilisez l'outil
électroportatif approprié pour le travail à
effectuer. Avec un outil approprié, vous
travaillerez mieux et en toute sécurité.
b. N’utilisez pas un outil électroportatif dont le
bouton marche/arrêt est défectueux. Un outil
électroportatif qui ne répond pas à la
commande marche/arrêt est dangereux et
doit être réparé.
c. Retirez la prise de courant et/ou débranchez
le blocbatterie avant d'effectuer des
réglages, de changer les accessoires ou de
ranger l'outil. Cette mesure de précaution
empêche de mettre l’outil en marche
accidentellement.
d. Rangez les outils électroportatifs hors de
portée des enfants. Les personnes ne
connaissant pas l’outil ou n’ayant pas lu ces
instructions ne doivent en aucun cas l’utiliser.
Les outils électroportatifs sont dangereux
lorsqu'ils sont utilisés par des personnes non
initiées.
e. Entretenez les outils électroportatifs. Vérifiez
que les parties en mouvement fonctionnent
correctement et qu'elles ne sont pas
coincées. Vérifiez qu'il n’y a pas de pièces
cassées ou endommagées susceptibles de
nuire au bon fonctionnement de l'outil. S’il est
endommagé, faites réparer l’outil avant de
l’utiliser. De nombreux accidents sont la
conséquence d’outils mal entretenus.
f. Les outils de coupe doivent toujours être
aiguisés et propres. Des outils
soigneusement entretenus avec des bords
tranchants bien aiguisés se coincent moins
souvent et peuvent être guidés plus
facilement.
g. Utilisez les outils électroportatifs, les
accessoires, etc., en suivant ces instructions
et en tenant compte des conditions de travail,
ainsi que du travail à effectuer. L'utilisation
des outils électroportatifs à d'autres fins que
celles prévues peut vous mettre en situation
dangereuse.
5. Réparations
a. Faites réparer votre outil électroportatif
uniquement par du personnel qualifié et
seulement avec des pièces de rechange
appropriées. Il s'agit d'une garantie pour votre
sécurité.
Consignes de sécurité
supplémentaires concernant les
outils électroportatifs
Attention! Consignes de sécurité
supplémentaires pour scies à onglet.
• N’utilisez pas de lame tordue, émoussée ou
endommagée.
• Remplacez le socle s'il est usé.
45
FRENCH
• N’utilisez pas de lame d’un diamètre
supérieur ou inférieur à celui recommandé.
Reportez-vous aux données techniques pour
connaître les diamètres appropriés. Utilisez
uniquement les lames mentionnées dans ce
manuel, conformes à la norme EN 847-1.
• Ne laissez pas les personnes non initiées
•
utiliser cette machine.
Avant l’utilisation, vérifiez toujours
l’installation de la lame. Assurez-vous que la
lame tourne dans la bonne direction. La lame
doit toujours être aiguisée.
• N’utilisez pas de lames fabriquées en acier à • Respectez la vitesse maximale inscrite sur la
coupe rapide (HSS).
lame.
• Portez des gants pour manipuler les lames et • Le laser installé ne doit en aucun cas être
les matériaux bruts (si possible, les lames
doivent être transportées dans un support).
• Pour scier du bois, utilisez le sac à poussière
fourni.
Attention ! Tout contact ou inhalation de
poussières pendant le ponçage peut présenter
un danger pour la santé de l’utilisateur ainsi que
des personnes autour. Portez un masque
antipoussières spécialement conçu pour vous
protéger des sciures et des fumées toxiques et
veillez à ce que les personnes se trouvant à
l'intérieur de la zone de travail ou y pénétrant
soient également protégées.
•
•
• Pensez à utiliser des lames spécialement
•
• Sélectionnez la lame correspondant au
•
conçues pour réduire le bruit ambiant.
matériel à couper.
• Cette scie à onglet Black & Decker a été
conçue pour scier uniquement du bois, du
métal non ferreux et du plastique.
•
• Ne faites pas fonctionner la machine sans le
protègelame en place. Ne faites pas
fonctionner la machine si le protège-lame ne
fonctionne pas ou s'il n'est pas correctement
installé.
• Assurez-vous que le levier est correctement
•
• Maintenez la zone autour de la machine
•
•
installé pour les coupes en biseau.
propre. Ne laissez aucun matériau traîner,
comme par exemple des copeaux et des
chutes de bois.
• Assurez-vous que l'éclairage de la machine
et de la zone de travail est approprié.
46
•
remplacé par un type de laser différent. Les
réparations sur le laser doivent être tentées
par des techniciens agréés ou des
techniciens appartenant au service technique
de Black & Decker.
Débranchez la machine du secteur avant
d'effectuer un entretien ou de changer la
lame.
N'effectuez jamais de nettoyage, d'entretien
et ne retirez pas les chutes de bois ou autres
parties de la pièce à couper de la zone de
travail quand la machine tourne et que la tête
de la scie n'est pas à l'arrêt.
Si possible, installez toujours la machine sur
un établi.
Fixez correctement la pièce à couper. Une
pièce à couper maintenue par un étau ou un
dispositif de serrage est nettement mieux
fixée que quand elle est maintenue à la main.
Serrez toujours fermement la pièce à couper.
Ne travaillez pas avec des pièces trop petites
qui sont difficles à serrer. La distance entre
les mains et la lame rotative serait trop
courte. Utilisez toujours un support
supplémentaire pour scier des pièces
longues.
Assurez-vous que les poignées et boutons de
blocage sont serrés avant de commencer.
N’utilisez jamais la scie sans le socle.
N'approchez jamais les mains de la lame
quand la scie est branchée au secteur.
Si la machine tourne rapidement, n'essayez
jamais de l'arrêter en coinçant un outil contre
la lame ou par d'autres moyens. Cela pourrait
provoquer de graves accidents.
FRENCH
• Lisez le manuel d’instructions avant
l’utilisation d'un accessoire. Un accessoire
utilisé de manière inappropriée peut causer
des dommages.
• N'utilisez pas de disques abrasifs.
• À partir du socle, sortez la lame de la pièce à
couper avant de relâcher le bouton
marche/arrêt.
• Ne placez aucun élément contre le
ventilateur pour maintenir l'arbre du moteur.
• Le protège-lame de votre scie est
automatiquement relevé en abaissant le
levier. En le relevant, il recouvre la lame. Le
protège-lame peut être relevé manuellement
en installant ou en retirant les lames de la
scie, mais aussi pour vérifier la scie. Ne
relevez le protège-lame manuellement que si
la machine est éteinte.
• Vérifiez régulièrement si les entrées d'air du
moteur sont propres. Il ne doit y avoir aucun
copeau.
• Ne travaillez pas avec des matériaux
contenant de l'amiante. L'amiante est
considérée comme étant cancérigène.
• Les mises en garde sur l'appareil
électroportatif doivent toujours rester lisibles.
• Ne vous mettez jamais sur l'outil
électroportatif. Le non respect de cette
consigne pourrait entraîner de graves
blessures si l'outil bascule ou s'il y a contact
avec la lame.
• Après la coupe, ne prenez pas la lame dans
la main avant qu'elle ne soit froide. La lame
chauffe énormément pendant la coupe.
• Avancez la lame contre la pièce à couper
uniquement quand la scie est en marche.
Sinon, il y a risque de recul brutal quand la
lame entre dans la pièce à couper.
• Les consignes d'utilisation sont données dans
ce manuel d’instructions. L’utilisation d’un
accessoire ou d’une fixation, ou bien
l’utilisation de cet appareil à d’autres fins que
celles recommandées dans ce manuel
d’instructions peut entraîner des blessures
et/ou des dommages matériels.
• Ne placez jamais vos mains près de la zone
de coupe. Éloignez les mains de la « Zone
interdite aux mains ». Cette zone représente
le socle entier et est signalée par le symbole
« Mains interdites ».
• Pour éviter les blessures dues à la projection
de copeaux, débranchez la scie. Ceci
permettra d'éviter un arrêt accidentel. Retirez
ensuite les petits copeaux.
• Avant l'utilisation et après l'entretien, le
fonctionnement du protège-lame doit être
vérifié. Pour cette vérification, assurez-vous
que la scie est éteinte et débranchée. Le
levier doit être relevé et abaissé pour
s'assurer que le protège-lame recouvre la
lame et que la lame ne touche pas le
protège-lame. Si le protège-lame ne
fonctionne pas correctement, faites réparer
votre outil électroportatif par un technicien
qualifié. Appelez le service client Black &
Decker pour trouver le technicien le plus
proche.
Risques résiduels
Les risques suivants sont liés à l'utilisation des
scies:
• Blessures causées en touchant les pièces en
rotation.
Malgré l'application des normes de sécurité
correspondantes et la présence de dispositifs de
sécurité, les risques résiduels suivants ne
peuvent être évités:
• Troubles de l'audition.
• Risques d'accidents causés par des pièces
non protégées de la lame de scie circulaire.
47
FRENCH
• Risque de blessures en changeant la lame.
• Risque de se coincer les doigts en ouvrant
les protège-lames.
• Risques pour la santé causés par l'inhalation
des sciures de bois, surtout quand il s'agit de
chêne, hêtre et de MDF.
Attention ! Si le frein électronique ne fonctionne
pas, faites réparer votre outil électroportatif par
un technicien qualifié. Appelez le service client
Black & Decker pour trouver le technicien le plus
proche.
Consignes de sécurité
supplémentaires pour
utilisation du laser
Ce laser est conforme aux normes CEI
60825-1:2007 de classe M. Ne remplacez pas la
diode laser par une diode de type différent. Si le
laser est endommagé, faites le réparer par un
réparateur agréé. N’utilisez jamais le laser à des
fins autres que la projection de raies laser.
• Ne regardez jamais directement et de
manière intentionnelle le rayon laser.
• N'utilisez jamais des instruments d’optique
pour regarder le faisceau.
• Installez l'outil en prenant les précautions
nécessaires pour que le rayon laser ne
puisse atteindre personne au niveau de la
tête.
• Ne laissez pas les enfants approcher du
laser.
Attention ! Évitez tout contact direct avec les
yeux. Quand le guide laser est allumé, le
rayonnement laser est activé. Débranchez
toujours la prise d'alimentation de la scie à
onglet avant de faire un réglage.
• Un viseur laser n'est pas un jouet et ne doit
en aucun cas être laissé entre les mains des
enfants. Le non respect de ces consignes
pourraient entraîner de graves blessures au
niveau des yeux.
48
• Tout réglage ayant pour effet d'augmenter la
puissance du laser est interdit. La société
Black & Decker ne pourra être tenue pour
responsable des dommages qui sont la
conséquence du non respect des instructions
de sécurité.
• Quand vous utilisez le viseur laser, ne pointez
pas le faisceau vers les gens et/ou les
surfaces réfléchisssantes. Un faisceau laser
de faible intensité peut aussi provoquer des
blessures au niveau des yeux. Pour cette
raison, ne regardez jamais directement le
faisceau à l’oeil nu.
• Le viseur laser se compose de pièces non
réparables. N'ouvrez en aucun cas le boîtier.
Cela aurait pour effet d'annuler la garantie.
Sécurité des personnes
• Cet outil ne peut être utilisé par des
personnes (y compris des enfants) ayant des
capacités mentales, sensorielles ou
physiques réduites, ou celles manquant
d’expérience et de connaissances, à moins
qu’elles ne soient encadrées ou qu’elles
n’aient été formées à l’utilisation de l’appareil
par une personne responsable de leur
sécurité.
• Ne laissez jamais les enfants sans
surveillance pour éviter qu’ils ne jouent avec
cet outil.
Vibration
La valeur des émissions de vibration déclarée
dans la section Déclaration/Données techniques
de conformité a été mesurée selon une méthode
d’essai standard fournie par la norme EN 61029
et peut être utilisée pour comparer un outil à un
autre. Elle peut aussi être utilisée pour une
évaluation préliminaire à l’exposition.
Attention ! Selon la manière dont l’outil est
utilisé, la valeur des émissions de vibration
pendant l’utilisation de l’outil peut être différente
de la valeur déclarée. Le niveau de vibration
peut augmenter au-dessus du niveau établi.
FRENCH
Pour évaluer l’exposition aux vibrations et
Sécurité électrique
déterminer les mesures de sécurité requises par
Cet outil est doublement isolé. Par
la directive 2002/44/CE afin de protéger les
conséquent, aucun câble de mise à
personnes utilisant régulièrement des outils
la terre n'est nécessaire. Vérifiez si
électroportatifs, il faut estimer l’exposition aux
l’alimentation mentionnée sur la plaque
vibrations, les conditions actuelles d’utilisation et signalétique de l'outil correspond bien à la
tension présente sur le lieu.
la manière dont l’outil est utilisé. Il faut aussi
tenir compte de tous les éléments du cycle de
• Si le câble d'alimentation est endommagé, il
doit être remplacé par le fabricant ou par un
fonctionnement comme la durée pendant
Centre de réparation agréé Black & Decker
laquelle l’outil est éteint et pendant laquelle il
pour éviter tout risque.
fonctionne au ralenti, ainsi que la durée du
Chutes de tension
déclenchement.
Les appels de courant peuvent provoquer de
courtes chutes de tension. Si l'alimentation n'est
Attention ! Pour réduire le risque de pas satisfaisante, le matériel annexe peut être
endommagé.
blessures, l’utilisateur doit lire le
Les pertubations ne se produiront certainement
manuel d’instructions.
pas en présence d'une impédance du système
Portez des lunettes de sécurité ou
de l'alimentation Zmax<0,34.
de protection.
Utilisation d’une rallonge
Étiquettes de l’outils
Portez un serre-tête antibruit.
Portez un masque anti-poussières.
Cet appareil ne doit pas être utilisé
par des enfants de moins de 16 ans.
Éloignez les bras et les doigts des
lames de scie circulaire.
• La rallonge utilisée doit être conforme aux
normes et doit s'adapter exactement à la
prise de cet outil (voir les données
techniques). Avant d'utiliser la rallonge,
assurez-vous qu'elle est en bon état et
récente. Si ce n'est pas le cas, remplacez-la.
Si vous utilisez un dévidoir, le câble doit être
complètement déroulé. Le non-respect de
toutes ces consignes, risque de provoquer un
incendie et un choc électrique.
Portez des gants pour manipuler les
lames.
Caractéristiques
Rayonnement laser.
1. Bouton laser marche/arrêt
Ne regardez jamais le faisceau à
l’oeil nu.
N'utilisez jamais des instruments
d’optique pour regarder le faisceau.
2. Poignée principale
3. Bouton marche/arrêt
4. Boîtier du moteur
5. Protège-lame inférieur rétractable
49
FRENCH
6. Butée d'extension du socle (droite)
34. Lame de scie
7. Extension du socle (droite)
35. Bouton de verrouillage de l’axe
8. Saignée
36. Levier de dégagement de l'axe de scie
9. Dispositif de fixation pour onglet Superlok™ Figure R
10. Bouton de blocage d'onglet
53. Serre-joint
11. Levier de déclenchement de coupe d'onglet
Assemblage
12. Viseur de position d'onglet
Attention ! Avant l'assemblage, assurez-vous
que l'outil est éteint et débranché.
13. Rapporteur d'angle d'onglet
14. Socle de rotation
15. Trous de fixation à l'établi
16. Supports de fixation
17. Extension du socle (gauche)
18. Butée d'extension du socle (gauche)
19. Bouton de blocage d'extension de socle
20. Dispositif de fixation du guide supérieur
coulissant
21. Guide gauche
22. Guide supérieur gauche coulissant
23. Axe de coupe en biseau 33,9°
24. Poignée arrière
25. Sortie de poussière
26. Protège-lame supérieur en métal
27. Poignée avant
28. Boîtier de brosse rétractable
29. Support
30. Poignée de blocage de coupe en biseau
31. Dispositif de réglage de coupe en biseau
32. Guide droit
33. Laser
50
Remarque: le réglage de cet outil est effectué
avec précision en usine avant l'expédition.
Vérifiez les éléments suivants et réajustez si
nécessaire afin d'obtenir les meilleures résultats
au moment de la coupe.
Faisceau laser
L'alignement du faisceau laser est défini en
usine.
L'utilisateur ne peut pas le régler.
Ajustement de l'angle de coupe
d'onglet
Le rapporteur de la scie à onglet à coulisse
permet d'identifier facilement les angles de
coupe d'onglet de 0° à 47° à gauche et à droite.
Les crans de réglage de coupe d'angle les plus
fréquemment utilisés ont des butées fixes qui
permettent de régler rapidement la position
souhaitée. Suivez le processus ci-dessous pour
effectuer des réglages rapides et précis.
Attache pour onglet Superlok™
(figure B)
Le dispositif de fixation pour onglet Superlok™
(9) permet de sélectionner des angles
spécifiques différents des angles pré-indexés de
0°, 15°, 22,5°, 31,6° et 45° en utilisant le levier
de déclenchement de coupe d'onglet (11).
FRENCH
Ajustement des butées de
coupe en biseau sur 90° et 45°
(figures C - F)
• Placez une équerre contre le guide gauche
• Desserrez la poignée de blocage de coupe
longueur, desserrez les trois vis (44) (figure
H) et ajustez le guide.
en biseau (30) et déplacez la tête de coupe
complètement à droite, puis serrez la
poignée de blocage de coupe en biseau.
• Utilisez une équerre pour fixer la lame à 90°
sur le socle (figure D).
• Si un ajustement est nécessaire, desserrez
l'écrou de blocage (41) et ajustez le boulon
(40) avec la clé pour que la lame soit à un
angle de 90° du socle.
• Serrez l’écrou de blocage (41).
• Alignez le témoin de coupe en biseau (39)
avec le repère 0° en serrant/desserrant la vis
(38).
En réglant la butée à 45°, vérifiez l'installation
du guide supérieur gauche coulissant (22).
Celui-ci doit être ajusté pour que la tête de
coupe puisse se déplacer à 45° (figure E).
• Relâchez le dispositif de fixation du guide
supérieur coulissant (20) et éloignez le guide
supérieur gauche coulissant (22) de la lame.
• Serrez le dispositif de fixation du guide
supérieur coulissant (20).
• Tirez sur l'axe de coupe en biseau 33,9° (23)
et suivez le même processus pour l'angle à
90° mais déplacez la tête de coupe vers la
gauche et utilisez l'écrou de blocage (43) et
le boulon de réglage (42).
Ajustement du guide
(figures G - H)
• Abaissez la tête de coupe et poussez l'axe
de blocage (46). Assurez-vous que le socle
est dans la position 0° de coupe d'onglet.
(21) et à côté de la lame (34) (figure G).
• Si la lame ne touche pas l'équerre sur la
• Serrez les trois vis (44).
Fixation sur l'établi (figure I)
Remarque : nous vous recommandons de fixer
fermement la scie à onglet sur un établi pour
garantir une stabilité maximale. Installez, si
possible, toujours la machine sur un établi.
• Localisez et repérez les quatre trous de
boulons sur l'établi.
• Percez l'établi avec un foret de 10 mm de
diamètre.
• Vissez la scie à onglet sur l'établi avec les
boulons, les rondelles et les écrous.
Remarque : ce matériel de fixation n'est pas
fourni avec l'outil.
Utilisation
• Éloignez vos mains d'au moins 150 mm de la
lame.
• Pour la découpe, serrez fermement la pièce à
couper sur le socle ainsi que le guide.
Maintenez vos mains en place jusqu'à ce que
le bouton soit relâché et que la lame soit
complètement arrêtée.
• Avant les coupes de finition, faites passer la
lame en laissant la scie éteinte. Ceci vous
permettra de vérifier le passage de la lame.
• Ne croisez pas vos mains.
• Adoptez une position stable et gardez votre
équilibre en permanence.
51
FRENCH
• En déplaçant l'axe de la scie à gauche et à
droite, uivez-le et restez légèrement sur le
côté de la lame.
• Pour suivre une ligne, faites une visée par
les fentes du protège-lame.
Fonctionnement de base de la
scie à onglet (figure H)
• Utilisez toujours le serre-joint (53) pour
• Maintenez la poignée principale (2) et tirez le
support (29) vers l'avant jusqu'à ce que le
centre de la lame dépasse l'avant de la pièce
à couper.
• Appuyez sur le bouton marche/arrêt (3) et
appuyez sur le levier de dégagement de l'axe
de scie (36) pour abaisser la tête de coupe.
• Quand la scie atteint la vitesse maximale,
maintenir fermement la pièce à couper. Deux
trous (45) permettent de fixer le serre-joint
(figures H et R).
poussez la poignée principale (2) lentement
vers le bas, en coupant le bord de la pièce à
couper.
Attention ! Avant de mettre la scie en marche,
assurez-vous que la pièce à couper est
correctement maintenue dans le serre-joint. Le
non respect de cette consigne peut entraîner de
graves blessures.
• Déplacez lentement la poignée principale (2)
Attention ! Placez toujours la pièce à couper
contre le guide. Une pièce déformée ou gauchie
ne peut être mise à plat sur le socle ou contre le
guide. Elle risque d'accrocher la lame et ne doit
pas être utilisée.
Coupe d'entraînement
(figures J et K)
Attention ! Ne tirez jamais la tête de coupe et la
lame de scie circulaire vers vous pendant la
découpe. La lame peut remonter vers le haut de
la pièce à découper, entraînant un recul brutal
de la lame et de la tête de coupe. N'abaissez
jamais la lame de la scie circulaire avant d'avoir
amener la tête de coupe à l'avant de la scie.
• Débloquez le support (29) avec le bouton de
blocage (48) et laissez la tête de coupe se
déplacer librement (figure J).
• Déplacez la tête de coupe sur l'angle requis
pour la coupe d'onglet et de biseau en
suivant les procédures de coupe d'onglet et
de coupe en biseau.
52
vers le guide pour terminer la découpe.
• Relâchez le bouton marche/arrêt (3) et
attendez que la lame s'arrête avant de laisser
la tête de coupe monter.
Coupe de pièces
• Glissez jusqu'en butée la tête de coupe vers
l'arrière, puis bloquez le support (29) avec le
bouton de blocage (48).
• Appuyez sur le bouton marche/arrêt (3) et
appuyez sur le levier de dégagement de l'axe
de scie (36) pour abaisser la tête de coupe.
• Quand la scie atteint la vitesse maximale,
poussez la poignée principale (2) lentement
vers le bas, en coupant le bord de la pièce à
couper.
• Quand la scie atteint la vitesse maximale,
poussez la poignée principale (2) lentement
vers le bas, en coupant dans la pièce à
couper.
• Relâchez le bouton marche/arrêt (3) et
attendez que la lame s'arrête avant de laisser
la tête de coupe monter.
FRENCH
Coupe d'onglet
• Réglez le guide de façon à ce qu'il soit le plus
proche possible de la lame et qu'il soutienne
au maximum la pièce. Le mouvement de haut
position marche.
en bas du bras ne doit absolument pas être
• Desserrez le levier de déclenchement de
gêné.
coupe d'onglet (11) et déplacez le socle dans
•
Serrez
le dispositif de fixation du guide
l'angle requis. Des butées sont pré-indexées
supérieur
coulissant (20) pour fixer le guide.
sur 0°, 15°, 22,5°, 31,6° et 45°. Serrez le
Attention ! La rainure du guide risque de se
levier de déclenchement de coupe d'onglet
boucher avec la poussière. Utilisez un bâton ou
(11).
de l'air à basse pression pour nettoyer la rainure
• Pour tous les autres angles, utilisez le
dispositif de fixation pour onglet Superlok™ du guide.
(9) (figure B) et réglez la coupe d'onglet sur Coupe en biseau
l'angle requis.
• Vérifiez l'orientation du guide supérieur
coulissant avant d'ajuster l'angle de biseau.
• Appuyez sur le bouton marche/arrêt (3) et
appuyez sur le levier de dégagement de
Remarque : la sice dispose d'un axe de coupe
l'axe de scie (36) pour abaisser la tête de
en biseau 33,9° (23) pour les coupes de moulure
coupe.
ornementale.
• Quand la scie atteint la vitesse maximale,
• Desserrez la poignée de blocage de coupe
poussez la poignée principale (2) lentement
en biseau (30) (figure F) et déplacez la tête
vers le bas, en coupant dans la pièce à
de coupe sur l'angle requis. Serrez la poignée
couper.
de blocage de coupe en biseau (30).
• Quand la scie atteint la vitesse maximale,
•
Actionnez le bouton marche/arrêt, puis
poussez la poignée principale (2) lentement
appuyez sur le levier de dégagement de l'axe
vers le bas, en coupant dans la pièce à
de scie (36) quand la scie atteint la vitesse
couper.
maximale, poussez la poignée principale (2)
lentement vers le bas, en coupant le bord de
• Relâchez le bouton marche/arrêt (3) et
la pièce à couper.
attendez que la lame s'arrête avant de
laisser la tête de coupe monter.
• Quand la scie atteint la vitesse maximale,
poussez la poignée principale (2) lentement
Fonctionnement du guide supérieur coulissant
vers le bas, en coupant le bord de la pièce à
pour toutes les coupes en biseau et coupes
couper.
d'onglet
•
Quand
la scie atteint la vitesse maximale,
• La pièce mobile du côté gauche du guide
poussez la poignée principale (2) lentement
peut être réglée pour soutenir au maximum
vers le bas, en coupant dans la pièce à
la pièce à côté de la lame, tout en laissant la
couper.
lame couper à un angle de 47°
complètement à gauche. La distance de
• Relâchez le bouton marche/arrêt (3) et
coulissement est limitée par les butées dans
attendez que la lame s'arrête avant de laisser
les deux directions.
la tête de coupe monter.
Réglage du guide (figure E)
• Assurez-vous que le levier est correctement
bloqué pour les coupes en biseau.
• Desserrez le dispositif de fixation du guide
supérieur coulissant (20) et glissez le guide Coupe mixte
vers la gauche.
l'orientation du guide supérieur
• Effectuez une coupe de finition en mettant la • Vérifiez
coulissant avant d'ajuster l'angle de biseau et
scie hors tension et vérifiez le jeu.
d'effectuer une coupe mixte.
• Mettez le bouton laser marche/arrêt (1) en
53
FRENCH
Une coupe mixte est un mélange de coupe en
biseau et de coupe d'onglet.
• Mettez le bouton laser marche/arrêt (1) en
position marche.
• Suivez les procédures ci-dessus pour
effectuer cette coupe.
• Quand la scie atteint la vitesse maximale,
poussez la poignée principale (2) lentement
vers le bas, en coupant le bord de la pièce à
couper.
• Relâchez le bouton marche/arrêt (3) et
attendez que la lame s'arrête avant de
laisser la tête de coupe monter.
Coupe de moulure de base
La moulure de base peut être coupée
verticalement contre le guide ou à plat sur le
socle.
• Reportez-vous au tableau ci-dessous :
Réglages
Angle de coupe
en biseau
Position
de moulure
Coin
Angle
intérieur d'onglet
Position
de
moulure
Côté fini
Coin
Angle
extérieur d'onglet
Position
de
moulure
Côté fini
54
Position verticale Position horizontale
(arrière de moulure (arrière de moulure
contre le guide). à plat sur le socle).
0°
Côté
gauche
Gauche
à 45°
Bas
contre
le socle
Côté
gauche
de coupe
maintenu
Droit à
45°
Bas
contre
le socle
Côté
gauche
de coupe
maintenu
Côté
droit
Droit à
45°
Bas
contre
le socle
Côté
droit de
coupe
maintenu
Gauche
à 45°
Bas
contre
le socle
Côté
droit de
coupe
maintenu
Coupe de moulure ornementale
(figure L)
La moulure ornementale ne peut être coupée
qu'à plat sur le socle avec cette scie à onglet.
• Des butées de coupe d'onglet spéciales à
31,6° à gauche et à droite et une butée de
coupe en biseau à 33,9° sont proposées sur
cette scie à onglet pour les moulures
ornementales. Par exemple, il est possible de
couper à 52° entre la moulure et la surface
plate du haut qui correspond à la surface
contre le plafond et à 38° entre l'arrière de la
moulure et la surface plate du bas qui
correspond à la surface contre le mur.
• Reportez-vous au tableau suivant pour
exécuter une coupe de moulure ornementale:
Réglages
Coin
intérieur
45°
Côté Côté droit
gauche
0°
0°
Haut
contre
le guide
Côté
gauche
de coupe
maintenu
0°
Bas
contre
le guide
Côté
gauche
de coupe
maintenu
0°
Haut
Bas
contre
contre
le guide le guide
Côté
Côté
droit de droit de
coupe
coupe
maintenu maintenu
Coin
extérieur
Angle
d'onglet
Côté gauche
Côté droit
Droit à 31.6° Gauche à 31,6°
Angle de
coupe en
biseau
33.9°
33.9°
Position
de
moulure
Haut contre
le guide
Bas contre
le guide
Côté fini
Côté gauche de Côté gauche de
coupe maintenu coupe maintenu
Angle
d'onglet
Droit à 31,6° Gauche à 31,6°
Angle de
coupe en
biseau
33.9°
33.9°
Position
de
moulure
Bas contre le
guide
Haut contre
le guide
Côté fini
Côté droit
de coupe
maintenu
Côté droit
de coupe
maintenu
FRENCH
Remarque: ces butées ne peuvent être utilisées
avec une moulure ornementale de 45°.
Remarque: les angles de la plupart des pièces
ne sont pas à 90°, la précision est donc
essentielle. Effectuez toujours une coupe
d'essai pour confirmer avec exactitude les
angles.
Réglage de la profondeur de
coupe (figure M)
La profondeur de coupe peut être préréglée
pour les coupes peu profondes, régulières et
répétitives.
• Ajustez la tête de coupe vers le bas jusqu'à
ce que les dents de la lame soient à la
profondeur de coupe souhaitée.
• Tout en maintenant le levier supérieur en
place, tournez la molette (47) jusqu'à ce
qu'elle touche la butée (49).
• Vérifiez la profondeur de la lame en
déplaçant la tête de coupe d'avant en arrière
avec le mouvement complet du levier de
commande en coupe normale.
Transport de l'outil (figure N)
• Desserrez le levier de déclenchement de
coupe d'onglet (11) (figure B) et tournez le
socle complètement à droite. Bloquez le
socle sur l'angle de coupe d'onglet de 45°.
• Tirez la tête de coupe vers l'avant de la scie
et bloquez le support avec le bouton de
blocage (48) (figure J).
• Abaissez la tête de coupe et poussez l'axe
• Portez la scie à onglet avec la poignée
principale (24) et la poignée arrière et avant
(24, 27).
Type de lame et de dent
Matériel Type de
600 ~ 100T 24 ~100T
dents
TCG
ATB
Bois
charpente
•
•
Bois de Contreplaqué
•
•
Panneau dur
•
•
Aggloméré
•
•
Plastique PVC
•
ABS
•
Acrylique
•
PC
•
PS
•
Métaux non Aluminium
•
ferreux Cuivre
•
Votre scie à onglet est livrée avec une lame à
angle de coupe négatif. Il est recommandé
d'utiliser une lame à angle de coupe négatif.
• Type TCG - Pour la coupe de feuilles
d'aluminium, extrusions de tube et autres
métaux non ferreux comme le cuivre, le
laiton.
• Type ATB - Pour des travaux ordinaires de
coupe et de taille de bois, de contreplaqué et
de mesure de panneau en bois comprimé,
panneau dur et panneau de particules, qui
nécessitent une coupe nette.
Pour couper des métaux non ferreux, utilisez
toujours une lame à angle de coupe négatif.
de blocage (46) (figure H).
55
FRENCH
Changement de lames
(figures O - Q)
Attention ! Pour éviter un démarrage accidentel
qui pourrait provoquer des blessures,
débranchez toujours la prise de la prise
d'alimentation avant de changer les lames.
Utilisez des lames correctement aiguisées.
Respectez la vitesse maximale et le type de
dent inscrits sur la lame. N’utilisez que les
accessoires Black & Decker recommandés sur
les lames. Pour remplacer la lame (34),
effectuez ce qui suit :
• Appuyez sur le levier de dégagement de
l'axe de scie (36) et tournez le protège-lame
inférieur rétractable dans le sens contraire
des aiguilles d'une montre, puis retirez la
lame. Maintenez le protège-lame en place
avec une main (figure O).
• Avec un tournevis, desserrez la vis (50) sans
• Installez une lame de rechange, en orientant
les dents vers le bas et en s'assurant que la
direction notée sur la lame est la même que
celle sur les protège-lames (sens des
aiguilles d'une montre) (figure P).
• Installez sans serrer le boulon de l'axe (52)
(tournez-le dans le sens contraire des
aiguilles d'une montre).
• Appuyez et maintenez le bouton de
verrouillage de l'axe (35) et utilisez la clé pour
serrer le boulon de l'axe (52) jusqu'à ce que
la lame soit fixée.
• Replacez la plaque de protection en métal
(26) dans sa position d'origine et serrez les
deux vis (50 et 51).
• Laissez le protège-lame inférieur rétractable
(5) reprendre sa position d'origine pour
couvrir la lame.
la retirer. Ne retirez pas complètement la vis, Attention ! N'appuyez jamais sur le verrou de
l'axe quand la lame tourne. Maintenez le support
la procédure de remontage serait plus
de la protection vers le bas et serrez fermement
difficile.
la vis de ce support après avoir installé la lame.
Avec un tournevis, desserrez la vis (51) sans
Attention ! Le support de la protection doit
la retirer jusqu'à ce qu'elle bouge dans la
plaque de protection en métal. Ne retirez pas revenir à sa position d'origine et la vis doit être
serrée avant de mettre la scie en marche. Si
complètement la vis, la procédure de
cette consigne n'est pas respectée, la lame
remontage serait plus difficile.
risque de toucher e protège-lame en tournant ce
Retirez la protection supérieure en métal en qui aurait pour effet d'endommager la scie et de
la tournant dans le sens contraire des
provoquer de graves blessures.
aiguilles d’une montre (figure P). Vous
pourrez accéder au boulon de l'axe (52) qui Accessoires
fixe la lame (34) sur la scie.
La qualité de travail réalisé par votre outil
dépend des accessoires utilisés. Les
Appuyez et maintenez le boulon de
accessoires Black & Decker et Piranha
verrouillage de l'axe (35) sur le boîtier pour
correspondent aux normes de qualité supérieure
verrouiller la lame de scie (34) et éviter
et sont conçus pour donner le meilleur résultat
qu'elle ne tourne.
possible.
Avec la clé fournie, tournez le boulon de l'axe
(52) dans le sens des aiguilles d'une montre En utilisant ces accessoires, votre outil vous
donnera entière satisfaction.
pour retirer le boulon et la lame (34).
•
•
•
•
56
FRENCH
Attention ! Ne soulevez pas la machine par le
protège-lame.
Entretien
Votre outil a été conçu pour fonctionner pendant
longtemps avec un minimum d'entretien. Un
fonctionnement continu satisfaisant dépend d'un
nettoyage régulier et d'un entretien approprié de
l’outil. Nettoyez régulièrement les orifices de
ventilation à l'aide d'une brosse sèche et propre.
Pour nettoyer l'outil, utilisez exclusivement du
savon doux et un chiffon humide. Évitez toute
pénétration de liquide dans l'outil et ne plongez
aucune pièce dans du liquide.
Attention ! Avant d'effectuer un entretien,
assurez-vous que l'outil est éteint et débranché.
Capacités de coupe
Capacity
Profondeur de coupe x
Coupe en travers max.
92 mm x 305 mm
Coupe en biseau max.47° 41 mm x 305 mm
Coupe d'onglet max. 47°
92 mm x 203 mm
Coupe mixte
max. à 47°/47°
41 mm x 203 mm
Caractéristiques techniques
SMS254
Tension
Puissance
Vca 220-240
W
2000
4800
Remplacement d’une prise
électrique
Aucune vitesse de charge
min-1
Diamètre de lame
mm
255
En cas d’installation d’une nouvelle prise:
Alésage de lame
mm
30
Épaisseur de lame
mm
1.8
Capacité de coupe en
travers max. 90°
mm
305
Capacité de coupe
d'onglet max. 45°
mm
203
Profondeur max.
de coupe 90°
mm
92
Profondeur max. de coupe
en biseau
mm
41
• Jetez l’ancienne prise.
• Connectez le fil marron sur la borne sous
tension de la nouvelle prise.
• Connectez le fil bleu sur la borne neutre.
• Si le produit est de classe I (terre), connecter
le fil vert / jaune sur la borne terre.
Attention! Si votre produit est de classe II avec
double isolation (seulement 2 fils dans le cordon
électrique), il n’y a aucune connexion à faire sur
la borne terre.
Suivez les instructions de montage fournies
avec les prises de bonne qualité
Coupe d'onglet
(positions max.)
gauche 47°
droit 47°
Coupe en biseau
(positions max.)
gauche 47°
droit 0°
Poids
kg
22
Tout fusible de rechange doit être du même
calibre que le fusible d'origine fourni avec le
produit.
57
FRENCH
Protection de l'environnement
Collecte séparée. Ce produit ne doit
pas être jeté avec les déchets
domestiques normaux.
Si vous décidez de remplacer ce produit Black
& Decker, ou si vous n'en avez plus l'utilité, ne
le jetez pas avec vos déchets domestiques
Rendez-le disponible pour une collecte séparée.
• Black & Decker fournit un dispositif
permettant de collecter et de recycler les
produits Black & Decker lorsqu'ils ont atteint
la fin de leur cycle de vie. Pour pouvoir
profiter de ce service, veuillez retourner votre
produit à un réparateur agréé qui se
chargera de le collecter pour nous.
• Pour connaître l'adresse du réparateur agréé
le plus proche de chez vous, contactez le
bureau Black & Decker à l'adresse indiquée
dans ce manuel. Vous pourrez aussi trouvez
un liste des réparateurs agréés de Black &
Decker et de plus amples détails sur notre
service après-vente sur le site Internet à
l'adresse suivante : www.2helpU.com
58
FRENCH
Garantie
Lorsqu’un appareil Black & Decker s’avère
defectueux en raison d’un défaut matériel ou de
fabrication dans les 12 mois à compter de la
date d’achat, Black & Decker garantit le
remplacement des pièces défectueuses ou de
l’appareil afin de minimiser les désagréments
causés au client, à l’exclusion des cas suivants:
• Utilisation abusive de l’appareil ou appareil
endommagé à cause de négligence.
• Appareil endommagé par d’autres appareils,
des substances ou par accident.
• Réparations effectuées par des personnes
autres qu’un réparateur agréé ou le service
technique de Black & Decker.
Pour avoir recours à la garantie, il est
nécessaire de fournir une preuve d’achat à
votre revendeur ou à un réparateur agréé. Pour
connaitre l’adresse du réparateur agréé le plus
proche, contactez le bureau Black & Decker à
l’adresse indiquée dans ce manuel. Vous
pouvez aussi trouver une liste des réparateurs
agréés Black & Decker et de plus amples
détails sur notre service après-vente en visitant
notre site: www.2helpU.com.
Visitez notre site Web www.blackanddecker.ae
pour enregistrer votre nouveau produit Black &
Decker et être informé des nouveaux produits et
des offres spéciales. Pour plus d'informations
concernant la marque Black & Decker et notre
gamme de produits, consultez notre site
www.blackanddecker.ae
59
Names & Addresses for Black & Decker Service Concessionaries
ALGERIA: Sarl Outillage Corporation, 08 Rue Med Boudiaf - Cheraga - Algiers, Algeria. Tel: (213-21) 375130, Fax: (213-21) 369667. AZERBAIJAN:
Royalton Holdings Ltd. 41 Khagani St. Apt. 47 AZ 1001, Baku. Tel: (994-12) 4935544, Fax: (994-12) 5980378. BAHRAIN: Alfouz Services Co. WLL.,
P.O. Box 26562, Tubli, Manama. Tel: (973) 17783562, Fax: (973) 17783479. EGYPT: El-Farab S.A.E 15 - Nabil El Wakkad Street, Dokki, Giza. Tel:
(202) 37603946, Fax: 33352796. ETHIOPIA: Seif Tewfik Sherif, Arada Sub-City, Kebele 01/02, Global Insurance Building, 2nd Floor, Room 43,
P.O. Box 2525, Addis Ababa, Ethiopia. Tel: (251-11) 1563968/ 1563969, Fax: (251-11) 1558009. IRAQ: Al Sard Co. for General Trading Ltd.
Jbara Bldg. 3Flr, Al Rasheed St. Bagdad. Tel: (964) 18184102. Sakhar Group, Arrassat al-hindya Al Masbah, Bagdad. (964) 7400144446. JORDAN:
Palestine Bldg. Matl. (Bashiti Hardware), 93 King Abdullah 2nd Street, Opp. ELBA House, P.O. Box 3005, Amman 11953, Tel: (962-6) 5349098, Fax:
(962-6) 5330731. KENYA: Dextron Tools Ltd., P.O. Box 20121-00200, Shariff House, Kimathi Street, Nairobi. Tel: (254-20) 6905000/ 2358021, Fax:
(254-20) 6905111/ 6905112. KUWAIT: Al Omar Technical Co., P.O. Box 4062, 13041 Safat, Kuwait. Tel: (965) 24848595/ 24840039, Fax:
(965) 24845652. Fawaz Al Zayani Establishment, P.O. Box 42426, Shop No. 18, Al Humaizi Commercial Complex, Khalifa Al Jassim, Shuwaikh, Kuwait.
Tel: (965) 24828710, Fax: (965) 24828716. LEBANON: Est. Shaya & Azar S.A.R.L., Boulvard, Jdeideh, Mar Takla-Bouchrieh, P.O. Box 90545,
Jdeideh, Beirut. Tel: (961-1) 872305/ 872306, Fax: (961-1) 872303. LIBYA: (Benghazi) Sniydel st., Amr Ibn EL-Aas Rd. Tel: (+218) 92 5771120.
(Tripoli) Al Barniq Service Center, Mokhazin elsukar st., ElFallah. Tel: (+218) 21 4808019. (Misrata) Al Hilal Service Center, Tawergha st. Tel:
(+218) 51 2626743. MAURITIUS: Robert le Marie Limited, Old Moka Road, Bell Village, P.O. Box 161, Port Louis. Tel: (230) 2121865/ 2122847, Fax:
(230) 2080843. MOROCCO: Ets. Louis Guillaud & Cie, 31, Rue Pierre Parent, Casablanca-21000. Tel: (+212) 522 305971, Fax: (+212) 522 444518.
NIGERIA: Meridian Power Tools Ltd., Gr. Floor, #1 Alhaji Masha Road, Next to Teslim Balogun Stadium, Near National Stadium, Surulere, Lagos. Tel:
(234-1) 7740431/ 7740410, Fax: (234-1) 7913798. OMAN: Al Jizzi Company LLC, P.O. Box 1704, P.C. 112 Ruwi, Oman. Tel: (968) 24832618/
24835153, Fax: (968) 24831334. Al Hassan Technical & Construction Supplies Co. LLC., P.O. Box 1948, P.C. 112, Ruwi, Oman. Tel: (968) 24810575/
24837054, Fax: (968) 24810287/ 248333080. Khimji Ramdas, P.O. Box 19, Post Code 100, Ghala, Muscat, Oman. Tel: (968) 24595906/ 907, Fax:
(968) 24852752. Oman Hardware Co. LLC., P.O. Box 635, Ruwi-112. Tel: (968) 24815131, Fax: (968) 24816491. Oman Marketing & Service Co.
(Omasco), P.O. Box 2734, Behind Honda Showroom, Wattayah, Oman. Tel: (968) 24560232/ 24560255, Fax: (968) 24560993. Oman Marketing &
Service Co. (Omasco), Al Ohi, Sohar, Oman. Tel: (968) 26846379, Fax: (968) 26846379. Oman Marketing & Service Co. (Omasco), Sanaya, Salalah,
Oman. Tel: (968) 23212290, Fax: (968) 23210936. PAKISTAN: Ammar Service & Spares, 60-Bank Arcade, Serai Road, Karachi, Pakistan. Tel:
(92-21) 32426905, Fax: (92-21) 32427214. ZIT Co., Nasir & Bros., 2nd Floor, Qadri Center, Chowk Dalgran, Railway Road, Lahore. Tel:
(92-42) 37670839, Fax: (92-42) 37652989. QATAR: Al Muftah Service Centre, Al Wakrah Road, P.O. Box 875, Doha, Qatar. Tel: (974) 4650880/
4650110/ 4446868, Fax: (974) 4441415/ 4662599. Shaheen Electrical Works & Trading Co. WLL., Gate 34, St.44 Industriala Area, P.O. Box 9756,
Doha. Tel: (974) 4600230/ 4600525, Fax: (974) 4601338. Teyseer Industrial Supplies & Services Co. WLL., 55, Al Wakalat St. (Between St. 18 & 19)
Salwa Industrial Area, P.O. Box 40523, Doha, Qatar. Tel: (974) 4581536, Fax: (974) 4682024. SAUDI ARABIA: (Al Bahr) Mohamed Ahmed Bin Afif
Est., P.O. Box 530, Yanbu, Al Bahr. Tel: (966-4) 3222626/ 3228867, Fax: (966-4) 3222210. (Al Khobar) Fawaz Ebrahim Al Zayani Trading Est.,
P.O. Box 76026, Al Khobar # 31952, Tel: (966-3) 8140914, Fax: (966-3) 8140824. MSS (Al-Mojil Supply & Services) P.O. Box 450, Jubail 31951,
Opp. Gulf Bridge Library & Riyadh House. Tel: (966-3) 3612850/ 3624487/ 3621729, Fax: (966-3) 3623589/ 3620783. (Dammam) Al Bawardi Tools &
Hardware, P.O. Box 112, Dammam 31411. Tel: (966-3) 8330780/ 8348585 ext. 24, Fax: (966-3) 8336303. (Jeddah) Al Bawardi Tools & Hardware,
P.O. Box 16905, Jeddah-21474. Tel: (966-2) 6444547, Fax: (966-2) 6439024. EAC (Al Yousef Contg. & Trdg. Est.), P.O. Box 30377, Jeddah -21477, Tel:
(966-2) 6519912, Fax: (966-2) 6511153. (Madina) Garziz Trading for Bldg Mat & Decoration, P.O. Box 3364, Madina. Tel: (966-4) 8261490/ 8227636,
Fax: (966-4) 8265741. (Riyadh) Al Bawardi Tools & Hardware, P.O. Box 68, Riyadh 11411. Tel: (966-1) 4484999, Fax: (966-1) 4487877.
Industrial Material Organization (IMO), P.O. Box 623, Rail Street, Riyadh. Tel: (966-1) 4028010, Fax: (966-1) 4037970. Sulatn Garment factory (RSC),
P.O. Box 29912, Riyadh 11467. Tel: (966-1) 4055148/ 4042889, Fax: (966) 4055148. SOUTH AFRICA: Trevco Power Tool Service 14 Steenbok Street,
Koedoespoort, 0186, Pretoria, South Africa. Tel: (27-86) 1873826, Fax: (27-86) 5001771. TANZANIA: General Motors investment Ltd., P.O. Box 16541,
14 Nyerere Road, Vingunguti, Dar-es-Salaam. Tel: (255 22) 2862661/ 2865022, Fax: (255 22) 2862667. TUNISIA: Societe Tunisienne De Maintenance
(STM), Rue de la Physique. Nouvelle Zone Industrielle Ben Arous., 2013 Ben Arous, Tunisia. Tel: (+216) 71 389687, Fax: (+216) 71 385154. UAE:
(Abu Dhabi) Light House Electrical, P.O. Box 120, Abu Dhabi, Tel: (971-2) 6726131, Fax: (971-2) 6720667. (Ajman) Al Sukoon Gen. Trdg. Co. LLC,
P.O. Box 2975, Ajman. Tel: (971-6) 7435725/ 7438317, Fax: (971-6) 7437350. (Al Ain) Zillion Equipment and Spare Parts Trading LLC, P.O. Box 19740,
Opp. Bin Sadal/ Trimix Redymix Sanaiya, Al Ain. Tel: (971-3) 7216690, Fax: (971-3) 7216103. (Dubai) Alebrah Engineering Service, P.O. Box 78954,
Al Qusais, Dubai. Tel: (971-4) 2850044, Fax: (971-4) 2844802. Black & Decker (Overseas) GmbH, P.O. Box 5420, Dubai, Tel: (971-4) 8127400/
8127406, Fax: (971-4)2822765. Ideal Star Workshop Eqpt. trading LLC, P.O. Box 37110, Al Quoz, Dubai. Tel: (971-4) 3474160, Fax: (971-4) 3474157.
(Musaffah) Light House Electrical, P.O. Box 120, Abu Dhabi, Tel: (971-2) 5548315, Fax: (971-2) 5540461. (Sharjah) Mc Coy Middle East LLC,
P.O. Box 25793, Sharjah, Tel: (971-6) 5395931, Fax: (971-6) 5395932. Burj Al Madeena, Industrial Area No.1, Opp. Pakistani Masjid, P.O. Box 37635,
Sharjah. Tel: (971-6) 5337747, Fax: (971-6) 5337719. (Ras Al Khaimah) Mc Coy Middle East LLC, P.O. Box 10584, Ras Al Khaimah, Tel:
(971-7) 2277095, Fax: (971-7) 2277096. UGANDA: The Building Center (U) Ltd., 52 Station Road, Kitgum House, P.O. Box 7436, Kampala, Uganda.
Tel: (256-41) 4234567/ 4259754, Fax: (256-41) 4236413. YEMEN: (Aden) Middle East Trad. Co. Ltd. (METCO), Mualla Dakka, Aden, Yemen. Tel:
(967-2) 222670, Fax: (967-2) 222670. (Sana'a) Middle East Trad. Co. Ltd. (METCO), Hayel St., Sana'a, Yemen. Tel: (967-1) 204201, Fax:
(967-1) 204204. (Taiz) Middle East Trading Co. (METCO), P.O. Box 12363, 5th Flr, Hayel Saeed Anam Bldg, Al-Mugamma St. Taiz, Yemen. Tel:
(967-4) 213455, Fax: (967-4) 219869.
WARRANTY REGISTRATION CARD
YOUR NAME/ rßù«
YOUR ADDRESS Ê«uMF∞«
POSTCODE Íb¥d∂∞« e±d∞«
DATE OF PURCHASE ¡«dA∞« a¥¸U¢
DEALER'S NAME & ADDRESS/ lzU∂∞« Ê«uM´ Ë rß≈
PRODUCT MODEL NO. SMS254